display SKODA OCTAVIA 2012 3.G / (5E) Workshop Manual
[x] Cancel search | Manufacturer: SKODA, Model Year: 2012, Model line: OCTAVIA, Model: SKODA OCTAVIA 2012 3.G / (5E)Pages: 222, PDF Size: 13.52 MB
Page 130 of 222
The indicator light is lit. Possible causes:
› the vehicle is travelling at less than 65 km/h;
› no lane boundary exists;
› the lane boundary was not detected;
› the driver's hands are not on the steering wheel;
› the lane is less than 2.5 m in width;
› the radius of the curve is too small.
Information for the driver
First read and observe the introductory information and safety warn-ings
on page 126.
The information for the driver appears in the instrument cluster display.
Lane Assist not available. No sensor view.
The windscreen is dirty, iced over or misted up in the camera viewing range. Clean the windscreen or remove the obstacles.
Lane Assist currently not available.
The system has limited functionality due to a temporary error. Try to re-activate
the machine.
Error: Lane Assist
A system error is present. Seek help from a ŠKODA specialist garage.
Lane Assist: Take over steering!
The system has detected that there are no hands on the steering wheel. In this case, the Assist system is not ready to intervene. Place your hands on the steer-
ing wheel.
128Using the system
Page 131 of 222
Automatic gearbox
Automatic transmission
Introduction
This chapter contains information on the following subjects:
Introductory information
129
Starting-off and driving
130
Selector lever positions
130
Manual shifting of gears (Tiptronic)
131
Selector lever lock
131
Kickdown function
132
Dynamic shift programme
132
Emergency programme
132
Selector lever-emergency unlocking
133WARNING■ Do not depress the accelerator if changing the position of the selector lever
when the vehicle is stationary and the engine is running – risk of accident!■
Never move the selector lever into position R or P when driving – risk of an
accident!
■
When the vehicle is stationery and the engine is running, stopping the vehi-
cle requires you pressing the brake pedal in all selector lever settings. When
the engine is idling, the power transmission is never completely interrupted -
the vehicle creeps.
■
The selector lever must be placed into position P and the handbrake firmly
applied before the bonnet can be opened and work on the running engine can
be completed – risk of accident! The safety guidelines must always be ob-
served » page 169 , Engine compartment .
■
If stopping on a hill (downhill gradient), never try to maintain the vehicle sta-
tionary with the gear engaged by means of the accelerator pedal, i.e. by let-
ting the clutch slip - This can lead to overheating of the clutch. If there is a risk
of overheating of the clutch due to overload, the clutch is opened automati-
cally and the vehicle rolls backward – risk of accident!
WARNING (Continued)■ If you have to stop on a slope, depress and hold the brake pedal to prevent
the vehicle from rolling back.■
On a smooth or slippery road surface using the kickdown function can cause
the driven wheels to spin – risk of skidding!
Note
If the driving mode Sport or Eco » page 124 is selected and the selector lever is in
position D/S, the gearbox is automatically set to mode S or E. The mode is indica-
ted in the instrument cluster display » Fig. 120 on page 130.
Introductory information
First read and observe the introductory information and safety warn-
ings
on page 129.
Starting
The engine can only be started when the selector lever is in position P or N .
When the steering is locked, when the ignition is turned on or off, or when start-
ing the engine, If the selector lever is not in the positions P or N, the following
message appears in the instrument cluster display Move the selector lever to Po-
sition P/N! or ENGAGE N OR P .
Shifting gears
Shifting up and down through the gears is performed automatically. The gearbox
can also be switched to Tiptronic mode. This mode makes it possible for you to
also shift gears manually » page 131.
If the selector lever position N is accidentally selected while driving, it is first nec-
essary to release pressure on the accelerator pedal and wait for the idling speed of the engine to be reached before the selector lever can be engaged in the driveposition.
At temperatures below -10 °C the engine can only be started in the selector lever position P.
Parking
When parking on a level road surface, it suffices to engage selector lever position
P .
129Automatic gearbox
Page 132 of 222
When parking on a slope, the handbrake should be applied firmly before the park
position P is selected. This ensures that there is no excessive pressure on the
lock mechanism and that it is subsequently easier to move the selector lever out of position P.
Starting-off and driving
First read and observe the introductory information and safety warn-
ings
on page 129.
Starting off
›
Firmly depress and hold the brake pedal.
›
Press the Shiftlock button (button in the selector lever handle), move the selec-
tor lever into the desired position » page 130 and then release the Shiftlock
button.
›
Release the brake pedal and accelerate.
Stop
The selector lever position N does not have to be selected when stopping for a
short time, such as at a cross roads.
›
Fully depress and hold the brake pedal until driving is resumed.
Parking
›
Fully depress and hold the brake pedal and bring the vehicle to a stop.
›
Firmly apply the handbrake.
›
Press and Shiftlock button in the selector lever, move the selector lever to P
and then release the Shiftlock button.
Driving in Neutral
›
Select the Eco driving mode » page 124, Select driving mode .
›
Take the foot of the accelerator (selector lever in position D/S).
The vehicle moves without the braking effect of the engine.
Idling can be interrupted by briefly pressing down on the accelerator pedal or
pressing the rocker switch -
on the multifunction steering wheel
» page 131.
Selector lever positionsFig. 120
Selector lever/Instrument cluster display
First read and observe the introductory information and safety warn- ings
on page 129.
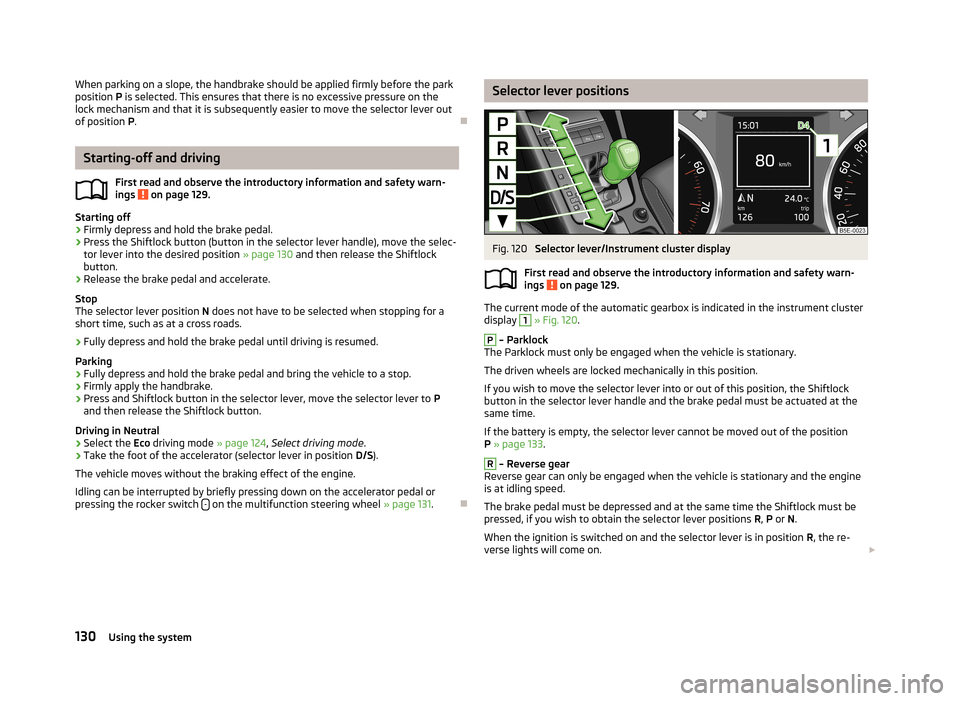
The current mode of the automatic gearbox is indicated in the instrument cluster display
1
» Fig. 120 .
P
– Parklock
The Parklock must only be engaged when the vehicle is stationary.
The driven wheels are locked mechanically in this position.
If you wish to move the selector lever into or out of this position, the Shiftlock
button in the selector lever handle and the brake pedal must be actuated at the
same time.
If the battery is empty, the selector lever cannot be moved out of the position
P » page 133 .
R
– Reverse gear
Reverse gear can only be engaged when the vehicle is stationary and the engine
is at idling speed.
The brake pedal must be depressed and at the same time the Shiftlock must be
pressed, if you wish to obtain the selector lever positions R, P or N.
When the ignition is switched on and the selector lever is in position R, the re-
verse lights will come on.
130Using the system
Page 133 of 222
N – Neutral
The brake pedal must be depressed to move the selector lever out of the position
N (if the lever is in this position for longer than 2 seconds) into the position D/S or
R when the vehicle is travelling at less than 5 km/h and the ignition is switched
on.D/S
- mode for driving forward (Normal program)/mode for driving forward
(Sport program)
The system switches from one mode to the other by moving the selector lever in- to the spring-tensioned position » Fig. 120 .
In the D or S mode, the forward gears are shifted up and down, depending on the
selected driving mode, engine load, driving speed and dynamic shifting program.
In the S mode, shifting up later into a higher gear makes it possible to fully exploit
the power potential of the engine. The gearbox also then shifts down at higher engine speeds as in the position D.
The brake pedal must be depressed to move the selector lever into position D/S
from Nwhen the vehicle is travelling at less than 5 km/h.
Manual shifting of gears (Tiptronic)
Fig. 121
Selector lever and multifunction steering wheel
First read and observe the introductory information and safety warn-
ings
on page 129.
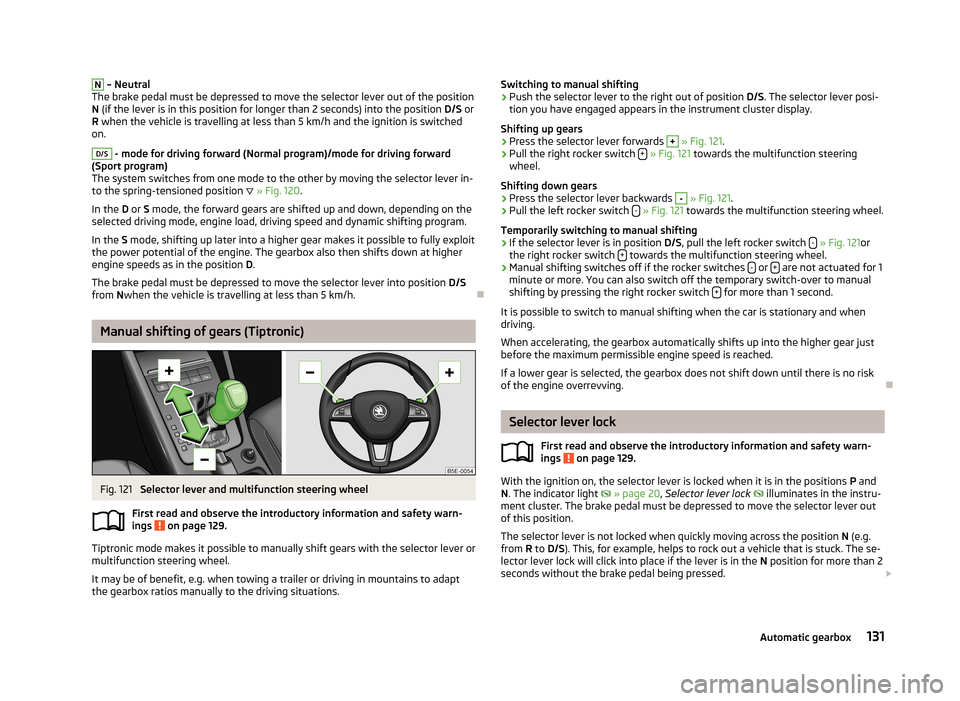
Tiptronic mode makes it possible to manually shift gears with the selector lever or
multifunction steering wheel.
It may be of benefit, e.g. when towing a trailer or driving in mountains to adapt
the gearbox ratios manually to the driving situations.
Switching to manual shifting›Push the selector lever to the right out of position D/S. The selector lever posi-
tion you have engaged appears in the instrument cluster display.
Shifting up gears›
Press the selector lever forwards
+
» Fig. 121 .
›
Pull the right rocker switch +
» Fig. 121 towards the multifunction steering
wheel.
Shifting down gears
›
Press the selector lever backwards
-
» Fig. 121 .
›
Pull the left rocker switch -
» Fig. 121 towards the multifunction steering wheel.
Temporarily switching to manual shifting
›
If the selector lever is in position D/S, pull the left rocker switch -
» Fig. 121 or
the right rocker switch + towards the multifunction steering wheel.
›
Manual shifting switches off if the rocker switches
- or + are not actuated for 1
minute or more. You can also switch off the temporary switch-over to manual shifting by pressing the right rocker switch +
for more than 1 second.
It is possible to switch to manual shifting when the car is stationary and when
driving.
When accelerating, the gearbox automatically shifts up into the higher gear just before the maximum permissible engine speed is reached.
If a lower gear is selected, the gearbox does not shift down until there is no risk
of the engine overrevving.
Selector lever lock
First read and observe the introductory information and safety warn-ings
on page 129.
With the ignition on, the selector lever is locked when it is in the positions P and
N . The indicator light
» page 20 , Selector lever lock
illuminates in the instru-
ment cluster. The brake pedal must be depressed to move the selector lever out
of this position.
The selector lever is not locked when quickly moving across the position N (e.g.
from R to D/S ). This, for example, helps to rock out a vehicle that is stuck. The se-
lector lever lock will click into place if the lever is in the N position for more than 2
seconds without the brake pedal being pressed.
131Automatic gearbox
Page 138 of 222
Button/adjust- ment
wheel
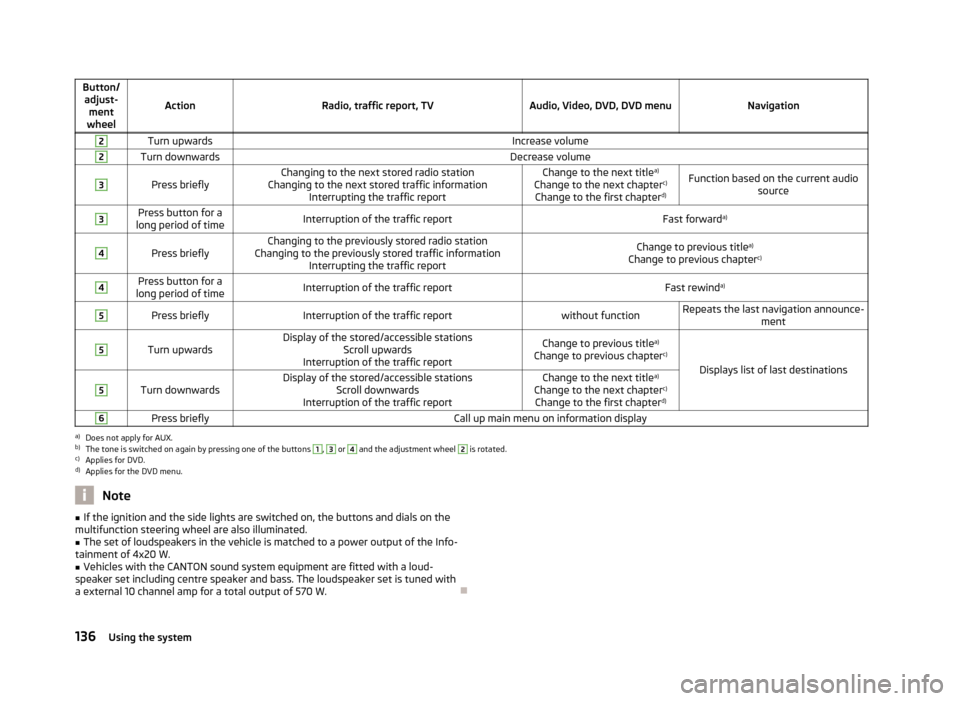
ActionRadio, traffic report, TVAudio, Video, DVD, DVD menuNavigation
2Turn upwardsIncrease volume2Turn downwardsDecrease volume3
Press brieflyChanging to the next stored radio station
Changing to the next stored traffic information Interrupting the traffic reportChange to the next title a)
Change to the next chapter c)
Change to the first chapter d)Function based on the current audio
source3Press button for a
long period of timeInterruption of the traffic reportFast forward a)4
Press brieflyChanging to the previously stored radio station
Changing to the previously stored traffic information Interrupting the traffic reportChange to previous title a)
Change to previous chapter c)4Press button for a
long period of timeInterruption of the traffic reportFast rewind a)5Press brieflyInterruption of the traffic reportwithout functionRepeats the last navigation announce-
ment5
Turn upwardsDisplay of the stored/accessible stationsScroll upwards
Interruption of the traffic reportChange to previous title a)
Change to previous chapter c)
Displays list of last destinations
5
Turn downwardsDisplay of the stored/accessible stations
Scroll downwards
Interruption of the traffic reportChange to the next title a)
Change to the next chapter c)
Change to the first chapter d)6Press brieflyCall up main menu on information displaya)
Does not apply for AUX.
b)
The tone is switched on again by pressing one of the buttons
1
,
3
or
4
and the adjustment wheel
2
is rotated.
c)
Applies for DVD.
d)
Applies for the DVD menu.
Note■
If the ignition and the side lights are switched on, the buttons and dials on the
multifunction steering wheel are also illuminated.■
The set of loudspeakers in the vehicle is matched to a power output of the Info-
tainment of 4x20 W.
■
Vehicles with the CANTON sound system equipment are fitted with a loud-
speaker set including centre speaker and bass. The loudspeaker set is tuned with
a external 10 channel amp for a total output of 570 W.
136Using the system
Page 152 of 222
WARNING (Continued)■Any seat or protective covers which you fit to the driver or front passenger
seats must only be of the type expressly authorized by ŠKODA. In view of the
fact that the airbag inflates out of the backrest of the seat, use of non-ap-
proved seat or protective covers would considerably impair the protective
function of the side airbag.■
Any damage to the original seat covers in the area of the side airbag module
must be repaired without delay by your ŠKODA specialist garage.
■
The airbag modules in the front seats must not display any damage, cracks
or deep scratches. It is not permissible to use force in order to open the mod-
ules.
Head airbags
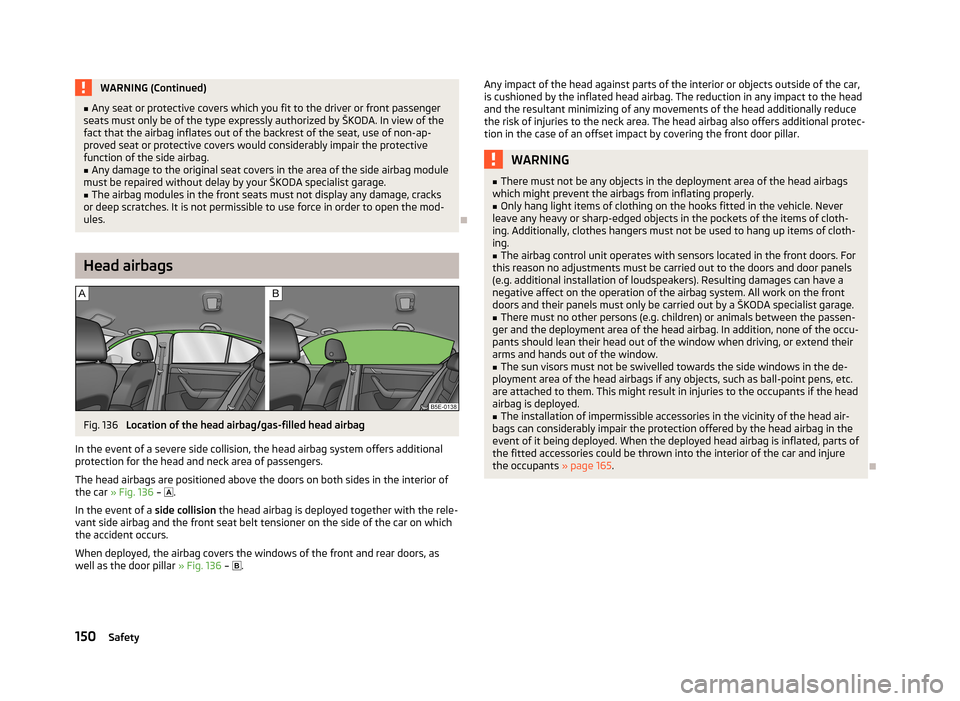
Fig. 136
Location of the head airbag/gas-filled head airbag
In the event of a severe side collision, the head airbag system offers additional
protection for the head and neck area of passengers.
The head airbags are positioned above the doors on both sides in the interior ofthe car » Fig. 136 –
.
In the event of a side collision the head airbag is deployed together with the rele-
vant side airbag and the front seat belt tensioner on the side of the car on which
the accident occurs.
When deployed, the airbag covers the windows of the front and rear doors, as well as the door pillar » Fig. 136 –
.
Any impact of the head against parts of the interior or objects outside of the car,
is cushioned by the inflated head airbag. The reduction in any impact to the head
and the resultant minimizing of any movements of the head additionally reduce
the risk of injuries to the neck area. The head airbag also offers additional protec-
tion in the case of an offset impact by covering the front door pillar.WARNING■ There must not be any objects in the deployment area of the head airbags
which might prevent the airbags from inflating properly.■
Only hang light items of clothing on the hooks fitted in the vehicle. Never
leave any heavy or sharp-edged objects in the pockets of the items of cloth-
ing. Additionally, clothes hangers must not be used to hang up items of cloth-
ing.
■
The airbag control unit operates with sensors located in the front doors. For
this reason no adjustments must be carried out to the doors and door panels (e.g. additional installation of loudspeakers). Resulting damages can have anegative affect on the operation of the airbag system. All work on the front
doors and their panels must only be carried out by a ŠKODA specialist garage.
■
There must no other persons (e.g. children) or animals between the passen-
ger and the deployment area of the head airbag. In addition, none of the occu-
pants should lean their head out of the window when driving, or extend their
arms and hands out of the window.
■
The sun visors must not be swivelled towards the side windows in the de-
ployment area of the head airbags if any objects, such as ball-point pens, etc.
are attached to them. This might result in injuries to the occupants if the head
airbag is deployed.
■
The installation of impermissible accessories in the vicinity of the head air-
bags can considerably impair the protection offered by the head airbag in the
event of it being deployed. When the deployed head airbag is inflated, parts of
the fitted accessories could be thrown into the interior of the car and injure
the occupants » page 165.
150Safety
Page 153 of 222

Deactivating airbags
Deactivating airbags
Deactivation of airbags is envisaged only for particular instances, such as if:
› using a child seat on the front passenger seat, in which the child has its back to
the vehicle's direction of travel (in some countries this must be in the direction
of travel due to different legal regulations applying) » page 154, Transporting
children safely ;
› not being able to maintain a distance of at least 25 cm between the middle of
the steering wheel and chest, despite the driver's seat being correctly adjusted;
› special attachments are required in the area of the steering wheel because of a
physical disability;
› other seats have been installed (e.g. orthopaedic seats without side airbags).
The front passenger airbag can be switched off with the key-operated
switch » page 151 , Deactivating the front passenger airbag .
We recommend that you ask a ŠKODA Partner to switch off any other airbags.
Monitoring the airbag system
The functionality of the airbag system is monitored electronically even if one of
the airbags is switched off.
If the airbag was switched off using diagnostic equipment:
› The warning light
lights up for approx. 4 seconds after switching on the igni-
tion and then flashes again for approx. 12 seconds.
The following applies if the front passenger airbag has been switched off using the key switch in the storage compartment:
› The indicator light
comes on for around 4 seconds after the ignition has been
switched on;
› The warning light
3
» Fig. 137 on page 151 comes on after the ignition has
been switched on.
Note
■ The national regulations for switching off airbags must be observed.■A ŠKODA Partner will be able to inform you which airbags in your vehicle can/
must be deactivated.
Deactivating the front passenger airbagFig. 137
Key-operated switch for the front passenger airbag/warning light
for front seat passenger airbag deactivation
Only the front passenger airbag is deactivated with the key switch.
Switching off
›
Switch off the ignition.
›
Open the storage box on the front passenger's side.
›
Use the key to turn the slot of the key switch into position
2
» Fig. 137 OFF .
›
Check whether the airbag indicator light
3
in the display
in the middle of the dash panel remains lit when the ignition is turned on.
Switching on
›
Switch off the ignition.
›
Use the key to turn the slot of the key switch into position
1
» Fig. 137 ON .
›
Close the storage box on the front passenger's side.
›
Check whether the airbag indicator light
3
in the display
in the middle of the dash panel remains lit when the ignition is turned on.
The warning light
goes out 65 seconds after the key switch status has changed
or after the ignition is switched on.
151Airbag system
Page 182 of 222

WARNING“Quick-charging” the vehicle battery is dangerous and requires a special
charger and specialist knowledge.
CAUTION
On vehicles with the START/STOP system, the pole terminal of the charger must
not be connected directly to the negative terminal of the vehicle battery, but only
to the engine earth » page 196, Jump-starting in vehicles with the START-STOP
system .
Note
We recommend having the quick charging of vehicle batteries undertaken by a
ŠKODA specialist garage.
Disconnecting and reconnecting the vehicle battery
First read and observe the introductory information and safety warn-ings
on page 176.
On disconnecting and reconnecting the vehicle battery the following functionsare initially deactivated or are no longer able to operate fault-free:
OperationOperating measureElectrical power window (operational faults)» page 41Enter the radio/navigation system code num-
ber» operating instructions for Info-
tainment radio or » operating in-
structions for Infotainment Navi-
gationSetting the clock» page 11Data in the multifunction display are deleted» page 22
Note
We recommend having the vehicle checked by a ŠKODA Partner to ensure the full
functionality of all electrical systems.
Automatic load deactivation
First read and observe the introductory information and safety warn-ings
on page 176.
The vehicle voltage control unit automatically prevents the battery from discharg-
ing when the bettery is subjected to heavy loads. This manifests itself by the fol-
lowing:
› The idling speed is raised to allow the generator to deliver more electricity to
the electrical system.
› Where appropriate large convenience consumers, e.g. seat heaters, rear win-
dow heaters, have their power limited or in case of emergency shut off com-pletely.
CAUTION
■ Despite such intervention by the vehicle electric system management, the vehi-
cle battery may be drained. For example, when the ignition is switched on a long
time with the engine turned off or the side or parking lights are turned on during longer parking.■
Consumers which are supplied via a 12 V socket can cause the vehicle battery to
discharge when the ignition is switched off.
Note
Driving comfort is not disrupted by any shutting off of consumers. Often the driv-
er is not aware of it having taken place.
180General Maintenance
Page 183 of 222
Wheels
Tyres and wheel rims
Introduction
This chapter contains information on the following subjects:
Tyre life
182
New tyres and wheels
183
Unidirectional tyres
184
Spare wheel
184
Full wheel trim
185
Wheel bolts
185
Tyre control display
185
Wheel bolts
186
Winter tyres
186
Snow chains
186WARNING■ During the first 500 km, new tyres do not offer optimum grip and appropri-
ate care should therefore be taken when driving – risk of accident!■
Never drive with damaged tyres – risk of accident!
■
Never exceed the maximum permissible load bearing capacity of mounted
tyres.
■
Immediately replace damaged wheel rims or tyres.
■
On all four wheels, use only radial tyres of the same type, size (rolling cir-
cumference) and the same tread pattern.
■
Only use those tyres or wheel rims which have been approved by ŠKODA for
your model of vehicle. Failure to observe this instruction will adversely affect the road safety of your vehicle – risk of accident!
■
The maximum permissible speed for your tyres must not be exceeded under
any circumstances – risk of an accident resulting from tyre damage and loss of
control of the vehicle.
WARNING (Continued)■ If the inflation pressure is too low, the tyre must perform a greater rolling
resistance. At higher speeds the tyre will warm up as a result of this. This can
result in tread separation and a tyre blowout.■
For safety reasons, do no replace tyres individually.
■
Never use tyres if you do not know anything about the condition and age.
■
You must have your tyres replaced with new ones at the latest when the
wear indicators have been worn down.
■
Worn tyres do not provide the necessary adhesion to the road surface par-
ticularly at high speeds on wet roads. One could experience “aquaplaning” (uncontrolled movements of the vehicle – “swimming” on a wet road surface).
■
Do not use summer or winter tyres that are older than 6 years or 4 years re-
spectively.
■
The wheel bolts must be clean and must turn easily. Never treat them with
grease or oil.
■
If the wheel bolts are tightened to a too low tightening torque, the rim can
come loose when the car is moving – risk of accident! A tightening torque
which is too high can damage the bolts and threads and this can result in per-
manent deformation of the contact surfaces on the rim.
■
In case of incorrect treatment of the wheel bolts, the wheel can loosen
when the car is moving – risk of accident!
■
Never drive with more than one spare wheel mounted.
■
Only use the spare wheel while absolutely necessary.
■
The snow chains cannot be used on the spare wheel.
■
An incorrect wheel alignment at the front or rear impairs handling - risk of
accident!
■
The tyre control display does not absolve the driver of the responsibility to
ensure the correct tyre inflation pressure. Check the tyre inflation pressure at
regular intervals.
■
Unusual vibrations or pulling of the vehicle to one side could be a sign of
tyre damage. If there is any doubt that a wheel is damaged, immediately re-
duce your speed and stop! If no external damage is evident, drive slowly and
carefully to the nearest ŠKODA specialist garage to have the vehicle checked.
■
To low or too high inflation pressure impairs handling - risk of an accident!
■
The national legal requirements must be observed for the use of tyres.
■
Observe the national legal regulations relating to the use of snow chains
and the maximum vehicle speed with snow chains.
181Wheels
Page 184 of 222
CAUTION■If a spare wheel is used that is not identical to the fitted tyres, the following
must be observed » page 184, Spare wheel .■
Protect the tyres from contact with oil, grease and fuel.
■
Replace lost dust caps.
■
If, in the event of a puncture, it is necessary to fit a spare wheel with a tyre
without a dedicated running direction or the opposite running direction, drive carefully as the optimum characteristics of the tyre are no longer applicable in
this situation.
■
The tyre control display does therefore not replace the regular tyre inflation
pressure control, as the system cannot detect an even loss of pressure.
■
The system cannot warn in case of very rapid tyre inflation pressure loss, e.g. in
case of sudden tyre damage. In this case carefully bring the vehicle to a standstill
without sudden steering movements or sharp braking.
■
To ensure a proper functioning of the tyre control display, it is necessary to re-
peat the basic setting every 10 000 km or once a year.
For the sake of the environment
Tyres which are insufficiently inflated increase your fuel consumption.
Note
■ We recommend that any work on the wheels or tyres is carried out by a ŠKODA
Partner.■
We recommend that you use wheel rims, tyres, full wheel trims and snow chains
from ŠKODA Original Accessories.
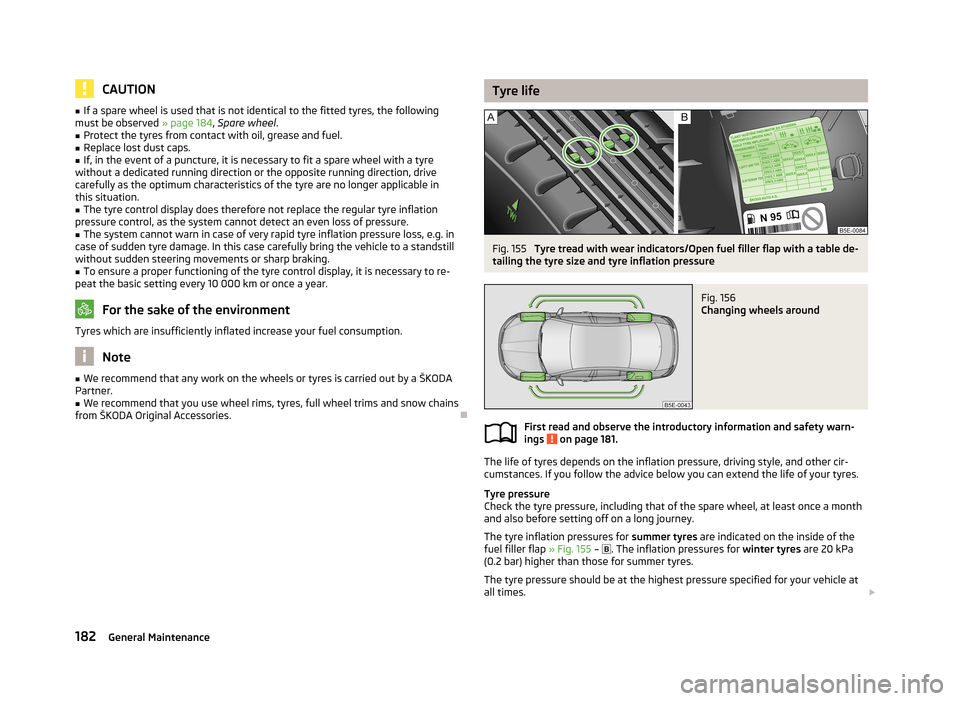
Tyre lifeFig. 155
Tyre tread with wear indicators/Open fuel filler flap with a table de-
tailing the tyre size and tyre inflation pressure
Fig. 156
Changing wheels around
First read and observe the introductory information and safety warn-
ings on page 181.
The life of tyres depends on the inflation pressure, driving style, and other cir-
cumstances. If you follow the advice below you can extend the life of your tyres.
Tyre pressure
Check the tyre pressure, including that of the spare wheel, at least once a month and also before setting off on a long journey.
The tyre inflation pressures for summer tyres are indicated on the inside of the
fuel filler flap » Fig. 155 –
. The inflation pressures for
winter tyres are 20 kPa
(0.2 bar) higher than those for summer tyres.
The tyre pressure should be at the highest pressure specified for your vehicle at all times.
182General Maintenance