checking oil SKODA OCTAVIA 2012 3.G / (5E) Owner's Manual
[x] Cancel search | Manufacturer: SKODA, Model Year: 2012, Model line: OCTAVIA, Model: SKODA OCTAVIA 2012 3.G / (5E)Pages: 222, PDF Size: 13.52 MB
Page 17 of 222
Seat belt warning light, rear
A rear seat belt is not fastenedA rear seat belt is fastened
The warning lights or come on after the ignition has been switched on.
When the seat belt is fastened/unfastened, the particular warning light lights up briefly and indicates the current belt status!
Further information » page 142, Seat belts .
Dynamo
The warning light
lights up when the engine is running, the vehicle battery is
not being charged.
Seek help from a ŠKODA specialist garage to have the electrical system checked
out.
WARNINGIf you have to stop for technical reasons, then park the vehicle at a safe dis-
tance from the traffic, switch off the engine and activate the hazard warning
light system » page 49.
CAUTION
If the warning light (cooling system fault) comes on in addition to the warning
light when driving, stop the vehicle immediately and switch the engine off –
there is a risk of engine damage!
Coolant temperature/coolant level
If the warning light
lights up, this means the coolant temperature is too high.
The following message is shown in the information cluster display:
Check coolant! Owner's manual!
or ENGINE COOLANT PLEASE CHECK
Stop the vehicle, switch off the engine, check the level of the coolant » page 174,
and refill the coolant if necessary » page 175.
If the coolant is within the specified range, the increased temperature may be
caused by an operating problem at the radiator fan. Check the fuse for the radia-
tor fan, replace if necessary » page 201, Fuses in the engine compartment .
Do not continue driving if the warning light does not go off even though the
coolant level is correct and the fuse for the fan is in working order!
Seek help from a ŠKODA specialist garage.WARNING■ If you have to stop for technical reasons, then park the vehicle at a safe dis-
tance from the traffic, switch off the engine and activate the hazard warning
light system » page 49.■
Carefully open the coolant expansion bottle. If the engine is hot, the cooling
system is pressurized – risk of scalding! It is therefore best to allow the engine
to cool down before removing the cap.
■
Do not touch the radiator fan. The radiator fan may switch itself on auto-
matically even if the ignition is off.
Engine oil
The warning light
flashes (low oil pressure)
The following message is shown in the information cluster display:
Oil pressure: Stop! Owner's manual!
or STOP VEHICLE OIL PRESSURE
Stop the vehicle, switch off the engine, and check the level of the engine
oil » page 172 , Checking the engine oil level .
Even if the oil level is correct,
do not drive any further if the warning light is
flashing! Also do not leave the engine running at an idling speed.
Seek help from a ŠKODA specialist garage.
The indicator light
lights up (oil quantity too low)
The following message is shown in the information cluster display:
Check oil level!
15Instruments and warning lights
Page 25 of 222
›Average speed
› Driving time
Since start
The memory collates the driving information from the moment the ignition is
switched on until it is switched off. New data will also flow into the calculation of
the current driving information if the trip is continued within 2 hours after
switching off the ignition. If the trip is interrupted for more than 2 hours, the
memory is automatically erased.
Long-term
The memory gathers driving information from any number of individual journeys
up to a total of 99 hours and 59 minutes driving or 9 999 kilometres driven. The
memory is deleted when either of these limits is reached and the calculation
starts all over again.
Since refuel
The memory gathers driving information since the last refuelling. The memory is erased automatically the next time you fill up.
Note
Disconnecting the vehicle battery will delete all memory data.
Multifunction display details
First read and observe the introductory information and safety warn-
ings
on page 22.
Range
The range indicates the distance you can still drive with your vehicle based on the
level of fuel in the tank and the same style of driving as before.
The display is shown in steps of 10 km. After lighting up of the indicator light
the display is shown in steps of 5 km.
The fuel consumption over the last 50 km is used to calculate the range. Therange can increase if you drive in a more fuel-efficient manner.
Average fuel consumption
The average fuel consumption 1)
is calculated since the last time the memory was
erased » page 22 .
If you wish to determine the average fuel consumption over a certain period of
time, you must set the memory at the start of the new measurement to zero » Fig. 3 on page 22. After erasing the memory, no fuel consumption data will
appear for the first 100 m driven.
The fuel consumption data is updated regularly while you are driving.
Current fuel consumption
You can use this information to adapt your driving style to the desired fuel con-
sumption 1)
.
The display appears in litres/hour if the vehicle is stationary or driving at a low
speed 2)
.
Oil temperature
If the engine oil temperature is in the range 80-110 °C, the engine operating tem-
perature is reached.
If the temperature lies below 80 °C or above 110 °C, avoid high engine revs, full
throttle and high engine loads.
If the oil temperature is lower than 50 °C or if a fault in the system for checking
the oil temperature is present,
are displayed instead of the oil temperature.
Warning against excessive speeds
Setting the speed limit, e.g. for the intra-urban top speed » page 24.
Traffic sign recognition
In the display, up to three detected traffic signs can be displayed, which provide
information about the following:
› Maximum speed (including additional sign);
› Overtaking prohibited.
Further information » page 25, Traffic sign recognition .
Current driving speed
The current speed is identical to the display on the speedometer 3
» Fig. 2 on
page 9.
1)
To set the units for the fuel consumption display
» Bedienungsanleitung Infotainment, chapter Unit
setup .
2)
On some models in certain countries, the display appears in --,- kilometres/litres if the vehicle is sta-
tionary.
23Information system
Page 102 of 222
Driving and the Environment
Running in
New engine
The engine has to be run in during the first 1 500 kilometres.
Up to 1 000 kilometres
›
Do not drive faster than 3/4 of the maximum speed of the gear in use, i.e. 3/4 of
the maximum permissible engine speed.
›
No full throttle.
›
Avoid high engine speeds.
›
Do not tow a trailer.
From 1 000 up to 1 500 kilometres
Gradually increase the power output of the engine up to the full speed of the
gear engaged, i.e. up to the maximum permissible engine speed.
During the first operating hours the engine has higher internal friction than lateruntil all of the moving parts have harmonized. The driving style which you adopt
during the first approx.1 500 kilometres plays a decisive part in the success of running in your car.
Never drive at unnecessarily high engine speeds even after the running-in period
is complete. The maximum permissible engine speed is marked by the start of the red scale area of the revolutions counter.
On vehicles fitted with a manual gearbox, at the very latest shift up into the nextgear when the red area is reached. Very high engine speeds when accelerating
(accelerator) are automatically restricted »
.
If the engine is no longer running smoothly, do not drive with unnecessarily low
engine revs on a vehicle with manual transmission. Shift down. Observe the rec-
ommended gear » page 21.
CAUTION■
The engine is not protected from excessive engine revs caused by shifting
down at the wrong time. This can result in the sudden increase in revs beyond
the permissible maximum rpm and thus cause engine damage.■
Never rev up a cold engine when the vehicle is stationary or when driving in in-
dividual gears.
■
All the speed and engine revolution figures apply only when the engine is at its
normal operating temperature.
For the sake of the environment
Never drive with unnecessarily high engine revs. Shifting up sooner helps save on
fuel, reduces engine noises and protects the environment.
New tyres
New tyres have to be “run in” since they do not offer optimal grip at first. Drive
especially carefully for the first 500 km or so.
New brake pads
New brake pads initially do not provide optimal braking performance. They first need to be “run in”. Drive especially carefully for the first 200 km or so.
Catalytic converter
Proper operation of the emission control system (catalytic converter) is of major
significance for driving your vehicle in an environmentally conscious way.
› Vehicles fitted with a petrol engine must always be refuelled with unleaded
petrol » page 168 .
› Do not pour too much oil into the engine
» page 172, Checking the engine oil
level .
› Do not switch off the ignition while you are driving the vehicle.
If you drive your vehicle in a country in which unleaded petrol is not available, you must have the catalytic converter replaced later when driving the vehicle into a
country in which use of a catalytic converter is mandatory.
100Using the system
Page 105 of 222
Information about convenience consumers and the amount of fuel con-sumed » operating instructions for Infotainment , chapter Setting vehicle systems
(CAR button) .
A maximum of three convenience consumers are displayed in the Infotainment
display- the top 3 in terms of energy consumption.
You can decide to switch off the consumers or to set them to a lower level to re-duce the level of fuel consumption.
Checking tyre inflation pressures
Tyres which are correctly inflated save fuel.
Always ensure the tyre inflation pressure is correct. If the inflation pressure is too
low, the tyres must overcome a higher rolling resistance. This will not only in-
crease fuel consumption but also tyre wear and the driving behaviour will worsen.
Always check the tyre inflation pressure when the tyres are cold.
Avoid unnecessary ballast
Transporting ballast costs fuel.
Every additional kilogram in weight increases the fuel consumption. We there-
fore recommend you do not travel with any unnecessary weight.
It is particularly in town traffic, when one is accelerating quite often, that the ve-
hicle weight will have a significant effect upon the fuel consumption. A rule of
thumb here is that an increase in weight of 100 kilograms will cause an increase
in fuel consumption of about 1 litre/100 kilometres.
At a speed of 100 - 120 km/h, a vehicle fitted with a roof rack cross member with-
out a load will use about 10 % more fuel than normal due to the increased aero- dynamic drag.
Regular servicing
A poorly tuned engine uses an unnecessarily high amount of fuel.
By having your vehicle regularly maintained by a ŠKODA specialist garage, you
create the conditions needed for driving economically. The maintenance state of your vehicle has a positive effect on traffic safety and value retention.
A poorly tuned engine can result in a fuel consumption which is 10 % higher than normal!
Check the oil at regular intervals, e.g. when filling up. Oil consumption is depend-
ent to a considerable extent on the load and speed of the engine. Oil consump-
tion could be as high as 0.5 litres/1 000 km depending on your style of driving.
It is quite normal that a new engine has a higher oil consumption at first, and rea- ches its lowest level only after a certain running in time. The oil consumption of anew vehicle can therefore only be correctly assessed after driving about5 000 km.
For the sake of the environment
■ Additional improvements to the fuel economy can be made by using synthetic
high-lubricity oils.■
Regularly check the ground under the vehicle. Have your vehicle inspected by a
ŠKODA specialist garage if you find any stains caused by oil or other fluids on the
floor.
Note
We recommend that your vehicle is serviced on a regular basis by a ŠKODA Part-
ner.
Environmental compatibility
Environmental protection has played a major role in the design, selection of mate-
rials and manufacture of your new ŠKODA. Particular emphasis has been placed
on the following points:
Design measures › Joints designed to be easily detached.
› Simplified disassembly due to the modular structure system.
› Improved purity of different classes of materials.
› Identification of all plastic parts in accordance with VDA Recommendation 260.
› Reduced fuel consumption and exhaust emission CO
2.
› Minimum fuel leakage during accidents.
› Reduced noise.
Choice of materials › Extensive use of recyclable material.
› Air conditioning filled with CFC-free refrigerant.
103Driving and the Environment
Page 171 of 222
■Engine parts can be damaged if petrol with a lower octane number than the one
prescribed is used.■
In no case may fuel additives with metal components be used, especially not
with manganese and iron content. Do not use any LRP fuels (lead replacement petrol) with metal parts - risk of serious damage to parts of the engine or exhaust
system!
■
Do not use any fuels with metal parts - risk of serious damage to parts of the
engine or exhaust system!
■
The use of unsuitable fuel additives can cause considerable damage to parts of
the engine or the exhaust system.
Diesel fuel
First read and observe the introductory information and safety warn-ings
on page 167.
Your vehicle can only be operated with diesel fuel, which complies with the
standard EN 590 (standard DIN 51628 in Germany, standard ÖNORM C 1590 in
Austria, GOST R 52368-2005/EN 590:2004 in Russia).
All diesel engines can be operated with diesel fuel with a maximum content of
7 % bio-fuel (B7), which complies with the standard DIN 52638 in Germany (in
Austria C 1590, in France EN 590).
Operation in winter – Winter-grade diesel fuel In the cold season, only use “winter-grade diesel fuel” which will still operateproperly even at a temperature of -20 °C.
It is often the case in countries with different climatic conditions that diesel fuels available have a different temperature characteristic. The ŠKODA Partners and
filling stations in the relevant country will be able to provide you with information
regarding the diesel fuels available.
Preheating fuel
The vehicle is fitted with a fuel filter preheating system. This secures operation of
a vehicle using diesel fuel down to an environmental temperature of -25 °C.
Fuel additives
Fuel additives, so-called “flow improvers” (petrol and similar products) must not
be added to the diesel fuel.
CAUTION■ Just filling the tank once with diesel fuel that does not comply with the stand-
ard, can cause severe damage to parts of the engine, the fuel and exhaust sys-
tem!■
Damage caused by using diesel fuel which does not comply with the standards
are excluded from the warranty.
■
If a different fuel other than diesel fuel, which complies to the above mentioned
standards (e.g. petrol) is used by mistake do not start the engine or switch on the
ignition! Extensive damage to engine parts can occur! We recommend that the
fuel system is cleaned by a ŠKODA Partner.
■
Water which has collected in the fuel filter can cause engine faults.
■
Your vehicle is not adapted for use of biofuel (RME), therefore this fuel must not
be refuelled and driven. The use of biofuel (RME) can cause considerable damage
to parts of the engine or fuel system.
■
Comply with the proscribed oil change intervals.
Engine compartment
Introduction
This chapter contains information on the following subjects:
Opening and closing the bonnet
171
Engine compartment overview
172
Checking the engine oil level
172
Replenishing the engine oil
173
Changing engine oil
173
Coolant
173
Checking the coolant level
174
Replenishing the coolant
175
Radiator fan
175
Checking the brake fluid
175
Brake fluid change
176
Windscreen washer system
176
169Inspecting and replenishing
Page 174 of 222
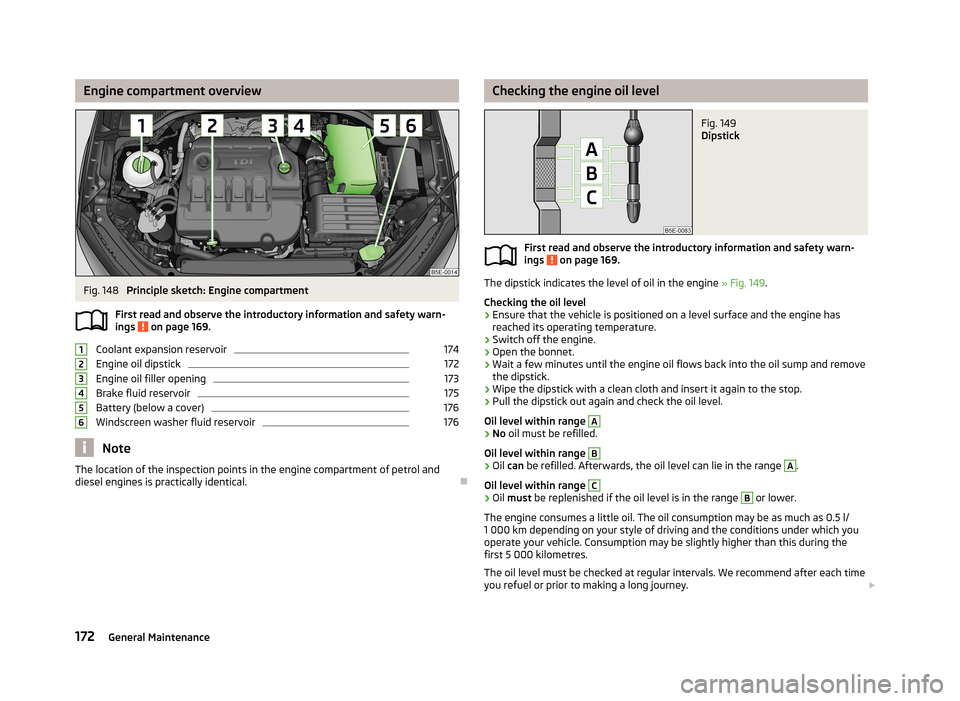
Engine compartment overviewFig. 148
Principle sketch: Engine compartment
First read and observe the introductory information and safety warn- ings
on page 169.
Coolant expansion reservoir
174
Engine oil dipstick
172
Engine oil filler opening
173
Brake fluid reservoir
175
Battery (below a cover)
176
Windscreen washer fluid reservoir
176
Note
The location of the inspection points in the engine compartment of petrol and
diesel engines is practically identical.
123456Checking the engine oil levelFig. 149
Dipstick
First read and observe the introductory information and safety warn- ings on page 169.
The dipstick indicates the level of oil in the engine » Fig. 149.
Checking the oil level
›
Ensure that the vehicle is positioned on a level surface and the engine has reached its operating temperature.
›
Switch off the engine.
›
Open the bonnet.
›
Wait a few minutes until the engine oil flows back into the oil sump and remove
the dipstick.
›
Wipe the dipstick with a clean cloth and insert it again to the stop.
›
Pull the dipstick out again and check the oil level.
Oil level within range
A›
No oil must be refilled.
Oil level within range
B›
Oil can be refilled. Afterwards, the oil level can lie in the range
A
.
Oil level within range
C›
Oil must be replenished if the oil level is in the range
B
or lower.
The engine consumes a little oil. The oil consumption may be as much as 0.5 l/ 1 000 km depending on your style of driving and the conditions under which you
operate your vehicle. Consumption may be slightly higher than this during the
first 5 000 kilometres.
The oil level must be checked at regular intervals. We recommend after each time
you refuel or prior to making a long journey.
172General Maintenance
Page 178 of 222
Brake fluid changeFirst read and observe the introductory information and safety warn-
ings
on page 169.
Brake fluid absorbs moisture. Over time it therefore absorbs moisture from the
environment.
Excessive water in the brake fluid may be the cause of corrosion in the brake sys-
tem.
The water content lowers the boiling point of the brake fluid.
The brake fluid must comply with the following standards or specifications: › VW 50114;
› FMVSS 116 DOT4.
WARNINGDo not use used brake fluid - the function of the brake system may be im-
paired - risk of accident!
CAUTION
Brake fluid damages the paintwork of the vehicle.
Note
The brake fluid is replaced as part of a proscribed Inspection service carried out by
a ŠKODA Partner.
Windscreen washer system
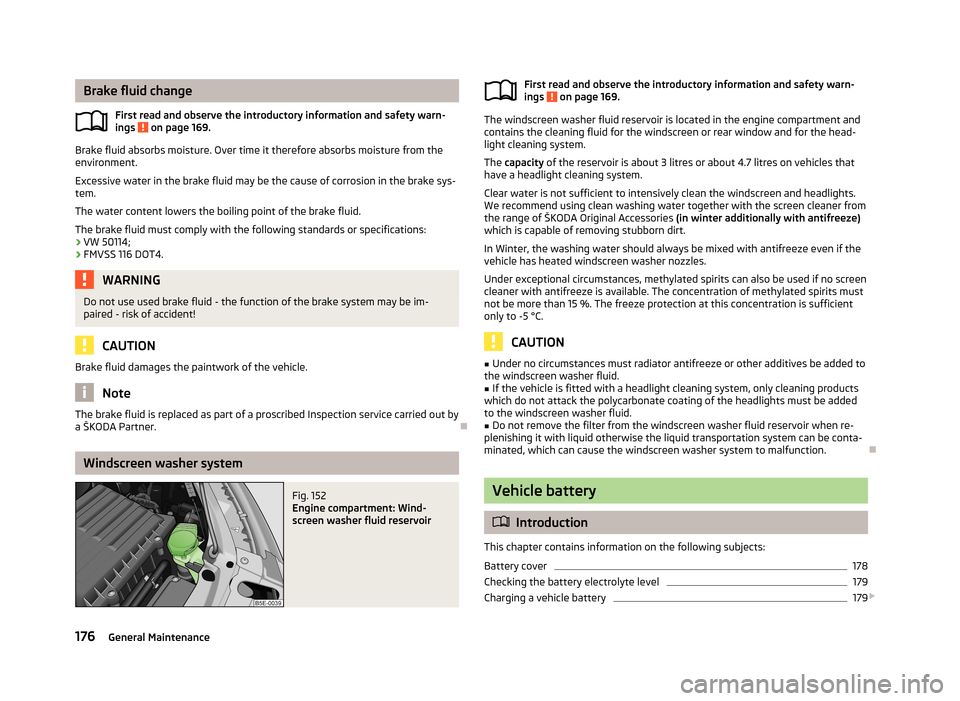
Fig. 152
Engine compartment: Wind-
screen washer fluid reservoirFirst read and observe the introductory information and safety warn-
ings on page 169.
The windscreen washer fluid reservoir is located in the engine compartment and
contains the cleaning fluid for the windscreen or rear window and for the head-
light cleaning system.
The capacity of the reservoir is about 3 litres or about 4.7 litres on vehicles that
have a headlight cleaning system.
Clear water is not sufficient to intensively clean the windscreen and headlights.
We recommend using clean washing water together with the screen cleaner from
the range of ŠKODA Original Accessories (in winter additionally with antifreeze)
which is capable of removing stubborn dirt.
In Winter, the washing water should always be mixed with antifreeze even if the
vehicle has heated windscreen washer nozzles.
Under exceptional circumstances, methylated spirits can also be used if no screen
cleaner with antifreeze is available. The concentration of methylated spirits must
not be more than 15 %. The freeze protection at this concentration is sufficient
only to -5 °C.
CAUTION
■ Under no circumstances must radiator antifreeze or other additives be added to
the windscreen washer fluid.■
If the vehicle is fitted with a headlight cleaning system, only cleaning products
which do not attack the polycarbonate coating of the headlights must be added
to the windscreen washer fluid.
■
Do not remove the filter from the windscreen washer fluid reservoir when re-
plenishing it with liquid otherwise the liquid transportation system can be conta-
minated, which can cause the windscreen washer system to malfunction.
Vehicle battery
Introduction
This chapter contains information on the following subjects:
Battery cover
178
Checking the battery electrolyte level
179
Charging a vehicle battery
179
176General Maintenance
Page 192 of 222
Note■The anti-theft wheel bolt set and adapter can be purchased from a ŠKODA Part-
ner.■
The national legal requirements must be observed when changing a wheel.
Preliminary work
First read and observe the introductory information and safety warn-ings
on page 189.
The following steps must be carried out before actually changing the wheel:
›
Park the vehicle as far away as possible from the flow of traffic. The place you choose should be level.
›
Let all of the occupants get out. While changing a tyre, the occupants of the
vehicle should not stand on the road (instead they should remain behind a crash
barrier).
›
Switch off the engine and move the gearshift lever into Neutral or move the se-
lector lever on the automatic gearbox into position P.
›
Firmly apply the handbrake.
›
If a trailer is connected, remove it.
›
Remove the vehicle tool kit » page 188 and the spare wheel » page 184 from
the luggage compartment.
Changing a wheel
First read and observe the introductory information and safety warn-
ings
on page 189.
Always change a wheel on a level surface as far as possible.
›
Remove the full wheel trim » page 185 or caps » page 185 .
›
First of all slacken the anti-theft wheel bolt and then the other wheel
bolts » page 191 .
›
Jack up the vehicle until the wheel that needs changing is clear of the
ground » page 191 .
›
Unscrew the wheel bolts and place them on a clean surface (cloth, paper, etc.).
›
Remove the wheel.
›
Attach the spare wheel and slightly screw on the wheel bolts.
›
Lower the vehicle.
›Alternately tighten the wheel bolts opposite each other using the wheel
wrench (crosswise) and then tighten the anti-theft wheel bolt » page 191.›
Replace the wheel trim or the caps.
Note
■
All bolts must be clean and must turn easily.■Under no circumstances grease or oil the wheel bolts!■
When fitting unidirectional tyres, ensure that the direction of rotation is cor-
rect » page 181 .
Subsequent steps
First read and observe the introductory information and safety warn-
ings
on page 189.
The following steps must also be performed after changing the wheel.
›
Stow and attach the replaced wheel in the spare wheel well using a special screw » page 184 .
›
Stow the vehicle tool kit in the space provided.
›
Check the tyre pressure on the installed spare wheel as soon as possible.
›
Have the tightening torque of the wheel bolts checked with a torque wrench
as soon as possible.
›
Change the damaged wheel or consult a ŠKODA specialist garage about repair
possibilities.
Note
■ If it is determined that the wheel bolts are corroded and difficult to turn when
changing the wheel, the bolts must be replaced before checking the tightening
torque.■
Drive cautiously and only at a moderate speed until the tightening torque has
been checked.
190Do-it-yourself
Page 215 of 222
Central locking system29
Changes165
Changing Engine oil
173
Wheels189
Charge level indicator of the vehicle battery
11
Charge level indicator vehicle battery
11
Charging a vehicle battery179
Checking Battery electrolyte level
179
Brake fluid175
Coolant level174
Engine oil172
Oil level172
Windscreen washer fluid176
Children and safety154
Child safety Side airbag
156
Child safety lock29
Child safety seat Use of child safety seats
156
Child seat Classification
156
ISOFIX157
on the front passenger seat155
TOP TETHER158
Use of child seats157
Chrome parts refer to Taking care of your vehicle
161
Cigarette lighter70
Cleaning159
Alcantara164
Artificial leather164
Cloths164
Headlight lenses162
Material coverings164
Natural leather164
Plastic parts162
Wheels163
Climatronic86
Clock11
Clothes hooks79
Cockpit Ashtray
70
Cigarette lighter70
General view7
Light51
Sockets71
Storage compartments72
Compartments72
Computer see Multifunction display
22
Coolant Checking
174
Replenishing175
Coolant temperature gauge display
10
Correct seated position139
Counter for distance driven11
Cruise control system (CCS)119
D
Daylight driving light
44
De-icing the windscreen and rear window52
Deactivating an airbag
151
Deactivating an airbag151
Delayed locking of the boot lid see Boot lid
38
Diesel refer to Fuel
169
Diesel fuel Operation in winter
169
Diesel particulate filter18
Digital clock11
Dipstick172
Display Service interval
11
Distance driven11
Door Child safety lock
29
Door locking Emergency
36
Doors Emergency locking
36
Driving Abroad
104
Driving through water on the street104
Emissions207
Fuel consumption207
Driving mode see Select driving mode
124
E
Economical and environmentally friendly driving
101
EDL114
Electrical power windows Button in the driver's door
38, 39
Button in the rear doors40
Central locking system40
Operational faults41
Electronic differential lock (EDL)114
Electronic immobiliser93
Emergency Automatic gearbox
133
Changing a wheel189
Door locking36
Hazard warning light system49
Jump-starting195
KESSY - start engine97
Locking the driver's door36
Towing the vehicle196
Tyre repair192
Unlocking the driver's door36
Unlocking the luggage compartment lid38
Emissions207
213Index
Page 216 of 222
EngineRunning in100
Starting and stopping the engine92
Engine compartment Brake fluid
175
Coolant173
Overview172
Vehicle battery176
Engine oil Capacity
209
Changing173
Checking172
Replenishing173
Specification209
Engine revolutions counter10
Environment101
Environmental compatibility103
Environmentally friendly driving101
ESC Function
112
Warning light17
F
Fatigue detection
27
Fire extinguisher188
First-aid kit188
Footmats99
Force limiter40
Front airbag147
Front seats59
Fuel167
Diesel169
Fuel gauge display10
refer to Fuel167
Refuelling167
Unleaded petrol168
Fuel consumption101
Fuel gauge display
10
FusesAssignment199
Replacing199
G
Gear Recommended gear
21
General view Cockpit
7
Glow plug system Warning light
18
H
Handbrake
98
Head airbag150
Headlight assist47
Headlight cleaning system Headlight cleaning system
55
Headlights Driving abroad
104
Headlight cleaning system55
Head restraint63
Heating Defrosting windows
83
Exterior mirror58
operating83
Recirculated air mode84
Seats62
Windscreen and rear window52
Hill hold control (HHC)112
Horn7
Hydraulic Brake Assist (HBA)112
I
Ignition see Ignition lock
94
Ignition lock94
Immobiliser93
Inertia reel145
Information display25
Instrument cluster9
see Instrument cluster9
Interior monitor36
ISOFIX157
J
Jacking points Raise vehicle
191
Jump-starting195
K
KESSY see Kessy system
33
Starting95
KESSY system Starting
95
Unlocking the vehicle33
Keys Lock the vehicle
31
Unlock the vehicle31
Knee airbag148
L
Lane Assist
126
Lever Main beam
45
Turn signal light45
Windscreen wipers54
Light Adaptive headlights (AHL)
46
Automatic driving lamp control45
Cockpit51
COMING HOME/LEAVING HOME function49
Daylight driving light44
Fog lights48
Fog lights with the function CORNER48
214Index