dashboard warning lights SKODA OCTAVIA 2012 3.G / (5E) Owner's Manual
[x] Cancel search | Manufacturer: SKODA, Model Year: 2012, Model line: OCTAVIA, Model: SKODA OCTAVIA 2012 3.G / (5E)Pages: 222, PDF Size: 13.52 MB
Page 14 of 222

orSERVICE IN... km OR ... DAYS
Resetting Service Interval Display
After resetting the display with flexible service intervals, the displayed data is the
same as that for a vehicle with fixed service intervals. We therefore recommend
that the Service Interval Display is only reset by a ŠKODA Partner, who will reset
the display with a vehicle system tester.
The ŠKODA Partner:
› Resets the memory of the display after the appropriate inspection
› Adds an entry to the Service Schedule
› Affixes the sticker with the entry of the following service interval to the side of
the dashboard on the driver's side.
It can be reset with the button 6
» Fig. 2 on page 9.
› Switch off the ignition.
› Press the button
6
and keep it pressed down.
› Switch on the ignition.
› Release the button
6
and press again.
CAUTION
We recommend that you do not reset the Service Interval Display yourself as this
can result in the incorrect setting of the Service Interval Display, which can also
cause possible problems with the operation of your vehicle.
Note
■ Information is retained in the Service Interval Display even after the vehicle bat-
tery is disconnected.■
If the instrument cluster is exchanged after a repair, the correct values must be
entered in the counter for the Service Interval Display. This work is carried out by a ŠKODA specialist garage.
■
For more information on the service intervals » Service Plan .
Warning lights
Auto Check Control
Certain functions and conditions of individual vehicle systems are checked contin-
uously when the ignition is switched on.
Error messages and/or other information are displayed in the instrument cluster display. The messages are displayed at the same time as the symbols in the dis-
play and/or the warning lights » page 12.
Depending on the meaning, the icon or together with the message appears
in the bar with the warning lights
5
» Fig. 2 on page 9.
SymbolDescriptionWarningDanger
While the operational faults remain unrectified, the messages are always indica-
ted again. After they are displayed for the first time, the symbols
or
continue
to be indicated without any extra messages for the driver.
WARNINGIf you have to stop for technical reasons, then park the vehicle at a safe dis-
tance from the traffic, switch off the engine and activate the hazard warning
light system » page 49. The warning triangle must be set up at the prescri-
bed distance - observe the national legal provisions when doing so.
Overview
The warning lights show the following functions/faults and may be accompanied by audible signals.
When switching on the ignition, some indicator lights illuminate briefly as a func-
tion test. These indicator lights will disappear several seconds after the vehicle is
started.
12Using the system
Page 108 of 222

Towing a trailer
Towing device
Introduction
This chapter contains information on the following subjects:
Description
106
Setting the ready position
107
Installing the ball rod
107
Check proper attachment
108
Removing the ball rod
108
Operation and maintenance
109
If your vehicle has already been factory-fitted with a towing device or is fitted
with a towing device from ŠKODA Original Accessories, then it meets all of the
technical requirements and national legal provisions for towing a trailer.
Your vehicle is fitted with a 13-pin power socket for the electrical connection be-tween the vehicle and trailer. If the trailer that is to be towed has a 7-pin connec-
tor , you can use a suitable adapter from ŠKODA Original Accessories.
The maximum trailer drawbar load is 75 kg/h.
WARNING■
Before each time you make a journey when using the ball rod, check that it
is seated correctly and is secured in the mounting recess.■
Do not operate the ball rod if it is not correctly inserted in the mounting re-
cess.
■
Do not operate the towing device if it is damaged or incomplete.
■
Do not perform any modifications or changes to the towing device.
■
Never release the ball rod while the trailer is still coupled.
CAUTION
■ If there is an error in the trailer lighting system, check the fuses in the fuse box
in the dashboard. » page 200■
Handle the ball rod carefully to avoid damaging the paintwork on the bumper.
Note■
After coupling the trailer and connecting up the power socket, check the rear
lights on the trailer to ensure they work.■
If you have any questions, please contact a ŠKODA Partner.
Description
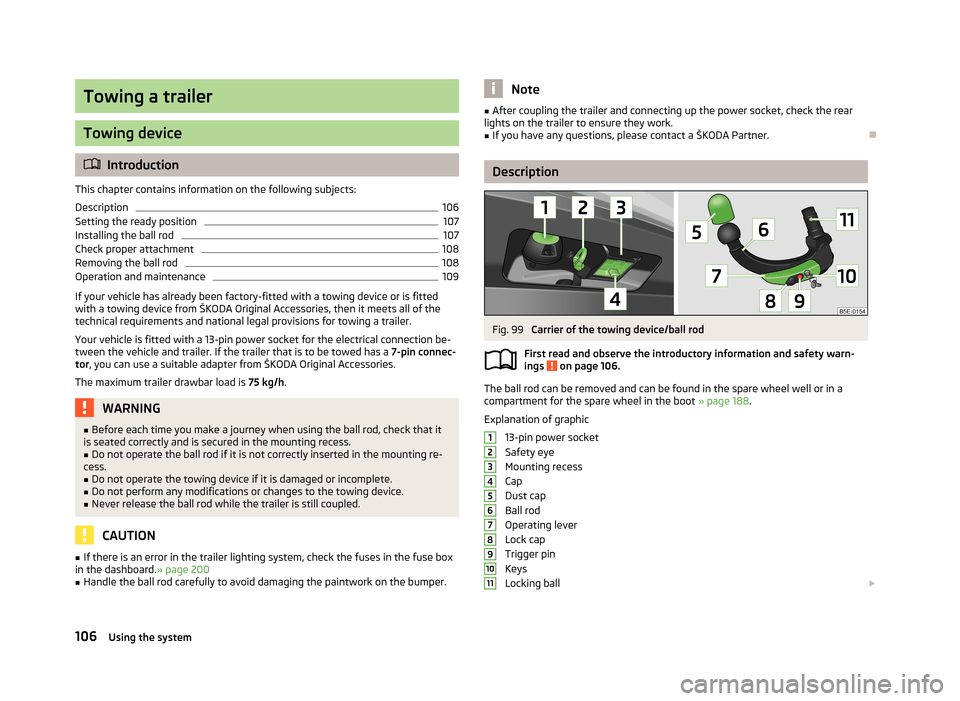
Fig. 99
Carrier of the towing device/ball rod
First read and observe the introductory information and safety warn-
ings
on page 106.
The ball rod can be removed and can be found in the spare wheel well or in a
compartment for the spare wheel in the boot » page 188.
Explanation of graphic
13-pin power socket
Safety eye
Mounting recess
Cap
Dust cap
Ball rod
Operating lever
Lock cap
Trigger pin
Keys
Locking ball
1234567891011106Using the system