fog light SKODA OCTAVIA 2012 3.G / (5E) Owner's Manual
[x] Cancel search | Manufacturer: SKODA, Model Year: 2012, Model line: OCTAVIA, Model: SKODA OCTAVIA 2012 3.G / (5E)Pages: 222, PDF Size: 13.52 MB
Page 15 of 222
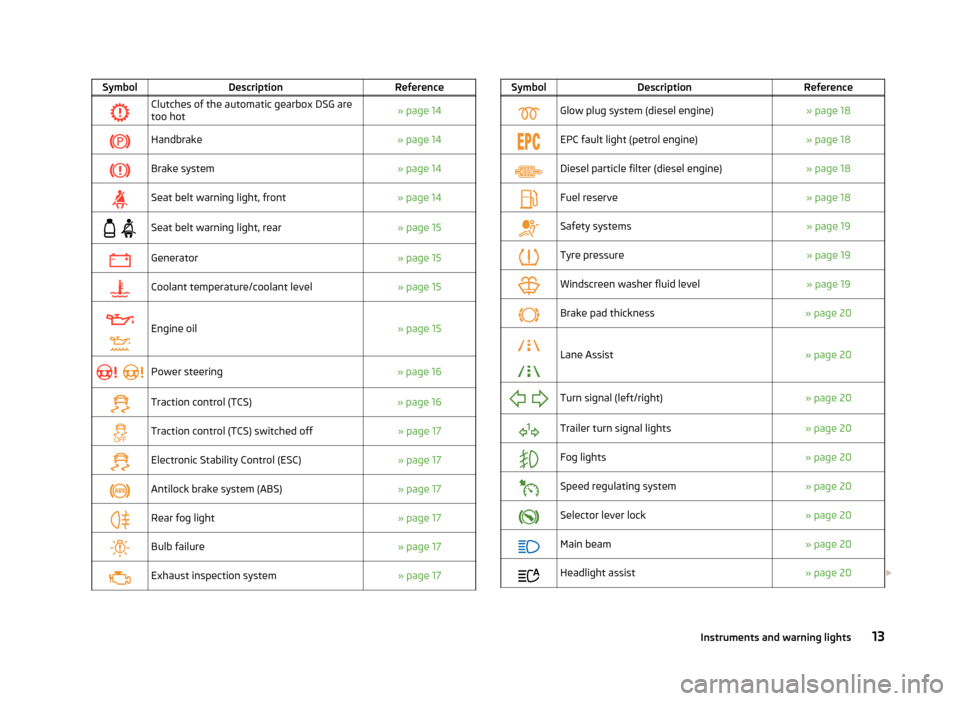
SymbolDescriptionReferenceClutches of the automatic gearbox DSG aretoo hot» page 14Handbrake» page 14Brake system» page 14Seat belt warning light, front» page 14
Seat belt warning light, rear» page 15Generator» page 15Coolant temperature/coolant level» page 15
Engine oil» page 15
Power steering» page 16Traction control (TCS)» page 16Traction control (TCS) switched off» page 17Electronic Stability Control (ESC)» page 17Antilock brake system (ABS)» page 17Rear fog light» page 17Bulb failure» page 17Exhaust inspection system» page 17SymbolDescriptionReferenceGlow plug system (diesel engine)» page 18EPC fault light (petrol engine)» page 18Diesel particle filter (diesel engine)» page 18Fuel reserve» page 18Safety systems» page 19Tyre pressure» page 19Windscreen washer fluid level» page 19Brake pad thickness» page 20
Lane Assist» page 20
Turn signal (left/right)» page 20Trailer turn signal lights» page 20Fog lights» page 20Speed regulating system» page 20Selector lever lock» page 20Main beam» page 20Headlight assist» page 20 13Instruments and warning lights
Page 19 of 222
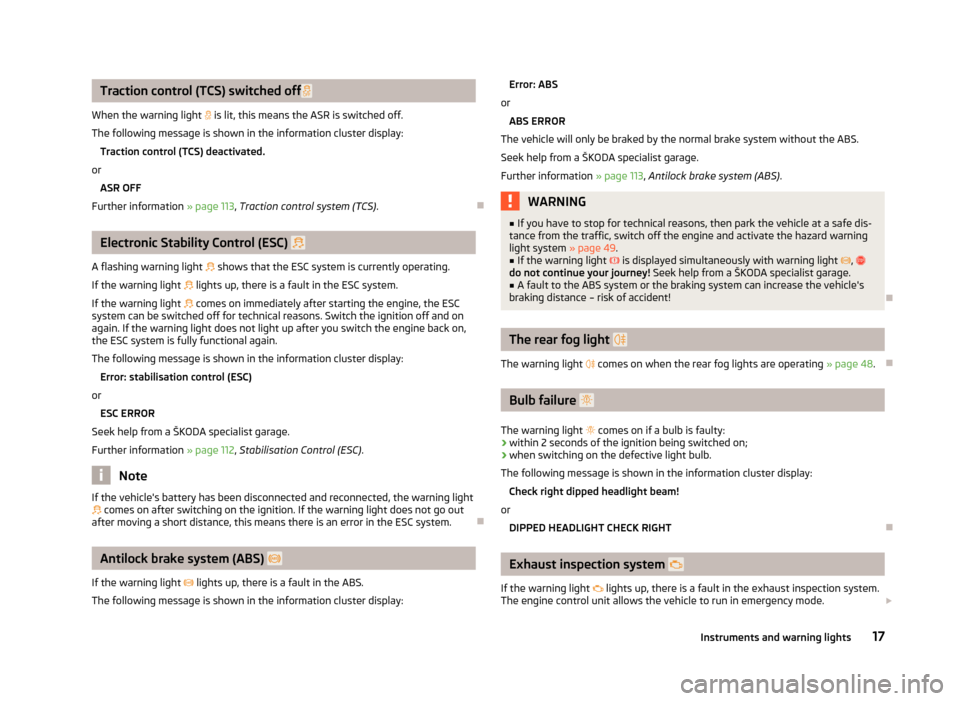
Traction control (TCS) switched off
When the warning light is lit, this means the ASR is switched off.
The following message is shown in the information cluster display: Traction control (TCS) deactivated.
or ASR OFF
Further information » page 113, Traction control system (TCS) .
Electronic Stability Control (ESC)
A flashing warning light
shows that the ESC system is currently operating.
If the warning light
lights up, there is a fault in the ESC system.
If the warning light
comes on immediately after starting the engine, the ESC
system can be switched off for technical reasons. Switch the ignition off and on
again. If the warning light does not light up after you switch the engine back on,
the ESC system is fully functional again.
The following message is shown in the information cluster display:
Error: stabilisation control (ESC)
or
ESC ERROR
Seek help from a ŠKODA specialist garage.
Further information » page 112, Stabilisation Control (ESC) .
Note
If the vehicle's battery has been disconnected and reconnected, the warning light
comes on after switching on the ignition. If the warning light does not go out
after moving a short distance, this means there is an error in the ESC system.
Antilock brake system (ABS)
If the warning light
lights up, there is a fault in the ABS.
The following message is shown in the information cluster display:
Error: ABS
or
ABS ERROR
The vehicle will only be braked by the normal brake system without the ABS.
Seek help from a ŠKODA specialist garage. Further information » page 113, Antilock brake system (ABS) .WARNING■
If you have to stop for technical reasons, then park the vehicle at a safe dis-
tance from the traffic, switch off the engine and activate the hazard warning
light system » page 49.■
If the warning light is displayed simultaneously with warning light ,
do not continue your journey! Seek help from a ŠKODA specialist garage.
■
A fault to the ABS system or the braking system can increase the vehicle's
braking distance – risk of accident!
The rear fog light
The warning light
comes on when the rear fog lights are operating » page 48.
Bulb failure
The warning light
comes on if a bulb is faulty:
› within 2 seconds of the ignition being switched on;
› when switching on the defective light bulb.
The following message is shown in the information cluster display: Check right dipped headlight beam!
or DIPPED HEADLIGHT CHECK RIGHT
Exhaust inspection system
If the warning light
lights up, there is a fault in the exhaust inspection system.
The engine control unit allows the vehicle to run in emergency mode.
17Instruments and warning lights
Page 22 of 222
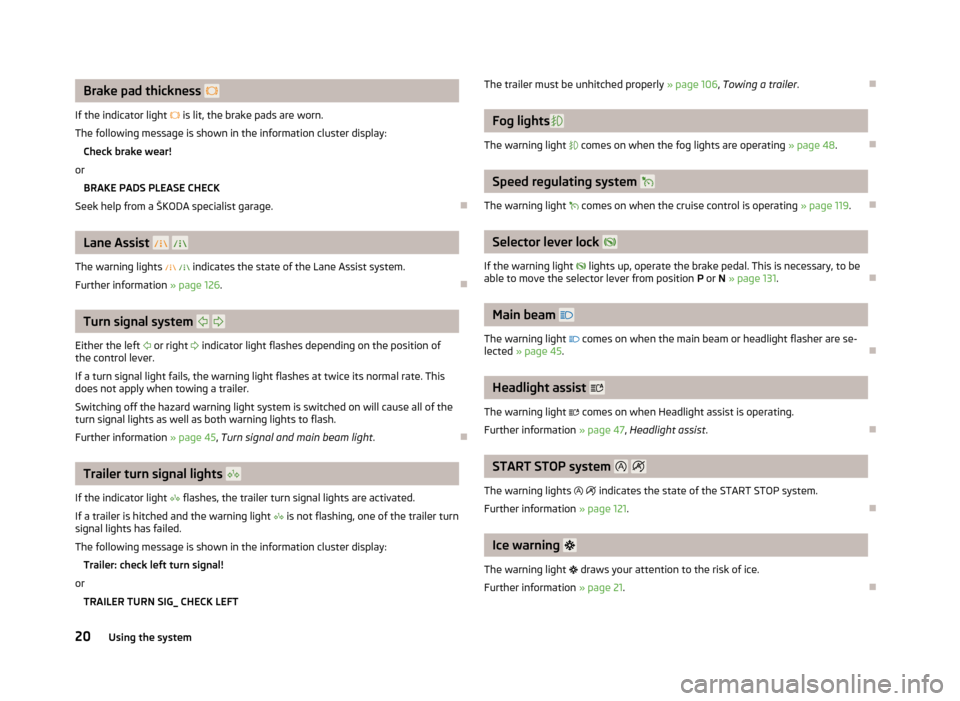
Brake pad thickness
If the indicator light is lit, the brake pads are worn.
The following message is shown in the information cluster display: Check brake wear!
or BRAKE PADS PLEASE CHECK
Seek help from a ŠKODA specialist garage.
Lane Assist
The warning lights
indicates the state of the Lane Assist system.
Further information » page 126.
Turn signal system
Either the left
or right
indicator light flashes depending on the position of
the control lever.
If a turn signal light fails, the warning light flashes at twice its normal rate. This
does not apply when towing a trailer.
Switching off the hazard warning light system is switched on will cause all of the
turn signal lights as well as both warning lights to flash.
Further information » page 45, Turn signal and main beam light .
Trailer turn signal lights
If the indicator light
flashes, the trailer turn signal lights are activated.
If a trailer is hitched and the warning light
is not flashing, one of the trailer turn
signal lights has failed.
The following message is shown in the information cluster display: Trailer: check left turn signal!
or TRAILER TURN SIG_ CHECK LEFT
The trailer must be unhitched properly » page 106
, Towing a trailer .
Fog lights
The warning light comes on when the fog lights are operating » page 48.
Speed regulating system
The warning light comes on when the cruise control is operating » page 119.
Selector lever lock
If the warning light
lights up, operate the brake pedal. This is necessary, to be
able to move the selector lever from position P or N » page 131 .
Main beam
The warning light
comes on when the main beam or headlight flasher are se-
lected » page 45 .
Headlight assist
The warning light
comes on when Headlight assist is operating.
Further information » page 47, Headlight assist .
START STOP system
The warning lights
indicates the state of the START STOP system.
Further information » page 121.
Ice warning
The warning light
draws your attention to the risk of ice.
Further information » page 21.
20Using the system
Page 29 of 222
Traffic sign recognition may not be available or may only be available to a limited
extent in the following situation:
› in poor visibility conditions, e.g. fog, heavy rain, thick snowfall;
› when dazzled by the sun;
› when dazzled by oncoming traffic;
› when the camera viewing range is obstructed by an obstacle;
› at high speeds;
› when the traffic signs are fully or partially obscured (e.g. by trees, snow, dirt or
other vehicles);
› when the traffic signs are not standard (round with a red border);
› when the traffic signs are damaged or bent;
› when the traffic signs are fixed to signs with flashing lights;
› when the traffic signs were changed and the navigation data are out of date.
Information for the driver
First read and observe the introductory information and safety warn-ings
on page 25.
The information for the driver appears in the instrument cluster display.
No traffic signs detected.
No maximum speeds were recognised (e.g. on German motorways where there is
no speed limit).
Error: traffic sign recognition
A system error is present. Seek help from a ŠKODA specialist garage.
Traffic sign recognition: clean windscreen!
The windscreen is dirty, iced over or misted up in the camera viewing range. Clean
the windscreen or remove the obstacles.
Traffic sign recognition: restricted.
Infotainment Navigation is not currently providing any data. Check whether the
maps are up-to-date or the whether the vehicle is currently in a location for which
no navigation data are available.
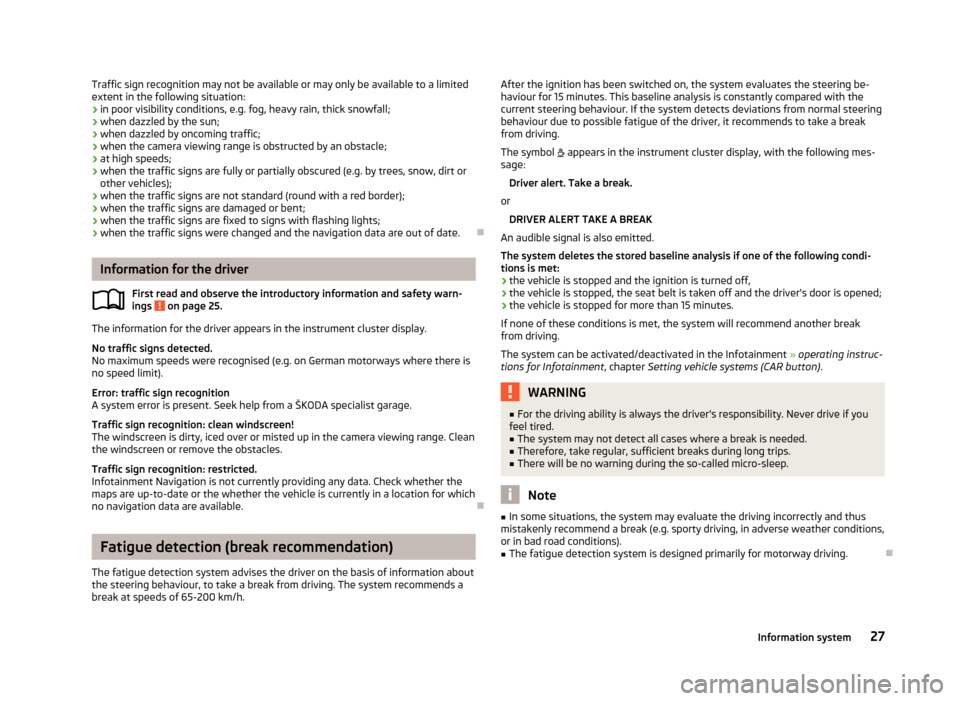
Fatigue detection (break recommendation)
The fatigue detection system advises the driver on the basis of information about
the steering behaviour, to take a break from driving. The system recommends a
break at speeds of 65-200 km/h.
After the ignition has been switched on, the system evaluates the steering be-
haviour for 15 minutes. This baseline analysis is constantly compared with the
current steering behaviour. If the system detects deviations from normal steering
behaviour due to possible fatigue of the driver, it recommends to take a break
from driving.
The symbol appears in the instrument cluster display, with the following mes-
sage:
Driver alert. Take a break.
or DRIVER ALERT TAKE A BREAK
An audible signal is also emitted.
The system deletes the stored baseline analysis if one of the following condi-
tions is met:
› the vehicle is stopped and the ignition is turned off,
› the vehicle is stopped, the seat belt is taken off and the driver's door is opened;
› the vehicle is stopped for more than 15 minutes.
If none of these conditions is met, the system will recommend another break
from driving.
The system can be activated/deactivated in the Infotainment » operating instruc-
tions for Infotainment , chapter Setting vehicle systems (CAR button) .WARNING■
For the driving ability is always the driver's responsibility. Never drive if you
feel tired.■
The system may not detect all cases where a break is needed.
■
Therefore, take regular, sufficient breaks during long trips.
■
There will be no warning during the so-called micro-sleep.
Note
■ In some situations, the system may evaluate the driving incorrectly and thus
mistakenly recommend a break (e.g. sporty driving, in adverse weather conditions,
or in bad road conditions).■
The fatigue detection system is designed primarily for motorway driving.
27Information system
Page 45 of 222
Lights and visibility
Lights
Introduction
This chapter contains information on the following subjects:
Side lights and the low beam
44
Daylight driving light function (DAY LIGHT)
44
Turn signal and main beam light
45
Automatic driving lamp control
45
Adaptive headlights (AHL)
46
Headlight assist
47
Fog lights
48
Fog lights with the function CORNER
48
Rear fog light
48
COMING HOME/LEAVING HOME function
49
Hazard warning light system
49
The light only operates if the ignition is switched on.
On models fitted with right-hand steering the position of certain switches differs
from that shown in » Fig. 25 on page 44. The symbols which mark the switch
positions are identical, however.
The low beam continues to shine while the ignition is switched on and the light
switch is in the position
or
. After switching off the ignition, the low beam
is switched off automatically and only the side lights come on. The side light goes
out after the ignition key is removed.
Keep the headlights lenses clean. The following guidelines must be ob- served » page 162 , Headlight lenses .
WARNING■
The activation of the lights should only be undertaken in accordance with
national legal requirements.■
The driver is always responsible for the correct settings and use of the
lights.
■
The automatic driving lamp control only operates as a support and does
not release the driver from his responsibility to check the light and, if necessa-
ry, to switch on the light depending on the light conditions. The light sensor
cannot, for example, detect rain or snow. Under these conditions we recom- mend switching on the low beam or fog lights!
Note
■ If there is a fault in the light switch, the low beam comes on automatically.■The headlights may mist up temporarily. When the driving lights are switched
on, the light outlet surfaces are free from mist after a short period, although the
headlight lenses may still be misted up in the peripheral areas. This mist has no
influence on the life of the lighting system.■
The instruments are also illuminated when the side light, low or high beam light
is switched on. The brightness of the instrument lighting can be activated/deacti- vated in the Infotainment » operating instructions for Infotainment , chapter Set-
ting vehicle systems (CAR button) .
43Lights and visibility
Page 48 of 222
Deactivating›Turn the light switch to position 0, or » Fig. 27 .
If the light switch is in position , the symbol lights up next to the light
switch. If the light is switched on automatically, the symbol next to the light
switch also lights up.
Automatic headlight control in rain
If the light switch is in position and if automatic wiping in rain or wiping (posi-
tion 2 or 3) is switched on for longer than 30 seconds » page 54, the side lights
and low beam will switch on automatically.
The light switches off when automatic wiping/wiping (position 2 or 3) is not
switched on for longer than approx. 4 seconds.
The automatic headlight control in rain can be activated/deactivated in the Info-tainment » operating instructions for Infotainment , chapter Setting vehicle sys-
tems (CAR button) .
CAUTION
Do not affix any stickers or similar objects in front of the light sensor on the wind-
screen, so that its functionality is not impaired or disabled.
Adaptive headlights (AHL)
First read and observe the introductory information and safety warn-ings
on page 43.
The AFS system works in tandem with automatic driving lamp control
, please
read the following » page 45.
The AFS system makes sure the street remains lit up depending on the traffic and weather situation.
The system automatically adjusts the cone of light in front of the vehicle based
on the vehicle speed, whether the windscreen wipers are in use, the rear fog lights, and data from Infotainment Navigation.
Activating
›
Turn the light switch into position
» Fig. 27 on page 45.
Deactivating
›
Turn the light switch to position 0,
or
» Fig. 27 on page 45.
The AHL system operates in the following modes.
Out of town mode
The cone of light in front of the vehicle is similar to the low beam. The mode is
active if none of the following modes are active.
City mode
The cone of light in front of the vehicle is adjusted so that it illuminates the adja- cent pavement, crossings, etc. The mode is active at speeds of 15-50 km/h.
Motorway mode
The cone of light in front of the vehicle is adjusted so that the driver can respond
in time to an obstruction or other hazard in time. The mode is active at speeds
above 110 km/h.
Rain mode
The cone of light in front of the vehicle is adjusted so that the driver can reduce the glare from oncoming traffic in rain. The mode is active at speeds of 50 –
90 km/h and if the windscreen wipers continuously operate for a period of time
longer than 2 minutes. The mode is deactivated when the windscreen wipers are switched off for longer than 8 minutes.
Fog mode
The cone of light in front of the vehicle is adjusted so that the driver is not daz-
zled by the reflection of the cone of light by fog in front of the vehicle. The mode
is active at speeds of 15 – 70 km/h and if the rear fog light is switched on for a
period of time longer than 10 seconds. The mode is deactivated when the rear fig
light is switched off for longer than 5 seconds.
Dynamic cornering lights
The cone of light in front of the vehicle is adjusted to the steering angle so that
the road in the curve is illuminated. This function is active at speeds greater than
10 km.h and in all AFS modes.
Tourist light
This mode makes it possible to drive in countries with opposing traffic system, driving on the left/right, without dazzling the oncoming vehicles. When the “tou- rist light” mode is active, the above-mentioned modes and the side swivel of the
headlights is deactivated.
The "Tourist light" mode can be configured in the Infotainment » operating in-
structions for Infotainment , chapter Setting vehicle systems (CAR button) .46Using the system
Page 50 of 222
WARNINGHeadlight assist only functions as a support and does not relieve the driver of
his responsibility to check the headlights and light beam and, if necessary, to
switch on the lights depending on the light conditions. Manual operation may be required in the following situations:■
in poor visibility conditions, e.g. fog, heavy rain, thick snowfall;
■
on A roads or motorways when oncoming traffic is partially obscured;
■
when passing poorly lit traffic, e.g. cyclists;
■
around sharp curves;
■
on sharp slopes up/down;
■
while driving through poorly-lit villages;
■
while driving over highly reflective surfaces;
■
when the windscreen around the camera is dirty, iced up, misted up, or cov-
ered up by stickers;
■
when an external navigation system is attached to the windscreen.
CAUTION
■ Do not attach any stickers or similar objects to the windscreen to avoid impair-
ing the functions of the Assist system.
Fog lights
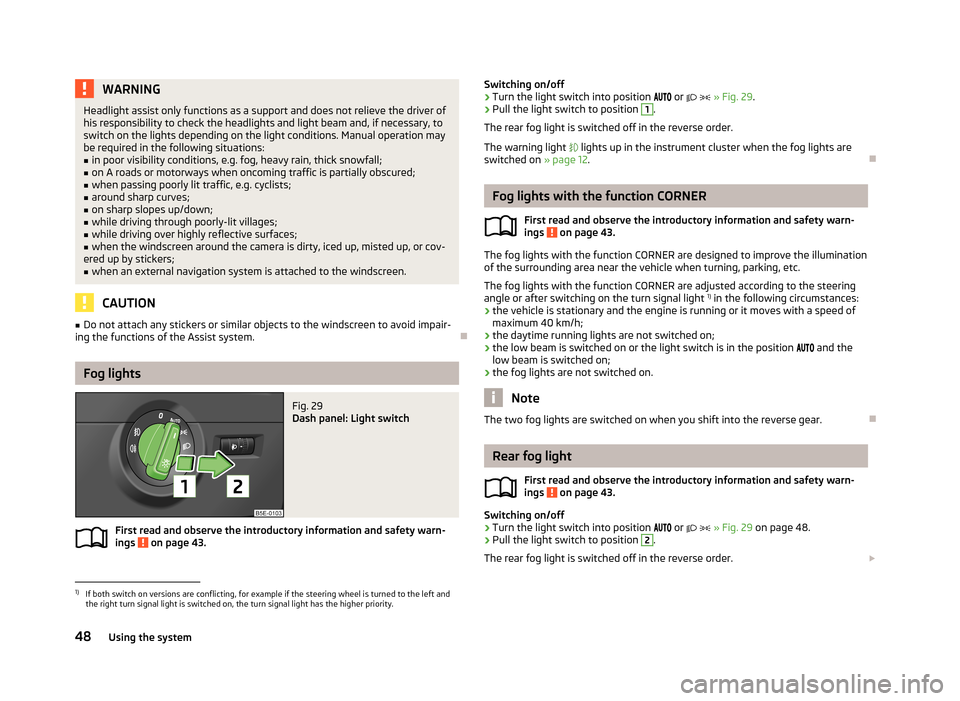
Fig. 29
Dash panel: Light switch
First read and observe the introductory information and safety warn- ings on page 43.
Switching on/off›Turn the light switch into position or » Fig. 29 .›
Pull the light switch to position
1
.
The rear fog light is switched off in the reverse order.
The warning light lights up in the instrument cluster when the fog lights are
switched on » page 12.
Fog lights with the function CORNER
First read and observe the introductory information and safety warn-
ings
on page 43.
The fog lights with the function CORNER are designed to improve the illumination
of the surrounding area near the vehicle when turning, parking, etc.
The fog lights with the function CORNER are adjusted according to the steeringangle or after switching on the turn signal light 1)
in the following circumstances:
› the vehicle is stationary and the engine is running or it moves with a speed of
maximum 40 km/h;
› the daytime running lights are not switched on;
› the low beam is switched on or the light switch is in the position
and the
low beam is switched on;
› the fog lights are not switched on.
Note
The two fog lights are switched on when you shift into the reverse gear.
Rear fog light
First read and observe the introductory information and safety warn-
ings
on page 43.
Switching on/off
›
Turn the light switch into position
or
» Fig. 29 on page 48.
›
Pull the light switch to position
2
.
The rear fog light is switched off in the reverse order.
1)
If both switch on versions are conflicting, for example if the steering wheel is turned to the left and
the right turn signal light is switched on, the turn signal light has the higher priority.
48Using the system
Page 51 of 222
If the vehicle is not fitted with fog lights, the rear fog light is switched on by pull-
ing out the light switch directly to the position 2. This switch only has one posi-
tion.
The warning light lights up in the instrument cluster when the rear fog light is
switched on » page 12.
When the rear fig light is switched on in towing mode, only the rear fog light of the trailer will light up. This is only the case when the trailer is coupled to a facto-
ry-fitted towing device/a towing device from ŠKODA Original accessories.
COMING HOME/LEAVING HOME function
First read and observe the introductory information and safety warn-ings
on page 43.
In poor visibility conditions, this function makes it possible to automatically
switch on the lights for a short time after leaving the vehicle or when approach-
ing the vehicle.
The intensity of the surrounding light for switching on the lights is controlled
with the light sensor in the interior mirror holder.
Switching on the COMING HOME function
›
Turn the light switch into position
» Fig. 27 on page 45.
›
Switch off the ignition.
The light switches on after opening the driver's door.
Switching off the COMING HOME function
›
Close all doors and the luggage compartment lid.
The light switches off after the pre-set time has passed.
If a door or the boot lid remains open, the light goes out after 60 seconds.
Switching on the LEAVING HOME function
›
Before leaving the vehicle, turn the light switch into position
» Fig. 27 on
page 45.
The light switches on after unlocking the vehicle with the remote control.
Switching off the LEAVING HOME function
The light switches off after the pre-set time has passed or before the pre-set
time has lapsed after the ignition is switched on or the vehicle is locked.
The COMING HOME/LEAVING HOME function can be configured in the Infotain-
ment » operating instructions for Infotainment , chapter Setting vehicle systems
(CAR button) .
Depending on the equipment fitted the COMING HOME/LEAVING HOME function switches on the following lights:
› Parking lights;
› Low beam;
› Entry lighting in the exterior mirrors;
› Licence plate light.
CAUTION
Do not affix any stickers or similar objects in front of the light sensor on the wind-
screen, so as not to impair or disable the COMING HOME/LEAVING HOME function.
Note
If the COMING HOME/LEAVING HOME function is switched on continuously, the
battery will be heavily discharged particularly over short distances.
Hazard warning light system
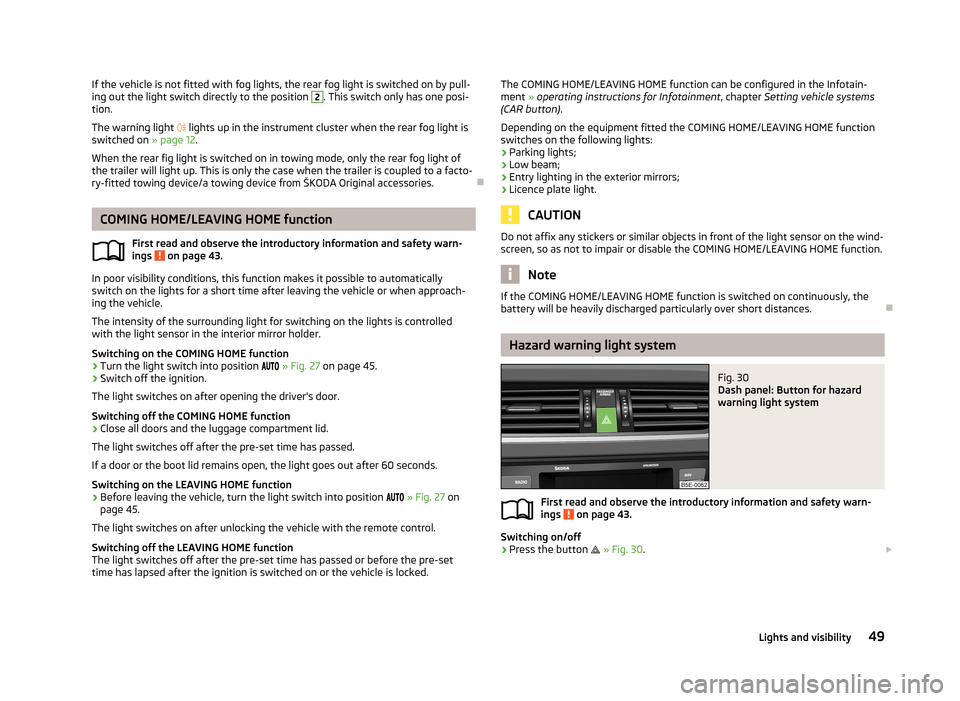
Fig. 30
Dash panel: Button for hazard
warning light system
First read and observe the introductory information and safety warn-
ings on page 43.
Switching on/off
›
Press the button
» Fig. 30 .
49Lights and visibility
Page 87 of 222
NoteThe warning light in the button lights after activation, even if not all of the
conditions for the function of the cooling system have been met » page 84, Intro-
ductory information . By lighting up of the warning light in the button, the opera-
tional readiness of the cooling system is signalled.
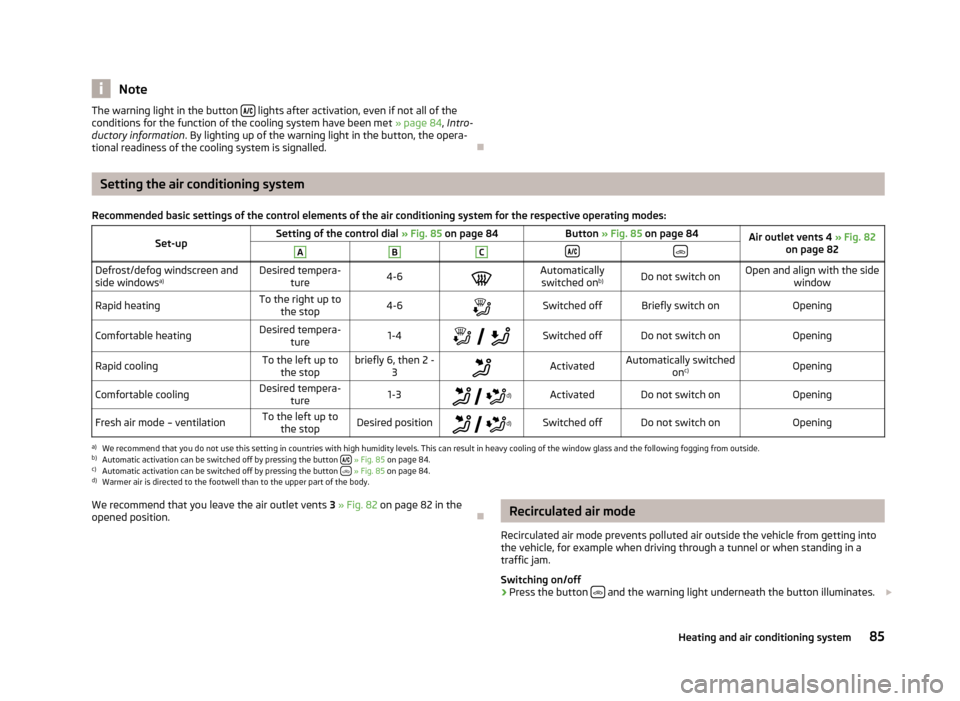
Setting the air conditioning system
Recommended basic settings of the control elements of the air conditioning system for the respective operating modes:Set-upSetting of the control dial » Fig. 85 on page 84Button » Fig. 85 on page 84Air outlet vents 4 » Fig. 82
on page 82ABCDefrost/defog windscreen and
side windows a)Desired tempera-
ture4-6Automatically
switched on b)Do not switch onOpen and align with the side
windowRapid heatingTo the right up tothe stop4-6Switched offBriefly switch onOpeningComfortable heatingDesired tempera-
ture1-4
Switched offDo not switch onOpeningRapid coolingTo the left up to
the stopbriefly 6, then 2 - 3ActivatedAutomatically switched
onc)OpeningComfortable coolingDesired tempera-
ture1-3
d)ActivatedDo not switch onOpeningFresh air mode – ventilationTo the left up to
the stopDesired position
d)Switched offDo not switch onOpeninga)
We recommend that you do not use this setting in countries with high humidity levels. This can result in heavy cooling of the window glass and the following fogging from outside.
b)
Automatic activation can be switched off by pressing the button
» Fig. 85 on page 84.
c)
Automatic activation can be switched off by pressing the button
» Fig. 85 on page 84.
d)
Warmer air is directed to the footwell than to the upper part of the body.
We recommend that you leave the air outlet vents 3 » Fig. 82 on page 82 in the
opened position.
Recirculated air mode
Recirculated air mode prevents polluted air outside the vehicle from getting into the vehicle, for example when driving through a tunnel or when standing in a
traffic jam.
Switching on/off›
Press the button and the warning light underneath the button illuminates.
85Heating and air conditioning system
Page 104 of 222
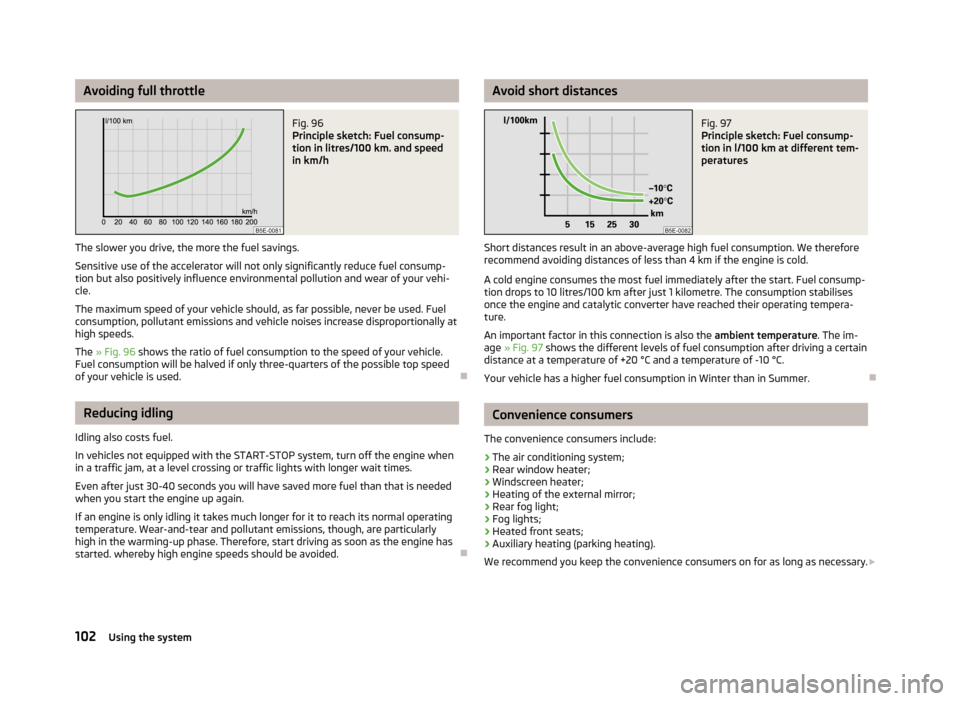
Avoiding full throttleFig. 96
Principle sketch: Fuel consump-
tion in litres/100 km. and speed
in km/h
The slower you drive, the more the fuel savings.
Sensitive use of the accelerator will not only significantly reduce fuel consump- tion but also positively influence environmental pollution and wear of your vehi-
cle.
The maximum speed of your vehicle should, as far possible, never be used. Fuel
consumption, pollutant emissions and vehicle noises increase disproportionally at
high speeds.
The » Fig. 96 shows the ratio of fuel consumption to the speed of your vehicle.
Fuel consumption will be halved if only three-quarters of the possible top speed
of your vehicle is used.
Reducing idling
Idling also costs fuel.
In vehicles not equipped with the START-STOP system, turn off the engine when
in a traffic jam, at a level crossing or traffic lights with longer wait times.
Even after just 30-40 seconds you will have saved more fuel than that is needed
when you start the engine up again.
If an engine is only idling it takes much longer for it to reach its normal operating
temperature. Wear-and-tear and pollutant emissions, though, are particularly
high in the warming-up phase. Therefore, start driving as soon as the engine has
started. whereby high engine speeds should be avoided.
Avoid short distancesFig. 97
Principle sketch: Fuel consump-
tion in l/100 km at different tem-
peratures
Short distances result in an above-average high fuel consumption. We therefore recommend avoiding distances of less than 4 km if the engine is cold.
A cold engine consumes the most fuel immediately after the start. Fuel consump- tion drops to 10 litres/100 km after just 1 kilometre. The consumption stabilises once the engine and catalytic converter have reached their operating tempera-
ture.
An important factor in this connection is also the ambient temperature. The im-
age » Fig. 97 shows the different levels of fuel consumption after driving a certain
distance at a temperature of +20 °C and a temperature of -10 °C.
Your vehicle has a higher fuel consumption in Winter than in Summer.
Convenience consumers
The convenience consumers include:
› The air conditioning system;
› Rear window heater;
› Windscreen heater;
› Heating of the external mirror;
› Rear fog light;
› Fog lights;
› Heated front seats;
› Auxiliary heating (parking heating).
We recommend you keep the convenience consumers on for as long as necessary.
102Using the system