ad blue SKODA OCTAVIA 2013 3.G / (5E) Amundsen Navigation System Manual
[x] Cancel search | Manufacturer: SKODA, Model Year: 2013, Model line: OCTAVIA, Model: SKODA OCTAVIA 2013 3.G / (5E)Pages: 83, PDF Size: 4.7 MB
Page 38 of 83

ŠKODA permits the operation of mobile phones and two-way radio systems with
a professionally installed external aerial and a maximum transmission power of
up to 10 watts.
Please ask at a specialist workshop about installing and operating mobile phones
and two-way radio systems that have a transmission power of more than 10 W.
Operating mobile phones or two-way radio systems may interfere with the func-
tionality of the electronic systems in your vehicle.
The reasons for this are as follows:
› no external aerial;
› external aerial incorrectly installed;
› transmission power greater than 10 watts.
Note
■
We recommend that the installation of mobile phones and two-way radio sys-
tems in a vehicle be carried out by a specialist garage.■
The phone features depend on the mobile network operators and on the phone
being used. Further information is available from the mobile network operator or
refer to your phone manual
■
In signal-free areas reception can be interrupted or the call disconnected.
■
Most modern electronic equipment is shielded from RF signals. In exceptional
cases, electronic equipment may not be shielded against the RF signals and tele-
phone service may be disrupted.
Main menu
Fig. 22
Phone: Main menu
First read and observe the introductory information and safety warn-
ings on page 35.
Explanation of graphic
Name of the mobile network provider
Click on name of the connected phone, press to open a list of paired phones Speed dial favourite telephone numbers » page 41
Direct entry of a phone number » page 42
Display the phonebook » page 43
Display of call list (if there are new missed calls, the symbol will appear here with information about the number of missed calls) » page 43
Menu Settings Phone » page 37
Call up the main menu
›
Press the button TELEPHONE.
If a mobile phone is connected to the device, the Telephone » Fig. 22 main menu
is displayed.
Symbols in the display
SymbolMeaningCharge status of the phone battery a)Signal strengtha)Roaming (before the name of the mobile network provider) a)Missed callCurrent calla)
This function is only supported by some mobile phones.
Problems with the Telephone function
First read and observe the introductory information and safety warn-
ings
on page 35.
If there are problems with the availability of the network or with the Bluetooth ®
function, the following messages appear on the device display screen.
ABC36Phone
Page 39 of 83
MessageDescriptionNetwork search...The mobile phone searches for availa-
ble GSM networks.No networkThe mobile phone is not connected to the GSM network.
Rejected by network.
The mobile phone network operator
has rejected the connection (e.g. not
enough mobile phone credit, SIM card
blocked, roaming not available).To use the Bluetooth function, please
switch the ignition on.Switch on the ignition.Please switch on Bluetooth.Switch on the Bluetooth ®
function.No Bluetooth devices paired.Connect the mobile phone with the de-
vice.
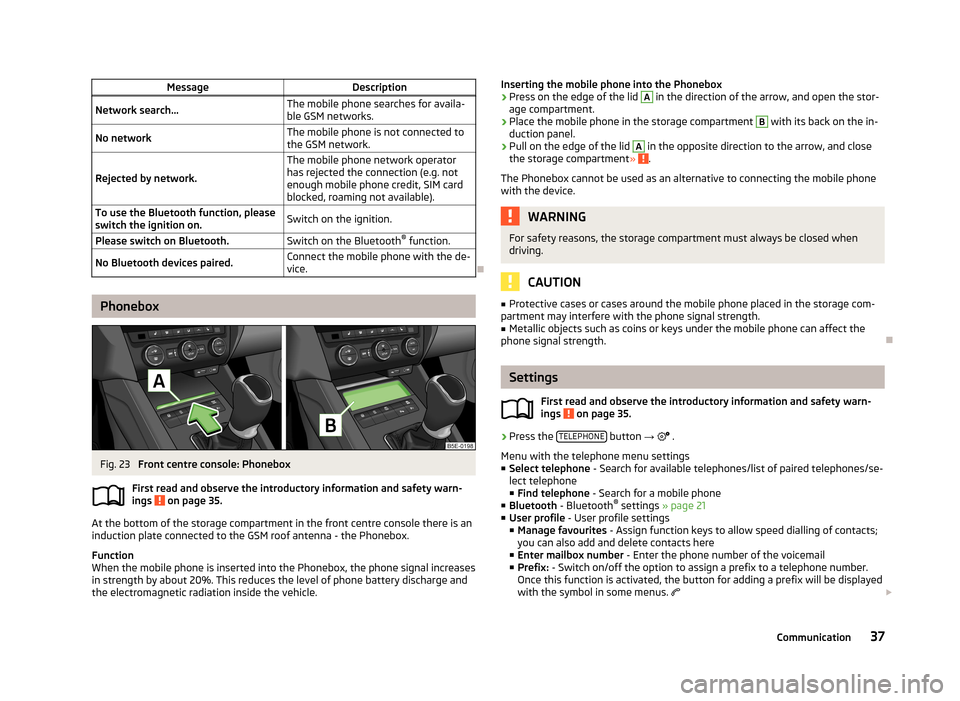
Phonebox
Fig. 23
Front centre console: Phonebox
First read and observe the introductory information and safety warn-
ings
on page 35.
At the bottom of the storage compartment in the front centre console there is an induction plate connected to the GSM roof antenna - the Phonebox.
Function
When the mobile phone is inserted into the Phonebox, the phone signal increases in strength by about 20%. This reduces the level of phone battery discharge and
the electromagnetic radiation inside the vehicle.
Inserting the mobile phone into the Phonebox›Press on the edge of the lid A in the direction of the arrow, and open the stor-
age compartment.›
Place the mobile phone in the storage compartment
B
with its back on the in-
duction panel.
›
Pull on the edge of the lid
A
in the opposite direction to the arrow, and close
the storage compartment » .
The Phonebox cannot be used as an alternative to connecting the mobile phone
with the device.
WARNINGFor safety reasons, the storage compartment must always be closed when
driving.
CAUTION
■ Protective cases or cases around the mobile phone placed in the storage com-
partment may interfere with the phone signal strength.■
Metallic objects such as coins or keys under the mobile phone can affect the
phone signal strength.
Settings
First read and observe the introductory information and safety warn-
ings
on page 35.
›
Press the TELEPHONE button
→
.
Menu with the telephone menu settings
■ Select telephone - Search for available telephones/list of paired telephones/se-
lect telephone ■ Find telephone - Search for a mobile phone
■ Bluetooth - Bluetooth ®
settings » page 21
■ User profile - User profile settings
■ Manage favourites - Assign function keys to allow speed dialling of contacts;
you can also add and delete contacts here
■ Enter mailbox number - Enter the phone number of the voicemail
■ Prefix: - Switch on/off the option to assign a prefix to a telephone number.
Once this function is activated, the button for adding a prefix will be displayed
with the symbol in some menus.
37Communication
Page 40 of 83
■Enter here - Enter the prefix of a phone number
■ Sort by: - Phonebook order
■ Name - Sort by contact name
■ Name - Sort by contact first name
■ Import contacts - Starts update of the phone book; the number of imported
contacts and number of contacts stored in the phone is displayed
■ Delete other user profiles - Delete up to three recently-connected user pro-
files (contacts, order of calls, call lists, speed dial buttons assigned to con- tacts)
■ Reminder: Remember your mobile - Switch on/off the reminder for a connected
telephone when the ignition is switched off and the ignition key is removed (or
the ignition is turned off and the driver's door opened in the case of vehicles
with the KESSY system)
■ Select ring tone - Select the ring tone if the connected mobile phone does not
support the in-band ringing function 1)
■ Show pictures for contacts - Switch on/off the display of the image assigned to
the contact in the mobile phone 2)
Connect to the mobile phone
Introduction
This chapter contains information on the following subjects:
Conditions for successful pairing
38
Connect device with your mobile phone
39
Pairing mobile phone with device
39
Connection with another paired mobile phone
40
Switch Bluetooth ®
profile on/off
40
Clear mobile phone from the list of paired devices
41
Disconnection
41
First and foremost, pay attention to the safety instructions » page 4 , Important
notes .
The device is displayed in the phone to be connected as SKODA_BT_. ... is replaced with the last four symbols of the VIN code of your vehicle.
You can change the name of the device » page 21
.WARNINGThe unit may require confirmation of certain features in the mobile phone
when pairing. The pairing process therefore does not take place while driving - danger of accident!
Note
■ The maximum number of phones paired is 20 When the maximum number is
reached and a new phone is paired, the least recently used paired phone will be automatically deleted.■
In some countries, the use of phones with the Bluetooth ®
function may be re-
stricted. Further information can be obtained from local authorities.
■
The range of the Bluetooth ®
connection to the hands-free system is restricted
to the vehicle interior. This depends on local conditions and on interference with other devices.
■
When pairing from the mobile phone, follow the instructions in the owner's
manual of the mobile phone.
Conditions for successful pairing
First read and observe the introductory information and safety warn-ings
on page 38.
To connect a mobile phone with the device, the two devices must be paired.
Prerequisites for successful pairing: The ignition is switched on.
The Bluetooth ®
function for the mobile phone » page 21 is switched on.
The visibility of the mobile phone is switched on » page 21.
The visibility of the mobile phone is switched on.
The mobile phone to which the connection is being made must have no ac-
tive connection to another mobile phone.
The pairing can be initiated from the device or from the mobile phone.
1)
The in-band ringing function makes it possible to use the ring tone of your phone as the ring tone.
2)
This function is only supported by some mobile phones.
38Phone
Page 41 of 83

Connect device with your mobile phoneFirst read and observe the introductory information and safety warn-
ings
on page 38.
A phone is paired with the device
After switching on the unit, the system automatically attempts to connect to the last connected mobile phone .
While the connection is being created, the message in the device screen may vary depending on the phone type ... Would you like to connect? And a menu will ap-
pear with the following function keys.
› Connect
- Pairing confirmation
› Cancel
- Cancel the pairing process
If the connection cannot be established the system will attempt to connect to other previously connected phones one by one.
If there is still no connection, start a phone search.
There is no phone paired with the device
After switching on the ignition, the message Please search for and connect a mo-
bile telephone. appears in the device screen. A menu is also displayed with the
following function keys.
›
Find telephone - Search for available phones with activated Bluetooth ®
Function and visibility
›
- Open the settings menu » page 37, Settings
Press Results function key after completion of the search. It will display a list of
discovered phones (the function key is also available during the search).
Select the phone you want from the list.
If the search fails, check that the conditions for successful pairing are
met » page 38 , Conditions for successful pairing and repeat the whole process.
Pairing confirmation
Depending on the phone's Bluetooth ®
version, pairing is confirmed in one of the
following ways.
› In the device and the phone within 30 seconds, confirm the 6-digit PIN code on
the device screen and the phone display 1)
.
› If necessary select in the phone the option of automatically connecting the
phone to the device.
or
› confirm the connection request in the telephone.
› Enter the 4-digit PIN code shown in the unit display into the mobile phone with-
in 30 seconds
› If necessary select in the phone the option of automatically connecting the
phone to the device.
Connection
After successful connection, the device will display the message ... user is con-
nected., And the main Phone menu » Fig. 22 on page 36is then displayed.
Note
If the mobile phone supports the Bluetooth ®
profile A2DP or AVRCP, your mobile
phone might prompt you to pair the phone as a Bluetooth ®
player.
Pairing mobile phone with device
First read and observe the introductory information and safety warn-
ings
on page 38.
When pairing from the phone, follow the instructions in the owner's manual of the phone.
›
Have the phone search for available Bluetooth ®
devices.
›
Select the device in the list of Bluetooth ®
devices 2)
.
While connecting, the message ... Would you like to connect?, and the following
function keys are displayed on the device screen.
Cancel - Cancel the pairing process
Connect - Confirm the coupling process
1)
For devices with Bluetooth ®
v2.1 and later, the phone's quick coupling procedure (SSP Secure Simple
Pairing) is used for pairing. This coupling method requires no PIN entered by the user.
2)
The name of the device will be found in the Bluetooth ®
settings » page 21 .
39Communication
Page 42 of 83

Depending on the phone's Bluetooth ®
version, pairing is confirmed in one of the
following ways.›
In the device and the phone within 30 seconds, confirm the 6-digit PIN code on
the device screen and the phone display 1)
.
›
If necessary select in the phone the option of automatically connecting the
phone to the device.
or
›
Enter the 4- 16-digit PIN code into the device
›
Enter the PIN code shown on the unit display into the mobile phone within 30 seconds
›
If necessary. acknowledge the confirmation request in the phone.
If the device is not connected to another phone, after successful connection the message ... user is connected., appears on the device screen and then the main
Phone menu » Fig. 22 on page 36 is displayed.
If the device is connected to another phone the new phone is paired but the origi-
nal phone remains connected.
Connection with another paired mobile phone
First read and observe the introductory information and safety warn-
ings
on page 38.
If you want to connect the device to another paired mobile phone, the existing connection does not have to be terminated. The connection to the existing mo- bile phone is automatically terminated by connecting to another mobile phone.
›
In the Phone main menu, press the function key
B
» Fig. 22 on page 36.
A list of previously paired phones is displayed.
›
Select the paired mobile phone to be connected with the device.
The message ... Replace this connection with ...?, is displayed in the device
screen along with the following function keys.
› Cancel
- Quit the menu for telephone exchange
› Replace
- Connection to the selected phone
After successful connection, the device will display the message ... user is con-
nected., and then the main menu » Fig. 22 on page 36 is displayed.
If the desired phone is not found in the list of previously paired phones, pair the phone with the device » page 39.
Switch Bluetooth ®
profile on/off
First read and observe the introductory information and safety warn-
ings
on page 38.
›
Press → Bluetooth → Paired devices .
A list of paired devices is displayed.
Pressing the function key on the connected Bluetooth ®
device opens a menu
with possibly supported connection profiles on the selected device.
If you press the function key with the name and symbol of the connection profile
depending on the context, the message ... Do you really want to disconnect the
profile? appears in the device screen and a menu of function keys.
›
Disconnect - press the function key to switch off the selected profile.
or
›
Replace - If another phone is already connected to the device it is replaced by a
new profile by pressing the function key of the existing profile.
In the device screen the message ... Connecting to ... is displayed and the selec-
ted Bluetooth ®
profile is turned on.
In each menu, the profile change is cancelled by pressing the Cancel function key.
Possible profile symbols:
SymbolMeaningDevices that support the functionality of the hands-free sys-
tem (Bluetooth ®
profile HFP) a)Devices that are connected to the device via Bluetooth ®
pro-
file HFP a)
1)
For devices with Bluetooth ®
v2.1 and later the rapid device pairing procedure (SSP Secure Simple
Pairing) is used for pairing. This connection method requires no PIN entered by the user.
40Phone
Page 43 of 83
SymbolMeaningBluetooth®
players (Bluetooth ®
profiles A2DP and AVRCP) b)Bluetooth®
player connected to the unit via Bluetooth ®
pro-
files A2DP and AVRCP b)a)
HFP is a Bluetooth
®
profile which supports the functionality of the hands-free system.
b)
A2DP and AVRCP are Bluetooth ®
profiles which support multimedia functions.
If a Bluetooth ®
device is already connected to the device via one of the profiles in
that the profile has been switched on on another device, the profile of the active
device ends and switches to the new selected device.
Only the newly selected profile is switched to. The other profiles remain connec-
ted to the original device.
Several phones (or Bluetooth ®
devices) can be coupled to the device but only one
can be actively connected via the HFP profile and one via the A2DP or AVRCPpro-
file .
Clear mobile phone from the list of paired devices
First read and observe the introductory information and safety warn-
ings
on page 38.
›
The function key
→ Bluetooth → Paired devices .
A list of paired devices and the following function keys is displayed.
› Delete all
- Delete all the phones in the list of paired devices
›
- Delete the desired phone
After selecting one of the function keys, the following function keys are dis- played.
› Cancel
- Cancels the delete process
› Delete
- Confirmation of the delete process
The device connected to the phone does not appear in the list of paired devices. In order to enable a delete operation, the connection between the phone and the
device must first be cancelled » page 41, Disconnection .
Disconnection
First read and observe the introductory information and safety warn-
ings
on page 38.
The connection of a mobile phone to the device can be disconnected in one of the
following ways.
› By removing the ignition key (or switching off the ignition and opening the driv-
er's door in vehicles with the KESSY system).
› By disconnecting the device or switching off the Bluetooth ®
function on the
mobile phone.
› By switching off the Bluetooth ®
function in the device » page 21, Bluetooth ®
settings .
› By removing the phone from the list of paired devices
» page 41, Clear mobile
phone from the list of paired devices .
› By switching off the Bluetooth ®
HFP profile » page 40, Switch Bluetooth ®
pro-
file on/off .
Telephone functions
Introduction
This chapter contains information on the following subjects:
Speed dialling a phone number
41
Direct entry of a phone number
42
Phone book
43
Call-lists
43
Telephone conversation
44
Conference
44
First and foremost, pay attention to the safety instructions » page 4 .
Speed dialling a phone number
First read and observe the introductory information given on page 41.
You can use the speed dial function keys
C
» Fig. 22 on page 36 to dial previously
assigned telephone numbers instantly.
41Communication
Page 58 of 83
The crosshairs move to the coordinates entered, which allows for checking of thedestination entered.
Crosshairs
The crosshairs show the position of the address which was previously entered.
The desired destination can be set by dragging your finger over the map to the
centre of the crosshairs.
The contact point is moved into the crosshairs through the finger movement and at the same time the degrees of latitude and longitude are adjusted to the point
entered.
The symbol displays the current map scale. This can be changed while the
entry is being made » page 49.
The bottom of the screen displays the address or the longitude and latitude of
the selected item.
Confirm destination
Confirm the destination by touching OK. Then the following items are displayed:
■ Store - Store the destination in the destination memory » page 9
■ Edit - Return to the main menu with the option to input a destination » page 54
■ Option. - Display a menu for setting the route parameters » page 47
■ Start - Route calculation starts with subsequent selection of route type and
route guidance or with guidance according to the preferred route type
Reduce/enlarge map
Press the function key with symbol
to switch map to full screen display.
Press the function key with symbol
to display the map on a split screen with the
menu for the entry using the GPS coordinates.
Entry of saved destinations
Introduction
This chapter contains information on the following subjects:
My destinations
56
Home address
57
Own destination (vCard)
57First and foremost, pay attention to the safety instructions » page 4 , Important
notes .
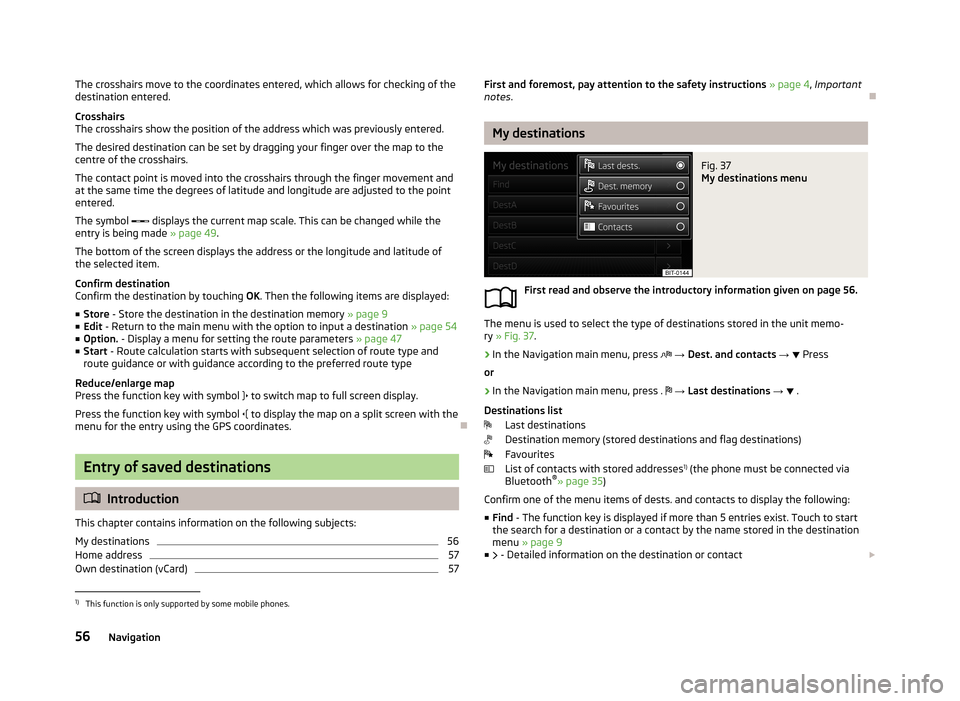
My destinations
Fig. 37
My destinations menu
First read and observe the introductory information given on page 56.
The menu is used to select the type of destinations stored in the unit memo-
ry » Fig. 37 .
›
In the Navigation main menu, press
→ Dest. and contacts →
Press
or
›
In the Navigation main menu, press .
→ Last destinations →
.
Destinations list Last destinations
Destination memory (stored destinations and flag destinations)
Favourites
List of contacts with stored addresses 1)
(the phone must be connected via
Bluetooth ®
» page 35 )
Confirm one of the menu items of dests. and contacts to display the following: ■ Find - The function key is displayed if more than 5 entries exist. Touch to start
the search for a destination or a contact by the name stored in the destination
menu » page 9
■ - Detailed information on the destination or contact
1)
This function is only supported by some mobile phones.
56Navigation
Page 68 of 83
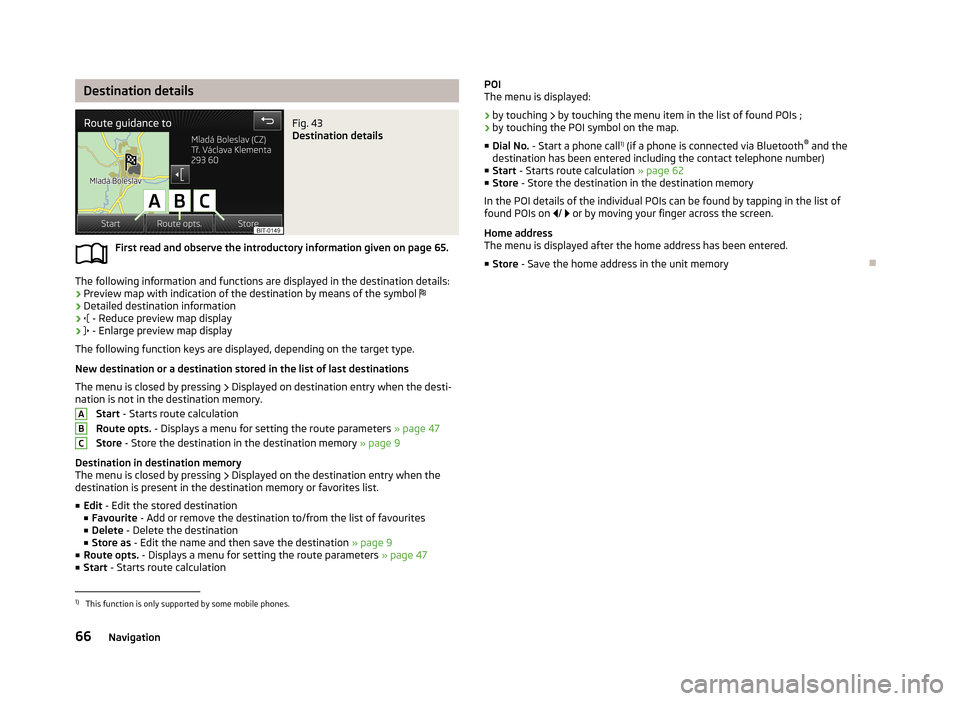
Destination detailsFig. 43
Destination details
First read and observe the introductory information given on page 65.
The following information and functions are displayed in the destination details:› Preview map with indication of the destination by means of the symbol
› Detailed destination information
›
- Reduce preview map display
›
- Enlarge preview map display
The following function keys are displayed, depending on the target type.
New destination or a destination stored in the list of last destinations The menu is closed by pressing
Displayed on destination entry when the desti-
nation is not in the destination memory.
Start - Starts route calculation
Route opts. - Displays a menu for setting the route parameters » page 47
Store - Store the destination in the destination memory » page 9
Destination in destination memory
The menu is closed by pressing
Displayed on the destination entry when the
destination is present in the destination memory or favorites list.
■ Edit - Edit the stored destination
■ Favourite - Add or remove the destination to/from the list of favourites
■ Delete - Delete the destination
■ Store as - Edit the name and then save the destination » page 9
■ Route opts. - Displays a menu for setting the route parameters » page 47
■ Start - Starts route calculation
ABCPOI
The menu is displayed:
› by touching
by touching the menu item in the list of found POIs ;
› by touching the POI symbol on the map.
■ Dial No. - Start a phone call 1)
(if a phone is connected via Bluetooth ®
and the
destination has been entered including the contact telephone number)
■ Start - Starts route calculation » page 62
■ Store - Store the destination in the destination memory
In the POI details of the individual POIs can be found by tapping in the list of
found POIs on / or by moving your finger across the screen.
Home address
The menu is displayed after the home address has been entered.
■ Store - Save the home address in the unit memory1)
This function is only supported by some mobile phones.
66Navigation
Page 71 of 83
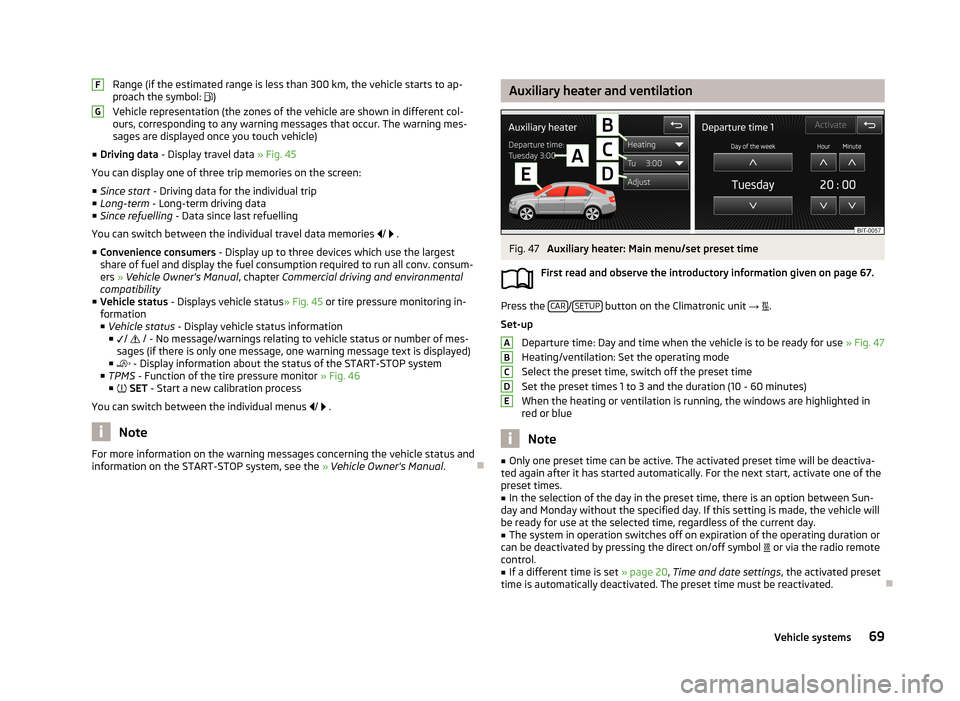
Range (if the estimated range is less than 300 km, the vehicle starts to ap-
proach the symbol: )
Vehicle representation (the zones of the vehicle are shown in different col- ours, corresponding to any warning messages that occur. The warning mes-
sages are displayed once you touch vehicle)
■ Driving data - Display travel data » Fig. 45
You can display one of three trip memories on the screen:
■ Since start - Driving data for the individual trip
■ Long-term - Long-term driving data
■ Since refuelling - Data since last refuelling
You can switch between the individual travel data memories
/
.
■ Convenience consumers - Display up to three devices which use the largest
share of fuel and display the fuel consumption required to run all conv. consum-
ers » Vehicle Owner's Manual , chapter Commercial driving and environmental
compatibility
■ Vehicle status - Displays vehicle status » Fig. 45 or tire pressure monitoring in-
formation
■ Vehicle status - Display vehicle status information
■ /
/ - No message/warnings relating to vehicle status or number of mes-
sages (if there is only one message, one warning message text is displayed)
■ - Display information about the status of the START-STOP system
■ TPMS - Function of the tire pressure monitor » Fig. 46
■ SET - Start a new calibration process
You can switch between the individual menus
/
.
Note
For more information on the warning messages concerning the vehicle status and
information on the START-STOP system, see the » Vehicle Owner's Manual .FGAuxiliary heater and ventilationFig. 47
Auxiliary heater: Main menu/set preset time
First read and observe the introductory information given on page 67.
Press the CAR/SETUP button on the Climatronic unit
→
.
Set-up Departure time: Day and time when the vehicle is to be ready for use » Fig. 47
Heating/ventilation: Set the operating mode
Select the preset time, switch off the preset timeSet the preset times 1 to 3 and the duration (10 - 60 minutes)
When the heating or ventilation is running, the windows are highlighted in
red or blue
Note
■ Only one preset time can be active. The activated preset time will be deactiva-
ted again after it has started automatically. For the next start, activate one of the preset times.■
In the selection of the day in the preset time, there is an option between Sun-
day and Monday without the specified day. If this setting is made, the vehicle will
be ready for use at the selected time, regardless of the current day.
■
The system in operation switches off on expiration of the operating duration or
can be deactivated by pressing the direct on/off symbol or via the radio remote
control.
■
If a different time is set » page 20, Time and date settings , the activated preset
time is automatically deactivated. The preset time must be reactivated.
ABCDE69Vehicle systems
Page 75 of 83
■Distance - Switch on/off the display of distance travelled in the display of the
instrument cluster
■ Average speed - Switch on/off the display of average speed in the display of
the instrument cluster
■ Digital speed display - Switch on/off the display of current speed in the display
of the instrument cluster
■ Speed warning - Switch on/off the display of speed warning in the display of
the instrument cluster
■ Oil temperature - Switch on/off the display of oil temperature in the display of
the instrument cluster
■ Coolant temperature - Switch on/off the display of coolant temperature in the
display of the instrument cluster
■ Reset Since start driving data - Reset the trip memory in the device screen and
in the display of the instrument cluster
■ Reset Long-term driving data - Reset the long-term memory in the device
screen and in the display of the instrument cluster
Service
First read and observe the introductory information given on page 67.
›
Press the CAR button
→
→ Service .
■ Vehicle no.: - Display the vehicle identification number
■ Inspection: --- / --- - Number of km/days remaining until the next service event
■ Oil change service: --- / --- - Number of km/days remaining until the next oil
change
Restore factory settings
First read and observe the introductory information given on page 67.
›
Press the CAR button
→
→ Factory settings .
■ All settings - All menu items
■ Driver assistance - Menu Driver assistance
■ Parking and manoeuvring - Menu Parking and manoeuvring
■ Light - Menu Light
■ Mirrors and wipers - Menu Mirrors and wipers
■
Opening and closing - Menu Opening and closing
■ Multifunction display - Menu Multifunction display
If one of the above menu items is selected, the system will ask you whether you
really want to reset the settings.
■ Cancel - Return to higher-level menu
■ Reset - Reset the settings
Climatronic settings
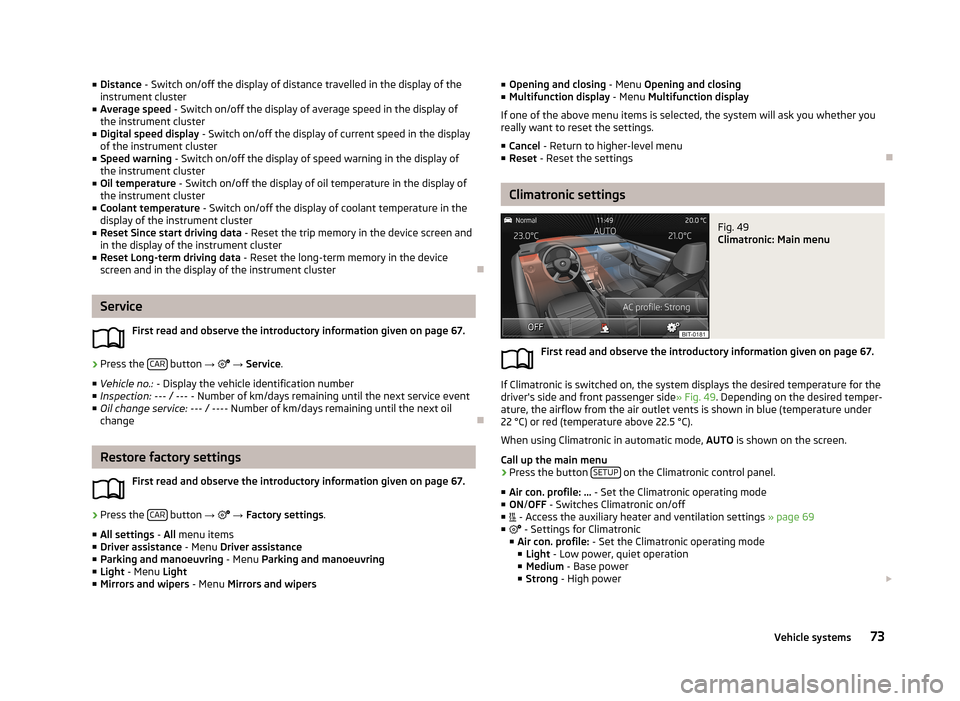
Fig. 49
Climatronic: Main menu
First read and observe the introductory information given on page 67.
If Climatronic is switched on, the system displays the desired temperature for the
driver's side and front passenger side » Fig. 49. Depending on the desired temper-
ature, the airflow from the air outlet vents is shown in blue (temperature under
22 °C) or red (temperature above 22.5 °C).
When using Climatronic in automatic mode, AUTO is shown on the screen.
Call up the main menu
›
Press the button SETUP on the Climatronic control panel.
■ Air con. profile: ... - Set the Climatronic operating mode
■ ON /OFF - Switches Climatronic on/off
■ - Access the auxiliary heater and ventilation settings » page 69
■ - Settings for Climatronic
■ Air con. profile: - Set the Climatronic operating mode
■ Light - Low power, quiet operation
■ Medium - Base power
■ Strong - High power
73Vehicle systems