audio SKODA OCTAVIA 2013 3.G / (5E) Columbus Navigation System Manual
[x] Cancel search | Manufacturer: SKODA, Model Year: 2013, Model line: OCTAVIA, Model: SKODA OCTAVIA 2013 3.G / (5E)Pages: 90, PDF Size: 5.21 MB
Page 4 of 90
Table of Contents
Abbreviations
Familiarization with the unit
Introductory information
4
Important notes
4
Unit overview
5
Unit operation
8
Concerning the device screen operation
8
Operation through the MAXI DOT display
10
Voice control
15
Unit settings
19
Setup menu
19
Audio/Video/Images
Radio
24
Operation
24
Radio settings
27
Media
29
Operation
29
signal sources
32
DVD video
37
Images
39
Phone
Communication
41
Telephones and two-way radio systems
41
Connect to the device to the mobile telephone
44
Telephone functions
47Navigation
Description of the navigation system51
Preface to navigation
51
Settings
52
Operating the map
54
Extra window
56
Navigation
60
Enter new destination
60
Entry of saved destinations
62
POI
63
POI categories
66
Route guidance
67
traffic reports
70
My tour
71
Destination management
72
Vehicle
Vehicle systems
74
Vehicle settings
74
Index
2Table of Contents
Page 5 of 90
AbbreviationsAbbreviationDefinitionA2DPAdvanced Audio Distribution Profile - a software profile for da-ta transfer via Bluetooth ®,
designed for a one-way transfer of
audio dataACCAdaptive cruise controlAFAlternative frequencies - alternative frequencies of the cur-
rent radio stationAMAmplitude modulation - denomination of the radio frequency
rangeTCSTraction Control of the drive wheelsAVRCPA software profile for data transmission by means of Blue- tooth ®,
which supports multimedia functionsAVAudio / visual source signal - typical for DVD player or TV tunerBTBluetooth ®
- wireless communication for reception and trans-
mission of voice and data informationDABDigital Audio Broadcasting - digital radio receptionDRMDigital Rights Management - technical methods to monitor or
restrict the use of digital media contentESCElectronic Stability ControlEXIFExchangeable image file format - additional information data to an image fileFMFrequency modulation - Identification of the radio frequency rangeHFPHands-free profile - a software profile for data transfer via
Bluetooth ®,
which allows for communication between a mo-
bile phone and the in-vehicle hands-free equipmentGPSGlobal Positioning System - satellite system for determining
positionGSMGroupe Spécial Mobile - Global System for Mobile communica- tion, the most popular standard for mobile phonesID3 tagan additional feature of a music file, which allows for the dis-
play of artist, title, album name, etc.KESSYkeyless unlocking, starting and lockingAbbreviationDefinitionNTSCNational Television System Committee - Audio-visual encoding
standard in North and Central America and some countries in Southeast AsiaPALphase alternating line - Audio-visual encoding standard inmost European countriesPIProgram identification - Station identification by means of aRDS codeRDSRadio Data System - system for the transmission of additionalinformation for FM radio receptionTMCTraffic Message Channel - service for transmitting traffic infor- mation to the driverTPTraffic Program identification - Program identifier for the
transmission of traffic informationvCard. File format - vcf for contact data exchange, especially elec-
tronic business cards, can include first and last names, ad-
dresses, phone numbers, URLs, logos, photos and audio clipsVINVehicle identification numberWMAWindows Media Audio - compressed audio format
3Abbreviations
Page 8 of 90
Touch screenFirst read and observe the introductory information given on page 5.
The unit is equipped with a so-called touch screen
11
» Fig. 1 on page 5which can
only be operated by the touch of a finger.
CAUTION
■ The screen can be operated by a slight touch of a finger. Do not apply pressure
to the screen - risk of damage!■
Do not use any objects to operate the screen - risk of damage!
■
Do not use solvents such as benzene or turpentine for cleaning, since they may
damage the screen surface.
Note
■ Use a soft cloth and, if necessary, methylated spirits, to remove fingerprints
from the screen. When doing so, ensure that you do not cause damage to other parts of the interior.■
It is not possible to operate the screen with your fingernails or while wearing
gloves.
■
Do not affix anything to the area of the unit below the screen. This could affect
the functioning of the sensors for the zoom effect.
■
To protect the screen, you can use a suitable screen protector for touchpads
that does not affect its functionality.
■
The brightness of the screen is adjusted automatically depending on the bright-
ness of the interior lighting. The automatic setting can be adjusted manual-
ly » page 20 .
Switching the unit on/off
First read and observe the introductory information given on page 5.
›
Press the knob to switch the device on or off.
When the device is switched on, the audio source and operating mode that were active before switching off the device will be restored.
If telephone mode was active before you switched off the unit and the ignition
and Bluetooth ®
function is not switched on, the screen displays the mes-
sage » page 42 . Switch on the ignition or the Bluetooth ®
function » page 22 .
If the vehicle key is pulled out of the ignition lock while the unit is switched on, the unit will switch off automatically. After switching on the ignition, the unit isturned on automatically.
If the device was switched off using the
knob, then the device will not switch
on automatically after switching on the ignition.
The unit will switch off automatically after the engine is switched off and the
door is opened if your vehicle is fitted with the KESSY system. If you open the
driver's door before switching off the engine, the device will also switch off.
When the ignition is switched off, the device switches off automatically after ap-
prox. half an hour (discharge protection of the vehicle battery).
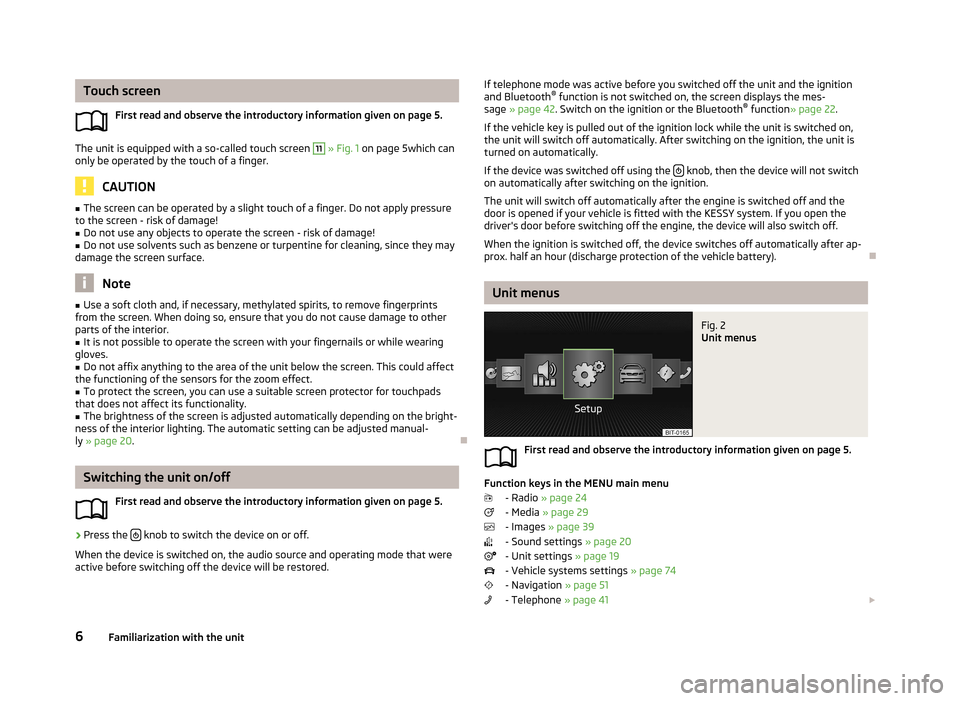
Unit menus
Fig. 2
Unit menus
First read and observe the introductory information given on page 5.
Function keys in the MENU main menu
- Radio » page 24
- Media » page 29
- Images » page 39
- Sound settings » page 20
- Unit settings » page 19
- Vehicle systems settings » page 74
- Navigation » page 51
- Telephone » page 41
6Familiarization with the unit
Page 12 of 90
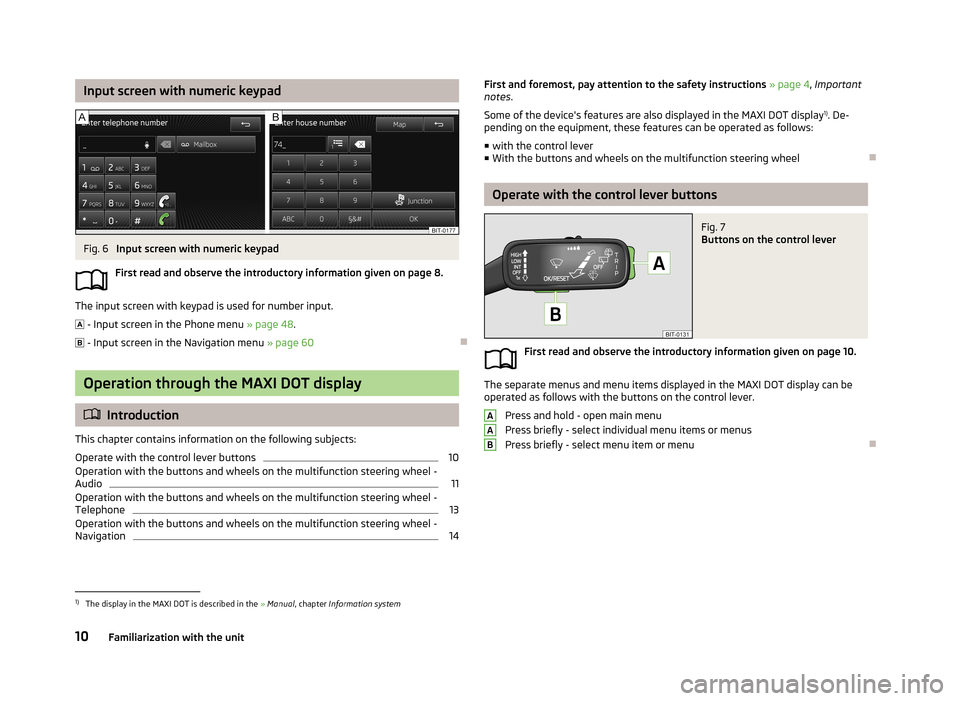
Input screen with numeric keypadFig. 6
Input screen with numeric keypad
First read and observe the introductory information given on page 8.
The input screen with keypad is used for number input.
- Input screen in the Phone menu » page 48.
- Input screen in the Navigation menu » page 60
Operation through the MAXI DOT display
Introduction
This chapter contains information on the following subjects:
Operate with the control lever buttons
10
Operation with the buttons and wheels on the multifunction steering wheel - Audio
11
Operation with the buttons and wheels on the multifunction steering wheel - Telephone
13
Operation with the buttons and wheels on the multifunction steering wheel -
Navigation
14First and foremost, pay attention to the safety instructions » page 4 , Important
notes .
Some of the device's features are also displayed in the MAXI DOT display 1)
. De-
pending on the equipment, these features can be operated as follows:
■ with the control lever
■ With the buttons and wheels on the multifunction steering wheel
Operate with the control lever buttons
Fig. 7
Buttons on the control lever
First read and observe the introductory information given on page 10.
The separate menus and menu items displayed in the MAXI DOT display can be
operated as follows with the buttons on the control lever.
Press and hold - open main menu
Press briefly - select individual menu items or menus
Press briefly - select menu item or menu
AAB1)
The display in the MAXI DOT is described in the » Manual , chapter Information system
10Familiarization with the unit
Page 13 of 90
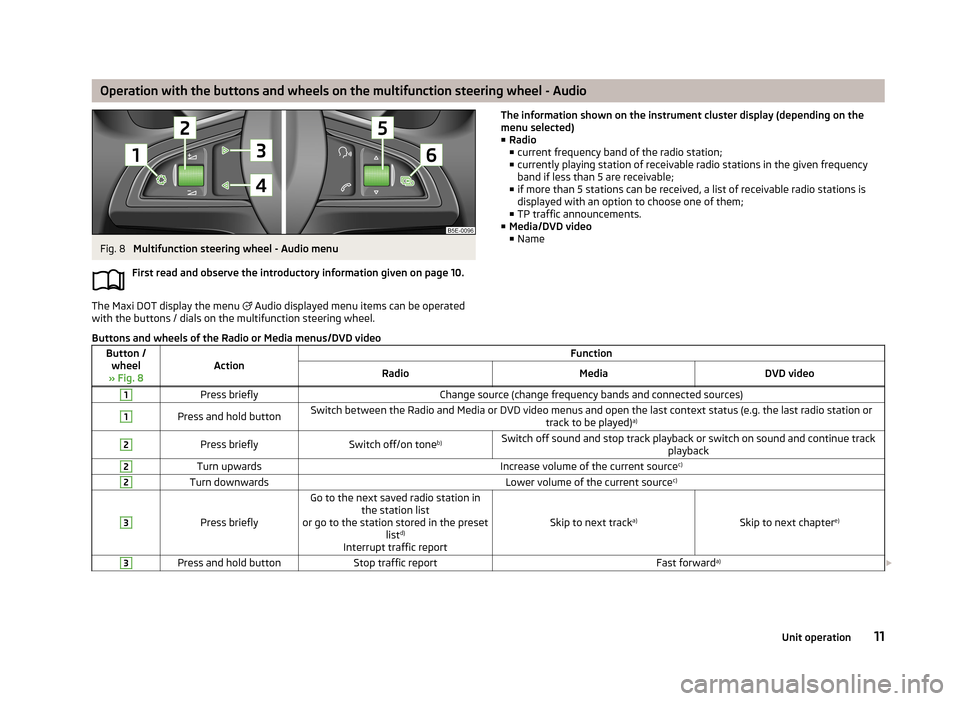
Operation with the buttons and wheels on the multifunction steering wheel - AudioFig. 8
Multifunction steering wheel - Audio menu
First read and observe the introductory information given on page 10.
The Maxi DOT display the menu
Audio displayed menu items can be operated
with the buttons / dials on the multifunction steering wheel.
The information shown on the instrument cluster display (depending on the
menu selected)
■ Radio
■ current frequency band of the radio station;
■ currently playing station of receivable radio stations in the given frequency
band if less than 5 are receivable;
■ if more than 5 stations can be received, a list of receivable radio stations is
displayed with an option to choose one of them;
■ TP traffic announcements.
■ Media/DVD video
■ NameButtons and wheels of the Radio or Media menus/DVD videoButton /
wheel
» Fig. 8ActionFunctionRadioMediaDVD video1Press brieflyChange source (change frequency bands and connected sources)1Press and hold buttonSwitch between the Radio and Media or DVD video menus and open the last context status (e.g. the last radio station or track to be played)a)2Press brieflySwitch off/on tone b)Switch off sound and stop track playback or switch on sound and continue track
playback2Turn upwardsIncrease volume of the current source c)2Turn downwardsLower volume of the current sourcec)3
Press briefly
Go to the next saved radio station in
the station list
or go to the station stored in the preset listd)
Interrupt traffic report
Skip to next track a)Skip to next chapter e)
3Press and hold buttonStop traffic reportFast forwarda)
11Unit operation
Page 14 of 90
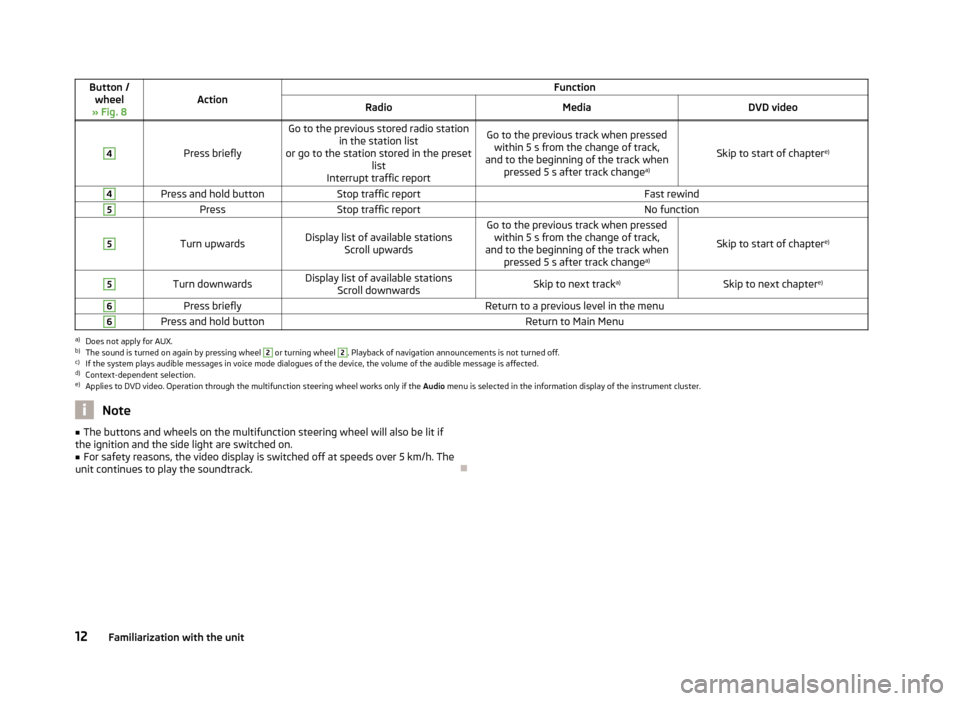
Button /wheel
» Fig. 8ActionFunctionRadioMediaDVD video4
Press briefly
Go to the previous stored radio station in the station list
or go to the station stored in the preset list
Interrupt traffic reportGo to the previous track when pressed within 5 s from the change of track,
and to the beginning of the track when pressed 5 s after track change a)
Skip to start of chaptere)
4Press and hold buttonStop traffic reportFast rewind5PressStop traffic reportNo function5
Turn upwardsDisplay list of available stations
Scroll upwardsGo to the previous track when pressedwithin 5 s from the change of track,
and to the beginning of the track when pressed 5 s after track change a)
Skip to start of chaptere)
5Turn downwardsDisplay list of available stations
Scroll downwardsSkip to next track a)Skip to next chapter e)6Press brieflyReturn to a previous level in the menu6Press and hold buttonReturn to Main Menua)
Does not apply for AUX.
b)
The sound is turned on again by pressing wheel
2
or turning wheel
2
. Playback of navigation announcements is not turned off.
c)
If the system plays audible messages in voice mode dialogues of the device, the volume of the audible message is affected.
d)
Context-dependent selection.
e)
Applies to DVD video. Operation through the multifunction steering wheel works only if the
Audio menu is selected in the information display of the instrument cluster.
Note■
The buttons and wheels on the multifunction steering wheel will also be lit if
the ignition and the side light are switched on.■
For safety reasons, the video display is switched off at speeds over 5 km/h. The
unit continues to play the soundtrack.
12Familiarization with the unit
Page 22 of 90
■Gracenote database: ... - Multimedia database version
■ Media codec: ... - Media codec version
■ Update software - manual software upgrade
■ Copyright - Information on licences and copyrights are only available in English
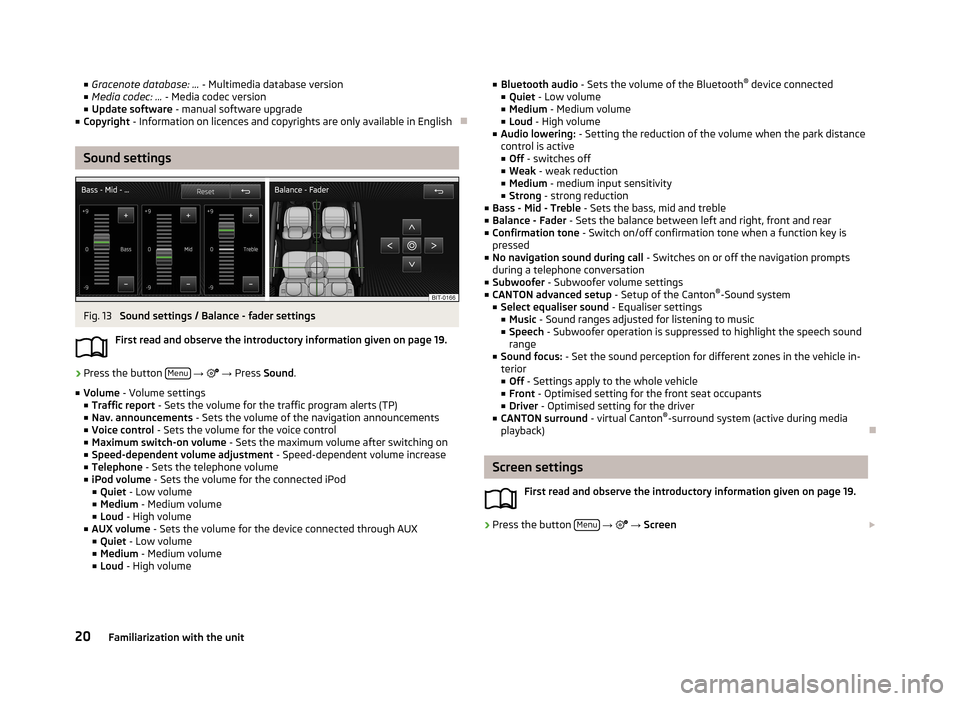
Sound settings
Fig. 13
Sound settings / Balance - fader settings
First read and observe the introductory information given on page 19.
›
Press the button Menu
→
→ Press Sound .
■ Volume - Volume settings
■ Traffic report - Sets the volume for the traffic program alerts (TP)
■ Nav. announcements - Sets the volume of the navigation announcements
■ Voice control - Sets the volume for the voice control
■ Maximum switch-on volume - Sets the maximum volume after switching on
■ Speed-dependent volume adjustment - Speed-dependent volume increase
■ Telephone - Sets the telephone volume
■ iPod volume - Sets the volume for the connected iPod
■ Quiet - Low volume
■ Medium - Medium volume
■ Loud - High volume
■ AUX volume - Sets the volume for the device connected through AUX
■ Quiet - Low volume
■ Medium - Medium volume
■ Loud - High volume
■
Bluetooth audio - Sets the volume of the Bluetooth ®
device connected
■ Quiet - Low volume
■ Medium - Medium volume
■ Loud - High volume
■ Audio lowering: - Setting the reduction of the volume when the park distance
control is active ■ Off - switches off
■ Weak - weak reduction
■ Medium - medium input sensitivity
■ Strong - strong reduction
■ Bass - Mid - Treble - Sets the bass, mid and treble
■ Balance - Fader - Sets the balance between left and right, front and rear
■ Confirmation tone - Switch on/off confirmation tone when a function key is
pressed
■ No navigation sound during call - Switches on or off the navigation prompts
during a telephone conversation
■ Subwoofer - Subwoofer volume settings
■ CANTON advanced setup - Setup of the Canton®
-Sound system
■ Select equaliser sound - Equaliser settings
■ Music - Sound ranges adjusted for listening to music
■ Speech - Subwoofer operation is suppressed to highlight the speech sound
range
■ Sound focus: - Set the sound perception for different zones in the vehicle in-
terior
■ Off - Settings apply to the whole vehicle
■ Front - Optimised setting for the front seat occupants
■ Driver - Optimised setting for the driver
■ CANTON surround - virtual Canton®
-surround system (active during media
playback)
Screen settings
First read and observe the introductory information given on page 19.
›
Press the button Menu
→
→ Screen
20Familiarization with the unit
Page 24 of 90
■Temperature: - Temperature units
■ ° - Degrees Celsius
■ ° - Degrees Fahrenheit
■ Volume: - Volume units
■ l - Litres
■ gal (US) - Gallons (US)
■ gal (UK) - Gallons (UK)
■ Consumption: - Consumption units
■ l/100km - Litres per 100 kilometres
■ km/l - Kilometres per litre
■ mpg (US) - Miles per gallon (US)
■ mpg (UK) - Miles per gallon (UK)
■ Gas consumption: - Gas consumption units
■ kg/100km - Kilograms per 100 km
■ km/kg - Kilometres per kilogram
■ m³/100km - Cubic metres per 100 kilometres
■ km/m³ - Kilometres per cubic metre
■ Pressure: - Pressure units for tyre pressure
■ kPa - Kilopascal
■ bar - bar
■ psi - Pounds per square inch
Voice control settings
First read and observe the introductory information given on page 19.
›
Press the button Menu
→
→ Voice control
■ Dialogue style: Setting the dialogue style
■ Long - Long dialogue (the system plays complete acoustic messages)
■ Short - Short dialogue (the system shortens some acoustic messages or sub-
stitutes them with an acoustic signal)
■ Display available commands - Switch on/off the menus containing basic voice
commands when voice control is activated
■ Voice control session start tone - Switch on/off the audible signal that is out-
put when voice control is activated
■ Voice control session end tone - Switch on/off the audible signal that is output
when voice control is ended
■ Input tone in voice dialogue - Switch on/off the audible signal that is output to
signal that voice control is waiting for a command
Restore factory settings
First read and observe the introductory information given on page 19.›
Press the button Menu
→ → Factory settings
■ Reset all settings and data
■ Restore factory settings - Reset all factory settings
■ Reset individual settings/data
■ Sound - Restore default settings for sound
■ Radio - Restore default settings for radio
■ Vehicle - Restore default settings for the vehicle systems
■ Telephone - Restore default settings for phone
■ Media - Restore default settings for media
■ Voice control - Restore default settings for voice control
■ Navigation - Restore default settings for navigation
■ System - Restore the system default settings
Bluetooth ®
settings
First read and observe the introductory information given on page 19.
›
Press the button Menu
→
→ Bluetooth
■ Bluetooth - Switch on/off Bluetooth ®
function
■ Visibility: - Switch on/off the visibility of the Bluetooth ®
device for other devices
■ Visible - Visibility is always on
■ Hidden - Visibility is off
■ At start-up - Turns on visibility for 5 minutes after switching on the ignition or
until the driving speed has exceeded 5 km/h
■ Name: - Open the input screen with keyboard - Chang the device name
■ Paired devices - Display the list of paired Bluetooth ®
devices; connect or delete
a paired device; delete the list of paired devices ■ Delete all - Delete all paired Bluetooth ®
devices
■ - Delete the paired Bluetooth ®
device
■ Find devices - Searches for available external devices with enabled Bluetooth ®
functions and activated visibility » page 45
■ Bluetooth audio (A2DP/AVRCP) - Switch on/off the connection option for Blue-
tooth ®
profiles A2DP and AVRCP 1)
22Familiarization with the unit
Page 26 of 90
Audio/Video/Images
Radio
Operation
Introduction
This chapter contains information on the following subjects:
Mainmenu
24
List of available stations
25
Search for radio stations and store
25
Search available stations (Scan)
26
Station logos
26
Traffic programme
26
Station information DAB)
27
First and foremost, pay attention to the safety instructions » page 4 , Important
notes .
The device allows analogue radio reception of FM and AM frequency ranges as
well as DAB digital radio reception.
Radio reception DAB allows multiple stations to be transmitted in a single fre-
quency in the form of a so-called ensemble. It also allows for the transmission of
additional data and information (e.g. messages, sport, weather, warnings, etc.).
Note
■ Car parks, tunnels, tall buildings or mountains can interfere with the radio signal
even causing it to fail completely.■
In countries where the RDS function is not supported sufficiently, we recom-
mend turning off the AF and RDS settings. Otherwise, these settings can affect
the functionality of the radio.
■
For vehicles with window antennas, if the windows have foil stuck to them or
metal-coated stickers this may cause you to experience some interference.
MainmenuFig. 14
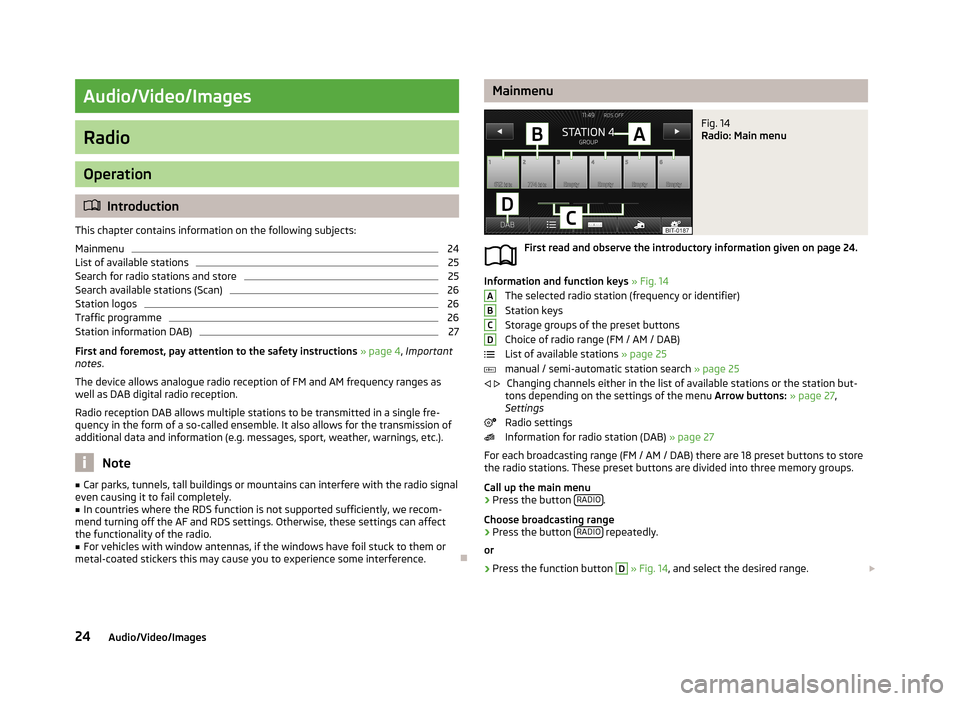
Radio: Main menu
First read and observe the introductory information given on page 24.
Information and function keys » Fig. 14
The selected radio station (frequency or identifier)
Station keys
Storage groups of the preset buttons Choice of radio range (FM / AM / DAB)
List of available stations » page 25
manual / semi-automatic station search » page 25
Changing channels either in the list of available stations or the station but-
tons depending on the settings of the menu Arrow buttons: » page 27 ,
Settings
Radio settings
Information for radio station (DAB) » page 27
For each broadcasting range (FM / AM / DAB) there are 18 preset buttons to store
the radio stations. These preset buttons are divided into three memory groups.
Call up the main menu
›
Press the button RADIO.
Choose broadcasting range
›
Press the button RADIO repeatedly.
or
›
Press the function button
D
» Fig. 14 , and select the desired range.
ABCD
24Audio/Video/Images
Page 28 of 90
Search available stations (Scan)First read and observe the introductory information given on page 24.
This function plays all the receivable stations in succession for a few seconds
each.
Switching on
›
Press the button
2
» Fig. 1 on page 5
or
›
press the → Scan button.
Switching off
›
Press the button
2
or
›
press any function key in the device screen.
After switching off the function, the device receives the stations at which the
function was canceled.
Station logos
First read and observe the introductory information given on page 24.
The preset buttons
(B
» Fig. 14 on page 24 ) can be associated with logos (im-
ages) of the radio station.
Store station logos automatically (FM / DAB)
›
Before you save the radio station to a station button function key
press →
Advanced setup
›
Activate the menu item Auto-save station logos » page 28 , Advanced Set-
tings (FM) and » page 28 , Advanced Settings (DAB) .
When you save the station to a station button, the station is assigned a logo from the device memory if the logo is available in the memory.
Storing station logos manually
A logo can be assigned manually for the previously stored stations.
›
The function key
→ Station logos
A menu with preset buttons for radio stations is displayed.›
Press the preset button for the station, which a logo is to be assigned to.
A menu of media (CD, SD card, USB) is displayed.
›
In the the relevant madia select the image you want to have.
By selection of the image it is assiagned to the relevant station button.
Note
■ The following image formats are supported: jpg, gif, png, bmp.■We recommend a resolution of up to 500 x 500 pixels.
Traffic programme
First read and observe the introductory information given on page 24.
During playback in the media menu the traffic information from the last selected
radio station is received.
Should this radio station not support traffic reports or the signal is not available,
then the device automatically searches for a TP station.
Switching on/off
›
The function key
.
›
Enable or disable the menu item Traffic programme (TP)
Traffic news
During a traffic announcement, the following menu is displayed:
›
Cancel - interruption of the current traffic report. The TP function remains acti-
vated.
›
Deactivate - Exit the current traffic report and turn off TP function.
Note
Some radio stations misleadingly identify themselves as traffic programs. It is
therefore not an error with the unit that there is no traffic news with these sta-
tions.
26Audio/Video/Images