start stop button SKODA OCTAVIA 2013 3.G / (5E) Columbus Navigation System Manual
[x] Cancel search | Manufacturer: SKODA, Model Year: 2013, Model line: OCTAVIA, Model: SKODA OCTAVIA 2013 3.G / (5E)Pages: 90, PDF Size: 5.21 MB
Page 14 of 90
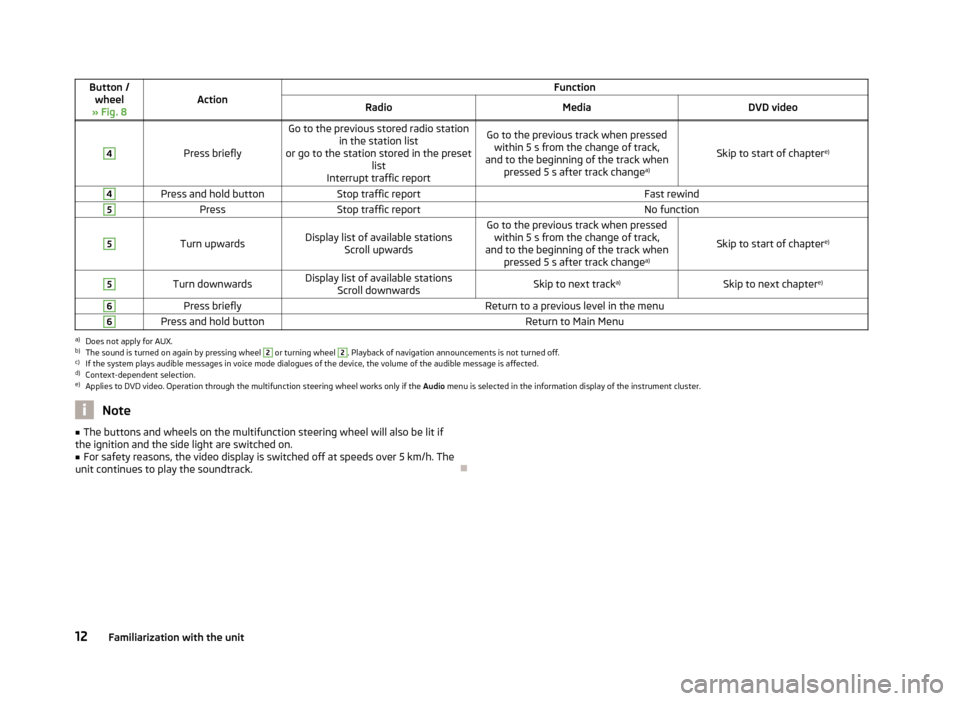
Button /wheel
» Fig. 8ActionFunctionRadioMediaDVD video4
Press briefly
Go to the previous stored radio station in the station list
or go to the station stored in the preset list
Interrupt traffic reportGo to the previous track when pressed within 5 s from the change of track,
and to the beginning of the track when pressed 5 s after track change a)
Skip to start of chaptere)
4Press and hold buttonStop traffic reportFast rewind5PressStop traffic reportNo function5
Turn upwardsDisplay list of available stations
Scroll upwardsGo to the previous track when pressedwithin 5 s from the change of track,
and to the beginning of the track when pressed 5 s after track change a)
Skip to start of chaptere)
5Turn downwardsDisplay list of available stations
Scroll downwardsSkip to next track a)Skip to next chapter e)6Press brieflyReturn to a previous level in the menu6Press and hold buttonReturn to Main Menua)
Does not apply for AUX.
b)
The sound is turned on again by pressing wheel
2
or turning wheel
2
. Playback of navigation announcements is not turned off.
c)
If the system plays audible messages in voice mode dialogues of the device, the volume of the audible message is affected.
d)
Context-dependent selection.
e)
Applies to DVD video. Operation through the multifunction steering wheel works only if the
Audio menu is selected in the information display of the instrument cluster.
Note■
The buttons and wheels on the multifunction steering wheel will also be lit if
the ignition and the side light are switched on.■
For safety reasons, the video display is switched off at speeds over 5 km/h. The
unit continues to play the soundtrack.
12Familiarization with the unit
Page 33 of 90
To sort the files in the Database on the current source by the followingcategories:
Track list - Track lists by popularity 1)
/playback frequency
Artist - Sorted by artist's name
Album - Sorted by album name
Genre - Sorted by the genre assigned to the tracks
Track - Sorted by the track title
Video - Files containing a video recording
Note
■
In the title / folder database a maximum of 1000 files / folders can be displayed
alphabetically.■
If the file format is not supported by the unit or the file is damaged and cannot
be played the title / folder database displays a struck-through icon.
Playback
First read and observe the introductory information given on page 29.
The device plays the files in alphabetical order.
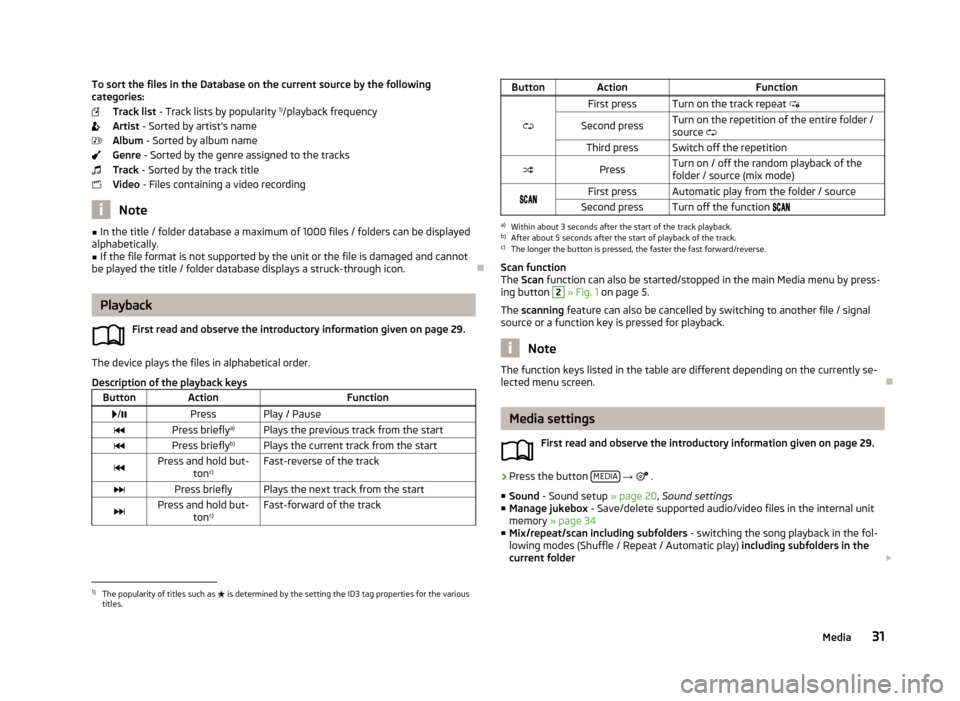
Description of the playback keys
ButtonActionFunction /PressPlay / PausePress briefly a)Plays the previous track from the startPress brieflyb)Plays the current track from the startPress and hold but-
tonc)Fast-reverse of the trackPress brieflyPlays the next track from the startPress and hold but-
tonc)Fast-forward of the trackButtonActionFunction
First pressTurn on the track repeat
Second pressTurn on the repetition of the entire folder /
source Third pressSwitch off the repetitionPressTurn on / off the random playback of the
folder / source (mix mode)First pressAutomatic play from the folder / sourceSecond pressTurn off the function a)
Within about 3 seconds after the start of the track playback.
b)
After about 5 seconds after the start of playback of the track.
c)
The longer the button is pressed, the faster the fast forward/reverse.
Scan function
The Scan function can also be started/stopped in the main Media menu by press-
ing button
2
» Fig. 1 on page 5.
The scanning feature can also be cancelled by switching to another file / signal
source or a function key is pressed for playback.
Note
The function keys listed in the table are different depending on the currently se-
lected menu screen.
Media settings
First read and observe the introductory information given on page 29.
›
Press the button MEDIA
→
.
■ Sound - Sound setup » page 20, Sound settings
■ Manage jukebox - Save/delete supported audio/video files in the internal unit
memory » page 34
■ Mix/repeat/scan including subfolders - switching the song playback in the fol-
lowing modes (Shuffle / Repeat / Automatic play) including subfolders in the
current folder
1)
The popularity of titles such as
is determined by the setting the ID3 tag properties for the various
titles.
31Media
Page 51 of 90
Phone bookFirst read and observe the introductory information given on page 47.›
Press the button .
The device telephone book contains up to 2000 free memory locations for impor- ted telephone contacts. Each contact can contain up to 5 telephone numbers.
The telephone book can also be accessed during an ongoing call. After successful pairing, the contacts are imported 1)
.
Loading the directory
Upon first connection of the telephone with the device, the system begins to
download the telephone book from the telephone and from the SIM card 2)
into
the device memory 1)
. Depending on the number of contacts this may take several
minutes to complete.
If the imported telephone book from the telephone contains more than 2000 contacts, loading is stopped and the message Contacts not completely im-
ported. appears on the screen. Only the contacts already loaded are available,
these are in the menu
.
The first 200 contacts along with the telephone contact data, including the pic- ture associated with the contact, are downloaded onto the device memory 3)
.
If an error occurs while loading the phone book, the message Import failed.
Please try again and check whether the BT device … allows connections.
Update phonebook
Each time the telephone has established a new connection with the device, the
relevant telephone book will be updated.
During the update, the phone book which was stored after the last completed up-date will be available. Newly stored telephone numbers are only shown after the
updating has ended.
The update can be performed manually » page 43 Import contacts
Find contact
Press the button Find to open the input screen with keypad to search in the pho-
nebook » page 9 .
Select contact
Pressing the function key with one of the displayed contacts starts the selection.
Where a contact contains several telephone numbers, the system displays a
menu containing the telephone numbers for the contact.
Contact details
By pressing the function key with the symbol the contact details are displayed.
Pressing the function key with one of the indicated telephone numbers starts the
selection.
By pressing the function key with the symbol and the contact will start the
route guidance.
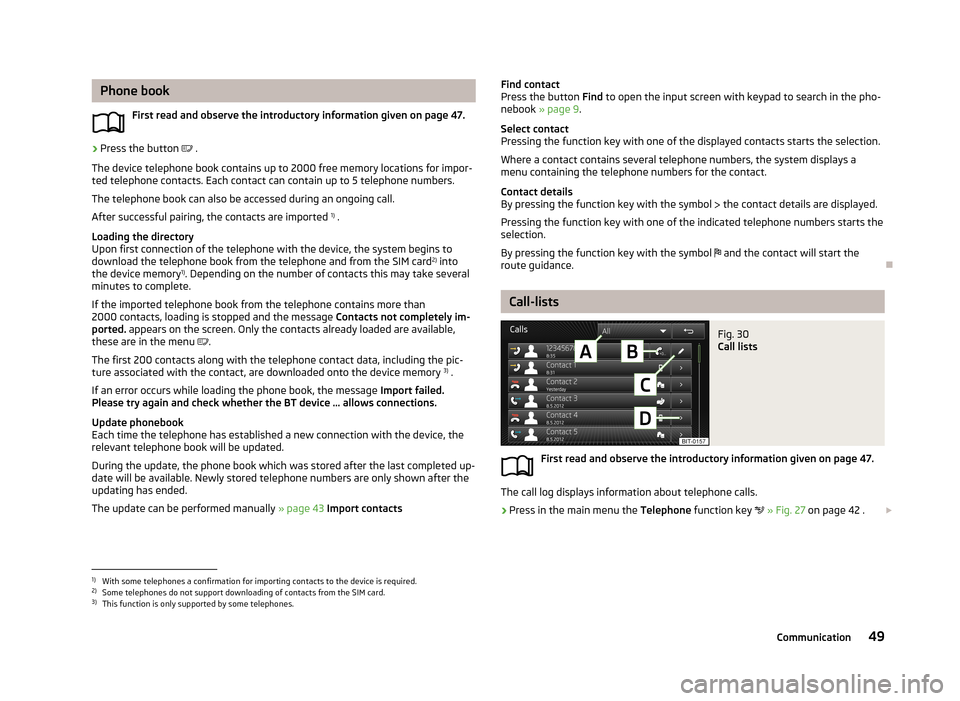
Call-lists
Fig. 30
Call lists
First read and observe the introductory information given on page 47.
The call log displays information about telephone calls.
›
Press in the main menu the Telephone function key
» Fig. 27 on page 42 .
1)
With some telephones a confirmation for importing contacts to the device is required.
2)
Some telephones do not support downloading of contacts from the SIM card.
3)
This function is only supported by some telephones.
49Communication
Page 59 of 90
Menus in the extra windowFirst read and observe the introductory information given on page 56.
Additional information is displayed in the extra window depending on the context
of the selected menu.
Switching on
›
In the navigation main menu, press NAV
or
›
in the Navigation main menu, press .
→ Split screen
The last opened split screen is displayed.
Switching off
›
In the navigation main menu, press NAV
or
›
in the additional window on
press
or
›
in the Navigation main menu, press .
→ Split screen
Menus in the split screen:
■ Audio - Playback operation of the currently selected audio source » page 57
■ Compass - Displays the current vehicle location in relation to the compass direc-
tions » page 58
■ Man. - Displays the next or following navigation instructions (manoeuvres), the
next POIs or an intersection detail » page 58;
■ Traffic signs - Displays traffic signs that are stored in the navigation data of the
maps or that are recognised by the front camera » page 58
■ GPS - Displays the geographical coordinates of the current vehicle loca-
tion » page 59
■ Map - Map display » page 59.
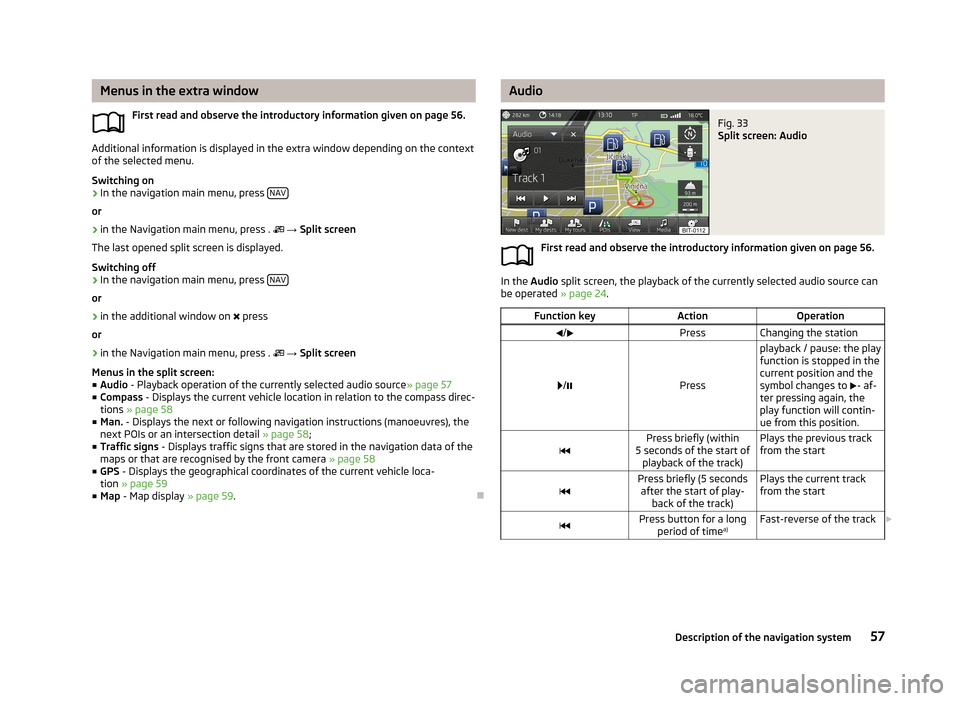
AudioFig. 33
Split screen: Audio
First read and observe the introductory information given on page 56.
In the Audio split screen, the playback of the currently selected audio source can
be operated » page 24.
Function keyActionOperation/PressChanging the station
/Press
playback / pause: the play
function is stopped in the
current position and the
symbol changes to - af-
ter pressing again, the
play function will contin-
ue from this position.Press briefly (within
5 seconds of the start of playback of the track)Plays the previous track
from the startPress briefly (5 seconds after the start of play- back of the track)Plays the current track
from the startPress button for a long period of time a)Fast-reverse of the track
57Description of the navigation system
Page 71 of 90
Nav. announcementsFirst read and observe the introductory information given on page 67.
The device outputs the navigation announcements. The navigation announce-
ments are started as soon as the route calculation is complete or a route type has
been selected.
Before turning, up to 3 recommendations are issued: The last navigation announcement can be repeated: › by pressing the menu knob
2
» Fig. 1 on page 5;
› Press the dial
2
» Fig. 10 on page 14 on the multifunction steering wheel.
The timing of the navigation announcement depends on the type of road and the
driving speed. For example, on motorways the first announcement is heard about 2000 m (6000 ft) before the location of the motorway exit.
During dynamic route guidance, the unit notifies the driver of traffic problems. If a
new route is calculated due to traffic problems, the Calculating the route... an-
nouncement is sounded.
Set the output volume of the navigation announcements or mute it during a phone call » page 53.
Route
First read and observe the introductory information given on page 67.
When there is a calculated route to the destination, the recommended route is
displayed.
›
In the navigation main menu, press .
The following menu is displayed: ■ Stop route guidance - Stops route guidance
■ New dest./stopover - Enter a new destination or add a destination to the calcu-
lated route » page 60 or » page 71
■
Route information - Display information about the destination and the calcula-
ted route (setup of information displayed » page 54)
■ - Arrival time at destination/stopover 1)
■ - Remaining travelling time to destination or stopover 1)
■ - Remaining travelling distance to destination or stopover
■ Store destination - Stores the destination on the input screen » page 9
■ Route list - Displays the list of route sections
■ Tour - display of tour destinations » page 71
■ Congestion ahead - If you hear of a traffic problem (e.g. congestion), you can
enter this traffic problem manually. After entering, this device recalculates and
provides an alternative route. The traffic jam information increases or decreases
by touching the scale / or by turning the menu button 2
» Fig. 1 on page 5.
Lane guidance
Fig. 47
Lane guidance
First read and observe the introductory information given on page 67.
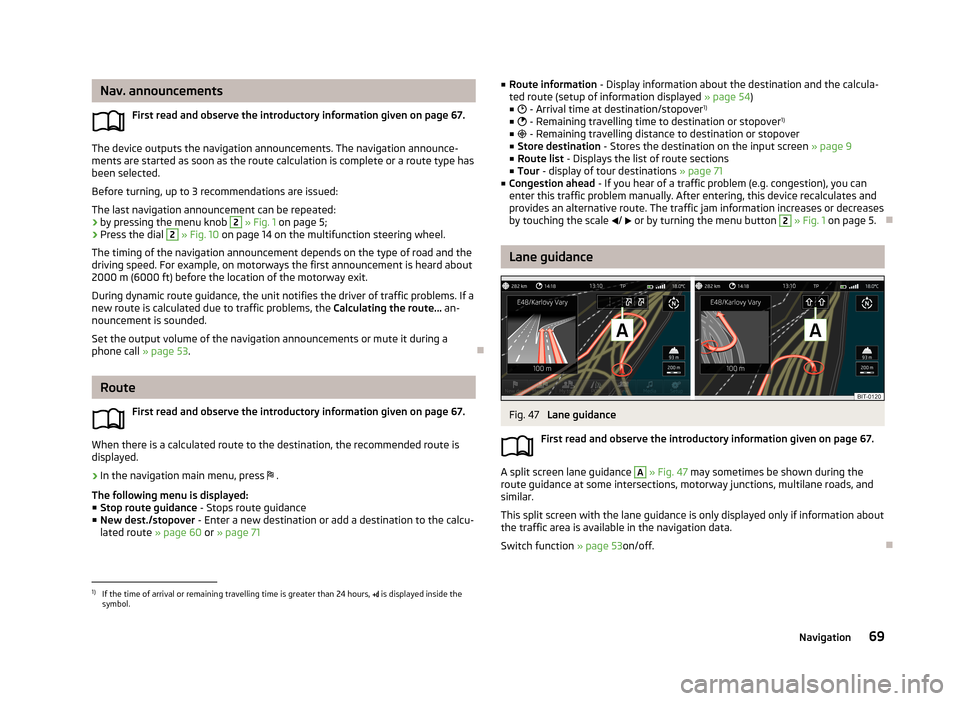
A split screen lane guidance
A
» Fig. 47 may sometimes be shown during the
route guidance at some intersections, motorway junctions, multilane roads, and
similar.
This split screen with the lane guidance is only displayed only if information about the traffic area is available in the navigation data.
Switch function » page 53on/off.
1)
If the time of arrival or remaining travelling time is greater than 24 hours, is displayed inside the
symbol.
69Navigation
Page 73 of 90
NoteMaking a diversion from a traffic jam based on TMC traffic reports may not always
offer a time advantage, e.g. if the diversion route is also congested.
Detailed traffic reports
First read and observe the introductory information given on page 70.
After pressing the TRAFFIC button, a screen appears with the following informa-
tion:
■ Function key All - Show all traffic information
■ Function key Route - only display the traffic information on the current route
■ A map showing the traffic obstruction
■ A window with a description of the traffic information
■ Location of event, the accuracy depends on the timeliness of the navigation
data
■ Description of up to three events related to the respective information
■ Description of the direction with respect to the event
■ probable duration of the event
■ Additional information, such as probable delay time
■ An information line, on how current the information is and on the provider of
the message
■ Symbol that specifies the type of information
■ - zoom in window with described traffic obstruction
■ - zoom out window with described traffic obstruction
■ - show previous traffic information
■ - show the following traffic information
■ - display list of all received traffic messages
My tour
Introduction
This chapter contains information on the following subjects:
New tour
71
Tour editing
72
Tour memory
72First and foremost, pay attention to the safety instructions » page 4 , Important
notes .
New tour
Fig. 48
Entering a new tour
First read and observe the introductory information given on page 71.
›
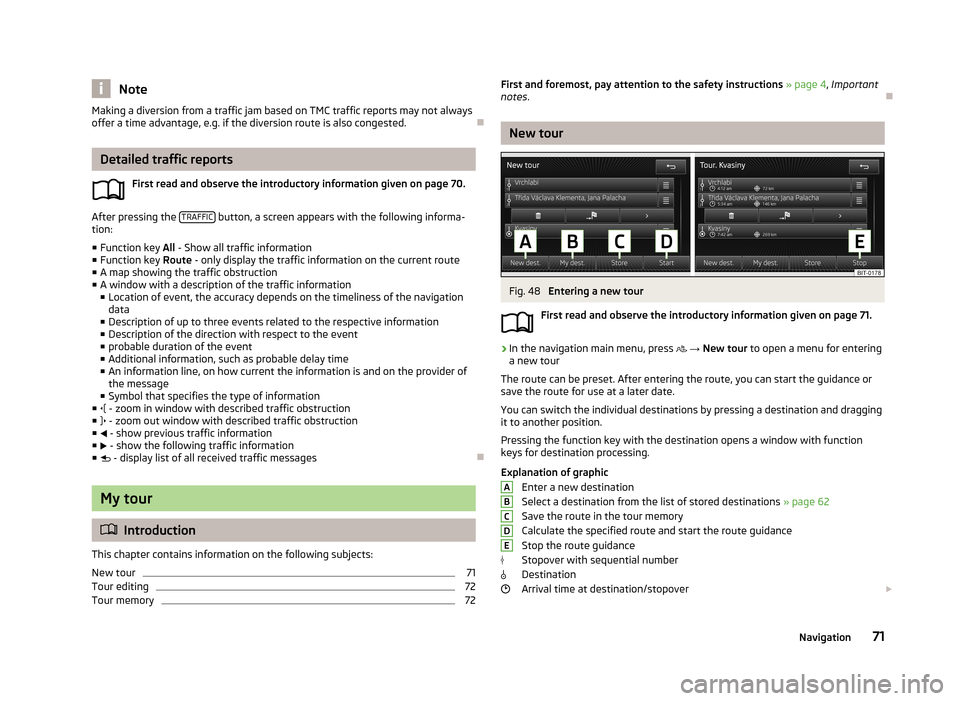
In the navigation main menu, press
→ New tour to open a menu for entering
a new tour
The route can be preset. After entering the route, you can start the guidance or
save the route for use at a later date.
You can switch the individual destinations by pressing a destination and dragging
it to another position.
Pressing the function key with the destination opens a window with function
keys for destination processing.
Explanation of graphic Enter a new destination
Select a destination from the list of stored destinations » page 62
Save the route in the tour memory
Calculate the specified route and start the route guidance Stop the route guidance
Stopover with sequential number Destination
Arrival time at destination/stopover
ABCDE71Navigation
Page 78 of 90
Range (if the estimated range is less than 300 km, the vehicle starts to ap-
proach the symbol: )
Vehicle representation (the zones of the vehicle are shown in different col- ours, corresponding to any warning messages that occur. The warning mes-
sages are displayed once you touch vehicle)
■ Driving data - Display travel data » Fig. 51
You can display one of three trip memories on the screen:
■ Since start - Driving data for the individual trip
■ Long-term - Long-term driving data
■ Since refuelling - Data since last refuelling
Changing between the individual travel data storage locations can be done with /
.
■ Convenience consumers - Displays up to three devices which use the largest
share of fuel and displays the fuel consumption required to run all conv. con-
sumers » Vehicle Owner's Manual , chapter Commercial driving and environmen-
tal compatibility
■ Vehicle status - Displays vehicle status » Fig. 51 or tyre pressure monitoring in-
formation
■ Vehicle status - Displays vehicle status information
■ /
- No message/warning messages relating to vehicle status or number
of messages (if there is only one message, one warning message text is dis-
played)
■ - Display information about the status of the START-STOP system
■ TPMS - Tyre pressure monitoring function » Fig. 52
■ SET - Start a new calibration process
Changing between the individual menus can be done with
/
.
Note
For more information on the warning messages concerning the vehicle status and
information on the START-STOP system, see the » Vehicle Owner's Manual .FGAuxiliary heater and ventilationFig. 53
Auxiliary heater: Main menu/set preset time
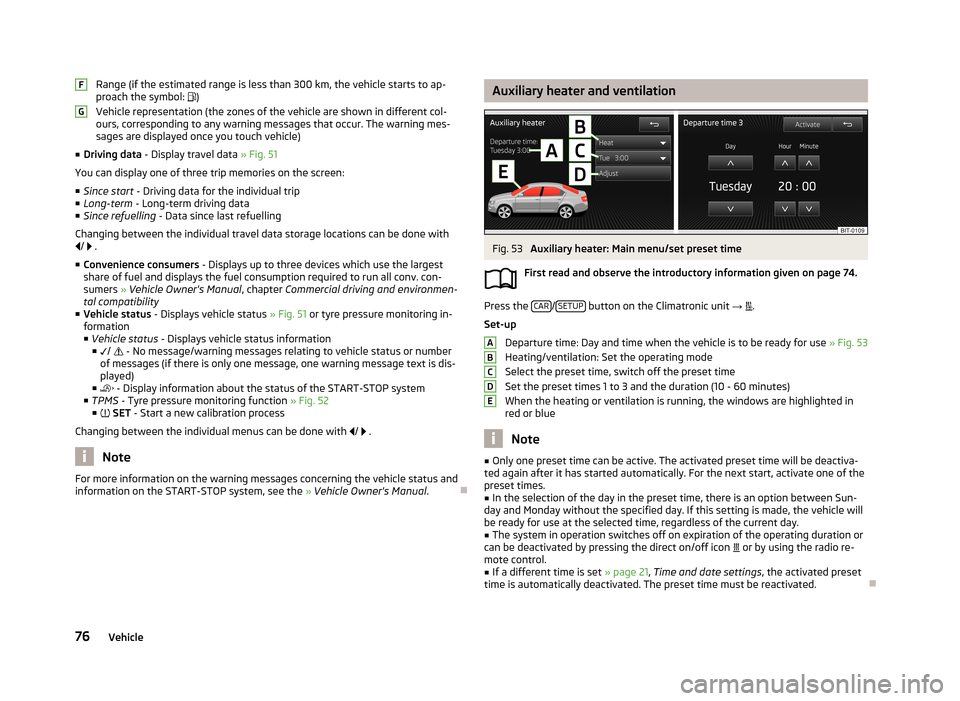
First read and observe the introductory information given on page 74.
Press the CAR/SETUP button on the Climatronic unit
→
.
Set-up Departure time: Day and time when the vehicle is to be ready for use » Fig. 53
Heating/ventilation: Set the operating mode
Select the preset time, switch off the preset timeSet the preset times 1 to 3 and the duration (10 - 60 minutes)
When the heating or ventilation is running, the windows are highlighted in
red or blue
Note
■ Only one preset time can be active. The activated preset time will be deactiva-
ted again after it has started automatically. For the next start, activate one of the preset times.■
In the selection of the day in the preset time, there is an option between Sun-
day and Monday without the specified day. If this setting is made, the vehicle will
be ready for use at the selected time, regardless of the current day.
■
The system in operation switches off on expiration of the operating duration or
can be deactivated by pressing the direct on/off icon or by using the radio re-
mote control.
■
If a different time is set » page 21, Time and date settings , the activated preset
time is automatically deactivated. The preset time must be reactivated.
ABCDE76Vehicle