fuel SKODA OCTAVIA 2013 3.G / (5E) User Guide
[x] Cancel search | Manufacturer: SKODA, Model Year: 2013, Model line: OCTAVIA, Model: SKODA OCTAVIA 2013 3.G / (5E)Pages: 287, PDF Size: 18.55 MB
Page 32 of 287
Driving data (Multifunction display)
Introduction
This chapter contains information on the following subjects:
Memory
29
Information overview
29
Warning at excessive speeds
31
The multifunction display only operates if the ignition is switched on.
After the ignition is switched on, the function that was last selected before
switching off the ignition is displayed.
Individual menu items can be shown or hidden in the Infotainment » Bedienung-
sanleitung Infotainment, chapter Vehicle settings (CAR button).
WARNINGConcentrate fully at all times on your driving! As the driver, you are fully re-
sponsible for the operation of your vehicle.
Note
In some national versions the displays appear in the Imperial system of measure-
ment.
Memory
First read and observe the introductory information and safety warn-
ings
on page 29.
The multifunction display is equipped with three automatic memories.
The display of the selected memory varies depending on vehicle equipment.
Since start (MAXI DOT display) or “1” (segment display)The memory collates the driving information from the moment the ignition isswitched on until it is switched off.
New data will also flow into the calculation of the current driving information if
the trip is continued within 2 hours after switching off the ignition.
If the trip is interrupted for more than 2 hours, the memory is automatically
erased.
Long-term (MAXI DOT display) or “2” (segment display)
The memory gathers driving information from any number of individual journeys
up to a total of 99 hours and 59 minutes driving or 9999 kilometres driven.
The memory is deleted when either of these limits is reached and the calculation
starts all over again.
Since refuel (MAXI DOT display) or “3” (segment display)
The memory gathers driving information since the last refuelling.
The memory is erased automatically the next time you fill up.
Select memory›
Select the corresponding element of the travel data » page 26, Using the infor-
mation system .
Confirm the element again to switch between the individual memories.
Resetting
›
Select the corresponding element of the travel data » page 26, Using the infor-
mation system .
›
Select the desired memory.
›
Press and hold button
B
or adjustment wheel
D
» Fig. 7 on page 26.
The following values of the selected memory are set to zero. › Average fuel consumption.
› Distance driven.
› Average speed.
› Driving time
Note
Disconnecting the vehicle battery will delete all memory data.
Information overview
First read and observe the introductory information and safety warn-
ings
on page 29.
The amount of information displayed may differ depending on the equipment.
29Information system
Page 33 of 287
Range
The range indicates the distance you can still drive with your vehicle based on the
level of fuel in the tank and the same style of driving as before.
The display is shown in steps of 10 km. After lighting up of the warning icon the
display is shown in steps of 5 km.
The fuel consumption over the last 50 km is used to calculate the range. The
range can increase if you drive in a more fuel-efficient manner.
Average fuel consumption
The average fuel consumption 1)
is calculated since the last time the memory was
erased.
If you wish to determine the average fuel consumption over a certain period of
time, you must set the memory at the start of the new measurement to zero » page 29 .
After erasing the memory, no fuel consumption data will appear for the first
100 m driven.
The indicated information is updated continuously while you are driving.
Current fuel consumption
You can use this information to adapt your driving style to the desired fuel con-
sumption 1)
.
The display appears in litres/hour if the vehicle is stationary or driving at a low
speed 2)
.
Oil temperature
If the engine oil temperature is in the range 80-110 °C, the engine operating tem-
perature is reached.
If the oil temperature is lower than 80 °C or above 110 °C, avoid high engine revs,
full throttle and high engine loads.
If the oil temperature is lower than 50 °C or if a fault in the system for checking the oil temperature is present,
are displayed instead of the oil temperature.
Warning against excessive speeds
Set the speed limit, for example, for the maximum permissible speed in
town » page 31 .Traffic sign recognition
The display can show up to three of the following traffic signs simultaneously.
› Speed limits (including additional signs).
› Overtaking prohibited.
Further information » page 166, Traffic sign recognition .
Current driving speed
The current speed displayed is identical to the display on the speedometer3
» Fig. 2 on page 11.
Average speed
The average speed since the memory was last erased is displayed in km/hour .
To determine the average speed over a certain period of time, set the memory to
zero at the start of the measurement » page 29.
After erasing the memory, no data will appear for the first 300 m driven. The indicated information is updated continuously while you are driving.
Distance travelled
The distance travelled since the memory was last erased is displayed.
If you want to measure the distance travelled from a particular moment in time on, at this moment, reset the memory by setting the button to zero » page 29.
The maximum distance indicated is 9999 km. The indicator is automatically set
back to zero if this period is exceeded.
Driving time
The time travelled since the memory was last erased is displayed.
If you want to measure the time travelled from a particular moment in time on, at this moment, reset the memory by setting the button to zero » page 29.
The maximum distance indicated is 99 hours and 59 minutes. The indicator is au- tomatically set back to zero if this period is exceeded.
Convenience consumers
There, the total consumption of all consumer comfort in l / h is displayed.
1)
The units for the displayed consumption are set in the Infotainment
» Bedienungsanleitung Infotain-
ment, chapter Device settings .
2)
On some models in certain countries, the display appears in --,- kilometres/litres if the vehicle is sta-
tionary.
30Using the system
Page 34 of 287
Together with the consumption display, a list of three convenience consumers
with the highest consumption is also displayed.
For more information » page 133 and » Infotainment manual , chapter Vehicle set-
tings (press CAR) .
Refuelling amount 1)
After the consumption of about 10 litres of fuel from the fully refuelled tank, an amount of fuel is displayed in l. This amount can now be safely refilled.
Warning at excessive speeds
First read and observe the introductory information and safety warn-
ings
on page 29.
Adjust the speed limit while the vehicle is stationary
›
Select the menu item Warning at (MAXI DOT display) or
(segment display).
›
Activate the speed limit option by confirming this menu item.
›
Set the desired speed limit, e.g. 50 km/h.
›
Store the speed limit by confirming the set value, or wait several seconds; your
settings will be saved automatically.
This allows you to set the speed in 5 km/h intervals.
Adjusting the speed limit while the vehicle is moving
›
Select the menu item Warning at (MAXI DOT display) or
(segment display).
›
Drive at the desired speed, e.g. 50 km/h.
›
Confirm the current speed as the speed limit.
If you wish to adjust the set speed limit, you can do so in 5 km/h intervals (e.g. the
accepted speed of 47 km/h increases to 50 km/h or decreases to 45 km/h).
›
Store the speed limit, or wait several seconds; your settings will be saved auto-
matically.
Change or disable speed limit
›
Select the menu item Warning at (MAXI DOT display) or
(segment display).
›
By confirming the stored value, the speed limit is disabled.
›
By reconfirming, the option to change the speed limit is activated.
If the pre-set speed is exceeded, an acoustic signal appears as a warning tone
and a warning message appears in the display.
Speed ... exceeded.
SPEED TOO HIGH
The speed limit set mode is stored even after the ignition is switched off and on.
After a gap between driving exceeding 2 hours, the pre-set speed limit is deacti- vated.
MAXI DOT display
Introduction
This chapter contains information on the following subjects:
Main menu
32
Lap timer (Stop watch)
32
The MAXI DOT display provides you with information about the current operating
state of your vehicle. The MAXI DOT display also provides you with data (depend-
ing on the equipment installed in the vehicle) relating to the Infotainment, multi-
functional indicator, and similar.
WARNINGConcentrate fully at all times on your driving! As the driver, you are fully re- sponsible for the operation of your vehicle.
1)
Only valid for some countries.
31Information system
Page 38 of 287
Unlocking and opening
Unlocking and locking
Introduction
This chapter contains information on the following subjects:
Vehicle key
36
Unlocking/locking with the key
36
Unlocking/locking with the remote control
37
Unlocking/locking – KESSY
38
Safe securing system
38
Individual settings
39
Locking/unlocking the vehicle from the inside
39
Child safety lock
40
Opening/closing a door
40
Your car is equipped with a central locking system. The central locking system allows you to lock and unlock all doors, the fuel filler
flap and luggage compartment lid at the same time based on the current setting 1)
.
The safe securing system » page 38 is integrated in the central locking system.
Once the car is locked from the outside, the door locks are automatically blocked
by the safe securing system »
.
The following is true after unlocking 1)
› The doors, the boot lid and the fuel filler flap are unlocked.
› The interior light operated via the door contact illuminates.
› The safe securing system is switched off.
› The indicator light in the driver door stops flashing.
› The exterior mirrors are folded back into the driving position 2)
.
› The anti-theft alarm system is deactivated.
The following is true after locking 1)
.
› The doors, the boot lid and the fuel filler flap are locked.
› The interior light operated via the door contact goes out.
› The safe securing system is switched on.
› The warning light in the driver door begins flashing.
› The exterior mirrors are folded back into park 2)
.
› The anti-theft alarm system is activated.
Displaying an error
If the warning light in the driver's door initially flashes quickly for around 2 sec- onds, and then lights up for 30 seconds without interruption before flashing
again slowly, you will need to seek the assistance of a specialist garage.WARNING■ If the car is locked and the safe securing system is activated, there must not
be any person in the car as it is then not possible to open either a door or a window from the inside. The locked doors make it more difficult for rescuers
to get into the vehicle in an emergency – risk of death!■
Locked doors prevent unwanted entry into the vehicle from outside, for ex-
ample at road crossings.
Note
■ In the event of an accident in which the airbags are deployed, the locked doors
are automatically unlocked in order to enable rescuers to gain access to the vehi- cle.■
Only the driver's door can be unlocked or locked using the key if the central
locking system fails » page 36. The other doors and the boot lid can be emer-
gency locked or unlocked. ■ Emergency locking of the door » page 248.
■ Emergency unlocking of the luggage compartment lid » page 249.
1)
Depending on the individual setting » page 39.
2)
Applies only if the function is enabled in the Infotainment » Infotainment manual , chapter Vehicle
settings (press CAR) .
35Unlocking and opening
Page 42 of 287
If the vehicle is locked and the safe securing system is switched off, the door can
be opened separately from the inside by a single pull on opening lever.
Switching off
The safelock can be switched off by locking twice within 2 seconds.
Switching on
The safelock switches on automatically the next time the vehicle is locked and unlocked.
Switch-on display
The warning light flashes for around 2 seconds in quick succession, afterwards it
begins to flash evenly at longer intervals.
Switch-off display
The indicator light in the driver door flashes for about 2 seconds fast, goes out
and starts to flash at longer intervals after about 30 seconds.WARNINGIf the car is locked and the safe securing system activated, no people must re- main in the car as it will then not be possible to either unlock a door or open a
window from the inside. The locked doors make it more difficult for rescuers
to get into the vehicle in an emergency – risk to life!
Note
This function only applies to certain countries.
Individual settings
First read and observe the introductory information and safety warn-
ings
on page 35.
The following functions of the central locking system can be set individual-
ly » owner's manual of Infotainment , chapter Vehicle settings (button CAR) .
Opening a single door
This function makes it possible to only unlock the driver's door. The other doors,
the fuel filler flap and the boot lid remain locked and are only unlocked after be- ing opened again.
Unlocking a vehicle side door
This function enables you to unlock both doors on the driver's side. The other
doors, the fuel filler flap and the boot lid remain locked and are only unlocked af-
ter being opened again.
Unlocking the vehicle with the KESSY system This function enables you to unlock all the doors, individual doors, both doors onthe left or right vehicle side. The other doors, the fuel filler flap and the boot lid
remain locked and are only unlocked after being opened again.
Automatic locking/unlocking
All doors are locked from a speed of around 15 km/h. The button in the handle of
the boot lid is deactivated.
If the ignition key is withdrawn, the car is then automatically unlocked again. In addition, it is possible for the driver or front passenger to unlock the car by press-
ing the central locking button
.
The vehicle doors can be unlocked and opened at any time by pulling once on the door opening lever.
Locking/unlocking the vehicle from the inside
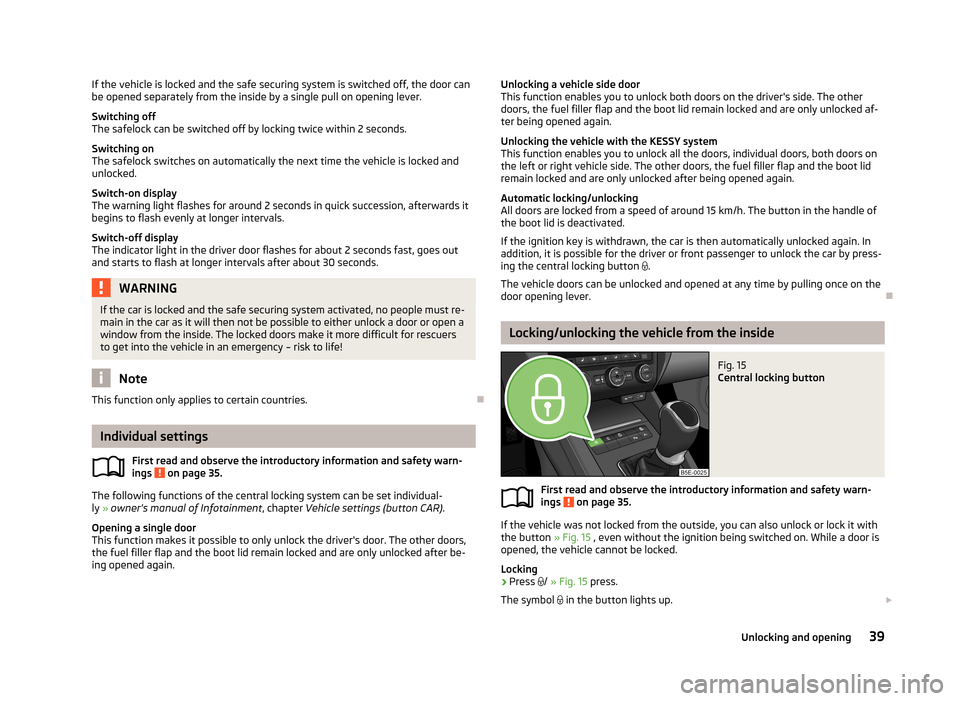
Fig. 15
Central locking button
First read and observe the introductory information and safety warn-
ings on page 35.
If the vehicle was not locked from the outside, you can also unlock or lock it with
the button » Fig. 15 , even without the ignition being switched on. While a door is
opened, the vehicle cannot be locked.
Locking
›
Press /
» Fig. 15 press.
The symbol in the button lights up.
39Unlocking and opening
Page 51 of 287
For the sake of the environmentAt high speeds, you should keep the windows closed to prevent unnecessarily
high fuel consumption.
Note
The window lift system is equipped with protection against overheating. Repea-
ted opening and closing of the window can cause this mechanism to overheat. If
this happens, it will not be possible to operate the window for a short time. You
will be able to operate the window again as soon as the overheating protection
has cooled down.
Opening/closing the window from the driver seat
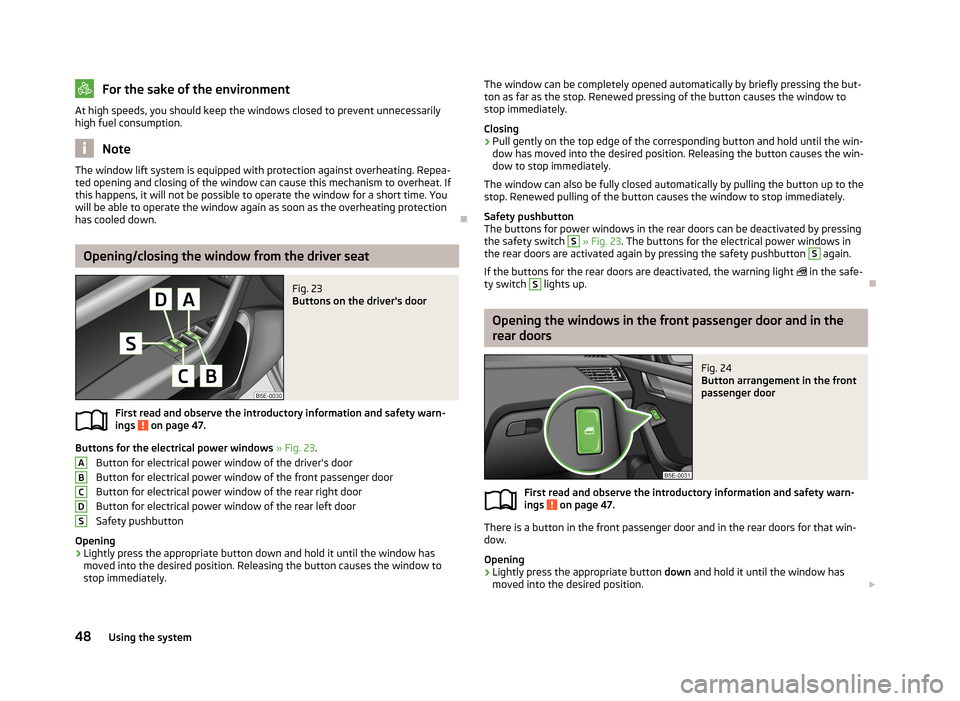
Fig. 23
Buttons on the driver's door
First read and observe the introductory information and safety warn-
ings on page 47.
Buttons for the electrical power windows » Fig. 23 .
Button for electrical power window of the driver's door
Button for electrical power window of the front passenger door
Button for electrical power window of the rear right door
Button for electrical power window of the rear left door
Safety pushbutton
Opening
›
Lightly press the appropriate button down and hold it until the window has moved into the desired position. Releasing the button causes the window to
stop immediately.
ABCDSThe window can be completely opened automatically by briefly pressing the but-
ton as far as the stop. Renewed pressing of the button causes the window tostop immediately.
Closing›
Pull gently on the top edge of the corresponding button and hold until the win-
dow has moved into the desired position. Releasing the button causes the win-
dow to stop immediately.
The window can also be fully closed automatically by pulling the button up to the
stop. Renewed pulling of the button causes the window to stop immediately.
Safety pushbutton
The buttons for power windows in the rear doors can be deactivated by pressing
the safety switch
S
» Fig. 23 . The buttons for the electrical power windows in
the rear doors are activated again by pressing the safety pushbutton
S
again.
If the buttons for the rear doors are deactivated, the warning light
in the safe-
ty switch
S
lights up.
Opening the windows in the front passenger door and in the
rear doors
Fig. 24
Button arrangement in the front
passenger door
First read and observe the introductory information and safety warn-
ings on page 47.
There is a button in the front passenger door and in the rear doors for that win- dow.
Opening
›
Lightly press the appropriate button down and hold it until the window has
moved into the desired position.
48Using the system
Page 67 of 287
WARNINGIf the entry light is on, do not touch its cover – risk of burns!
Note
If the door is open and the ignition switched off, the light will extinguish auto-
matically after around 10 minutes.
Visibility
Introduction
This chapter contains information on the following subjects:
Windscreen and rear window heater
64
Sun visors
65
Sun screen
65
Windscreen and rear window heater
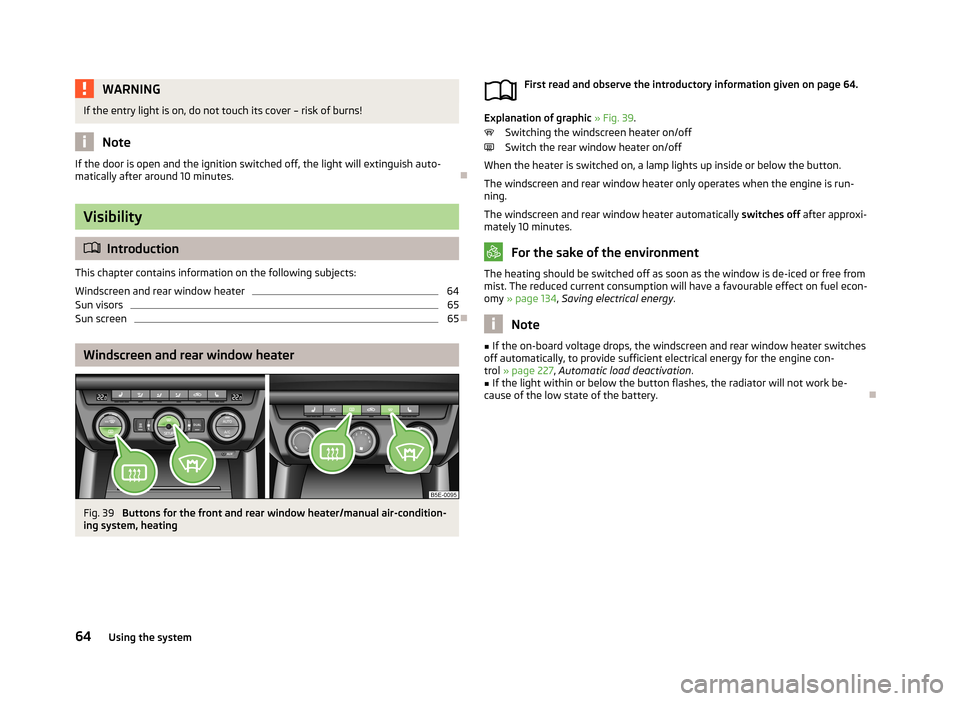
Fig. 39
Buttons for the front and rear window heater/manual air-condition-
ing system, heating
First read and observe the introductory information given on page 64.
Explanation of graphic » Fig. 39 .
Switching the windscreen heater on/off
Switch the rear window heater on/off
When the heater is switched on, a lamp lights up inside or below the button.
The windscreen and rear window heater only operates when the engine is run-
ning.
The windscreen and rear window heater automatically switches off after approxi-
mately 10 minutes.
For the sake of the environment
The heating should be switched off as soon as the window is de-iced or free from
mist. The reduced current consumption will have a favourable effect on fuel econ-
omy » page 134 , Saving electrical energy .
Note
■
If the on-board voltage drops, the windscreen and rear window heater switches
off automatically, to provide sufficient electrical energy for the engine con- trol » page 227 , Automatic load deactivation .■
If the light within or below the button flashes, the radiator will not work be-
cause of the low state of the battery.
64Using the system
Page 70 of 287
Automatic windscreen wiping in rain
Automatic windscreen wiping in rain can be activated or deactivated in the Info-
tainment » Operating instructions for Infotainment , chapter Vehicle settings (CAR
button) .
Automatic wipe/wash for windscreen
The wash system operates immediately, the windscreen wipers wipe somewhat
later. The wash system and the windscreen wiper operate simultaneously at a
speed of more than 120 km/h.
Letting go of the operating lever will cause the windscreen wash system to stop and the wipers to continue for another 2-3 wiper strokes (depending on the spraying duration).
At a speed of more than 2 km/h, the wiper wipes once again 5 seconds after the last wiper stroke in order to wipe the last drops from the windscreen. This func-
tion can be activated/deactivated by a specialist garage.
Automatic wipe/wash for the rear windowThe wash system operates immediately, the windscreen wiper wipes somewhat
later.
Letting go of the operating lever will cause the windscreen wash system to stop and the wiper to continue for another 2-3 wiper strokes (depending on the spray-
ing duration). The operating lever remains in position 6
.
Automatic rear window wipe (Octavia Estate)
If the lever is in position
2
or
3
» Fig. 42 , the rear window is wiped every
30 or 10 seconds if the vehicle's speed exceeds 5 km/h.
If automatic windscreen wiping in rain is activated (the operating lever is in the
position
1
) the function is only active if the windscreen wipers operate in contin-
uous mode (no break between each wiping process).
Automatic rear window wiping can be activated or deactivated in the Infotain-
ment » Operating instructions for Infotainment , chapter Vehicle settings (CAR
button) .
Winter setting of the windscreen wiper If the windscreen wipers are in rest position, they cannot be folded out from thewindscreen. For this reason we recommend adjusting the windscreen wipers in
winter so that they can be folded out from the windscreen easily.
› Switch on the windscreen wipers.
› Switch off the ignition.
The windscreen wipers remain in the position in which they were when switching
off the ignition.
The service position can also be used as a winter position » page 250
.
Note
If the slow or the fast wiper setting is switched on and the vehicle speed decrea-
ses to below 4 km/h, the wiper speed is incrementally set to a lower wiper speed.
The original setting is restored step by step when the speed of the vehicle ex-
ceeds 8 km/h.
Headlight cleaning system
First read and observe the introductory information and safety warn-
ings
on page 65.
The headlights will be cleaned once the ignition is on and always upon the first and after every tenth spraying of the windscreen, when the low beam is switched
on.
Each time the headlamps are cleaned each lamp is sprayed twice. You should remove stubborn dirt (such as insect residues) from the headlight len-
ses at regular intervals, for example when refuelling. The following guidelines
must be observed » page 207, Headlight lenses .
To ensure the proper operation of the cleaning system during the winter, any
snow should be removed from the washer nozzle fixtures and ice should be
cleared with a de-icing spray.
CAUTION
Never remove the nozzles from the headlight cleaning system by hand – risk of
damage!
Note
The headlamp cleaning system works with an ambient temperature of about -12 °
C to + 39 ° C.
67Lights and visibility
Page 107 of 287
WARNING■The items which you transport on the roof rack must be reliably attached –
risk of accident!■
Always secure the load with appropriate and undamaged lashing straps or
tensioning straps.
■
Distribute the load evenly over the roof rack system.
■
When transporting heavy objects or objects which take up a large area on
the roof rack system, the handling of the car may change as a result of the displacement of the centre of gravity. The style of driving and speed musttherefore be adapted to the current circumstances.
■
Avoid abrupt and sudden driving/braking manoeuvres.
■
Adjust the speed and driving style to the visibility, weather, road and traffic
conditions.
■
The permissible roof load, permissible axle loads and gross permissible
weight of the vehicle must not be exceeded under any circumstances – risk of
accident!
CAUTION
■ Only use roof rack systems approved by ŠKODA AUTO a.s.■When dealing with roof rack systems, the installation instructions supplied with
the roof luggage rack system must be observed.■
On models fitted with a sliding/tilting roof, ensure that the sliding/tilting roof
does not strike any items of luggage transported on the roof.
■
Ensure that the luggage compartment lid does not hit the roof load when
opened.
■
The height of the vehicle changes after mounting a roof luggage rack system
and the load that is secured to it. Compare the vehicle height with available clear-
ances, such as underpasses and garage doors.
■
Always remove the roof luggage rack system before entering an automated car
wash.
■
Ensure the roof aerial is not impaired by the secured load.
For the sake of the environment
The increased aerodynamic drag results in a higher fuel consumption.NoteThe removed roof rack for the Octavia Estate can be stowed in the stowage com-
partment under the variable loading floor » page 97, Stowing roll-up luggage
compartment cover and roof racks .
Attachment points
Does not apply to the Octavia Estate.
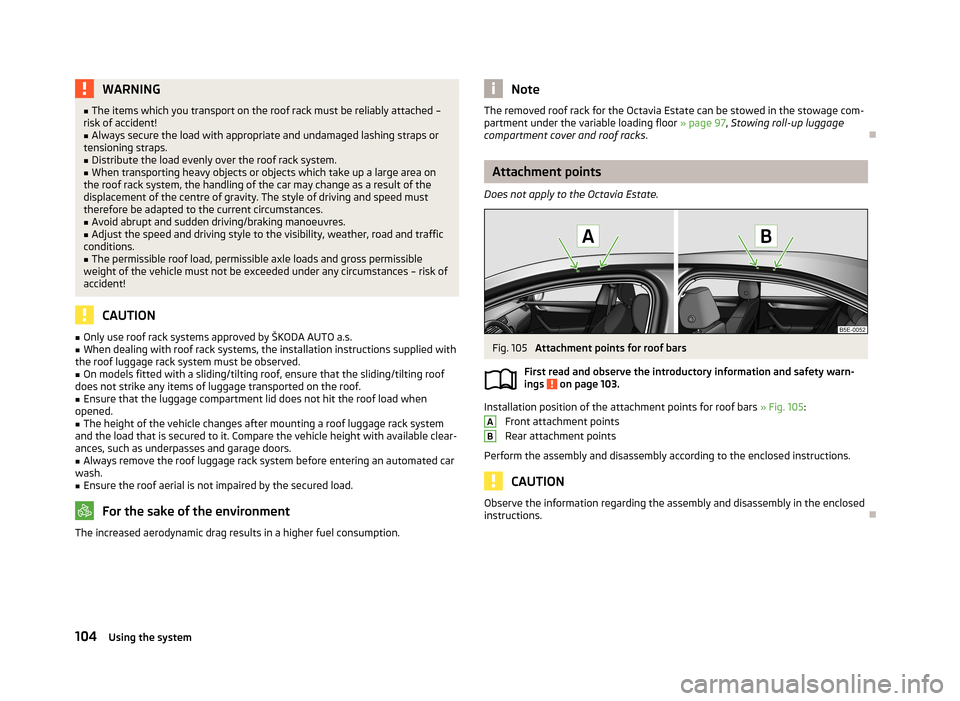
Fig. 105
Attachment points for roof bars
First read and observe the introductory information and safety warn- ings
on page 103.
Installation position of the attachment points for roof bars » Fig. 105:
Front attachment points
Rear attachment points
Perform the assembly and disassembly according to the enclosed instructions.
CAUTION
Observe the information regarding the assembly and disassembly in the enclosed
instructions.
AB104Using the system
Page 110 of 287
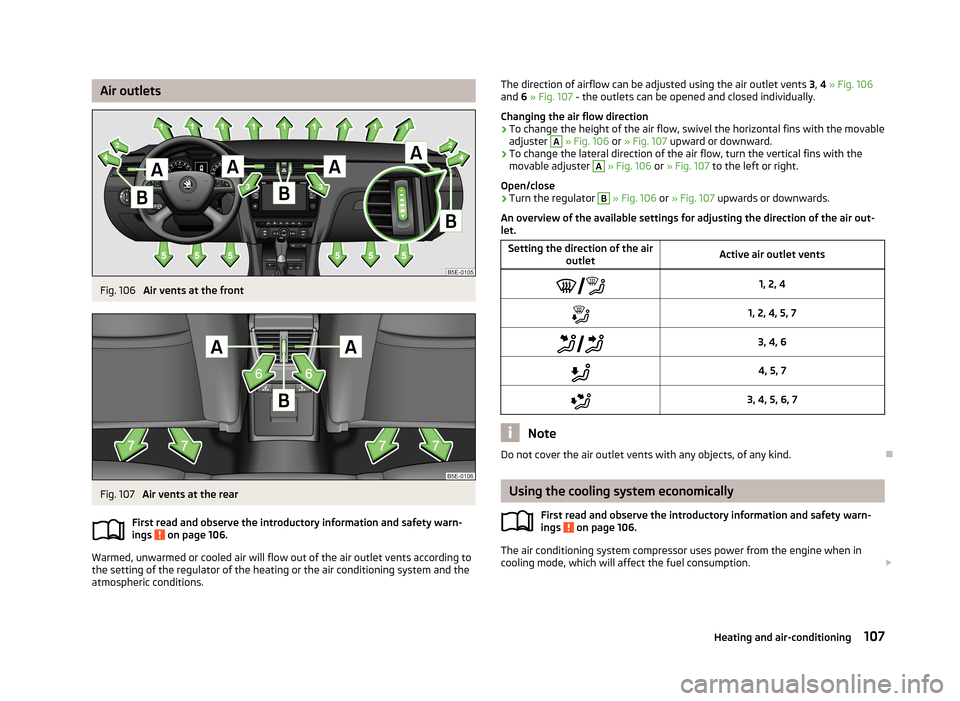
Air outletsFig. 106
Air vents at the front
Fig. 107
Air vents at the rear
First read and observe the introductory information and safety warn-
ings
on page 106.
Warmed, unwarmed or cooled air will flow out of the air outlet vents according to
the setting of the regulator of the heating or the air conditioning system and the atmospheric conditions.
The direction of airflow can be adjusted using the air outlet vents 3, 4 » Fig. 106
and 6 » Fig. 107 - the outlets can be opened and closed individually.
Changing the air flow direction›
To change the height of the air flow, swivel the horizontal fins with the movable
adjuster
A
» Fig. 106 or » Fig. 107 upward or downward.
›
To change the lateral direction of the air flow, turn the vertical fins with the
movable adjuster
A
» Fig. 106 or » Fig. 107 to the left or right.
Open/close
›
Turn the regulator
B
» Fig. 106 or » Fig. 107 upwards or downwards.
An overview of the available settings for adjusting the direction of the air out- let.
Setting the direction of the air
outletActive air outlet vents1, 2, 41, 2, 4, 5, 7 3, 4, 64, 5, 73, 4, 5, 6, 7
Note
Do not cover the air outlet vents with any objects, of any kind.
Using the cooling system economically
First read and observe the introductory information and safety warn-
ings
on page 106.
The air conditioning system compressor uses power from the engine when in
cooling mode, which will affect the fuel consumption.
107Heating and air-conditioning