wheel size SKODA OCTAVIA 2013 3.G / (5E) User Guide
[x] Cancel search | Manufacturer: SKODA, Model Year: 2013, Model line: OCTAVIA, Model: SKODA OCTAVIA 2013 3.G / (5E)Pages: 287, PDF Size: 18.55 MB
Page 237 of 287
Winter operation
Introduction
This chapter contains information on the following subjects:
Winter tyres
234
Snow chains
234
Winter tyres
First read and observe the introductory information given on page 234.
The handling of your vehicle will be significantly improved when driving on wintry
roads if you fit winter tyres. Summer tyres on ice, snee and at temperatures be-
low 7 °C have less grip. This is especially true of low-profile tyres or high-speed
tyres .
To achieve the best possible handling properties, winter tyres must be fitted on
all 4 wheels, the minimum tread depth must be 4 mm and tyres must be no older than 4 years.
Winter tyres of a lower speed category can be used provided that the permissible
maximum speed of these tyres is not exceeded even if the possible maximum
speed of the vehicle is higher.
The winter tyre speed limit is set in the Infotainment system » Operating instruc-
tions for Infotainment , chapter Vehicle settings (CAR button) .
For the sake of the environment
Fit the summer tyres on again in good time as they provide better handling prop-
erties, a shorter braking distance, less tyre noise, and reduced tyre wear on roadswhich are free of snow and ice as well as at temperatures above 7 °C. The fuelconsumption is also lower.
Snow chains
First read and observe the introductory information given on page 234.
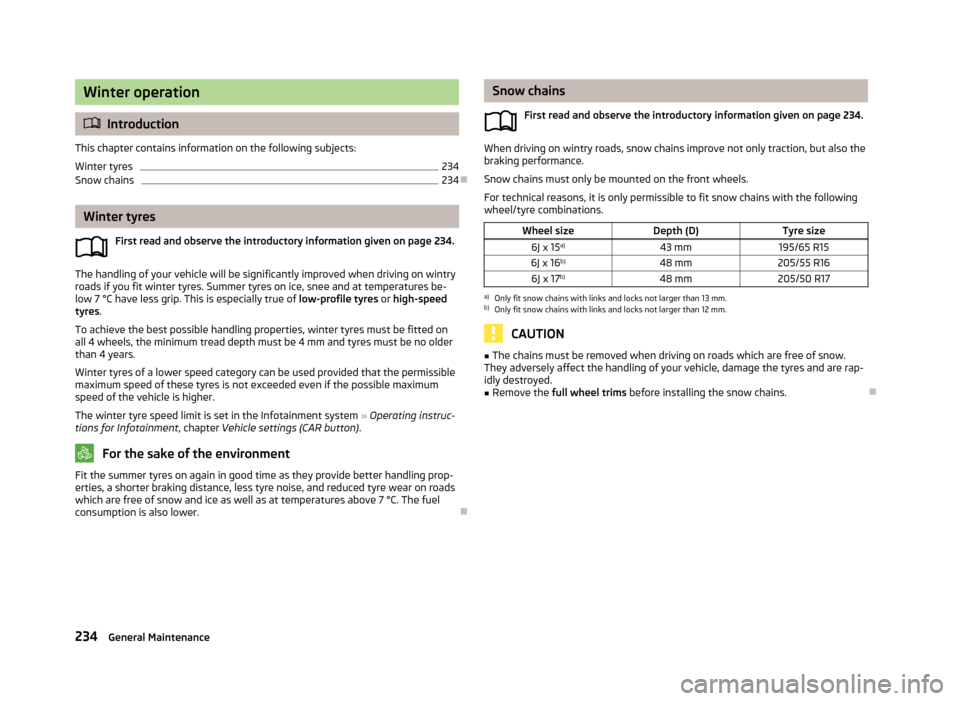
When driving on wintry roads, snow chains improve not only traction, but also the
braking performance.
Snow chains must only be mounted on the front wheels.
For technical reasons, it is only permissible to fit snow chains with the following wheel/tyre combinations.
Wheel sizeDepth (D)Tyre size6J x 15 a)43 mm195/65 R156J x 16 b)48 mm205/55 R166J x 17b)48 mm205/50 R17a)
Only fit snow chains with links and locks not larger than 13 mm.
b)
Only fit snow chains with links and locks not larger than 12 mm.
CAUTION
■
The chains must be removed when driving on roads which are free of snow.
They adversely affect the handling of your vehicle, damage the tyres and are rap-
idly destroyed.■
Remove the full wheel trims before installing the snow chains.
234General Maintenance
Page 243 of 287
›Continue turning up the jack until the wheel is just about lifted off the ground.WARNING■
Only raise the vehicle at the attachment points.■Choose a flat and firm surface for jacking the vehicle.
Securing wheels against theft
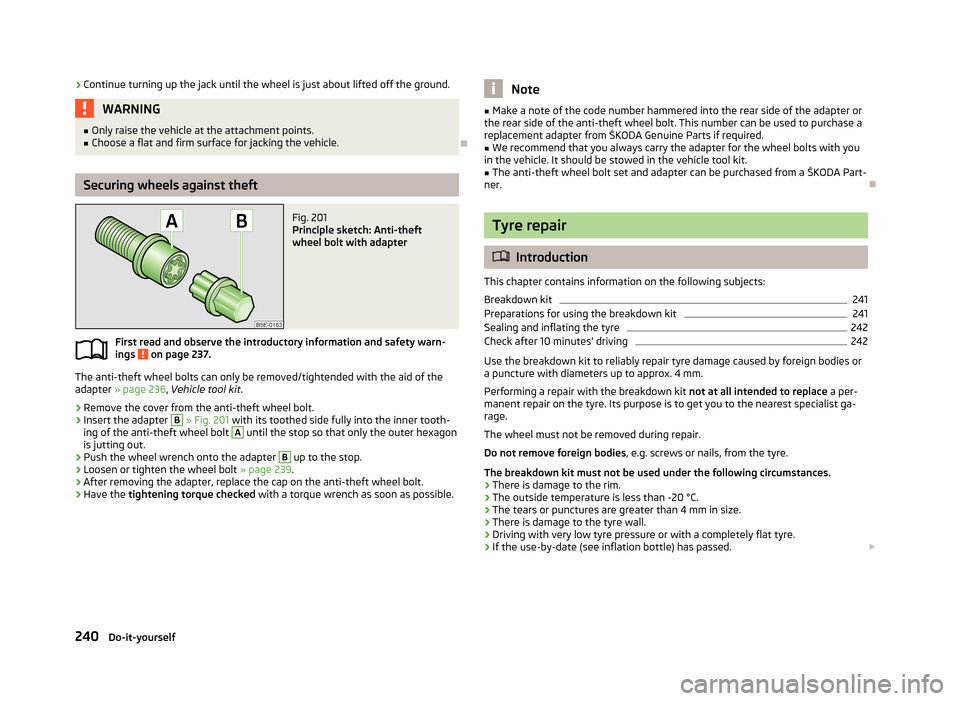
Fig. 201
Principle sketch: Anti-theft
wheel bolt with adapter
First read and observe the introductory information and safety warn-
ings on page 237.
The anti-theft wheel bolts can only be removed/tightended with the aid of theadapter » page 236 , Vehicle tool kit .
›
Remove the cover from the anti-theft wheel bolt.
›
Insert the adapter
B
» Fig. 201 with its toothed side fully into the inner tooth-
ing of the anti-theft wheel bolt
A
until the stop so that only the outer hexagon
is jutting out.
›
Push the wheel wrench onto the adapter
B
up to the stop.
›
Loosen or tighten the wheel bolt » page 239
.
›
After removing the adapter, replace the cap on the anti-theft wheel bolt.
›
Have the tightening torque checked with a torque wrench as soon as possible.
Note■
Make a note of the code number hammered into the rear side of the adapter or
the rear side of the anti-theft wheel bolt. This number can be used to purchase a
replacement adapter from ŠKODA Genuine Parts if required.■
We recommend that you always carry the adapter for the wheel bolts with you
in the vehicle. It should be stowed in the vehicle tool kit.
■
The anti-theft wheel bolt set and adapter can be purchased from a ŠKODA Part-
ner.
Tyre repair
Introduction
This chapter contains information on the following subjects:
Breakdown kit
241
Preparations for using the breakdown kit
241
Sealing and inflating the tyre
242
Check after 10 minutes' driving
242
Use the breakdown kit to reliably repair tyre damage caused by foreign bodies or
a puncture with diameters up to approx. 4 mm.
Performing a repair with the breakdown kit not at all intended to replace a per-
manent repair on the tyre. Its purpose is to get you to the nearest specialist ga-
rage.
The wheel must not be removed during repair.
Do not remove foreign bodies , e.g. screws or nails, from the tyre.
The breakdown kit must not be used under the following circumstances. › There is damage to the rim.
› The outside temperature is less than -20 °C.
› The tears or punctures are greater than 4 mm in size.
› There is damage to the tyre wall.
› Driving with very low tyre pressure or with a completely flat tyre.
› If the use-by-date (see inflation bottle) has passed.
240Do-it-yourself
Page 283 of 287
Cleaning the wheels208
Decorative films206
Door lock cylinders207
Headlight lenses207
High-pressure cleaner204
Plastic parts206
Polishing the paintwork205
Rubber seals206
Taking care of the interior208
Taking care of your vehicle exterior205
Washing203
Washing by hand204
Wash system204
Wax treatment205
Taking care of your vehicles Fabric covers
210
TCS Operation
138
Warning light18
Technical data263
Temporary spare wheel232
Tiptronic128
Tools236
TOP TETHER197
Towing244
Towing a trailer169
Towing device Description
169
Drawbar load169
Use and care172
Towing eye front
245
Rear245
Towing protection43
Traction Control System (TCS)138
Traffic sign recognition166
Function166
Information messages167
Traffic Sign Recognition Notifications and settings
167
Traffic signssee Traffic sign recognition166
Trailer169, 172
13-pin power socket173
driving with a trailer173
loading172
Safety eye173
Trailer stabilisation174
Transmission warning messages
16
Transport Luggage compartment
91
Roof rack system103
Transporting children safely193
Turn signal56
Turn signal system Warning light
20
Type plate263
Tyre control display Calibration
231
Tyre inflation pressure Warning light
20
Tyre load-bearing capacity see Wheels
230
Tyre repair Check pressure
242
Preparations241
Sealing and inflating the tyre242
Tyres228
Inflation pressure229
New230
See Wheels230
Sizes229
Tyre wear indicator229
U
Underbody protection
208
Unleaded petrol136
Unlocking Individual settings39
KESSY38
Key36
Remote control37
Vehicle key36
Unlocking and locking35
Useful equipment 12-volt power outlet
84
230-volt power socket89
Ashtray83
Car park ticket holder80
Cigarette lighter83
Clothes hook88
Cup holders82
Glasses storage box86
Holder for reflective vest81
Multimedia holder85
Removable ski bag90
Seat backrest with long-cargo channel90
Storage compartment in the front centre console 82
Storage compartment on the driver's side
80
Storage compartments in the doors81
Storage compartment under the front armrest86
Using the information system26
Using the selector lever127
V
Variable loading floor
99
Dividing the luggage compartment101
Folding up101
Position change100
Vehicle battery Automatic load deactivation
227
Charge level indicator14
charging226
Checking the battery electrolyte level226
Cover225
Operation in winter226
Replacing227
280Index
Page 284 of 287
Safety instructions224
Warning icon22
Vehicle care198
Alcantara210
Artificial leather210
Cloths210
Vehicle condition see Auto-check control
14
Vehicle data sticker263
Vehicle dimensions265
Vehicle height265
vehicle identification number - VIN (vehicle body number)
263
Vehicle key Locking
36
Unlocking36
Vehicle length265
Vehicle tool kit236
Vehicle width265
Vest Holder for reflective vest
81
Visibility64
Visors see Sun screen
65
see Sun visors65
W
Warning at excessive speeds
31
Warning icons21
Warning lights15
Warning symbols see Warning lights
15
see Warning symbols21
Warning triangle235
Warranty5
Washing198
Automatic car wash system204
by hand204
Chrome parts206
High-pressure cleaner204
Waste container85
Water Driving through
135
Water in the fuel filter indicator symbol
25
warning messages25
Wax treatment See Taking care of your vehicle
205
Weights263
Wheel bolts Anti-theft wheel bolt
240
Caps233
Loosening and tightening239
Wheel rims228
Wheels Bolts
233
Changing237
Full trim233
General information228
Load index230
Low-profile tyres231
Replacing wheels229
Service life of tyres229
Snow chains234
Spare wheel232
Speed symbol231
Storing wheels229
Temporary spare wheel232
Tyre pressure229
Tyre sizes229
Tyre wear indicator229
Winter tyres234
Windows De-icing
207
See Electrical power windows47
Window wiper Replacing the rear window wiper blade
250
Windscreen Heater
64
Windscreen washer fluidChecking218
Replenishing218
Warning icon24
Winter218
Windscreen washers Windscreen washers
66
Windscreen washer system218
Windscreen wipers Operating
66
Replacing the windscreen wipers250
Windscreen washer fluid218
Windscreen wipers and washers65
Winter operation234
Snow chains234
Winter tyres234
Winter tyres See Wheels
234
Wiper blades Service position of the windscreen wiper arms
250
X
XDS
139
281Index