height SKODA OCTAVIA 2013 3.G / (5E) Owner's Guide
[x] Cancel search | Manufacturer: SKODA, Model Year: 2013, Model line: OCTAVIA, Model: SKODA OCTAVIA 2013 3.G / (5E)Pages: 287, PDF Size: 18.55 MB
Page 220 of 287
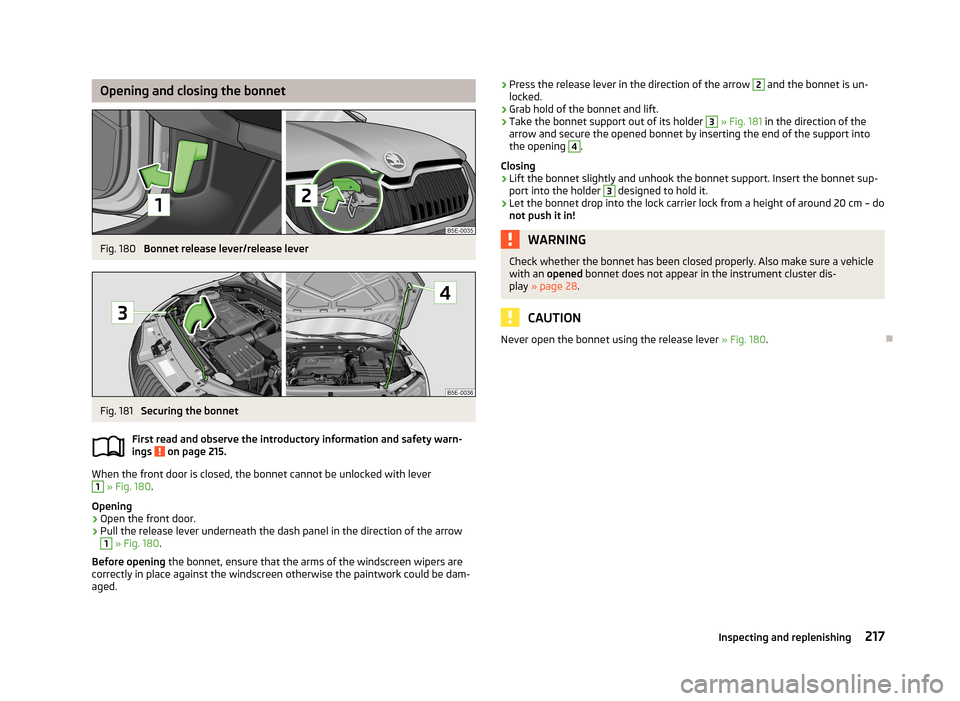
Opening and closing the bonnetFig. 180
Bonnet release lever/release lever
Fig. 181
Securing the bonnet
First read and observe the introductory information and safety warn-
ings
on page 215.
When the front door is closed, the bonnet cannot be unlocked with lever
1
» Fig. 180 .
Opening
›
Open the front door.
›
Pull the release lever underneath the dash panel in the direction of the arrow
1
» Fig. 180 .
Before opening the bonnet, ensure that the arms of the windscreen wipers are
correctly in place against the windscreen otherwise the paintwork could be dam- aged.
› Press the release lever in the direction of the arrow 2 and the bonnet is un-
locked.›
Grab hold of the bonnet and lift.
›
Take the bonnet support out of its holder
3
» Fig. 181 in the direction of the
arrow and secure the opened bonnet by inserting the end of the support into the opening
4
.
Closing
›
Lift the bonnet slightly and unhook the bonnet support. Insert the bonnet sup-
port into the holder
3
designed to hold it.
›
Let the bonnet drop into the lock carrier lock from a height of around 20 cm – do not push it in!
WARNINGCheck whether the bonnet has been closed properly. Also make sure a vehicle
with an opened bonnet does not appear in the instrument cluster dis-
play » page 28 .
CAUTION
Never open the bonnet using the release lever » Fig. 180.
217Inspecting and replenishing
Page 233 of 287
Always check the inflation pressure when the tyres are cold. Do not reduce the
higher pressure of warm tyres.
With greater payload, adjust the tyre inflation pressure accordingly.
Driving style
Fast cornering, sharp acceleration and braking increase the wear of your tyres.
Balancing wheels
The wheels of a new vehicle are balanced. When driving, there are a wide range
of influences which may result in an imbalance. This may become apparent by a
“vibration” in the steering.
Have the wheels rebalanced after replacing the tyres.
Wheel alignment errors
An incorrect wheel alignment at the front or rear leads to excess wear on the tyres.
Tyre damage
Drive over kerbs and other such obstacles slowly and perpendicularly wherever possible in order to avoid damage to tyres and wheel trims.
We recommend checking your tyres and wheel rims for damage (punctures, cuts,
splits and bulges, etc.) on a regular basis. Remove foreign bodies (e.g. small
stones) from the tyre profile immediately.
Changing wheels around
If significantly greater wear is present on the front tyres, we recommend replac-
ing the front wheels with the rear wheels as shown in the diagram » Fig. 190 .
You will then obtain approximately the same life for all the tyres.
We recommend that you change the tyres around every 10000 km in order to
achieve even wear on all tyres and to obtain optimal tyre life.
Storing tyres
Mark them previously used tyres so that you are able to fit them on again to run in the same direction.
Always store wheels or tyres in a cool, dry and, where possible, dark place. Tyres which are not fixed to a wheel trim should be stored upright.
Wear indicators
The base of the tread of the tyres has 1.6 mm high wear indicators installed.
These wear indicators are evenly spaced around the circumference of the tyre,
depending on the make » Fig. 189 -
. Markings on the walls of the tyres through
the letters “TWI”, triangular symbols or other symbols identify the position of the
wear indicators.Tyre age
Tyres age losing their original characteristics, even if they are not used. There-
fore, we recommend not to use summer or winter tyres that are older than 6 years or 4 years respectively.
New tyres
First read and observe the introductory information and safety warn-
ings
on page 228.
Only fit radial tyres of the same type, size (rolling circumference) and the same
tread pattern on one axle on all 4 wheels.
The tyre/wheel combinations which are approved for your vehicle are indicated in
your vehicle documents.
Where possible replace tyres by axle. Always fit the tyres with the deeper tread
depth to the front wheels.
Explanation of tyre markings
195/65 R 15 91 T
What this means is:
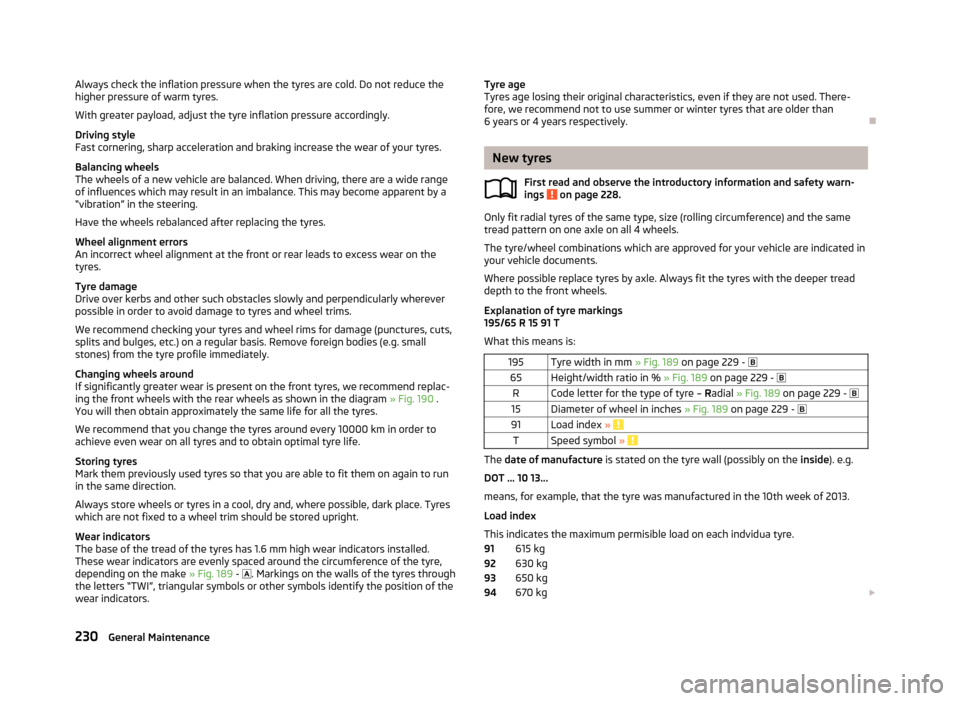
195Tyre width in mm » Fig. 189 on page 229 - 65Height/width ratio in % » Fig. 189 on page 229 - RCode letter for the type of tyre – Radial » Fig. 189 on page 229 - 15Diameter of wheel in inches » Fig. 189 on page 229 - 91Load index » TSpeed symbol »
The date of manufacture is stated on the tyre wall (possibly on the inside). e.g.
DOT ... 10 13...
means, for example, that the tyre was manufactured in the 10th week of 2013.
Load index
This indicates the maximum permisible load on each indvidua tyre. 615 kg
630 kg
650 kg
670 kg
91929394230General Maintenance
Page 268 of 287
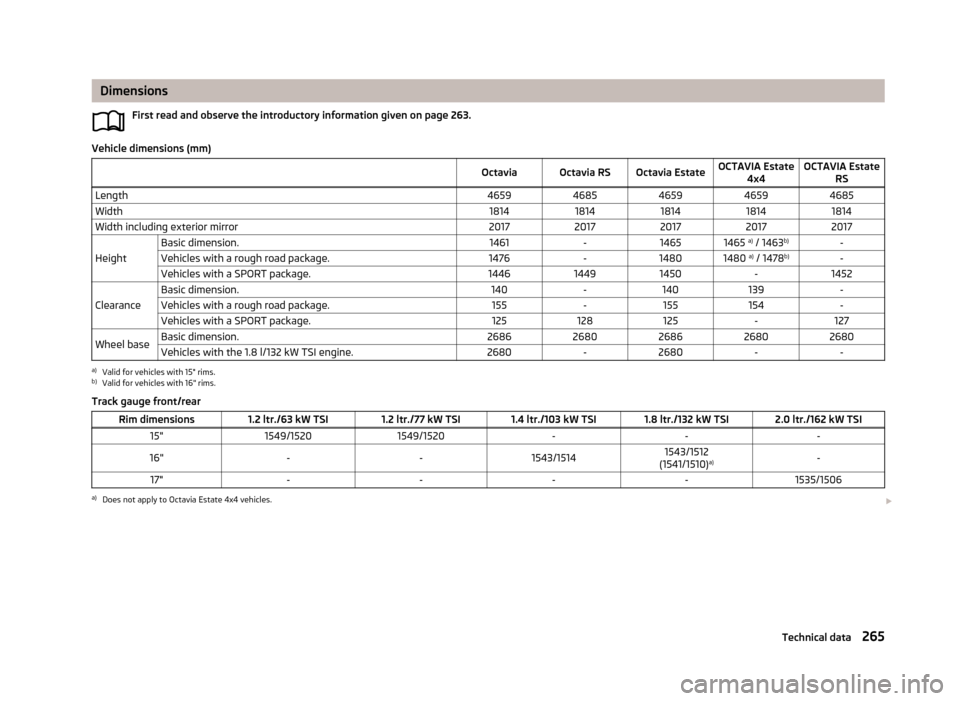
DimensionsFirst read and observe the introductory information given on page 263.
Vehicle dimensions (mm)
OctaviaOctavia RSOctavia EstateOCTAVIA Estate4x4OCTAVIA Estate RSLength46594685465946594685Width18141814181418141814Width including exterior mirror20172017201720172017
Height
Basic dimension.1461-14651465 a)
/ 1463 b)-Vehicles with a rough road package.1476-14801480 a)
/ 1478 b)-Vehicles with a SPORT package.144614491450-1452
Clearance
Basic dimension.140-140139-Vehicles with a rough road package.155-155154-Vehicles with a SPORT package.125128125-127Wheel baseBasic dimension.26862680268626802680Vehicles with the 1.8 l/132 kW TSI engine.2680-2680--a)
Valid for vehicles with 15" rims.
b)
Valid for vehicles with 16" rims.
Track gauge front/rear
Rim dimensions1.2 ltr./63 kW TSI1.2 ltr./77 kW TSI1.4 ltr./103 kW TSI1.8 ltr./132 kW TSI2.0 ltr./162 kW TSI15"1549/15201549/1520---16"--1543/15141543/1512
(1541/1510) a)-17"----1535/1506a)
Does not apply to Octavia Estate 4x4 vehicles.
265Technical data
Page 275 of 287
Index
A
Abroad Driving abroad
136
Unleaded petrol136
ABS Function
138
Warning light18
ACC148
Accessories200
Adaptive cruise control148
automatic stop-start151
Information messages154
Instructions and Information148
Operation150
Operation Overview151
Radar sensor149
Set/change the desired speed.152
Set time interval level153
special driving conditions153
Start control152
Stop/resume control152
Adaptive headlights (AFS)57
Adjust Auxiliary heating (auxiliary heating and ventila-
tion)
116
Adjusting Belt height
183
Exterior mirrors69
Head restraints73
Interior mirror69
Manual air conditioning111
Seats71, 72
Steering wheel118
Adjusting the seats71, 177
Adjustment Headlight beam
55
Aerial204
AFS57
Airbag185
Deactivating191
Deactivating the front passenger airbag191
Deployment185
Front airbag187
Head airbag189
Knee airbag188
Modifications and damage to the airbag system 203
Side airbag
188
warning light19
Airbag system185
Air conditioning system Air outlets
107
Climatronic112
Manual air conditioning system110
Air outlets107
Air recirculation Climatronic
114
Alarm Switching off
42
Triggering42
Anti-theft alarm system Activating/deactivating
42
Trailer174
Antilock Braking System138
Area monitoring system154
Armrest Front
77
Rear77
Artificial leather210
Ashtray83
ASR warning light
17
Assistant systems Front Assist
154
Assist system ABS
138
Assist systems137
ABS18
Adaptive cruise control148
ASR17
Cruise Control System146
Driving mode161
DSR139
EDL139
ESC18, 137
HBA139
Headlight assist58
HHC139
Lane Assist164
Park assist142
Parking aid140
ProActive passenger protection163
START-STOP158
TCS138
XDS139
Auto-check control14
Automatic driving lamp control57
Automatic gearbox Selector lever-emergency unlocking
249
Starting-off and driving129
Tiptronic128
Automatic load deactivation227
automatic transmission selector lever lock defect
128
Automatic transmission126
Kickdown129
Selector lever lock128
Using the selector lever127
Automatic Transmission indicator
16
malfunction16
warning messages16
Auxiliary heating (auxiliary heating and ventila- tion)
115
Adjust116
Radio remote control116
Switching on/off116
272Index
Page 282 of 287

Saving electrical energy131
Seals Taking care of your vehicle
206
Seat belt Warning icon
22
warning light17
Seat belts180
Belt tensioners183
Cleaning211
fastening and unfastening182
Height adjustment183
Seatbelts Inertia reels
183
Seat belts The physical principle of a head-on collision
181
Seat features76
Seats Electric adjustment
73
Folding front passenger seat77
Front armrest77
Head restraints73
Heating76
Manually adjusting72
Rear armrest77
save74
Seat backrests78
Storing in memory of remote control key75
Seats and useful equipment71
Adjusting the seats71
see automatic gearbox Manual shifting of gears on the multifunction steering wheel
128
Select driving mode Eco mode
162
Individual mode163
Sport mode162
Selecting driving mode161
Selector lever see Using the selector lever
127
Selector lever lock Warning light
21
Service201
Service interval display33
Service intervals198
Setting14
Positions of the variable loading floor100
Setting the14
Shelves79
Shifting gears Driving and saving energy
132
Side airbag188
Side lights55
ski bag90
Sliding/tilting roof Closing the sun screen (Octavia Estate)
52
Closing (Octavia Estate)52
Closing (Octavia)50
Opening/closing the sun screen (Octavia Estate)52
Opening and tilting (Octavia Estate)52
Opening and tilting (Octavia)50
Operation (Octavia Estate)52
Operation (Octavia)50
Snow chains234
Spare wheel232
Speedometer12
see speedometer12
Speed symbol see Wheels
231
Spoiler202
START-STOP158
Manually activating/deactivating the system160
Operating conditions of the system160
Starting/shutting down the engine159
Warning icon25
Starting and stopping the engine - KESSY121
Starting and stopping the engine using the key119
Starting engine Jump-starting
243
Starting the engineJump-starting243
Key120
see KESSY123
START STOP Information messages
161
Jump-starting244
Steering force assistance119
Steering lock / unlock see KESSY
122
Steering wheel118
Stopping the engine Key
121
Stop watch32
Storage compartment in rear centre console88
Storage compartment on the passenger side87
Storage compartments79
Storage compartment under the passenger seat87
Storage pockets on the front seats88
Storing skis90
Sun screen65
Sun visors65
Switch See Ignition
120
Switching off the engine see KESSY
123
Switching off the ignition see KESSY
123
Switching on the ignition see KESSY
123
T
Taking care of the vehicle Natural leather
209
Seat belts211
Taking care of your vehicle Automatic car wash system
204
Cavity protection208
Chrome parts206
279Index
Page 284 of 287
Safety instructions224
Warning icon22
Vehicle care198
Alcantara210
Artificial leather210
Cloths210
Vehicle condition see Auto-check control
14
Vehicle data sticker263
Vehicle dimensions265
Vehicle height265
vehicle identification number - VIN (vehicle body number)
263
Vehicle key Locking
36
Unlocking36
Vehicle length265
Vehicle tool kit236
Vehicle width265
Vest Holder for reflective vest
81
Visibility64
Visors see Sun screen
65
see Sun visors65
W
Warning at excessive speeds
31
Warning icons21
Warning lights15
Warning symbols see Warning lights
15
see Warning symbols21
Warning triangle235
Warranty5
Washing198
Automatic car wash system204
by hand204
Chrome parts206
High-pressure cleaner204
Waste container85
Water Driving through
135
Water in the fuel filter indicator symbol
25
warning messages25
Wax treatment See Taking care of your vehicle
205
Weights263
Wheel bolts Anti-theft wheel bolt
240
Caps233
Loosening and tightening239
Wheel rims228
Wheels Bolts
233
Changing237
Full trim233
General information228
Load index230
Low-profile tyres231
Replacing wheels229
Service life of tyres229
Snow chains234
Spare wheel232
Speed symbol231
Storing wheels229
Temporary spare wheel232
Tyre pressure229
Tyre sizes229
Tyre wear indicator229
Winter tyres234
Windows De-icing
207
See Electrical power windows47
Window wiper Replacing the rear window wiper blade
250
Windscreen Heater
64
Windscreen washer fluidChecking218
Replenishing218
Warning icon24
Winter218
Windscreen washers Windscreen washers
66
Windscreen washer system218
Windscreen wipers Operating
66
Replacing the windscreen wipers250
Windscreen washer fluid218
Windscreen wipers and washers65
Winter operation234
Snow chains234
Winter tyres234
Winter tyres See Wheels
234
Wiper blades Service position of the windscreen wiper arms
250
X
XDS
139
281Index