check oil SKODA OCTAVIA 2013 3.G / (5E) Owner's Manual
[x] Cancel search | Manufacturer: SKODA, Model Year: 2013, Model line: OCTAVIA, Model: SKODA OCTAVIA 2013 3.G / (5E)Pages: 287, PDF Size: 18.55 MB
Page 26 of 287
WARNING■If you have to stop for technical reasons, then park the vehicle at a safe dis-
tance from the traffic, switch off the engine and switch on the hazard warning lights » page 61 . The warning triangle must be set up at the prescribed dis-
tance - observe the national legal provisions when doing so.■
Carefully open the coolant expansion bottle. If the engine is hot, the cooling
system is pressurized – risk of scalding! It is therefore best to allow the engine
to cool down before removing the cap.
■
Do not touch the radiator fan. The radiator fan may switch itself on auto-
matically even if the ignition is off.
Engine oil pressure
First read and observe the introductory information and safety warn-
ings
on page 21.
When the warning icon
flashes, the engine oil pressure is too low.
The following message is shown in the information cluster display. Oil pressure: Stop! Owner's manual!
STOP VEHICLE OIL PRESSURE
Stop the vehicle, switch off the engine, and check the level of the engine
oil » page 220 , Checking the oil level .
Even if the oil level is correct, do not drive any further if the warning icon
is
flashing! Also do not leave the engine running at an idling speed.
Seek help from a specialist garage.
WARNINGIf you have to stop for technical reasons, then park the vehicle at a safe dis-
tance from the traffic, switch off the engine and switch on the hazard warning
lights » page 61 . The warning triangle must be set up at the prescribed dis-
tance - observe the national legal provisions when doing so.
Engine oil level
First read and observe the introductory information and safety warn-
ings
on page 21.
Engine oil level too low
If the warning icons and are lit , the engine oil level is too low.
The following message is shown in the information cluster display. Oil level: top up oil!
TOP UP OIL
Stop the vehicle, switch off the engine, and check the level of the engine
oil » page 220 .
The warning icon will go out if the bonnet is left open for more than 30 seconds.
If no engine oil has been replenished, the warning icon will come on again after
driving about 100 km.
Engine oil level too high
If the warning icons
and
are lit in conjunction with the following message on
the display, the engine oil level is too high.
Reduce oil level!
OIL LEVEL TOO HIGH
Stop the vehicle, switch off the engine, and check the level of the engine
oil » page 220 .
Engine oil level sensor
If the warning icons
and
are lit in conjunction with the following message on
the display, the engine oil level sensor is defective.
Oil sensor: workshop!
OIL SENSOR WORKSHOP
Seek assistance from a specialist garage immediately.
23Instruments and warning lights
Page 27 of 287
WARNING■Do not continue your journey if for some reason it is not possible to top up
the engine oil ! Switch off the engine and seek assistance from a specialist
garage.■
If you have to stop for technical reasons, then park the vehicle at a safe dis-
tance from the traffic, switch off the engine and switch on the hazard warning
lights » page 61 . The warning triangle must be set up at the prescribed dis-
tance - observe the national legal provisions when doing so.
Lamp failure
First read and observe the introductory information and safety warn-
ings
on page 21.
The warning icon
comes on if a bulb is faulty.
The following message is shown in the information cluster display, for example. Check right dipped headlight beam!
DIPPED HEADLIGHT CHECK RIGHT
Diesel particulate filter (diesel engine)
First read and observe the introductory information and safety warn-ings
on page 21.
The diesel particulate filter separates the soot particles from the exhaust. The
soot particles collect in the diesel particulate filter where they are burnt on a reg-
ular basis.
If the warning icon
illuminates, soot has accumulated in the diesel particulate
filter.
To clean the diesel particle filter, and where traffic conditions permit »
, drive
for at least 15 minutes or until the warning icon
goes out as follows.
› 4 or gear 5 engaged (automatic gearbox: Position D/S).
› Vehicle speed at least 70 km/h.
› Engine speed between 1800-2500 rpm.
If the filter is properly cleaned, the warning icon
goes out.
If the filter is not properly cleaned, the warning icon does not go out and the
warning icon begins to flash.
The following message is shown in the information cluster display. Diesel particulate filter: owner's manual!DIESEL PM FILTER OWNER MANUAL
Seek assistance from a specialist garage immediately.WARNING■ The diesel particle filter achieves very high temperatures. Therefore do not
park in areas where the hot filter can come into direct contact with dry grass
or other combustible materials – there is the risk of fire!■
Always adjust your speed to suit weather, road, region and traffic condi-
tions. The recommendations indicated by the warning light must not tempt
you to disregard the national regulations for road traffic.
CAUTION
■ As long as the warning icon lights up, you must take into account an in-
creased fuel consumption and in certain circumstances a power reduction of the
engine.■
Using diesel fuel with an increased sulphur content can considerably reduce the
life of the diesel particle filter. A ŠKODA partner will be able to tell you which
countries use diesel fuel with a high sulphur content.
Note
■ We encourage you to avoid constant short journeys. This will improve the com-
bustion process of the soot particles in the diesel particulate filter.■
If the engine is turned off during the filter cleaning process or shortly after-
wards, the cooling fan may turn on automatically for a few minutes.
Windscreen washer fluid level
First read and observe the introductory information and safety warn-ings
on page 21.
If the windscreen washer fluid level is too low, the warning icon comes on.
24Using the system
Page 33 of 287
Range
The range indicates the distance you can still drive with your vehicle based on the
level of fuel in the tank and the same style of driving as before.
The display is shown in steps of 10 km. After lighting up of the warning icon the
display is shown in steps of 5 km.
The fuel consumption over the last 50 km is used to calculate the range. The
range can increase if you drive in a more fuel-efficient manner.
Average fuel consumption
The average fuel consumption 1)
is calculated since the last time the memory was
erased.
If you wish to determine the average fuel consumption over a certain period of
time, you must set the memory at the start of the new measurement to zero » page 29 .
After erasing the memory, no fuel consumption data will appear for the first
100 m driven.
The indicated information is updated continuously while you are driving.
Current fuel consumption
You can use this information to adapt your driving style to the desired fuel con-
sumption 1)
.
The display appears in litres/hour if the vehicle is stationary or driving at a low
speed 2)
.
Oil temperature
If the engine oil temperature is in the range 80-110 °C, the engine operating tem-
perature is reached.
If the oil temperature is lower than 80 °C or above 110 °C, avoid high engine revs,
full throttle and high engine loads.
If the oil temperature is lower than 50 °C or if a fault in the system for checking the oil temperature is present,
are displayed instead of the oil temperature.
Warning against excessive speeds
Set the speed limit, for example, for the maximum permissible speed in
town » page 31 .Traffic sign recognition
The display can show up to three of the following traffic signs simultaneously.
› Speed limits (including additional signs).
› Overtaking prohibited.
Further information » page 166, Traffic sign recognition .
Current driving speed
The current speed displayed is identical to the display on the speedometer3
» Fig. 2 on page 11.
Average speed
The average speed since the memory was last erased is displayed in km/hour .
To determine the average speed over a certain period of time, set the memory to
zero at the start of the measurement » page 29.
After erasing the memory, no data will appear for the first 300 m driven. The indicated information is updated continuously while you are driving.
Distance travelled
The distance travelled since the memory was last erased is displayed.
If you want to measure the distance travelled from a particular moment in time on, at this moment, reset the memory by setting the button to zero » page 29.
The maximum distance indicated is 9999 km. The indicator is automatically set
back to zero if this period is exceeded.
Driving time
The time travelled since the memory was last erased is displayed.
If you want to measure the time travelled from a particular moment in time on, at this moment, reset the memory by setting the button to zero » page 29.
The maximum distance indicated is 99 hours and 59 minutes. The indicator is au- tomatically set back to zero if this period is exceeded.
Convenience consumers
There, the total consumption of all consumer comfort in l / h is displayed.
1)
The units for the displayed consumption are set in the Infotainment
» Bedienungsanleitung Infotain-
ment, chapter Device settings .
2)
On some models in certain countries, the display appears in --,- kilometres/litres if the vehicle is sta-
tionary.
30Using the system
Page 69 of 287
The rear window is wiped once automatically if the windscreen wipers are onwhen reverse gear is selected.
Automatic rear window wiping can be activated or deactivated in the Infotain-
ment » Operating instructions for Infotainment , chapter Vehicle settings (CAR
button) .
Top up with windscreen wiper fluid » page 218.WARNING■
Properly maintained windscreen wiper blades are essential for clear visibility
and safe driving » page 250.■
Replace the windscreen wiper blades once or twice a year for safety rea-
sons. These can be purchased from a ŠKODA Partner.
■
Do not use the windscreen washer system at low temperatures, without
heating the windscreen beforehand. Otherwise the window cleaner could
freeze on the windscreen and restrict the view to the front.
■
Automatic wiping in rain only operates as a support. The driver is not re-
leased from the responsibility to set the function of the windscreen wipers
manually depending on the visibility conditions.
CAUTION
■ In cold temperatures and during the winter, check before the journey or before
switching on the ignition that the wiper blades are not frozen to the windscreen. If the windscreen wipers are switched on when the blades are frozen to the
windscreen, this may damage both the blades and windscreen wiper motor!■
If the ignition is switched off while the windscreen wipers are switched on, the
windscreen wipers will continue wiping in the same mode after the ignition is
turned back on. The windscreen wipers could freeze up in cold temperatures be- tween the time the ignition was turned off and when it was turned back on again.
■
Carefully detach frozen wiper blades from the front or rear window.
■
Remove snow and ice from the windscreen wipers before driving.
■
If the windscreen wipers are handled carelessly, there is a risk of damage to the
windscreen.
■
Do not switch on the ignition if the front wiper arms are retracted. The wiper
blades would move back into their rest position and while doing so damage the
paintwork of the bonnet.
■
If there is an obstacle on the windscreen, the wiper will try to push away the
obstacle. The wiper stops automatically after 5 attempts to eliminate the obsta-
cle, in order to avoid a damage to the wiper. Remove the the obstacle and switch
the wiper on again.
Note■ Each time the ignition switches off for the third time, the position of the wind-
screen wipers changes. This counteracts an early fatigue of the wiper rubbers.■
The rear window wiper only operates if the boot lid is closed.
■
Keep the wiper blades clean. They may become soiled, e.g., with wax residues
after washing in automatic car wash systems » page 204.
■
The windscreen washer nozzles for the windscreen are heated when the en-
gine is running and the outside temperature is less than approx. +10 °C.
Windscreen wipers and washers
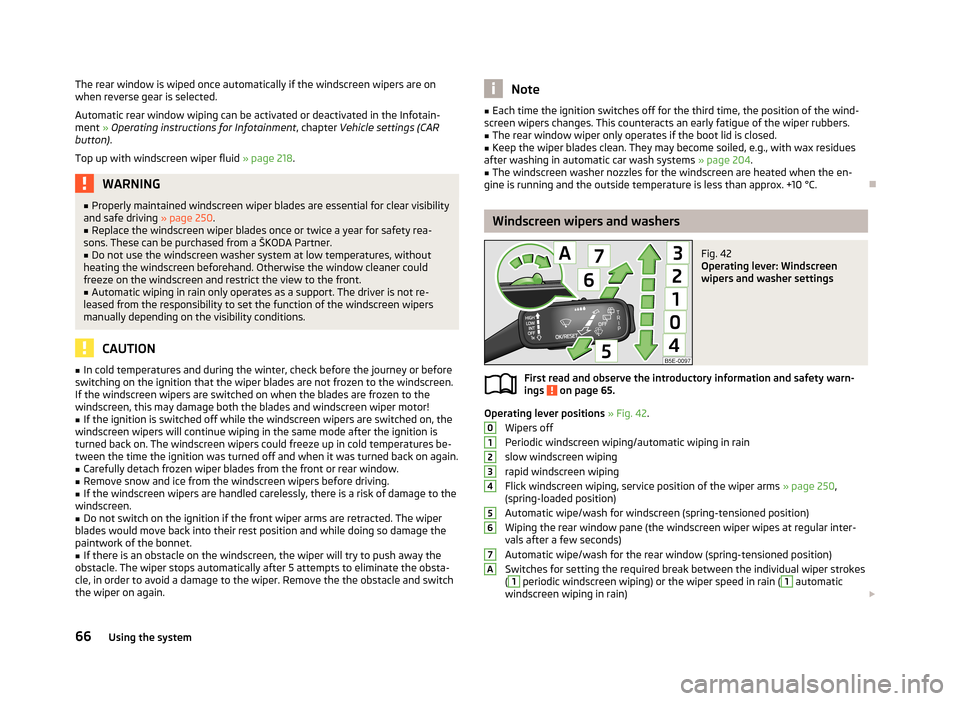
Fig. 42
Operating lever: Windscreen
wipers and washer settings
First read and observe the introductory information and safety warn-
ings on page 65.
Operating lever positions » Fig. 42 .
Wipers off
Periodic windscreen wiping/automatic wiping in rain
slow windscreen wiping
rapid windscreen wiping
Flick windscreen wiping, service position of the wiper arms » page 250,
(spring-loaded position)
Automatic wipe/wash for windscreen (spring-tensioned position)
Wiping the rear window pane (the windscreen wiper wipes at regular inter- vals after a few seconds)
Automatic wipe/wash for the rear window (spring-tensioned position)
Switches for setting the required break between the individual wiper strokes
(
1
periodic windscreen wiping) or the wiper speed in rain (
1
automatic
windscreen wiping in rain)
01234567A66Using the system
Page 82 of 287
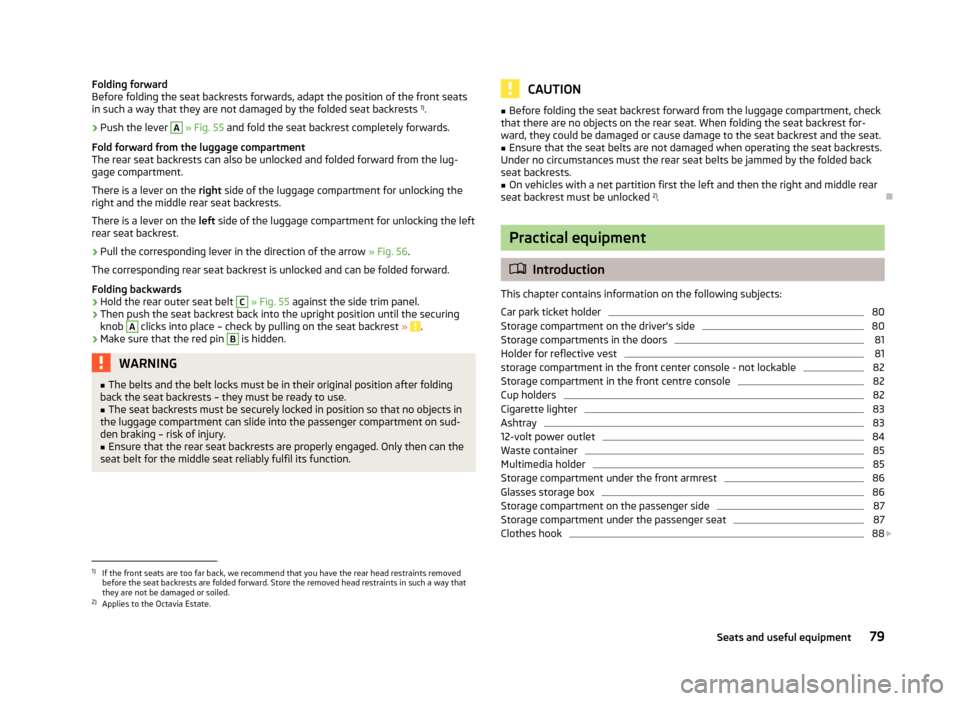
Folding forward
Before folding the seat backrests forwards, adapt the position of the front seats
in such a way that they are not damaged by the folded seat backrests 1)
.›
Push the lever
A
» Fig. 55 and fold the seat backrest completely forwards.
Fold forward from the luggage compartment
The rear seat backrests can also be unlocked and folded forward from the lug-
gage compartment.
There is a lever on the right side of the luggage compartment for unlocking the
right and the middle rear seat backrests.
There is a lever on the left side of the luggage compartment for unlocking the left
rear seat backrest.
›
Pull the corresponding lever in the direction of the arrow » Fig. 56.
The corresponding rear seat backrest is unlocked and can be folded forward.
Folding backwards
›
Hold the rear outer seat belt
C
» Fig. 55 against the side trim panel.
›
Then push the seat backrest back into the upright position until the securing
knob
A
clicks into place – check by pulling on the seat backrest » .
›
Make sure that the red pin
B
is hidden.
WARNING■
The belts and the belt locks must be in their original position after folding
back the seat backrests – they must be ready to use.■
The seat backrests must be securely locked in position so that no objects in
the luggage compartment can slide into the passenger compartment on sud- den braking – risk of injury.
■
Ensure that the rear seat backrests are properly engaged. Only then can the
seat belt for the middle seat reliably fulfil its function.
CAUTION■ Before folding the seat backrest forward from the luggage compartment, check
that there are no objects on the rear seat. When folding the seat backrest for-
ward, they could be damaged or cause damage to the seat backrest and the seat.■
Ensure that the seat belts are not damaged when operating the seat backrests.
Under no circumstances must the rear seat belts be jammed by the folded back
seat backrests.
■
On vehicles with a net partition first the left and then the right and middle rear
seat backrest must be unlocked 2)
.
Practical equipment
Introduction
This chapter contains information on the following subjects:
Car park ticket holder
80
Storage compartment on the driver's side
80
Storage compartments in the doors
81
Holder for reflective vest
81
storage compartment in the front center console - not lockable
82
Storage compartment in the front centre console
82
Cup holders
82
Cigarette lighter
83
Ashtray
83
12-volt power outlet
84
Waste container
85
Multimedia holder
85
Storage compartment under the front armrest
86
Glasses storage box
86
Storage compartment on the passenger side
87
Storage compartment under the passenger seat
87
Clothes hook
88
1)
If the front seats are too far back, we recommend that you have the rear head restraints removed
before the seat backrests are folded forward. Store the removed head restraints in such a way that
they are not be damaged or soiled.
2)
Applies to the Octavia Estate.
79Seats and useful equipment
Page 127 of 287
The engine and the ignition are switched off simultaneously.
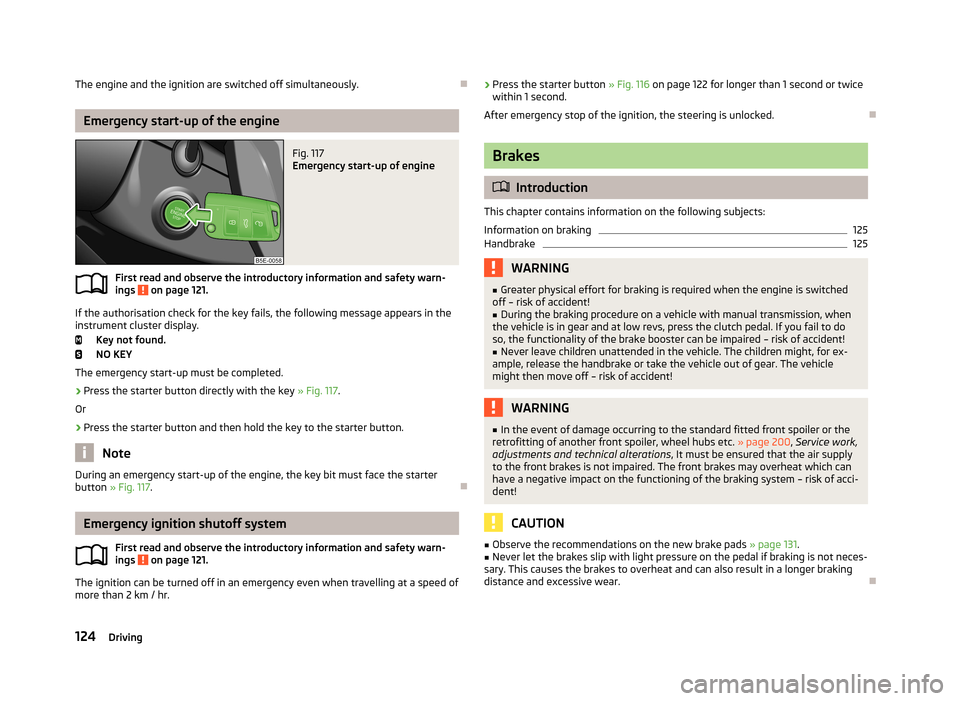
Emergency start-up of the engine
Fig. 117
Emergency start-up of engine
First read and observe the introductory information and safety warn-ings on page 121.
If the authorisation check for the key fails, the following message appears in the instrument cluster display.
Key not found.
NO KEY
The emergency start-up must be completed.
› Press the starter button directly with the key
» Fig. 117.
Or
› Press the starter button and then hold the key to the starter button.
Note
During an emergency start-up of the engine, the key bit must face the starter
button » Fig. 117 .
Emergency ignition shutoff system
First read and observe the introductory information and safety warn-
ings
on page 121.
The ignition can be turned off in an emergency even when travelling at a speed of
more than 2 km / hr.
› Press the starter button
» Fig. 116 on page 122 for longer than 1 second or twice
within 1 second.
After emergency stop of the ignition, the steering is unlocked.
Brakes
Introduction
This chapter contains information on the following subjects:
Information on braking
125
Handbrake
125WARNING■ Greater physical effort for braking is required when the engine is switched
off – risk of accident!■
During the braking procedure on a vehicle with manual transmission, when
the vehicle is in gear and at low revs, press the clutch pedal. If you fail to do
so, the functionality of the brake booster can be impaired – risk of accident!
■
Never leave children unattended in the vehicle. The children might, for ex-
ample, release the handbrake or take the vehicle out of gear. The vehicle might then move off – risk of accident!
WARNING■ In the event of damage occurring to the standard fitted front spoiler or the
retrofitting of another front spoiler, wheel hubs etc. » page 200, Service work,
adjustments and technical alterations , It must be ensured that the air supply
to the front brakes is not impaired. The front brakes may overheat which can
have a negative impact on the functioning of the braking system – risk of acci-
dent!
CAUTION
■ Observe the recommendations on the new brake pads » page 131.■Never let the brakes slip with light pressure on the pedal if braking is not neces-
sary. This causes the brakes to overheat and can also result in a longer braking
distance and excessive wear.
124Driving
Page 137 of 287
Avoiding unnecessary ballastFirst read and observe the introductory information and safety warn-
ings
on page 131.
Transporting ballast costs fuel.
Each kilogramme of weight increases the fuel consumption. Therefore, we rec-
ommend to carry no unnecessary weight.
It is particularly in town traffic, when one is accelerating quite often, that the ve-
hicle weight will have a significant effect upon the fuel consumption. A rule of
thumb here is that an increase in weight of 100 kilograms will cause an increase
in fuel consumption of about 1 litre/100 kilometres.
At a speed of 100 - 120 km/h, a vehicle fitted with a roof rack cross member with-
out a load will use about 10 % more fuel than normal due to the increased aero-
dynamic drag.
Regular maintenance
First read and observe the introductory information and safety warn-
ings
on page 131.
A poorly tuned engine uses an unnecessarily high amount of fuel.
By having your vehicle regularly maintained by a specialist garage, you create the conditions needed for economical driving. The maintenance state of your vehicle has a positive effect on traffic safety and value retention.
A poorly tuned engine can result in a fuel consumption which is 10 % higher thannormal!
Check the oil at regular intervals, e.g. when filling up. Oil consumption is depend-
ent to a considerable extent on the load and speed of the engine. Oil consump-
tion could be as high as 0.5 litres/1000 km depending on your style of driving.
It is quite normal that a new engine has a higher oil consumption at first, and rea- ches its lowest level only after a certain running in time. The oil consumption of anew vehicle can therefore only be correctly assessed after driving about 5000 km.
For the sake of the environment■ Additional improvements to the fuel economy can be made by using synthetic
high-lubricity oils.■
Regularly check the ground under the vehicle. Have your vehicle inspected by a
specialist garage if you find any stains caused by oil or other fluids on the ground.
Note
We recommend that your vehicle be serviced on a regular basis by a ŠKODA serv- ice partner.
Saving electrical energy
First read and observe the introductory information and safety warn-ings
on page 131.
When the engine is running, the alternator generates and supplies electrical pow- er. If more electrical components of the electrical system are switched on, more
fuel is needed to operate the alternator. We therefore recommend switching off
electrical components if these are no longer required.
Environmental compatibility
First read and observe the introductory information and safety warn-ings
on page 131.
Environmental protection has played a major role in the design, selection of mate-
rials, and manufacture of your new ŠKODA. Particular emphasis has been placed
on the following points.
Design measures › Joints designed to be easily detached.
› Simplified disassembly due to the modular structure system.
› Improved purity of different classes of materials.
› Identification of all plastic parts in accordance with VDA Recommendation 260.
› Reduced fuel consumption and exhaust emission CO
2.
› Minimum fuel leakage during accidents.
› Reduced noise.
134Driving
Page 184 of 287
WARNINGObserve the following instructions for the proper use of the seat belts.■Never use one seat belt to secure two people (including children). The seat-
belt must not be placed over a child who is sitting on the lap of another pas-
senger.■
The lock tongue should only be inserted into the lock which is the correct
one for your seat. Wrong use of the safety belt will reduce its capacity to pro-
tect and the risk of injury increases.
■
The slot of the belt tongue must not be blocked otherwise the belt tongue
will not lock in place properly.
■
Many layers of clothing and loose clothing (e. g. a winter coat over a jacket)
do not allow you to be correctly seated and impairs proper operation of the
seat belts.
■
It is prohibited to use clamps or other objects to adjust seat belts (e. g. for
shortening the belts for smaller persons).
■
The seat belts for the rear seats can only fulfil their function reliably when
the seat backrests are correctly locked into position » page 78.
WARNINGObserve the following instructions for proper use of the seat belts.■The belt webbing must always be kept clean. Soiled belt webbing may im-
pair proper operation of the inertia reel » page 211.■
The seat belts must not be removed or changed in any way. Do not attempt
to repair the seat belts yourself.
■
Check the condition of all the seat belts on a regular basis. If any damage to
the seat belts, seat belt connections, inertia reel or the lock is detected, the
relevant seat belt must be replaced by a specialist garage.
■
Damaged seat belts which have been subjected to stress in an accident and
were therefore stretched, must be replaced – this is best done by a specialist
garage. The anchorage points for the belts should also be checked.
Note
The national legal requirements must be observed when using seat belts.
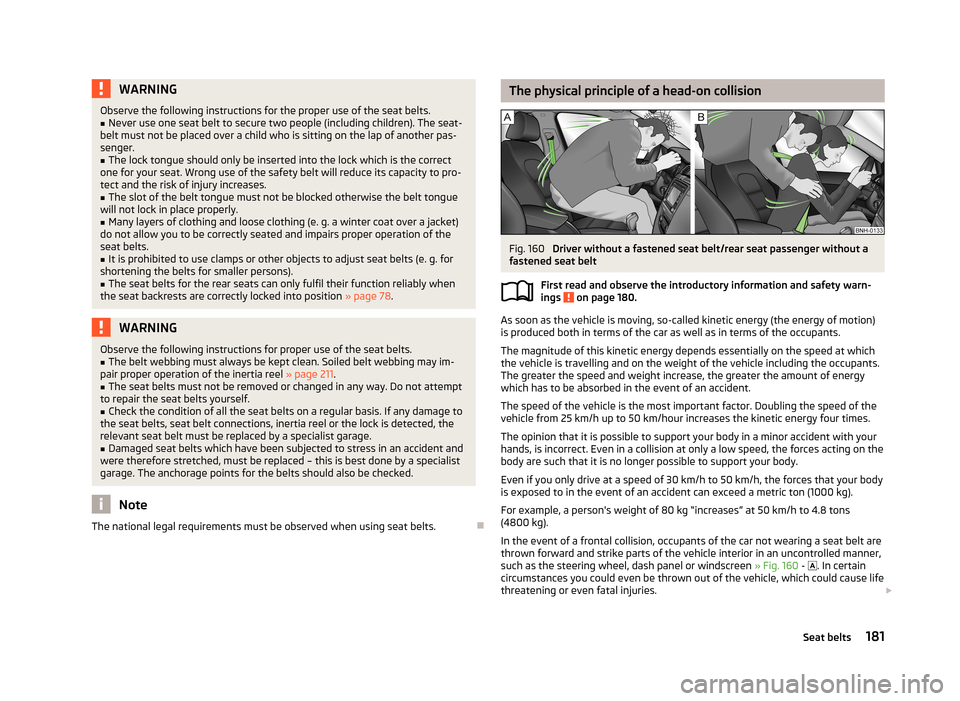
The physical principle of a head-on collisionFig. 160
Driver without a fastened seat belt/rear seat passenger without a
fastened seat belt
First read and observe the introductory information and safety warn-
ings
on page 180.
As soon as the vehicle is moving, so-called kinetic energy (the energy of motion)
is produced both in terms of the car as well as in terms of the occupants.
The magnitude of this kinetic energy depends essentially on the speed at which
the vehicle is travelling and on the weight of the vehicle including the occupants.
The greater the speed and weight increase, the greater the amount of energy
which has to be absorbed in the event of an accident.
The speed of the vehicle is the most important factor. Doubling the speed of the
vehicle from 25 km/h up to 50 km/hour increases the kinetic energy four times.
The opinion that it is possible to support your body in a minor accident with your
hands, is incorrect. Even in a collision at only a low speed, the forces acting on the body are such that it is no longer possible to support your body.
Even if you only drive at a speed of 30 km/h to 50 km/h, the forces that your body is exposed to in the event of an accident can exceed a metric ton (1000 kg).
For example, a person's weight of 80 kg “increases” at 50 km/h to 4.8 tons
(4800 kg).
In the event of a frontal collision, occupants of the car not wearing a seat belt are thrown forward and strike parts of the vehicle interior in an uncontrolled manner, such as the steering wheel, dash panel or windscreen » Fig. 160 -
. In certain
circumstances you could even be thrown out of the vehicle, which could cause life
threatening or even fatal injuries.
181Seat belts
Page 201 of 287
General Maintenance
Vehicle care
Service intervals
Introduction
This chapter contains information on the following subjects:
Overview of service intervals
198
Fixed service intervals QI1 - QI4
199
Variable service interval QI6
199
Information about the ŠKODA service
199
The service interval display in the instrument cluster will remind you to carry out every service stipulated by the manufacturer at the right time in order to prevent you from forgetting any.
Timely and proper performance of servicing works is one of the requirements for the settlement of potential warranty claims.
The completion of services can be verified by the validated service certificate and the corresponding receipts.
The specified service intervals are tailored to normal operating conditions.
In the case of difficult operating conditions, it is necessary to have some service
work performed before the date of the next service or between the specified
service intervals. This applies mainly to the cleaning or the replacement of the air
filter insert in regions with heavy dust pollution as well as checking and replacing
the toothed belt, but also to vehicles with diesel particle filters, which can put
greater strain on the engine oil.
These difficult conditions are: › Fuel with sulphur content;
› Frequent short trips;
› Longer periods of engine idling (e.g. taxis);
› Operation in areas with heavy dust pollution;
› Frequent trailer operation;
›
Predominantly stop-and-go traffic as is often the case in city driving, for exam-
ple;
› Operation predominantly during winter.
A service consultant at the specialist garage will tell you whether the operating conditions of your vehicle may make it necessary for service work to be carried
out between the normal service intervals.
Different service charges may apply from the particular scope of work required,
depending on the vehicle type and equipment and the status of your vehicle.
Note
■ The customer is responsible for covering the cost of all services including
changing or replenishing the oil, even during the warranty period, unless stated otherwise in the ŠKODA AUTO a.s. warranty terms or other agreements.■
You will be informed about the current service scopes for the particular service
work by the specialist garage.
Overview of service intervals
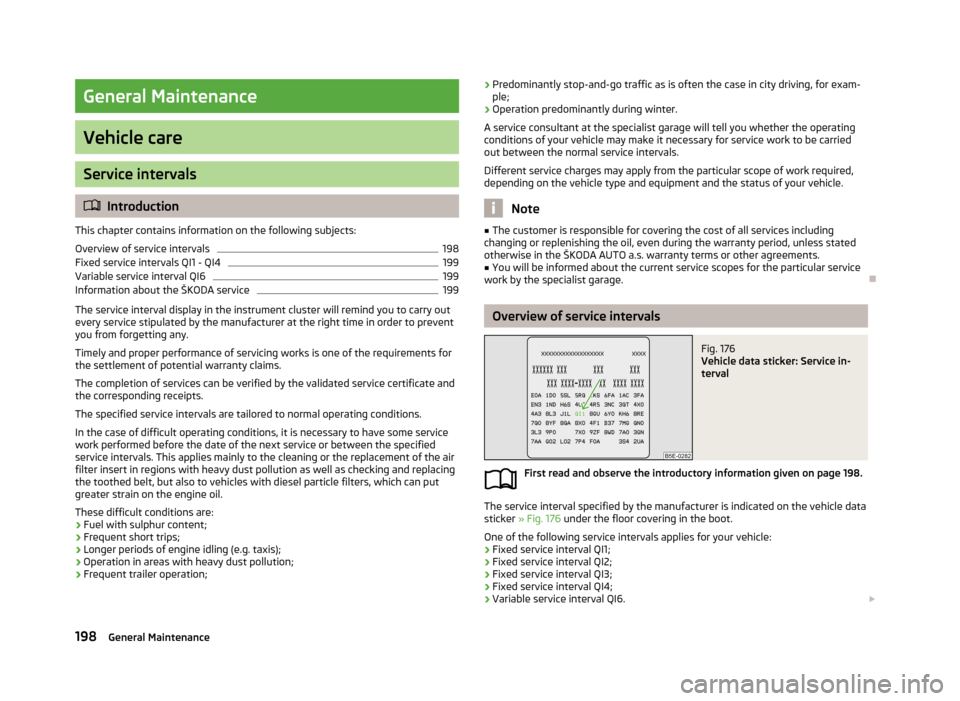
Fig. 176
Vehicle data sticker: Service in-
terval
First read and observe the introductory information given on page 198.
The service interval specified by the manufacturer is indicated on the vehicle data sticker » Fig. 176 under the floor covering in the boot.
One of the following service intervals applies for your vehicle: › Fixed service interval QI1;
› Fixed service interval QI2;
› Fixed service interval QI3;
› Fixed service interval QI4;
› Variable service interval QI6.
198General Maintenance
Page 212 of 287
Regular and proper care helps to ensure efficiency and to maintain the value of
your vehicle.
We recommend using vehicle care products from ŠKODA Original Accessories. These are available from ŠKODA Partners. The usage instructions on the package
must be observed.WARNING■ Vehicle care products may be harmful to your health if not used according to
the instructions.■
Always store vehicle care products safely, in particular out of the reach of
children – risk of poisoning!
CAUTION
■ Be sure to check clothing for colourfastness to avoid any damage or visible
stains on the material (leather), panels and textiles.■
Remove fresh stains such as those from ball-point pens, ink, lipstick, shoe pol-
ish, etc., from the material (leather), panels and textiles as quickly as possible.
■
Air fresheners and scents can be hazardous to heath when the temperature in-
side the vehicle is high.
■
Do not attach scents or air fresheners to the dash panel – there is a risk of dam-
age to the dash panel.
■
Do not stick any stickers on the inside of the rear windows, the rear side win-
dows and in the vicinity of the heating elements on the windscreen or near the
window aerial. These may get damaged.
■
Do not clean the roof panelling with a brush – risk of damage to the surface of
the panelling.
■
Cleaner that contain solvents can damage the material being cleaned.
■
Apply only a small amount of the cleaning and care product.
For the sake of the environment
Used vehicle care product cans represent hazardous waste that is harmful to the
environment. These must be disposed of in accordance with national legal regula-
tions.NoteDue to the special tools and knowledge required, and to avoid any potential prob-
lems with the cleaning and care of the interior of your vehicle, we recommend
that cleaning and care of the interior of your vehicle be carried out by a ŠKODA service partner.
Natural leather
First read and observe the introductory information and safety warn-
ings
on page 208.
Leather is a natural material with specific properties, and requires regular clean-
ing and maintenance.
Depending on the amount of wear-and-tear, the leather should be cleaned on a
regular basis.
Dust and dirt in the pores and folds act as abrasive materials. This leads to severe corrosion and the premature brittleness of the leather surface.
We recommend that you remove dust regularly and at short intervals using a
cloth or vacuum cleaner.
Clean soiled leather surfaces with a water-dampened cotton or woollen cloth and
then dry with a clean, dry cloth »
.
Clean severely soiled areas with a cloth soaked in a mild soap solution (2 table-
spoons of neutral soap to 1 litre of water).
To remove stains , use a cleaning agent specially designed for this purpose.
Treat the leather regularly and at suitable intervals using a suitable leather care
product.
CAUTION
■ Ensure that no part of the leather is soaked through during cleaning and that
no water gets into the seams. Otherwise, the leather could become brittle or
cracked.■
Avoid leaving the vehicle for lengthy periods in bright sunlight to avoid the
leather from bleaching. If the vehicle is parked in the open for lengthy periods, protect the leather from direct sunlight by covering it.
209Vehicle care