window SKODA OCTAVIA 2014 3.G / (5E) Bolero Car Radio Manual
[x] Cancel search | Manufacturer: SKODA, Model Year: 2014, Model line: OCTAVIA, Model: SKODA OCTAVIA 2014 3.G / (5E)Pages: 54, PDF Size: 3.15 MB
Page 9 of 54
Device operation
operate via the device screen
Introduction
This chapter contains information on the following subjects:
Operation
7
Input screen with keyboard
8
Input screen with numeric keyboard
8
First and foremost, pay attention to the safety instructions » page 4 , Impor-
tant notes .
This chapter covers the instrument operation and the work with the touch
screen and with various types of input keyboards.
Operation
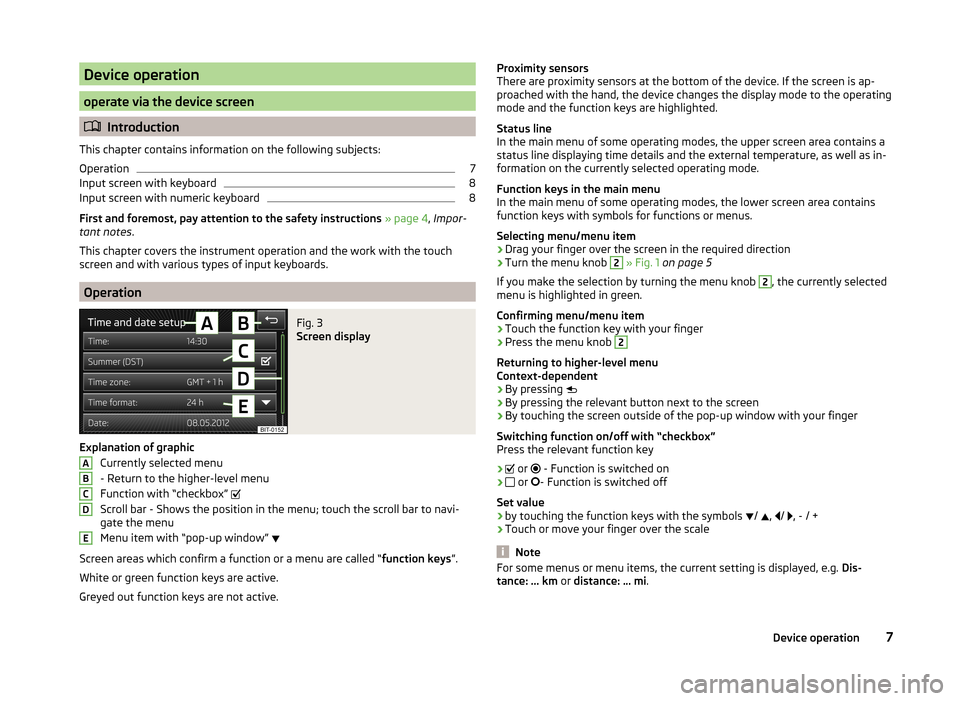
Fig. 3
Screen display
Explanation of graphic
Currently selected menu
- Return to the higher-level menu
Function with “checkbox”
Scroll bar - Shows the position in the menu; touch the scroll bar to navi-
gate the menu
Menu item with “pop-up window”
Screen areas which confirm a function or a menu are called “ function keys”.
White or green function keys are active.
Greyed out function keys are not active.
ABCDEProximity sensors
There are proximity sensors at the bottom of the device. If the screen is ap-
proached with the hand, the device changes the display mode to the operating
mode and the function keys are highlighted.
Status line
In the main menu of some operating modes, the upper screen area contains a status line displaying time details and the external temperature, as well as in-
formation on the currently selected operating mode.
Function keys in the main menu
In the main menu of some operating modes, the lower screen area contains
function keys with symbols for functions or menus.
Selecting menu/menu item
› Drag your finger over the screen in the required direction
› Turn the menu knob 2
» Fig. 1 on page 5
If you make the selection by turning the menu knob
2
, the currently selected
menu is highlighted in green.
Confirming menu/menu item
› Touch the function key with your finger
› Press the menu knob
2
Returning to higher-level menu
Context-dependent
› By pressing
› By pressing the relevant button next to the screen
› By touching the screen outside of the pop-up window with your finger
Switching function on/off with “checkbox” Press the relevant function key
›
or
- Function is switched on
›
or
- Function is switched off
Set value › by touching the function keys with the symbols
/
,
/
, - / +
› Touch or move your finger over the scale
Note
For some menus or menu items, the current setting is displayed, e.g.
Dis-
tance: ... km or distance: ... mi .7Device operation
Page 14 of 54
SymbolMeaningA phone is connected to the deviceMissed calls (if there are several missed calls, the number
of calls is shown next to the symbol)a)
This function is only supported by some mobile phones.
Call list
In the MAXI DOT display, only the call list can be displayed and used.
If the call list includes no entries, the following message appears in the MAXI DOT display No entries available.
The following symbols are displayed next to each entry in the call list.
SymbolMeaningIncoming callOutgoing callMissed call
voice control
Introduction
This chapter contains information on the following subjects:
function requirements
12
Switching on/off
13
Help for voice control
13
Operation
13
not recognizing a voice command
14
override a voice command input
14
stop/restore voice command input
14
Voice commands not included in the Help
14
First and foremost, pay attention to the safety instructions » page 4 , Impor-
tant notes .
Some equipment functions can be operated using voice commands. Thus, the
use of the device is accelerated and increased comfort while driving.
Voice control can be used in the menus radio, media and phone .
The voice control system can be operated either by the driver or by the front
passenger.WARNING■ Please pay attention to the traffic first and foremost! As the driver you
are fully responsible for road safety. Only use the system so that you are in
full control of your vehicle in every traffic situation - risk of accident!■
Do not use the voice control system when under stress or in an emergen-
cy. Your Voice commands may not be recognized in such situations. In such
circumstances a telephone connection may not be established or the con-
nection may take too long to complete. The emergency number should be
dialled manually!
function requirements
Read and observe
on page 12 first.
Function requirements for voice control. The ignition is switched on.
The device is switched on.
No phone call is in progress.
The parking aid is not active.
Requirements for optimum voice command recognition.
› Only issue voice commands when the symbol is displayed on the device
screen or appears in the information display.
.
› Speak with a normal tone of voice without intonation and excessive pauses.
› Avoid a bad pronunciation.
› Close doors, windows and the sliding roof, in order to prevent external dis-
turbances affecting recognition of the voice commands.
› It is recommended to speak louder at higher speeds, so that the tone of your
voice is louder than the increased surrounding noise.
› During voice control, limit additional noise in the vehicle, e.g. passengers
talking at the same time.
CAUTION
For some languages, there is no voice control available. The device indicates
this fact via a text message that is displayed after setting the device language
screen » page 15 . 12Device operation
Page 21 of 54
Radio
Operation
Introduction
This chapter contains information on the following subjects:
Main menu
19
List of available stations
20
Search and store radio station
20
Search the available stations (Scan)
21
Station logos
21
Traffic programme
21
Station information (DAB)
22
First and foremost, pay attention to the safety instructions » page 4 , Impor-
tant notes .
The device allows analogue radio reception of FM and AM frequency ranges as
well as DAB digital radio reception.
The radio reception DAB allows multiple stations to be transmitted in a single
frequency in the form of a so-called ensemble. It also allows for the transmis-
sion of additional data and information (e.g. messages, sport, weather, warn-
ings, etc.).
CAUTION
■ Car parks, tunnels, tall buildings or mountains can disrupt the radio signal
even causing it to fail completely.■
For vehicles with window antennas; if the windows are covered in foil or with
metallic film stickers, reception interference may be experienced.
■
In countries where the RDS function is not supported sufficiently, we recom-
mend turning off the RDS and AF functions. Otherwise, these settings can af-
fect the functionality of the radio.
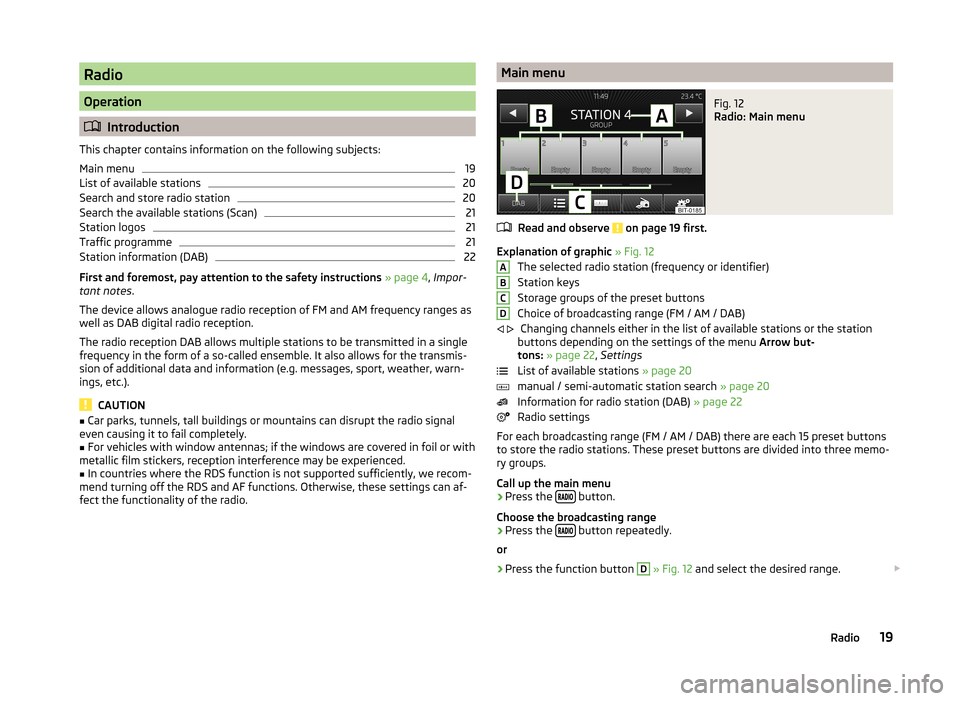
Main menuFig. 12
Radio: Main menu
Read and observe on page 19 first.
Explanation of graphic » Fig. 12
The selected radio station (frequency or identifier)
Station keys
Storage groups of the preset buttons
Choice of broadcasting range (FM / AM / DAB) Changing channels either in the list of available stations or the station
buttons depending on the settings of the menu Arrow but-
tons: » page 22 , Settings
List of available stations » page 20
manual / semi-automatic station search » page 20
Information for radio station (DAB) » page 22
Radio settings
For each broadcasting range (FM / AM / DAB) there are each 15 preset buttons to store the radio stations. These preset buttons are divided into three memo-
ry groups.
Call up the main menu
›
Press the button.
Choose the broadcasting range
›
Press the button repeatedly.
or
›
Press the function button
D
» Fig. 12 and select the desired range.
ABCD
19Radio
Page 28 of 54
First and foremost, pay attention to the safety instructions » page 4 , Impor-
tant notes .WARNING■
Never place external signal sources close to the airbags. Loose objects
could hit a deployed airbag and injure occupants – danger of death!■
Never place external signal sources on the console panel. Loose objects
can be thrown forward during a sudden manoeuvre or in case of an acci-
dent and can injure the occupants.
■
Do not place external signal sources while driving in your hand or on your
knees. Loose objects can be thrown forward during a sudden manoeuvre or
in case of an accident and can injure the occupants.
■
Always route the connection cable of the external signal source such that
is does not in any way restrict you when driving.
CAUTION
We recommend that you do not store any important data on CD media, Blue-
tooth ®
players, to an SD memory card or connected external devices. The
ŠKODA Partner is not responsible for damage due to the loss of data stored on
these storage devices.
Note
For some external devices, the setting of the output volume can be changed.
Supported sources and file formats
Read and observe
and on page 26 first.
Supported audio sources
SD memory cardSD, SDHC, SDXCCD driveAudio CD (up to 80 min), CD-R and CD-RW (with a capacity
of up to 700 MB)USB devicesUSB stick, USB MP3 player, HDD (without special soft-
ware)Specifications for USB devicesUSB 1.x and 2.x or higher, supported by USB 2.x (the
speed of data transmission corresponds to the maximum
speed of USB 2.x )
Max. speed of 480 Mb/sSpecification Bluetooth ®
-
PlayerBluetooth protocolsA2DPand AVRCP (1.0 - 1.3)Other external sourcesPortable player (e.g., iPod ®
, iPad ®
, iPhone ®
, MTP player,
(MSC))
Formats of audio files
File system
SD memory card
FAT16, VFAT, FAT32
USB flashdriveCDISO9660, joliet (Level 1,2,3), UDF 1.x, UDF
2.xCodec type
(File formats)MPEG-1/2 (Layer-3)Windows
Media Audio 7, 8 and 9MPEG -2/4WAVFile suffixmp3wmaasfaacwavPlaylistsm3u, pls, wpl, m3u8; asxFile
propertiesbit ratemax. 320 kb/ssampling ratemax. 48 kHzPictures on thealbum coversImage resolution up to 500 x 500 pixels (200 kb) (jpg,
jpeg, png, bmp, gif), depending on the availability of al-
bum covers they are displayed on the respective media
CAUTION
■ At the time of publication, the device has been tested with most products
and media available in the various markets up to a size of max. 32 GB. Howev-
er, it is possible that some external devices, media or files are unreadable or
unplayable.■
The GPT Standards (GUID Partition Table) method structured signal sources
are not supported by the device.
26Media
Page 45 of 54
■Convenience consumers - Displays up to three consumers which have the
largest share of fuel consumption and displays the fuel consumption to run
all convenience systems
■ Vehicle status - Displays vehicle status » Fig. 26 or tyre pressure monitoring
information
■ Vehicle status - Displays vehicle status information
■ - No message /
- warning messages relating to vehicle status or
number of messages (if there is only one message, one warning message
text is displayed)
■ - Display information about the status of the START-STOP system
■ TPMS - Function of the tire pressure monitor » Fig. 27
■ SET - Storage of the tire pressure values
Switching between the individual menus can be done by using the function
keys
.
Note
After pressing the button, the view from the menu last displayed is shown
.
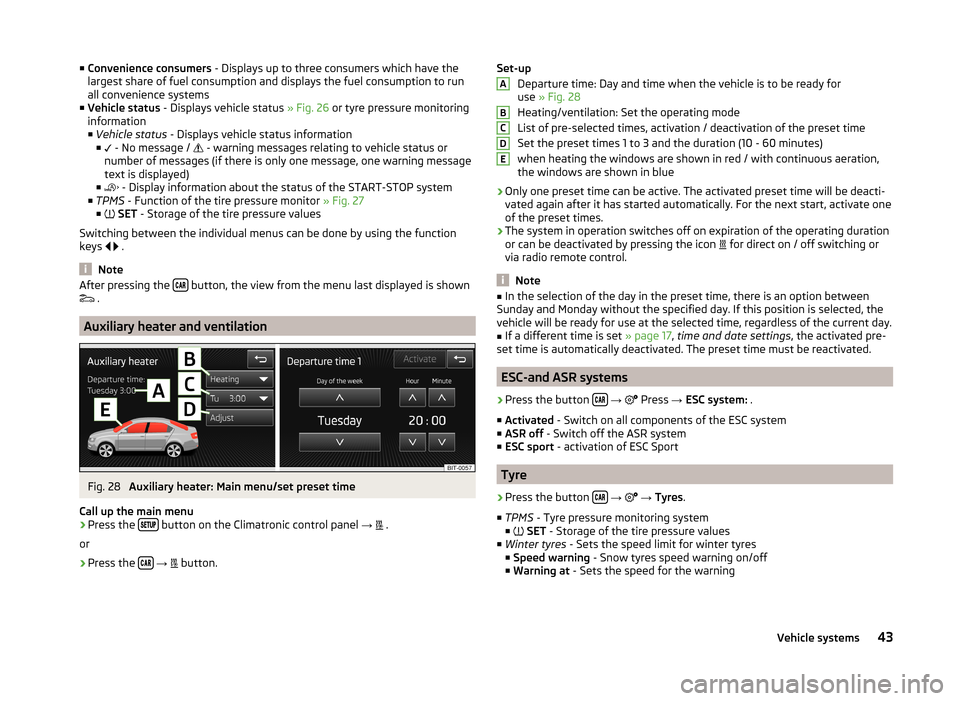
Auxiliary heater and ventilation
Fig. 28
Auxiliary heater: Main menu/set preset time
Call up the main menu
›
Press the button on the Climatronic control panel
→
.
or
›
Press the
→
button.
Set-up
Departure time: Day and time when the vehicle is to be ready for
use » Fig. 28
Heating/ventilation: Set the operating mode
List of pre-selected times, activation / deactivation of the preset time
Set the preset times 1 to 3 and the duration (10 - 60 minutes) when heating the windows are shown in red / with continuous aeration,
the windows are shown in blue
› Only one preset time can be active. The activated preset time will be deacti-
vated again after it has started automatically. For the next start, activate one
of the preset times.
› The system in operation switches off on expiration of the operating duration
or can be deactivated by pressing the icon for direct on / off switching or
via radio remote control.
Note
■ In the selection of the day in the preset time, there is an option between
Sunday and Monday without the specified day. If this position is selected, the
vehicle will be ready for use at the selected time, regardless of the current day.■
If a different time is set » page 17, time and date settings , the activated pre-
set time is automatically deactivated. The preset time must be reactivated.
ESC-and ASR systems
›
Press the button
→
Press
→ ESC system: .
■ Activated - Switch on all components of the ESC system
■ ASR off - Switch off the ASR system
■ ESC sport - activation of ESC Sport
Tyre
›
Press the button
→
→ Tyres .
■ TPMS - Tyre pressure monitoring system
■
SET - Storage of the tire pressure values
■ Winter tyres - Sets the speed limit for winter tyres
■ Speed warning - Snow tyres speed warning on/off
■ Warning at - Sets the speed for the warning
ABCDE43Vehicle systems
Page 47 of 54
■Rear tone setting - Setting the pitch of the beeps for the rear obstacle de-
tection
■ Audio lowering: - lowering the volume of the speakers (audio)
■ Off - No volume reduction of the sound from speakers
■ Weak - weak volume attenuation of sound from speakers
■ Medium - medium volume attenuation of sound from speakers
■ Strong - Strong volume attenuation of sound from speakers
Note
The compact display of the parking aid can be switched to a full screen view by
touching the screen within the display.
Light
›
Press the button
→
→ Light .
■ Light assistance - Setting of outdoor lighting
■ Dynamic Light Assist - Switch on/off the head light assist function
■ Switch-on time: - Set the sensibility of the light sensor against the change
in intensity of the ambient light ■ Early - High sensibility
■ Medium - Medium sensibility
■ Late - Low sensibility
■ Automatic headlight control in rain - Activate/deactivate automatic head-
light control in rain
■ Daytime running lights - Activate/deactivate daytime running lights
■ Lane change flash - Activate/deactivate lane change flashing
■ Travel mode: - Travel mode on/off
■ R-hand traffic - For right-hand traffic
■ L-hand traffic - For left-hand traffic
■ Interior lighting - Sets the interior lighting
■ Instrument/switch lighting - Set the brightness of the instrument/switch
lighting
■ Footwell lighting - Sets the brightness of the footwell light
■ Coming/Leaving home Fct. - Setting the COMING HOME/LEAVING HOME func-
tion
■ Coming Home function - Sets the period that the lights remain on after you
leave the vehicle (0 - 30 seconds; 0 = function deactivated)
■ Leaving Home function - Sets the period that the lights remain on after
you unlock the vehicle (0 - 30 seconds; 0 = function deactivated)
mirrors and wiper›
Press the button
→
→ Mirrors and wipers .
■ Mirrors - Adjusts the mirrors
■ Synchronous adjustment - Activate/deactivate synchronous mirror adjust-
ment
■ Lower while reversing - Activate/deactivate the lowering of the front pas-
senger mirror
■ Fold in when parked - Activate/deactivate folding the mirror via the remote
control key or by using the sensor in the handle (KESSY)
■ Wipers - Adjusts the windscreen wipers
■ Automatic wiping in rain - Activate/deactivate automatic windscreen wip-
ing in rain
■ Automatic rear wiper - Activate/deactivate automatic rear window wiping
Opening and closing
›
Press the button
→
→ Opening and closing .
■ Window operation - Window operation settings
■ Conven. opening: - Set the convenience opening feature
■ All windows - All windows
■ Driver window - Driver's window only
■ Off - Deactivates the convenience opening
■ Central locking - Settings for opening and closing of doors
■ Door unlocking: - Set the door unlocking feature
■ All doors - All doors
■ Single door - Driver's door or driver's or passenger door with KESSY sys-
tem
■ Vehicle side - Doors on the driver's side or on the driver's or passenger's
side with KESSY system
■ Automatic locking - Activate/deactivate automatic locking when starting
off
■ Acoustic confirmation - Activate/deactivate acoustic signals when locking/
unlocking the vehicle with an anti-theft alarm system
Seats
›
Press the button
→
→ Seats .
45Vehicle systems
Page 50 of 54
Index
A
ACC
44
Additional keyboard languages17
Adjusting volume
6
Adjust vehicle systems ESC system
43
AM19
Anti-theft protection4
Apple - device30
ASR43
Audio Media
24
Radio19
Automatic distance control44
Automatic front window wiping in rain45
Automatic headlight in rain45
Automatic locking45
Automatic rear window wiping45
Automatic search for radio station20
AUX29
Auxiliary heater and ventilation Settings
43
B
Bluetooth Connect the device with the phone
34
settings18
switch on/off18
visibility18
Bluetooth audio27
Bluetooth player27
C
CD
27
Climatronic automatic air recirculation46
Automatic operation46
mode46
COMING HOME45
Communication31
Phonebox33
Component protection4
Connect the device with the phone
34
Control lever9
Convenience consumer42
D
DAB
19
Settings23
Station information22
Data Convenience consumer
42
Travel42
Vehicle status42
date17
Daytime running lights45
Declaration of conformity4
Description of the device5
Device menus6
Device operation7
Control lever9
device screen7
Device screen7
MAXI DOT display8
Multifunction steering wheel9, 11
device screen keyboard
8
maintenance5
numerical keyboard8
operation7
Device screen16
Operation7
Device Settings15
Digital radio reception Settings
23
display5
Door release45
Driving mode41
Driving Mode Selection41
E
Eco tips
46
ESC sport43
External input AUX
29
MEDIA IN30
USB29
F
factory settings
18
Factory settings18, 46
Fatigue detection44
File formats26
Requirements and Limitations27
FM19
Settings22
Folder list Media
24
Folding down the exterior mirrors - folding in while parking
45
Frequency range See main menu
19
Front Assist44
Function key7
Function keys7
H
Head Light Assist
45
48Index
Page 52 of 54
SD memory card28
Search for radio station20
Seats Settings
45
Select frequency range See main menu
19
Selection of travel mode41
Select radio station See main menu
19
Select signal source Media
24
Semi-automatic search for radio station20
settings additional keyboard languages
17
Bluetooth18
keyboard17
Restore factory settings18
time and date17
units17
Voice control17
Settings DAB
23
device15
Device screen16
Driving mode41
FM22
Language15
Manage favourites37
Media25
Radio22
Telephone33
User profile37
Volume6
Setting vehicle systems Auxiliary heater and ventilation
43
Parking and manoeuvring44
Restore factory settings46
Setup15
Sound16
Set vehicle systems Tyre43
Signal source25
Sound16
Speed limit for snow tyres43
START-STOP42
Status line7
Switching off volume
6
Switching the unit off5
Switching the unit on5
Synchronous adjustment of both mirrors45
T
telephone voice control
12
Telephone31
Conference39
Disconnection37
Functions37
Main menu32
Multifunction steering wheel11
On screen messages32
Pairing35
Quick connection36
Select telephone36
Settings33
Telephone conference39
Telephone conversation39
Telephone functions37
Tilting the mirror surface - lowering in reverse45
Time17
Traffic programme (TP)21
Travel light - travel mode45
Tyre pressure monitor42, 43
U
Units
17
USB29
V
Vehicle equipment Declaration of conformity
4
Vehicle identification number46
Vehicle settings41
Vehicle systems41
Vehicle system settings Assistance systems
44
vehicle systems settings mirrors and wiper
45
Opening and closing45
Vehicle systems settings Climatronic
46
Light45
Multifunction display46
Seats45
Service46
VIN number46
Voice control1213
function requirements12
not recognizing a voice command14
settings17
stop/restore input/14
switching on/off13
Voice command input correct14
W
Windows comfort control
45
Wireless link to the outside antenna see Phonebox
33
Other Characters
(Traffic programme (TP)
21
50Index