phone SKODA OCTAVIA 2014 3.G / (5E) Columbus Infotinment Navigation System Manual
[x] Cancel search | Manufacturer: SKODA, Model Year: 2014, Model line: OCTAVIA, Model: SKODA OCTAVIA 2014 3.G / (5E)Pages: 83, PDF Size: 5.16 MB
Page 43 of 83
NoteAvailable updates for Bluetooth ®
devices as well as information about the
phone support can be obtained from the ŠKODA website www.infotain-
ment.skoda-auto.com .
Connect device with your telephone
Read and observe
on page 40 first.
A telephone is paired with the device
After switching on the ignition, the device attempts to automatically connect to the last connected telephone.
During the connection setup and depending on the telephone type the device
screen displays may show ... Would you like to connect? and a menu will ap-
pear with the following function keys.
› Connect
- pairing confirmation
› Cancel
- stops the coupling process
If the connection cannot be established, the device will then attempt to con-
nect to other previously paired telephones one by one.
If there is also no connection, then a telephone search is to be started.
No telephone is paired with the device
After switching on the ignition, on the device screen the message Please
search for and connect a mobile telephone. appears and a menu with the fol-
lowing function keys.
›
Find telephone - search for available telephones with activated Bluetooth
® function and visibility
›
- Opening of the settings menu
» page 39, Settings
After completion of the search press the Results function key, a list of availa-
ble telephones will be displayed (the function key is also available during the
search).
Select the telephone you want from the list.
If the search fails, check that the conditions for successful pairing are
met » page 40 , Conditions for successful pairing and repeat the whole process.
Pairing confirmation
Depending on the telephone's Bluetooth ®
, conformation is in one of the fol-
lowing ways.
› Confirm the 6-digit PIN code 1)
displayed on the device screen and the tele-
phone display within 30 seconds on both the device and the telephone.
› If required select the option in the telephone for automatically connecting
the telephone to the device.
Or
› Confirm the connection request in the telephone.
› Enter the 4 digit PIN code shown on the unit display into the telephone with-
in 30 seconds
› If required select the option in the telephone for automatically connecting
the telephone to the device.
Connection
After successful connection the device will display the message ... user is con-
nected and then the main menu telephone » Fig. 27 on page 38 .
Note
If the telephone supports the Bluetooth ®
profile A2DP or AVRCP, your tele-
phone display may prompt you to pair the telephone as a Bluetooth ®
player.
Pair the mobile telephone withe the device
Read and observe
on page 40 first.
When pairing from the telephone, follow the instructions in the owner's man-ual of the telephone.
›
Have the telephone search for available Bluetooth ®
devices.
›
Select the device in the list of Bluetooth ®
devices 2)
.
The following message is shown in the device screen during pairing ... Would
you like to connect?, and the following function keys are displayed.
Cancel - stops the coupling process
Connect - confirmation of the coupling process
1)
For devices with Bluetooth ®
v2.1 and later the telephone quick pairing procedure (SSP Secure Simple
Pairing) is used for pairing. This pairing method does not require the user to enter a PIN.
2)
Fpr the name of the device refer to the Bluetooth ®
settings » page 20 .
41Communication
Page 44 of 83
Depending on the telephone's Bluetooth ®
, conformation is in one of the fol-
lowing ways.›
Confirm the 6-digit PIN code 1)
displayed on the device screen and the tele-
phone display within 30 seconds on both the device and the telephone.
›
If required select the option in the telephone for automatically connecting
the telephone to the device.
Or
›
Enter the 4 - 16 digit PIN code into the device.
›
Enter the PIN code shown on the device display into the telephone within 30
seconds.
›
If required acknowledge the confirmation request with the telephone.
If no other device is connected to the telephone and after successful connec-
tion the following message is shown in the device screen ... user is connected
and then the main menu telephone » Fig. 27 on page 38 .
If the device is connected to another telephone then only the pairing to the
new telephone takes place and the original telephone remains connected.
Connection to another paired telephone
Read and observe
on page 40 first.
If you want to connect the device to another paired telephone, the current
connection does not have to be terminated. The connection to the existing tel-
ephone is automatically terminated by connecting to another telephone.
›
In the main menu press the Telephone function key
B
» Fig. 27 on
page 38 .
It displays a list of previously paired telephones.
›
Select the paired telephone to be connected with the device.
The following message is shown in the device screen ... Replace this connec-
tion with ... ?, and the following function keys are displayed.
› Cancel
- stops the menu for telephone change
› Replace
- connection to the selected telephone
After successful connection the device will display the message ... user is con-
nected and then the main menu » Fig. 27 on page 38 .
If the desired telephone is not in the list of previously paired telephones then
the telephone is to be paired with the device » page 41.
Switching on/off the Bluetooth ®
profile
Read and observe
on page 40 first.
›
Press the button
→ Bluetooth → paired devices .
A list of paired devices is displayed.
Pressing the function key on the connected Bluetooth ®
device opens a menu
with possible connection profiles supported with the selected device.
Pressing the function key with the name and symbol of the connection profile causes a context-dependent message to be displayed in the device screen ... …
Disconnect the profile - are you sure? and a menu with the function keys is
displayed.
›
Disconnect - Pressing the function key turns off the selected profile.
Or
›
Replace - If the device is already connected to another telephone then
pressing the function key will replace the existing profile with the new pro- file.
The following message is shown in the device screen ... Connection with ... will
be made ... and the selected Bluetooth ®
Profile is turned on.
In each menu pressing the function key Cancel will cancel the profile change.
Possible profile symbols:
SymbolMeaningDevices that support the functionality of the hands-free
system (Bluetooth ®
profile HFP) a)Devices that are connected to the device via Bluetooth ®
profile HFP a)
1)
For devices with Bluetooth ®
v2.1 and later the device quick pairing procedure (SSP Secure Simple Pair-
ing) is used for pairing. This connection method does not require the user to enter a PIN.
42Phone
Page 45 of 83
SymbolMeaningBluetooth®
players (Bluetooth ®
profiles A2DP and AVRCP) b)Bluetooth®
player connected to the unit via Bluetooth ®
profiles A2DP and AVRCP b)a)
HFP is a Bluetooth
®
profile that supports the functionality of the hands-free system.
b)
A2DP and AVRCP are Bluetooth ®
profiles that support multimedia functions.
If a Bluetooth ®
device is already connected to the device via one of the pro-
files, then turning on the profile in another device will end the profile on the
active device and it is switched to the newly selected device.
Only the newly selected profile will be switched the other profiles remain con-
nected to the original device.
The device can be paired with several telephones (or Bluetooth ®
devices), but
only one can be actively connected on the HFP profile and one on the A2DP
profile or AVRCP.
Delete the mobile telephone from the list of paired devices
Read and observe
on page 40 first.
›
The function key
→ Bluetooth → paired devices .
A listof paired devices and the following function keys are displayed.
› Delete all
- Delete all the telephones in the list of paired devices
›
- Delete the desired telephone
After selecting one of the function keys, the function keys are displayed.
› Cancel
- Cancels the deletion
› Delete
- delete confirmation
The device connected to the telephone does not appear in the list of paired
devices. In order to enable an delete operation the connection between the
telephone and the device should first to interrupted » page 43, Disconnec-
tion .
Disconnection
Read and observe
on page 40 first.
The connection of a telephone to the device can be disconnected in one of the
following ways.
› By removing the ignition key (or switching off the ignition and opening the
driver's door in vehicles with the KESSY system).
› By disconnecting the hands-free system or switching off the Bluetooth ®
function on the telephone.
› By switching off the Bluetooth ®
function on the device » page 20, Blue-
tooth ®
settings .
› By removing the telephone from the list of paired devices
» page 43, Delete
the mobile telephone from the list of paired devices .
› By turning off the Bluetooth ®
HFP profile » page 42, Switching on/off the
Bluetooth ®
profile .
Telephone functions
Introduction
This chapter contains information on the following subjects:
Speed dialling a telephone number
43
Direct entry of a phone number
44
Phone book
44
Call-lists
45
Telephone conversation
45
Conference
46
First and foremost, pay attention to the safety instructions » page 4 .
Speed dialling a telephone number
You can use the speed dial function key
C
» Fig. 27 on page 38 to instantly dial
previously assigned telephone number contacts.
There are six speed dial function keys available.
Assign telephone number of a contact
›
Press a function key for the speed dial
C
» Fig. 27 on page 38 that is not
assigned.
The unit displays the telephone book.
›
If necessary, enter one of the contact numbers for the desired telephone
contact.
The assignment of the contact telephone number to a function key for the
speed dialling is also possible in the telephone menu settings » page 39.
43Communication
Page 46 of 83
Select assigned contact telephone number›Press the desired function key to speed dial the telephone number of a con-
tact C
» Fig. 27 on page 38 .
Change assigned telephone number of a contact
›
Press the desired function key for the speed dial
C
» Fig. 27 on page 38 for
longer.
The unit displays the telephone book.
›
If necessary, enter one of the contact numbers for the desired telephone
contact.
The telephone number of a contact is assigned to the selected function key for
speed dialling.
You can also make the change in the Telephone menu » page 39 .
Remove a telephone number contact
›
Press the symbol button
→ User profile → Manage Favourites .
›
Press the function key for the speed dial. By confirming the menu item De-
lete the telephone number of a contact on the selected function key is re-
moved for quick dialling.
Direct entry of a phone number
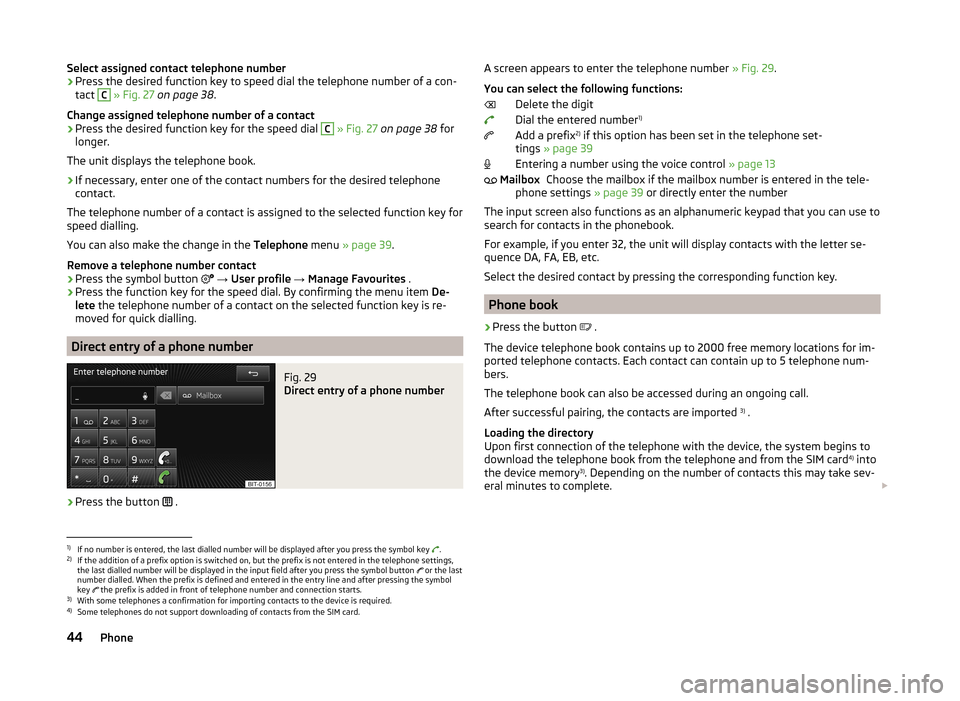
Fig. 29
Direct entry of a phone number
›
Press the button .
A screen appears to enter the telephone number
» Fig. 29.
You can select the following functions: Delete the digit
Dial the entered number 1)
Add a prefix 2)
if this option has been set in the telephone set-
tings » page 39
Entering a number using the voice control » page 13
Choose the mailbox if the mailbox number is entered in the tele-
phone settings » page 39 or directly enter the number
The input screen also functions as an alphanumeric keypad that you can use to
search for contacts in the phonebook.
For example, if you enter 32, the unit will display contacts with the letter se-
quence DA, FA, EB, etc.
Select the desired contact by pressing the corresponding function key.
Phone book
›
Press the button .
The device telephone book contains up to 2000 free memory locations for im-
ported telephone contacts. Each contact can contain up to 5 telephone num-
bers.
The telephone book can also be accessed during an ongoing call.
After successful pairing, the contacts are imported 3)
.
Loading the directory
Upon first connection of the telephone with the device, the system begins to
download the telephone book from the telephone and from the SIM card 4)
into
the device memory 3)
. Depending on the number of contacts this may take sev-
eral minutes to complete.
Mailbox1)
If no number is entered, the last dialled number will be displayed after you press the symbol key .
2)
If the addition of a prefix option is switched on, but the prefix is not entered in the telephone settings,
the last dialled number will be displayed in the input field after you press the symbol button or the last
number dialled. When the prefix is defined and entered in the entry line and after pressing the symbol
key the prefix is added in front of telephone number and connection starts.
3)
With some telephones a confirmation for importing contacts to the device is required.
4)
Some telephones do not support downloading of contacts from the SIM card.
44Phone
Page 47 of 83
If the imported telephone book from the telephone contains more than
2000 contacts, loading is stopped and the message Contacts not completely
imported. appears on the screen. Only the contacts already loaded are availa-
ble, these are in the menu
.
The first 200 contacts along with the telephone contact data, including the
picture associated with the contact, are downloaded onto the device
memory 1)
.
If an error occurs while loading the phone book, the message Import failed.
Please try again and check whether the BT device … allows connections.
Update phonebook
Each time the telephone has established a new connection with the device,
the relevant telephone book will be updated.
During the update, the phone book which was stored after the last completed update will be available. Newly stored telephone numbers are only shown af-
ter the updating has ended.
The update can be performed manually » page 39 Import contacts
Find contact
Press the button Find to open the input screen with keypad to search in the
phonebook » page 8.
Select contact
Pressing the function key with one of the displayed contacts starts the selec-
tion.
Where a contact contains several telephone numbers, the system displays a
menu containing the telephone numbers for the contact.
Contact details
By pressing the function key with the symbol the contact details are dis-
played.
Pressing the function key with one of the indicated telephone numbers starts
the selection.
By pressing the function key with the symbol and the contact will start the
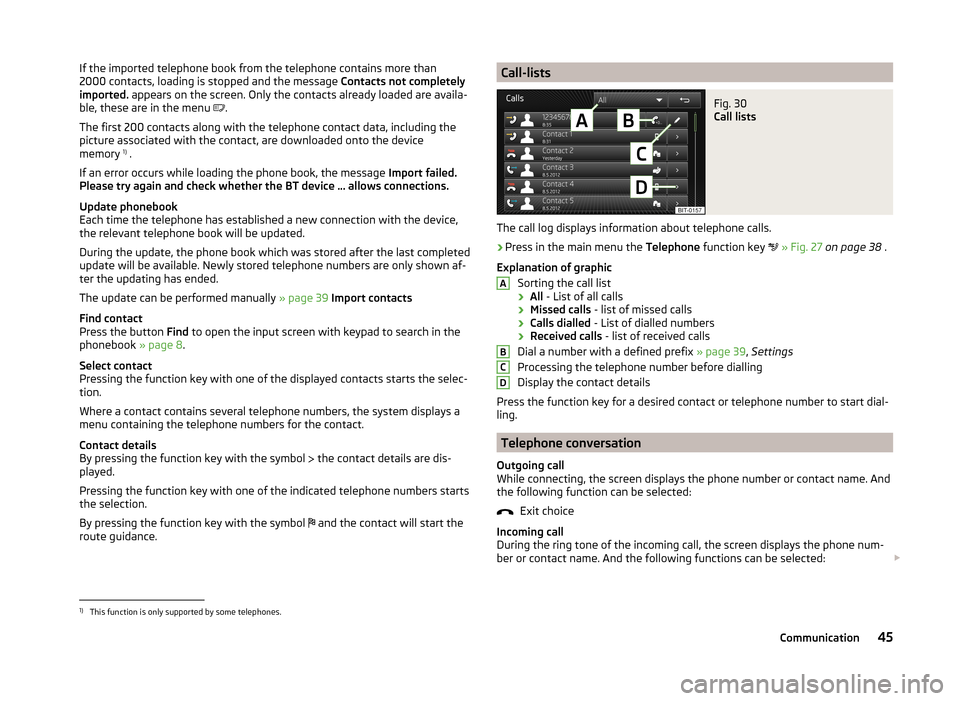
route guidance.Call-listsFig. 30
Call lists
The call log displays information about telephone calls.
›
Press in the main menu the Telephone function key
» Fig. 27 on page 38 .
Explanation of graphic Sorting the call list› All
- List of all calls
› Missed calls
- list of missed calls
› Calls dialled
- List of dialled numbers
› Received calls
- list of received calls
Dial a number with a defined prefix » page 39, Settings
Processing the telephone number before dialling
Display the contact details
Press the function key for a desired contact or telephone number to start dial-
ling.
Telephone conversation
Outgoing call
While connecting, the screen displays the phone number or contact name. And
the following function can be selected:
Exit choice
Incoming call
During the ring tone of the incoming call, the screen displays the phone num-
ber or contact name. And the following functions can be selected:
ABCD1)
This function is only supported by some telephones.
45Communication
Page 48 of 83
Answer the incoming call
Ignore the incoming call (mute ring tone) Reject the incoming call
Contact picture 1)
- Display caller details
Current call
During a current call, the screen displays the phone number or contact name
and the call duration. Depending on the context, the following functions can
be selected:
Hold a call
Deactivate the microphone
Activate the microphone End call
Contact image 1)
- View details of the caller or the called party
Conference
The conference is a shared call with between three and six participants.
Start a conference/invite additional participants
›
During a call or conference, make the next call.
or
›
The new incoming call .
During a conference
During an ongoing conference call, the call duration is displayed on the screen.
Depending on the context, the following functions can be selected:
Hold a conference - leave the conference temporarily (the conference con-
tinues in your absence)
Return to the held conference
Deactivate the microphone
Activate the microphone End conference call
Conference call image - Display conference details
Conference details
During a conference, press the conference symbol to display a list of other
conference participants. The following functions can be selected depending on
the type of telephone:
View participant detailsTalk to a participant separately of the conferenceEnd the call to a conference participant1)
The button is only functional when the contact is stored in the telephone book.
46Phone
Page 51 of 83
■ Avoid routes requiring toll stickers - Switch use of routes requiring toll
stickers on/off
■ Show available toll stickers - select from the list of routes requiring toll
stickers for which a valid toll sticker is available
Map
›
In the Navigation main menu, press
→ Map .
■ Day/night: - Select the background colour of the map
■ Day - light coloured background
■ Night - dark coloured background
■ Automatic - map with light or dark coloured background; the background
changes once you turn on the lights (does not apply to daytime running
lights)
■ Autozoom - Switch on/off the automatic zoom in/out of the map display
while driving » page 51
■ Show traffic signs - Switch on/off the display of traffic signs
■ Select categories for POIs - Select POIs to be displayed in the map from a list
of available POIs (max. 10 POIs) » page 60
■ Show brands for POIs - Switch on/off the display company logos at the POIs
■ Show favourites - Switch on/off the display of favourites
■ Lane guidance - Switch on/off the display of a window with the recommen-
ded lane for complicated intersections » page 63
Fuel options
›
In the Navigation main menu, press
Fuel options .
The following warning message is displayed when the fuel gauge pointer rea-
ches the reserve marking: Warning: fuel tank almost empty. Would you like to
find a fuel station nearby?
■ Select preferred fuel station - Select your preferred fuel station brand (the
selected station brand will be displayed on the first positions of the list)
■ Fuel warning - Switch on/off the display of the warning message for low on
fuel with the following: ■ Cancel - Close the window with the warning
■ Find - Search for the nearest fuel station; when you select the fuel station,
the new route will be calculated from your current position
Navigation announcements›
In the Navigation main menu, press
→ Nav. announcements
■ Volume - Set the volume of the navigation announcements
■ Nav. announcements: - Set the type of navigation announcements
■ Comprehensive - Full navigation announcements
■ Brief - Short navigation announcements
■ Congestion only - navigation announcements only when there is conges-
tion
■ No voice guidance during call - Switch on/off navigation announcements
during a telephone call (if using a phone connected to the device » page 37)
Advanced settings
›
In the Navigation main menu, press
press
→ Advanced setup .
■ Time display: - Select the time to be displayed in the status line
■ Time of arrival - displays the expected time to destination
■ Travelling time - Display the expected travelling time to the destination
■ Status line: Status line - Display information about your selected destination
in the status line ■ Destination - Display information about the length and duration of the
guidance to the destination
■ Next stopover - Display information about the length and duration of the
guidance to the stopover
■ Note: national border crossed - Switch on/off the display of the information
window with speed limits when crossing the national border
■ Demo mode - Switch on/off guidance in demo mode
■ Define demo mode starting point - Enter the starting point for preliminary
route calculation in demo mode
■ Cancel - Cancel the entry
■ Position - Select the current vehicle position as the starting point
■ Address - Select an address as the starting point
Manage memory
›
In the Navigation main menu, press
→ Manage memory .
■ Sort by: - Sort contacts downloaded from a connected telephone
■ Surname - Sort by contact name
■ Name - Sort by contact first name
49Description of the navigation system
Page 59 of 83
Crosshairs
The crosshairs indicate the position of the pre-filled address.
Drag the desired destination to the centre of the crosshairs on the map with your finger.
Touch the map with your finger to move the point of contact in the crosshair
while adjusting the latitude and longitude valuesfor the entered point.
The symbol
displays the current map scale. This can be changed while the
entry is being made » page 51.
The bottom of the screen displays the address or the longitude and latitude of
the selected item.
Confirm target
Confirm the destination by touching OK. Then the following items are dis-
played:
■ Store - Store the destination in the destination memory » page 8
■ Edit - Return to the main menu with the option to input a destina-
tion » page 55
■ Route opts. - Display a menu for setting the route parameters » page 48
■ Start - Route calculation starts with subsequent selection of route type and
route guidance or with guidance according to the preferred route type
Map zoom in / out
by pressing the function key the map goes to full screen display
by pressing the function key the map is displayed on a split screen along
with the menu for the entry using the GPS coordinates.
Entry of saved destinations
Introduction
This chapter contains information on the following subjects:
My destinations
57
Home address
57
Own destination (vCard)
58
First and foremost, pay attention to the safety instructions » page 4 , Impor-
tant notes .
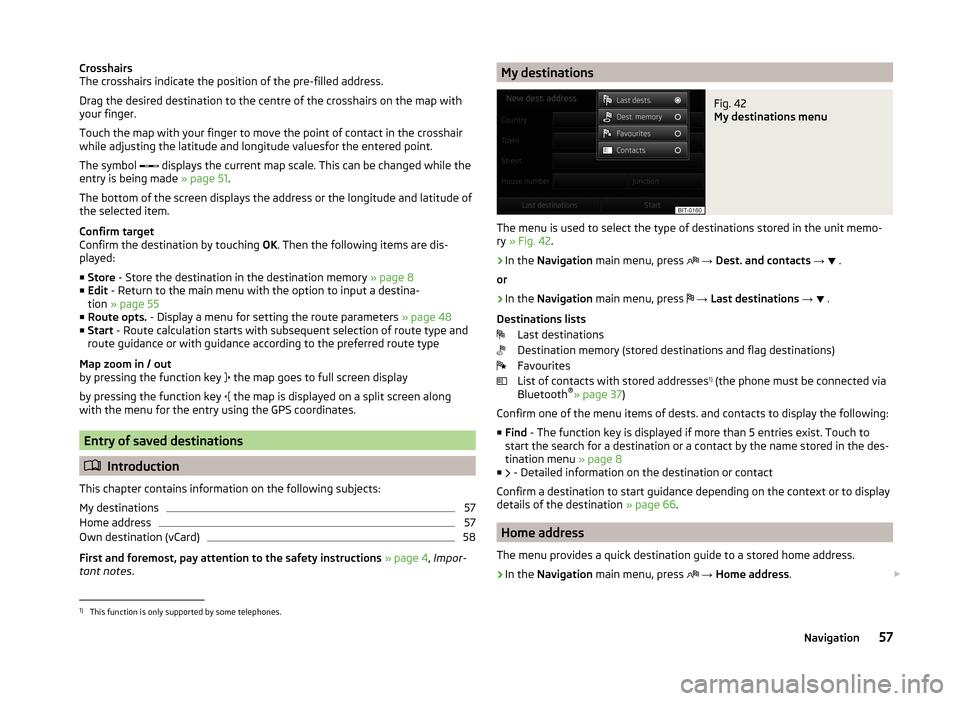
My destinationsFig. 42
My destinations menu
The menu is used to select the type of destinations stored in the unit memo-
ry » Fig. 42 .
›
In the
Navigation main menu, press
→ Dest. and contacts →
.
or
›
In the Navigation main menu, press
→ Last destinations →
.
Destinations lists Last destinations
Destination memory (stored destinations and flag destinations)
Favourites
List of contacts with stored addresses 1)
(the phone must be connected via
Bluetooth ®
» page 37 )
Confirm one of the menu items of dests. and contacts to display the following: ■ Find - The function key is displayed if more than 5 entries exist. Touch to
start the search for a destination or a contact by the name stored in the des-
tination menu » page 8
■ - Detailed information on the destination or contact
Confirm a destination to start guidance depending on the context or to display
details of the destination » page 66.
Home address
The menu provides a quick destination guide to a stored home address.
›
In the Navigation main menu, press
→ Home address .
1)
This function is only supported by some telephones.
57Navigation
Page 65 of 83
The timing of the navigation announcement depends on the type of road and
the driving speed. For example, on motorways the first announcement is made
about 2000 m (6000 ft) before the location where you want to leave the mo-
torway.
During dynamic route guidance, the unit notifies the driver of traffic problems.
If a new route is calculated due to traffic problems, the Calculating the route...
announcement is sounded.
Set the output volume of the navigation announcements or mute it during a
phone call » page 49.
Route
When there is a calculated route to the destination, the recommended route is
displayed.
›
In the Navigation main menu, press
.
The following menu is displayed: ■ Stop route guidance - Stops route guidance
■ New dest./stopover - Enter a new destination or add a destination to the
calculated route » page 55 or » page 65
■ Route information - Display information about the destination and the calcu-
lated route (setup of information displayed » page 49)
■ - Arrival time at destination/stopover 1)
■ - Remaining travelling time to destination or stopover 1)
■ - Remaining travelling distance to destination or stopover
■ Store destination - Stores the destination on the input screen » page 8
■ Route list - Displays the list of route sections
■ Tour - display of tour destinations » page 65
■ Congestion ahead - If you hear of a traffic problem (e.g. congestion), you can
enter this traffic problem manually. After entering, this device recalculates
and provides an alternative route. The traffic jam information increases or
decreases by touching the scale /
or by turning the menu button
2
» Fig. 1 on page 5 .
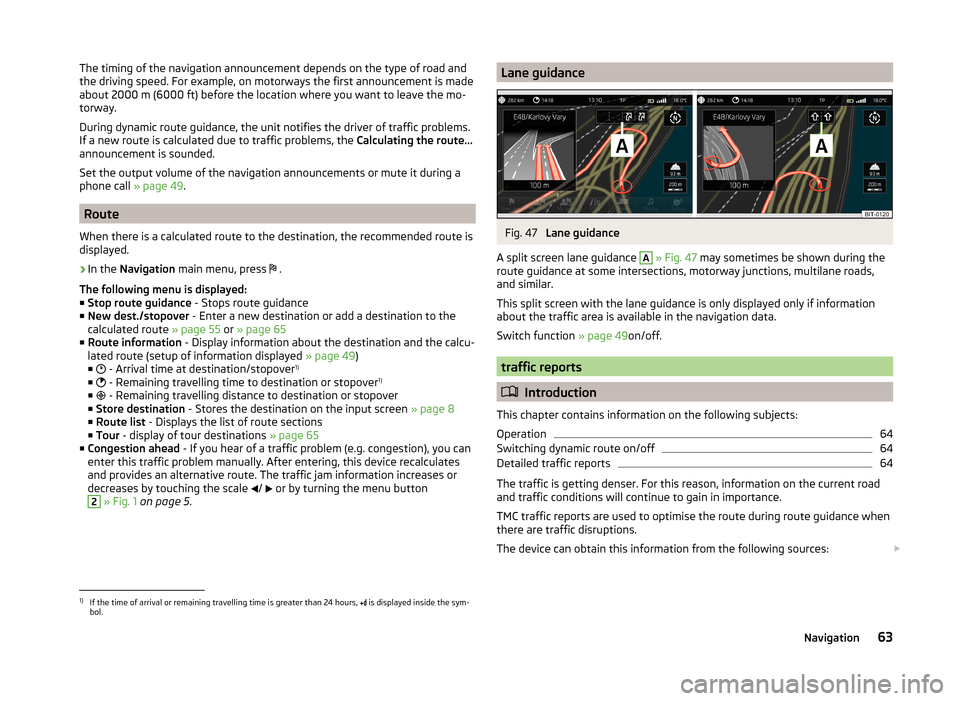
Lane guidanceFig. 47
Lane guidance
A split screen lane guidance
A
» Fig. 47 may sometimes be shown during the
route guidance at some intersections, motorway junctions, multilane roads,
and similar.
This split screen with the lane guidance is only displayed only if information
about the traffic area is available in the navigation data.
Switch function » page 49on/off.
traffic reports
Introduction
This chapter contains information on the following subjects:
Operation
64
Switching dynamic route on/off
64
Detailed traffic reports
64
The traffic is getting denser. For this reason, information on the current road
and traffic conditions will continue to gain in importance.
TMC traffic reports are used to optimise the route during route guidance when
there are traffic disruptions.
The device can obtain this information from the following sources:
1)
If the time of arrival or remaining travelling time is greater than 24 hours,
is displayed inside the sym-
bol.
63Navigation
Page 69 of 83
›by touching
the menu item in the list of found POIs;
› by touching the POI symbol on the map.
■ Dial No. - Start a telephone call 1)
(If a telephone is connected via Bluetooth ®
and the destination has been entered including the contact telephone num-
ber)
■ Start - Start route calculation » page 62
■ Store - Store the destination in the destination memory
In the POI details, individual POIs can be shown from the POIs found by tap-
ping on
/
or by finger motion across the screen.
Home address
The menu is displayed after the home address has been entered.
■ Store - Store the home address in the unit memory1)
This function is only supported by some telephones.
67Navigation