engine oil SKODA OCTAVIA 2014 3.G / (5E) User Guide
[x] Cancel search | Manufacturer: SKODA, Model Year: 2014, Model line: OCTAVIA, Model: SKODA OCTAVIA 2014 3.G / (5E)Pages: 280, PDF Size: 35.53 MB
Page 199 of 280
ŠKODA Service Partners are informed about the latest changes by the manu-
facturer. We therefore recommend that the oil change be completed by a
ŠKODA Service Partner.
The specifications (VW standards) stated in the following can be indicated sep-
arately or together with other specifications on the bottle.
The engine oil should be changed after specified service intervals » page 53.WARNINGThe engine compartment of your car is a hazardous area. The following
warning instructions must be followed at all times when working in the en-
gine compartment » page 192.
CAUTION
Do not pour any additives into the engine oil – risk of serious damage to the
engine parts!
Note
■ Before a long drive we recommend that you purchase and carry with you en-
gine oil which complies with the specification for your vehicle.■
We recommend that you use oils from ŠKODA Original Accessories.
■
If your skin has come into contact with oil, it must be washed thoroughly.
Specification
Read and observe
and on page 196 first.
Vehicles with variable service intervals
Petrol enginesSpecification1.2 l/63, 77 kW TSI
VW 504 00
1.4 l/103 kW TSI1,8 l/132 kW TSI2,0 l/162 kW TSIDiesel engines a)Specification1.6 l/66, 77, 81 kW TDIVW 507 002.0 l/110, 135 kW TDI CRa)
Engine oil VW 505 01 can optionally be used in diesel engines without a
DPF.
Vehicles with fixed service intervalsPetrol enginesSpecification1.2 l/63, 77 kW TSI
VW 502 00
1.4 l/81 kW TSI G-TEC1.4 l/103 kW TSI1.6 l/81 kW MPI1.8 l/132 kW TSI2.0 l/162 kW TSIDiesel engines a)Specification1.6 l/66, 77, 81 kW TDIVW 507 002.0 l/105, 110, 135 kW TDIa)
Engine oil VW 505 01 can optionally be used in diesel engines without a
DPF.
CAUTION
■
If the above engine oils are not available, a different engine oil can be used in
an emergency. To prevent damage to the engine, a maximum of 0.5 litres only
of the following engine oils may be used: ■ For petrol engine models: ACEA A3/ACEA B4 or API SN, (API SM);
■ for diesel engines: ACEA C3 or API CJ-4.
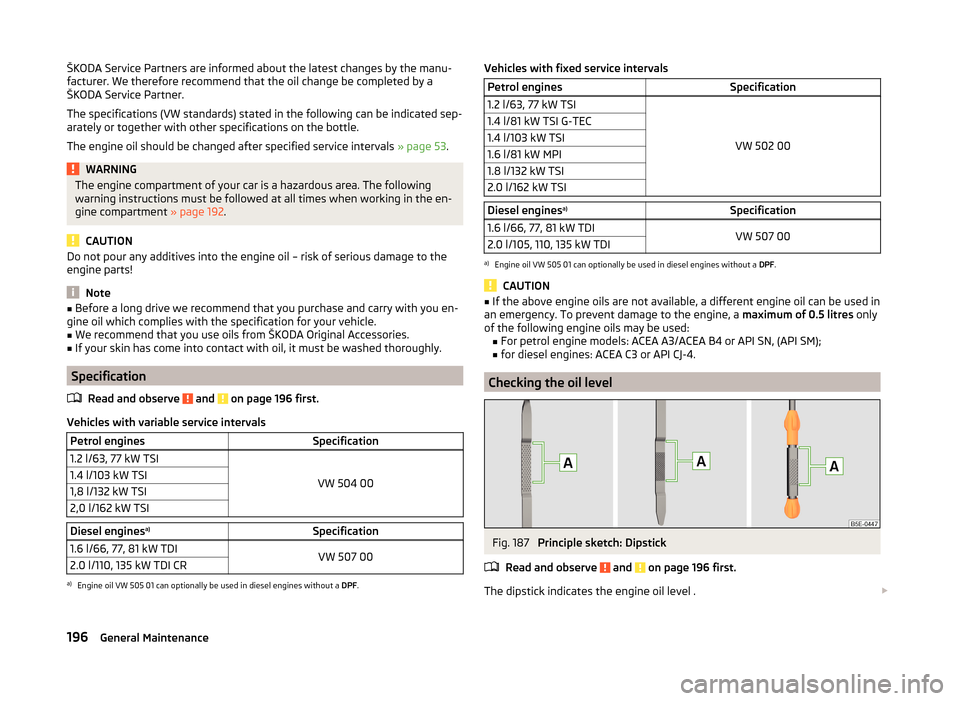
Checking the oil level
Fig. 187
Principle sketch: Dipstick
Read and observe
and on page 196 first.
The dipstick indicates the engine oil level .
196General Maintenance
Page 200 of 280
Dipstick » Fig. 187
The oil level must be within this range.
The oil can be checked and topped up, if the following conditions are satisfied. The vehicle stands on a horizontal surface.
The engine operating temperature is reached.
The engine is turned off.
The bonnet is open.
Checking the level›
Wait a few minutes until the engine oil flows back into the oil trough.
›
Pull out the dipstick.
›
Wipe the dipstick with a clean cloth and insert it again to the stop.
›
Pull the dipstick out again and check the oil level.
›
Re-insert the dipstick.
The engine consumes a little oil. The oil consumption may be as much as 0.5 l/
1000 km depending on your style of driving and the conditions under which
you operate your vehicle. Consumption may be slightly higher than this during
the first 5 000 km.
The oil level must be checked at regular intervals.
In case of low oil level, the display of the instrument cluster shows a check
mark and the corresponding message
» page 42. Check the oil level using
the dipstick as soon as possible. Add oil accordingly.
CAUTION
■ The oil level must never be above the A range » Fig. 187 – there is a risk of
damaging the exhaust system!■
If for some reason it is not possible to top up the engine oil under the current
circumstances,
do not continue driving! Switch off the engine and seek as-
sistance from a specialist garage.
■
If the oil level is above level
A
,
do not continue to drive! Switch off the
engine and seek assistance from a specialist garage.
Replenishing
Read and observe
and on page 196 first.
›
Unscrew the cap of the engine oil filler opening » Fig. 185 on page 194 .
›
Replenish the oil in portions of 0.5 litres in accordance with the correct speci-
fications » page 196 .
›
Check the oil level » page 196.
A›Screw the lid of the engine oil filler closed carefully.›Pull the dipstick out as far as the stop.
Coolant
Introduction
This chapter contains information on the following subjects:
Checking the coolant level
198
Replenishing
198
The coolant provides cooling for the motor.
It consists of water and coolant additive with additives that protect the cooling
system against corrosion and prevents furring.
The coolant additive level in the coolant must be at least 40%.
The coolant additive may be increased to a maximum of 60%.
The correct mixing ratio of water and coolant additive is to be checked if nec- essary by a specialist garage or is to be restored if necessary.
The description of the coolant is shown in the coolant expansion reser-
voir » Fig. 188 on page 198 .
WARNINGThe engine compartment of your car is a hazardous area. The following
warning instructions must be followed at all times when working in the en- gine compartment » page 192.■
The coolant is harmful to health.
■
Avoid contact with the coolant.
■
Coolant vapours are harmful to health.
■
Never open the end cover of the coolant expansion reservoir while the
engine is still warm. The cooling system is pressurized!
■
When opening the end cover of the coolant expansion reservoir, cover it
with a cloth to protect your face, hands and arms from hot steam or hot
coolant.
■
If any coolant splashes into your eyes, immediately rinse out your eyes
with clear water and contact a doctor as soon as possible.
■
Always keep the coolant in the original container, safe from people who
are not completely independent, especially children - there is a danger of
poisoning!
197Inspecting and replenishing
Page 225 of 280
Vehicles with manual transmission may be towed in with a tow bar or a tow
rope or with the front or rear wheels raised.
Vehicles with automatic transmission may be towed in with a tow bar or a tow
rope or with the front wheels raised. If the vehicle is raised at rear, the auto-
matic gearbox is damaged!
Driver of the tow vehicle›
Engage the clutch gently when starting off or depress the accelerator partic-
ularly gently if the vehicle is fitted with an automatic gearbox.
›
Only then approach correctly when the rope is taut.
The maximum towing speed is 50 km/h.
Driver of the towed vehicle
›
Switch on the ignition so that the steering wheel is not locked and so that
the turn signal lights, windscreen wipers and windscreen washer system can
be used.
›
Take the vehicle out of gear or move the selector lever into position N if the
vehicle is fitted with an automatic gearbox.
Please note that the brake servo unit and power steering only operate if the
engine is running. If the engine is not running, significantly more physical force
is required to depress the brake pedal and steer the vehicle.
If using a tow rope, ensure that it is always kept taught.
Both drivers should be familiar with the problems which might possibly occur while a vehicle is being towed. Unskilled drivers should not attempt to tow in
another vehicle or to be towed in.
The vehicle must be transported on a special breakdown vehicle or trailer if it
is not possible to tow in the vehicle in the way described or if the towing dis-
tance is greater than 50 km.
WARNING■ When towing, respect the national legal provisions, especially those
which relate to the identification of the towing vehicle and the vehicle be-
ing towed.■
When towing, exercise increased caution.
■
Spiral tow ropes must not be used for towing » Fig. 207-
, the towing
eye may unscrew out of the vehicle - risk of accident.
■
The tow rope should not be twisted - risk of accident.
CAUTION■ Do not tow start the engine – there is a risk of damaging the engine and the
catalytic converter. The battery from another vehicle can be used as a jump-
start aid » page 220 , Jump-starting .■
If the gearbox no longer contains any oil, your vehicle must only be towed
with the front axle raised clear of the ground or on a breakdown vehicle or
trailer.
■
To protect both vehicles when tow-starting or towing, the tow rope should
be elastic. Thus one should only use plastic fibre rope or a rope made out of a
similarly elastic material.
■
There is always a risk of excessive stresses and damage resulting at the
points to which you attach the tow rope or tow bar when you attempt to tow a
vehicle which is not standing on a paved road.
■
Attach the tow rope or the tow bar to the towing eyes » page 222
or » page 223 to the detachable ball head of the towing equip-
ment » page 169 .
Note
We recommend using a tow rope from ŠKODA Original Accessories available
from a ŠKODA Partner.
Front towing eye
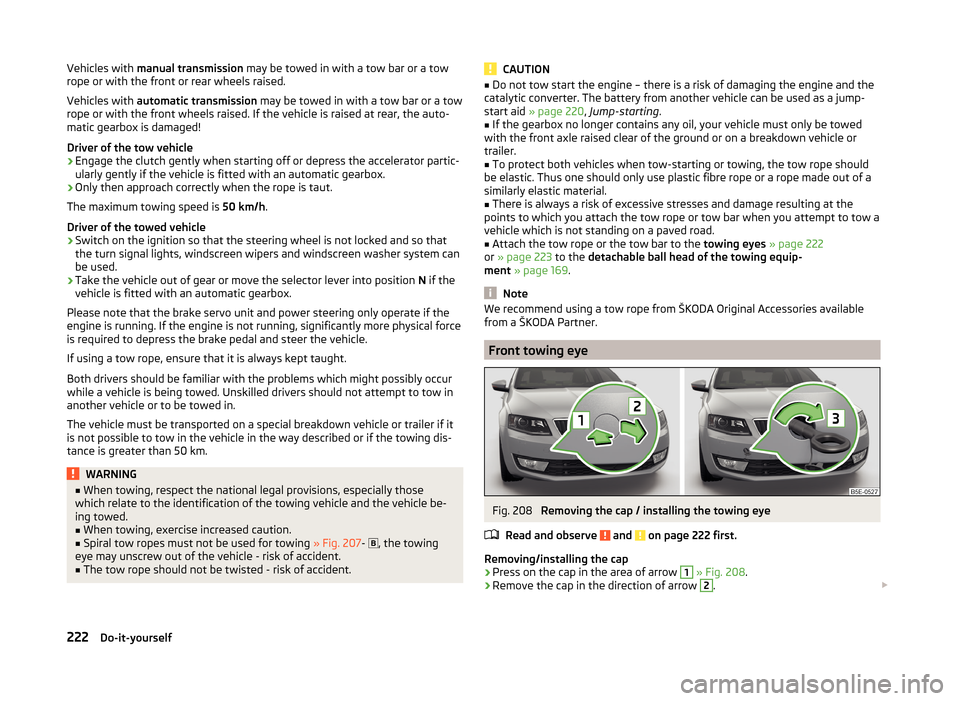
Fig. 208
Removing the cap / installing the towing eye
Read and observe
and on page 222 first.
Removing/installing the cap
›
Press on the cap in the area of arrow
1
» Fig. 208 .
›
Remove the cap in the direction of arrow
2
.
222Do-it-yourself
Page 233 of 280
No.Consumer12Radio13Belt tensioner - driver's side14Air blower for air conditioning,heating15Electric steering lock16Signal amplifier for telephone, telephone preinstallation17Instrument cluster18Not assigned19KESSY control unit20Operating lever underneath the steering wheel21Not assigned22Towing hitch - contact in the socket23Light - right24Panorama roof25Control unit for central locking front door right, power windows -
left26Heated front seats27Music amplifier28Towing hitch - left light29CNG relay30Not assigned31Headlight - left32Parking aid (Park Assist)33Airbag switch for hazard warning lights
34
TCS, ESC button, tyre control display, pressure sensor for air-condi-
tioning, reverse light switch, interior mirror with automatic dim-
ming, START-STOP button, telephone preinstallation, control for
heating of rear seats, sensor for air-conditioning, 230 V power
socket, sport-sound generator35Headlight, headlamp beam adjustment, diagnostic connector, cam-
era, radar36Headlight right37Headlight left38Towing hitch - right lightNo.Consumer39Control unit for central locking front door - right, power windows -
front and rear right4012-Volt power socket41Not assigned42Control unit for central locking rear door - left, right, headlight
cleaning system, windscreen wipers43Visor for gas discharge bulbs, interior lighting44Towing hitch - contact in the socket45Control unit for control of seat adjustment46230-Volt power socket47Rear window wiper48Not assigned49Coil on starter relay, clutch pedal switch50Opening the boot lid51Belt tensioner - front passenger side52Not assigned53Relay for rear window heater
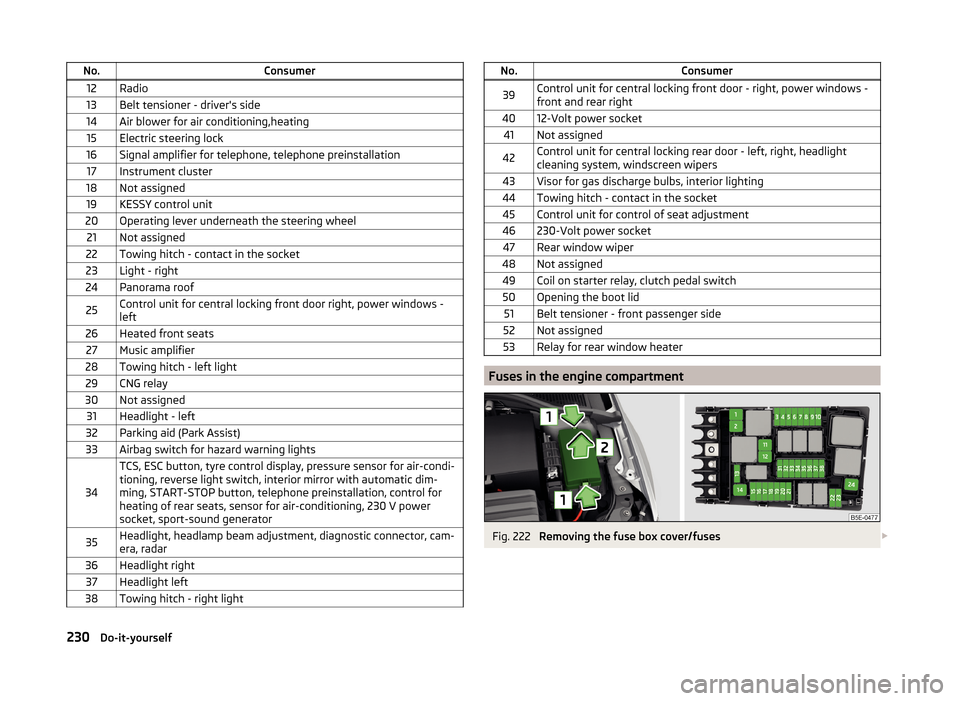
Fuses in the engine compartment
Fig. 222
Removing the fuse box cover/fuses
230Do-it-yourself
Page 234 of 280
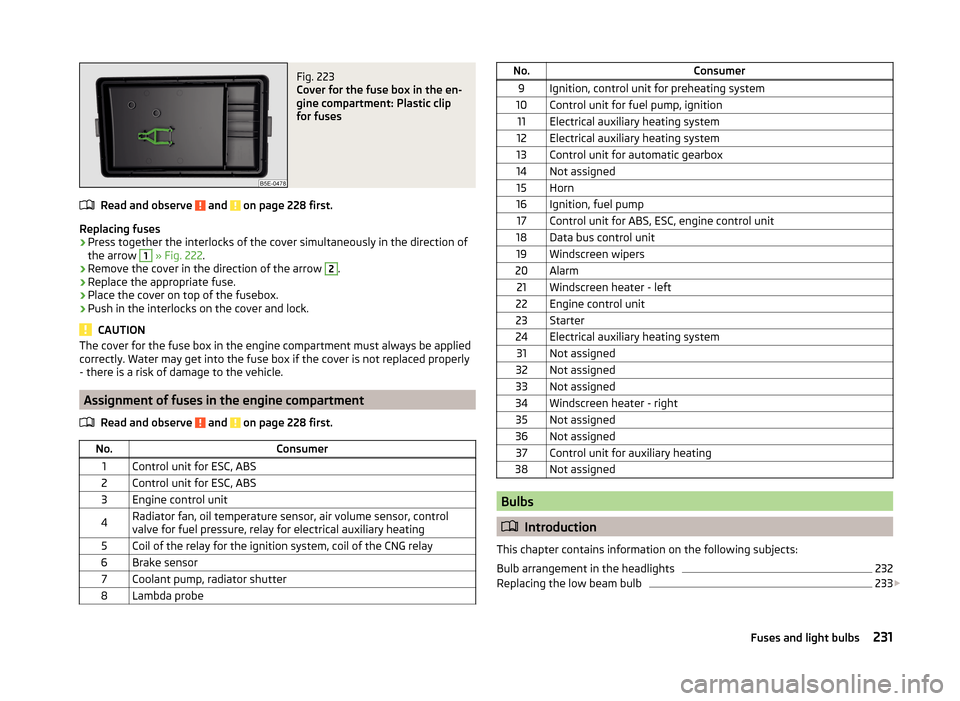
Fig. 223
Cover for the fuse box in the en-
gine compartment: Plastic clip
for fuses
Read and observe and on page 228 first.
Replacing fuses
›
Press together the interlocks of the cover simultaneously in the direction of
the arrow
1
» Fig. 222 .
›
Remove the cover in the direction of the arrow
2
.
›
Replace the appropriate fuse.
›
Place the cover on top of the fusebox.
›
Push in the interlocks on the cover and lock.
CAUTION
The cover for the fuse box in the engine compartment must always be applied
correctly. Water may get into the fuse box if the cover is not replaced properly
- there is a risk of damage to the vehicle.
Assignment of fuses in the engine compartment
Read and observe
and on page 228 first.
No.Consumer1Control unit for ESC, ABS2Control unit for ESC, ABS3Engine control unit4Radiator fan, oil temperature sensor, air volume sensor, control
valve for fuel pressure, relay for electrical auxiliary heating5Coil of the relay for the ignition system, coil of the CNG relay6Brake sensor7Coolant pump, radiator shutter8Lambda probeNo.Consumer9Ignition, control unit for preheating system10Control unit for fuel pump, ignition11Electrical auxiliary heating system12Electrical auxiliary heating system13Control unit for automatic gearbox14Not assigned15Horn16Ignition, fuel pump17Control unit for ABS, ESC, engine control unit18Data bus control unit19Windscreen wipers20Alarm21Windscreen heater - left22Engine control unit23Starter24Electrical auxiliary heating system31Not assigned32Not assigned33Not assigned34Windscreen heater - right35Not assigned36Not assigned37Control unit for auxiliary heating38Not assigned
Bulbs
Introduction
This chapter contains information on the following subjects:
Bulb arrangement in the headlights
232
Replacing the low beam bulb
233
231Fuses and light bulbs
Page 264 of 280
Automatic gearbox modes133
Automatic load deactivation203
automatic transmission selector lever lock defect
134
Automatic transmission Kickdown
135
Launch control135
Selector lever lock134
Automatic Transmission Malfunction
35
Warning light35
warning messages35
Auxiliary heating (auxiliary heating and ventila- tion)
121
Adjust122
Radio remote control123
Switching on/off122
B
Ball head Check fitting
172
Ready position170
Ball rod assembling, step 1
171
assembling, step 2171
Ready position170
removing, step 1172
removing, step 2173
Battery In the remote control key
224
Belts12
Belt tensioners15
Bonnet Closing
194
Opening194
Boot Class N1 vehicles
110
See Boot lid61
Boot lid automatic locking61
Closing61
Opening61
Brake information messages
35
warning light35
Brake booster131
brake fluid specification
199
Brake fluid199
Checking199
information messages35
Brake linings warning light
39
Brake pedal (automatic transmission) Indicator light
40
brakes Driving in
136
Brakes Brake booster
131
Brake fluid199
Braking and stabilisation systems138
Handbrake131
Brakes and parking130
Braking Information on braking
130
Break recommendation See Fatigue detection
166
Bulbs Replacing
231
Buttons in the door Power windows
64
C
Camera Lens care
184
Camera lens care
184
Car computersee multifunction display47
Care and maintenance177
cargo cover roll-up cargo cover
108
Cargo element108
Caring for the vehicle exterior Towing hitch
185
Car park132
Car park ticket holder95
Carrier Roof rack
113
Cavity protection184
Central locking54
Problems58
Central locking button58
Central warning light Indicator light
36
Change bulb for additional parking light
233
bulb for fog lights - Version 1234
bulb for fog lights - Version 2234
bulb for high beam233
bulb for the parking light233
bulb in the rear light - Version 1236
bulb in the rear light - Version 2237
daytime running light bulb233
light bulb in tail light235
Changing Engine oil
195
Wheels214
Changing a wheel Follow-up tasks
215
Preparation214
Removing and refitting a wheel215
Charging a vehicle battery202
Check Fit ball head properly
172
261Index
Page 265 of 280
CheckingBattery electrolyte level201
Brake fluid199
Coolant198
Engine oil196
Oil level196
Windscreen washer fluid195
Checks Statutory checks
177
Children and safety22
Child safety Side airbag
24
Child safety lock58
Child safety seat Use of child safety seats
25
Child seat Classification
25
ISOFIX25
on the front passenger seat23
TOP TETHER27
Use of ISOFIX child seats26
Chrome parts see vehicle care
183
Cigarette lighter97
cleaning chrome parts
183
Cleaning Alcantara
187
and maintaining belts187
artificial leather187
headlight glasses184
materials187
natural leather186
plastic parts182
seats covers of the electrically heated seats187
wheels185
Cleaning safety belt
187
Cleaning seat covers
187
Cleaning the interiorartificial leather187
Seat covers187
Cleaning the outside of the vehicle Decorative films
183
Cleaning the vehicle exterior Camera lens
184
Cavity protection184
Door locking cylinder184
Headlight glasses184
Under-body protection185
wheels185
Windows and external mirrors183
Cleaning vehicle180
Cleaning vehicle exterior181
Plastic parts182
Rubber seals183
Vehicle paint work182
Wiper blades185
Clean interior Safety belt
187
clean outside of vehicle chrome parts
183
Climatronic air distribution control
117
Operating elements119
Closing sun roof - Version 1
67
- Version 269
Clothes hook101
CNG192
Indicator light40
Natural gas reserve display32
refuelling191
Refuelling191
Sticker192
Cockpit 12-Volt power outlet
98
Ashtray97
Cigarette lighter97
General view29
Lighting78
storage compartments94
useful equipment94
Comfort control window
66
comfort controls sun roof - Version 1
68
sun roof - Version 270
COMING HOME77
compartments94
Component protection179
Components of the puncture repair kit218
Compressed natural gas see CNG
192
Computer see multifunction display
47
convenience turn signal73
Coolant197
Checking198
Indicator symbol41
Information messages41
Replenishing198
Temperature gauge32
Cooling system cost-effective use
121
malfunctions121
CORNER See Fog lights with CORNER function
76
Correct seated position9
Driver9
Front passenger10
Instructions11
Rear seats11
Counter for distance driven33
cruise control operation
148
operation Description149
Cruise control system Warning light
40
262Index
Page 267 of 280
Engine number238
engine oil specification
196
Engine oil195
Changing195
Checking196
Indicator symbol42
Replenishing197
Warning icon42
EPC Warning light
38
ESC Functioning
138
Warning light37
ESC Sport138
Estate instrument Natural gas reserve display
32
Estate Instrument panel Petrol / Diesel reserve display
33
Exhaust inspection system Warning light
38
F
Fastening elements
104
Fatigue detection166
Function166
Information messages167
Films183
Fire extinguisher211
First-aid kit 211
Floor covering Fixing
106
in the luggage compartment106
Fog lights76
Warning light40
Fog lights with CORNER function76
Fold in passenger's mirror85
Footmats132
see footmats132
Force limit Electric boot lid61
Power windows65
Front airbag17
Front Assistant155
Activating/deactivating157
Information messages157
Operation156
Radar sensor155
Warning symbol44, 45
Front door warning light79
fuel lead-free petrol
189
Fuel188
CNG192
Diesel190
Natural gas reserve display32
Petrol / Diesel reserve display33
refer to Fuel188
Refuelling188
Refuelling - natural gas191
Warning icon43
Fuel consumption239
Fuel filter Information messages
44
Fuses Assignment
228
Assignment of fuses in the dash panel229
Colour coding228
Fuse assignment in the engine compartment231
Plastic clip230
Replacing228
G
Gear change Gear recommendation
46
Information on the selected gear46
Gear changing Gear stick
132
General viewCockpit29
Genuine parts178
Glasses compartment100
Glow plug system Warning light
38
H
Handbrake
131
Warning light35
Hazard warning light system77
HBA140
Head airbag20
Headlight assist Warning symbol
44
Headlight cleaning system Headlight cleaning system
83
Headlights Bulb arrangement
232
Driving abroad78
Headlight cleaning system83
Headrest Removing and installing
88
Head restraints88
Adjust height88
Heater Windscreen and rear window
80
Heating116
Air distribution control117
Control elements118
Exterior mirrors85
Seats90
HHC140
High beam assistant75
Hill Hold Control (HHC)140
Hitch169
Drawback load169
Hook106
Horn29
264Index
Page 269 of 280
lock steering lock / unlockkey126
Long cargo channel94
Low beam71
Low tyre pressure warning See tyre pressure monitoring
167
Luggage compartment103
Compartment with cargo element108
Cover107
Emergency unlocking226
Fastening elements104
Fix floor covering106
Fixing nets105
floor covering on both sides106
foldable hook106
Folding double hooks105
Lighting103
Luggage net106
Net partition112
roll-up cargo cover108
Storage compartments under the floor cover- ing
109
Stowing the roof rack115
Unlocking the tailgate226
Variable loading floor110
Luggage compartment cover107
Luggage compartment lid60
Luggage net106
Luggage storage Multi-function pocket
110
M
Main beam
73
Warning light40
Maintenance see vehicle care
182
Manual air conditioning Air distribution control
117
Operating elements119
Manual gear changing see gear changing132
Manually adjusting seats
87
Manually adjusting seats87
MAXI DOT display50
Lap timer51
Main menu51
Operation46
Stop watch51
MAXI DOT see MAXI DOT display
50
Maximum permissible weights
238
Mechanical windows66
opening and closing67
Media see radio/navigation system
4
Memory48
Memory Function for the seat89
Mirror Exterior mirrors
85
Make-up81
Mirrors Interior mirror
84
MODE button see driving mode selection
160
Modifications177
Modifications and technical alterations Airbags
179
Service178
Spoiler179
Multi-collision brake140
Multi-function pocket110
Multifunction display Functions
47
Information48
Memory48
Operation46
Multimedia holder99
N
N1
110
Nameplate238
Natural gas operation Indicator light
40
Natural gas vehicles See CNG
192
Navigation system4
Net partition112
behind the front seats112
behind the rarer seats112
Removing and refitting the housing113
Nets105
Notes for driving with a repaired tyre220
Notes on using wheels204
O
Oil Information messages
42
See Engine oil196
Oil pressure Information messages
42
Onboard computer see multifunction display
47
Opening and closing sun roof - Version 1
67
sun roof - Version 269
Operate roller blind - Version 1
68
Operating weight239
Operation in winter Diesel fuel
190
Vehicle battery201
Optical Parking Assistant143
Function keys144
Operation143
Orientation lines144
266Index
Page 270 of 280
Original accessories178
Outside temperature46
Overview Engine compartment
194
Warning icons40
Warning lights34
P
Park assist
144
Departing from a parallel parking space147
Finding a parking space145
Information messages147
Parking146
Park Assist automatic emergency braking
147
Operation145
Parking132
Park assist144
Parking aid140
Parking aid140
Automatic system activation when moving for- ward
143
Function141
Road display142
Parking lights71
Park the vehicle see Parking
132
Part replacement177
Passive safety Before setting off
8
Driving safety8
Safety equipment8
Passive Safety8
Payload239
Pedals132
Footmats132
Petrol see fuel
189
Phonebox96
Plastic parts182
Polishing vehicle paint work see vehicle care
182
Positioning the jack
216
Power limit Sun roof - Version 1
67
Sun roof - Version 269
Power outlet 12 V
98
Power steering Warning light
36
Power windows64
Button in the front passenger door65
Button in the rear doors65
Buttons in the driver's door64
Practical equipment Reflective vest
211
Practical features 12-Volt power outlet
98
Storage pockets on the front seats101
Waste container98
Proactive passenger protection Indicator light
38
ProActive passenger protection161
Function162
Puncture repair kit218
R
Radiator fan
195
Radio4
Radio remote control Auxiliary heating
123
Raising the vehicle216
Rear-view mirror Exterior mirrors
85
Fold in passenger mirror85
Synchronous adjustment of the rear-view mir- ror
85
Rear fog light76
Warning light38
Rear mirror83
Interior mirror84
Rear view camera143
Rear window - heater80
Refuelling188
Fuel188
Fuel - natural gas191
Remote control Locking
55
Replacing the battery224
Synchronisation process224
Unlocking55
Remote control key Replacing the battery
224
Removable through-loading bag102
Repairs and technical alterations177
Replace the battery in the auxiliary heating (auxiliary heating) in the remote control
225
Replacing Bulb for the licence plate light
235
Bulbs231
Fuses228
Fuses – engine compartment230
Fuses – LHD228
Fuses – RHD229
Low beam bulb233
Rear window wiper blade227
Vehicle battery202
windscreen wiper blades227
Replenishing Coolant
198
Engine oil197
Windscreen washer fluid195
Retraction and economical driving136
Reversing camera143
Lens care184
Revolutions counter31
267Index