navigation system SKODA OCTAVIA 2014 3.G / (5E) Owner's Manual
[x] Cancel search | Manufacturer: SKODA, Model Year: 2014, Model line: OCTAVIA, Model: SKODA OCTAVIA 2014 3.G / (5E)Pages: 280, PDF Size: 35.53 MB
Page 32 of 280
Using the system
Cockpit
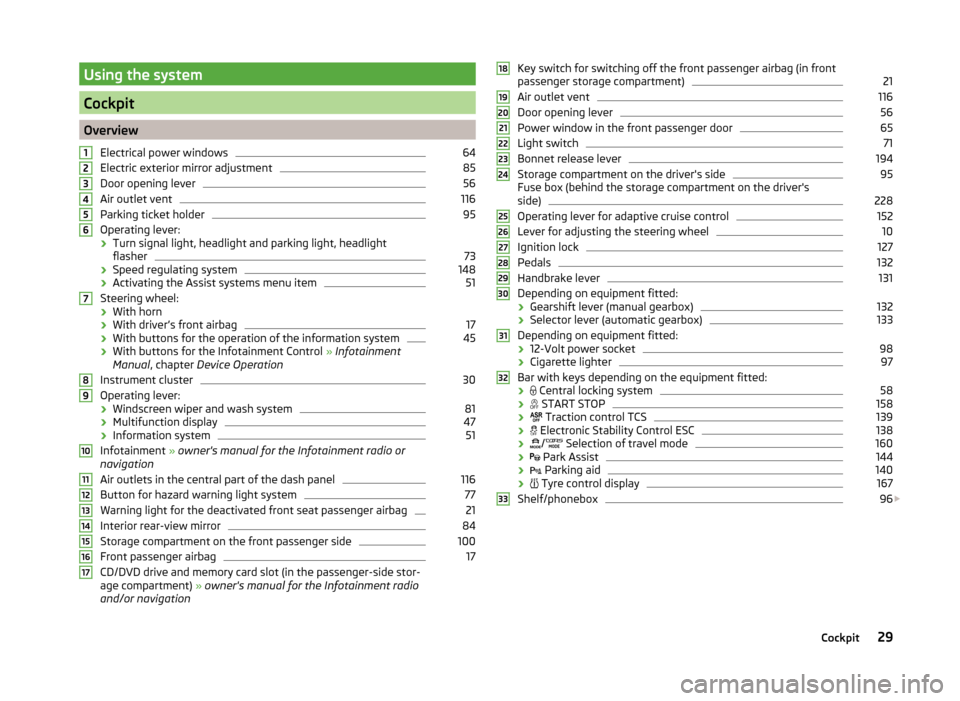
OverviewElectrical power windows
64
Electric exterior mirror adjustment
85
Door opening lever
56
Air outlet vent
116
Parking ticket holder
95
Operating lever:
› Turn signal light, headlight and parking light, headlight
flasher
73
› Speed regulating system
148
›Activating the Assist systems menu item
51
Steering wheel:
› With horn
› With driver’s front airbag
17
›With buttons for the operation of the information system
45
›With buttons for the Infotainment Control
» Infotainment
Manual , chapter Device Operation
Instrument cluster
30
Operating lever: › Windscreen wiper and wash system
81
›Multifunction display
47
›Information system
51
Infotainment
» owner's manual for the Infotainment radio or
navigation
Air outlets in the central part of the dash panel
116
Button for hazard warning light system
77
Warning light for the deactivated front seat passenger airbag
21
Interior rear-view mirror
84
Storage compartment on the front passenger side
100
Front passenger airbag
17
CD/DVD drive and memory card slot (in the passenger-side stor-
age compartment) » owner's manual for the Infotainment radio
and/or navigation
1234567891011121314151617Key switch for switching off the front passenger airbag (in front
passenger storage compartment)21
Air outlet vent
116
Door opening lever
56
Power window in the front passenger door
65
Light switch
71
Bonnet release lever
194
Storage compartment on the driver's side
95
Fuse box (behind the storage compartment on the driver's
side)
228
Operating lever for adaptive cruise control
152
Lever for adjusting the steering wheel
10
Ignition lock
127
Pedals
132
Handbrake lever
131
Depending on equipment fitted:
› Gearshift lever (manual gearbox)
132
›Selector lever (automatic gearbox)
133
Depending on equipment fitted:
› 12-Volt power socket
98
›Cigarette lighter
97
Bar with keys depending on the equipment fitted:
›
Central locking system
58
›
START STOP
158
›
Traction control TCS
139
›
Electronic Stability Control ESC
138
›
/
Selection of travel mode
160
›
Park Assist
144
›
Parking aid
140
›
Tyre control display
167
Shelf/phonebox
96
1819202122232425262728293031323329Cockpit
Page 39 of 280
Seat belt warning lightRead and observe
on page 34 first.
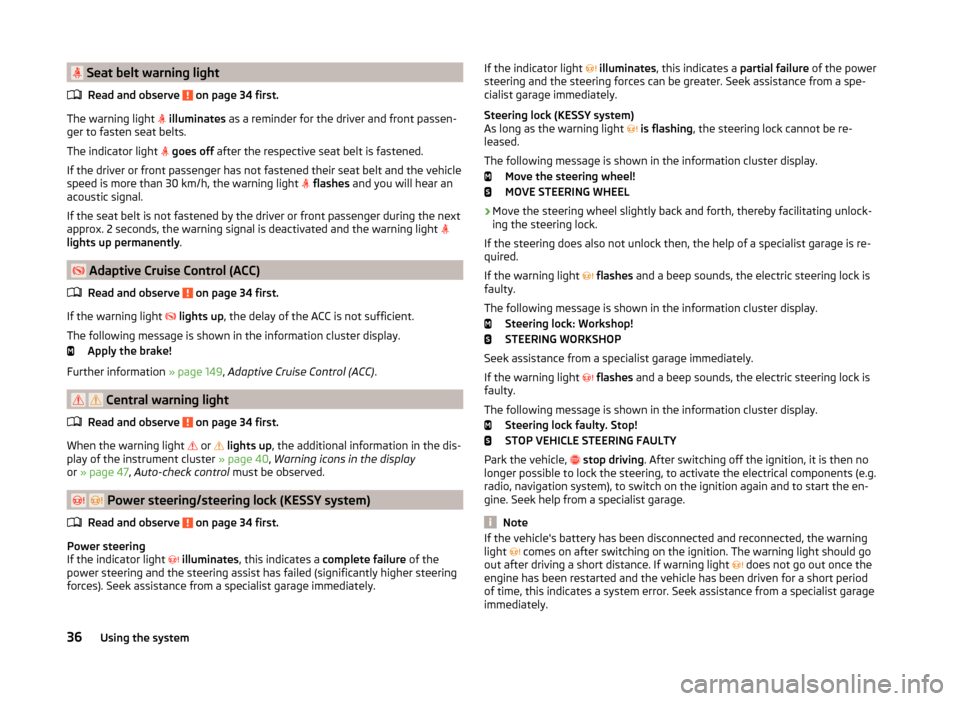
The warning light
illuminates as a reminder for the driver and front passen-
ger to fasten seat belts.
The indicator light
goes off after the respective seat belt is fastened.
If the driver or front passenger has not fastened their seat belt and the vehicle
speed is more than 30 km/h, the warning light
flashes and you will hear an
acoustic signal.
If the seat belt is not fastened by the driver or front passenger during the next
approx. 2 seconds, the warning signal is deactivated and the warning light
lights up permanently .
Adaptive Cruise Control (ACC)
Read and observe
on page 34 first.
If the warning light
lights up , the delay of the ACC is not sufficient.
The following message is shown in the information cluster display. Apply the brake!
Further information » page 149, Adaptive Cruise Control (ACC) .
Central warning light
Read and observe
on page 34 first.
When the warning light or
lights up , the additional information in the dis-
play of the instrument cluster » page 40, Warning icons in the display
or » page 47 , Auto-check control must be observed.
Power steering/steering lock (KESSY system)
Read and observe
on page 34 first.
Power steering
If the indicator light
illuminates , this indicates a complete failure of the
power steering and the steering assist has failed (significantly higher steering
forces). Seek assistance from a specialist garage immediately.
If the indicator light illuminates , this indicates a partial failure of the power
steering and the steering forces can be greater. Seek assistance from a spe-
cialist garage immediately.
Steering lock (KESSY system)
As long as the warning light
is flashing , the steering lock cannot be re-
leased.
The following message is shown in the information cluster display. Move the steering wheel!
MOVE STEERING WHEEL
› Move the steering wheel slightly back and forth, thereby facilitating unlock-
ing the steering lock.
If the steering does also not unlock then, the help of a specialist garage is re-
quired.
If the warning light
flashes and a beep sounds, the electric steering lock is
faulty.
The following message is shown in the information cluster display. Steering lock: Workshop!
STEERING WORKSHOP
Seek assistance from a specialist garage immediately.
If the warning light
flashes and a beep sounds, the electric steering lock is
faulty.
The following message is shown in the information cluster display. Steering lock faulty. Stop!
STOP VEHICLE STEERING FAULTY
Park the vehicle,
stop driving . After switching off the ignition, it is then no
longer possible to lock the steering, to activate the electrical components (e.g.
radio, navigation system), to switch on the ignition again and to start the en-
gine. Seek help from a specialist garage.
Note
If the vehicle's battery has been disconnected and reconnected, the warning
light comes on after switching on the ignition. The warning light should go
out after driving a short distance. If warning light
does not go out once the
engine has been restarted and the vehicle has been driven for a short period
of time, this indicates a system error. Seek assistance from a specialist garage
immediately.36Using the system
Page 54 of 280

Main menuFig. 31
Operating lever: Button to open
the menu item wizard
Read and observe on page 50 first.
Operating the MAXI DOT display » page 46.
Main menu items (depending on vehicle equipment) ■ Driving data » page 47
■ Assist systems » page 162 , » page 155
■ Navigation » operating instructions for Infotainment , chapter Navigation
system (NAV button)
■ Audio » operating instructions for Infotainment , chapter Audio (MEDIA but-
ton)
■ Telephone » operating instructions for Infotainment , chapter Communica-
tion (PHONE button)
■ Vehicle » page 47 , Auto-check control
■ Lap timer » page 51 , Lap timer (Stop watch)
Menu item wizard
In the menu item Assist systems the Front Assist and the Lane Assist can be
confirmed and activated or deactivated .
The menu item Assist systems in the main menu can also be opened by press-
ing the button
A
on the control lever » Fig. 31.
Note■
If the MAXI DOT display shows warning messages, these messages must be
confirmed in order to access the main menu » page 46, Using the information
system .■
For vehicles with Infotainment, the language of the MAXI DOT display can be
set in the Infotainment » Infotainment operating instructions , chapter Device
settings (SETUP key) .
■
For vehicles without infotainment, the language of the MAXI DOT displays
can only be adjusted by a specialist garage.
Lap timer (Stop watch)
Read and observe
on page 50 first.
The Laptimer function offers the possibility of calculating the lap time, for ex-
ample when driving on a race course. The measured time is shown in the dis-
play.
Operation of the lap timer function » page 46, Using the information system .
The calculated times are displayed in minutes, seconds and deciseconds.
Activate Laptimer function › From the main menu of the display select the menu item
Lap timer.
The following functions are available.
■ Start - start the timing manually or continue the interrupted measurement
■ Since start - Start the timer automatically upon start-up
■ Statistics - Evaluate and reset the measured times
Time measurement
Manually start the measurement
› Select the menu item
Lap timer - Start .
Start the measurement automatically
› Select the menu item
Lap timer - Since start . Timing will begin automatically
when starting up.
Start timing of next round
› Select the menu item
New lap during timing.
During timing, information about the fastest and the last lap time are also
shown in the display.
51Information system
Page 55 of 280
Measure split time
› During the timing, select the menu item
Split time. The split time data is dis-
played for about 5 seconds in the display.
The split time can be measured repeatedly during a round.
Stop measurement › During the timing, press the menu item
Stop.
The time measurement is stopped, the following functions are now available.
■ Continue - Continue measurement of the current lap time
■ New lap - Start measurement of the next lap time.
■ Abort lap - Cancel the timer (the aborted lap time is not stored)
■ Hang up - End timing (the aborted lap time is stored)
Evaluate recorded times
› Select the menu item
Lap timer - Statistics .
The following information is displayed. › Fastest:
- The fastest lap
› Slowest:
- The slowest lap
› Average:
- The average lap time
› Overall time:
- The total of all the lap times
Reset measured times › Select the menu item
Lap timer - Statistics - Reset .WARNING■
Concentrate fully at all times on your driving! As the driver, you are fully
responsible for the operation of your vehicle.■
Only use the Lap timer system when you are in any traffic situation where
you have full control over the vehicle.
Note
■ The system allows the measurement of up to 11 lap times.■The measurement of a single lap time is terminated after 99 h, 59 min. and
59 sec. After this time has been reached, measurement of the new lap time
starts automatically.■
The measured times cannot be reset individually.
■
If the measured times are not reset, then these are stored even after turning
off the ignition.
Compass point displayFig. 32
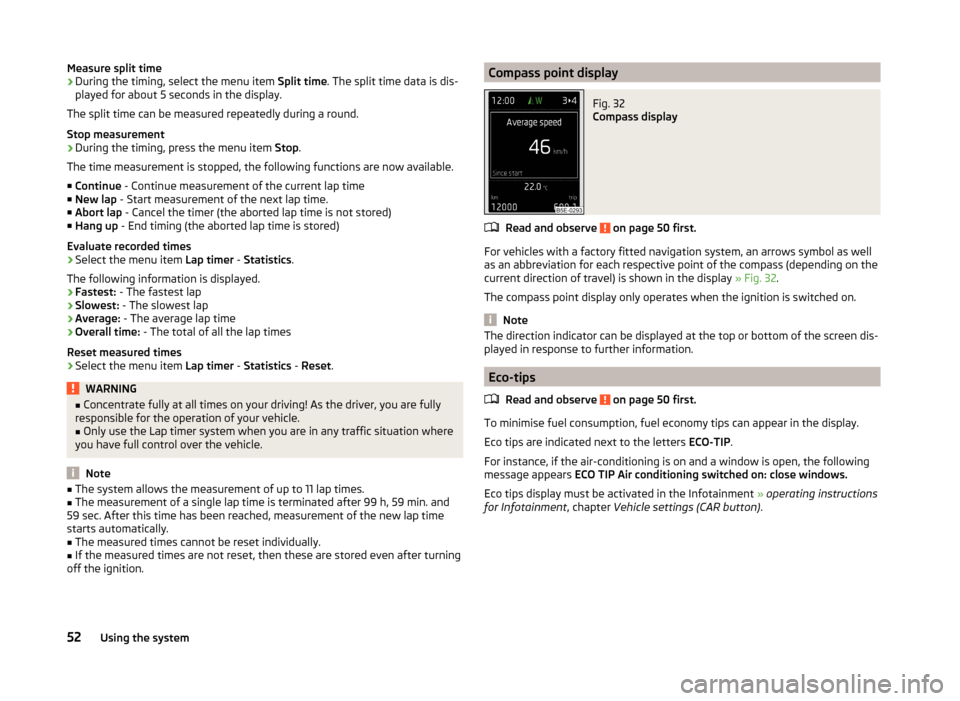
Compass display
Read and observe on page 50 first.
For vehicles with a factory fitted navigation system, an arrows symbol as well
as an abbreviation for each respective point of the compass (depending on the
current direction of travel) is shown in the display » Fig. 32.
The compass point display only operates when the ignition is switched on.
Note
The direction indicator can be displayed at the top or bottom of the screen dis-
played in response to further information.
Eco-tips
Read and observe
on page 50 first.
To minimise fuel consumption, fuel economy tips can appear in the display.
Eco tips are indicated next to the letters ECO-TIP.
For instance, if the air-conditioning is on and a window is open, the following
message appears ECO TIP Air conditioning switched on: close windows.
Eco tips display must be activated in the Infotainment » operating instructions
for Infotainment , chapter Vehicle settings (CAR button) .
52Using the system
Page 77 of 280

Automatic driving light control during rain
The daytime running lights are switched on automatically if the following con-
ditions are met.
The light switch is in the position
» Fig. 52 .
Automatic wiping with rain - position 1
or wiping - position
2
or
3
is
turned on » page 82, Windscreen wipers and washers .
The windscreen wipers are on for more than 30 s.
The light turns off about 4 minutes after turning off the wipers.
The function can be activated/deactivated in the Infotainment » Infotainment
manual , chapter Vehicle settings (CAR button) .
CAUTION
Do not attach any stickers or similar objects in front of the light sensor on the
windscreen to avoid impairing the function or its reliability.
Adaptive headlights (AFS)
Read and observe
on page 71 first.
The AFS system makes sure the street remains lit up depending on the traffic
and weather situation.
The AFS system automatically adjusts the cone of light in front of the vehicle
based on the vehicle speed, whether the windscreen wipers are in use, the
rear fog lights, and data from Infotainment Navigation.
The AFS system works as long as the light switch is in position
» page 73 .
The AHL system operates in the following modes.
Out of town mode
The cone of light in front of the vehicle is similar to the low beam.
City mode
The cone of light in front of the vehicle is adjusted so that it illuminates the
adjacent pavement, crossings, etc. The mode is active at speeds of 15-50 km/h.
Motorway mode
The cone of light in front of the vehicle is adjusted so that the driver can re-
spond in time to an obstruction or other hazard in time. The mode is active at
speeds above 110 km/h.
Rain mode
The cone of light in front of the vehicle is adjusted so that the driver can re-
duce the glare from oncoming vehicles in rain.
The mode is active at speeds of 50 – 90 km/h and if the windscreen wipers
continuously operate for a period of time longer than 2 minutes. The mode is
deactivated when the windscreen wipers are switched off for longer than 8
minutes.
Fog mode
The cone of light in front of the vehicle is adjusted so that the driver is not
dazzled by the reflection of the cone of light by fog in front of the vehicle.
The mode is active at speeds of 15 – 70 km/h and if the rear fog light is switch-
ed on for a period of time longer than 10 seconds. The mode is deactivated
when the rear fig light is switched off for longer than 5 seconds.
Dynamic cornering lights
The cone of light in front of the vehicle is adjusted to the steering angle so
that the road in the curve is illuminated. This function is active at speeds
greater than 10 km.h and in all AFS modes.
travel mode (“tourist light”)
This mode makes it possible to drive in countries with opposing traffic system
(driving on the left/right) without dazzling the oncoming vehicles.
When this mode is active, the above-mentioned modes and the side swivel of
the headlights is deactivated.
This mode can be activated/deactivated in the Infotainment » Infotainment
operating instructions , chapter Vehicle settings (CAR button) .WARNINGIf the AFS system is defective, the headlights are automatically lowered to
the emergency position, which prevents a possible dazzling of oncoming
traffic. This reduces the cone of light in front of the vehicle. Drive carefully
and visit a specialist garage as soon as possible.
Note
If the Eco driving mode is selected, the AFS system is deactivated » page 160.74Using the system
Page 79 of 280
WARNING (Continued)■The windscreen around the camera is dirty, iced up, misted up, or covered
by stickers.■
Near the camera lens there is a light source, such as the screen of an ex-
ternal navigation system.
CAUTION
Do not attach any stickers or similar objects in front of the camera on the
windscreen to avoid impairing the function or its reliability.
Fog lights
Fig. 54
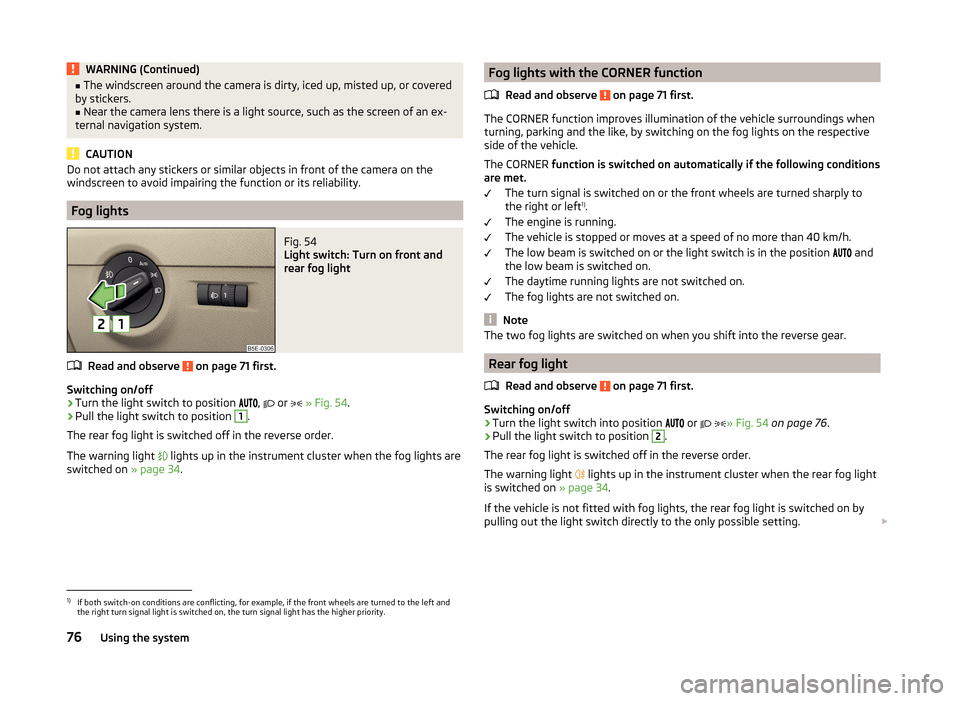
Light switch: Turn on front and
rear fog light
Read and observe on page 71 first.
Switching on/off
›
Turn the light switch to position
,
or
» Fig. 54 .
›
Pull the light switch to position
1
.
The rear fog light is switched off in the reverse order.
The warning light
lights up in the instrument cluster when the fog lights are
switched on » page 34.
Fog lights with the CORNER function
Read and observe
on page 71 first.
The CORNER function improves illumination of the vehicle surroundings when
turning, parking and the like, by switching on the fog lights on the respective
side of the vehicle.
The CORNER function is switched on automatically if the following conditions
are met.
The turn signal is switched on or the front wheels are turned sharply to
the right or left 1)
.
The engine is running.
The vehicle is stopped or moves at a speed of no more than 40 km/h.
The low beam is switched on or the light switch is in the position and
the low beam is switched on.
The daytime running lights are not switched on.
The fog lights are not switched on.
Note
The two fog lights are switched on when you shift into the reverse gear.
Rear fog light
Read and observe
on page 71 first.
Switching on/off
›
Turn the light switch into position or
» Fig. 54
on page 76 .
›
Pull the light switch to position
2
.
The rear fog light is switched off in the reverse order.
The warning light lights up in the instrument cluster when the rear fog light
is switched on » page 34.
If the vehicle is not fitted with fog lights, the rear fog light is switched on by
pulling out the light switch directly to the only possible setting.
1)
If both switch-on conditions are conflicting, for example, if the front wheels are turned to the left and
the right turn signal light is switched on, the turn signal light has the higher priority.
76Using the system
Page 87 of 280

WARNING■Make sure that the mirror is not covered by ice, snow, mist or other ob-
jects.■
Convex (curved outward) or aspheric exterior mirrors increase the field of
vision. They do, however, make objects appear smaller in the mirror. These
mirrors are therefore only of limited use for estimating distances to the fol-
lowing vehicles.
■
Whenever possible use the interior mirror for estimating the distances to
the following vehicles.
WARNINGThe mirrors with automatic dimming contain an electrolyte liquid which can
escape if mirror glass is broken.■
The leaking electrolytic fluid can irritate the skin, eyes and breath appara-
tus. Immediately seek out fresh air and leave the vehicle. If this is not pos-
sible, at least open the window.
■
If you swallow electrolytic fluid, seek medical assistance immediately.
■
If your eyes or skin come into contact with the electrolytic fluid, immedi-
ately wash the affected area for a few minutes long with a lot of water.
Then consult a doctor immediately.
Interior mirror
Fig. 64
Interior mirror: manual dimming/auto-dimming/light sensor
Read and observe
on page 84 first.
Mirror with manual dimming » Fig. 64
Basic position of the mirror
Mirror blackout
12Mirror with automatic dimming » Fig. 64
Warning light - lights when dimming is activated
Switch for the activation of the automatic mirror dimming
Light sensor
Light sensor on the back of the mirror
Mirror with automatic dimming
If the automatic dimming is enabled, the mirror dims automatically depending
on the light falling on the sensors.
When the interior lights are switched on or the reverse gear is engaged, the
mirror always moves back into the basic position (not dimmed).
Do not attach external navigation devices on to the windscreen or in the vicini-
ty of the interior mirror »
.
WARNINGThe illuminated display of an external navigation unit can lead to opera-
tional faults to the automatic dimming interior mirror – risk of accident.
CAUTION
The automatic dimming mirror only functions smoothly if the light falling on
the sensors is not impaired, e.g. by the rear sun roller blind.
Note
If the automatic interior mirror dimming is switched off, the exterior mirror
dimming is also switched off.ABCD84Using the system
Page 168 of 280

WARNING (Continued)■Traffic signs may not be recognised at all by the system, or may be recog-
nised incorrectly. As a result, the traffic signs may not be displayed at all, or
the wrong one may appear.■
On the system side, only a traffic sign display is undertaken, neither a
warning when limit is exceeded or driving speed adjustment is undertaken!
■
The speed information in the displayed road signs refer to the country-
specific speed units. For example, the notification
in the display may
therefore refer to km/h or mph, depending on the country.
Note
The system is only available in some countries.
Function
Fig. 162
Camera viewing range for traffic
sign recognition
Fig. 163
Instrument cluster display: Examples of system indications
Read and observe on page 164 first.
System displays » Fig. 163
Display of detected traffic signs
Additional display (monochromatic display)
Additional display (color display)
The detected traffic signs are indicated in the display of the instrument clus-
ter » page 47 , Driving data (Multifunction display) .
■ Driving data
■ Road sign
The system can display in the display the following recognized traffic sign.
› Speed limit
› Overtaking prohibited.
Additional signs, such as 'when wet' or signs which only apply for a limited
time can also be displayed.
The system works on the basis of the data captured by the camera and is only
able to show traffic signs which are in the camera's “viewing range” » Fig. 162.
Data from the camera can be supplemented by information from the Infotain-
ment Navigation. This is the reason why traffic signs with maximum speeds
can also be shown on sections of roads which do not have any traffic signs.
The system may not be available or may only be available to a limited extent
in the following situations.
› Poor visibility conditions, e.g. fog, heavy rain, thick snowfall.
› The camera is blinded by the sun.
› The camera is blinded by the oncoming traffic.
› The camera “viewing range” is obstructed by an obstacle.
› Travelling at high speed.
› The traffic signs are fully or partially obscured (e.g. by trees, snow, dirt or
other vehicles).
› The traffic signs are not standard (round with a red border).
› The traffic signs are damaged or bent.
› The traffic signs are attached to flashing neon signs.
› The traffic signs were changed (the navigation data are out of date).
ABC165Assist systems
Page 169 of 280

Additional displayRead and observe
on page 164 first.
If the menu item Road sign is currently not shown » Fig. 163 on page 165 -
,
the road sign with the speed limit will appear in the upper display area of the
instrument cluster » Fig. 163 on page 165 -
,
.
If several traffic signs are detected simultaneously, the next traffic sign will al- so in some cases be displayed in the colour display -
. All detected traffic
signs can be displayed in the menu item Road sign -
.
The additional display traffic sign detection can be activated/deactivated in
the Infotainment » operating instructions for Infotainment , chapter Vehicle
settings (CAR button) .
Traffic sign display when towing a trailer
Read and observe
on page 164 first.
When towing a trailer, displaying the traffic signs which apply when towing atrailer can be activated.
The traffic sign detection display when towing a trailer can be activated/deac-
tivated in the Infotainment » operating instructions for Infotainment , chap-
ter Vehicle settings (CAR button) .
Information messages
Read and observe
on page 164 first.
The information messages are shown in the instrument cluster display. No road signs available.
No maximum speeds were recognised (e.g. on German motorways where there
is no speed limit).
Error: Dynamic Road Sign Display
There is a system error. Seek help from a specialist garage. Dynamic Road Sign Display clean windscreen!
The windscreen is dirty, iced over or misted up in the camera viewing range.
Clean the windscreen or remove the obstacles.
Dynamic Road Sign Display currently restricted.
Infotainment Navigation is not currently providing any data. Check whether
the maps are up-to-date or the whether the vehicle is currently in a location
for which no navigation data are available.
Fatigue detection (break recommendation)
Introduction
This chapter contains information on the following subjects:
Function
166
Information messages
167
The fatigue detection system (hereinafter referred to only as system) recom-
mends the driver taking a break from driving when, because of the driver's
steering behavior, driver fatigue can be detected.
WARNING■ For the driving ability is always the driver's responsibility. Never drive if
you feel tired.■
The system may not detect all cases where a break is needed.
■
Therefore, take regular, sufficient breaks during long trips.
■
There will be no system warning during the so-called micro-sleep.
Note
■ In some situations, the system may evaluate the driving incorrectly and thus
mistakenly recommend a break (e.g. sporty driving, adverse weather condi-
tions or poor road conditions).■
The system is designed primarily for use on motorways.
Function
Read and observe
on page 166 first.
From the start of the journey, the system evaluates steering behavior. If, while
driving, there have been changes in the steering behaviours that are evaluated
by the system as indicating possible fatigue, a break recommendation is is-
sued.
The system evaluates steering behavior and recommends a break at speeds of
65-200 km / h.
166Driving
Page 206 of 280
›Firstly disconnect the battery's negative terminal
, followed by the positive
terminal .
Connecting›
Firstly connect the battery's positive terminal
, followed by the negative
terminal
.
After disconnecting and re-connecting the vehicle battery, the following func- tions or devices are partially or completely inoperative.
Function / deviceOperating measureElectrical power windows» page 66Panorama sliding/tilting roof» page 68Sun screen» page 70
Radio or navigation system
Enter code » Operating instruc-
tions for Infotainment Radio
or » Operating instructions for
Infotainment NavigationTime settings» page 33
CAUTION
■ Disconnect the vehicle battery only with the ignition turned off - there is a
risk of damaging the electrical system of the vehicle.■
Under no circumstances must the battery cables be connected incorrectly –
risk of a cable fire.
Note
■ After disconnecting and re-connecting the vehicle battery, we recommend
having the vehicle checked by a specialist to ensure that the full functionality
of all electrical systems is guaranteed.■
The data of the multi-function display will be reset.
Automatic load deactivation
Read and observe
and on page 200 first.
The vehicle voltage control unit automatically prevents the battery from dis-
charging when the bettery is subjected to heavy loads. This manifests itself by
the following.
› The idling speed is raised to allow the generator to deliver more electricity to
the electrical system.
› Where appropriate large convenience consumers, e.g. seat heaters, rear win-
dow heaters, have their power limited or in case of emergency shut off com-
pletely.
CAUTION
■ Despite such intervention by the vehicle electric system management, the
vehicle battery may be drained. For example, when the ignition is switched on
a long time with the engine turned off or the side or parking lights are turned
on during longer parking.■
Consumers which are supplied via a 12 V socket can cause the vehicle battery
to discharge when the ignition is switched off.
Note
Driving comfort is not disrupted by any shutting off of consumers. Often the
driver is not aware of it having taken place.203Inspecting and replenishing