key SKODA OCTAVIA 2015 3.G / (5E) Amundsen Bolero Infotainment System Manual
[x] Cancel search | Manufacturer: SKODA, Model Year: 2015, Model line: OCTAVIA, Model: SKODA OCTAVIA 2015 3.G / (5E)Pages: 84, PDF Size: 8.21 MB
Page 20 of 84
Radio
Operation
Introduction
This chapter contains information on the following subjects:
Main menu
17
Select broadcasting sector
17
List of available stations
18
Search and select available stations
18
Store preferred station
19
Station logos
19
TP Traffic programme
19
Radio DAB text and image presentation
20
The device allows analogue radio reception of FM and AM frequency ranges as
well as DAB digital radio reception.
CAUTION
■ For vehicles with window antennas do not stick foil or metal coated stickers
to the window as this can lead to interference.■
Car parks, tunnels, tall buildings or mountains can interfere with the radio
signal even causing it to fail completely.
Main menu
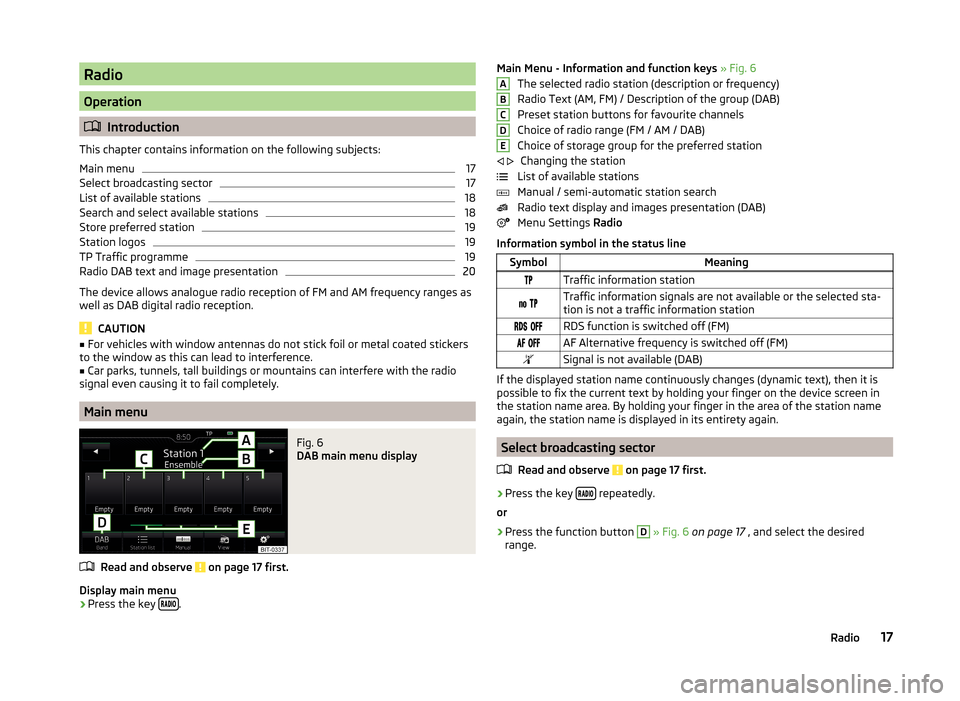
Fig. 6
DAB main menu display
Read and observe on page 17 first.
Display main menu
›
Press the key .
Main Menu - Information and function keys
» Fig. 6
The selected radio station (description or frequency)
Radio Text (AM, FM) / Description of the group (DAB)
Preset station buttons for favourite channels
Choice of radio range (FM / AM / DAB) Choice of storage group for the preferred station Changing the station
List of available stations
Manual / semi-automatic station search
Radio text display and images presentation (DAB)
Menu Settings Radio
Information symbol in the status lineSymbolMeaningTraffic information station Traffic information signals are not available or the selected sta-
tion is not a traffic information station RDS function is switched off (FM) AF Alternative frequency is switched off (FM)Signal is not available (DAB)
If the displayed station name continuously changes (dynamic text), then it is
possible to fix the current text by holding your finger on the device screen in
the station name area. By holding your finger in the area of the station name
again, the station name is displayed in its entirety again.
Select broadcasting sector
Read and observe
on page 17 first.
›
Press the key repeatedly.
or
›
Press the function button
D
» Fig. 6 on page 17 , and select the desired
range.
ABCDE 17Radio
Page 21 of 84
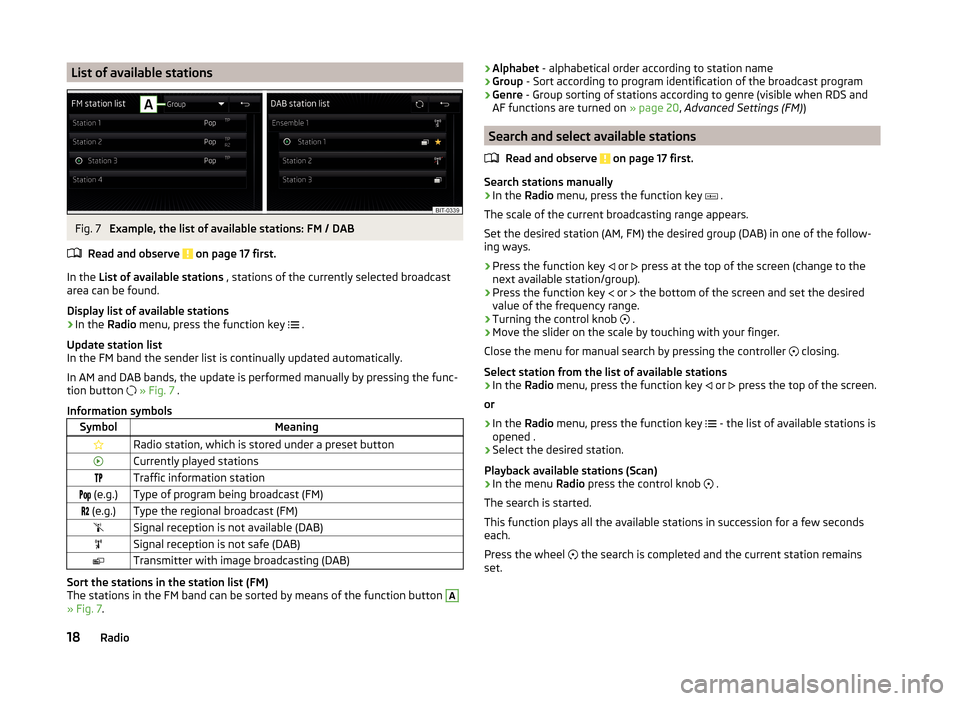
List of available stationsFig. 7
Example, the list of available stations: FM / DAB
Read and observe
on page 17 first.
In the List of available stations , stations of the currently selected broadcast
area can be found.
Display list of available stations
›
In the Radio menu, press the function key
.
Update station list
In the FM band the sender list is continually updated automatically.
In AM and DAB bands, the update is performed manually by pressing the func-
tion button
» Fig. 7 .
Information symbols
SymbolMeaningRadio station, which is stored under a preset buttonCurrently played stationsTraffic information station (e.g.)Type of program being broadcast (FM) (e.g.)Type the regional broadcast (FM)Signal reception is not available (DAB)Signal reception is not safe (DAB)Transmitter with image broadcasting (DAB)
Sort the stations in the station list (FM)
The stations in the FM band can be sorted by means of the function button
A
» Fig. 7 .
›Alphabet
- alphabetical order according to station name
› Group
- Sort according to program identification of the broadcast program
› Genre
- Group sorting of stations according to genre (visible when RDS and
AF functions are turned on » page 20, Advanced Settings (FM) )
Search and select available stations
Read and observe
on page 17 first.
Search stations manually
›
In the Radio menu, press the function key
.
The scale of the current broadcasting range appears.
Set the desired station (AM, FM) the desired group (DAB) in one of the follow-
ing ways.
›
Press the function key or
press at the top of the screen (change to the
next available station/group).
›
Press the function key or
the bottom of the screen and set the desired
value of the frequency range.
›
Turning the control knob .
›
Move the slider on the scale by touching with your finger.
Close the menu for manual search by pressing the controller closing.
Select station from the list of available stations
›
In the Radio menu, press the function key
or
press the top of the screen.
or
›
In the Radio menu, press the function key
- the list of available stations is
opened .
›
Select the desired station.
Playback available stations (Scan)
›
In the menu Radio press the control knob
.
The search is started.
This function plays all the available stations in succession for a few seconds
each.
Press the wheel the search is completed and the current station remains
set.
18Radio
Page 22 of 84
Store preferred stationRead and observe
on page 17 first.
For each broadcasting range there are 15 preset buttons to store the preferred
stations. These preset buttons are divided into three memory groups.
A station can be stored in the device memory in one of the following ways.
Store station from the Radio menu
›
In the menu Radio select a station and hold the desired station button
C
» Fig. 6 on page 17 until you hear an acoustic signal.
If a station was already stored in the desired position it is replaced with the
currently selected station.
Store station from the station list
›
In the list of available stations » page 18 hold the function key of the desired
station.
The following station button is displayed.
›
Press the station button.
Station logos
Read and observe
on page 17 first.
Channel logos are stored in the device memory which are assigned automati-
cally by the device when storing the stations under preset buttons.
Disable / Enable Auto-save station logos (FM / DAB)
›
In the Radio menu, press the function key
→ Advanced settings .
›
Select the menu item
Auto-save station logos Switch on or off » page 20,
Advanced Settings (FM) and » page 20 , Advanced set-up (DAB) .
Assign station logo manually
A logo can be assigned manually for the preferred station.
›
In the Radio menu, press the function key
→ Station logos .
A menu with preset buttons for stations is displayed.
›
Press the preset button for the station, which a logo is to be assigned to.
A menu of media (SD card, USB) is displayed.
›
In the relevant media select the logo you want to have.
Remove station logo›In the Radio menu, press the function key → Station logos .
A menu with preset buttons for stations is displayed.›
Press the preset button for the station, which a logo is to be removed from.
Note
■ The following image formats are supported: jpg, gif, png, bmp.■We recommend a resolution of up to 500 x 500 pixels.
TP Traffic programme
Read and observe
on page 17 first.
The function allows the reception of traffic information.
Switching the traffic information station on and off manually
›
In the Radio menu, press the function key
.
›
Enable or disable the menu item
Traffic programme (TP).
Current traffic reports
During a traffic announcement, the following menu is displayed.
›
Cancel - Interruption of the current traffic report, the TP function remains ac-
tive
›
Deactivate - Interrupt the current traffic report and turn off TP function
Note
■
Should this station not transmit traffic reports or the signal is not available,
then the device automatically searches in the background for another TP sta-
tion.■
During playback in menu Media or a station in the AM radio range, traffic
news is received from the previously selected FM radio range.
19Radio
Page 23 of 84
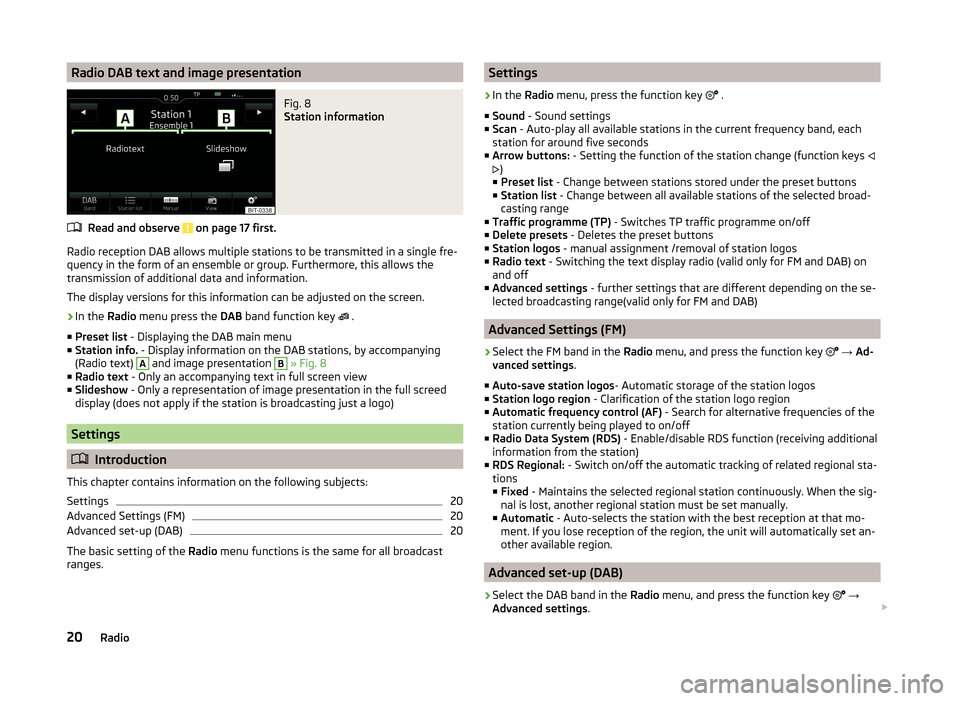
Radio DAB text and image presentationFig. 8
Station information
Read and observe on page 17 first.
Radio reception DAB allows multiple stations to be transmitted in a single fre-
quency in the form of an ensemble or group. Furthermore, this allows the
transmission of additional data and information.
The display versions for this information can be adjusted on the screen.
›
In the Radio menu press the DAB band function key
.
■ Preset list - Displaying the DAB main menu
■ Station info. - Display information on the DAB stations, by accompanying
(Radio text)
A
and image presentation
B
» Fig. 8
■ Radio text - Only an accompanying text in full screen view
■ Slideshow - Only a representation of image presentation in the full screed
display (does not apply if the station is broadcasting just a logo)
Settings
Introduction
This chapter contains information on the following subjects:
Settings
20
Advanced Settings (FM)
20
Advanced set-up (DAB)
20
The basic setting of the Radio menu functions is the same for all broadcast
ranges.
Settings›
In the Radio menu, press the function key
.
■ Sound - Sound settings
■ Scan - Auto-play all available stations in the current frequency band, each
station for around five seconds
■ Arrow buttons: - Setting the function of the station change (function keys
)
■ Preset list - Change between stations stored under the preset buttons
■ Station list - Change between all available stations of the selected broad-
casting range
■ Traffic programme (TP) - Switches TP traffic programme on/off
■ Delete presets - Deletes the preset buttons
■ Station logos - manual assignment /removal of station logos
■ Radio text - Switching the text display radio (valid only for FM and DAB) on
and off
■ Advanced settings - further settings that are different depending on the se-
lected broadcasting range(valid only for FM and DAB)
Advanced Settings (FM)
›
Select the FM band in the Radio menu, and press the function key
→ Ad-
vanced settings .
■ Auto-save station logos - Automatic storage of the station logos
■ Station logo region - Clarification of the station logo region
■ Automatic frequency control (AF) - Search for alternative frequencies of the
station currently being played to on/off
■ Radio Data System (RDS) - Enable/disable RDS function (receiving additional
information from the station)
■ RDS Regional: - Switch on/off the automatic tracking of related regional sta-
tions
■ Fixed - Maintains the selected regional station continuously. When the sig-
nal is lost, another regional station must be set manually.
■ Automatic - Auto-selects the station with the best reception at that mo-
ment. If you lose reception of the region, the unit will automatically set an-
other available region.
Advanced set-up (DAB)
›
Select the DAB band in the Radio menu, and press the function key
→
Advanced settings .
20Radio
Page 25 of 84
Media
Operation
Introduction
This chapter contains information on the following subjects:
Main menu
22
Select audio source
22
Playback
23
Folder / track list
23
Multimedia database
24
Settings
24
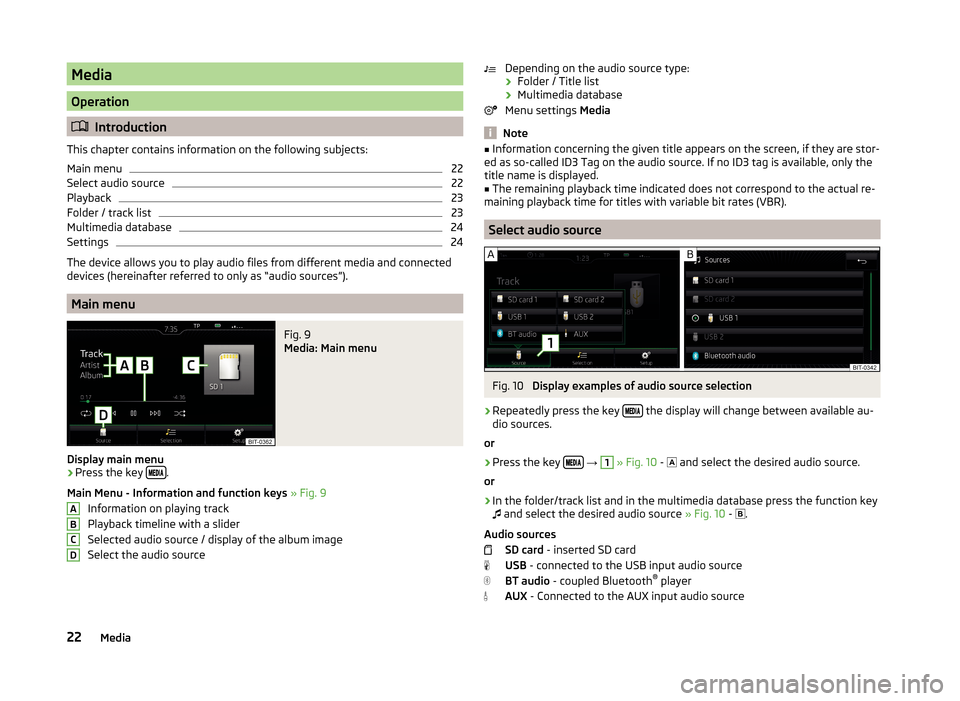
The device allows you to play audio files from different media and connected
devices (hereinafter referred to only as “audio sources”).
Main menu
Fig. 9
Media: Main menu
Display main menu
›
Press the key .
Main Menu - Information and function keys » Fig. 9
Information on playing track
Playback timeline with a slider
Selected audio source / display of the album image
Select the audio source
ABCDDepending on the audio source type:
› Folder / Title list
› Multimedia database
Menu settings Media
Note
■
Information concerning the given title appears on the screen, if they are stor-
ed as so-called ID3 Tag on the audio source. If no ID3 tag is available, only the
title name is displayed.■
The remaining playback time indicated does not correspond to the actual re-
maining playback time for titles with variable bit rates (VBR).
Select audio source
Fig. 10
Display examples of audio source selection
›
Repeatedly press the key the display will change between available au-
dio sources.
or
›
Press the key
→
1
» Fig. 10 -
and select the desired audio source.
or
›
In the folder/track list and in the multimedia database press the function key
and select the desired audio source » Fig. 10 -
.
Audio sources SD card - inserted SD card
USB - connected to the USB input audio source
BT audio - coupled Bluetooth ®
player
AUX - Connected to the AUX input audio source
22Media
Page 26 of 84
Playback
The unit will play the contents of the connected audio source according to the
alphabetically sequenced directory and file name.
Operating modesOperationActionPlay / PausePress from
Plays the current track from the start
Press from (after about 3 seconds
after the start of the title playback)Finger movement to the right of the screen area A
» Fig. 9 on page 22
(After 3 seconds from the start of the track playback)Fast-reverse within the titlePress and hold Fast-forward within the trackPress and hold
Play the previous track
Press from (within 3 seconds after
the start of the track playback)Finger movement to the right of the screen area A
» Fig. 9 on page 22
(Within 3 seconds after the start of the track playback)Play the next track
Press from Finger movement to the left of the
screen area A
» Fig. 9 on page 22Switch on/off the random playback
from the current album or folderPress from Switch on/off the repeat playback
from the current album or folderPress from Switch on/off repeat playback of spe-
cific trackPress from
The movement within the track is possible by finger touching the timeline
B
» Fig. 9 on page 22 .
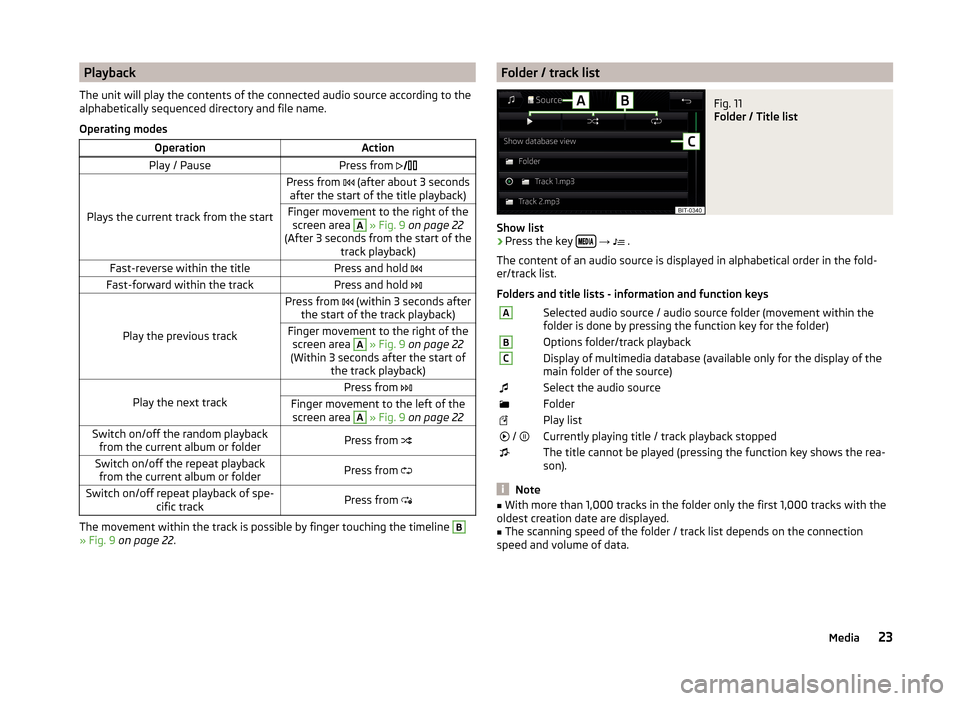
Folder / track listFig. 11
Folder / Title list
Show list
›
Press the key
→
.
The content of an audio source is displayed in alphabetical order in the fold-
er/track list.
Folders and title lists - information and function keys
ASelected audio source / audio source folder (movement within the
folder is done by pressing the function key for the folder)BOptions folder/track playbackCDisplay of multimedia database (available only for the display of the
main folder of the source)Select the audio sourceFolderPlay list / Currently playing title / track playback stoppedThe title cannot be played (pressing the function key shows the rea-
son).
Note
■ With more than 1,000 tracks in the folder only the first 1,000 tracks with the
oldest creation date are displayed.■
The scanning speed of the folder / track list depends on the connection
speed and volume of data.
23Media
Page 27 of 84
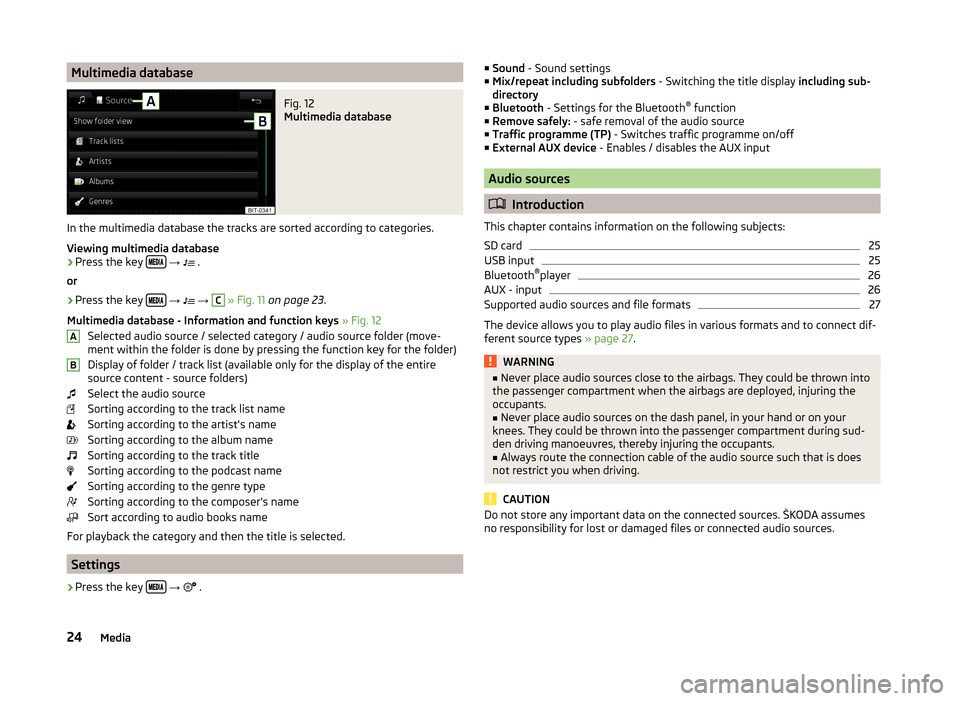
Multimedia databaseFig. 12
Multimedia database
In the multimedia database the tracks are sorted according to categories.
Viewing multimedia database
›
Press the key
→
.
or
›
Press the key
→
→
C
» Fig. 11 on page 23 .
Multimedia database - Information and function keys » Fig. 12
Selected audio source / selected category / audio source folder (move- ment within the folder is done by pressing the function key for the folder)
Display of folder / track list (available only for the display of the entire
source content - source folders)
Select the audio source
Sorting according to the track list name
Sorting according to the artist's name
Sorting according to the album name
Sorting according to the track title
Sorting according to the podcast name
Sorting according to the genre type
Sorting according to the composer's name
Sort according to audio books name
For playback the category and then the title is selected.
Settings
›
Press the key
→
.
AB■
Sound - Sound settings
■ Mix/repeat including subfolders - Switching the title display including sub-
directory
■ Bluetooth - Settings for the Bluetooth ®
function
■ Remove safely: - safe removal of the audio source
■ Traffic programme (TP) - Switches traffic programme on/off
■ External AUX device - Enables / disables the AUX input
Audio sources
Introduction
This chapter contains information on the following subjects:
SD card
25
USB input
25
Bluetooth ®
player
26
AUX - input
26
Supported audio sources and file formats
27
The device allows you to play audio files in various formats and to connect dif-
ferent source types » page 27.
WARNING■
Never place audio sources close to the airbags. They could be thrown into
the passenger compartment when the airbags are deployed, injuring the
occupants.■
Never place audio sources on the dash panel, in your hand or on your
knees. They could be thrown into the passenger compartment during sud-
den driving manoeuvres, thereby injuring the occupants.
■
Always route the connection cable of the audio source such that is does
not restrict you when driving.
CAUTION
Do not store any important data on the connected sources. ŠKODA assumes
no responsibility for lost or damaged files or connected audio sources.24Media
Page 28 of 84
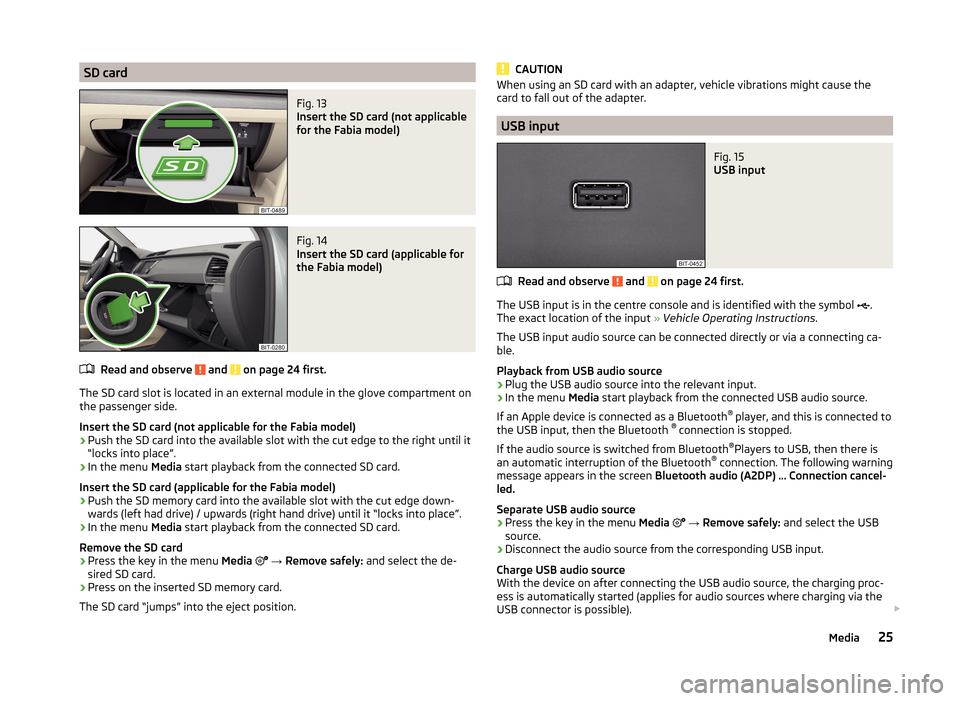
SD cardFig. 13
Insert the SD card (not applicable
for the Fabia model)
Fig. 14
Insert the SD card (applicable for
the Fabia model)
Read and observe and on page 24 first.
The SD card slot is located in an external module in the glove compartment on the passenger side.
Insert the SD card (not applicable for the Fabia model)
›
Push the SD card into the available slot with the cut edge to the right until it
“locks into place”.
›
In the menu Media start playback from the connected SD card.
Insert the SD card (applicable for the Fabia model)
›
Push the SD memory card into the available slot with the cut edge down-
wards (left had drive) / upwards (right hand drive) until it “locks into place”.
›
In the menu Media start playback from the connected SD card.
Remove the SD card
›
Press the key in the menu Media
→ Remove safely: and select the de-
sired SD card.
›
Press on the inserted SD memory card.
The SD card “jumps” into the eject position.
CAUTIONWhen using an SD card with an adapter, vehicle vibrations might cause the
card to fall out of the adapter.
USB input
Fig. 15
USB input
Read and observe and on page 24 first.
The USB input is in the centre console and is identified with the symbol
.
The exact location of the input » Vehicle Operating Instructions .
The USB input audio source can be connected directly or via a connecting ca-
ble.
Playback from USB audio source
›
Plug the USB audio source into the relevant input.
›
In the menu Media start playback from the connected USB audio source.
If an Apple device is connected as a Bluetooth ®
player, and this is connected to
the USB input, then the Bluetooth ®
connection is stopped.
If the audio source is switched from Bluetooth ®
Players to USB, then there is
an automatic interruption of the Bluetooth ®
connection. The following warning
message appears in the screen Bluetooth audio (A2DP) … Connection cancel-
led.
Separate USB audio source
›
Press the key in the menu Media
→ Remove safely: and select the USB
source.
›
Disconnect the audio source from the corresponding USB input.
Charge USB audio source
With the device on after connecting the USB audio source, the charging proc-
ess is automatically started (applies for audio sources where charging via the
USB connector is possible).
25Media
Page 31 of 84
Pictures
Image viewer
Introduction
This chapter contains information on the following subjects:
Home Page
28
Select Image Source
28
Operation
28
Image with GPS coordinates (Amundsen)
29
Supported image sources and file formats
29
Settings
29
Note
Viewing images in the device screen is not supported by connected Apple de-
vices.
Home Page
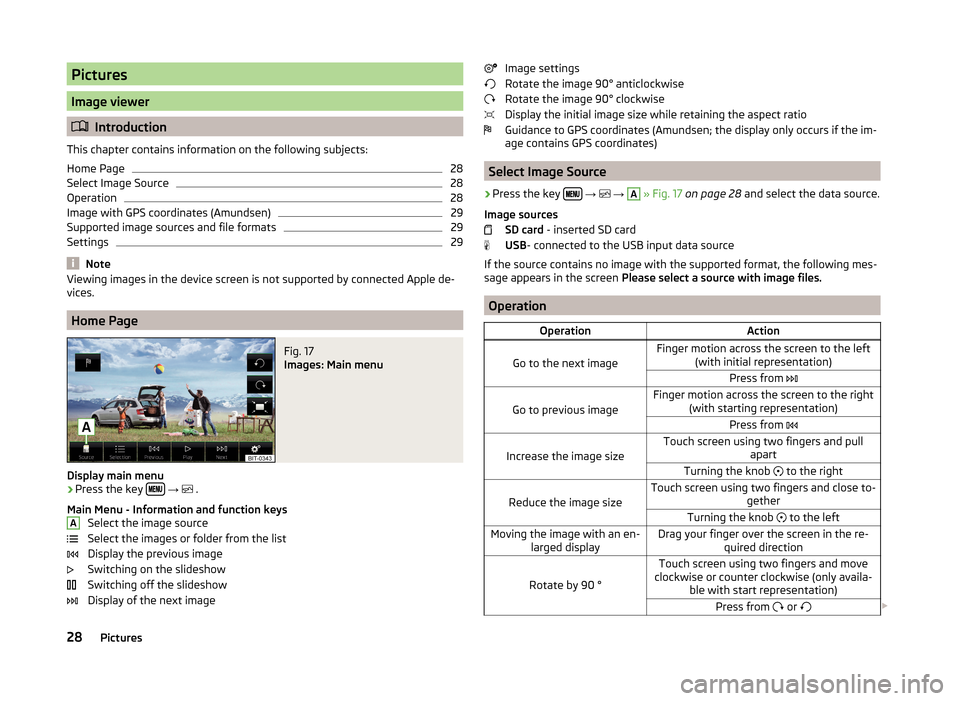
Fig. 17
Images: Main menu
Display main menu
›
Press the key
→
.
Main Menu - Information and function keys Select the image source
Select the images or folder from the list
Display the previous image
Switching on the slideshow
Switching off the slideshow
Display of the next image
AImage settings
Rotate the image 90° anticlockwise
Rotate the image 90° clockwise
Display the initial image size while retaining the aspect ratio
Guidance to GPS coordinates (Amundsen; the display only occurs if the im-
age contains GPS coordinates)
Select Image Source
›
Press the key
→
→
A
» Fig. 17 on page 28 and select the data source.
Image sources SD card - inserted SD card
USB - connected to the USB input data source
If the source contains no image with the supported format, the following mes-
sage appears in the screen Please select a source with image files.
Operation
OperationAction
Go to the next image
Finger motion across the screen to the left
(with initial representation)Press from
Go to previous image
Finger motion across the screen to the right
(with starting representation)Press from
Increase the image size
Touch screen using two fingers and pull
apartTurning the knob to the right
Reduce the image size
Touch screen using two fingers and close to-
getherTurning the knob to the leftMoving the image with an en-
larged displayDrag your finger over the screen in the re- quired direction
Rotate by 90 °
Touch screen using two fingers and move
clockwise or counter clockwise (only availa- ble with start representation)Press from or 28Pictures
Page 32 of 84
OperationActionMaximum zoomDouble finger tap on the screenDisplay the initial image size
while retaining the aspect ra- tioDouble tap on the screen againPressing the knob
When browsing through folder and the first or last image is reached the fol-
lowing message appears on the screen Start/end of folder reached. Browsing
is continued from start to finish.
Image with GPS coordinates (Amundsen)
The device enables the guidance to the GPScoordinate data stored in the im-
age.
›
In the menu Images open an image in the connected source with GPS coordi-
nates.
›
Press the function key , a menu opens with the option to start the route
guidance.
An image with GPS coordinates can be created and imported in the application “MyDestination”. More information can be found on the ŠKODA Internet pages www.infotainment.skoda-auto.com .
Supported image sources and file formats
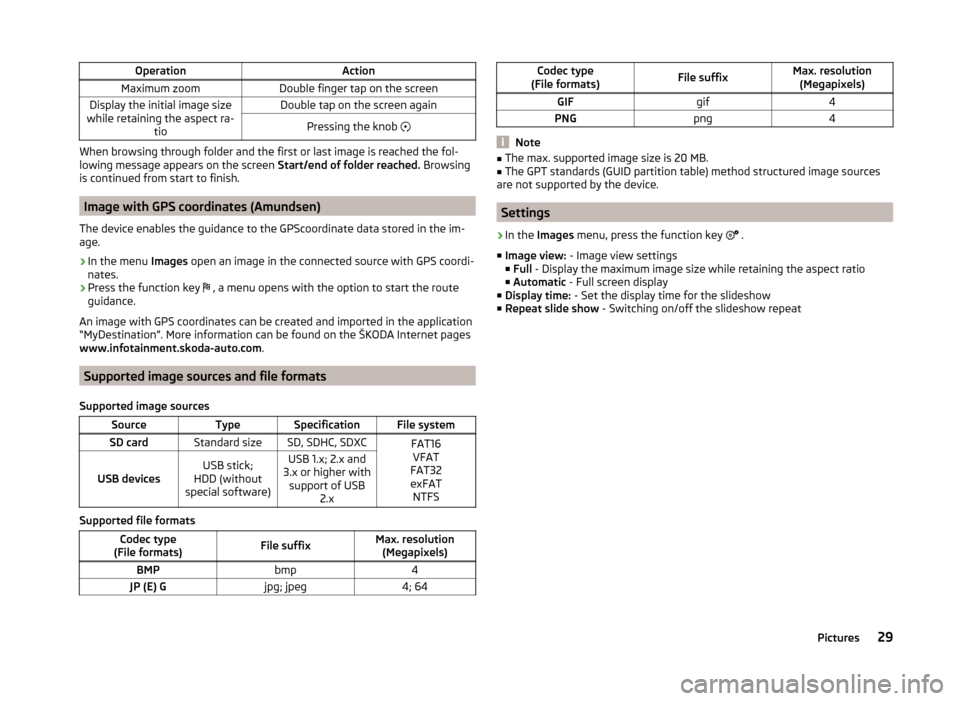
Supported image sources
SourceTypeSpecificationFile systemSD cardStandard sizeSD, SDHC, SDXCFAT16 VFAT
FAT32
exFAT NTFS
USB devicesUSB stick;
HDD (without
special software)USB 1.x; 2.x and
3.x or higher with support of USB 2.x
Supported file formats
Codec type
(File formats)File suffixMax. resolution (Megapixels)BMPbmp4JP (E) Gjpg; jpeg4; 64Codec type
(File formats)File suffixMax. resolution (Megapixels)GIFgif4PNGpng4
Note
■ The max. supported image size is 20 MB.■The GPT standards (GUID partition table) method structured image sources
are not supported by the device.
Settings
›
In the Images menu, press the function key
.
■ Image view: - Image view settings
■ Full - Display the maximum image size while retaining the aspect ratio
■ Automatic - Full screen display
■ Display time: - Set the display time for the slideshow
■ Repeat slide show - Switching on/off the slideshow repeat
29Pictures