Back mirror SKODA OCTAVIA 2016 3.G / (5E) Owner's Manual
[x] Cancel search | Manufacturer: SKODA, Model Year: 2016, Model line: OCTAVIA, Model: SKODA OCTAVIA 2016 3.G / (5E)Pages: 324, PDF Size: 48.85 MB
Page 73 of 324

Windscreen and rear window heaterFig. 55
Buttons for the front and rear window heater: Climatronic / man-
ual air conditioning, heating
Read and observe
on page 70 first.
The heating for quick defrosting and ventilation of the front /and rear window.The heating only works when the engine is running.
Buttons for the heating (depending on vehicle equipment) » Fig. 55
Switch on/off the rear window heating
Switching the windscreen heater on/off
When the heating is switched on, a light illuminates inside or below the but-
ton.
The heating automatically switches off after 10 minutes.
If the engine is switched off when the heating is on and turned back on again
within 10 minutes, the heating is continued.
Note
■ If the on-board voltage decreases, the heating switches off automatically
» page 258 , Automatic consumer shutdown - Discharge protection of the vehi-
cle battery .■
If the lighting inside or below the button flashes, the heater will not work be-
cause of the low charge of the battery.
■
If the Climatronic recognises that the windshield could fog up, the windshield
heating is automatically switched on. This function can be activated / deactiva-
ted on the Climatronic control panel menu
→
.
Sun visorsFig. 56
Fold down visor / flip up visor / make-up mirror and Park Memo
Holder
Read and observe
on page 70 first.
Operation and description of the sun visor » Fig. 56
Swivel cover towards the windscreen
Swivel cover towards the door
Make-up mirror with cover (the cover can be pushed in the direction of the
arrow)
Parking ticket holder
Sunshade
Fig. 57
Sun screen
Read and observe on page 70 first.
The sun screen is located in a housing on the luggage compartment cover.
›
To dim pull the screen
B
out of the housing at the handle and hook into the
magnetic holders
A
» Fig. 57 .
12AB71Lights and visibility
Page 76 of 324
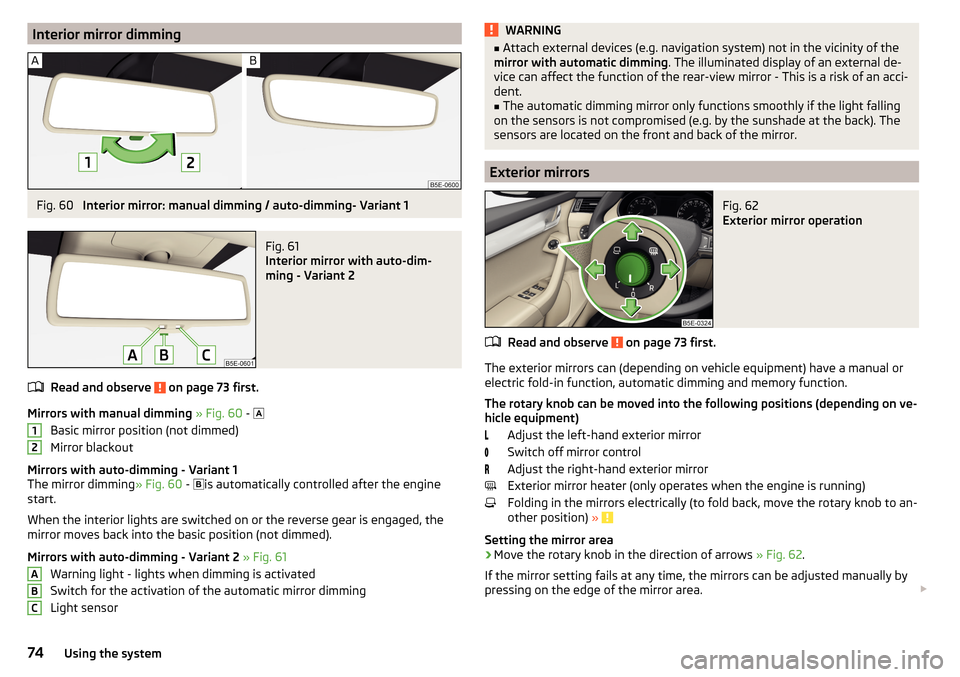
Interior mirror dimmingFig. 60
Interior mirror: manual dimming / auto-dimming- Variant 1
Fig. 61
Interior mirror with auto-dim-
ming - Variant 2
Read and observe on page 73 first.
Mirrors with manual dimming » Fig. 60 -
Basic mirror position (not dimmed)
Mirror blackout
Mirrors with auto-dimming - Variant 1
The mirror dimming » Fig. 60 -
is automatically controlled after the engine
start.
When the interior lights are switched on or the reverse gear is engaged, the
mirror moves back into the basic position (not dimmed).
Mirrors with auto-dimming - Variant 2 » Fig. 61
Warning light - lights when dimming is activated
Switch for the activation of the automatic mirror dimming
Light sensor
12ABCWARNING■ Attach external devices (e.g. navigation system) not in the vicinity of the
mirror with automatic dimming . The illuminated display of an external de-
vice can affect the function of the rear-view mirror - This is a risk of an acci-
dent.■
The automatic dimming mirror only functions smoothly if the light falling
on the sensors is not compromised (e.g. by the sunshade at the back). The
sensors are located on the front and back of the mirror.
Exterior mirrors
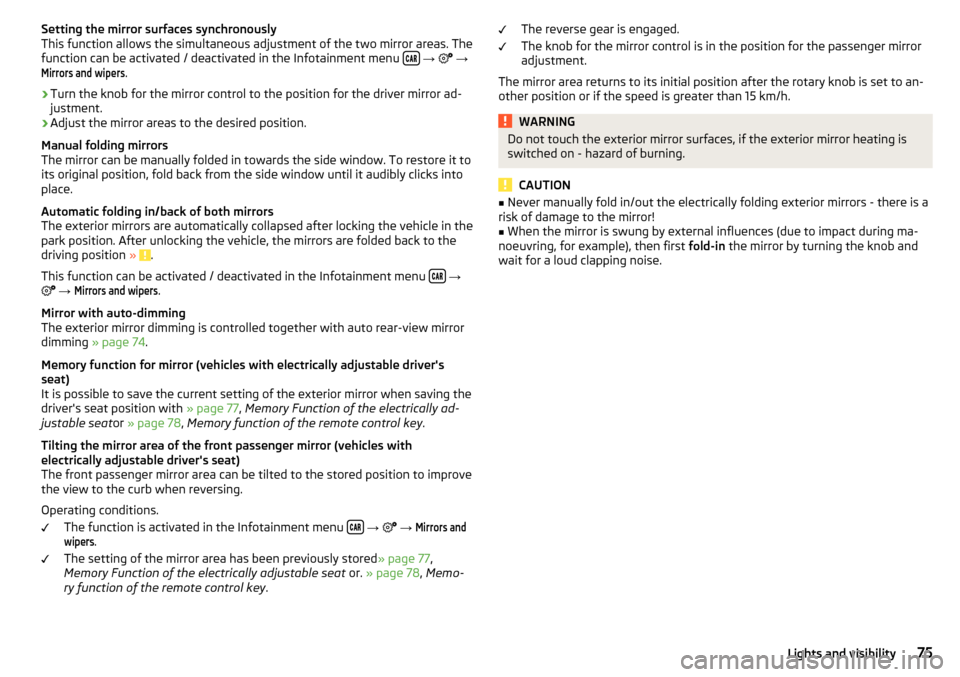
Fig. 62
Exterior mirror operation
Read and observe on page 73 first.
The exterior mirrors can (depending on vehicle equipment) have a manual or
electric fold-in function, automatic dimming and memory function.
The rotary knob can be moved into the following positions (depending on ve- hicle equipment)
Adjust the left-hand exterior mirror
Switch off mirror control
Adjust the right-hand exterior mirror
Exterior mirror heater (only operates when the engine is running)
Folding in the mirrors electrically (to fold back, move the rotary knob to an-
other position) »
Setting the mirror area
›
Move the rotary knob in the direction of arrows » Fig. 62.
If the mirror setting fails at any time, the mirrors can be adjusted manually by
pressing on the edge of the mirror area.
74Using the system
Page 77 of 324
Setting the mirror surfaces synchronously
This function allows the simultaneous adjustment of the two mirror areas. The
function can be activated / deactivated in the Infotainment menu
→
→
Mirrors and wipers
.
›
Turn the knob for the mirror control to the position for the driver mirror ad-
justment.
›
Adjust the mirror areas to the desired position.
Manual folding mirrors
The mirror can be manually folded in towards the side window. To restore it to
its original position, fold back from the side window until it audibly clicks into
place.
Automatic folding in/back of both mirrors
The exterior mirrors are automatically collapsed after locking the vehicle in the park position. After unlocking the vehicle, the mirrors are folded back to the
driving position »
.
This function can be activated / deactivated in the Infotainment menu
→
→
Mirrors and wipers
.
Mirror with auto-dimming
The exterior mirror dimming is controlled together with auto rear-view mirror
dimming » page 74 .
Memory function for mirror (vehicles with electrically adjustable driver's
seat)
It is possible to save the current setting of the exterior mirror when saving the
driver's seat position with » page 77, Memory Function of the electrically ad-
justable seat or » page 78 , Memory function of the remote control key .
Tilting the mirror area of the front passenger mirror (vehicles with
electrically adjustable driver's seat)
The front passenger mirror area can be tilted to the stored position to improve
the view to the curb when reversing.
Operating conditions. The function is activated in the Infotainment menu
→
→
Mirrors andwipers
.
The setting of the mirror area has been previously stored » page 77,
Memory Function of the electrically adjustable seat or. » page 78 , Memo-
ry function of the remote control key .
The reverse gear is engaged.
The knob for the mirror control is in the position for the passenger mirror
adjustment.
The mirror area returns to its initial position after the rotary knob is set to an-
other position or if the speed is greater than 15 km/h.WARNINGDo not touch the exterior mirror surfaces, if the exterior mirror heating is
switched on - hazard of burning.
CAUTION
■ Never manually fold in/out the electrically folding exterior mirrors - there is a
risk of damage to the mirror!■
When the mirror is swung by external influences (due to impact during ma-
noeuvring, for example), then first fold-in the mirror by turning the knob and
wait for a loud clapping noise.
75Lights and visibility
Page 79 of 324
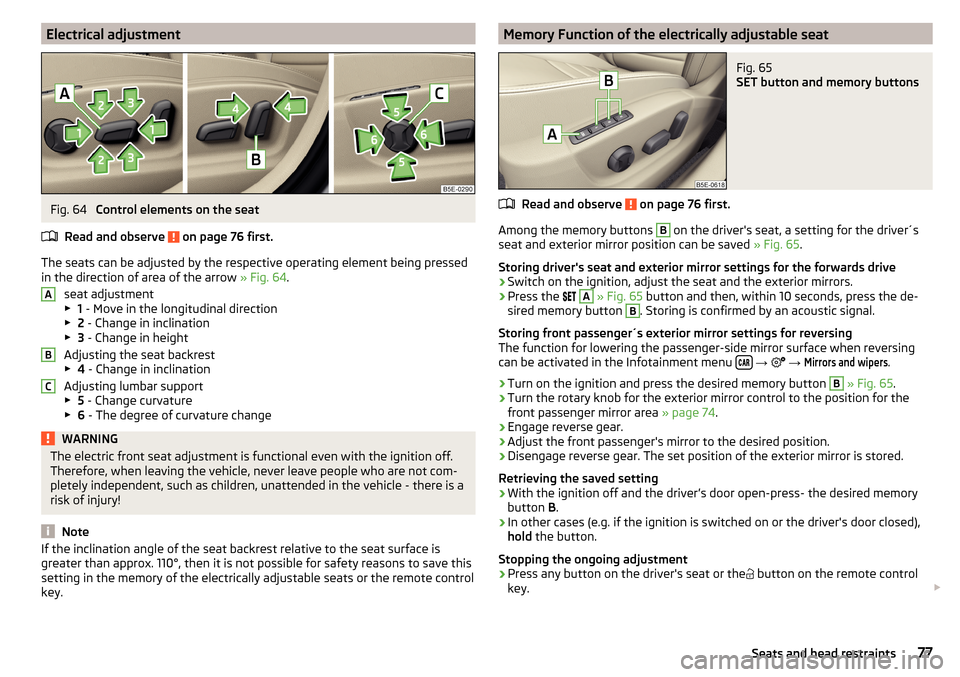
Electrical adjustmentFig. 64
Control elements on the seat
Read and observe
on page 76 first.
The seats can be adjusted by the respective operating element being pressed
in the direction of area of the arrow » Fig. 64.
seat adjustment
▶ 1 - Move in the longitudinal direction
▶ 2 - Change in inclination
▶ 3 - Change in height
Adjusting the seat backrest
▶ 4 - Change in inclination
Adjusting lumbar support
▶ 5 - Change curvature
▶ 6 - The degree of curvature change
WARNINGThe electric front seat adjustment is functional even with the ignition off.
Therefore, when leaving the vehicle, never leave people who are not com-
pletely independent, such as children, unattended in the vehicle - there is a
risk of injury!
Note
If the inclination angle of the seat backrest relative to the seat surface is
greater than approx. 110°, then it is not possible for safety reasons to save this
setting in the memory of the electrically adjustable seats or the remote control
key.ABCMemory Function of the electrically adjustable seatFig. 65
SET button and memory buttons
Read and observe on page 76 first.
Among the memory buttons
B
on the driver's seat, a setting for the driver´s
seat and exterior mirror position can be saved » Fig. 65.
Storing driver's seat and exterior mirror settings for the forwards drive
›
Switch on the ignition, adjust the seat and the exterior mirrors.
›
Press the
A
» Fig. 65 button and then, within 10 seconds, press the de-
sired memory button
B
. Storing is confirmed by an acoustic signal.
Storing front passenger´s exterior mirror settings for reversing
The function for lowering the passenger-side mirror surface when reversing can be activated in the Infotainment menu
→
→
Mirrors and wipers
.
›
Turn on the ignition and press the desired memory button
B
» Fig. 65 .
›
Turn the rotary knob for the exterior mirror control to the position for the
front passenger mirror area » page 74.
›
Engage reverse gear.
›
Adjust the front passenger's mirror to the desired position.
›
Disengage reverse gear. The set position of the exterior mirror is stored.
Retrieving the saved setting
›
With the ignition off and the driver’s door open
-press-
the desired memory
button B.
›
In other cases (e.g. if the ignition is switched on or the driver's door closed),
hold the button.
Stopping the ongoing adjustment
›
Press any button on the driver's seat or the button on the remote control
key.
77Seats and head restraints
Page 80 of 324
NoteEvery time you save new seat and exterior mirror settings for driving forwards,
you must also save the front passenger mirror setting for reversing again.
Memory function of the remote control key
Read and observe
on page 76 first.
Every time the vehicle is locked, the driver´s seat and exterior mirror settings
are saved and assigned to the key with which the vehicle was locked.
After the following unlocking of the vehicle with the same key and opening
the driver’s door, the driver´s seat and exterior mirrors that are saved to this
key will be adopted.
This function can be activated / deactivated in the Infotainment menu
→
→
Seats
.
Storing front passenger´s exterior mirror settings for reversing
The function for lowering the passenger-side mirror surface when reversing
can be activated in the Infotainment menu
→
→
Mirrors and wipers
.
›
Unlock the vehicle with the remote control key and switch on the ignition.
›
Turn the rotary knob for the exterior mirror control to the position for the
front passenger mirror area » page 74.
›
Engage reverse gear.
›
Adjust the front passenger's mirror to the desired position.
›
Disengage reverse gear. The adjusted position of the exterior mirror is stored
in the remote control key memory.
Stopping the ongoing adjustment
›
Press any button on the driver's seat or the button on the remote control
key.
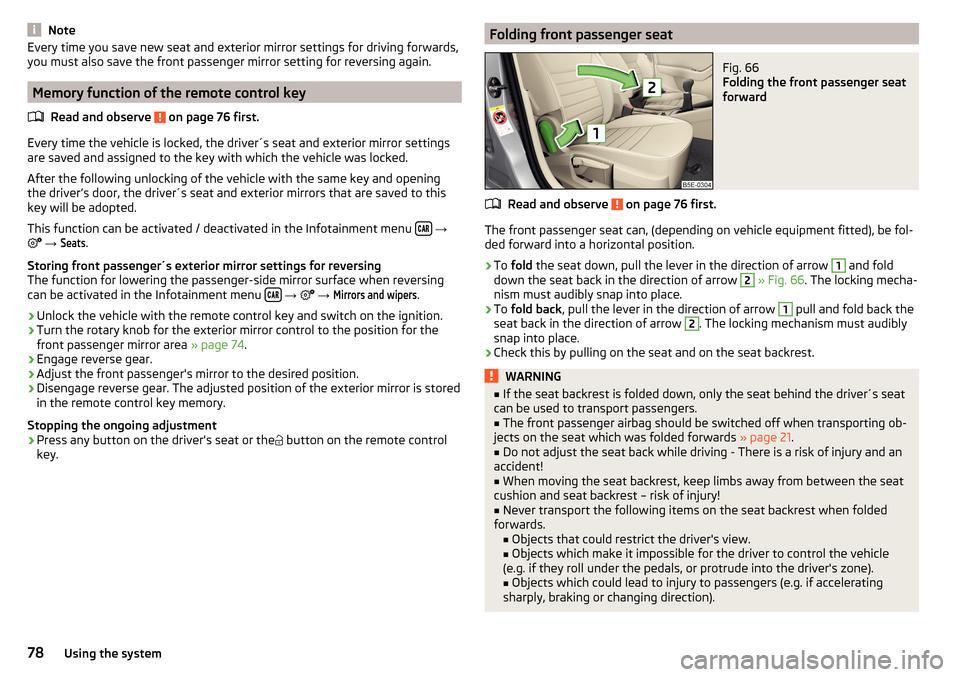
Folding front passenger seatFig. 66
Folding the front passenger seat
forward
Read and observe on page 76 first.
The front passenger seat can, (depending on vehicle equipment fitted), be fol-
ded forward into a horizontal position.
›
To fold the seat down, pull the lever in the direction of arrow
1
and fold
down the seat back in the direction of arrow
2
» Fig. 66 . The locking mecha-
nism must audibly snap into place.
›
To fold back , pull the lever in the direction of arrow
1
pull and fold back the
seat back in the direction of arrow
2
. The locking mechanism must audibly
snap into place.
›
Check this by pulling on the seat and on the seat backrest.
WARNING■ If the seat backrest is folded down, only the seat behind the driver´s seat
can be used to transport passengers.■
The front passenger airbag should be switched off when transporting ob-
jects on the seat which was folded forwards » page 21.
■
Do not adjust the seat back while driving - There is a risk of injury and an
accident!
■
When moving the seat backrest, keep limbs away from between the seat
cushion and seat backrest – risk of injury!
■
Never transport the following items on the seat backrest when folded
forwards. ■ Objects that could restrict the driver's view.
■ Objects which make it impossible for the driver to control the vehicle
(e.g. if they roll under the pedals, or protrude into the driver's zone). ■ Objects which could lead to injury to passengers (e.g. if accelerating
sharply, braking or changing direction).
78Using the system
Page 120 of 324
Restart of Infotainment
If Infotainment does not respond (if it “freezes”) This can be restarted by hold-
ing
for longer than 10 s.
Adjusting the volume
Every change in volume is displayed on the screen.
›
To increase the volume , turn the controller clockwise.
›
To
reduce volume , turn the controller anticlockwise.
›
To
mute , turn the controller to the left to 0.
›
or:
press the button (applies to Infotainment Swing).
The following symbol appears on the screen when the sound is muted .
If, at the time of muting, sound is played from the source in the Media menu,
then the playback is interrupted (pause) 1)
.
CAUTION
■ High volumes can cause sound resonance in the vehicle.■When changing or connecting an audio source, this may cause sudden
changes in volume. Reduce the volume before changing or connecting an au-
dio source.
Infotainment menus
Applies to Infotainment Columbus, Amundsen, Bolero.
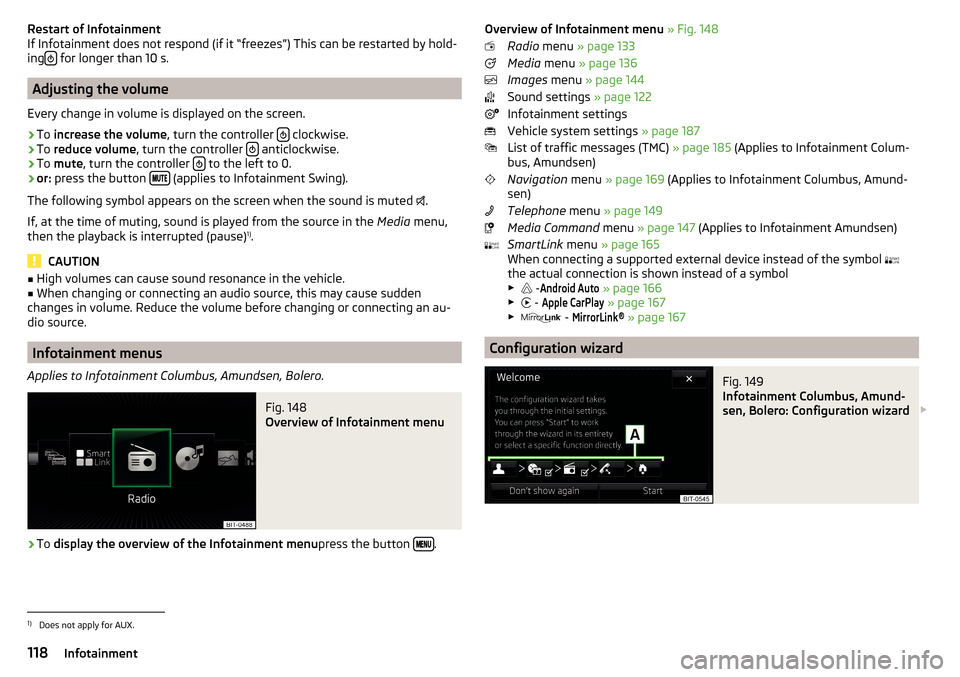
Fig. 148
Overview of Infotainment menu
›
To display the overview of the Infotainment menu press the button .
Overview of Infotainment menu
» Fig. 148
Radio menu » page 133
Media menu » page 136
Images menu » page 144
Sound settings » page 122
Infotainment settings
Vehicle system settings » page 187
List of traffic messages (TMC) » page 185 (Applies to Infotainment Colum-
bus, Amundsen)
Navigation menu » page 169 (Applies to Infotainment Columbus, Amund-
sen)
Telephone menu » page 149
Media Command menu » page 147 (Applies to Infotainment Amundsen)
SmartLink menu » page 165
When connecting a supported external device instead of the symbol
the actual connection is shown instead of a symbol ▶ -Android Auto
» page 166
▶ -
Apple CarPlay
» page 167
▶ -
MirrorLink®
» page 167
Configuration wizard
Fig. 149
Infotainment Columbus, Amund-
sen, Bolero: Configuration wizard
1)
Does not apply for AUX.
118Infotainment
Page 310 of 324
Road sign178
Show POI176
|Alignment177
MAXI DOT See MAXI DOT display
46
MAXI DOT display Assist systems menu item
47
Audio menu item46
Lap timer47
Main menu46
Navigation menu item46
Operation43
Stop watch47
Telephone menu item47
Maximum speed296
MCB202
Mechanical window lifter open/close
59
media Compatible sources
142, 143
file formats142, 143
Requirements and Restrictions142, 143
Media Audio source
139
AUX85, 141
Bluetooth Audio141
Browser138
CD / DVD139
Foreword136
Jukebox141
List138
Main menu136
Multimedia database139
Operation136
Playback operation137
safe removal of the data source124
Safe removal of the data source130
SD card140
Select audio source137
Settings126
Set to132
USB85, 140
Voice control119
WLAN142
Media Command Control
148
Main menu147
Supported formats148
Memory45
Memory Function for the seat77
Menu Setup
122, 130
Mirror73
Vanity71
MirrorLink®167
Connection establishment168
Disconnection168
Function issues168
Main menu168
Operation168
MODE button See driving mode
221
Modes of the automatic transmission194
Modifications and technical alterations240
Most common routes181
MSR201
Multi-function pocket100
Multi-media AUX
141
Multicollision brake (MCB)202
Multifunction display Data
44
Functions44
Memory45
Multifunction pocket95
Multifunction steering wheel43
Multimedia USB
140
Multimedia database139
Multimedia holder86
Mute118
My destinations175
My POIs175
N
N1
100
Nameplate288
Natural gas operation Warning light
37
navigation Map orientation
177
Start the route guidance179
Navigation Abort route guidance
181
Advanced settings129
Alternative routes128
Contacts174
Demo mode129, 180
Destination address172
Destination details179
Destination memory174
Destination on the map173
Destination presentation in the split screen178
Destination representation176
Dynamic route128
Edit route181
Favourites174
Final destinations173
Finish route guidance181
Foreword169
Fuel options129
GPS169
Graphical driving recommendations180
Home address174
Image with GPS176
Import destination175
Imported destinations128
Intermediate target179
Main menu170
308Index
Page 312 of 324
Passive safetyBefore setting off12
Driving safety12
Passive Safety12
Pedals194
Floor mats194
Personalisation Configuration wizard
118
Personal POIs175
Petrol249
Petrol station logo128
Phone Bluetooth® update
153
Compatibility153
Introductory information149
rSAP155
Voice control119
Phonebox84
Phone compatibility153
Phone Premium SIM card
154
Pictures Compatible sources
145
File formats145
Requirements and restrictions145
Supported file formats145
Pin code set to
126
Playback Video DVD
145
Plsyback Media
137
Pockets88
Pockets in the luggage compartment95
POI175
Choose on the map176
Import175
My POIs175
Tap on the map176
Pop-up window Map178
Positioning the jack
269
Power limit Tilt / slide sunroof
62
Power steering33
Power windows Button in the front passenger door
60
Button in the rear doors60
Practical features Pockets
88
Seat backrest with long cargo channel89
Storage compartment for umbrella87
Waste container85
Preferred contacts159
Preheating unit35
Principles of Infotainment operation116
Proactive passenger protection223
Warning light35
R
Rack
103
Radiator shutters198
radio Select station
133
Radio Broadcasting
133
DAB - settings132
DAB settings125
FM - settings125, 131
L-band126
List of available stations134
Main menu133
Operation133
Preface133
Radio station logo135
Save station135
Scan133
Search stations133
set to125, 131
Station buttons135
Traffic program (TP)136
Voice control119
Radio station logo135
Radio station logos Update
125
Radio stations Choose
133
Logo135
Save station135
Search stations133
Select station133
Station buttons135
Raising the vehicle269
Rear fog light67
Warning light34
Rear seats79
Rear view mirror73
Rear window - heating71
Record waypoints184
Refilling Coolant
257
Engine oil256
Windscreen washer fluid254
Reflective vest265
Refuelling249
Fuel249
Regulation Headlight beam
64
Remote Change battery
275
Remote control Auxiliary heating (auxiliary heating and ventila- tion)
110
Synchronisation process55
Unlocking/locking the vehicle52
Remote transfer of SIM data155
Removable through-loading bag89
310Index