stop start SKODA OCTAVIA 2016 3.G / (5E) Owner's Manual
[x] Cancel search | Manufacturer: SKODA, Model Year: 2016, Model line: OCTAVIA, Model: SKODA OCTAVIA 2016 3.G / (5E)Pages: 324, PDF Size: 48.85 MB
Page 5 of 324
Media136Operation136
Audio sources
139
Images
144
Image viewer
144
Video DVD
145
Video player
145
Media Command
147
Operation
147
Telephone
149
Introductory information
149
Pair and connect
152
Use the SIM card in the external module
154
rSAP
155
Telephone functions
157
Text messages (SMS)
161
Hotspot (WLAN) and data connection
163
Hotspot (WLAN)
163
Data connection
164
SmartLink
165
Introductory information
165
Android Auto
166
Apple CarPlay
167
MirrorLink®
167
Navigation
169
Introductory information
169
Search for destination and enter
171
Import my destinations
175
Map
176
Route guidance
179
Route
181Waypoint mode183Traffic reports185
Vehicle systems
187
CAR Vehicle settings
187
Driving
Starting-off and Driving
188
Starting and stopping the engine
188
START-STOPsystem
190
Brakes and Parking
191
Manual shifting of gears and pedals
193
Automatic transmission
194
Running in and economical driving
196
Avoiding damage to your vehicle
198
Assist systems
199
General information
199
Braking and stabilisation systems
200
OFF ROADmode
203
Parking aid (Park Pilot)
204
Reversing camera
207
Park Assist
209
Cruise Control System
212
Adaptive Cruise Control (ACC)
214
Front Assist
219
Select the driving mode (Driving Mode
Selection)
221
Proactive passenger protection (Crew Protect
Assist)
223
Lane Departure Warning (Lane Assist)
224
Traffic sign recognition
226
Fatigue detection
228
Tyre pressure monitoring
229
Towing device and trailer
230
Hitch
230
Using hitch
235General Maintenance
Care and maintenance240
Service work, adjustments and technical
alterations
240
Service intervals
242
Cleaning and care
244
Inspecting and replenishing
248
Fuel
248
Engine compartment
252
Engine oil
255
Coolant
256
Brake fluid
257
Vehicle battery
258
Wheels
260
Wheels and tyres
260
Operating in winter conditions
263
Do-it-yourself
Emergency equipment, and self-help
265
Emergency equipment
265
Changing a wheel
266
Breakdown kit
270
Jump-starting
272
Towing the vehicle
273
Remote - replacing battery
275
Emergency unlocking / locking of doors
276
Replacing windscreen wiper blades
277
Fuses and light bulbs
278
Fuses
278
Bulbs
282
Technical data
Technical data
288
Basic vehicle data
288
Vehicle-specific details per engine type
2963Table of Contents
Page 31 of 324
Using the system
cockpit
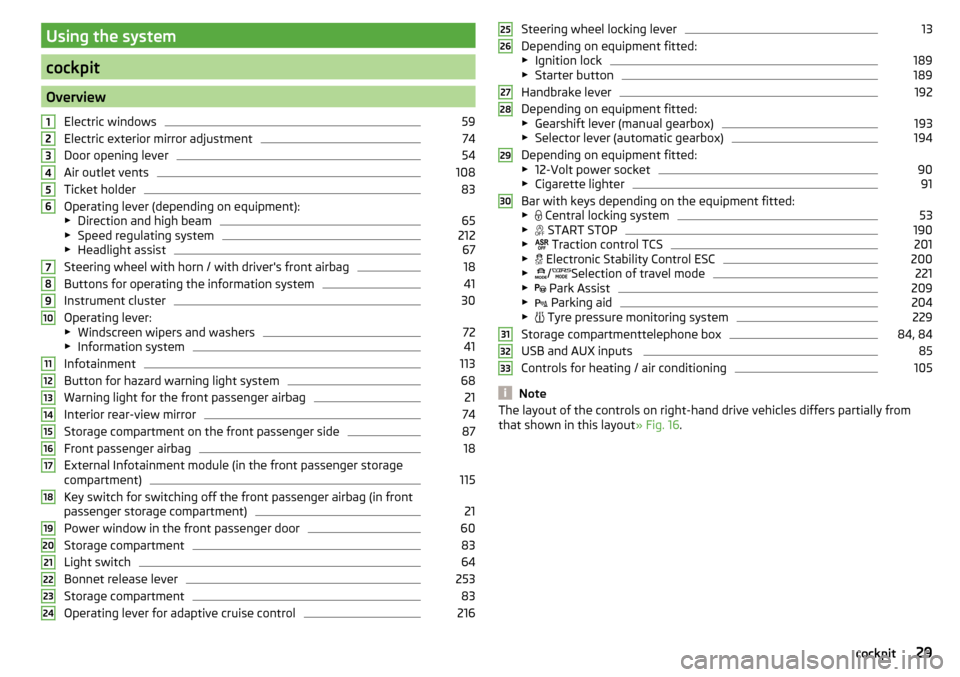
OverviewElectric windows
59
Electric exterior mirror adjustment
74
Door opening lever
54
Air outlet vents
108
Ticket holder
83
Operating lever (depending on equipment):
▶ Direction and high beam
65
▶Speed regulating system
212
▶Headlight assist
67
Steering wheel with horn / with driver's front airbag
18
Buttons for operating the information system
41
Instrument cluster
30
Operating lever:
▶ Windscreen wipers and washers
72
▶Information system
41
Infotainment
113
Button for hazard warning light system
68
Warning light for the front passenger airbag
21
Interior rear-view mirror
74
Storage compartment on the front passenger side
87
Front passenger airbag
18
External Infotainment module (in the front passenger storage
compartment)
115
Key switch for switching off the front passenger airbag (in front
passenger storage compartment)
21
Power window in the front passenger door
60
Storage compartment
83
Light switch
64
Bonnet release lever
253
Storage compartment
83
Operating lever for adaptive cruise control
216123456789101112131415161718192021222324Steering wheel locking lever13
Depending on equipment fitted:
▶ Ignition lock
189
▶Starter button
189
Handbrake lever
192
Depending on equipment fitted:
▶ Gearshift lever (manual gearbox)
193
▶Selector lever (automatic gearbox)
194
Depending on equipment fitted:
▶ 12-Volt power socket
90
▶Cigarette lighter
91
Bar with keys depending on the equipment fitted:
▶ Central locking system
53
▶
START STOP
190
▶
Traction control TCS
201
▶
Electronic Stability Control ESC
200
▶
/
Selection of travel mode
221
▶
Park Assist
209
▶
Parking aid
204
▶
Tyre pressure monitoring system
229
Storage compartmenttelephone box
84, 84
USB and AUX inputs
85
Controls for heating / air conditioning
105
Note
The layout of the controls on right-hand drive vehicles differs partially from
that shown in this layout » Fig. 16.25262728293031323329cockpit
Page 34 of 324
Warning lights
Introduction
This chapter contains information on the following subjects:
Handbrake
33
Braking system
33
Front seat belt warning light
33
Adaptive cruise control (ACC)
33
Power steering / steering lock (KESSY system)
33
Stability control (ESC) / Traction control (TCS)
34
Traction control (TCS) disabled
34
Anti-lock braking system (ABS)
34
Rear fog light
34
Emission control system
35
Preheating unit (diesel)
35
EPC warning light (petrol)
35
Safety systems
35
Tyre pressure
35
Brake linings
36
Low fuel - petrol / diesel
36
Lane assist (Lane Assist)
36
Turn signal system
36
Trailer turn signal lights
36
Fog lights
37
Cruise control
37
Brake pedal (automatic gearbox)
37
Natural gas operation
37
Main beam
37
Automatic gearbox
37
Rear seat belt warning light
37
Generator
37
Coolant
38
Engine oil pressure
38
Engine oil level
38
Lamp failure
39
Diesel particle filter (diesel)
39
Windscreen washer fluid level39High beam assistant39
START-STOPsystem
39
Display a low temperature
39
Water in the fuel filter (diesel)
40
Adaptive cruise control (ACC)
40
Distance warning (Front Assist)
40
Front assist
40
OFF ROAD mode
40
Adaptive Chassis Control (DCC)
40
Service
40
The warning lights in the instrument cluster indicate certain functions or
faults.
Some warning lights can be accompanied by acoustic signals and messages in
the display of the instrument cluster.
After switching on the ignition, some warning lights light up briefly as a func-
tion test. If the tested systems are OK, the corresponding warning lights go
out a few seconds after switching on the ignition or after starting the engine.
The warning lights are located at the following positions in the instrument
cluster » Fig. 17 on page 30 .
▶ Tachometer
1
▶Display
2
▶Speedometer
3
▶Bar with warning lights
5
Warning lights in the display
Depending on the importance the warning light (danger) or
(warning) illu-
minate along with some of the warning lights in the list with the warning
lights.
Depending on vehicle equipment, some warning lights can be displayed in col-
our on the display. For example. the coolant warning lamp may be represented
as follows.
▶ - Segment display / monochromatic (“black and white”) MAXI DOT display
▶ - Coloured MAXI DOT display
32Using the system
Page 35 of 324
WARNING■Ignoring illuminated warning lights and related messages or instructions
in the display of the instrument cluster may lead to serious personal injury
or damage to the vehicle.■
If you have to stop for technical reasons, then park the vehicle at a safe
distance from the traffic, switch off the engine and activate the hazard
warning light system » page 68. Place the warning triangle at the prescri-
bed distance.
■
The engine compartment of your car is a hazardous area. While working in
the engine compartment, be sure to observe the following warnings
» page 252 .
Handbrake
Read and observe
on page 33 first.
lights up – the handbrake has been applied.
An acoustic signal will sound if you drive the vehicle above 5 km/h while the
handbrake is still on.
▶ Release the handbrake.
Braking system
Read and observe
on page 33 first.
illuminates – the brake fluid level in the brake system is too low.
▶ Park the vehicle,
stop driving! Seek help from a specialist garage.
WARNINGA fault to the braking system can increase the vehicle’s braking distance -
There is a risk of an accident!
Front seat belt warning light
Read and observe
on page 33 first.
lights up - the driver or front passenger has not fastened their seat belt.
At a speed of over 30 km/h the warning light
flashes and an audible warning
sounds at the same time.
If the seat belt is not fastened by the driver or front passenger during the next
approx. 2 minutes, the warning signal is deactivated and the warning light il-
luminates permanently.
Adaptive cruise control (ACC)
Read and observe
on page 33 first.
illuminates - the ACC delay is not sufficient.
▶ Apply the brake.
For more information about the ACC system » page 214.
Power steering / steering lock (KESSY system)
Read and observe
on page 33 first.
Fault in the power steering
lights up – this indicates a complete failure of the power steering and the
steering assist is no longer working (significantly higher steering forces).
lights up – this indicates a partial failure of the power steering and the
steering forces can be greater.
▶ Switch off the ignition, start the engine again and travel a short distance.
▶ If the warning light does not go off, stop the vehicle,
stop driving
. Seek
help from a specialist garage.
▶ If the warning light does not go off, you can drive on, exercising appropriate
caution. Seek assistance from a specialist garage immediately.
Steering lock defect (KESSY system)
An audible signal sounds as a warning.
flashes
Steering column lock faulty. Stop!STOP VEHICLE STEERING FAULTY
▶ Park the vehicle,
stop driving . After switching off the ignition, it is no lon-
ger possible to lock the steering, to activate the electrical components (e.g.
Infotainment ), to switch on the ignition again and to start the engine. Seek
help from a specialist garage.
flashes
Steering lock: Workshop!STEERING WORKSHOP
▶ You can drive on, exercising appropriate caution. Seek assistance from a spe-
cialist garage immediately.
33Instruments and warning lights
Page 38 of 324
▶Correct the tyre pressure if necessary or replace the affected wheel
» page 266 or use the repair kit » page 270.
▶ Save the tyre pressure values in the system » page 229.
System fault
flashes for approximately 1 minute and remains lit – there may be a fault in
the tyre pressure monitoring system.
▶ Stop the vehicle, turn the ignition off and start the engine again.
If the warning light
flashes after starting the engine again, there is a system
error.
▶ You can drive on, exercising appropriate caution. Seek assistance from a spe-
cialist garage immediately.
Disconnecting the vehicle battery
If the vehicle's battery has been disconnected and reconnected, the indicator
light comes on after switching on the ignition.
The warning light should go out after driving a short distance.
If, after a short drive, the indicator light does not go out, there is a system er-
ror.
▶ You can drive on, exercising appropriate caution. Seek assistance from a spe-
cialist garage immediately.
Other incidents
The illumination of the warning light can have the following reasons.
▶ The vehicle is loaded on one side. Distribute the load evenly.
▶ The wheels of one axle are loaded more heavily (e.g. when towing a trailer or
when driving uphill or downhill).
▶ Snow chains are mounted.
▶ A wheel has been changed.
CAUTION
Under certain circumstances (e.g. sporty style of driving, wintry or unpaved
roads) the warning light in the instrument cluster can be delayed or does
not light up at all.
Brake linings
Read and observe
on page 33 first.
illuminates - the brake pads are worn.
▶
You can drive on, exercising appropriate caution. Seek assistance from a spe-
cialist garage immediately.
Low fuel - petrol / diesel
Read and observe
on page 33 first.
illuminates – the fuel level in the fuel tank is at the reserve level (approxi-
mately 6 litres).
An audible signal sounds as a warning. ▶ Please refuel » page 249.
Note
The text in the display goes out after refuelling and driving a short distance.
Lane assist (Lane Assist)
Read and observe
on page 33 first.
The warning lights
indicates the state of the Lane Assist system.
More information about the Lane Assist System » page 224.
Turn signal system
Read and observe
on page 33 first.
flashes – the left turn signal is turned on.
flashes – the right turn signal is turned on.
If there is a fault in the turn signal system, the warning light flashes at twice
its normal rate (does not apply when towing).
Switching off the hazard warning light system is switched on will cause all of
the turn signal lights as well as both warning lights to flash.
Trailer turn signal lights
Read and observe
on page 33 first.
flashes – the trailer turn signal lights are switched on.
If a trailer is hitched and the warning light is not flashing, one of the trailer
turn signal lights has failed.
36Using the system
Page 41 of 324
Lamp failureRead and observe
on page 33 first.
illuminates – one of the lamps is faulty.
A message will appear in the display about the affected lamp.
Diesel particle filter (diesel)
Read and observe
on page 33 first.
The diesel particulate filter separates the soot particles from the exhaust. The
soot particles collect in the diesel particulate filter where they are burnt on a
regular basis.
illuminates – the filter is clogged with soot.
To clean the filter, and where traffic conditions permit »
, drive as follows for
at least 15 minutes or until the indicator light goes out.
4. or gear 5 engaged (automatic gearbox: Position D / S).
Vehicle speed at least 70 km/h.
Engine speed between 1800-2500 rpm.
If the filter is properly cleaned, the warning light extinguishes.
If the filter is not properly cleaned, the warning light does not go out and
the warning light begins to flash.
▶ You can drive on, exercising appropriate caution. Seek assistance from a spe-
cialist garage immediately.
WARNING■ Always adjust the speed and driving style to the actual weather, road, ter-
rain and traffic conditions.■
The diesel particulate filter reaches very high temperatures - there is a
fire hazard and serious injury could be caused. Therefore, never stop the
vehicle at places where the underside of your vehicle can come into contact
with flammable materials, such as dry grass, undergrowth, leaves, spilled
fuel etc.
CAUTION■ As long as the warning light illuminates, one must take into account an
increased fuel consumption and a power reduction of the engine.■
Using diesel fuel with an increased sulphur content can considerably reduce
the life of the diesel particle filter. A ŠKODA partner will be able to tell you
which countries use diesel fuel with a high sulphur content.
Note
We encourage you to avoid constant short journeys. This will improve the com-
bustion process of the soot particles in the diesel particulate filter.
Windscreen washer fluid level
Read and observe
on page 33 first.
illuminates – the windscreen washer fluid level is too low.
▶ Top up the windscreen washer fluid » page 254.
High beam assistant
Read and observe
on page 33 first.
illuminates – the high beam assistant is activated » page 67, High-beam
assistant (Light Assist) .
START-STOPsystem
Read and observe
on page 33 first.
The warning lights
indicates the state of the START STOP system
» page 190 .
Display a low temperature
Read and observe
on page 33 first.
illuminates – the outside temperature is below +4 °C.
WARNINGEven at temperatures of around +4 °C, black ice may still be on the road
surface! You should therefore not only rely on the outside temperature dis-
play for accurate information as to whether there is ice on the road.39Instruments and warning lights
Page 43 of 324
Information system
Driver information system
Introduction
This chapter contains information on the following subjects:
Display in the instrument cluster
41
Setting the clock
42
Gear recommendation
42
Vehicle condition
42
Display in the instrument cluster
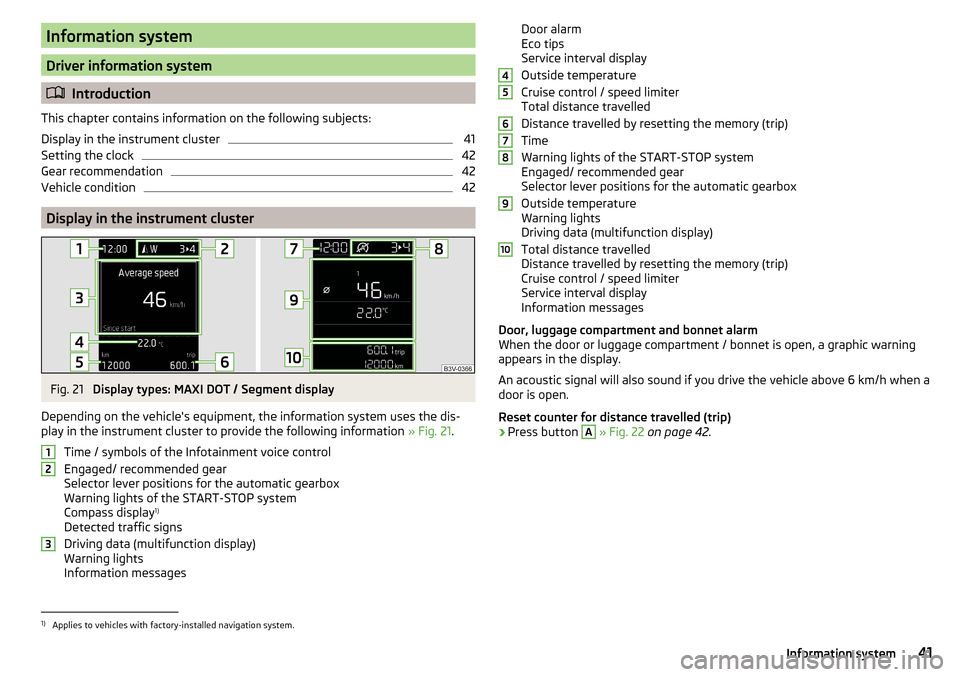
Fig. 21
Display types: MAXI DOT / Segment display
Depending on the vehicle's equipment, the information system uses the dis- play in the instrument cluster to provide the following information » Fig. 21.
Time / symbols of the Infotainment voice control
Engaged/ recommended gear
Selector lever positions for the automatic gearbox
Warning lights of the START-STOP system
Compass display 1)
Detected traffic signs
Driving data (multifunction display)
Warning lights
Information messages
123Door alarm
Eco tips
Service interval display
Outside temperature
Cruise control / speed limiter
Total distance travelled
Distance travelled by resetting the memory (trip)
Time
Warning lights of the START-STOP system
Engaged/ recommended gear
Selector lever positions for the automatic gearbox
Outside temperature
Warning lights
Driving data (multifunction display)
Total distance travelled
Distance travelled by resetting the memory (trip)
Cruise control / speed limiter
Service interval display
Information messages
Door, luggage compartment and bonnet alarm
When the door or luggage compartment / bonnet is open, a graphic warning
appears in the display.
An acoustic signal will also sound if you drive the vehicle above 6 km/h when a
door is open.
Reset counter for distance travelled (trip)›
Press button
A
» Fig. 22 on page 42 .
456789101)
Applies to vehicles with factory-installed navigation system.
41Information system
Page 45 of 324
No message/warning messages relating to vehicle status and the num-
ber (if there is only one message, one warning message text is dis-
played)Display information about the status of the START-STOP system Activation / deactivation of notes relating to START-STOP-System
messages in another screen display
Operation of the information system
Operation via the operating lever
Fig. 25
Buttons on the control lever
Operating the multifunction display
Press (up or down) - Select data / Setting values
Press Show / confirm entry
Operating the MAXI DOT display Press (up or down) - move to the selected menu
Hold (up or down) - display main menu
Press - confirm selected menu item
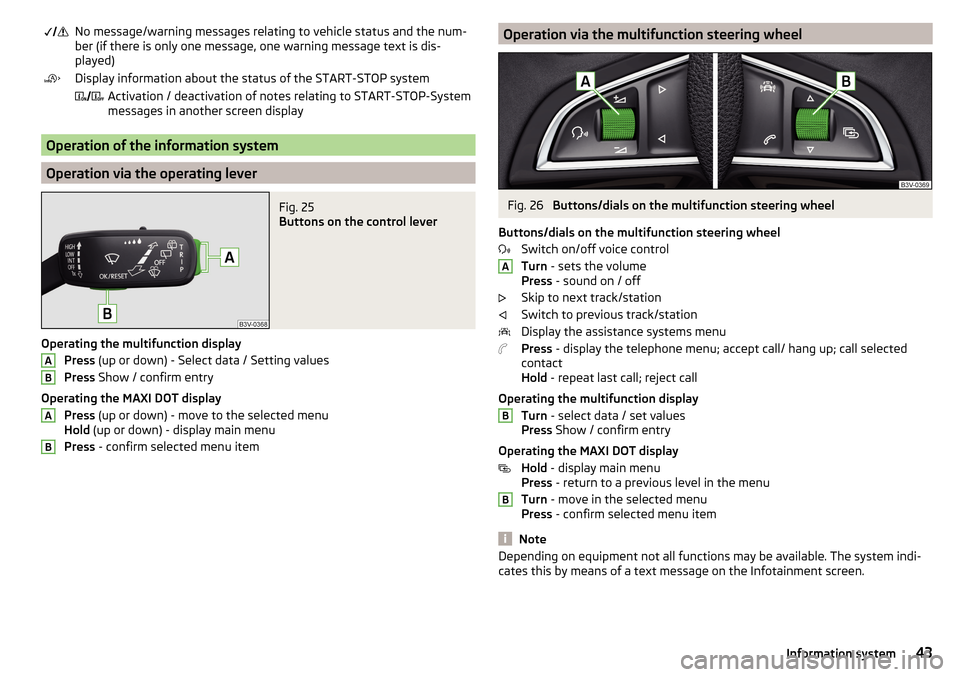
ABABOperation via the multifunction steering wheelFig. 26
Buttons/dials on the multifunction steering wheel
Buttons/dials on the multifunction steering wheel Switch on/off voice control
Turn - sets the volume
Press - sound on / off
Skip to next track/station
Switch to previous track/station
Display the assistance systems menu
Press - display the telephone menu; accept call/ hang up; call selected
contact
Hold - repeat last call; reject call
Operating the multifunction display Turn - select data / set values
Press Show / confirm entry
Operating the MAXI DOT display Hold - display main menu
Press - return to a previous level in the menu
Turn - move in the selected menu
Press - confirm selected menu item
Note
Depending on equipment not all functions may be available. The system indi-
cates this by means of a text message on the Infotainment screen.ABB43Information system
Page 49 of 324

Menu itemTelephone
The call list with the following symbols is displayed in the
Telephone
menu item.
Incoming call
Outgoing call
Missed call
Symbols in the display Charge status of the telephone battery 1)
Signal strength 1)
A telephone is connected to the unit
Missed calls (if there are several missed calls, the number of calls is shown
next to the symbol)
Switch-off microphone
Menu item
Assist systems
The following systems are activated/deactivated in the
Assist systems
menu
item.
▶ Front Assist
▶ Lane Assist
Menu item
Lap timer
(Stop watch)
The Lap timer function offers the possibility of calculating the lap time, for ex-
ample when driving on a race course. The measured time is shown in the dis-
play.
The calculated times are displayed in minutes, seconds and tenths of seconds.
The following functions are available. ■
Start time
- start the timing manually or continue the interrupted measure-
ment
■
Since start
- Start the timer automatically upon start-up
■
Statistics
- Evaluate and reset the measured times
Time measurement
▶ To start the measurement manually, choose the menu itemLap timer
-
start
.
▶ To start the measurement automatically, choose the menu item
Lap timer
-
Since Start
. Timing will begin automatically when starting up.
▶ To start the measurement of the next lap during time measurement, choose
the menu item
new lap
.
During timing, information about the fastest and the last lap time are also
shown in the display.
Measure split time ▶ During the timing, select the menu item
Split time
. The split time data is dis-
played for about 5 seconds in the display.
The split time can be measured repeatedly during a round.
Stop measurement
▶ During the timing, press the menu item
Stop
.
The time measurement is stopped, the following functions are now available.
■
Continue
- Continue measurement of the current lap time
■
New lap
- Start measurement of the next lap time.
■
Abort lap
- Cancel the timer (the aborted lap time is not stored)
■
Hang up
- End timing (the aborted lap time is stored)
Evaluate recorded times ▶ Select the menu item
Lap timer
-
Statistics
.
The following information is displayed.
▶
Fastest:
- The fastest lap
▶
Slowest:
- The slowest lap
▶
Average:
- The average lap time
▶
Overall time:
- The total of all the lap times
Reset measured times ▶ Select the menu item
Lap timer
-
Statistics
-
Reset
.
WARNING■ Concentrate fully at all times on your driving! As the driver, you are fully
responsible for the operation of your vehicle.■
Only use the
Lap timer
when you are in any traffic situation where you have
full control over the vehicle.
1)
This function is only supported by some mobile phones.
47Information system
Page 54 of 324
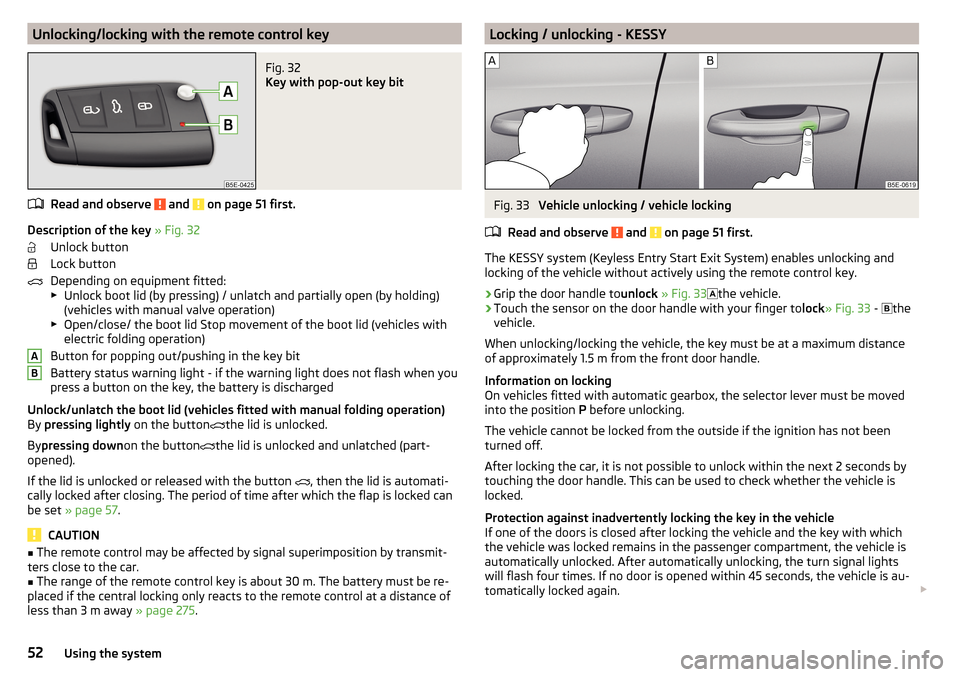
Unlocking/locking with the remote control keyFig. 32
Key with pop-out key bit
Read and observe and on page 51 first.
Description of the key » Fig. 32
Unlock button
Lock button
Depending on equipment fitted:
▶ Unlock boot lid (by pressing) / unlatch and partially open (by holding)
(vehicles with manual valve operation)
▶ Open/close/ the boot lid Stop movement of the boot lid (vehicles with
electric folding operation)
Button for popping out/pushing in the key bit
Battery status warning light - if the warning light does not flash when you
press a button on the key, the battery is discharged
Unlock/unlatch the boot lid (vehicles fitted with manual folding operation)
By pressing lightly on the button
the lid is unlocked.
By pressing down on the button
the lid is unlocked and unlatched (part-
opened).
If the lid is unlocked or released with the button , then the lid is automati-
cally locked after closing. The period of time after which the flap is locked can
be set » page 57 .
CAUTION
■
The remote control may be affected by signal superimposition by transmit-
ters close to the car.■
The range of the remote control key is about 30 m. The battery must be re-
placed if the central locking only reacts to the remote control at a distance of
less than 3 m away » page 275.
ABLocking / unlocking - KESSYFig. 33
Vehicle unlocking / vehicle locking
Read and observe
and on page 51 first.
The KESSY system (Keyless Entry Start Exit System) enables unlocking and
locking of the vehicle without actively using the remote control key.
›
Grip the door handle to unlock » Fig. 33
the vehicle.
›
Touch the sensor on the door handle with your finger to
lock» Fig. 33 -
the
vehicle.
When unlocking/locking the vehicle, the key must be at a maximum distance
of approximately 1.5 m from the front door handle.
Information on locking
On vehicles fitted with automatic gearbox, the selector lever must be moved
into the position P before unlocking.
The vehicle cannot be locked from the outside if the ignition has not been
turned off.
After locking the car, it is not possible to unlock within the next 2 seconds by
touching the door handle. This can be used to check whether the vehicle is
locked.
Protection against inadvertently locking the key in the vehicle
If one of the doors is closed after locking the vehicle and the key with which
the vehicle was locked remains in the passenger compartment, the vehicle is
automatically unlocked. After automatically unlocking, the turn signal lights
will flash four times. If no door is opened within 45 seconds, the vehicle is au-
tomatically locked again.
52Using the system