bonnet SKODA OCTAVIA 2016 3.G / (5E) Owner's Manual
[x] Cancel search | Manufacturer: SKODA, Model Year: 2016, Model line: OCTAVIA, Model: SKODA OCTAVIA 2016 3.G / (5E)Pages: 324, PDF Size: 48.85 MB
Page 14 of 324
Safety
Passive Safety
General information
Introduction
This chapter contains information on the following subjects:
Before setting off
12
Driving safety
12
In this section of the instructions you will find important information on the
subject of passive safety. We have combined everything here which you
should be familiar with, for example, regarding seat belts, airbags, safety of children and anything similar.
Other important safety information can also be found in the subsequent sec-
tions of this Owner's Manual. Therefore, the Owner's Manual should always be
kept in the vehicle.
Before setting off
For your own safety and the safety of the people travelling with you, please
pay attention to the following points before setting off.
▶ Check the lights and turn signal lights are functioning correctly.
▶ Check the wiper function and the wiper blades for wear. Check the wind-
screen washer fluid level.
▶ Ensure that all of the windows offer good visibility to the outside.
▶ Adjust the rear-view mirror so that vision to the rear is guaranteed. Ensure
that the mirrors are not covered.
▶ Check the tyre inflation pressure.
▶ Check the engine oil, brake fluid and coolant level.
▶ Secure all items of luggage.
▶ Do not exceed the permissible axle loads and permissible gross weight of the
vehicle.
▶ Close all doors as well as the bonnet and boot lid.
▶ Ensure that no objects can obstruct the pedals.
▶
Protect children using a suitable child seat » page 22, Transporting children
safely .
▶ Adopt the correct seated position. Tell your passengers to assume the cor-
rect seated position » page 12, Correct and safe seated position .
Driving safety
For safety in traffic, the following precautions must be observed. ▶ Do not become distracted from concentrating on the traffic situation, (e.g. by
your passengers or mobile phone calls).
▶ Never drive when your driving ability is impaired, (e.g. due to medication, al-
cohol, drugs or similar).
▶ Keep to the traffic regulations and the permissible speed limit.
▶ Always adjust the driving speed to the road, traffic and weather conditions.
▶ Take regular breaks on long journeys (at least every two hours).
Correct and safe seated position
Introduction
This chapter contains information on the following subjects:
Driver’s correct seated position
13
Adjusting the steering wheel position
13
Passenger’s correct seating position
14
Passengers’ correct seating position on the rear seats
14
Always assume the correct seated position before setting off and do not
change this position while driving. Also advise your passengers to adopt the
correct seated position and not to change this position while the car is moving.
The following list contains instructions for the Passenger which, if not ob-
served, may cause serious injuries or death. ▶ Do not lean against the dash panel.
▶ Do not put your feet on the dash panel.
The following list contains instructions for all Passengers which, if not ob-
served, may cause serious injuries or death.
▶ Do not sit only on the front area of the seat.
▶ Do not sit facing to one side.
▶ Do not lean out of the window.
▶ Do not put your limbs out of the window.
▶ Do not put your feet on the seat upholstery.
12Safety
Page 31 of 324
Using the system
cockpit
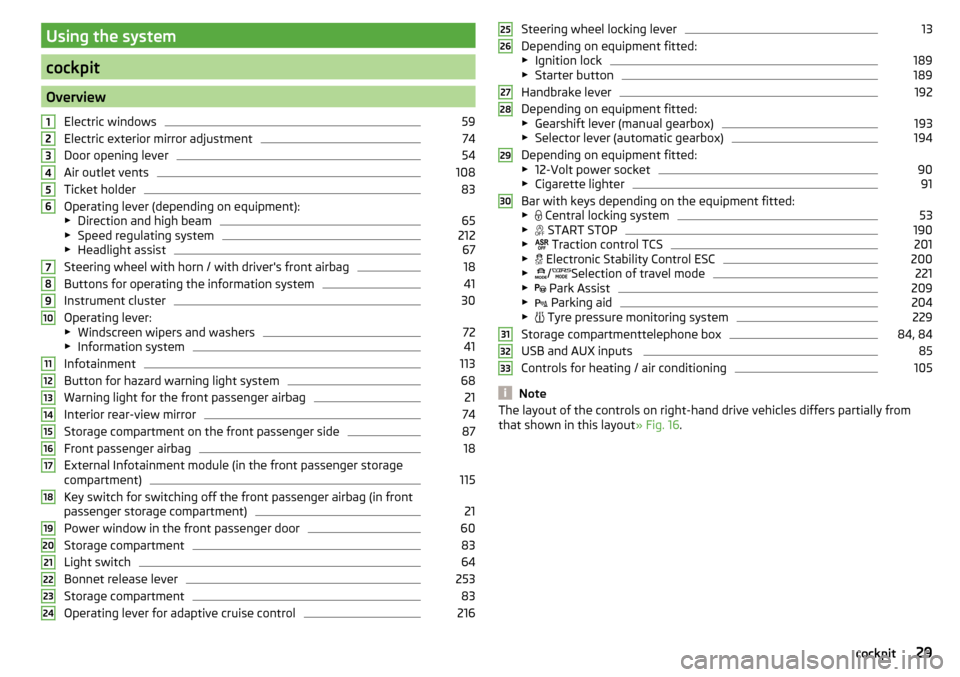
OverviewElectric windows
59
Electric exterior mirror adjustment
74
Door opening lever
54
Air outlet vents
108
Ticket holder
83
Operating lever (depending on equipment):
▶ Direction and high beam
65
▶Speed regulating system
212
▶Headlight assist
67
Steering wheel with horn / with driver's front airbag
18
Buttons for operating the information system
41
Instrument cluster
30
Operating lever:
▶ Windscreen wipers and washers
72
▶Information system
41
Infotainment
113
Button for hazard warning light system
68
Warning light for the front passenger airbag
21
Interior rear-view mirror
74
Storage compartment on the front passenger side
87
Front passenger airbag
18
External Infotainment module (in the front passenger storage
compartment)
115
Key switch for switching off the front passenger airbag (in front
passenger storage compartment)
21
Power window in the front passenger door
60
Storage compartment
83
Light switch
64
Bonnet release lever
253
Storage compartment
83
Operating lever for adaptive cruise control
216123456789101112131415161718192021222324Steering wheel locking lever13
Depending on equipment fitted:
▶ Ignition lock
189
▶Starter button
189
Handbrake lever
192
Depending on equipment fitted:
▶ Gearshift lever (manual gearbox)
193
▶Selector lever (automatic gearbox)
194
Depending on equipment fitted:
▶ 12-Volt power socket
90
▶Cigarette lighter
91
Bar with keys depending on the equipment fitted:
▶ Central locking system
53
▶
START STOP
190
▶
Traction control TCS
201
▶
Electronic Stability Control ESC
200
▶
/
Selection of travel mode
221
▶
Park Assist
209
▶
Parking aid
204
▶
Tyre pressure monitoring system
229
Storage compartmenttelephone box
84, 84
USB and AUX inputs
85
Controls for heating / air conditioning
105
Note
The layout of the controls on right-hand drive vehicles differs partially from
that shown in this layout » Fig. 16.25262728293031323329cockpit
Page 40 of 324
CAUTIONIf in addition to the light the light lights up while driving, stop driving -
risk of engine damage! Switch off the engine and seek assistance from a spe-
cialist garage.
Coolant
Read and observe
on page 33 first.
Coolant level too low
Illumi-
nates
ENGINE COOLANT PLEASE CHECK! Log book!ENGINE COOLANT PLEASE CHECK
▶ Stop the vehicle, switch off the engine, and allow the engine to cool down.
▶ Check the coolant level » page 257.
If the coolant level is within the specified range and the warning light lights
up again, then there may be a malfunction of the cooling fan.
▶ Switch off the ignition.
▶ Check the fuse for the radiator fan, replace if necessary.
If the coolant level and fan fuse are both OK but the warning light lights up
again,
stop driving!
▶ Seek help from a specialist garage.
Coolant temperature too high
Illumi-
nates
Engine overheat. Stop! Log book!ENGINE OVERHEAT STOP
▶ Stop the vehicle, switch off the engine, and allow the engine to cool down.
▶ Continue your journey only after the warning light has disappeared.
Engine oil pressure
Read and observe
on page 33 first.
flashes – the engine oil pressure is too low.
▶ Stop the vehicle, switch off the engine, and check the engine oil level.
▶ Even if the oil level is correct,
do not drive any further if the warning light
is flashing. Also do not leave the engine running at an idling speed.
▶ Seek help from a specialist garage.
CAUTIONIf, under the given conditions, it is not possible to top up with engine oil,
stop driving - there is a risk of engine damage! Switch off the engine and seek
assistance from a specialist garage.
Engine oil level
Read and observe
on page 33 first.
Engine oil level too low
Illumi-
nates
Oil level: add oil!ADD OIL
▶ Stop the vehicle, switch off the engine, and check the engine oil level, top up
if necessary.
The warning light will go out if the bonnet is left open for more than 30 sec-
onds. If the engine oil is not refilled, the warning light will come on again after
driving about 100 km.
Engine oil level too high
Illumi-
nates
Reduce oil level!OIL LEVEL TOO HIGH
▶ Stop the vehicle, switch off the engine, and check the engine oil level.
▶ If the oil level is too high, you can driven on, exercising appropriate caution.
Seek assistance from a specialist garage immediately.
Fault on the engine oil level sensor
Illumi-
nates
Oil sensor: Workshop!OIL SENSOR WORKSHOP
▶ You can drive on, exercising appropriate caution. Seek assistance from a spe-
cialist garage immediately.
CAUTION
If, under the given conditions, it is not possible to top up with engine oil,
stop driving - there is a risk of engine damage! Switch off the engine and seek
assistance from a specialist garage.38Using the system
Page 43 of 324
Information system
Driver information system
Introduction
This chapter contains information on the following subjects:
Display in the instrument cluster
41
Setting the clock
42
Gear recommendation
42
Vehicle condition
42
Display in the instrument cluster
Fig. 21
Display types: MAXI DOT / Segment display
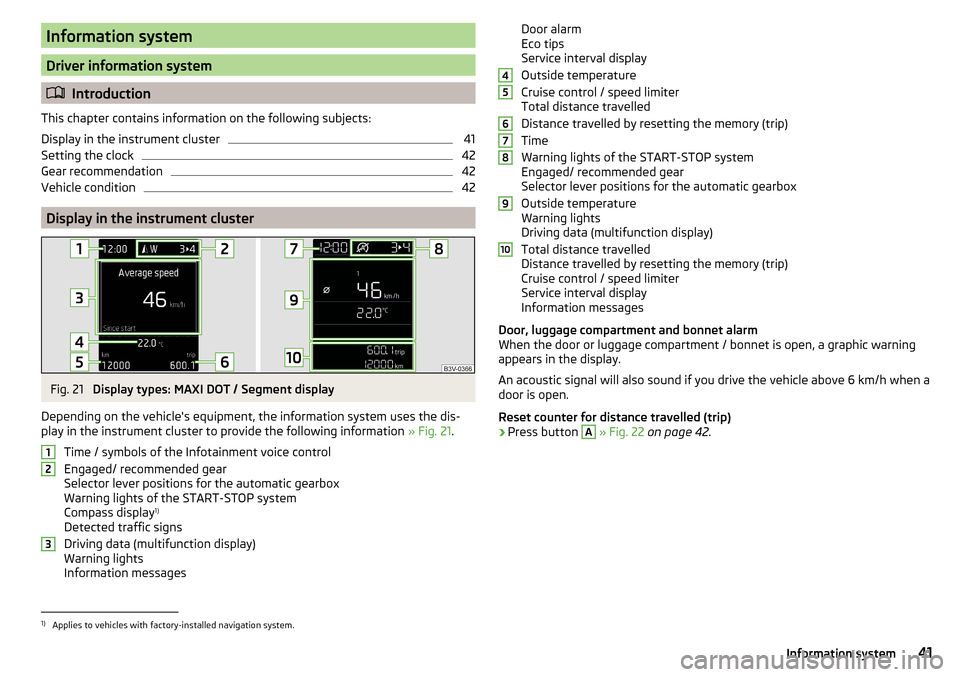
Depending on the vehicle's equipment, the information system uses the dis- play in the instrument cluster to provide the following information » Fig. 21.
Time / symbols of the Infotainment voice control
Engaged/ recommended gear
Selector lever positions for the automatic gearbox
Warning lights of the START-STOP system
Compass display 1)
Detected traffic signs
Driving data (multifunction display)
Warning lights
Information messages
123Door alarm
Eco tips
Service interval display
Outside temperature
Cruise control / speed limiter
Total distance travelled
Distance travelled by resetting the memory (trip)
Time
Warning lights of the START-STOP system
Engaged/ recommended gear
Selector lever positions for the automatic gearbox
Outside temperature
Warning lights
Driving data (multifunction display)
Total distance travelled
Distance travelled by resetting the memory (trip)
Cruise control / speed limiter
Service interval display
Information messages
Door, luggage compartment and bonnet alarm
When the door or luggage compartment / bonnet is open, a graphic warning
appears in the display.
An acoustic signal will also sound if you drive the vehicle above 6 km/h when a
door is open.
Reset counter for distance travelled (trip)›
Press button
A
» Fig. 22 on page 42 .
456789101)
Applies to vehicles with factory-installed navigation system.
41Information system
Page 57 of 324
MalfunctionsRead and observe
and on page 51 first.
Synchronising the remote control
If the buttons on the remote control key have been depressed several times
beyond the effective range of the equipment or the battery has been replaced
in the remote control key and the vehicle cannot be unlocked with the remote
control, the key must be synchronised.
›
Press any button on the remote control key.
›
Unlock the door with the key via the lock cylinder within 1 minute of pressing
the button.
Fault with the central locking
If the warning light in the driver's door initially flashes quickly for around 2 sec-
onds, and then illuminates for 30 seconds without interruption before flashing
again slowly, you will need to seek the assistance of a specialist garage.
A failure in the central locking system can lead the vehicle doors and the boot
lid can emergency lock or emergency release » page 276.
Failure of the system KESSY
If there is a fault in the KESSY system, the appropriate error message is dis-
played in the instrument cluster.
Low voltage of the key battery
If the voltage of the key battery is too low, a message appears in the display of the instrument cluster referring to the need to replace the battery. Replace
the battery » page 275.
Anti-theft alarm system
Introduction
This chapter contains information on the following subjects:
Alarm trigger
55
Interior monitor and towing protection
56
The alarm system triggers audible and visual signals if an attempt is made to
break into the vehicle (hereafter referred to as alarm).
The alarm system is activated automatically approximately 30 seconds after the vehicle is locked. This is automatically disabled after release.
CAUTIONBefore leaving the vehicle, it must be checked that all of the windows, doors
and the sliding/tilting roof are locked in order to ensure the full functionality of
the anti-theft alarm system.
Note
The alarm system has its own power source, the service life of which is 5 years.
In order to ensure functionality of the alarm system, we recommend that you
get the alarm checked after this time by a specialist garage.
Alarm trigger
Read and observe
on page 55 first.
The alarm is triggered when one of the following unauthorised actions is acti-
vated on the vehicle with an activated warning system. ▶ Opening the bonnet.
▶ Opening the boot lid.
▶ Opening the doors.
▶ Manipulation of the ignition lock.
▶ Towing the vehicle.
▶ Movement in the vehicle.
▶ Sudden and significant voltage drop of the electrical system.
▶ Uncoupling the trailer.
An alarm is triggered also when the driver's door is unlocked and opened by
the lock cylinder.
The alarm is switched off by pressing the
button on the key or switching on
the ignition.
55Unlocking and opening
Page 74 of 324
›To
furl grab the screen at the handle B and remove from the holders A.
Hold the sunshade so that this can slowly roll back in without damaging.
Windscreen wipers and washers
Introduction
This chapter contains information on the following subjects:
Front wipers and washers
72
Rear wipers and washers / reversing camera cleaning system
73
Headlight cleaning system
73
The windscreen wipers and the wash system only operate if the ignition is
switched on and the bonnet and boot are closed.
WARNINGDo not use the windscreen washer system at low temperatures, without
heating the windscreen beforehand. Otherwise the window washer fluid
could freeze on the windscreen and restrict the view to the front.
CAUTION
■ If the windscreen wipers are in rest position, they cannot be folded out from
the windscreen. The wipers must be set to the service position to raise them
off the windscreen » page 277.■
In cold temperatures and during the winter, check before switching on the
ignition that the wiper blades are not frozen to the windscreen. If the wind-
screen wipers are switched on when the blades are frozen to the windscreen,
this may damage both the blades and windscreen wiper motor.
■
Carefully separate frozen windscreen wiper blades from the windscreen and
free from snow and ice.
■
Handle the windscreen wipers with care - there is a risk of damage to the
windscreen by the windscreen wiper arms.
■
Do not switch on the ignition when the wiper arm is raised from the wind-
screen - there is a risk of damage to the bonnet by the wiper arms.
■
If there is an obstacle on the windscreen, the wipers will try to push away
the obstacle five times. The wipers then stop to prevent themselves from be-
ing damaged. Only switch the wipers on again after the obstacle has been re-
moved.
Note■ Each time the ignition switches off for the third time, the position of the
windscreen wipers changes. This counteracts an early fatigue of the wiper
blades.■
The windscreen washer nozzles for the windscreen are heated when the en-
gine is running and the outside temperature is less than +10 °C.
Front wipers and washers
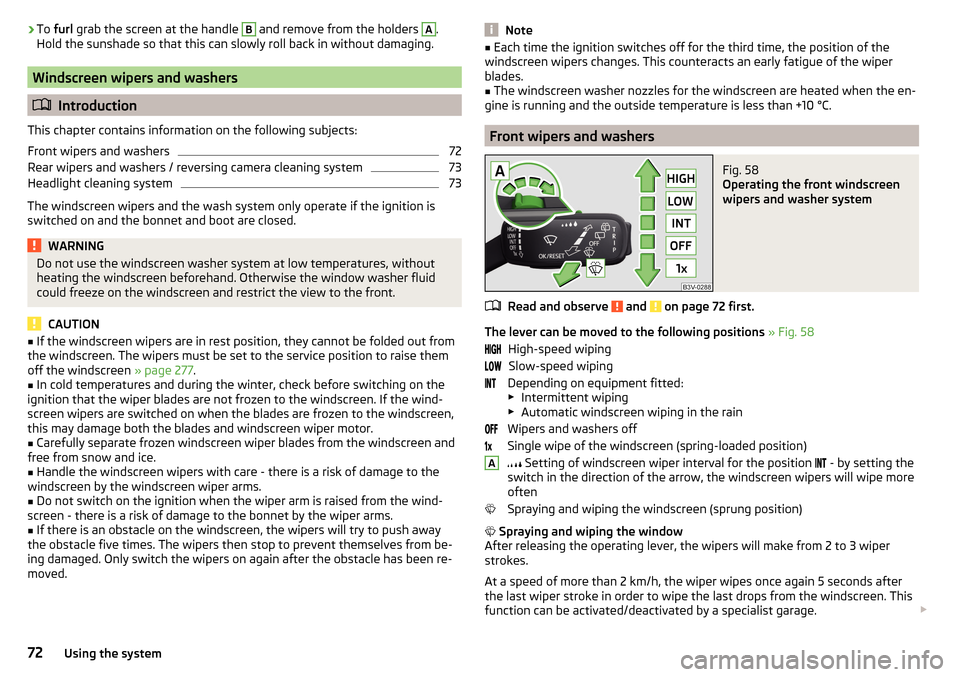
Fig. 58
Operating the front windscreen
wipers and washer system
Read and observe and on page 72 first.
The lever can be moved to the following positions » Fig. 58
High-speed wiping Slow-speed wiping
Depending on equipment fitted:
▶ Intermittent wiping
▶ Automatic windscreen wiping in the rain
Wipers and washers off
Single wipe of the windscreen (spring-loaded position)
Setting of windscreen wiper interval for the position
- by setting the
switch in the direction of the arrow, the windscreen wipers will wipe more
often
Spraying and wiping the windscreen (sprung position)
Spraying and wiping the window
After releasing the operating lever, the wipers will make from 2 to 3 wiper
strokes.
At a speed of more than 2 km/h, the wiper wipes once again 5 seconds after
the last wiper stroke in order to wipe the last drops from the windscreen. This
function can be activated/deactivated by a specialist garage.
A72Using the system
Page 254 of 324
CNGFig. 289
Position of the CNG label(s).
Read and observe
and on page 248 first.
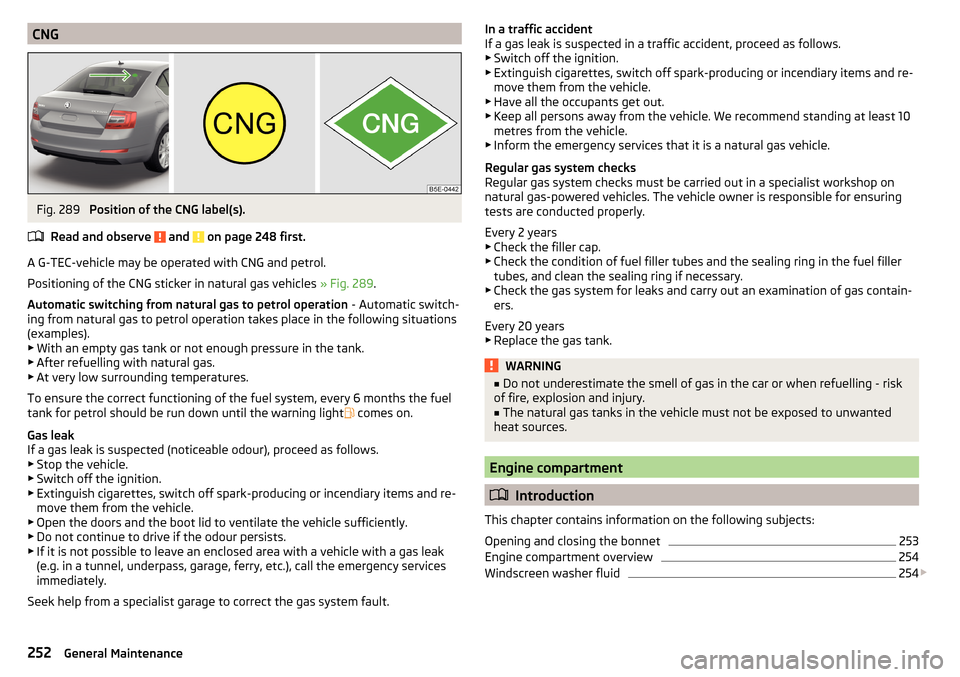
A G-TEC-vehicle may be operated with CNG and petrol.
Positioning of the CNG sticker in natural gas vehicles » Fig. 289.
Automatic switching from natural gas to petrol operation - Automatic switch-
ing from natural gas to petrol operation takes place in the following situations
(examples). ▶ With an empty gas tank or not enough pressure in the tank.
▶ After refuelling with natural gas.
▶ At very low surrounding temperatures.
To ensure the correct functioning of the fuel system, every 6 months the fuel tank for petrol should be run down until the warning light comes on.
Gas leak
If a gas leak is suspected (noticeable odour), proceed as follows. ▶ Stop the vehicle.
▶ Switch off the ignition.
▶ Extinguish cigarettes, switch off spark-producing or incendiary items and re-
move them from the vehicle.
▶ Open the doors and the boot lid to ventilate the vehicle sufficiently.
▶ Do not continue to drive if the odour persists.
▶ If it is not possible to leave an enclosed area with a vehicle with a gas leak
(e.g. in a tunnel, underpass, garage, ferry, etc.), call the emergency services
immediately.
Seek help from a specialist garage to correct the gas system fault.
In a traffic accident
If a gas leak is suspected in a traffic accident, proceed as follows.
▶ Switch off the ignition.
▶ Extinguish cigarettes, switch off spark-producing or incendiary items and re-
move them from the vehicle.
▶ Have all the occupants get out.
▶ Keep all persons away from the vehicle. We recommend standing at least 10
metres from the vehicle.
▶ Inform the emergency services that it is a natural gas vehicle.
Regular gas system checks
Regular gas system checks must be carried out in a specialist workshop on
natural gas-powered vehicles. The vehicle owner is responsible for ensuring
tests are conducted properly.
Every 2 years ▶ Check the filler cap.
▶ Check the condition of fuel filler tubes and the sealing ring in the fuel filler
tubes, and clean the sealing ring if necessary.
▶ Check the gas system for leaks and carry out an examination of gas contain-
ers.
Every 20 years ▶ Replace the gas tank.WARNING■ Do not underestimate the smell of gas in the car or when refuelling - risk
of fire, explosion and injury.■
The natural gas tanks in the vehicle must not be exposed to unwanted
heat sources.
Engine compartment
Introduction
This chapter contains information on the following subjects:
Opening and closing the bonnet
253
Engine compartment overview
254
Windscreen washer fluid
254
252General Maintenance
Page 255 of 324
WARNINGNever cover the engine with additional insulation material (e.g. with a blan-
ket) – risk of fire!WARNINGWhen working in the engine compartment, the following instructions must
be observed - otherwise risk of injury or fire. The engine compartment of
your car is a hazardous area!WARNINGInstructions before beginning work in the engine compartment■Stop the engine and remove the ignition key, on vehicles with the KESSY
system, open the driver's door.■
Firmly apply the handbrake.
■
For vehicles with manual transmission the lever into the neutral position.
For vehicles with automatic transmission , place the selector lever in the P
position.
■
Allow the engine to cool.
■
Never open the bonnet if you can see steam or coolant flowing out of the
engine compartment – risk of scalding! Wait until the steam or coolant has
stopped escaping.
WARNINGInformation for working in the engine compartment■Keep everyone away from the engine compartment.■
Do not touch any hot engine parts – risk of burns!
■
Never touch the radiator fan. The radiator fan may still turn suddenly
about 10 minutes after switching off the ignition!
■
Do not smoke in the vicinity of the engine and avoid the use of open
flames or sparks.
■
Do not leave any items (e.g. cloths or tools) in the engine compartment.
This presents a fire hazard and the risk of engine damage.
■
Read the information and warning instructions on the fluid containers.
WARNINGInformation for working in the engine compartment with the engine run-
ning■
If it is necessary to work on the engine with the engine running, beware
of rotating engine parts and electrical plants - There is a risk to life!
■
Never touch the electric wiring on the ignition system.
■
Avoid short circuits in the electrical system, particularly on the vehicle's
battery.
CAUTION
Only refill using fluids with the proper specification - There is risk of damage to
the vehicle!
Note
■ Fluids with the proper specifications can be purchased from the ŠKODA Origi-
nal Accessories or from the ŠKODA Genuine Parts ranges.■
We recommend you have the operating fluids replaced by a specialist garage.
Opening and closing the bonnet
Fig. 290
Open the bonnet
Read and observe
and on page 253 first.
Open flap
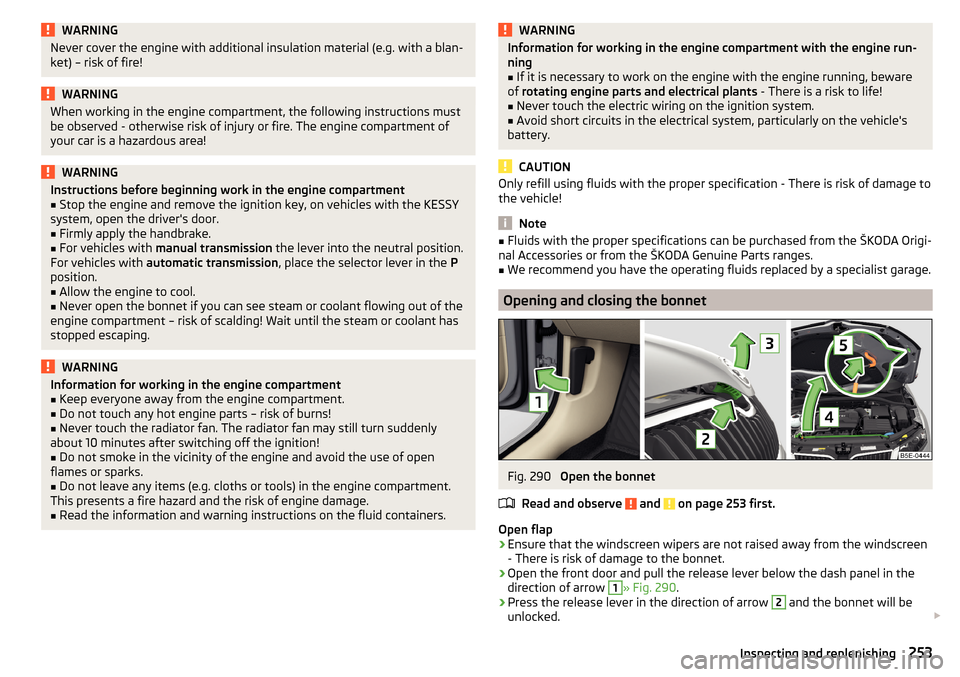
›
Ensure that the windscreen wipers are not raised away from the windscreen
- There is risk of damage to the bonnet.
›
Open the front door and pull the release lever below the dash panel in the
direction of arrow
1
» Fig. 290 .
›
Press the release lever in the direction of arrow
2
and the bonnet will be
unlocked.
253Inspecting and replenishing
Page 256 of 324
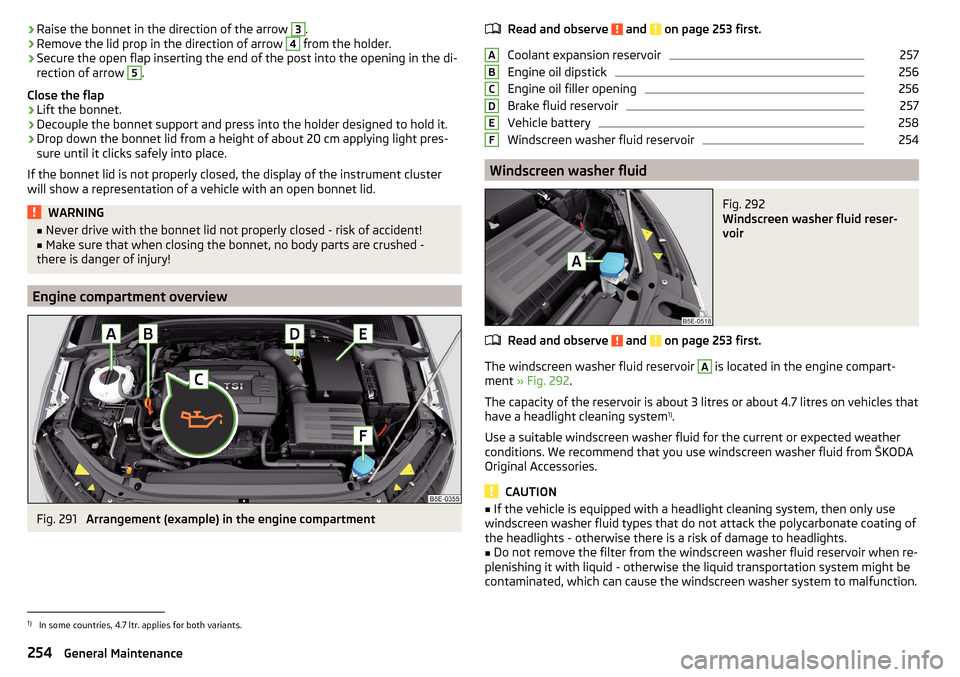
›Raise the bonnet in the direction of the arrow 3.›Remove the lid prop in the direction of arrow 4 from the holder.›
Secure the open flap inserting the end of the post into the opening in the di-
rection of arrow
5
.
Close the flap
›
Lift the bonnet.
›
Decouple the bonnet support and press into the holder designed to hold it.
›
Drop down the bonnet lid from a height of about 20 cm applying light pres-
sure until it clicks safely into place.
If the bonnet lid is not properly closed, the display of the instrument cluster will show a representation of a vehicle with an open bonnet lid.
WARNING■ Never drive with the bonnet lid not properly closed - risk of accident!■Make sure that when closing the bonnet, no body parts are crushed -
there is danger of injury!
Engine compartment overview
Fig. 291
Arrangement (example) in the engine compartment
Read and observe and on page 253 first.
Coolant expansion reservoir
257
Engine oil dipstick
256
Engine oil filler opening
256
Brake fluid reservoir
257
Vehicle battery
258
Windscreen washer fluid reservoir
254
Windscreen washer fluid
Fig. 292
Windscreen washer fluid reser-
voir
Read and observe and on page 253 first.
The windscreen washer fluid reservoir
A
is located in the engine compart-
ment » Fig. 292 .
The capacity of the reservoir is about 3 litres or about 4.7 litres on vehicles that
have a headlight cleaning system 1)
.
Use a suitable windscreen washer fluid for the current or expected weather
conditions. We recommend that you use windscreen washer fluid from ŠKODA
Original Accessories.
CAUTION
■ If the vehicle is equipped with a headlight cleaning system, then only use
windscreen washer fluid types that do not attack the polycarbonate coating of
the headlights - otherwise there is a risk of damage to headlights.■
Do not remove the filter from the windscreen washer fluid reservoir when re-
plenishing it with liquid - otherwise the liquid transportation system might be
contaminated, which can cause the windscreen washer system to malfunction.
ABCDEF1)
In some countries, 4.7 ltr. applies for both variants.
254General Maintenance
Page 279 of 324
›Insert a screwdriver or similar tool into the recess or the opening in the
trim » Fig. 319 as far as the stop.›
Unlock the lid by moving it in the direction of the arrow.
Selector lever-emergency unlocking
Fig. 320
Remove / release the selector lever
›
Firmly apply the handbrake.
›
Open the stowage compartment in the front centre console.
›
Grab hold of the cover
A
in the area of the arrows and carefully raise it for-
wards in the direction of the arrow
1
and then backwards » Fig. 320.
›
Press on the yellow plastic part in the direction of arrow
2
, simultaneously
press the lock button in the selector lever handle and put the lever in posi-
tion N.
If the selector lever is moved again to position P, it is once again blocked.
CAUTION
Make sure when lifting not to damage cover parts by the screwdriver in the
shift lever environment.
Replacing windscreen wiper blades
Introduction
This chapter contains information on the following subjects:
Replacing the windscreen wiper blades
277
Replacing the rear window wiper blade
278WARNINGReplace the windscreen wiper blades once or twice a year for safety rea-
sons.
Replacing the windscreen wiper blades
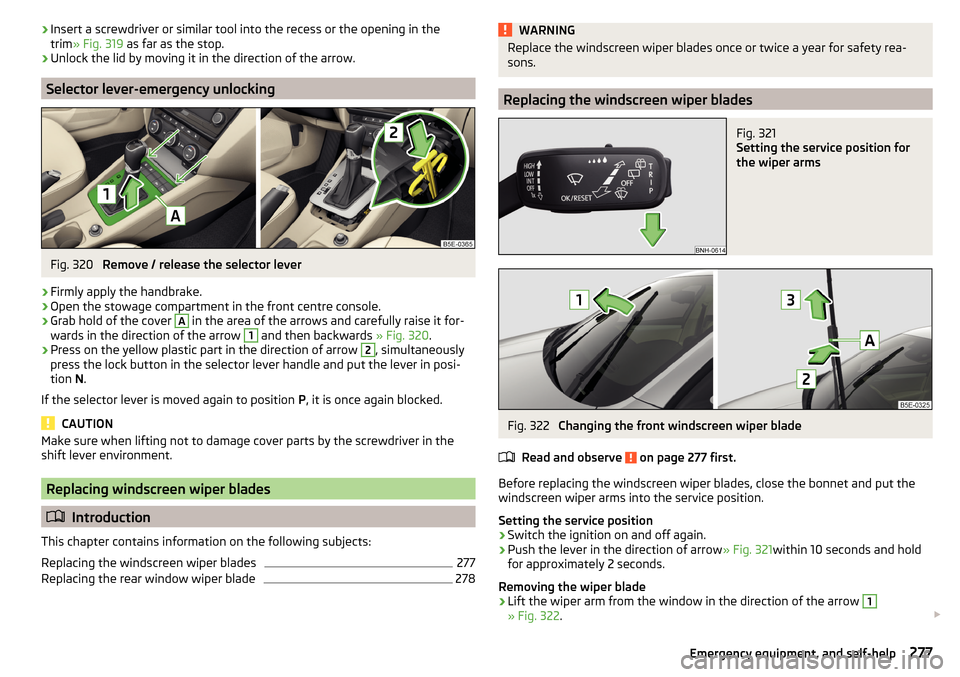
Fig. 321
Setting the service position for
the wiper arms
Fig. 322
Changing the front windscreen wiper blade
Read and observe
on page 277 first.
Before replacing the windscreen wiper blades, close the bonnet and put the windscreen wiper arms into the service position.
Setting the service position
›
Switch the ignition on and off again.
›
Push the lever in the direction of arrow » Fig. 321within 10 seconds and hold
for approximately 2 seconds.
Removing the wiper blade
›
Lift the wiper arm from the window in the direction of the arrow
1
» Fig. 322 .
277Emergency equipment, and self-help