navigation system SKODA OCTAVIA 2016 3.G / (5E) Owner's Manual
[x] Cancel search | Manufacturer: SKODA, Model Year: 2016, Model line: OCTAVIA, Model: SKODA OCTAVIA 2016 3.G / (5E)Pages: 324, PDF Size: 48.85 MB
Page 4 of 324
Table of Contents
Liability for defects and ŠKODA Warranty for
new cars5
Printed Owner's Manual
7
Online Owner's Manual
8
Notes
9
Structure of the Owner's Manual and further
information
10
Abbreviations
Safety
Passive Safety
12
General information
12
Correct and safe seated position
12
Seat belts
15
Using seat belts
15
Inertia reel and belt pretensioners
17
Airbag system
18
Description of the airbag system
18
Airbag deactivation
21
Transporting children safely
22
Child seat
22
Fastening elements
25
Using the system
cockpit
29
Overview
28
Instruments and warning lights
30
Instrument cluster
30
Warning lights
32Information system41Driver information system41
Operation of the information system
43
Driving data (Multifunction display)
44
MAXI DOT display
46
Service interval display
48
SmartGate
48
Unlocking and opening
51
Unlocking and locking
51
Anti-theft alarm system
55
Manually operated tailgate
56
Electric boot lid
57
Window operation
59
Panoramic tilt / slide sunroof
61
Lights and visibility
64
Light
64
Interior lighting
69
Viisibility
70
Windscreen wipers and washers
72
Rear view mirror
73
Seats and head restraints
76
Front seats
76
Rear seats
79
Headrests
80
Seat heaters
81
Useful features
82
Interior fittings
82
Electrical sockets
90
Ashtray and cigarette lighter
91
Tablet holder
92
Transport of cargo
93
Luggage compartment and transporting
objects
93
Variable loading floor in the luggage
compartment (Estate)
100Net partition102Transport on the roof rack103
Heating and ventilation
104
Heating, manual air conditioning system,
Climatronic
104
Auxiliary heating (auxiliary heating and
ventilation)
108
Infotainment
Introductory information
112
Important information
112
Infotainment overview
113
Infotainment operation
116
Infotainment operation
116
Voice control
119
Software update
122
Infotainment settings - Columbus, Amundsen,
Bolero
122
Infotainment system settings
122
Radio menu settings
125
Media menu settings
126
Image menu settings
126
Video DVD menu settings
126
Telephone menu settings
126
SmartLink menu settings
128
Navigation menu settings
128
Infotainment settings - Swing
130
Infotainment system settings
130
Radio menu settings
131
Media menu settings
132
Telephone menu settings
132
Radio
133
Operation
1332Table of Contents
Page 5 of 324
Media136Operation136
Audio sources
139
Images
144
Image viewer
144
Video DVD
145
Video player
145
Media Command
147
Operation
147
Telephone
149
Introductory information
149
Pair and connect
152
Use the SIM card in the external module
154
rSAP
155
Telephone functions
157
Text messages (SMS)
161
Hotspot (WLAN) and data connection
163
Hotspot (WLAN)
163
Data connection
164
SmartLink
165
Introductory information
165
Android Auto
166
Apple CarPlay
167
MirrorLink®
167
Navigation
169
Introductory information
169
Search for destination and enter
171
Import my destinations
175
Map
176
Route guidance
179
Route
181Waypoint mode183Traffic reports185
Vehicle systems
187
CAR Vehicle settings
187
Driving
Starting-off and Driving
188
Starting and stopping the engine
188
START-STOPsystem
190
Brakes and Parking
191
Manual shifting of gears and pedals
193
Automatic transmission
194
Running in and economical driving
196
Avoiding damage to your vehicle
198
Assist systems
199
General information
199
Braking and stabilisation systems
200
OFF ROADmode
203
Parking aid (Park Pilot)
204
Reversing camera
207
Park Assist
209
Cruise Control System
212
Adaptive Cruise Control (ACC)
214
Front Assist
219
Select the driving mode (Driving Mode
Selection)
221
Proactive passenger protection (Crew Protect
Assist)
223
Lane Departure Warning (Lane Assist)
224
Traffic sign recognition
226
Fatigue detection
228
Tyre pressure monitoring
229
Towing device and trailer
230
Hitch
230
Using hitch
235General Maintenance
Care and maintenance240
Service work, adjustments and technical
alterations
240
Service intervals
242
Cleaning and care
244
Inspecting and replenishing
248
Fuel
248
Engine compartment
252
Engine oil
255
Coolant
256
Brake fluid
257
Vehicle battery
258
Wheels
260
Wheels and tyres
260
Operating in winter conditions
263
Do-it-yourself
Emergency equipment, and self-help
265
Emergency equipment
265
Changing a wheel
266
Breakdown kit
270
Jump-starting
272
Towing the vehicle
273
Remote - replacing battery
275
Emergency unlocking / locking of doors
276
Replacing windscreen wiper blades
277
Fuses and light bulbs
278
Fuses
278
Bulbs
282
Technical data
Technical data
288
Basic vehicle data
288
Vehicle-specific details per engine type
2963Table of Contents
Page 43 of 324
Information system
Driver information system
Introduction
This chapter contains information on the following subjects:
Display in the instrument cluster
41
Setting the clock
42
Gear recommendation
42
Vehicle condition
42
Display in the instrument cluster
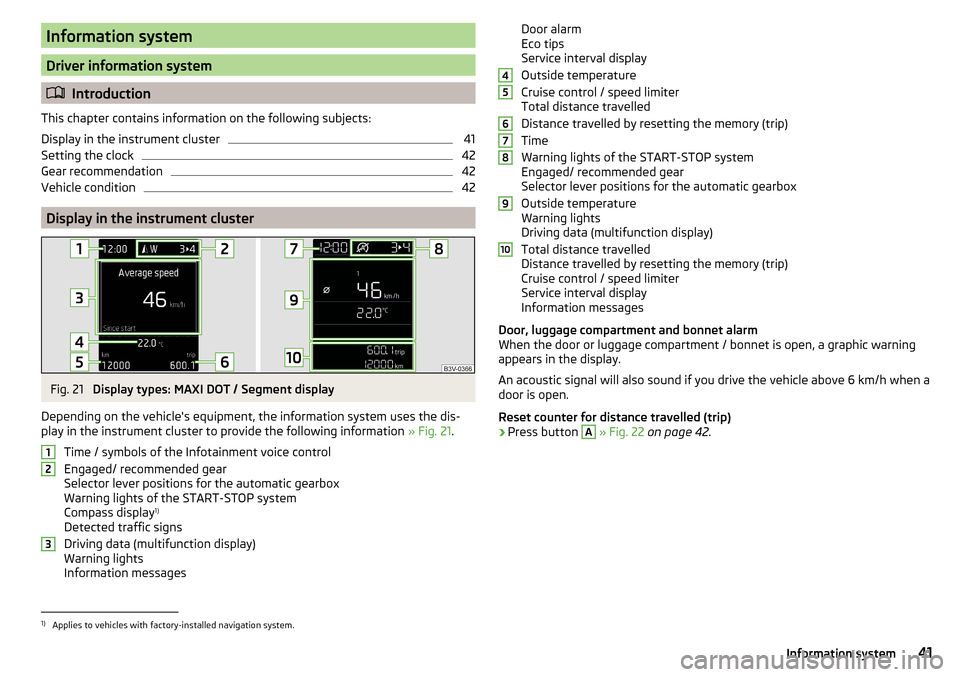
Fig. 21
Display types: MAXI DOT / Segment display
Depending on the vehicle's equipment, the information system uses the dis- play in the instrument cluster to provide the following information » Fig. 21.
Time / symbols of the Infotainment voice control
Engaged/ recommended gear
Selector lever positions for the automatic gearbox
Warning lights of the START-STOP system
Compass display 1)
Detected traffic signs
Driving data (multifunction display)
Warning lights
Information messages
123Door alarm
Eco tips
Service interval display
Outside temperature
Cruise control / speed limiter
Total distance travelled
Distance travelled by resetting the memory (trip)
Time
Warning lights of the START-STOP system
Engaged/ recommended gear
Selector lever positions for the automatic gearbox
Outside temperature
Warning lights
Driving data (multifunction display)
Total distance travelled
Distance travelled by resetting the memory (trip)
Cruise control / speed limiter
Service interval display
Information messages
Door, luggage compartment and bonnet alarm
When the door or luggage compartment / bonnet is open, a graphic warning
appears in the display.
An acoustic signal will also sound if you drive the vehicle above 6 km/h when a
door is open.
Reset counter for distance travelled (trip)›
Press button
A
» Fig. 22 on page 42 .
456789101)
Applies to vehicles with factory-installed navigation system.
41Information system
Page 48 of 324
Long-term ( ) And “2” ( )
The memory gathers driving data from any number of individual journeys up to
a total of 99 hours and 59 minutes driving time or 9 999 kilometres driven.
The indicator is automatically set back to zero if one of the indicated values is
exceeded.Since refuel
(
) or “3” (
)
The driving data is stored in the memory since the last fuel refuelling.
The memory is erased automatically the next time you fill up.
›
To choose the memory bank , confirm the selected indication again and se-
lect the desired memory.
›
To delete the memory bank of the chosen selection, hold down the button
confirming the selection.
The following driving data is stored in different memory banks.
▶ Average fuel consumption.
▶ Distance driven.
▶ Average speed.
▶ Driving time.
Note
Disconnecting the vehicle battery will delete all memory data.
MAXI DOT display
Introduction
This chapter contains information on the following subjects:
Menu item
Navigation46
Menu item
Audio46
Menu item
Telephone47
Menu item
Assist systems47
Menu item
Lap timer
(Stop watch)
47
The MAXI DOT display is a user interface which, depending on the equipment
configuration, provides information about Infotainment, the multifunction dis-
play, the assistance systems etc.
The menus with details can be operated and displayed using the buttons on
the operating lever or the multifunction steering wheel » page 43.
Main menu items (depending on vehicle equipment)
■Driving data
» page 44
■
Assist systems
» page 47
■
Navigation
» page 46
■
Audio
» page 46
■
Telephone
» page 47 ;
■
Vehicle
» page 42
■
Lap timer
» page 47
Note
■
If warning messages are displayed, these messages must first be confirmed
to access the main menu.■
The display language can be set in Infotainment » page 123, Setting the In-
fotainment language and » page 130 , Setting the Infotainment language .
Menu item
Navigation
The following information is displayed in the
Navigation
menu item.
▶ Driving recommendations
▶ Compass
▶ Last destinations
Menu item
Audio
The following information is displayed in the
Audio
menu item.
Radio
▶ Station currently being played (name/frequency).
▶ The selected frequency range (e.g. FM) optionally with the number of the sta-
tion button (e.g. FM 3), if the station is stored in the memory list.
▶ List of available stations (if more than 5 stations can be received).
▶ TP traffic announcements.
Media
▶ Name of the track being played, if necessary, further information regarding
title (e.g. artist, album name), if this information is stored as a so called ID3
tag on the audio source.
46Using the system
Page 76 of 324
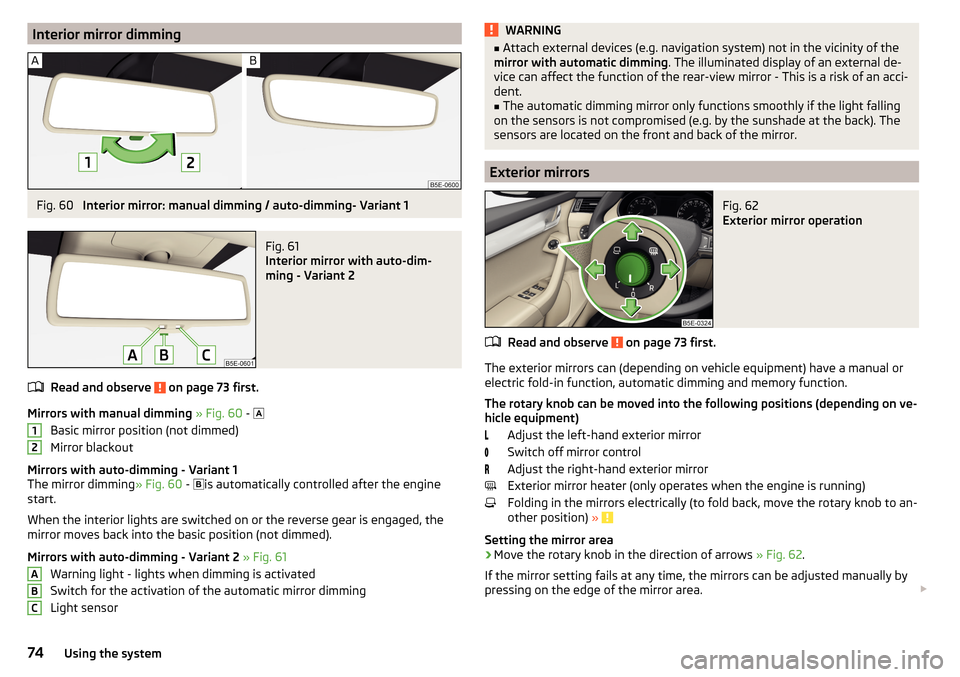
Interior mirror dimmingFig. 60
Interior mirror: manual dimming / auto-dimming- Variant 1
Fig. 61
Interior mirror with auto-dim-
ming - Variant 2
Read and observe on page 73 first.
Mirrors with manual dimming » Fig. 60 -
Basic mirror position (not dimmed)
Mirror blackout
Mirrors with auto-dimming - Variant 1
The mirror dimming » Fig. 60 -
is automatically controlled after the engine
start.
When the interior lights are switched on or the reverse gear is engaged, the
mirror moves back into the basic position (not dimmed).
Mirrors with auto-dimming - Variant 2 » Fig. 61
Warning light - lights when dimming is activated
Switch for the activation of the automatic mirror dimming
Light sensor
12ABCWARNING■ Attach external devices (e.g. navigation system) not in the vicinity of the
mirror with automatic dimming . The illuminated display of an external de-
vice can affect the function of the rear-view mirror - This is a risk of an acci-
dent.■
The automatic dimming mirror only functions smoothly if the light falling
on the sensors is not compromised (e.g. by the sunshade at the back). The
sensors are located on the front and back of the mirror.
Exterior mirrors
Fig. 62
Exterior mirror operation
Read and observe on page 73 first.
The exterior mirrors can (depending on vehicle equipment) have a manual or
electric fold-in function, automatic dimming and memory function.
The rotary knob can be moved into the following positions (depending on ve- hicle equipment)
Adjust the left-hand exterior mirror
Switch off mirror control
Adjust the right-hand exterior mirror
Exterior mirror heater (only operates when the engine is running)
Folding in the mirrors electrically (to fold back, move the rotary knob to an-
other position) »
Setting the mirror area
›
Move the rotary knob in the direction of arrows » Fig. 62.
If the mirror setting fails at any time, the mirrors can be adjusted manually by
pressing on the edge of the mirror area.
74Using the system
Page 115 of 324
The range of available applications and their functionality is dependent on the
Infotainment model, vehicle and region.
The function of mobile applications can be influenced by the quality of the In- ternet connection.
Some applications are dependent on the availability of services that are provi-
ded by third parties.
Infotainment overview
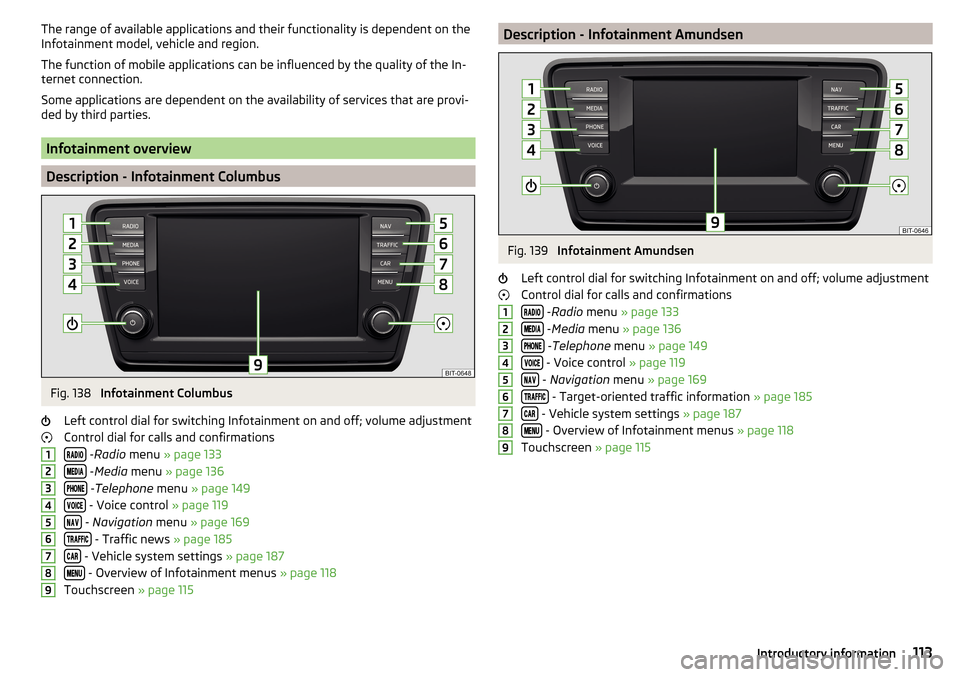
Description - Infotainment Columbus
Fig. 138
Infotainment Columbus
Left control dial for switching Infotainment on and off; volume adjustment
Control dial for calls and confirmations
- Radio menu » page 133
- Media menu » page 136
- Telephone menu » page 149
- Voice control » page 119
- Navigation menu » page 169
- Traffic news » page 185
- Vehicle system settings » page 187
- Overview of Infotainment menus » page 118
Touchscreen » page 115
123456789Description - Infotainment AmundsenFig. 139
Infotainment Amundsen
Left control dial for switching Infotainment on and off; volume adjustment
Control dial for calls and confirmations
- Radio menu » page 133
- Media menu » page 136
- Telephone menu » page 149
- Voice control » page 119
- Navigation menu » page 169
- Target-oriented traffic information » page 185
- Vehicle system settings » page 187
- Overview of Infotainment menus » page 118
Touchscreen » page 115
123456789113Introductory information
Page 120 of 324
Restart of Infotainment
If Infotainment does not respond (if it “freezes”) This can be restarted by hold-
ing
for longer than 10 s.
Adjusting the volume
Every change in volume is displayed on the screen.
›
To increase the volume , turn the controller clockwise.
›
To
reduce volume , turn the controller anticlockwise.
›
To
mute , turn the controller to the left to 0.
›
or:
press the button (applies to Infotainment Swing).
The following symbol appears on the screen when the sound is muted .
If, at the time of muting, sound is played from the source in the Media menu,
then the playback is interrupted (pause) 1)
.
CAUTION
■ High volumes can cause sound resonance in the vehicle.■When changing or connecting an audio source, this may cause sudden
changes in volume. Reduce the volume before changing or connecting an au-
dio source.
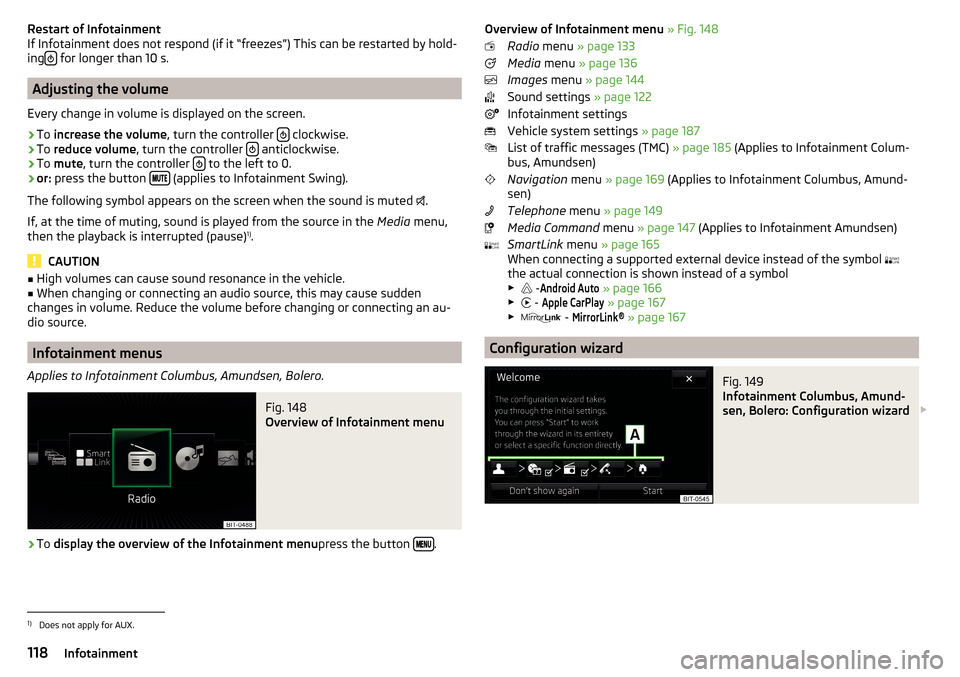
Infotainment menus
Applies to Infotainment Columbus, Amundsen, Bolero.
Fig. 148
Overview of Infotainment menu
›
To display the overview of the Infotainment menu press the button .
Overview of Infotainment menu
» Fig. 148
Radio menu » page 133
Media menu » page 136
Images menu » page 144
Sound settings » page 122
Infotainment settings
Vehicle system settings » page 187
List of traffic messages (TMC) » page 185 (Applies to Infotainment Colum-
bus, Amundsen)
Navigation menu » page 169 (Applies to Infotainment Columbus, Amund-
sen)
Telephone menu » page 149
Media Command menu » page 147 (Applies to Infotainment Amundsen)
SmartLink menu » page 165
When connecting a supported external device instead of the symbol
the actual connection is shown instead of a symbol ▶ -Android Auto
» page 166
▶ -
Apple CarPlay
» page 167
▶ -
MirrorLink®
» page 167
Configuration wizard
Fig. 149
Infotainment Columbus, Amund-
sen, Bolero: Configuration wizard
1)
Does not apply for AUX.
118Infotainment
Page 121 of 324
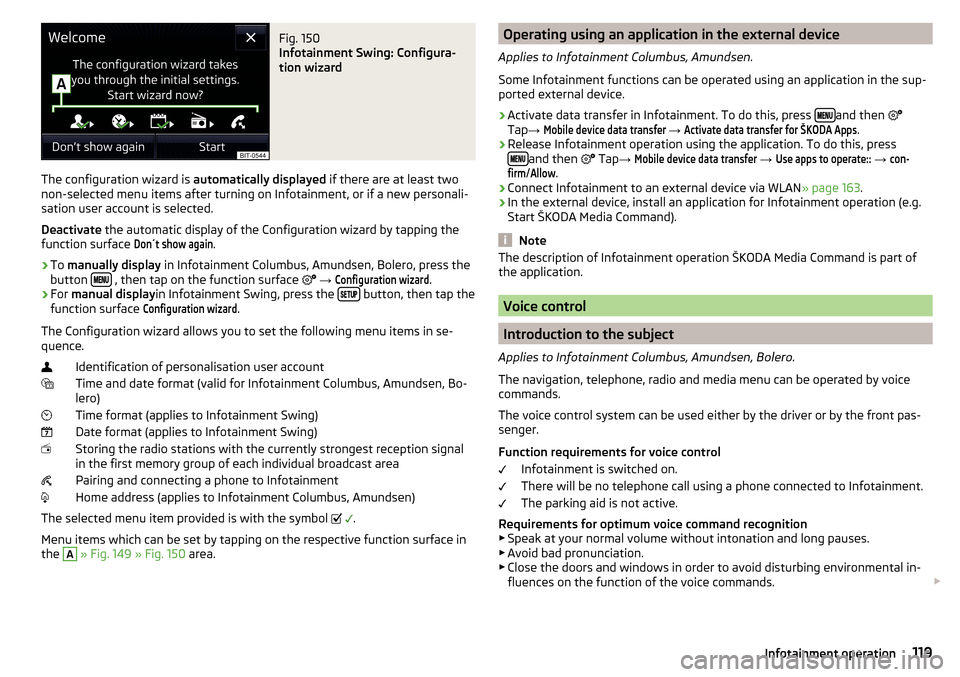
Fig. 150
Infotainment Swing: Configura-
tion wizard
The configuration wizard is automatically displayed if there are at least two
non-selected menu items after turning on Infotainment, or if a new personali-
sation user account is selected.
Deactivate the automatic display of the Configuration wizard by tapping the
function surface
Don´t show again
.
›
To manually display in Infotainment Columbus, Amundsen, Bolero, press the
button , then tap on the function surface
→
Configuration wizard
.
›
For manual display in Infotainment Swing, press the button, then tap the
function surface
Configuration wizard
.
The Configuration wizard allows you to set the following menu items in se-
quence.
Identification of personalisation user account
Time and date format (valid for Infotainment Columbus, Amundsen, Bo-
lero)
Time format (applies to Infotainment Swing)
Date format (applies to Infotainment Swing)
Storing the radio stations with the currently strongest reception signal
in the first memory group of each individual broadcast area
Pairing and connecting a phone to Infotainment
Home address (applies to Infotainment Columbus, Amundsen)
The selected menu item provided is with the symbol
.
Menu items which can be set by tapping on the respective function surface in
the
A
» Fig. 149 » Fig. 150 area.
Operating using an application in the external device
Applies to Infotainment Columbus, Amundsen.
Some Infotainment functions can be operated using an application in the sup-
ported external device.›
Activate data transfer in Infotainment. To do this, press and then
Tap →
Mobile device data transfer
→
Activate data transfer for ŠKODA Apps
.
›
Release Infotainment operation using the application. To do this, press
and then
Tap →
Mobile device data transfer
→
Use apps to operate::
→
con-firm
/
Allow
.
›
Connect Infotainment to an external device via WLAN » page 163.
›
In the external device, install an application for Infotainment operation (e.g.
Start ŠKODA Media Command).
Note
The description of Infotainment operation ŠKODA Media Command is part of
the application.
Voice control
Introduction to the subject
Applies to Infotainment Columbus, Amundsen, Bolero.
The navigation, telephone, radio and media menu can be operated by voice
commands.
The voice control system can be used either by the driver or by the front pas-
senger.
Function requirements for voice control Infotainment is switched on.
There will be no telephone call using a phone connected to Infotainment.
The parking aid is not active.
Requirements for optimum voice command recognition
▶ Speak at your normal volume without intonation and long pauses.
▶ Avoid bad pronunciation.
▶ Close the doors and windows in order to avoid disturbing environmental in-
fluences on the function of the voice commands.
119Infotainment operation
Page 122 of 324
▶You are recommended to speak louder at higher speeds, so that the sound of
your voice is not drowned out by the increased ambient noise.
▶ During voice control, limit additional noise in the vehicle, e.g. passengers
talking at the same time.WARNINGThe emergency number should be dialled manually. Your voice commands
may not be recognised in such situations. The telephone connection may
not be established or the connection may take too much time to complete.
CAUTION
■ The messages are generated by Infotainment. Flawless clarity (e.g. road or
city name) cannot always be guaranteed.■
For some Infotainment languages, there is no voice control available. Info-
tainment indicates this fact through a text message that is displayed on the
screen after setting the Infotainment language.
Note
During voice control, no nav. announcements and traffic announcements are
played.
Voice control on / off
Fig. 151
Voice control: Main menu
Activating
›
Press the button on infotainment
or press the button
on the multi-
function steering wheel.
the main menu is displayed » Fig. 151.
Switching off
›
Press the button on infotainment twice
or press the button twice
on
the multifunction steering wheel.
› or
Issue the voice command “ End voice control”.
Operation principle
Fig. 152
Example of screen display
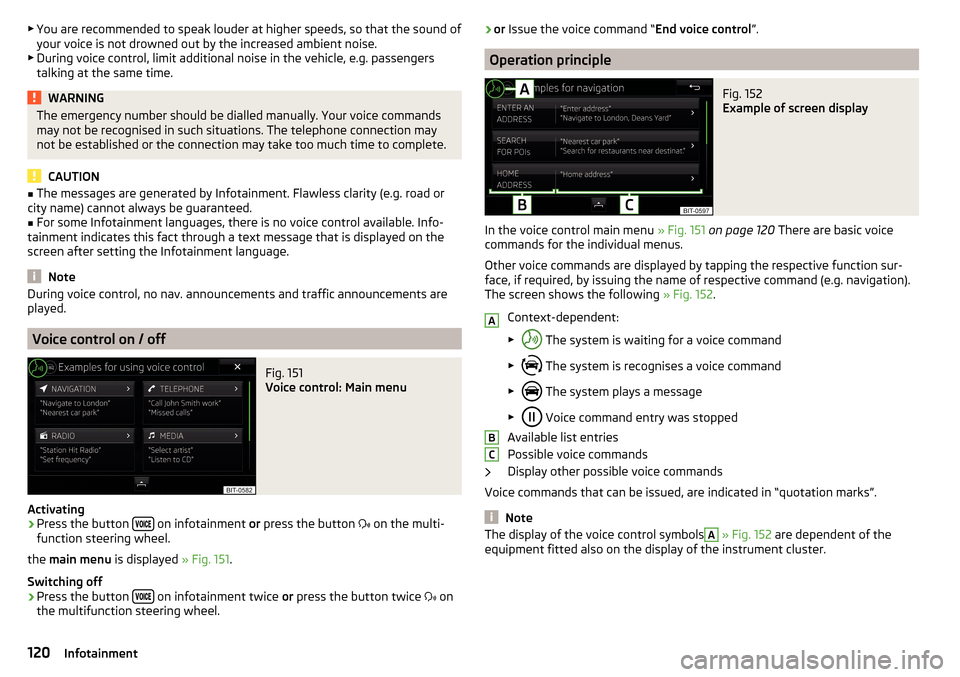
In the voice control main menu » Fig. 151 on page 120 There are basic voice
commands for the individual menus.
Other voice commands are displayed by tapping the respective function sur-
face, if required, by issuing the name of respective command (e.g. navigation).
The screen shows the following » Fig. 152.
Context-dependent:
▶ The system is waiting for a voice command
▶ The system is recognises a voice command
▶ The system plays a message
▶ Voice command entry was stopped
Available list entries
Possible voice commands
Display other possible voice commands
Voice commands that can be issued, are indicated in “quotation marks”.
Note
The display of the voice control symbolsA » Fig. 152 are dependent of the
equipment fitted also on the display of the instrument cluster.ABC120Infotainment
Page 127 of 324

■Password: ... - Password setting
■Authentication
- Setting for the type of verification
■
Normal
- Without verification
■
Safe
- Verification required
■
Reset Access Point (APN)
- Delete the parameters for the network setting
■
Store
- Storage of the parameters for the network setting
■
Network provider: ...
- Selecting the data service provider (the menu item is visi-
ble when the data services of the SIM card inserted in the external module
are active)
■
Data roaming
- Enable / disable the use of data roaming connection
■
Current connection details
- Display of information on data downloaded (by tap-
ping the function button
Reset
the data information is deleted)
■
Data Connection:
- Settings of the data services of the SIM card inserted in the
external module
■
Off
- The data services are turned off
■
Ask
- The data services are active after confirmation
■
On
- The data services are turned on
System information
›
Press the button, then tap on the function surface
Tap on
→
Systeminformation
.
›
To perform a Software Update (Z. B. Bluetooth®
or radio station logo) Tap
the function surface
Update software
.
Displaying system information.
▶ Device part number: ... - Infotainment part number
▶ Hardware: ... - Hardware version
▶ Software: ... - Software version
▶ Navigation database: ... - Version of the navigation data
▶ “Gracenote” database: ... - Version of the Gracenote multimedia database
(applies to Infotainment Columbus)
▶ Media Codec: ... - Version of media codecs
▶ Bluetooth version: ... - Version of the Bluetooth ®
software
The information on available software updates is obtained from a ŠKODA Part-
ner or from the following ŠKODA Internet pages.
http://go.skoda.eu/updateportal
Radio menu settings
Settings for all broadcasting areas
›
Tap on the Radio main menu function surface
.
■
Sound
- Sound settings
■
Scan
- Automatic play short portions of all available stations in the current
frequency range
■
Arrow buttons:
- Setting the function of the function surfaces
■
Preset list
- Change between stations stored under the preset buttons
■
Station list
- Change between all available stations of the selected broad-
casting range
■
Traffic program (TP)
- Switches TP traffic programme on/off
■
Delete presets
- Deletes the preset buttons
■
Station logos
- manual management of station logos
■
Radio text
- Switching the text display radio (FM and DAB) on and off
■
Advanced settings
- further settings that are different depending on the selec-
ted broadcasting range(FM and DAB)
Advanced Settings (FM)
›
Select the FM band in the Radio main menu and tap on the function surface
→
Advanced settings
.
■
Auto-save station logos
- Automatic storage of the station logos
■
Region for station logo:
- Setting the region for station logos
■
Automatic frequency control (AF)
- Search for alternative frequencies of the station
currently being played to on/off
■
Radio Data System (RDS)
- Activate/deactivate RDS function (receiving additional
information from the station)
■
RDS Regional:
- Switch on/off the automatic tracking of related regional sta-
tions
■
Fixed
- Maintains the selected regional station continuously. When the sig-
nal is lost, another station must be set manually.
■
Automatic
- Auto-selects the station with the best reception at the moment.
If you lose reception in the given the region, Infotainment will automatical-
ly set another available region.
Advanced settings (DAB)
›
In the Radio main menu, select the DAB range and tap on the function sur-
face
→
Advanced settings
.
125Infotainment settings - Columbus, Amundsen, Bolero