radio SKODA OCTAVIA 2016 3.G / (5E) Swing Infotainment System Navigation Manual
[x] Cancel search | Manufacturer: SKODA, Model Year: 2016, Model line: OCTAVIA, Model: SKODA OCTAVIA 2016 3.G / (5E)Pages: 40, PDF Size: 4.41 MB
Page 4 of 40
Table of Contents
Important information about this Owner's
Manual3
Explanations and further information
4
Abbreviations
Introductory information
Important notes
6
Unit overview
7
Device operation and settings
Device operation
8
Device settings
10
Radio
Operation
12
Settings
14
Media
Operation
15
Audio sources
17
Telephone
Introductory information
20
Pair and connect
21
Telephone functions
22
Vehicle systems
CAR - vehicle setting
26
Index
2Table of Contents
Page 5 of 40
Important information about this Owner's Manual
This Owner's Manual is valid for the different versions of the Infotainment
Swing (hereinafter referred to only as device). The device may vary in both its
appearance and in the controls arrangement, depending on the vehicle model
in which it is installed.
This Owner's Manual describes all possible device functions without identify-
ing them as special equipment, model variants or market-dependent equip-
ment. Consequently, the device in your vehicle does not need to contain all of
the functions described in this Owner's Manual.
For example, if the vehicle is not factory equipped with the sound system, the
menu points
ŠKODA Surround
and
Virtual Subwoofer
are not displayed in the sound
settings menu.
For information about the device , e.g. with respect to its compatibility with
external devices or the software update, please refer to the following web-
sites.
http://go.skoda.eu/infotainment
The availability of some features described in this Owner's Manual depends
on the type of external devices (for example, telephone, music player, etc.).
The illustrations in this Owner's Manual are for illustrative purposes only. The
illustrations can differ in minor details from your vehicle; they are only inten-
ded to provide general information.
ŠKODA AUTO pursues a policy of ongoing product and model development
with all vehicles. Changes in terms of supply scope are possible at any time
with regard to design, equipment and technology. The information provided in
this Owner's Manual corresponds to the information available at the time of
publishing.
Therefore, legal claims cannot be made based on the technical data, illustra-
tions and information contained in this Owner's Manual.
We recommend that the web pages that are referred to in this Owner's Man-
ual are displayed using the classic view. If the web pages are displayed using
the mobile view, they may not contain all necessary information.
Screen texts that appear in this Owner´s Manual may differ slightly depending
on the texts show on the device screen.
Declaration of conformity
ŠKODA AUTO hereby declares that the ŠKODA Infotainment systems meet the
basic requirements and additional provisions of the 1999/5/EC Directive with
reference to radio equipment and telecommunications devices.3Important information about this Owner's Manual
Page 7 of 40
AbbreviationsAbbreviationDefinitionA2DPa Bluetooth®
profile for the one-sided audio data transmis-
sionACCAdaptive cruise controlAFAlternative frequencies for the current radio stationAMIdentification of the radio-frequency rangeTCSTraction Control of the drive wheelsAVRCPa Bluetooth ®
profile for the operation associated with the
transmission of audio data multimedia functionsBTBluetooth ®
- wireless communication for reception and
transmission of voice and data informationDABDigital radio receptionDRMa system for monitoring or restricting the use of digital me-
dia contentESCElectronic Stability ControlFMIdentification of the radio-frequency rangeID3 tagan additional feature of a music file, which allows for the dis-
play of artist, title, album name, etc.mp3compressed audio formatPINpersonal identification numberPTYType of broadcast programRDSa system for the transmission of additional information for
FM radio receptionSIM carda card for the identification of the mobile network operatorTPIdentification of a traffic information stationUSB MSCa software profile for transferring files between two devices
(sometimes referred to as EMS)VBRvariable bit rate with files that have data compressionVINVehicle identification numberwmacompressed audio format5Abbreviations
Page 9 of 40
Unit overview
Description of the device
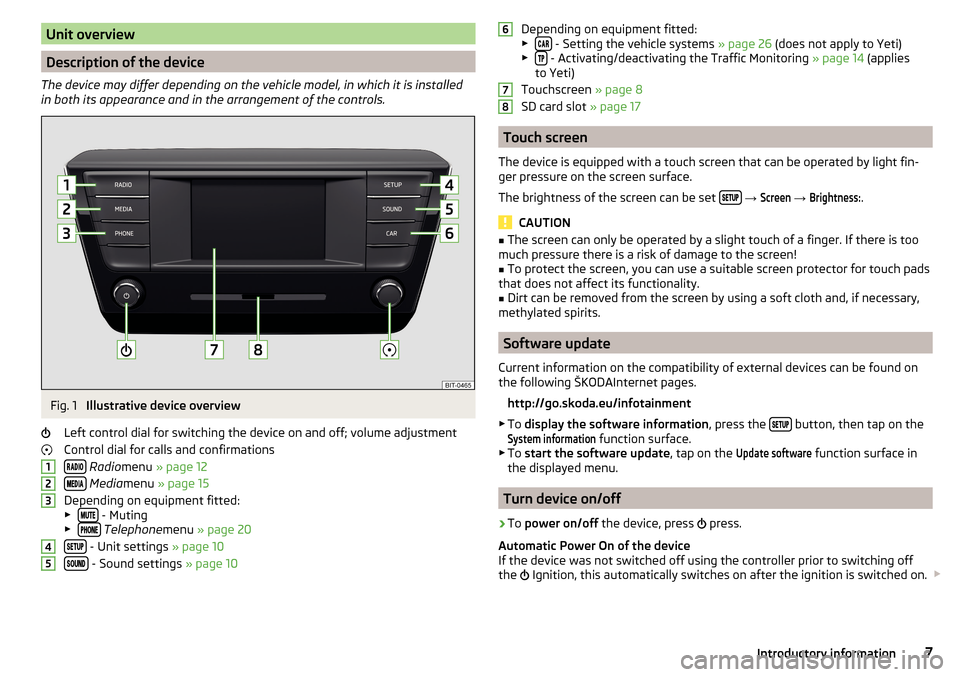
The device may differ depending on the vehicle model, in which it is installed
in both its appearance and in the arrangement of the controls.
Fig. 1
Illustrative device overview
Left control dial for switching the device on and off; volume adjustment
Control dial for calls and confirmations
Radio menu » page 12
Media menu » page 15
Depending on equipment fitted:
▶
- Muting
▶ Telephone menu » page 20
- Unit settings » page 10
- Sound settings » page 10
12345Depending on equipment fitted:
▶ - Setting the vehicle systems » page 26 (does not apply to Yeti)
▶ - Activating/deactivating the Traffic Monitoring » page 14 (applies
to Yeti)
Touchscreen » page 8
SD card slot » page 17
Touch screen
The device is equipped with a touch screen that can be operated by light fin-
ger pressure on the screen surface.
The brightness of the screen can be set
→
Screen
→
Brightness:
.
CAUTION
■
The screen can only be operated by a slight touch of a finger. If there is too
much pressure there is a risk of damage to the screen!■
To protect the screen, you can use a suitable screen protector for touch pads
that does not affect its functionality.
■
Dirt can be removed from the screen by using a soft cloth and, if necessary,
methylated spirits.
Software update
Current information on the compatibility of external devices can be found on
the following ŠKODAInternet pages.
http://go.skoda.eu/infotainment
▶ To display the software information , press the
button, then tap on the
System information
function surface.
▶ To start the software update , tap on the
Update software
function surface in
the displayed menu.
Turn device on/off
›
To power on/off the device, press
press.
Automatic Power On of the device
If the device was not switched off using the controller prior to switching off
the Ignition, this automatically switches on after the ignition is switched on.
6787Introductory information
Page 12 of 40
By tapping on the function surface a list of matching entries opens. If fewer
than 4 entries are found, a list of the found entries opens automatically.
Device settings
Configuration wizard
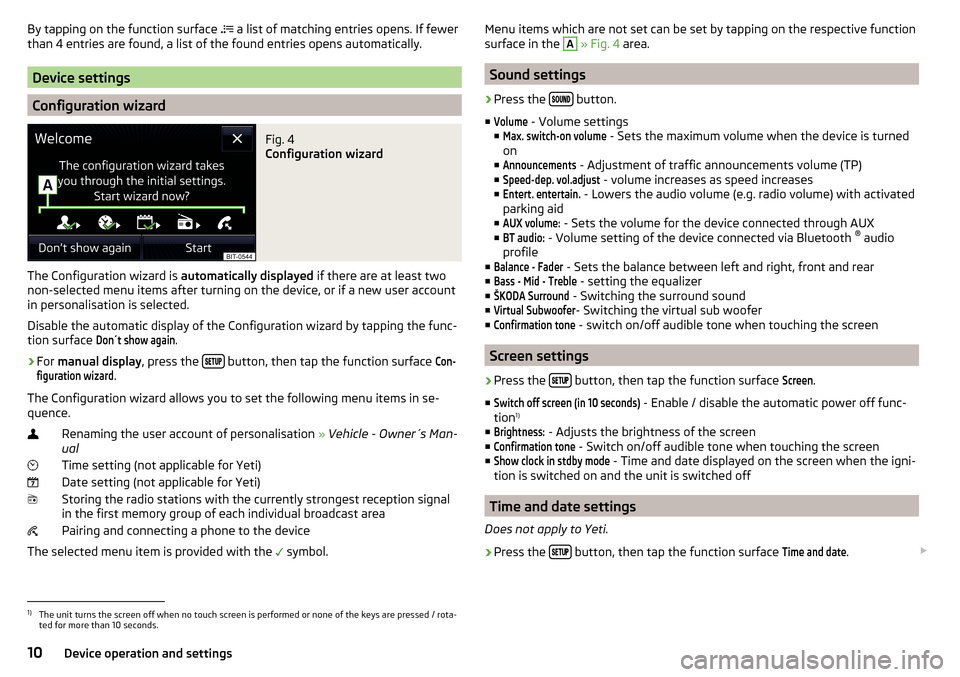
Fig. 4
Configuration wizard
The Configuration wizard is automatically displayed if there are at least two
non-selected menu items after turning on the device, or if a new user account
in personalisation is selected.
Disable the automatic display of the Configuration wizard by tapping the func-
tion surface
Don´t show again
.
›
For manual display , press the button, then tap the function surface
Con-figuration wizard
.
The Configuration wizard allows you to set the following menu items in se-
quence.
Renaming the user account of personalisation » Vehicle - Owner´s Man-
ual
Time setting (not applicable for Yeti) Date setting (not applicable for Yeti) Storing the radio stations with the currently strongest reception signalin the first memory group of each individual broadcast area
Pairing and connecting a phone to the device
The selected menu item is provided with the symbol.
Menu items which are not set can be set by tapping on the respective function
surface in the A » Fig. 4 area.
Sound settings
›
Press the button.
■
Volume
- Volume settings
■
Max. switch-on volume
- Sets the maximum volume when the device is turned
on
■
Announcements
- Adjustment of traffic announcements volume (TP)
■
Speed-dep. vol.adjust
- volume increases as speed increases
■
Entert. entertain.
- Lowers the audio volume (e.g. radio volume) with activated
parking aid
■
AUX volume:
- Sets the volume for the device connected through AUX
■
BT audio:
- Volume setting of the device connected via Bluetooth ®
audio
profile
■
Balance - Fader
- Sets the balance between left and right, front and rear
■
Bass - Mid - Treble
- setting the equalizer
■
ŠKODA Surround
- Switching the surround sound
■
Virtual Subwoofer
- Switching the virtual sub woofer
■
Confirmation tone
- switch on/off audible tone when touching the screen
Screen settings
›
Press the button, then tap the function surface
Screen
.
■
Switch off screen (in 10 seconds)
- Enable / disable the automatic power off func-
tion 1)
■
Brightness:
- Adjusts the brightness of the screen
■
Confirmation tone
- Switch on/off audible tone when touching the screen
■
Show clock in stdby mode
- Time and date displayed on the screen when the igni-
tion is switched on and the unit is switched off
Time and date settings
Does not apply to Yeti.
›
Press the button, then tap the function surface
Time and date
.
1)
The unit turns the screen off when no touch screen is performed or none of the keys are pressed / rota-
ted for more than 10 seconds.
10Device operation and settings
Page 14 of 40
Radio
Operation
Introduction to the subject
The device allows analogue radio reception of FM and AM frequency ranges as
well as DAB digital radio reception.
CAUTION
■ For vehicles with window antennas do not stick foil or metal coated stickers
to the window as this can lead to interference.■
Car parks, tunnels, tall buildings or mountains can interfere with the radio
signal even causing it to fail completely.
Main menu
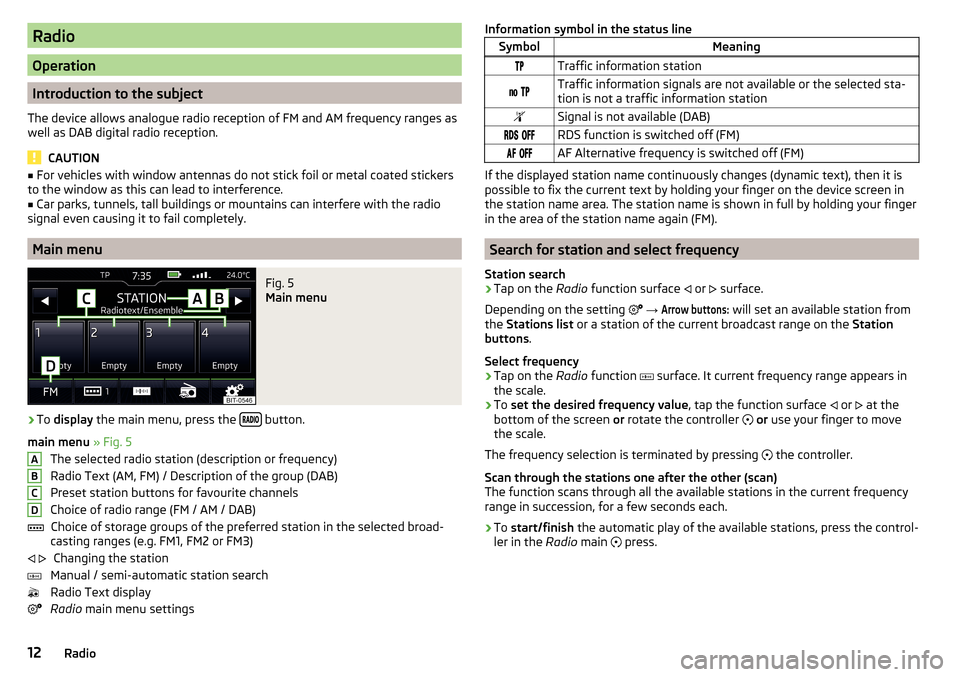
Fig. 5
Main menu
›
To display the main menu, press the button.
main menu » Fig. 5
The selected radio station (description or frequency)
Radio Text (AM, FM) / Description of the group (DAB)
Preset station buttons for favourite channels
Choice of radio range (FM / AM / DAB) Choice of storage groups of the preferred station in the selected broad-
casting ranges (e.g. FM1, FM2 or FM3)
Changing the station
Manual / semi-automatic station search
Radio Text display
Radio main menu settings
ABCD Information symbol in the status lineSymbolMeaningTraffic information station Traffic information signals are not available or the selected sta-
tion is not a traffic information stationSignal is not available (DAB) RDS function is switched off (FM) AF Alternative frequency is switched off (FM)
If the displayed station name continuously changes (dynamic text), then it is
possible to fix the current text by holding your finger on the device screen in
the station name area. The station name is shown in full by holding your finger
in the area of the station name again (FM).
Search for station and select frequency
Station search
›
Tap on the Radio function surface
or
surface.
Depending on the setting
→
Arrow buttons:
will set an available station from
the Stations list or a station of the current broadcast range on the Station
buttons .
Select frequency
›
Tap on the Radio function
surface. It current frequency range appears in
the scale.
›
To set the desired frequency value , tap the function surface
or
at the
bottom of the screen or rotate the controller
or use your finger to move
the scale.
The frequency selection is terminated by pressing the controller.
Scan through the stations one after the other (scan)
The function scans through all the available stations in the current frequency range in succession, for a few seconds each.
›
To start/finish the automatic play of the available stations, press the control-
ler in the Radio main
press.
12Radio
Page 15 of 40
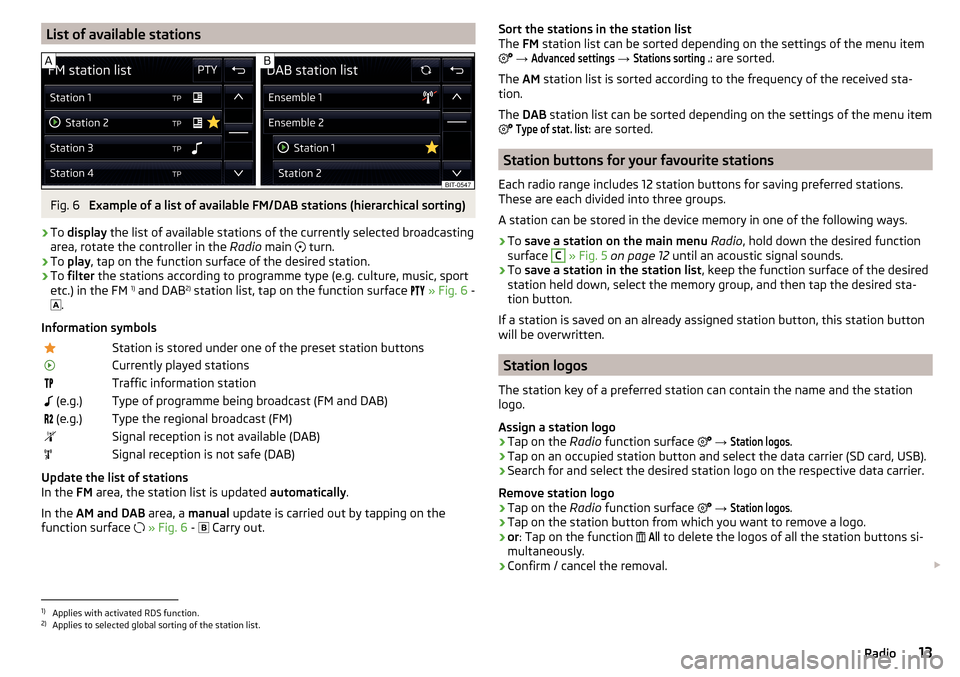
List of available stationsFig. 6
Example of a list of available FM/DAB stations (hierarchical sorting)
›
To display the list of available stations of the currently selected broadcasting
area, rotate the controller in the Radio main
turn.
›
To
play , tap on the function surface of the desired station.
›
To filter the stations according to programme type (e.g. culture, music, sport
etc.) in the FM 1)
and DAB 2)
station list, tap on the function surface
» Fig. 6 -
.
Information symbols
Station is stored under one of the preset station buttonsCurrently played stationsTraffic information station (e.g.)Type of programme being broadcast (FM and DAB) (e.g.)Type the regional broadcast (FM)Signal reception is not available (DAB)Signal reception is not safe (DAB)
Update the list of stations
In the FM area, the station list is updated automatically.
In the AM and DAB area, a manual update is carried out by tapping on the
function surface
» Fig. 6 -
Carry out.
Sort the stations in the station list
The FM station list can be sorted depending on the settings of the menu item
→ Advanced settings
→
Stations sorting .:
are sorted.
The AM station list is sorted according to the frequency of the received sta-
tion.
The DAB station list can be sorted depending on the settings of the menu item
Type of stat. list:
are sorted.
Station buttons for your favourite stations
Each radio range includes 12 station buttons for saving preferred stations.
These are each divided into three groups.
A station can be stored in the device memory in one of the following ways.
›
To save a station on the main menu Radio , hold down the desired function
surface
C
» Fig. 5 on page 12 until an acoustic signal sounds.
›
To save a station in the station list , keep the function surface of the desired
station held down, select the memory group, and then tap the desired sta-
tion button.
If a station is saved on an already assigned station button, this station button will be overwritten.
Station logos
The station key of a preferred station can contain the name and the station
logo.
Assign a station logo
›
Tap on the Radio function surface
→
Station logos
.
›
Tap on an occupied station button and select the data carrier (SD card, USB).
›
Search for and select the desired station logo on the respective data carrier.
Remove station logo
›
Tap on the Radio function surface
→
Station logos
.
›
Tap on the station button from which you want to remove a logo.
›
or : Tap on the function
All
to delete the logos of all the station buttons si-
multaneously.
›
Confirm / cancel the removal.
1)
Applies with activated RDS function.
2)
Applies to selected global sorting of the station list.
13Radio
Page 16 of 40
Note■The following image formats are supported: jpg, gif, png, bmp (we recom-
mend using the png format).■
Maximum resolution 400x240 pixels.
TP Traffic programme
›
To switch on/off the traffic monitoring in the main menu Radio, tap on the
function surface
→
Traffic program (TP)
.
During a traffic announcement, it is possible to cancel the current announce-
ment if necessary by deactivating the traffic monitoring.
Note
■ Should this station not transmit traffic reports or the signal is not available,
then the device automatically searches in the background for another TP sta-
tion.■
During playback in Media main menu or a station in the AM radio range, traf-
fic news is received from the previously selected station in the FM radio range.
Settings
Settings
›
Tap on the Radio main menu function
surface.
■
Scan
- auto-play all available stations in the current frequency band for
around 5 seconds each
■
Arrow buttons:
Arrow buttons: - setting the station change function (function
surfaces
)
■
Presets
- Change between stations stored under the preset buttons
■
Stations
- Change between all available stations of the selected broadcast-
ing range
■
Traffic program (TP)
- Switches traffic programme on/off
■
Radio text
- Switching the text display radio (FM and DAB) on and off
■
Kind of stat. list:
- Sort types of radio stations in the station list (DAB)
■
Global
- alphanumeric station sorting with the filtering ability according to
the transmitted program type
■
Hierarchical
- station sorting according to their assigned parent station
groups (Ensemble) - Tree structure of the list
■Station logos - manual management of station logos
■Delete presets
- Delete the stations stored under preset buttons
■
Advanced settings
- further settings that are different depending on the selec-
ted broadcasting range(FM and DAB)
Advanced Settings (FM)
›
Select the FM band in the Radio main menu and tap on the function surface
→
Advanced settings
.
■
RDS Regional:
- Switch on/off the automatic tracking of related regional sta-
tions
■
Automatic
- auto-selects the station with the best reception at the moment.
If you lose reception the region, the unit will automatically set another
available region.
■
Fixed
- Maintains the selected regional station continuously. When the sig-
nal is lost, another regional station must be set manually.
■
Alternative frequency (AF)
- Search for alternative frequencies of the station cur-
rently being played to on/off
■
Radio Data System (RDS)
- enable/disable RDS function (receiving additional in-
formation from the station) 1)
■
Sort stations:
- Sort types of radio stations in the station list (FM)
■
Group
- Sort by transmitted program type
■
ABC
- alphabetical order according to station name
Advanced Settings (DAB)
›
In the Radio main menu, select the DAB range and tap on the function sur-
face
→
Advanced settings
.
■
DAB traffic messages
- Switch on/off DAB announcements
■
Other DAB messages
- Switch on/off other announcements (e.g., warnings, re-
gional weather, sports reports, financial news)
■
DAB station tracking
- Switch on/off automatic DAB station tracking on another
frequency or in other station groups
■
Aut. DAB - FM switching
- switches on/off auto-switching from DAB to the FM
frequency band if the DAB signal is lost
1)
Only valid for some countries.
14Radio
Page 28 of 40
Vehicle systems
CAR - vehicle setting
Introduction to the subject
In the menu CAR travel data and information displayed on the vehicle and
some vehicle systems can be set.
Description of the individual systems » Vehicle Owner's Manual .
Note
Settings relating to the vehicle systems can only be made when the ignition is
switched on.
Main menu
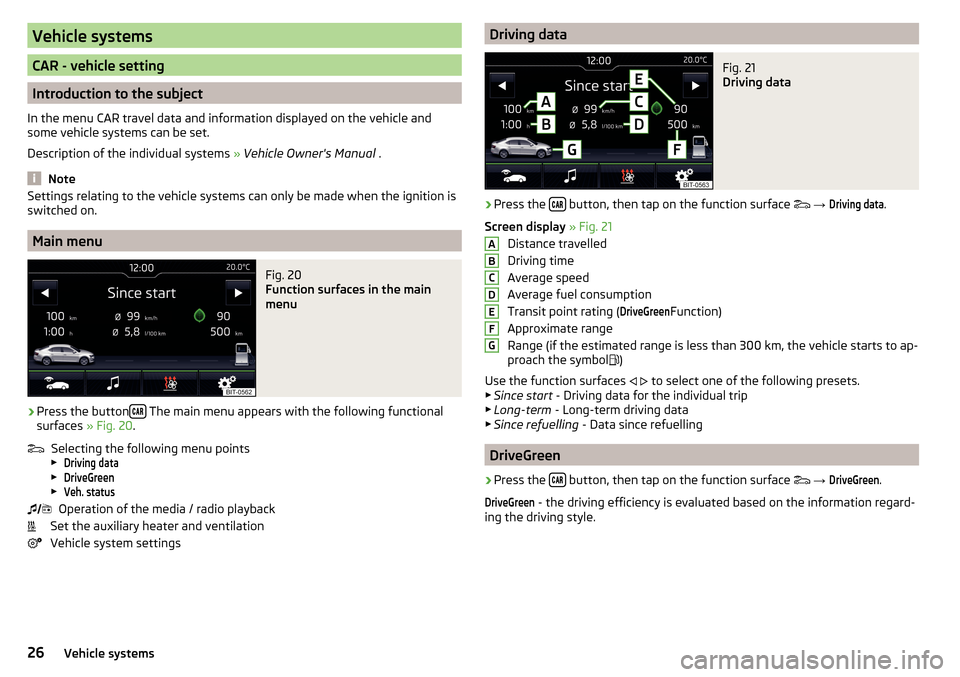
Fig. 20
Function surfaces in the main
menu
›
Press the button The main menu appears with the following functional
surfaces » Fig. 20.
Selecting the following menu points
▶
Driving data
▶
DriveGreen
▶
Veh. status
Operation of the media / radio playback
Set the auxiliary heater and ventilation
Vehicle system settings
Driving dataFig. 21
Driving data
›
Press the button, then tap on the function surface
→
Driving data
.
Screen display » Fig. 21
Distance travelled
Driving time
Average speed
Average fuel consumption
Transit point rating (
DriveGreen
Function)
Approximate range
Range (if the estimated range is less than 300 km, the vehicle starts to ap-
proach the symbol )
Use the function surfaces
to select one of the following presets.
▶ Since start - Driving data for the individual trip
▶ Long-term - Long-term driving data
▶ Since refuelling - Data since refuelling
DriveGreen
›
Press the button, then tap on the function surface
→
DriveGreen
.
DriveGreen
- the driving efficiency is evaluated based on the information regard-
ing the driving style.
ABCDEFG26Vehicle systems
Page 30 of 40
■Front tone setting - Setting the pitch of the beeps for obstacle detection in
front
■Rear volume
- Set the volume level of the beeps for the rear obstacle detec-
tion
■
Rear tone setting
- Setting the pitch of the beeps for the rear obstacle detec-
tion
■
Entert. entertain.
- Lowers the audio volume (e.g. radio volume) with activated
parking aid
Light
›
Press the button, then tap on the function surface
→
Light
.
■ Background lighting - Sets the interior lighting
■
Instrument panel
- Sets the brightness of the instrument/switch lighting
■
Footwell lighting
- Sets the brightness of the footwell lighting
■ Light assistance - Setting of outdoor lighting
■
Switch-on time:
- Sensitivity adjustment of the sensor for the automatic head-
light control ■
Early
- High sensibility
■
Medium
- Medium sensibility
■
Late
- Low sensibility
■
Aut. headlight contr. (rain)
- Activate/deactivate automatic headlight control in
rain
■
Daytime running lights
- Activate/deactivate daytime running lights
■
Comfort turn signal
- Activate/deactivate lane change flashing
■
Travel mode:
- Light setting for the right/left-hand traffic
■
Left
- For left-hand traffic
■
Right
- For right-hand traffic
■ “Coming/leaving home” - Setting the COMING HOME / LEAVING HOME-func-
tion ■
Coming home
- Set the period that the lights remain on after you leave the
vehicle (0 - 30 seconds; 0 = function deactivated)
■
Leaving home
- Sets the period that the lights remain on after you unlock the
vehicle (0 - 30 seconds; 0 = function deactivated)
Windshield wipers
›
Press the button, then tap on the function surface
Tap
→
Windscreenwipers
.
■
Wipers - Adjusts the windscreen wipers
■Automatic wiping (rain)
- Activate/deactivate automatic windscreen wiping in
rain
■
Automatic rear wiper
- Activate/deactivate automatic rear window wiping
Open and close
›
Press the button, then tap on the function surface
→
Opening and clos-ing
.
■ Central locking - Settings for opening and closing of doors
■
Door unlock.:
- Set the door unlocking feature
■
All
- All doors
■
Single door
- Driver's or passenger's door (when unlocking via the sensor in
the passenger door handle)
■
Side
- Doors on the driver or passenger side (when unlocking via the sen-
sor in the passenger door handle)
■
Automatic locking
- Activate/deactivate automatic locking when starting off
Instrument cluster (multifunction display)
›
Press the button, then tap on the function surface
→
Instrument cluster
.
In this menu it is possible to hide/show the appearance of the menu items in
the instrument cluster multifunction display and reset the trip data.
■
Current consumption
- Display of current fuel consumption on/off
■
Average consumption
- Display of average fuel consumption on/off
■
Travelling time
- Display of travelling time on/off
■
Distance
- Display of distance travelled on/off
■
Average speed
- Display of average speed on/off
■
Digital speed display
- Display of current speed on/off
■
Speed warning
- Winter tyres warning on/off
■
Oil temperature
- Oil temperature on/off
■
Reset "Since start" data
- Reset the single-trip memory in the device screen and
in the display of the instrument cluster
■
Reset "Long-term" data
- Reset the long-term memory in the device screen and
in the display of the instrument cluster
Time, date and unit setting
›
Press the button, then tap on the function surface
→
Time and date
.
›
Press the button, then tap on the function surface
→
Units
.
28Vehicle systems