driver seat adjustment SKODA OCTAVIA TOUR 2009 1.G / (1U) Owner's Manual
[x] Cancel search | Manufacturer: SKODA, Model Year: 2009, Model line: OCTAVIA TOUR, Model: SKODA OCTAVIA TOUR 2009 1.G / (1U)Pages: 224, PDF Size: 13.53 MB
Page 10 of 224
Cockpit
9
Using the system
Safety
Driving Tips
General Maintenance
Breakdown assistance
Technical Data
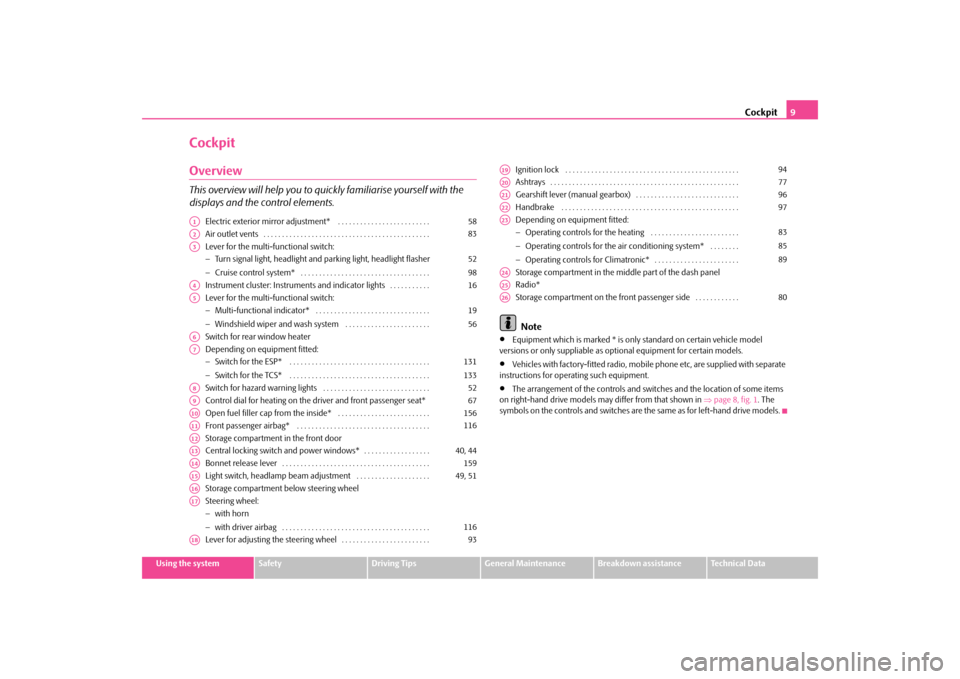
CockpitOverviewThis overview will help you to quickly familiarise yourself with the displays and the control elements.
Electric exterior mirror adjustment* . . . . . . . . . . . . . . . . . . . . . . . . . Air outlet vents . . . . . . . . . . . . . . . . . . . . . . . . . . . . . . . . . . . . . . . . . . . . . Lever for the multi-functional switch: − Turn signal light, headlight and parking light, headlight flasher − Cruise control system* . . . . . . . . . . . . . . . . . . . . . . . . . . . . . . . . . . . Instrument cluster: Instrum
ents and indicator lights . . . . . . . . . . .
Lever for the multi-functional switch: − Multi-functional indicator* . . . . . . . . . . . . . . . . . . . . . . . . . . . . . . . − Windshield wiper and wash system . . . . . . . . . . . . . . . . . . . . . . . Switch for rear window heater Depending on equipment fitted: − Switch for the ESP* . . . . . . . . . . . . . . . . . . . . . . . . . . . . . . . . . . . . . . − Switch for the TCS* . . . . . . . . . . . . . . . . . . . . . . . . . . . . . . . . . . . . . . Switch for hazard warning lights . . . . . . . . . . . . . . . . . . . . . . . . . . . . . Control dial for heating on the driver and front passenger seat* Open fuel filler cap from the inside* . . . . . . . . . . . . . . . . . . . . . . . . . Front passenger airbag* . . . . . . . . . . . . . . . . . . . . . . . . . . . . . . . . . . . . Storage compartment in the front door Central locking switch and power windows* . . . . . . . . . . . . . . . . . . Bonnet release lever . . . . . . . . . . . . . . . . . . . . . . . . . . . . . . . . . . . . . . . . Light switch, headlamp beam adjustment . . . . . . . . . . . . . . . . . . . . Storage compartment below steering wheelSteering wheel: − with horn − with driver airbag . . . . . . . . . . . . . . . . . . . . . . . . . . . . . . . . . . . . . . . . Lever for adjusting the steering wheel . . . . . . . . . . . . . . . . . . . . . . . .
Ignition lock . . . . . . . . . . . . . . . . . . . . . . . . . . . . . . . . . . . . . . . . . . . . . . . Ashtrays . . . . . . . . . . . . . . . . . . . . . . . . . . . . . . . . . . . . . . . . . . . . . . . . . . . Gearshift lever (manual gearbox) . . . . . . . . . . . . . . . . . . . . . . . . . . . . Handbrake . . . . . . . . . . . . . . . . . . . . . . . . . . . . . . . . . . . . . . . . . . . . . . . . Depending on equipment fitted: − Operating controls for the heating . . . . . . . . . . . . . . . . . . . . . . . . − Operating controls for the air conditioning system* . . . . . . . . − Operating controls for Climatronic* . . . . . . . . . . . . . . . . . . . . . . . Storage compartment in the midd
le part of the dash panel
Radio* Storage compartment on the front passenger side . . . . . . . . . . . . Note
•
Equipment which is marked * is only standard on certain vehicle model
versions or only suppliable as op
tional equipment for certain models.
•
Vehicles with factory-fitted radio, mobi
le phone etc, are supplied with separate
instructions for operating such equipment.•
The arrangement of the controls and swit
ches and the location of some items
on right-hand drive models may differ from that shown in
⇒page 8, fig. 1
. The
symbols on the controls and switches are the same as for left-hand drive models.
A1
58
A2
83
A3
52 98
A4
16
A5
1956
A6A7
131133
A8
52
A9
67
A10
156
A11
116
A12A13
40, 44
A14
159
A15
49, 51
A16A17
116
A18
93
A19
94
A20
77
A21
96
A22
97
A23
838589
A24A25A26
80
s2g8.b.book Page 9 Tuesday, April 7, 2009 8:53 AM
Page 52 of 224
Lights and Visibility
51
Using the system
Safety
Driving Tips
General Maintenance
Breakdown assistance
Technical Data
Instrument lighting*
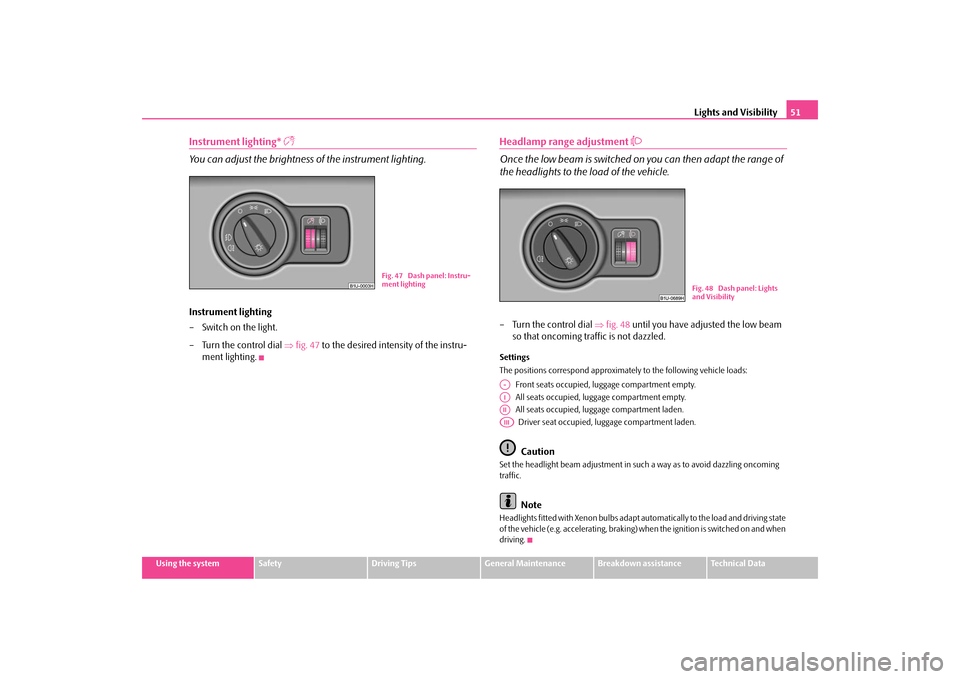
You can adjust the brightness of the instrument lighting.Instrument lighting – Switch on the light. – Turn the control dial
⇒
fig. 47
to the desired intensity of the instru-
ment lighting.
Headlamp range adjustment
Once the low beam is switched on
you can then adapt the range of
the headlights to the
load of the vehicle.
– Turn the control dial
⇒
fig. 48
until you have adjusted the low beam
so that oncoming traffic is not dazzled.
Settings The positions correspond approximat
ely to the following vehicle loads:
Front seats occupied, luggage compartment empty. All seats occupied, lugga
ge compartment empty.
All seats occupied, luggage compartment laden.Driver seat occupied, luggage compartment laden.Caution
Set the headlight beam adjustment in su
ch a way as to avoid dazzling oncoming
traffic.
Note
Headlights fitted with Xenon bulbs adapt au
tomatically to the load and driving state
of the vehicle (e.g. accelerating, braking) when the ignition is switched on and when driving.
Fig. 47 Dash panel: Instru- ment lighting
Fig. 48 Dash panel: Lights and Visibility
A-AIAIIAIII
s2g8.b.book Page 51 Tuesday, April 7, 2009 8:53 AM
Page 61 of 224
Seats and Storage
60
Seats and StorageFront seatsBasic informationThe front seats have a wide range of different settings and can thus be matched to the physical characteristics of the driver and front passenger. Correct adjustment of the seats is particularly important for:•
safely and quickly reaching the controls;
•
a relaxed, fatigue-free body position;
•
achieving the maximum protection offere
d by the seat belts and the airbag
system.
WARNING
•
Never transport more occupants than the maximum seating in the
vehicle.•
Each occupant must correctly fasten
the seat belt belonging to the seat.
Children must be fastened
⇒page 123, “Transporting children safely” with
a suitable restraint system.•
The front seats and the head restraints must always be adjusted to match
the body size of the seat occupant as well as the seat belts must always be correctly fastened in order to provide an optimal protection for you and your occupants.•
Always keep your feet in the footwel
l when the vehicle is being driven -
never place your feet on the instrument panel, out of the window or on the surfaces of the seats. This is particularly important for the front seat passenger. You will be exposed to increased risk of injury if it becomes necessary to apply the brake or in the event of an accident. If an airbag is deployed, you may suffer fatal injuries
when adopting an incorrect seated
position!•
It is important for the driver and front passenger to maintain a distance
of at least 25 cm from the steering wheel
or dash panel. Not maintaining this
minimum distance will mean that the airbag system will not be able to prop- erly protect you - hazard! The front
seats and the head restraints must
always also be correctly adjusted to match the body size of the occupant.•
Ensure that there are no objects in
the footwell as any objects may get
behind the pedals during a driving or
braking manoeuvre. You would then
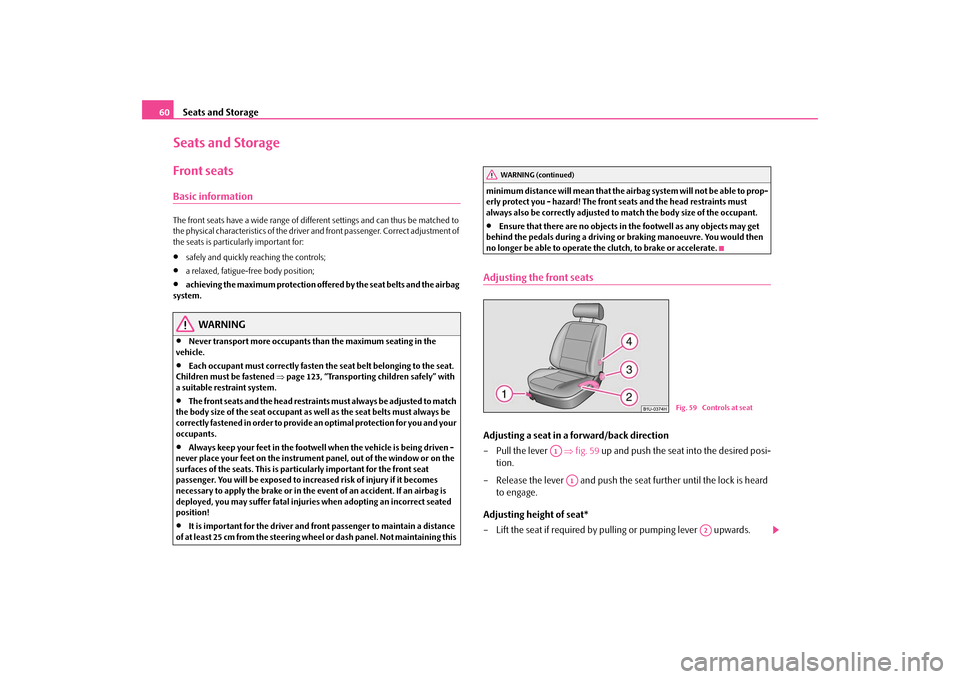
no longer be able to operate the clutch, to brake or accelerate.Adjusting the front seatsAdjusting a seat in a forward/back direction – Pull the lever
⇒
fig. 59
up and push the seat into the desired posi-
tion.
– Release the lever and push the seat further until the lock is heard
to engage.
Adjusting height of seat* – Lift the seat if required by pulling or pumping lever upwards.
WARNING (continued)
Fig. 59 Controls at seat
A1
A1
A2
s2g8.b.book Page 60 Tuesday, April 7, 2009 8:53 AM
Page 63 of 224
Seats and Storage
62
•
In view of the fact that the seats can
also be adjusted when the ignition is
switched off (even when ignition key withdrawn), you should never leave children unattended in the vehicle.•
The seat backrests must not be angl
ed too far back when driving other-
wise this will affect proper operation of the seat belts and of the airbag system - risk of injury!
Note
If the movement of the seat is inadverten
tly interrupted during an adjustment, once
again press the switch in the appropriate
direction and continue with the adjust-
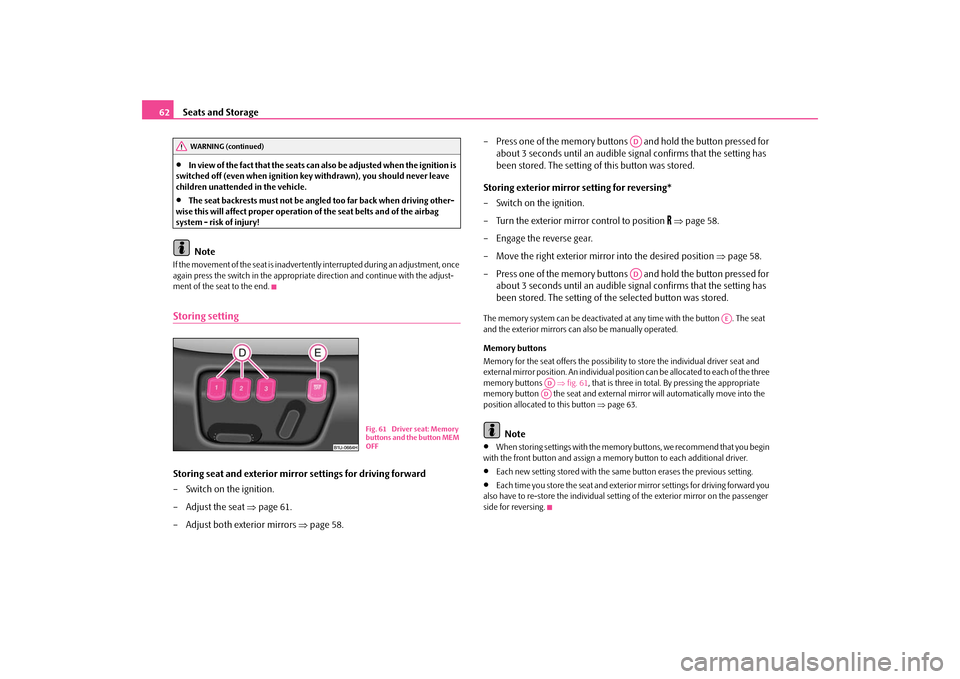
ment of the seat to the end.Storing settingStoring seat and exterior mirror settings for driving forward – Switch on the ignition. – Adjust the seat
⇒
page 61.
– Adjust both exterior mirrors
⇒
page 58.
– Press one of the memory buttons and hold the button pressed for
about 3 seconds until an audible sign
al confirms that the setting has
been stored. The setting of this button was stored.
Storing exterior mirror setting for reversing* – Switch on the ignition. – Turn the exterior mirror control to position
⇒
page 58.
– Engage the reverse gear.– Move the right exterior mirror into the desired position
⇒
page 58.
– Press one of the memory buttons and hold the button pressed for
about 3 seconds until an audible sign
al confirms that the setting has
been stored. The setting of the selected button was stored.
The memory system can be
deactivated at any time with the button . The seat
and the exterior mirrors can also be manually operated. Memory buttons Memory for the seat offers the possibility to store the individual driver seat and external mirror position. An individual position can be allocated to each of the three memory buttons
⇒fig. 61
, that is three in total. By pressing the appropriate
memory button the seat and external mi
rror will automatica
lly move into the
position allocated to this button
⇒page 63.
Note
•
When storing settings with the memory buttons, we recommend that you begin
with the front button and assign a memory button to each additional driver.•
Each new setting stored with the same
button erases the previous setting.
•
Each time you store the seat and exterior mirror settings for driving forward you
also have to re-store the individual settin
g of the exterior mirror on the passenger
side for reversing.
WARNING (continued)
Fig. 61 Driver seat: Memory buttons and the button MEM OFF
ADAD
AE
ADAD
s2g8.b.book Page 62 Tuesday, April 7, 2009 8:53 AM
Page 105 of 224
Passive Safety
104
•
Ensure that the lighting and the turn signal system are functioning properly.
•
Inspect the tyre inflation pressure.
•
Ensure that all the windows offer a good visibility to the outside.
•
Safely attach the items of luggage
⇒page 68, “Loading the luggage compart-
ment”.•
Ensure that no objects can obstruct the pedal.
•
Adjust the mirror, the front seat and the head restraint to match your body size.
•
Point out to your occupants that the head restraints must be adjusted to match
their body size.•
Protect the children in suitable child se
ats with correctly fastened seat belts
⇒ page 123, “Transporting children safely”.•
Adopt the correct seated position
⇒page 104, “Correct seated position”. Also
inform your occupants to adop
t the correct seated position.
•
Fasten the seat belt correctly. Also inform your occupants to properly fasten the
seat belts
⇒page 110, “How are seat belts correctly fastened?”.
What influences the driving safety? The driving safety is primarily dete
rmined by the style of driving and
the personal behaviour of all the occupants.The driver is fully responsible for himself and his occupants. If your driving safety is effected, you place yourself and the oncomi
ng traffic at risk. Please refer to the
following guidelines.•
Do not get distracted from concentrating on the traffic situation, e.g. by your
occupants or mobile phone calls.•
Never drive when your driving ability is impaired, e.g. through medication,
alcohol, drugs.•
Keep to the traffic regulations and the permissible speed limit.
•
Adjust the driving speed at all times to the road condition as well as to the traffic
and weather conditions.•
Take regular breaks on long journe
ys - at the latest every two hours.
Correct seated positionCorrect seated position for the driver Correct seated position for the dr
iver is important for safe and
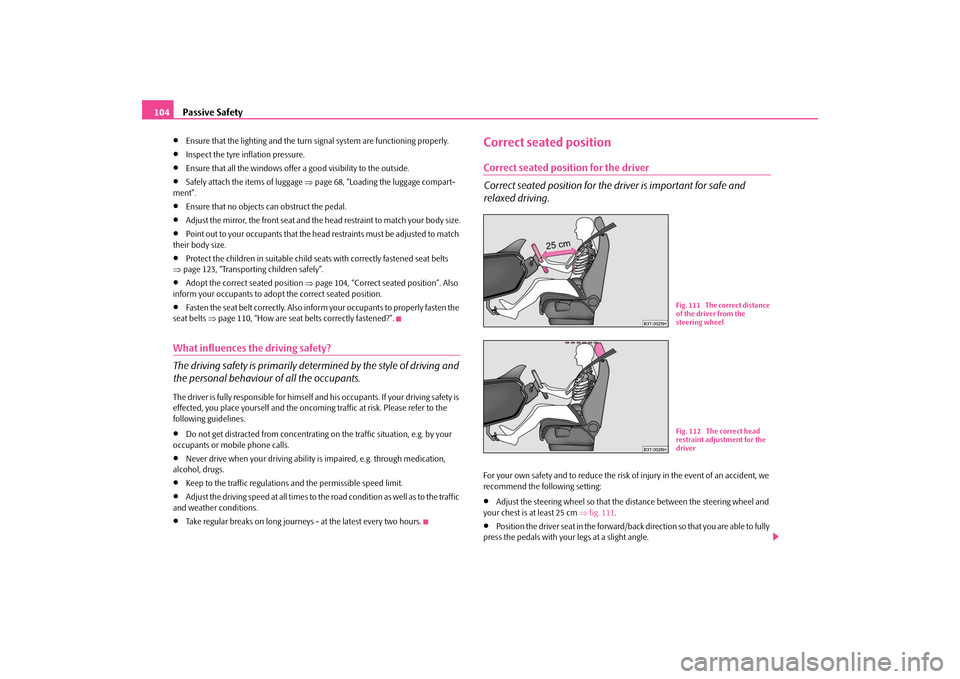
relaxed driving.For your own safety and to reduce the risk of injury in the event of an accident, we recommend the following setting:•
Adjust the steering wheel so that the distance between the steering wheel and
your chest is at least 25 cm
⇒fig. 111
.
•
Position the driver seat in the forward/back direction so that you are able to fully
press the pedals with your legs at a slight angle.
Fig. 111 The correct distance of the driver from the steering wheelFig. 112 The correct head restraint adjustment for the driver
s2g8.b.book Page 104 Tuesday, April 7, 2009 8:53 AM
Page 106 of 224
Passive Safety
105
Using the system
Safety
Driving Tips
General Maintenance
Breakdown assistance
Technical Data
•
Adjust the seat backrest so that you are able to reach the highest point of the
steering wheel with your arms at a slight angle.•
Adjust the head restraint so that the top edge of the head restraint is at the same
level as the upper part of your head
⇒page 104, fig. 112
.
•
Fasten the seat belt correctly
⇒page 110, “How are seat belts correctly
fastened?”. Manual driver seat adjustment
⇒page 60, “Adjusting the front seats”.
Electrical driver seat adjustment
⇒page 61, “Adjusting front seats electrically*”.
WARNING
•
The front seats and the head restraints must always be adjusted to match
the body size of the seat occupant as well as the seat belts must always be correctly fastened in order to provide an optimal protection for you and your occupants.•
The driver must maintain a distance of at least 25 cm to the steering
wheel
⇒page 104, fig. 111
. Not maintaining this minimum distance will
mean that the airbag system will not be able to properly protect you - hazard!•
When driving, hold the steering whee
l with both hands firmly on the
outer edge in the 9 o'clock and 3 o'clock position. Never hold the steering wheel firmly in the 12 o'clock position or in another way (e.g. in the middle of the steering wheel or at the inner
steering wheel edge). In such cases,
injuries to the arms, the hands and the head can occur when the driver airbag is deployed.•
The seat backrests must not be angled too far back when driving other-
wise this will affect proper operation of the seat belts and of the airbag system - risk of injury!•
Ensure that there are no objects in the footwell as any objects may get
behind the pedals during a driving or
braking manoeuvre.
You would then
no longer be able to operate the
clutch, to brake or accelerate.
Correct seated position for the front passenger The front passenger must maintain a distance of at least 25°cm from the dash panel so that the combination of the airbag and the seat belt offers the greatest possible sa
fety when an airbag is deployed.
For the safety of the front passenger and to
reduce the risk of injury in the event of
an accident, we recommend the following setting:•
Adjust the front passenger seat as far as possible to the rear.
•
Adjust the head restraint so that the top edge of the head restraint is at the same
level as the upper part of your head
⇒page 104, fig. 112
.
•
Fasten the seat belt correctly
⇒page 110, “How are seat belts correctly
fastened?”. In exceptional cases the front pass
enger airbag can be deactivated
⇒page 120,
“Deactivating an airbag”. Manual front passenger adjustment
⇒page 60, “Adjusting the front seats”.
Electrical front passenger seat adjustment
⇒page 61, “Adjusting front seats electri-
cally*”.
WARNING
•
The front seats and the head restraints must always be adjusted to match
the body size of the seat occupant as well as the seat belts must always be correctly fastened in order to provide an optimal protection for you and your occupants.•
The front passenger must maintain a distance of at least 25 cm to the
dash panel. Not maintaining this mi
nimum distance will mean that the
airbag system will not be able to properly protect you - hazard!•
Always keep your feet in
the footwell when the vehicle is being driven -
never place your feet on the instrument panel, out of the window or on the surfaces of the seats. You will be exposed to increased risk of injury if it becomes necessary to apply the brake or in the event of an accident. If an airbag is deployed, you may suffer fata
l injuries when adopting an incorrect
seated position!
s2g8.b.book Page 105 Tuesday, April 7, 2009 8:53 AM
Page 114 of 224
Seat belts
113
Using the system
Safety
Driving Tips
General Maintenance
Breakdown assistance
Technical Data
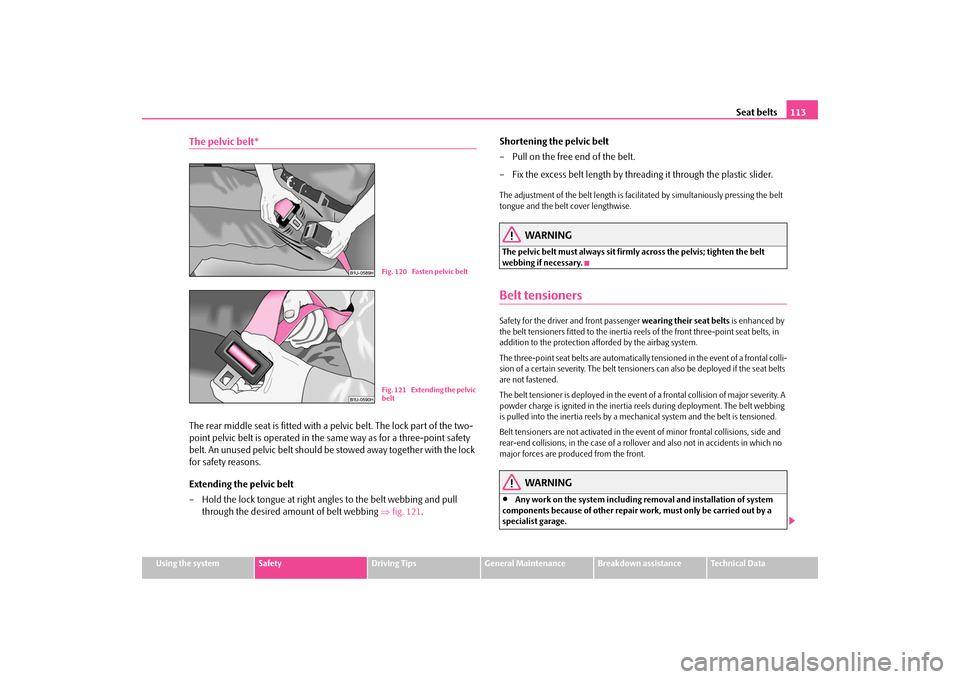
The pelvic belt*The rear middle seat is fitted with a pelvic belt. The lock part of the two- point pelvic belt is operated in the same way as for a three-point safety belt. An unused pelvic belt should be stowed away together with the lock for safety reasons. Extending the pelvic belt – Hold the lock tongue at right an
gles to the belt webbing and pull
through the desired amo
unt of belt webbing
⇒
fig. 121
.
Shortening the pelvic belt – Pull on the free end of the belt. – Fix the excess belt length by threading it through the plastic slider.The adjustment of the belt length is facili
tated by simultaniously pressing the belt
tongue and the belt
cover lengthwise.
WARNING
The pelvic belt must always sit firmly across the pelvis; tighten the belt webbing if necessary.Belt tensionersSafety for the driver and front passenger
wearing their seat belts
is enhanced by
the belt tensioners fitted to the inertia reels of the front three-point seat belts, in addition to the protection afforded by the airbag system. The three-point seat belts are automatically tensioned in the event of a frontal colli- sion of a certain severity. The belt tensioners can also be deployed if the seat belts are not fastened. The belt tensioner is deployed in the event of a frontal collision of major severity. A powder charge is ignited in the inertia
reels during deployment. The belt webbing
is pulled into the inertia reels by a mech
anical system and the belt is tensioned.
Belt tensioners are not activated in the ev
ent of minor frontal collisions, side and
rear-end collisions, in the case of a rollover and also not in accidents in which no major forces are produced from the front.
WARNING
•
Any work on the system including removal and installation of system
components because of other repair work, must only be carried out by a specialist garage.
Fig. 120 Fasten pelvic beltFig. 121 Extending the pelvic belt
s2g8.b.book Page 113 Tuesday, April 7, 2009 8:53 AM
Page 216 of 224
Index
215
Using the system
Safety
Driving Tips
General Maintenance
Breakdown assistance
Technical Data
Index AAbroad . . . . . . . . . . . . . . . . . . . . . . . . . . . . . . . . . . . . . 142 ABS . . . . . . . . . . . . . . . . . . . . . . . . . . . . . . . . . . . . . . . . . 135
Warning light . . . . . . . . . . . . . . . . . . . . . . . . . . . . . 32
Accessories . . . . . . . . . . . . . . . . . . . . . . . . . . . . . . . . . 179Adjusting seats . . . . . . . . . . . . . . . . . . . . . . . . . . . 60, 104
electrically . . . . . . . . . . . . . . . . . . . . . . . . . . . . . . . . 61
Adjusting the steering wheel . . . . . . . . . . . . . . . . . . . 93 Air conditioning system . . . . . . . . . . . . . . . . . . . . . . . 85
Recirculated air mode . . . . . . . . . . . . . . . . . . . . . 88
Airbag . . . . . . . . . . . . . . . . . . . . . . . . . . . . . . . . . . . . . . 115
Deployment . . . . . . . . . . . . . . . . . . . . . . . . . . . . . 116Front airbag . . . . . . . . . . . . . . . . . . . . . . . . . . . . . 116Side airbag . . . . . . . . . . . . . . . . . . . . . . . . . . . . . . 119Warning light . . . . . . . . . . . . . . . . . . . . . . . . . . . . . 30
Airbag system . . . . . . . . . . . . . . . . . . . . . . . . . . . . . . . 115
Warning light . . . . . . . . . . . . . . . . . . . . . . . . . . . . . 30
Airbags . . . . . . . . . . . . . . . . . . . . . . . . . . . . . . . . . . . . . 115 Alarm . . . . . . . . . . . . . . . . . . . . . . . . . . . . . . . . . . . . . . . . 43Alternator
Warning light . . . . . . . . . . . . . . . . . . . . . . . . . . . . . 34
Antilock brake system . . . . . . . . . . . . . . . . . . . . . . . . 135 Antilock brake system (ABS)
Warning light . . . . . . . . . . . . . . . . . . . . . . . . . . . . . 32
Anti-theft alarm system . . . . . . . . . . . . . . . . . . . . . . . 43 Ashtray . . . . . . . . . . . . . . . . . . . . . . . . . . . . . . . . . . . . . . 77 Auto Check Control . . . . . . . . . . . . . . . . . . . . . . . . . . . 25
Auto Computer . . . . . . . . . . . . . . . . . . . . . . . . . . . . . . 19 Automatic seat adjustment . . . . . . . . . . . . . . . . . . . . 62 Automatic vehicle wash systems . . . . . . . . . . . . . . 148Automatic wiper/washer system . . . . . . . . . . . . . . . 56 Avoiding damage to your vehicle . . . . . . . . . . . . . 143BBattery . . . . . . . . . . . . . . . . . . . . . . . . . . . . . . . . . . 34, 168
change . . . . . . . . . . . . . . . . . . . . . . . . . . . . . . . . . . 171 Charge . . . . . . . . . . . . . . . . . . . . . . . . . . . . . . . . . . 170 Inspecting the electrolyte level . . . . . . . . . . . . 170Operation in winter . . . . . . . . . . . . . . . . . . . . . . 170
Before setting off . . . . . . . . . . . . . . . . . . . . . . . . . . . . 103 Belt
Warning light . . . . . . . . . . . . . . . . . . . . . . . . . . . . . 34
Belt tensioners . . . . . . . . . . . . . . . . . . . . . . . . . . . . . . 113 Belts . . . . . . . . . . . . . . . . . . . . . . . . . . . . . . . . . . . . . . . . 108 Bonnet . . . . . . . . . . . . . . . . . . . . . . . . . . . . . . . . . . 14, 159Boot lid . . . . . . . . . . . . . . . . . . . . . . . . . . . . . . . . . . . . . . 41 Brake
Handbrake . . . . . . . . . . . . . . . . . . . . . . . . . . . . . . . 97Warning light . . . . . . . . . . . . . . . . . . . . . . . . . . . . . 34
Brake Assist . . . . . . . . . . . . . . . . . . . . . . . . . . . . . . . . . 135Brake booster . . . . . . . . . . . . . . . . . . . . . . . . . . . . . . . 134 Brake fluid . . . . . . . . . . . . . . . . . . . . . . . . . . . . . . . . . . 167 Brake pads
Warning light . . . . . . . . . . . . . . . . . . . . . . . . . . . . . 31
Brakes . . . . . . . . . . . . . . . . . . . . . . . . . . . . . . . . . . . . . . 133 Bulbs
Warning light . . . . . . . . . . . . . . . . . . . . . . . . . . . . . 29
Button for the central locking system . . . . . . . . . . . 40Buttons on the driver's door
Power windows . . . . . . . . . . . . . . . . . . . . . . . . . . . 44
CCar state . . . . . . . . . . . . . . . . . . . . . . . . . . . . . . . . . . . . . 25 Catalytic converter . . . . . . . . . . . . . . . . . . . . . . . . . . 138 Central locking system . . . . . . . . . . . . . . . . . . . . . . . . 38
lock . . . . . . . . . . . . . . . . . . . . . . . . . . . . . . . . . . . . . . 39unlock . . . . . . . . . . . . . . . . . . . . . . . . . . . . . . . . . . . 39
Changing a wheel . . . . . . . . . . . . . . . . . . . . . . . . . . . 183Changing bulbs . . . . . . . . . . . . . . . . . . . . . . . . . . . . . 195 Changing the engine oil . . . . . . . . . . . . . . . . . . . . . . 164 Changing wheels around . . . . . . . . . . . . . . . . . . . . . 175Charging the battery . . . . . . . . . . . . . . . . . . . . . . . . . 170
Warning light . . . . . . . . . . . . . . . . . . . . . . . . . . . . . 34
Check engine oil level . . . . . . . . . . . . . . . . . . . . . . . . 163 Child safety . . . . . . . . . . . . . . . . . . . . . . . . . . . . . . . . . 123
Side airbag . . . . . . . . . . . . . . . . . . . . . . . . . . . . . . 125
Child safety lock . . . . . . . . . . . . . . . . . . . . . . . . . . . . . . 37 Child safety seat
on the front passenger seat . . . . . . . . . . . . . . . 124Safety information . . . . . . . . . . . . . . . . . . . . . . . 123
s2g8.b.book Page 215 Tuesday, April 7, 2009 8:53 AM