engine oil SKODA OCTAVIA TOUR 2010 2.G / (1Z) User Guide
[x] Cancel search | Manufacturer: SKODA, Model Year: 2010, Model line: OCTAVIA TOUR, Model: SKODA OCTAVIA TOUR 2010 2.G / (1Z)Pages: 199, PDF Size: 12.09 MB
Page 124 of 199

Driving and the Environment123
Using the system
Safety
Driving Tips
General Maintenance
Breakdown assistance
Technical Data
Solvent-free protection of the vehicle for transportation from the production plant
to the customer.
The use of solvent-free adhesives.
No CFCs used in the production process.
Without use of mercury.
Use of water-soluble paints.
Trade-in and recycling of old cars
Škoda Auto meets the requirements of the brand and its products regarding environ-
ment and resource protection. All new Škoda vehicles can be utilized up to 95 % and
always
5) be returned. In a lot of countries su fficient trade-in networks have been
created, where you can trade-in your vehicle. After you trade-in your vehicle, you will
receive a confirmation stating the recycling in accordance with environmental regula-
tions.
Vehicles with special built-on types
Technical documents regarding changes carried out on the vehicle must be kept by the
vehicle user, in order to hand over later to the old car user. This ensures the recycling
in accordance with en vironmental regulations.Note
Detailed information about the trade-in and recycling of old cars is available from a
Škoda Service Partner.Motoring abroadGeneral
Other circumstances may exist abroad.It is possible, in certain countries, that th e Škoda Service Partner network is limited or
has not been established yet. This is the reason why obtaining certain spare parts may
be somewhat complicated and specialist garage personnel may only be able to make
limited repairs. Škoda Auto in the Czech Re public and relevant importers are happy to provide information about technical aspect
s of the vehicle, required maintenance
work and possibilities for getting repairs done.
Unleaded petrolA vehicle fitted with a petrol engine must always be refuelled with unleaded petrol
page 119. The automobile associations can provide you with information regarding
the locations of filling stations which offer unleaded petrol.HeadlightThe low beam of your headligh ts is set asymmetrically. It illuminates the side of the
road on which you are driving to a greater ex tent. If you drive abroad on the other side
of the road, you will da zzle oncoming traffic.
In order to prevent the dazzling of oncoming tr affic, it is necessary that an adjustment
of the headlights is carried out by your auth orised Škoda Service Partner.Avoiding damage to your vehicleWhen driving on poor roads and lanes or when driving over kerbstones, steep ramps
etc., you must pay particular attention to ensuring that any low-slung parts of the
vehicle, such as spoiler and exhaust, do not touch the ground and get damaged.
This particularly applies to models with a lowered suspension (sport suspension) and
also when your vehicle is fully laden.
5)Subject to fulfilment of the national legal requirements.
s2bs.2.book Page 123 Monday, September 27, 2010 9:53 AM
Page 134 of 199

Taking care of your vehicle and cleaning the vehicle133
Using the system
Safety
Driving Tips
General Maintenance
Breakdown assistance
Technical Data
Underbody protectionThe underside of your vehicle is protected for life against chemical and mechanical
influences.
One cannot, however, completely rule out damage to the protective layer when
driving so we recommend that you inspect the protective layer on the underside of
your vehicle and on the chassis at certain intervals - this is best done at the beginning
and end of the winter - and to touch up any damaged areas.
The authorised Škoda Service Partners have suitable spray products available as well
as the necessary equipment and are familiar with the instructions for use. It is therefore
best to have such touch-up work or additional corrosion protection measures carried
out by an authorised Škoda Service Partner.
WARNING
Never use additional underbody protection or corrosion-protection agents for
the exhaust pipes, catalytic converters or heat shields. When the engine
reaches its operating temperature, these su bstances might ignite - risk of fire!Protection of hollow spacesAll the cavities of your vehicle which are at risk from corrosion are protected for life by
a layer of protective wax applied in the factory.
This wax protection does not require to be inspected or re-treated. Please remove any
small amount of wax which flows out of the cavities at high temperatures with a plastic
scraper and clean the spot using petroleum cleaner.
WARNING
Safety and environmental pr otection regulations should observed when using
petroleum cleaner to remove wax - a risk of fire!Engine compartmentGood corrosion protection is very importan t, particularly in winter when one often
drives over its salt-strewn roads. One should therefore clean the whole engine compartment before and after the salt spreading period and treat with preservative in
order to prevent the salt from being destructive.
The authorised Škoda Service Partners have the cleaning agents and preservatives
recommended by Škoda and al
so the required equipment.
WARNING
It is necessary to observe the guidelines given in the chapter before working
on the engine compartment page 140, “Working in the engine compart-
ment”.
Let the engine cool down before cleaning the engine compartment.Caution
Engine cleaning may be only be un dertaken when the ignition is off.
It is recommended to cover the generator before washing the engine compart-
ment.For the sake of the environment
The dirty water produced by washing the engine has washed away petrol, and residues
of grease and oil and should therefore be cleaned by an oil separator. This is why
engine washing should only be undertaken in a specialist garage or at a fuelling station
(when these are fitted with the required equipment).Care of the interior of vehiclePlastic parts, artificial leather and clothsYou can clean plastic parts and artificial leather with a moist cloth. You should only
treat such parts with special solvent-free plastic cleaning and care products it does
prove to be adequate.
Upholstery cloth and cloth trim on the do ors, luggage compartment cover, headliner
etc. are best treated with special cl eaning products, using if necessary a dry foam and
a soft sponge or brush.
s2bs.2.book Page 133 Monday, September 27, 2010 9:53 AM
Page 141 of 199

Inspecting and replenishing
140
Working in the engine compartment
Particular care is required when carrying out any work in the engine
compartment!There is a risk of injuries, scalding, acci dents and fire when working in the engine
compartment, e.g. inspecting and replenishing oil and other fluids. For this
reason, it is essential to comply with the warning instructions stated below and
with the general applicable rules of safe ty. The engine compartment of your car
is a hazardous area .
WARNING
Never open the bonnet if you see that steam or coolant is flowing out of the
engine compartment - risk of scalding! Wait long enough until the steam or
coolant has stopped escaping.
Switch off the engine and pull out the ignition key.
Apply the handbrake firmly.
Move the gear lever into the Neutral position.
Allow the engine to cool down.
Keep children clear of the engine compartment.
Never spill oil and other fluids over the hot engine. Such fluids (e.g. the anti-
freeze contained in the coolant) may ignite!
Avoid short circuits in the electrical system - particularly on the battery.
Never place your hand into the radiator fan as long as the engine is still
warm. The fan might suddenly start running!
Never open the cap of the coolant expans ion bottle as long as the engine is
still warm. The cooling system is pressurized!
Cover over the cap of the coolant expansion reservoir with a large cloth
when opening it as protection for your face, hands and arms from hot steam or
hot coolant.
Do not let objects, such as e.g. cleaning cloth or tools lie in the engine
compartment.
If you wish to work under the vehicl e, you must secure the vehicle from
rolling away and support it with suitable supporting blocks; the lifting jack* is
not sufficient for this - risk of injury!
In cases where it be necessary to carry out inspection work when the engine
is running there is an additional risk fr om rotating parts (e.g. the V-ribbed belt,
alternator, radiator fan) and from the high-voltage ignition system. Please
observe in addition the following:
Never touch the electrical cabl es of the ignition system.
Absolutely avoid any jewellery, loose it ems of clothing or long hair from
getting into the rotating parts of the engine - Hazard! Therefore remove any
jewellery beforehand, tie up your hair and wear tight fitting clothing.
Please also comply with the warnin g instructions stated below when
carrying out any essential work on the fu el system or on the electrical system:
Always separate the car battery from the electrical system.
Do not smoke.
Never carry out any work close to naked flames.
Always keep a working fire extinguisher at hand.Caution
When replenishing fluids in the engine, always ensure that the fluids are on no account
mixed up. This may result in major oper ating problems and also vehicle damage!
WARNING (continued)
s2bs.2.book Page 140 Monday, September 27, 2010 9:53 AM
Page 142 of 199
Inspecting and replenishing141
Using the system
Safety
Driving Tips
General Maintenance
Breakdown assistance
Technical Data
Overview of the engine compartment
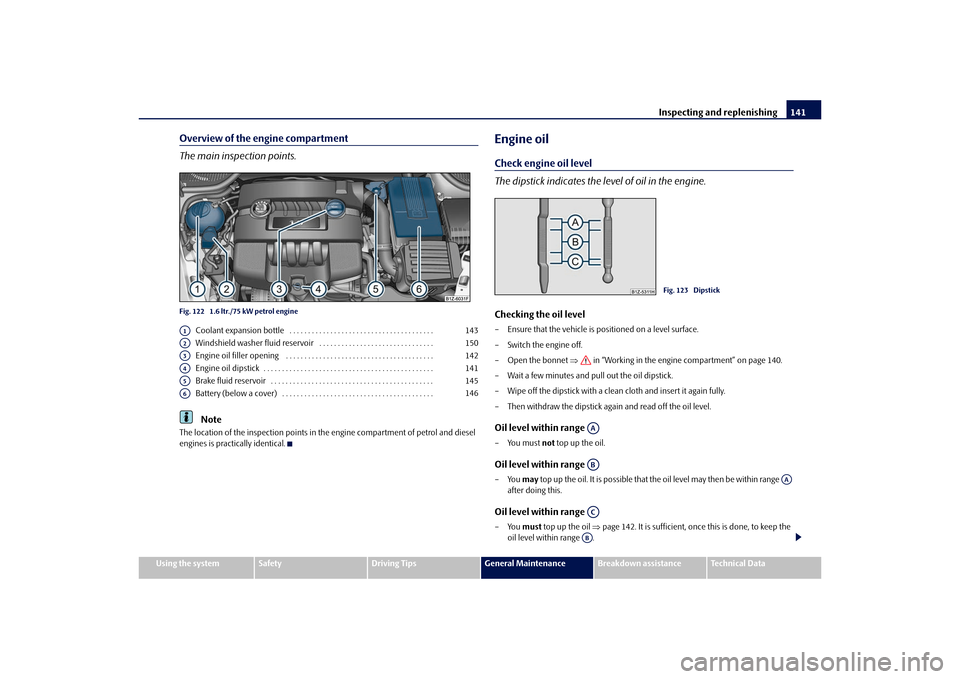
The main inspection points.Fig. 122 1.6 ltr./75 kW petrol engine
Coolant expansion bottle . . . . . . . . . . . . . . . . . . . . . . . . . . . . . . . . . . . . . . .
Windshield washer fluid reservoir . . . . . . . . . . . . . . . . . . . . . . . . . . . . . . .
Engine oil filler opening . . . . . . . . . . . . . . . . . . . . . . . . . . . . . . . . . . . . . . . .
Engine oil dipstick . . . . . . . . . . . . . . . . . . . . . . . . . . . . . . . . . . . . . . . . . . . . . .
Brake fluid reservoir . . . . . . . . . . . . . . . . . . . . . . . . . . . . . . . . . . . . . . . . . . . .
Battery (below a cover) . . . . . . . . . . . . . . . . . . . . . . . . . . . . . . . . . . . . . . . . .Note
The location of the inspection points in th e engine compartment of petrol and diesel
engines is practically identical.
Engine oilCheck engine oil level
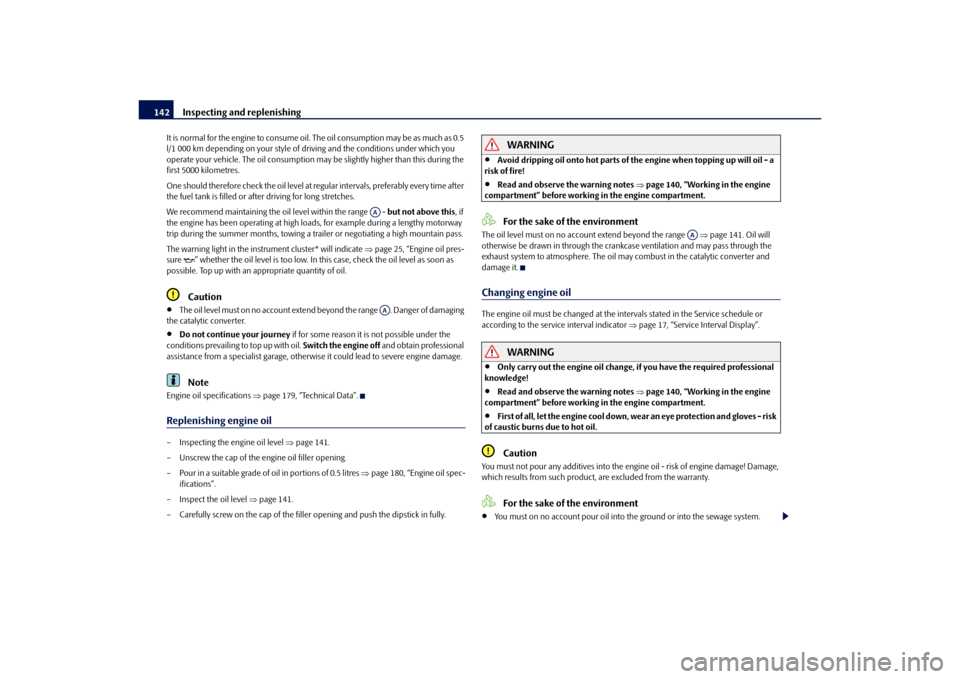
The dipstick indicates the le vel of oil in the engine.Checking the oil level– Ensure that the vehicle is po sitioned on a level surface.
– Switch the engine off.
– Open the bonnet in “Working in the engine compartment” on page 140.
– Wait a few minutes and pull out the oil dipstick.
– Wipe off the dipstick with a clea n cloth and insert it again fully.
– Then withdraw the dipstick again and read off the oil level.Oil level within range –You must not top up the oil.Oil level within range –You may top up the oil. It is possible that the oil level may then be within range
after doing this.Oil level within range –You must top up the oil page 142. It is sufficient, once this is done, to keep the
oil level within range .
A1
143
A2
150
A3
142
A4
141
A5
145
A6
146
Fig. 123 Dipstick
AAAB
AA
ACAB
s2bs.2.book Page 141 Monday, September 27, 2010 9:53 AM
Page 143 of 199
Inspecting and replenishing
142
It is normal for the engine to consume oil. The oil consumption may be as much as 0.5
l/1 000 km depending on your style of driving and the conditions under which you
operate your vehicle. The oil consumption may be slightly hi gher than this during the
first 5000 kilometres.
One should therefore check the oil level at regular intervals, preferably every time after
the fuel tank is filled or after driving for long stretches.
We recommend maintaining the oil level within the range - but not above this, if
the engine has been operating at high load s, for example during a lengthy motorway
trip during the summer months, towing a tr ailer or negotiating a high mountain pass.
The warning light in the instrument cluster* will indicate page 25, “Engine oil pres-
sure ” whether the oil level is too low. In this case, check the oil level as soon as
possible. Top up with an appropriate quantity of oil.
Caution
The oil level must on no account extend beyond the range . Danger of damaging
the catalytic converter.
Do not continue your journey if for some reason it is not possible under the
conditions prevailing to top up with oil. Switch the engine off and obtain professional
assistance from a specialist garage, otherwise it could lead to severe engine damage.Note
Engine oil specifications page 179, “Technical Data”.Replenishing engine oil– Inspecting the engine oil level page 141.
– Unscrew the cap of the engine oil filler opening.
– Pour in a suitable grade of oil in portions of 0.5 litres page 180, “Engine oil spec-
ifications”.
– Inspect the oil level page 141.
– Carefully screw on the cap of the filler opening and push the dipstick in fully.
WARNING
Avoid dripping oil onto hot parts of the engine when topping up will oil - a
risk of fire!
Read and observe the warning notes page 140, “Working in the engine
compartment” before working in the engine compartment.For the sake of the environment
The oil level must on no acco unt extend beyond the range page 141. Oil will
otherwise be drawn in through the crankc ase ventilation and may pass through the
exhaust system to atmosphere. The oil ma y combust in the catalytic converter and
damage it.Changing engine oilThe engine oil must be changed at the intervals stated in the Service schedule or
according to the service interval indicator page 17, “Service Interval Display”.
WARNING
Only carry out the engine oil change, if you have the required professional
knowledge!
Read and observe the warning notes page 140, “Working in the engine
compartment” before working in the engine compartment.
First of all, let the engine cool down, we ar an eye protection and gloves - risk
of caustic burns due to hot oil.Caution
You must not pour any additives into the engine oil - risk of engine damage! Damage,
which results from such product, are excluded from the warranty.
For the sake of the environment
You must on no account pour oil into the ground or into the sewage system.
AAAA
AA
s2bs.2.book Page 142 Monday, September 27, 2010 9:53 AM
Page 144 of 199
Inspecting and replenishing143
Using the system
Safety
Driving Tips
General Maintenance
Breakdown assistance
Technical Data
In view of the problems involved in prop erly disposing of old oil, the necessary
special tools and the knowledge required for such work, we recommend that you have
the oil and oil filter change carried out by an authorised Škoda Service Partner.Note
After your skin has come in contact with th e oil, you must thoroughly wash your skin.Cooling systemCoolant
The job of the coolant is to cool the engine.The cooling system does not require any maintenance under normal operating condi-
tions. The coolant consists of water with a concentration of coolant additive of 40 %.
This mixture not only provides antifreeze protection down to -25 °C but also protects
the cooling and heating system from corrosion. It also prevents the formation of scale
and significantly increases the boiling point of the coolant.
You must therefore not reduce the concentration of antifreeze agent in the coolant by
adding water, also not during the summer mo nths or in countries with a warm climate.
The concentration of coolant additive in the coolant must be at least 40 %.
You can increase the amount of antifreeze in the coolant if a higher concentration of
antifreeze is necessary for climatic reasons but only up to 60 % (antifreeze protection
down to approx. -40 °C). The antifreeze pr otection tails off above that concentration.
Vehicles exported to countries with a cold climate (e.g. Sweden, Norway, Finland) are
already factory-filled with a coolant which offers antifreeze protection down to about
-35 °C. In these countries the concentration of coolant additive should be at least 50 %.
Coolant
The cooling system is factor y-filled with coolant (purple in colour), which complies
with the specification TL-VW 774 G.
We recommend that you use the same coolant additive - G12 PLUS-PLUS (purple in
colour) for topping up the system. Please contact an authorised Škoda Serv
ice Partner if you have any questions
regarding the coolant or if you wish to fill up with a different coolant.
An authorised Škoda Service Partner can also supply you with the correct coolant addi-
tives.
Coolant quantity
Caution
Other coolant additives may cause operational problems which, in particular,
involves significantly reduci ng the anticorrosion effect.
Any faults or problems resulting from corrosion may cause a loss of coolant
and, as a consequenc e of this, result in major engine damage.
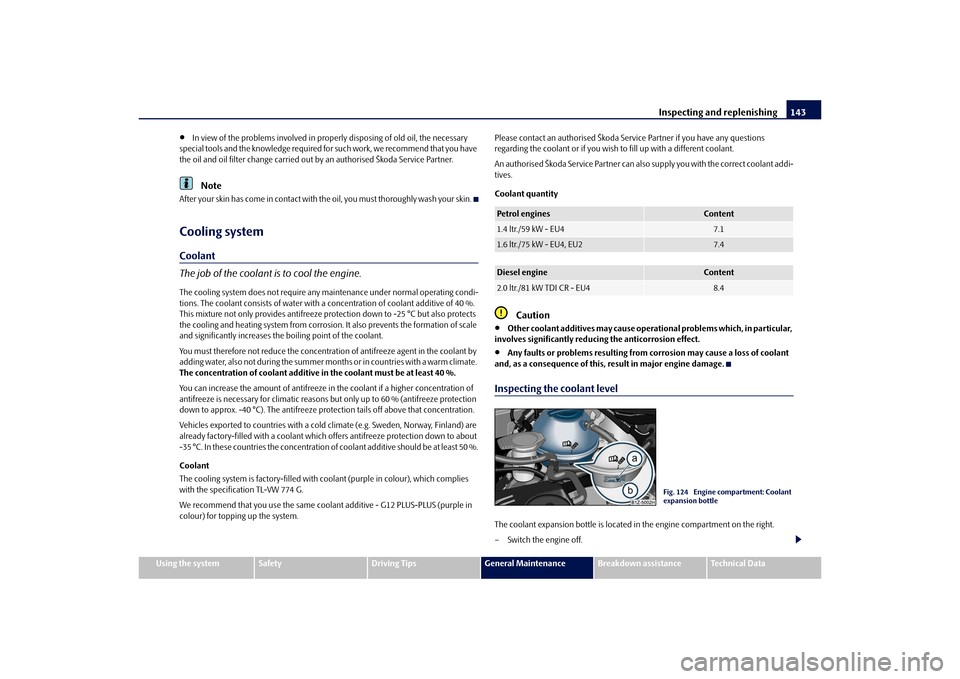
Inspecting the coolant levelThe coolant expansion bottle is located in the engine compartment on the right.
– Switch the engine off.Petrol engines
Content
1.4 ltr./59 kW - EU4
7.1
1.6 ltr./75 kW - EU4, EU2
7.4
Diesel engine
Content
2.0 ltr./81 kW TDI CR - EU4
8.4
Fig. 124 Engine compartment: Coolant
expansion bottle
s2bs.2.book Page 143 Monday, September 27, 2010 9:53 AM
Page 145 of 199

Inspecting and replenishing
144
– Open the bonnet page 139.
– Check the level of coolant in the coolant expansion bottle page 143, fig. 124 .
The coolant level when the engine is cold must lie between the (MIN) and
(MAX) markings. The level may also rise slightly above the (MAX) marking when
the engine is warm.
If the coolant level in the reservoir is too lo w, this is indicated by the warning light in
the instrument cluster page 25, “Coolant temperature/coolant level ”. We never-
theless recommend inspecting the coolant leve l directly at the reservoir from time to
time.
Loss of coolant
A loss of coolant is first and foremost an indication of a leak in the system. You should
not merely top up the coolant in the reservoir. It is also important to have the cooling
system inspected without delay by a specialist garage.
Losses can only occur through the pressure relief in the cap of the coolant expansion
bottle which is completely free of leaks if the coolant boils as a result of overheating
and is forced out of the cooling system.
WARNING
Read and observe the warning notes page 140, “Working in the engine
compartment” before working in the engine compartment.
Caution
One should contact a specialist garage as soon as possible if the source of overheating
itself cannot be determined and removed, since there may be grave damage to the
engine.Replenishing the coolant– Switch the engine off.
– Allow the engine to cool down.
– Place a cloth over the cap of the coolant expansion reservoir page 143, fig. 124
and unscrew the cap carefully by turning it to the left . –Top up the coolant.
– Screw the cap tight until it is heard to lock.
The coolant which you use for replenishing the system, must comply with one specific
specification
page 143. Do not use an alternative additive if the coolant additive
G13 is not available in an emergency. Just to p up the system with water and as soon as
possible arrange adjustment to correct the mixing ratio of water and coolant additive
again by a specialist garage.
Only use fresh coolant for topping up the system.
Do not fill up over the “MAX” marking! Excess coolant which is heated up is forced out
of the cooling system through the pressure relief valve in the cap of the coolant
compensation bottle.
Wait until the engine has cooled down for a system which has suffered a major loss of
coolant before pouring in coolant. This is necessary to avoid engine damage.
WARNING
The cooling system is pressurized! Do not open the cap of the coolant
expansion bottle if the engine is still hot - risk of scalding!
The coolant additive and thus all of the coolant is harmful to your health.
Avoid contact with the coolant. Coolant vapours are also harmful to the health.
It is important, therefore, to always safely store any coolant additive in its orig-
inal container out of the reach of children - risk of poisoning!
If any splashes of coolant get into yo ur eyes, rinse out your eyes immedi-
ately with clear water and contact a doctor as soon as possible.
You should also consult a doctor without delay if you have inadvertently
swallowed coolant.Caution
Do not continue your journey if for some reason it is not possible under the
conditions prevailing to top up with coolant. Switch the engine off and obtain
professional assistance from a specialist garage, otherwise it could lead to severe
engine damage.
Ab
Aa
Aa
s2bs.2.book Page 144 Monday, September 27, 2010 9:53 AM
Page 146 of 199
Inspecting and replenishing145
Using the system
Safety
Driving Tips
General Maintenance
Breakdown assistance
Technical Data
For the sake of the environment
Do not re-use coolant if it is necessary to drain the coolant in the system. It should be
collected and disposed of in compliance with environmental protection regulations.Radiator fan
The radiator fan may switch on suddenly.The radiator fan is driven by an electric motor and controlled according to the coolant
temperature.
The radiator fan may continue running for up to 10 minutes after the engine has been
switched off - even if the igni tion is also off. It may also switch on suddenly after a
certain time, if
the coolant temperature has risen beca use of an accumulation of heat or
the warm engine compartment is heated up additionally by strong sunlight.
WARNING
You must therefore be aware when workin g in the engine compartment that the
fan may switch on suddenly - risk of injury!Brake fluidInspecting the brake fluid level
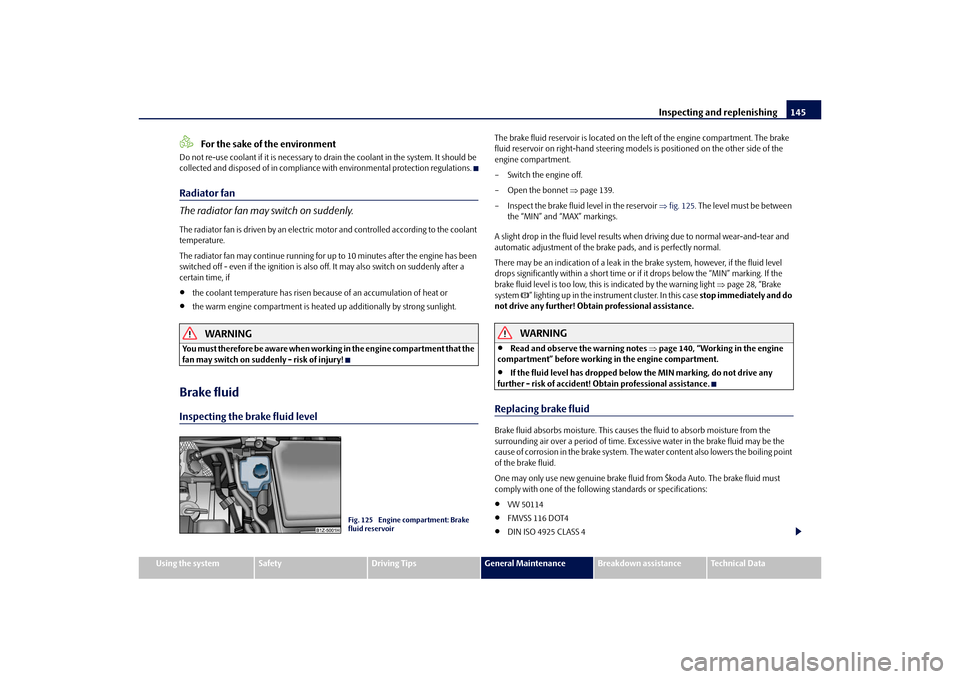
The brake fluid reservoir is located on the left of the engine compartment. The brake
fluid reservoir on right-hand steering models is positioned on the other side of the
engine compartment.
– Switch the engine off.
– Open the bonnet page 139.
– Inspect the brake fluid level in the reservoir fig. 125 . The level must be between
the “MIN” and “MAX” markings.
A slight drop in the fluid level results when driving due to normal wear-and-tear and
automatic adjustment of the brak e pads, and is perfectly normal.
There may be an indication of a leak in the brake system, however, if the fluid level
drops significantly within a short time or if it drops below the “MIN” marking. If the
brake fluid level is too low, this is indicated by the warning light page 28, “Brake
system ” lighting up in the instru ment cluster. In this case stop immediately and do
not drive any further! Obtain professional assistance.
WARNING
Read and observe the warning notes page 140, “Working in the engine
compartment” before working in the engine compartment.
If the fluid level has dropped below the MIN marking, do not drive any
further - risk of accident! Obtain professional assistance.
Replacing brake fluidBrake fluid absorbs moisture. This causes the fluid to absorb moisture from the
surrounding air over a period of time. Exce ssive water in the brake fluid may be the
cause of corrosion in the brake system. The water content also lowers the boiling point
of the brake fluid.
One may only use new genuine brake fluid from Škoda Auto. The brake fluid must
comply with one of the following standards or specifications:
VW 50114
FMVSS 116 DOT4
DIN ISO 4925 CLASS 4
Fig. 125 Engine compartment: Brake
fluid reservoir
s2bs.2.book Page 145 Monday, September 27, 2010 9:53 AM
Page 163 of 199

Breakdown assistance
162
–Take the vehicle tool kit page 159 and the spare wheel* page 160 out of the
luggage compartment.
WARNING
If you find yourself in flowing traffic switch on the hazard warning lights
system and place the warning triangle on the side of the road at the prescribed
distance from your vehicle while observing all national legal provisions. In this
way you are protecting not only yourself but also other road users.
Never start the engine with the vehicle si tting on the raised jack - danger of
suffering injury.Caution
If you have to change a wheel on a slope first block the opposite wheel with a stone or
similar object in order to secure the vehicle from unexpec tedly rolling away.
Note
Comply with the national legal regulations.Changing a wheelAlways change a wheel on a level surface as far as possible.
– Take off the full wheel trim* page 163 or the caps page 163.
– In the case of light alloy wheels remove the wheel trim cap page 163.
– First of all slacken the safety wheel bo lt* and afterwards the other wheel bolts
page 164.
– Jack up the vehicle until the wheel to be changed is clear of the ground page 164.
– Unscrew the wheel bolts and place them on a clean surface (cloth, paper etc.).
– Take off the wheel.
– Fit on the spare wheel and ti ghten the wheel bolts slightly.
–Lower the car. – Tighten the wheel bolts firmly, alternatel
y and diagonally using the wheel wrench
(crosswise) and last the safety wheel bolt* page 164.
– Mount the full wheel trim/wheel trim cap or the caps.
Note
All bolts must be clean and must turn easily.
You must never grease or oil the wheel bolts!
When fitting on unidirectional tyres, ensu re that the tyres rotate in the correct
direction page 151.
Subsequent stepsAfter changing the wheel, you mu st perform the following steps.
– Stow and attach the replaced wheel in the spare wheel well.
– Stow the vehicle tool kit in the space provided.
– Check the tyre pressure on the spare wheel just mounted as soon as possible.
– Have the tightening torque of the wheel bolts checked with a torque wrench as
soon as possible. Steel and light alloy wheels must be tightened to a tightening
torque of 120 Nm.
– Change the damaged wheel or consult a sp ecialist garage about possibilities for
getting repairs done.
WARNING
It is necessary to observe the guidelines given on page 153 if the vehicle is
subsequently fitted with tyres which are di fferent to those it was fitted with at
the works.
Note
If you find, when changing the wheel, that the wheel bolts are corroded and diffi-
cult to turn, the bolts must be replaced before checking the tightening torque.
Drive cautiously and only at a moderate speed to a workshop where the tightening
torque can be checked.
s2bs.2.book Page 162 Monday, September 27, 2010 9:53 AM
Page 168 of 199

Breakdown assistance167
Using the system
Safety
Driving Tips
General Maintenance
Breakdown assistance
Technical Data
Tow-starting and towing vehicleGeneralPlease pay attention to the following instructions if you are going to use a tow rope:Driver of the towing vehicle– Do not drive off until the tow rope is taught.
– Release the clutch particularly gently when starting off.Driver of the towed vehicle– Switch the ignition on so that the steeri ng wheel is not blocked and you can also
operate the turn signal lights, the headlight flasher, the windscreen wipers and
windscreen washer system.
– Move the gearshift lever into Neutral.
– Note that the brake servo unit and power steering only operate if the engine is running. You will require significantly grea ter physical force to depress the brake
pedal and to steer th e vehicle if the engine is not running.
– Ensure that the tow rope is always kept taught.
Tow rope or tow bar
A tow bar is safest way of towing a vehicle an d also minimizes any shocks. You can use
a tow rope only if a suitable tow bar is not available.
The tow rope must be elastic to protect the vehicle. Thus one should only use plastic
fibre rope or a rope made out of a similarly elastic material.
Only attach the tow rope to the towing eyes provided for this purpose page 167
and page 168.
Driving style
Towing another vehicle requires a certain am ount of practice. Both drivers should be
familiar with the particular points about to wing a vehicle. Unskilled drivers should not
attempt to tow in another vehicle or to be towed in.
One should be constantly vigi lant not to allow impermissibly high towing forces or
jerky loadings. There is always a risk of excessive stresses and damage resulting at the points to which you attach the tow rope or
tow bar when you attempt to tow a vehicle
which is not standing on a paved road.
Caution
If the gearbox of your vehicle no longer contains any oil because of a defect, your
vehicle must only be towed in with the driven wheels raised clear of the ground, or on
a special vehicle transporter or trailer.
Note
Please comply with any national legal provisions particularly regarding the
switched on signal systems, when towi ng in or tow-starting another vehicle.
The tow rope must not be twisted as it may in certain circumstances result in the
front towing eye being unscrewed out of your vehicle.
Front towing eye
The towing eye is stored in th e box for the vehicle tool kit.Fig. 141 Front bumper: protective grille/installing the towing eyeRemove the protective grille carefully as follows:
– Press on grille with the hand (at the end removed from the licence plate) and
release it in the direction of the arrow fig. 141 - left.
s2bs.2.book Page 167 Monday, September 27, 2010 9:53 AM