check oil SKODA OCTAVIA TOUR 2010 2.G / (1Z) Owner's Manual
[x] Cancel search | Manufacturer: SKODA, Model Year: 2010, Model line: OCTAVIA TOUR, Model: SKODA OCTAVIA TOUR 2010 2.G / (1Z)Pages: 199, PDF Size: 12.09 MB
Page 15 of 199

The brief instruction
14
Opening the bonnetFig. 13 Radiator grille: Release lever/se curing the bonnet with the bonnet support– Pulling on the release lever in direction of arrow fig. 13 will unlock the
bonnet.
– Take the bonnet support out of its holder and set it in the opening on the bonnet.
Further information page 139, “Opening and closing the bonnet.”.Inspecting the engine oil level Engine oil must not be refilled.
Engine oil can be refilled.
Engine oil must be refilled. Further information
page 141, “Check engine oil level”.
A1
A2
Fig. 14 Dipstick
AAABACs2bs.2.book Page 14 Monday, September 27, 2010 9:53 AM
Page 26 of 199
Instruments and Indicator/Warning Lights25
Using the system
Safety
Driving Tips
General Maintenance
Breakdown assistance
Technical Data
Further information
page 116.
WARNING
Contact your specialist garage if the power steering is defective.
Note
If the yellow warning light
goes out after starting the engine again and a short
drive, it is not necessary to visit a specialist garage.
If the battery has been di sconnected and reconnected, the yellow warning light
comes on after switching on the ignition. Th e warning light must go out after driving a
short distance.
Engine oil pressure
The warning light
comes on for a few seconds when the ignition is switched on.
Stop the vehicle and switch the engine off if the warning light does not go off after
the engine has started or flashes while driving. Check the oil level and top up with oil
as necessary page 142, “Replenishing engine oil”.
An audible signal sounds three times as an additional warning signal.
Do not continue your journey if for some reason it is not possible under the condi-
tions prevailing to top up with oil. Keep the engine switched off and obtain profes-
sional assistance from a specialist garage, otherwise it could lead to severe engine
damage.
Do not drive any further if the warning light flashes even if the oil is at the correct
level. Do not run the engine not at idling speed either. Contact the nearest specialist
garage to obtain professional assistance.
WARNING
If you must stop for technical reasons, then park the vehicle at a safe
distance from the traffic and switch off the engine and switch on the hazard
warning light system.
The red oil pressure light
is not an oil level indicator! One should there-
fore check the oil level at regular interv als, preferably after every refuelling
stop.
EPC fault light
(petrol engine)
The
(Electronic Power Control) warning light comes on for a few seconds when the
ignition is switched on.
If the warning light
does not go out or lights up after starting the engine, a fault
exists in the engine control. The engine management system selects an emergency
programme which enables you to drive to the nearest specialist garage by adopting a
gentle style of driving.
Glow plug system
(diesel engine)
The warning light
lights up for a cold engine when switching on the ignition (pre-
heat position) page 77. Start the engine after the indicator light goes out.
The glow plug indicator light will come on for about 1 second if the engine is at a
normal operating temperature or if the outside temperature is above +5 °C. This
means that you can start the engine right away.
There is a fault in the glow plug system if the warning light
does not come on at
all or lights up continuously . Contact a specialist garage as soon as possible to obtain
assistance.
If the warning light
begins to flash while driving, a fault exists in the engine control.
The engine management syst em selects an emergency programme which enables you
to drive to the nearest specialist garage by adopting a gentle style of driving.
Coolant temperature/coolant level
The warning light
comes on for a few seconds when the ignition is switched on.
The coolant temperature is too high or the coolant level too low if the warning light
does not go out or flashes while driving.
WARNING (continued)
A2
s2bs.2.book Page 25 Monday, September 27, 2010 9:53 AM
Page 30 of 199
Instruments and Indicator/Warning Lights29
Using the system
Safety
Driving Tips
General Maintenance
Breakdown assistance
Technical Data
If the warning light does not go out after
the engine has started, or comes on when
driving, drive to the nearest specialist garage. The vehicle battery will be discharged in
this case so switch off all non- essential electrical components.
Caution
If the warning light
comes on when driving and in addition the warning light
(cooling system fault) also comes on in di splay, you must then stop the car immedi-
ately and switch the engine off - risk of engine damage!
Engine oil level
Warning light
lights up
If the warning light lights up, the quantity of oil in the engine is probably too low.
Check as soon as possible the oil level or top up page 142, “Replenishing engine oil”
with engine oil.
A peep sounds as an additional warning signal.
The warning light will go out if the bonnet is le ft open for more than 30 seconds. If no
engine oil has been replenished, the warning light will come on again after driving
about 100 km.
Warning light
flashes
A fault on the engine oil level sensor is indicated additionally by an audible signal and
the warning light coming on several times after the ignition has been switched on.
In this case have the engine inspected without delay by a specialist garage.
Fuel reserve
The warning light
comes on, if the fuel level is still below 9 litres.
An audible signal sounds as an additional warning signal.
s2bs.2.book Page 29 Monday, September 27, 2010 9:53 AM
Page 91 of 199

Seat belts
90
The speed of the vehicle is, nevertheless, the most important factor. Doubling the
speed of the vehicle from 25 km/h up to 50 km/hour increases the kinetic energy four
times.
The common opinion that it is possible to su pport your body in a minor accident with
your hands, is incorrect. Even in a collision at only a low speed, the forces acting on the
body are such that it is no longer possible to support your body.
Even if you only drive at a speed within the range from 30 km/hour to 50 km/hour, the
forces which are produced on your body in the event of an accident can easily exceed
10.000 N (Newton). This equals a weight of one tonne (1 000 kg).
In the event of a frontal collision, occupants of the vehicle not wearing a seat belt, are
thrown forward and strike in an uncontrolled way parts of the interior of the vehicle,
such as steering wheel, dash panel, windscreen, page 89, fig. 91 - left. The occu-
pants of a vehicle who have not fastened their seat belts may even be thrown out of
the vehicle. This can result in fatal injuries.
It is also important that rear seat occupants fasten their seat belts as they will otherwise
be thrown through the vehicle in an uncontr olled manner in the event of an accident
A rear seat passenger who has not fastened the s eat bel t i s a dang er not o nl y to hims elf
but also for those seated at the front page 89, fig. 91 - right.Important safety information regarding the use of seat beltsThe correct use of the seat belts cons iderably reduces the risk of injury!
WARNING
The belt webbing must not be jammed in-between at any point or twisted,
or chafe against any sharp edges.
It is important that the belt webbing is properly routed if the seat belts are
to offer their maximum protection page 91.
No two persons (also not children) should ever use a single seat belt
together.
The maximum protection which seat belts can offer is only achieved if you
are correctly seated page 86, “Correct seated position”.
The belt webbing must not run across solid or fragile objects (e.g. specta-
cles, ball-point pens, keys etc.) as this may be a cause of injuries.
Bulky, loose clothing (e.g. a winter coat over a jacket) does not allow you to
be correctly seated and impairs proper operation of the seat belts.
It is prohibited to use clamps or other objects to adjust seat belts (e.g. for
shortening the belts for smaller persons).
The lock tongue should only be inserted into the lock which is the correct
one for your seat. Wrong use of the safety belt will reduce its capacity to protect
and the risk of injury increases.
The seat backrests of the front seats must not be tilted too far to the rear
otherwise the seatbelts can lose their effectiveness.
The belt webbing must always be kept clean. A soiled belt webbing may
impair proper operation of the inertia reel page 135, “Seat belts”.
The slot of the belt tongue must not be blocked by paper or similar objects
otherwise the belt tongue will not lock in place properly.
Inspect the seat belts regula rly to ensure they are in good condition. If you
find seat belts which have damage to the seat belt webbing, seat belt connec-
tions, to the inertia reels or to the lock, the relevant safety belt must be replaced
by a specialist garage.
The seat belts must not be removed or changed in any way. Do not make an
attempt to repair the seat belts yourself.
Damaged seat belts which have been subjected to stress in an accident and
were therefore stretched, must be replaced - this is best done by a specialist
garage. The anchorage points of the belts must also be inspected. The
anchorage points for the belts should also be checked.
In certain countries it is possible to use seat belts which differ in terms of
their operation from the seat belts which are described on the pages which
follow.WARNING (continued)
s2bs.2.book Page 90 Monday, September 27, 2010 9:53 AM
Page 122 of 199
Driving and the Environment121
Using the system
Safety
Driving Tips
General Maintenance
Breakdown assistance
Technical Data
Reducing idling
Idling also costs fuel.It is worthwhile switching off the engine in a traffic jam or when waiting at a level
crossing or at traffic lights with a lengthy red phase. Even after just 30 - 40 seconds you
will have saved more fuel th an that is needed when you start the engine up again.
If an engine is only idling it takes much longer for it to reach its normal operating
temperature. Wear-and-tear an d pollutant emissions, though, are particularly high in
the warming-up phase. This is why you should drive off right after starting the engine.
Do avoid high engine revolu tions at this time, however.Regular servicing
A poorly tuned engine consumes an unnecessarily high amount of fuel.Having your vehicle serviced regularly at a specialist garge enables you to satisfy one
of the requirements for economical motoring even before you set off on your journey.
Keeping your vehicle properly serviced not on ly has a positive effect on the safety of
your vehicle and maintaining its value, but also saves on fuel.
A poorly tuned engine can result in a fu el consumption which is 10 % higher than
normal.
The foreseen maintenance work should be undertaken exactly according to the
Service schedule by a specialist garage.
Also check the oil level after refuelling. Oil consumption is dependent to a consider-
able extent on the load and speed of the en gine. Oil consumption could be as high as
0.5 litres/1 000 km depending on your style of driving.
It is quite normal that a new engine has a higher oil consumption at first, and reaches
its lowest level only after a certain running in time. It is therefore not possible to
correctly assess the oil consum ption of a new vehicle until after you have driven about
5 000 km.
For the sake of the environment
You can achieve additional improvements in your fuel economy by using high-
lubricity oils.
Check the ground below your vehicle at regu lar intervals to detect any leakages in
good time. Please have your vehicle inspected by a specialist garge if you find any
stains caused by oil or other fluids on the floor.
Avoid driving short distances
Short distances result in an above-average high fuel consumption.– Avoid driving a distance of no more than 4 km if the engine is cold.
The engine and catalytic converter mu st first have reached their optimal operating
temperature in order to effectively reduce fuel consumption and pollutant emissions.
The cold engine vehicle cons umes approx. 15 - 20 litres/100 km of fuel immediately
after starting. Fuel co nsumption drops to 10 litres/100 km after just 1 kilometre. The
engine reaches its operating temperat ure (outside temperature and engine
dependent) only after about 4 to 10 kilometres and the fuel consumption then stabi-
lizes. You should therefore avoid driving short distances whenever possible.
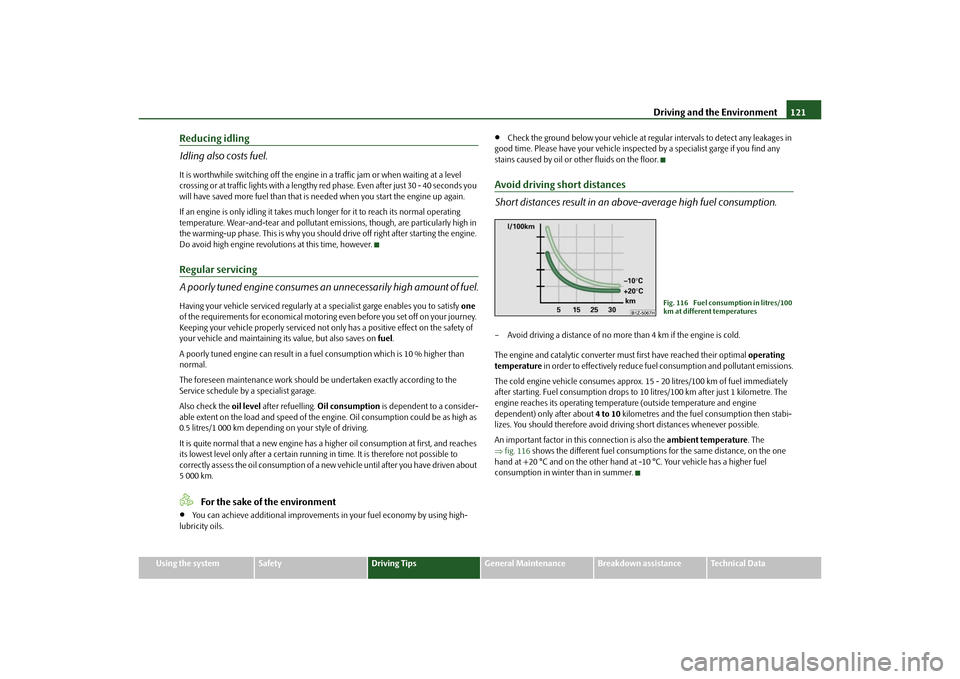
An important factor in this connection is also the ambient temperature. The
fig. 116 shows the different fuel consumptions for the same distance, on the one
hand at +20 °C and on the other hand at -10 °C. Your vehicle has a higher fuel
consumption in winter than in summer.
Fig. 116 Fuel consumption in litres/100
km at different temperatures
s2bs.2.book Page 121 Monday, September 27, 2010 9:53 AM
Page 142 of 199
Inspecting and replenishing141
Using the system
Safety
Driving Tips
General Maintenance
Breakdown assistance
Technical Data
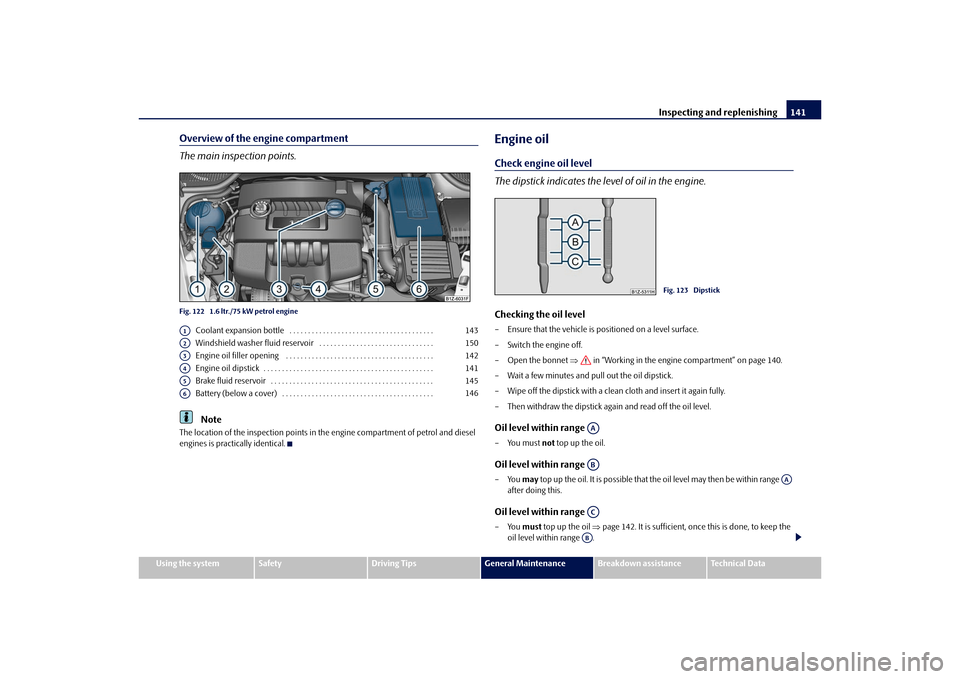
Overview of the engine compartment
The main inspection points.Fig. 122 1.6 ltr./75 kW petrol engine
Coolant expansion bottle . . . . . . . . . . . . . . . . . . . . . . . . . . . . . . . . . . . . . . .
Windshield washer fluid reservoir . . . . . . . . . . . . . . . . . . . . . . . . . . . . . . .
Engine oil filler opening . . . . . . . . . . . . . . . . . . . . . . . . . . . . . . . . . . . . . . . .
Engine oil dipstick . . . . . . . . . . . . . . . . . . . . . . . . . . . . . . . . . . . . . . . . . . . . . .
Brake fluid reservoir . . . . . . . . . . . . . . . . . . . . . . . . . . . . . . . . . . . . . . . . . . . .
Battery (below a cover) . . . . . . . . . . . . . . . . . . . . . . . . . . . . . . . . . . . . . . . . .Note
The location of the inspection points in th e engine compartment of petrol and diesel
engines is practically identical.
Engine oilCheck engine oil level
The dipstick indicates the le vel of oil in the engine.Checking the oil level– Ensure that the vehicle is po sitioned on a level surface.
– Switch the engine off.
– Open the bonnet in “Working in the engine compartment” on page 140.
– Wait a few minutes and pull out the oil dipstick.
– Wipe off the dipstick with a clea n cloth and insert it again fully.
– Then withdraw the dipstick again and read off the oil level.Oil level within range –You must not top up the oil.Oil level within range –You may top up the oil. It is possible that the oil level may then be within range
after doing this.Oil level within range –You must top up the oil page 142. It is sufficient, once this is done, to keep the
oil level within range .
A1
143
A2
150
A3
142
A4
141
A5
145
A6
146
Fig. 123 Dipstick
AAAB
AA
ACAB
s2bs.2.book Page 141 Monday, September 27, 2010 9:53 AM
Page 143 of 199
Inspecting and replenishing
142
It is normal for the engine to consume oil. The oil consumption may be as much as 0.5
l/1 000 km depending on your style of driving and the conditions under which you
operate your vehicle. The oil consumption may be slightly hi gher than this during the
first 5000 kilometres.
One should therefore check the oil level at regular intervals, preferably every time after
the fuel tank is filled or after driving for long stretches.
We recommend maintaining the oil level within the range - but not above this, if
the engine has been operating at high load s, for example during a lengthy motorway
trip during the summer months, towing a tr ailer or negotiating a high mountain pass.
The warning light in the instrument cluster* will indicate page 25, “Engine oil pres-
sure ” whether the oil level is too low. In this case, check the oil level as soon as
possible. Top up with an appropriate quantity of oil.
Caution
The oil level must on no account extend beyond the range . Danger of damaging
the catalytic converter.
Do not continue your journey if for some reason it is not possible under the
conditions prevailing to top up with oil. Switch the engine off and obtain professional
assistance from a specialist garage, otherwise it could lead to severe engine damage.Note
Engine oil specifications page 179, “Technical Data”.Replenishing engine oil– Inspecting the engine oil level page 141.
– Unscrew the cap of the engine oil filler opening.
– Pour in a suitable grade of oil in portions of 0.5 litres page 180, “Engine oil spec-
ifications”.
– Inspect the oil level page 141.
– Carefully screw on the cap of the filler opening and push the dipstick in fully.
WARNING
Avoid dripping oil onto hot parts of the engine when topping up will oil - a
risk of fire!
Read and observe the warning notes page 140, “Working in the engine
compartment” before working in the engine compartment.For the sake of the environment
The oil level must on no acco unt extend beyond the range page 141. Oil will
otherwise be drawn in through the crankc ase ventilation and may pass through the
exhaust system to atmosphere. The oil ma y combust in the catalytic converter and
damage it.Changing engine oilThe engine oil must be changed at the intervals stated in the Service schedule or
according to the service interval indicator page 17, “Service Interval Display”.
WARNING
Only carry out the engine oil change, if you have the required professional
knowledge!
Read and observe the warning notes page 140, “Working in the engine
compartment” before working in the engine compartment.
First of all, let the engine cool down, we ar an eye protection and gloves - risk
of caustic burns due to hot oil.Caution
You must not pour any additives into the engine oil - risk of engine damage! Damage,
which results from such product, are excluded from the warranty.
For the sake of the environment
You must on no account pour oil into the ground or into the sewage system.
AAAA
AA
s2bs.2.book Page 142 Monday, September 27, 2010 9:53 AM
Page 145 of 199

Inspecting and replenishing
144
– Open the bonnet page 139.
– Check the level of coolant in the coolant expansion bottle page 143, fig. 124 .
The coolant level when the engine is cold must lie between the (MIN) and
(MAX) markings. The level may also rise slightly above the (MAX) marking when
the engine is warm.
If the coolant level in the reservoir is too lo w, this is indicated by the warning light in
the instrument cluster page 25, “Coolant temperature/coolant level ”. We never-
theless recommend inspecting the coolant leve l directly at the reservoir from time to
time.
Loss of coolant
A loss of coolant is first and foremost an indication of a leak in the system. You should
not merely top up the coolant in the reservoir. It is also important to have the cooling
system inspected without delay by a specialist garage.
Losses can only occur through the pressure relief in the cap of the coolant expansion
bottle which is completely free of leaks if the coolant boils as a result of overheating
and is forced out of the cooling system.
WARNING
Read and observe the warning notes page 140, “Working in the engine
compartment” before working in the engine compartment.
Caution
One should contact a specialist garage as soon as possible if the source of overheating
itself cannot be determined and removed, since there may be grave damage to the
engine.Replenishing the coolant– Switch the engine off.
– Allow the engine to cool down.
– Place a cloth over the cap of the coolant expansion reservoir page 143, fig. 124
and unscrew the cap carefully by turning it to the left . –Top up the coolant.
– Screw the cap tight until it is heard to lock.
The coolant which you use for replenishing the system, must comply with one specific
specification
page 143. Do not use an alternative additive if the coolant additive
G13 is not available in an emergency. Just to p up the system with water and as soon as
possible arrange adjustment to correct the mixing ratio of water and coolant additive
again by a specialist garage.
Only use fresh coolant for topping up the system.
Do not fill up over the “MAX” marking! Excess coolant which is heated up is forced out
of the cooling system through the pressure relief valve in the cap of the coolant
compensation bottle.
Wait until the engine has cooled down for a system which has suffered a major loss of
coolant before pouring in coolant. This is necessary to avoid engine damage.
WARNING
The cooling system is pressurized! Do not open the cap of the coolant
expansion bottle if the engine is still hot - risk of scalding!
The coolant additive and thus all of the coolant is harmful to your health.
Avoid contact with the coolant. Coolant vapours are also harmful to the health.
It is important, therefore, to always safely store any coolant additive in its orig-
inal container out of the reach of children - risk of poisoning!
If any splashes of coolant get into yo ur eyes, rinse out your eyes immedi-
ately with clear water and contact a doctor as soon as possible.
You should also consult a doctor without delay if you have inadvertently
swallowed coolant.Caution
Do not continue your journey if for some reason it is not possible under the
conditions prevailing to top up with coolant. Switch the engine off and obtain
professional assistance from a specialist garage, otherwise it could lead to severe
engine damage.
Ab
Aa
Aa
s2bs.2.book Page 144 Monday, September 27, 2010 9:53 AM
Page 152 of 199
Wheels and Tyres151
Using the system
Safety
Driving Tips
General Maintenance
Breakdown assistance
Technical Data
Wheels and TyresWheelsGeneral information
New tyres do not offer optimal grip at first and should therefore be run in for about
500 km at a moderate speed and an appropri ately cautious style of driving. You will
also profit from longer tyre life.
The tread depth of new tyres may differ because of design features and the config-
uration of the tread (depending on the type of tyre and the manufacturer).
Drive over curbs on the side of the road and other such obstacles slowly and,
where possible, at a right angle in order to avoid damage to tyres and wheel trims.
Inspect your tyres from time to time for damage (punctures, cuts, splits and
bulges). Remove foreign bodies from the tyre profile.
Damage to tyres and wheels is frequently not visible. Unusual vi brations or pulling
of the vehicle to one side coul d be a sign of tyre damage. Please reduce your speed
immediately and stop if you su spect that a wheel is damaged. Inspect the tyres for
signs of damage (bulges, splits, etc.) If no vi sible damage is present, please drive at an
appropriately slow speed and carefully to the nearest specialist garage in order to have
your vehicle inspected.
Also protect your tyres from contact with oil, grease and fuel.
Immediately replace any dust caps of the valves which have got lost.
Mark wheels before removing them so that their previous direction of running can
be maintained when mounted them again.
Always store wheels or tyres which been removed in a cool, dry and, where
possible, dark place. Tyres which are not fixed to a wheel trim should be stored upright.
Unidirectional tyres*
The direction of rotation of the tyres is mark ed by arrows on the wall of the tyre. This
indicates the direction of rotation of the tyre, and it is essential that the tyres are fitted
on to run in this direction. Only then are the tyres able to provide the optimal proper-
ties in terms of grip, low nois e, wear-and-tear and aquaplaning.
Further information concerning th e use of unidirectional tyres page 155.
WARNING
New tyres during the first 500 km do not offer optimal grip and should
therefore be run appropriately - risk of accident!
Never drive with damaged tyres - risk of accident!Note
Please observe the various differing legal requirements regarding tyres.Ty re l i feThe life of your tyres very much depends on the following points:
Tyre pressure
The working life of tyres will be shortened considerably if the tyres are insufficiently or
over-inflated and this will have an adverse effect on the handling of your vehicle.
Correctly inflated tyres are of particular importance when travelling at high speeds. It
is therefore good to check the pressure at least once a month and also before setting
off on a long trip. Please do not forget the spare wheel when checking the tyres.
The tyre inflation pressures for summer tyres are indicated on the inside of the fuel
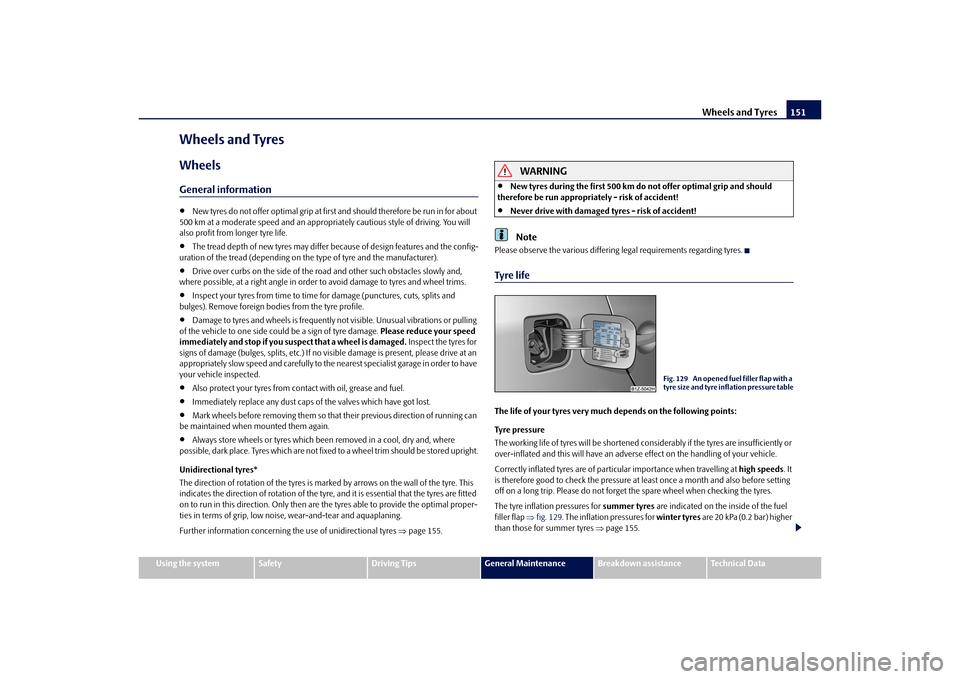
filler flap fig. 129 . The inflation pressures for winter tyres are 20 kPa (0.2 bar) higher
than those for summer tyres page 155.
Fig. 129 An opened fuel filler flap with a
tyre size and tyre inflation pressure table
s2bs.2.book Page 151 Monday, September 27, 2010 9:53 AM
Page 163 of 199

Breakdown assistance
162
–Take the vehicle tool kit page 159 and the spare wheel* page 160 out of the
luggage compartment.
WARNING
If you find yourself in flowing traffic switch on the hazard warning lights
system and place the warning triangle on the side of the road at the prescribed
distance from your vehicle while observing all national legal provisions. In this
way you are protecting not only yourself but also other road users.
Never start the engine with the vehicle si tting on the raised jack - danger of
suffering injury.Caution
If you have to change a wheel on a slope first block the opposite wheel with a stone or
similar object in order to secure the vehicle from unexpec tedly rolling away.
Note
Comply with the national legal regulations.Changing a wheelAlways change a wheel on a level surface as far as possible.
– Take off the full wheel trim* page 163 or the caps page 163.
– In the case of light alloy wheels remove the wheel trim cap page 163.
– First of all slacken the safety wheel bo lt* and afterwards the other wheel bolts
page 164.
– Jack up the vehicle until the wheel to be changed is clear of the ground page 164.
– Unscrew the wheel bolts and place them on a clean surface (cloth, paper etc.).
– Take off the wheel.
– Fit on the spare wheel and ti ghten the wheel bolts slightly.
–Lower the car. – Tighten the wheel bolts firmly, alternatel
y and diagonally using the wheel wrench
(crosswise) and last the safety wheel bolt* page 164.
– Mount the full wheel trim/wheel trim cap or the caps.
Note
All bolts must be clean and must turn easily.
You must never grease or oil the wheel bolts!
When fitting on unidirectional tyres, ensu re that the tyres rotate in the correct
direction page 151.
Subsequent stepsAfter changing the wheel, you mu st perform the following steps.
– Stow and attach the replaced wheel in the spare wheel well.
– Stow the vehicle tool kit in the space provided.
– Check the tyre pressure on the spare wheel just mounted as soon as possible.
– Have the tightening torque of the wheel bolts checked with a torque wrench as
soon as possible. Steel and light alloy wheels must be tightened to a tightening
torque of 120 Nm.
– Change the damaged wheel or consult a sp ecialist garage about possibilities for
getting repairs done.
WARNING
It is necessary to observe the guidelines given on page 153 if the vehicle is
subsequently fitted with tyres which are di fferent to those it was fitted with at
the works.
Note
If you find, when changing the wheel, that the wheel bolts are corroded and diffi-
cult to turn, the bolts must be replaced before checking the tightening torque.
Drive cautiously and only at a moderate speed to a workshop where the tightening
torque can be checked.
s2bs.2.book Page 162 Monday, September 27, 2010 9:53 AM