brake SKODA OCTAVIA TOUR 2011 2.G / (1Z) Owner's Guide
[x] Cancel search | Manufacturer: SKODA, Model Year: 2011, Model line: OCTAVIA TOUR, Model: SKODA OCTAVIA TOUR 2011 2.G / (1Z)Pages: 183, PDF Size: 11.13 MB
Page 132 of 183
Inspecting and replenishing131
Using the system
Safety
Driving Tips
General Maintenance
Breakdown assistance
Technical Data
Working in the engine compartment
Particular care is required when carrying out any work in the engine
compartment!There is a risk of injuries, scalding, acci dents and fire when working in the engine
compartment, e.g. inspecting and replen ishing oil and other fluids. For this
reason, it is essential to comply with the warning instructions stated below and
with the general applicable rules of safety . The engine compartment of your car is
a hazardous area .
WARNING
•
Never open the bonnet if you see that steam or coolant is flowing out of the
engine compartment - risk of scalding! Wait long enough until the steam or
coolant has stopped escaping.
•
Switch off the engine and pull out the ignition key.
•
Apply the handbrake firmly.
•
Move the gear lever into the Neutral position.
•
Allow the engine to cool down.
•
Keep children clear of the engine compartment.
•
Never spill oil and other fluids over the hot engine. Such fluids (e.g. the anti-
freeze contained in the coolant) may ignite!
•
Avoid short circuits in the electrical system - particularly on the battery.
•
Never place your hand into the radiator fan as long as the engine is still
warm. The fan might suddenly start running!
•
Never open the cap of the coolant expans ion bottle as long as the engine is
still warm. The cooling system is pressurized!
•
Cover over the cap of the coolant expans ion reservoir with a large cloth when
opening it as protection for your face , hands and arms from hot steam or hot
coolant.
•
Do not let objects, such as e.g. cle aning cloth or tools lie in the engine
compartment.
•
If you wish to work under the vehicl e, you must secure the vehicle from
rolling away and support it with suitable supporting blocks; the lifting jack* is
not sufficient for this - risk of injury!
•
In cases where it be necessary to carry out inspection work when the engine
is running there is an additi onal risk from rotating parts (e.g. the V-ribbed belt,
alternator, radiator fan) and from the high-voltage ignition system. Please
observe in addition the following: −
Never touch the electrical cables of the ignition system.
− Absolutely avoid any jewellery, loose items of clothing or long hair from
getting into the rotating parts of the engine - Hazard! Therefore remove any
jewellery beforehand, tie up your hair and wear tight fitting clothing.
•
Please also comply with the warnin g instructions stated below when
carrying out any essential work on the fuel system or on the electrical system:
− Always separate the car batter y from the electrical system.
− Do not smoke.
− Never carry out any work close to naked flames.
− Always keep a working fire extinguisher at hand.Caution
When replenishing fluids in the engine, always ensure that the fluids are on no
account mixed up. This may result in ma jor operating problems and also vehicle
damage!Overview of the engine compartment
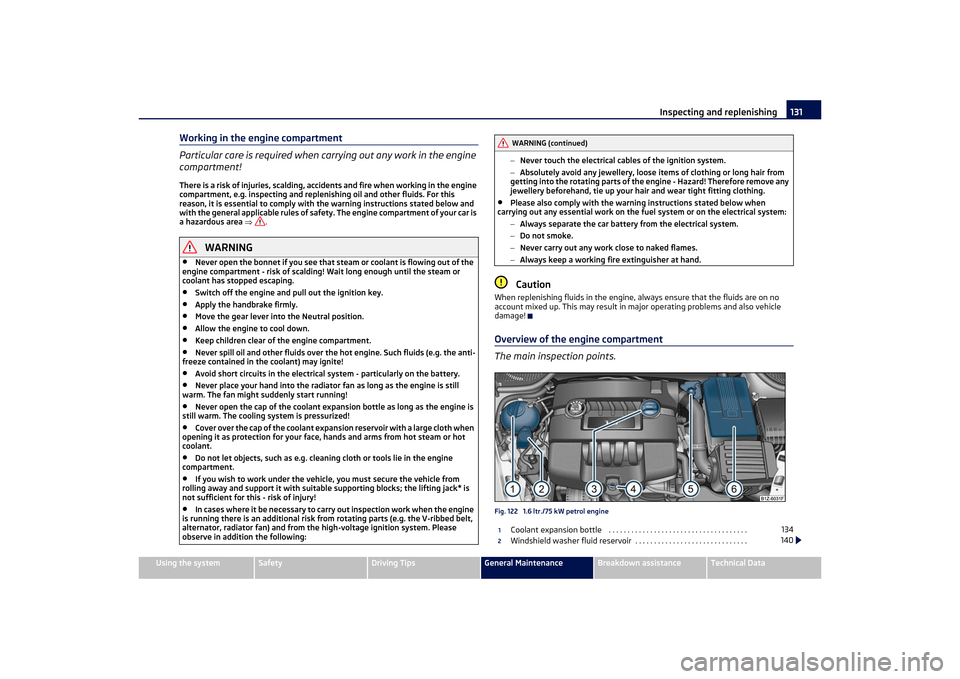
The main inspection points.Fig. 122 1.6 ltr./75 kW petrol engine
Coolant expansion bottle . . . . . . . . . . . . . . . . . . . . . . . . . . . . . . . . . . . . .
Windshield washer fluid reservoir . . . . . . . . . . . . . . . . . . . . . . . . . . . . . . WARNING (continued)
1
134
2
140
s2lk.2.book Page 131 Monday, April 18, 2011 7:41 AM
Page 133 of 183
Inspecting and replenishing
132Engine oil filler opening . . . . . . . . . . . . . . . . . . . . . . . . . . . . . . . . . . . . . . .
Engine oil dipstick . . . . . . . . . . . . . . . . . . . . . . . . . . . . . . . . . . . . . . . . . . . .
Brake fluid reservoir . . . . . . . . . . . . . . . . . . . . . . . . . . . . . . . . . . . . . . . . . .
Battery (below a cover) . . . . . . . . . . . . . . . . . . . . . . . . . . . . . . . . . . . . . . . Note
The location of the inspection points in the engine compartment of petrol and diesel
engines is practically identical.Engine oilCheck engine oil level
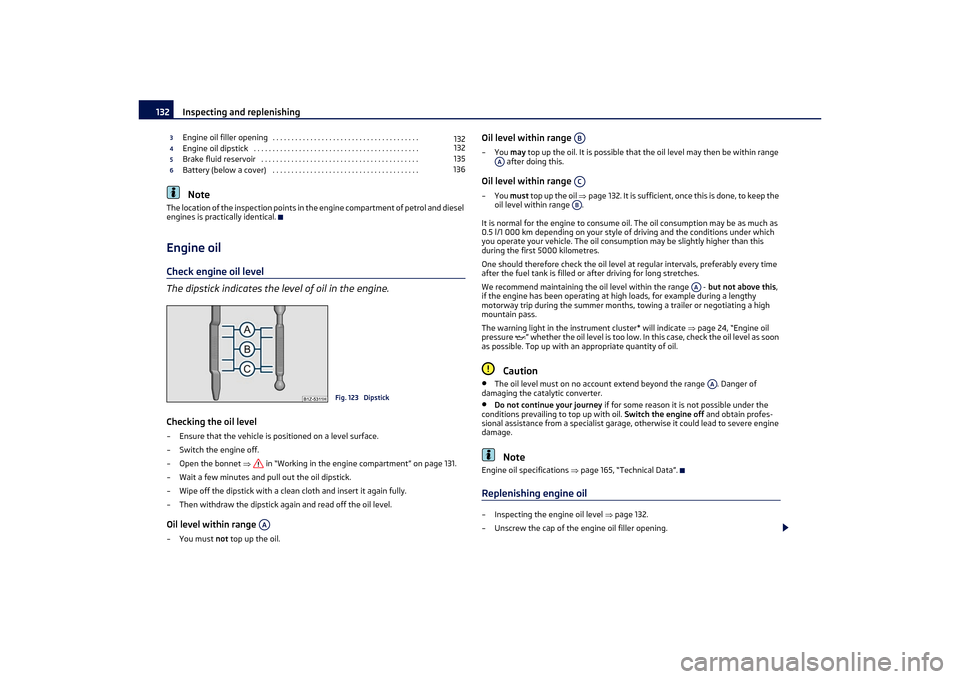
The dipstick indicates the level of oil in the engine.Checking the oil level– Ensure that the vehicle is positioned on a level surface.
– Switch the engine off.
–Open the bonnet in “Working in the engine compartment” on page 131.
– Wait a few minutes and pull out the oil dipstick.
– Wipe off the dipstick with a clea n cloth and insert it again fully.
– Then withdraw the dipstick ag ain and read off the oil level.Oil level within range –You must not top up the oil.
Oil level within range –You may top up the oil. It is possible that the oil level may then be within range
after doing this.Oil level within range –You must top up the oil page 132. It is sufficient, once this is done, to keep the
oil level within range .
It is normal for the engine to consume oil. The oil consumption may be as much as
0.5 l/1 000 km depending on your style of driving and the conditions under which
you operate your vehicle. The oil consumption may be slightly higher than this
during the first 5000 kilometres.
One should therefore check the oil level at regular intervals, preferably every time
after the fuel tank is filled or after driving for long stretches.
We recommend maintaining the oil level within the range - but not above this,
if the engine has been operating at high loads, for example during a lengthy
motorway trip during the summer months, towing a trailer or negotiating a high
mountain pass.
The warning light in the instrument cluster* will indicate page 24, “Engine oil
pressure ” whether the oil level is too low. In this case, check the oil level as soon
as possible. Top up with an appropriate quantity of oil.
Caution
•
The oil level must on no account extend beyond the range . Danger of
damaging the catalytic converter.
•
Do not continue your journey if for some reason it is not possible under the
conditions prevailing to top up with oil. Switch the engine off and obtain profes-
sional assistance from a specialist garage, otherwise it could lead to severe engine
damage.Note
Engine oil specifications page 165, “Technical Data”.Replenishing engine oil– Inspecting the engine oil level page 132.
– Unscrew the cap of the engine oil filler opening.
3
132
4
132
5
135
6
136
Fig. 123 Dipstick
AA
AB
AA
ACAB
AA
AA
s2lk.2.book Page 132 Monday, April 18, 2011 7:41 AM
Page 136 of 183
Inspecting and replenishing135
Using the system
Safety
Driving Tips
General Maintenance
Breakdown assistance
Technical Data
as soon as possible arrange adjustment
to correct the mixing ratio of water and
coolant additive again by a specialist garage.
Only use fresh coolant for topping up the system.
Do not fill up over the “MAX” marking! Exce ss coolant which is heated up is forced
out of the cooling system through the pressu re relief valve in the cap of the coolant
compensation bottle.
Wait until the engine has cooled down for a system which has suffered a major loss
of coolant before pouring in coolant. This is necessary to avoid engine damage.
WARNING
•
The cooling system is pressurized! Do not open the cap of the coolant expan-
sion bottle if the engine is still hot - risk of scalding!
•
The coolant additive and thus all of the coolant is harmful to your health.
Avoid contact with the coolant. Coolant vapours are also harmful to the health.
It is important, therefore, to always safely store any coolant additive in its orig-
inal container out of the reach of children - risk of poisoning!
•
If any splashes of coolant get into your eyes, rinse out your eyes immediately
with clear water and contact a doctor as soon as possible.
•
You should also consult a doctor wi thout delay if you have inadvertently
swallowed coolant.Caution
Do not continue your journey if for some reason it is not possible under the condi-
tions prevailing to top up with coolant. Switch the engine off and obtain profes-
sional assistance from a specialist garage, otherwise it could lead to severe engine
damage.
For the sake of the environment
Do not re-use coolant if it is necessary to drain the coolant in the system. It should
be collected and disposed of in comp liance with environmental protection
regulations.Radiator fan
The radiator fan may switch on suddenly.The radiator fan is driven by an electric motor and controlled according to the
coolant temperature. The radiator fan may continue running for up to 10 minutes after the engine has
been switched off - even if the ignition is also off. It may also switch on suddenly
after a certain time, if
•
the coolant temperature has risen beca
use of an accumulation of heat or
•
the warm engine compartment is heated up additionally by strong sunlight.
WARNING
You must therefore be aware when workin g in the engine compartment that the
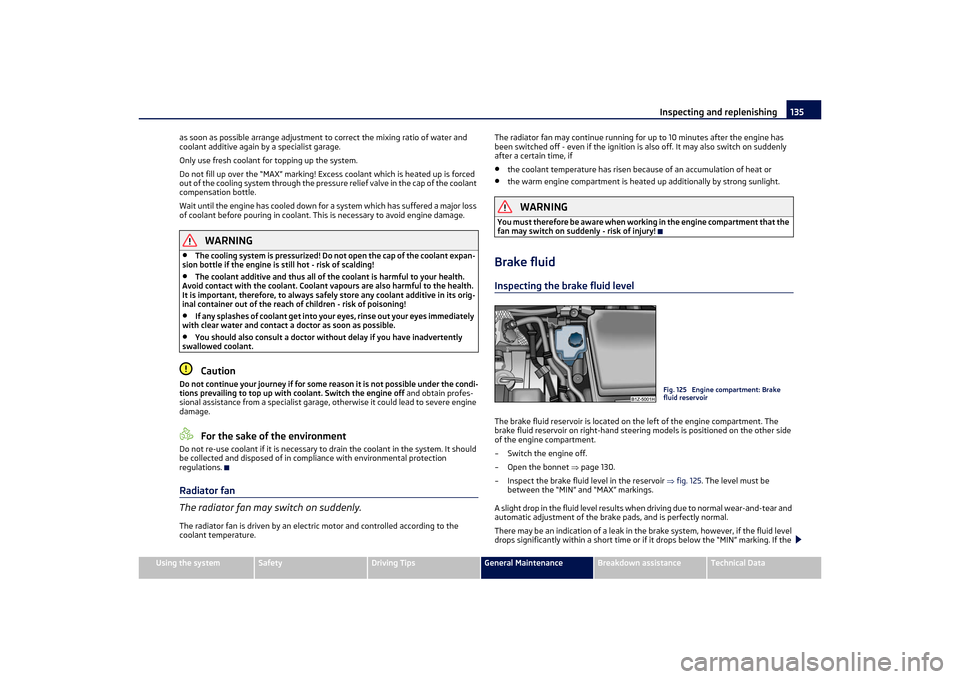
fan may switch on suddenly - risk of injury!Brake fluidInspecting the brake fluid levelThe brake fluid reservoir is located on the left of the engine compartment. The
brake fluid reservoir on right-hand steering models is positioned on the other side
of the engine compartment.
– Switch the engine off.
– Open the bonnet page 130.
– Inspect the brake fluid level in the reservoir fig. 125 . The level must be
between the “MIN” and “MAX” markings.
A slight drop in the fluid level results when driving due to normal wear-and-tear and
automatic adjustment of the brak e pads, and is perfectly normal.
There may be an indication of a leak in the brake system, however, if the fluid level
drops significantly within a sh ort time or if it drops below the “MIN” marking. If the
Fig. 125 Engine compartment: Brake
fluid reservoir
s2lk.2.book Page 135 Monday, April 18, 2011 7:41 AM
Page 137 of 183

Inspecting and replenishing
136
brake fluid level is too low, this is indicated by the warning light page 27, “Brake
system ” lighting up in the instrument cluster. In this case stop immediately and
do not drive any further! Ob tain professional assistance.
WARNING
•
Read and observe the warning notes page 131, “Working in the engine
compartment” before working in the engine compartment.
•
If the fluid level has dropped below the MIN marking, do not drive any further
- risk of accident! Obtain professional assistance.
Replacing brake fluidBrake fluid absorbs moisture. This causes the fluid to absorb moisture from the
surrounding air over a period of time. Excessive water in the brake fluid may be the
cause of corrosion in the brake system. The water content also lowers the boiling
point of the brake fluid.
One may only use new genuine brake fluid from Škoda Auto. The brake fluid must
comply with one of the followin g standards or specifications:•
VW 50114
•
FMVSS 116 DOT4
•
DIN ISO 4925 CLASS 4
We recommend that you have the brake fluid replaced by an authorised Škoda
Service Partner as part of an Inspection Service.
WARNING
Using old brake fluid can result in severe stress on the brakes because of the
formation of vapour bubbles in the br ake system. This greatly impairs the
braking efficiency and thus also the safety of your vehicle.
Caution
Brake fluid damages the paintwork of the vehicle.
For the sake of the environment
In view of the problems involved with proper disposal of brake fluid, the special
tools and the professional knowledge requ ired, you should have the brake fluid
replaced by a Škoda Service Partner.
BatteryWorking on the batteryFig. 126 Engine compartment: Polyester cover of the vehicle battery / plastic cover of the
vehicle batteryThe battery is located in the engine compartment under a polyester cover fig. 126
- left, or it may be located under a plastic cover* fig. 126 - right.
– Open the battery cover in direction of arrow fig. 126 or press the elastic
interlock on the side of the battery co ver, fold the cover up and remove it.
– The installation of the battery co ver takes place in the reverse order.
The edge of the battery cover fig. 126 - left is inserted between the battery and
the side wall of the battery cover when working on the battery.
Removal and installation of the battery is not recommended since it can, under
certain circumstances, lead to major damage. Contact a specialist garage.
There is a risk of injuries, scalding, accidents and burns when carrying out any work
on the battery and on the electrical system. For this reason, it is essential to comply
with the warning instructions stated below and with the general applicable
rules of safety.
WARNING
•
The battery acid is strongly corrosiv e and must, therefore, be handled with
the greatest of care. Always wear protective gloves, eye and skin protection
when handling batteries. Corrosive fumes in the air irritate the air passages and
lead to conjunctivitis and inflammation of the air passages in the lungs. Battery
acid corrodes dental enamel and create s deep wounds after contact with the
skin which take a long time to heal. Re peated contact with diluted acids causes
A1
A2
s2lk.2.book Page 136 Monday, April 18, 2011 7:41 AM
Page 145 of 183
Wheels and Tyres
144
and when adopting an appropri ately cautious style of driving. It should be replaced
as quickly as possible by a normal wheel.
WARNING
•
Only use those tyres or wheel rims which have been approved for your model
of Škoda Auto vehicle. Failure to observ e this instruction will adversely affect
the road safety of your vehicle - risk of accident! Approval and licensing of your
vehicle on public roads may also become void as a result.
•
You must on no account drive at a high er speed than is permissible for your
tyres - risk of an accident resulting from tyre damage and loss of control over
your vehicle.
•
T y r e s w h i c h a r e 6 y e a r s o l d o r m o r e s h o u l d o n l y b e f i t t e d i n e x c e p t i o n a l c a s e s
and when adopting an appropriately cautious style of driving.
•
Never fit tyres which have already been used without having adequate
knowledge of their previous history. Tyres age even if they have not been used
at all or only very little. A spare tyre must only be used in exceptional cases and
only then when adopting an appropriately cautious style of driving.
•
Do not, where possible, replace individu al tyres but at least replace them on
both wheels of a given axle at the same time. Always fit the tyres with the
deeper tread depth to the front wheels.For the sake of the environment
Old tyres must be disposed of in conformity with the appropriate regulations.
Note
It is not normally possible to fit wheels from other models of cars for technical
reasons. This may also appl y in certain circumstances to the wheels of the same
type of vehicle.Wheel boltsWheels and wheel bolts are matched to each other in terms of design. Each time
you fit other wheels - e.g. light alloy wheels or wheels with winter tyres - you must
therefore also use the matching wheel bolts of the correct length and shape of
spherical cap. This is essential to ensure that the wheels are tightly fitted and that
the brake system operates properly.
If you retrofit wheel trims (or have this done), please also ensure that an adequate
flow of air remains assured for cooling the brake system. The authorised Škoda Service Partners are instructed in the technical possibilities
which exist regarding converting or retr
ofitting tyres, wheels and wheel trims.
WARNING
•
In case of incorrect treatment of the wheel bolts, the wheel can loosen when
the car is moving - risk of accident!
•
The wheel bolts must be clean and must turn easily. However, they must
never be treated with grease or oil.
•
If the wheel bolts are tightened to a too low tightening torque, the rim can
lossen when the car is moving - risk of accident! A tightening torque which is too
high can damage the bolts and threads and this can result in permanent defor-
mation of the contact surfaces on the rim.Caution
The prescribed tightening torque of the wheel bolts for steel and light alloy wheels
is 120 Nm.Winter tyresThe handling of your vehicle will be signif icantly improved when driving on wintry
roads if you fit winter tyres. Summer tyres do not offer the same grip on ice, snow
and at temperatures below 7 °C because of their construction (width, rubber blend,
tread pattern). This particularly applies to vehicles which are equipped with low-
profile tyres or high-speed tyres (code index H or V on wall of tyre).
Winter tyres must be mounted on all four wheels to obtain the best handling char-
acteristics.
You must only fit those types of winter tyre which are approved for your vehicle. The
permissible sizes of winter tyres are stated in your vehicle documents. Approvals
may differ because of national legislation.
Please remember that the tyres should be inflated to 20 kPa (0.2 bar) more than is
the case for summer tyres page 141.
Winter tyres no longer offer the same winter performance once the tyre tread has
worn down to a depth of about 4 mm.
Ageing also causes winter tyres to lose most of their winter performance properties
- even in cases where the remaining tread depth is still clearly more than 4 mm.
Speed restrictions apply to winter tyres as well as to summer tyres page 143,
.
s2lk.2.book Page 144 Monday, April 18, 2011 7:41 AM
Page 150 of 183
Breakdown assistance149
Using the system
Safety
Driving Tips
General Maintenance
Breakdown assistance
Technical Data
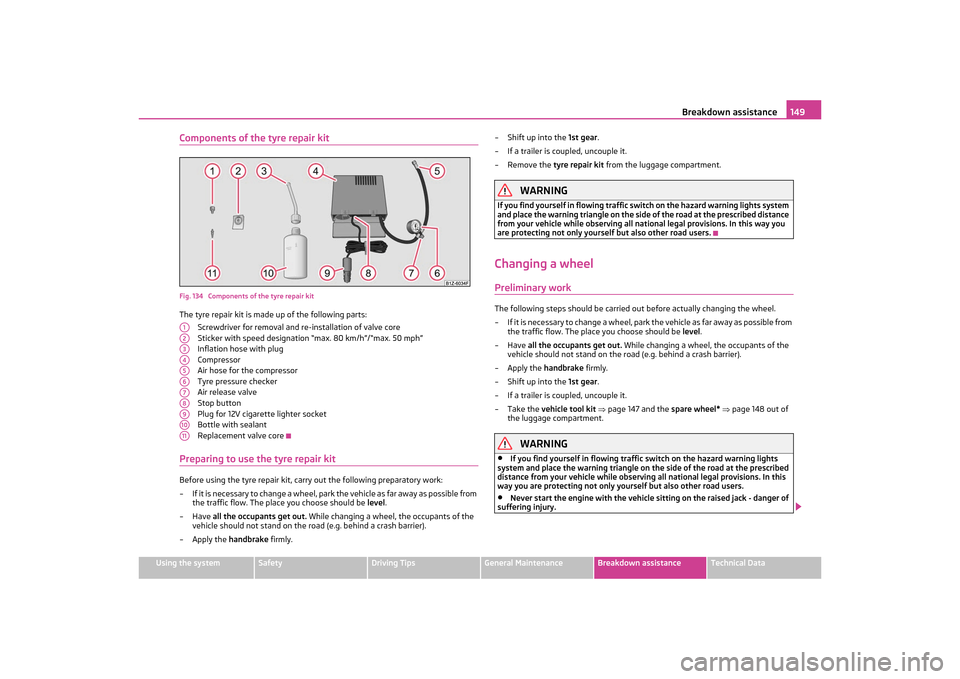
Components of the tyre repair kitFig. 134 Components of the tyre repair kitThe tyre repair kit is made up of the following parts:
Screwdriver for removal and re-installation of valve core
Sticker with speed designation “max. 80 km/h”/“max. 50 mph”
Inflation hose with plug
Compressor
Air hose for the compressor
Tyre pressure checker
Air release valve
Stop button
Plug for 12V cigarette lighter socket
Bottle with sealant
Replacement valve corePreparing to use the tyre repair kitBefore using the tyre repa ir kit, carry out the following preparatory work:
– If it is necessary to change a wheel, park the vehicle as far away as possible from
the traffic flow. The plac e you choose should be level .
–Have all the occupants get out. While changing a wheel, the occupants of the
vehicle should not stand on the ro ad (e.g. behind a crash barrier).
– Apply the handbrake firmly. – Shift up into the
1st gear.
– If a trailer is coup led, uncouple it.
– Remove the tyre repair kit from the luggage compartment.
WARNING
If you find yourself in flowing traffic sw itch on the hazard warning lights system
and place the warning triangle on the side of the road at the prescribed distance
from your vehicle while observing all nat ional legal provisions. In this way you
are protecting not only yourself but also other road users.Changing a wheelPreliminary workThe following steps should be carried ou t before actually changing the wheel.
– If it is necessary to change a wheel, park the vehicle as far away as possible from
the traffic flow. The place you choose should be level.
–Have all the occupants get out. While changing a wheel, the occupants of the
vehicle should not stand on the road (e.g. behind a crash barrier).
–Apply the handbrake firmly.
– Shift up into the 1st gear.
– If a trailer is coup led, uncouple it.
–Take the vehicle tool kit page 147 and the spare wheel* page 148 out of
the luggage compartment.
WARNING
•
If you find yourself in flowing traffi c switch on the hazard warning lights
system and place the warning triangle on the side of the road at the prescribed
distance from your vehicle while observin g all national legal provisions. In this
way you are protecting not only yourself but also other road users.
•
Never start the engine with the vehicle sitting on the raised jack - danger of
suffering injury.
A1A2A3A4A5A6A7A8A9A10A11
s2lk.2.book Page 149 Monday, April 18, 2011 7:41 AM
Page 155 of 183
Breakdown assistance
154WARNING
•
The non-insulated parts of the termi nal clamps must never make contact
with each other. Furthermore, the cable connected to the positive terminal of
the battery must not come into contact with electrically conducting parts of the
vehicle - risk of a short circuit!
•
Do not affix the jump starting cables to the negative terminal of the
discharged battery. There is the risk of detonating gas seeping out the battery
being ignited by the strong spark which results from the engine being started.
•
Run the jump-start cables so that they cannot be caught by any rotating
parts in the engine compartment.
•
Do not bend over the batteries - risk of caustic burns!
•
The vent screws of the battery cells must be tightened firmly.
•
Keep any sources of ignition (naked fl ame, smouldering cigarettes etc.) away
from the battery - risk of an explosion!
•
Never jump-start the batteries which have a too low electrolyte level - risk
of explosion and caustic burns!
Tow-starting and towing vehicleGeneralPlease pay attention to the following instru ctions if you are going to use a tow rope:Driver of the towing vehicle– Do not drive off until the tow rope is taught.
– Release the clutch particularly gently when starting off.Driver of the towed vehicle– Switch the ignition on so that the steering wheel is not blocked and you can also
operate the turn signal lights, the headli ght flasher, the windscreen wipers and
windscreen washer system.
–Move the gearshift lever into Neutral.
– Note that the brake servo unit and power steering only operate if the engine is running. You will require significantly greater physical force to depress the brake
pedal and to steer the vehicle if the engine is not running.
– Ensure that the tow rope is always kept taught. Tow rope or tow bar
A tow
bar is safest way of towing a vehicle and also minimizes any shocks. You can
use a tow rope only if a suitable tow bar is not available.
The tow rope must be elastic to protect the vehicle. Thus one should only use
plastic fibre rope or a rope made out of a similarly elastic material.
Only attach the tow rope to the towing eyes provided for this purpose page 155
and page 155.
Driving style
Towing another vehicle requires a certain amount of practice. Both drivers should
be familiar with the particular points about towing a vehicle. Unskilled drivers
should not attempt to tow in another vehicle or to be towed in.
One should be constantly vigilant not to allow impermissibly high towing forces or
jerky loadings. There is always a risk of excessive stresses and damage resulting at
the points to which you attach the tow rope or tow bar when you attempt to tow a
vehicle which is not standing on a paved road.
Caution
If the gearbox of your vehicle no longer contains any oil because of a defect, your
vehicle must only be towed in with the driven wheels raised clear of the ground, or
on a special vehicle tr ansporter or trailer.
Note
•
Please comply with any national legal provisions particularly regarding the
switched on signal systems, when towing in or tow-starting another vehicle.
•
The tow rope must not be twisted as it ma y in certain circumstances result in the
front towing eye being unsc rewed out of your vehicle.
s2lk.2.book Page 154 Monday, April 18, 2011 7:41 AM
Page 159 of 183
Fuses and light bulbs
158
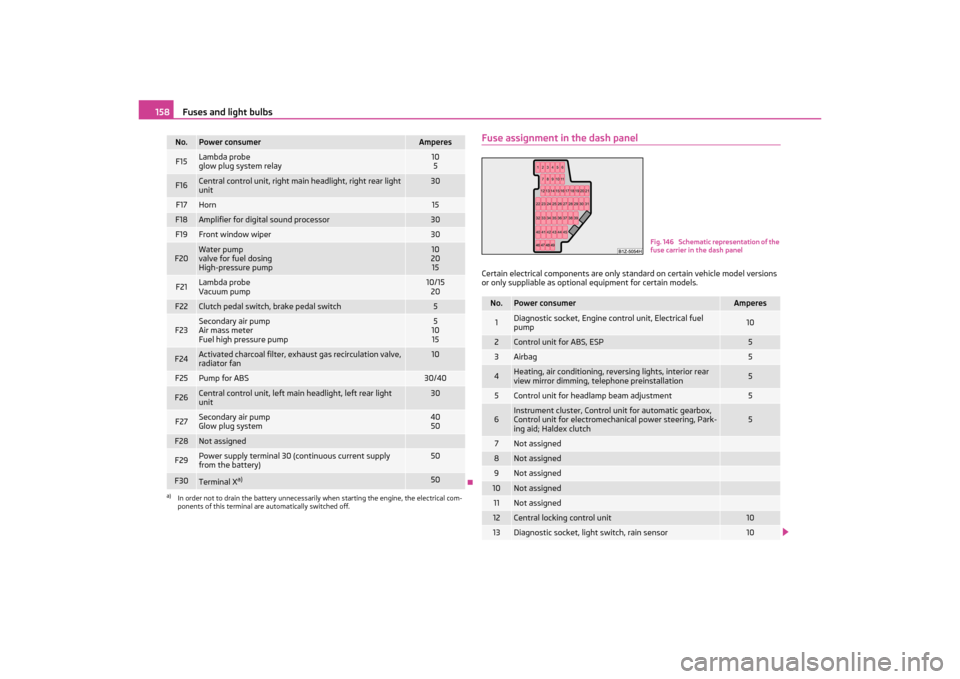
Fuse assignment in the dash panelCertain electrical components are only st andard on certain vehicle model versions
or only suppliable as optional equipment for certain models.
F15
Lambda probe
glow plug system relay
10
5
F16
Central control unit, right main headlight, right rear light
unit
30
F17
Horn
15
F18
Amplifier for digital sound processor
30
F19
Front window wiper
30
F20
Water pump
valve for fuel dosing
High-pressure pump
10
20
15
F21
Lambda probe
Vacuum pump
10/15 20
F22
Clutch pedal switch, brake pedal switch
5
F23
Secondary air pump
Air mass meter
Fuel high pressure pump
5
10
15
F24
Activated charcoal filter, exha ust gas recirculation valve,
radiator fan
10
F25
Pump for ABS
30/40
F26
Central control unit, left main headlight, left rear light
unit
30
F27
Secondary air pump
Glow plug system
40 50
F28
Not assigned
F29
Power supply terminal 30 (continuous current supply
from the battery)
50
F30
Terminal X
a)
50
a)In order not to drain the battery unnecessarily when starting the engine, the electrical com-
ponents of this terminal are automatically switched off.No.
Power consumer
Amperes
No.
Power consumer
Amperes
1
Diagnostic socket, Engine control unit, Electrical fuel
pump
10
2
Control unit for ABS, ESP
5
3
Airbag
5
4
Heating, air conditioning, reversing lights, interior rear
view mirror dimming, telephone preinstallation
5
5
Control unit for headlamp beam adjustment
5
6
Instrument cluster, Control unit for automatic gearbox,
Control unit for electromechanical power steering, Park-
ing aid; Haldex clutch
5
7
Not assigned
8
Not assigned
9
Not assigned
10
Not assigned
11
Not assigned
12
Central locking control unit
10
13
Diagnostic socket, light switch, rain sensor
10
Fig. 146 Schematic representation of the
fuse carrier in the dash panel
s2lk.2.book Page 158 Monday, April 18, 2011 7:41 AM
Page 161 of 183
Fuses and light bulbs
160
A stowage place for the bulbs is located in the box in the spare wheel.
Bulb - Overview
WARNING
•
Bulbs H7 and H1 are pressurised and ma y burst when changing the bulb - risk
of injury!
•
It is recommended to wear gloves and safety glasses when changing a bulb.Caution
Do not take hold of the glass bulb with naked fingers (even the smallest amount of
dirt reduces the working life of the light bu lb). Use a clean cloth, serviette or some-
thing similar.
Note
This Owner's Manual only describes the replacement of bulbs where it is assumed
that no major complications will arise. Other light bulbs should be replaced by your
specialist garage.
9)The small box with replacement bulbs is part of the basic equipping of the vehicle in some
countries.Front headlight
Halogen headlight
Low beam light
H7
Main beam light
H1
Parking lights
W5W
Turn signals
PY21W
Fog lights*
H8
Light unit (Octavia)
Bulb
Reversing light
P21W
Turn signals
PY21W
Twin filament light bulb for the brake lights and tail
lights
P21/4W
Twin filament light bulb for the rear fog lights and tail
lights
P21/4W
Parking lights
W3W
Rear light unit (Combi)
Bulb
Reversing lights, brake lights, tail lights and rear fog
light
P21W
Turn signals
PY21W
Parking lights
W3W
Others
Bulb
Side turn signal lights
LED
Licence plate light
C5W
3. Brake light
LED
Interior lighting
C10W
Reading lights
W5W
Luggage compartment light
W5W
s2lk.2.book Page 160 Monday, April 18, 2011 7:41 AM
Page 167 of 183
Technical Data
166
Sticker on inside of fuel filler flap
The stickers are affixed to the inside of the fuel filler flap and contain the following
information:•
The prescribed types of fuel,
•
Tyre size,
•
Tyre pressure.
Fuel consumption based on ECE regulations and EC guidelinesDepending on the range of the special equipment, style of driving, traffic situation,
weather influences and vehicle condition, the consumption values which in practice
result when using the vehicle can deviate from the indicated values.
Urban traffic
The consumption measurement in urban traffic begins with starting of the cold
engine. Afterwards the normal urban traffic is simulated.
Non-urban traffic
For the consumption measurement in non-ur ban traffic the vehicle, as in daily
motoring, is accelerated and braked several times in all gears. The vehicle speed
changes within the range from 0 to 120 km/h.
Combined traffic
The consumption value in the combined traffic consists of 37 % from the value for
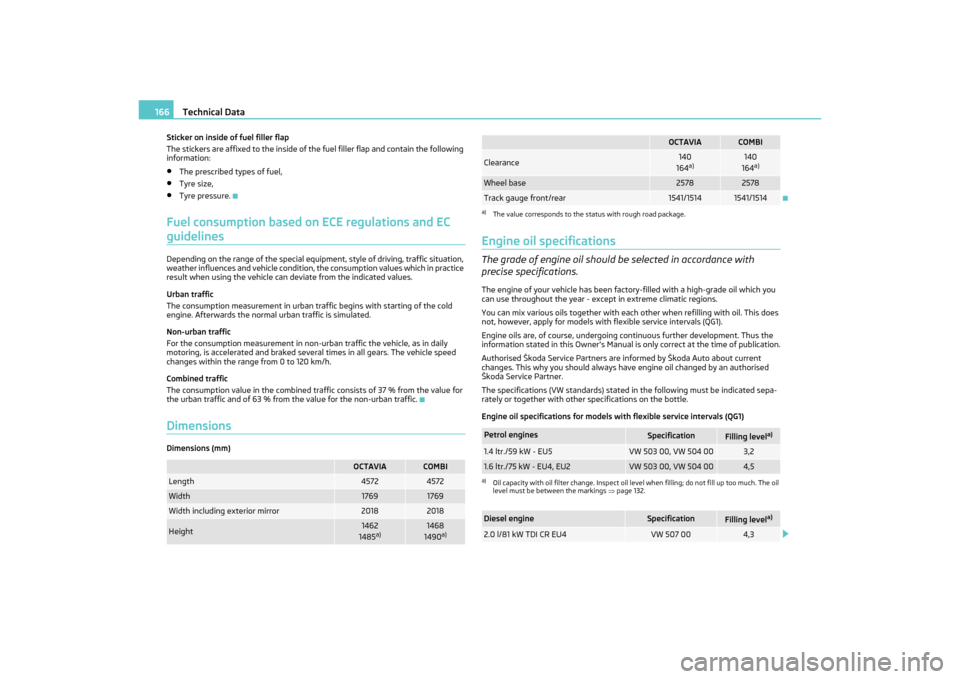
the urban traffic and of 63 % from the value for the non-urban traffic.DimensionsDimensions (mm)
Engine oil specificationsThe grade of engine oil should be selected in accordance with
precise specifications.The engine of your vehicle has been factory-filled with a high-grade oil which you
can use throughout the year - except in extreme climatic regions.
You can mix various oils together with each other when refilling with oil. This does
not, however, apply for models with flexible service intervals (QG1).
Engine oils are, of course , undergoing continuous further development. Thus the
information stated in this Owner's Manual is only correct at the time of publication.
Authorised Škoda Service Partners are informed by Škoda Auto about current
changes. This why you should always have engine oil changed by an authorised
Škoda Service Partner.
The specifications (VW standards) stated in the following must be indicated sepa-
rately or together with other specifications on the bottle.
Engine oil specifications for models with flexible service intervals (QG1)
OCTAVIA
COMBI
Length
4572
4572
Width
1769
1769
Width including exterior mirror
2018
2018
Height
1462
1485
a)
1468
1490
a)
Clearance
140
164a)
140
164a)
Wheel base
2578
2578
Track gauge front/rear
1541/1514
1541/1514
a)The value corresponds to the status with rough road package.Petrol engines
Specification
Filling level
a)
a)Oil capacity with oil filter change. Inspect oil le vel when filling; do not fill up too much. The oil
level must be between the markings page 132.1.4 ltr./59 kW - EU5
VW 503 00, VW 504 00
3,2
1.6 ltr./75 kW - EU4, EU2
VW 503 00, VW 504 00
4,5
Diesel engine
Specification
Filling level
a)
2.0 l/81 kW TDI CR EU4
VW 507 00
4,3
OCTAVIA
COMBI
s2lk.2.book Page 166 Monday, April 18, 2011 7:41 AM