door lock SKODA RAPID 2012 1.G User Guide
[x] Cancel search | Manufacturer: SKODA, Model Year: 2012, Model line: RAPID, Model: SKODA RAPID 2012 1.GPages: 180, PDF Size: 4.36 MB
Page 40 of 180

Interior light
Interior lighting – version 1
Fig. 23
Interior lighting – version 1
Switching on
› Press switch A
» Fig. 23 towards the edge of the light, the symbol
appears.
Switching off
› Press the switch A
» Fig. 23 in the middle position
O.
Operating with the door contact switch
› Press switch A
» Fig. 23 towards the middle of the light, the symbol
ap-
pears.
Reading lights
› Press switch B
» Fig. 23 to switch the reading lights on or off.
If operating lights with the door contact switch is enabled (switch A
» Fig. 23 is
in position ), the light will come on when:
› the vehicle is unlocked;
› one of the doors is opened;
› or the ignition key is removed.
If operating lights with the door contact switch is enabled (switch A
is in position
), the light will turn off when:
› the vehicle is locked;
› the ignition is switched on;
› about 30 seconds after all the doors have been closed.
If a door remains open, or if the switch A
is in the position
, the interior light
goes out after 10
minutes to prevent the battery from discharging. Ð Interior lighting – version 2
Fig. 24
Interior lighting – version 2
Switching on
› Press the switch
» Fig. 24 into position .
Switching off
› Press the switch
» Fig. 24 into position 0.
Operating with the door contact switch
› Press the switch
» Fig. 24 into position .
The same principles apply for interior lighting version 2 as for » page 38, Interior
lighting – version 1 . Ð Interior lights at the rear
Fig. 25
Interior lights at the rear
Press switch » Fig. 25 to turn the light light on or off. Ð
38 Using the system
Page 44 of 180
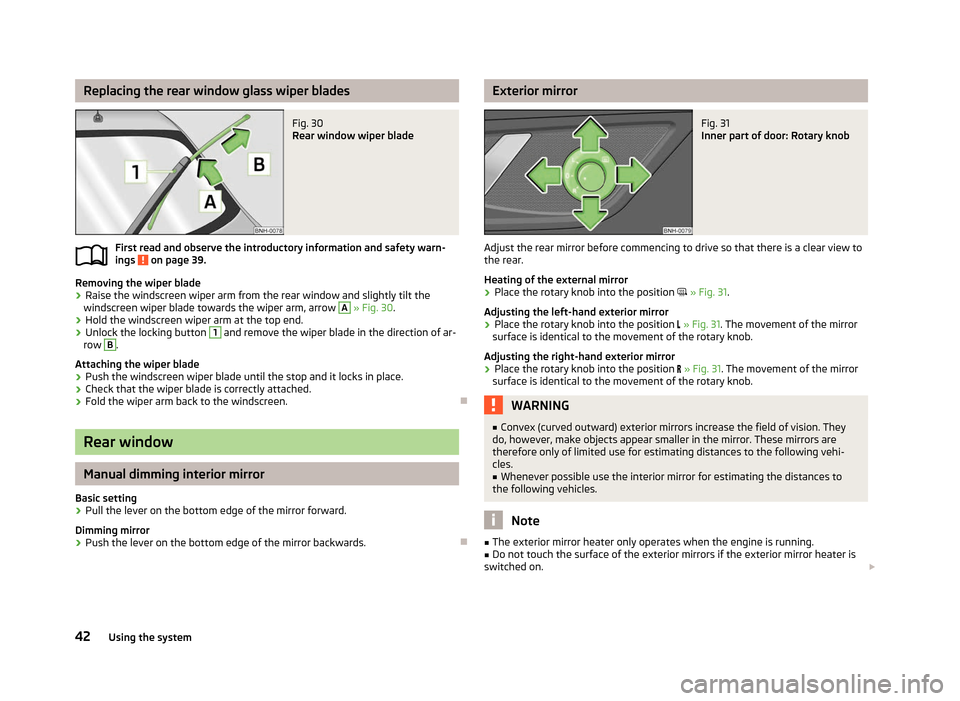
Replacing the rear window glass wiper blades
Fig. 30
Rear window wiper blade
First read and observe the introductory information and safety warn-
ings on page 39.
Removing the wiper blade
› Raise the windscreen wiper arm from the rear window and slightly tilt the
windscreen wiper blade towards the wiper arm, arrow A
» Fig. 30
.
› Hold the windscreen wiper arm at the top end.
› Unlock the locking button 1
and remove the wiper blade in the direction of ar-
row B
.
Attaching the wiper blade
› Push the windscreen wiper blade until the stop and it locks in place.
› Check that the wiper blade is correctly attached.
› Fold the wiper arm back to the windscreen. ÐRear window
Manual dimming interior mirror
Basic setting
› Pull the lever on the bottom edge of the mirror forward.
Dimming mirror
› Push the lever on the bottom edge of the mirror backwards. Ð
ä Exterior mirror
Fig. 31
Inner part of door: Rotary knob
Adjust the rear mirror before commencing to drive so that there is a clear view to
the rear.
Heating of the external mirror
› Place the rotary knob into the position
» Fig. 31.
Adjusting the left-hand exterior mirror
› Place the rotary knob into the position
» Fig. 31. The movement of the mirror
surface is identical to the movement of the rotary knob.
Adjusting the right-hand exterior mirror
› Place the rotary knob into the position
» Fig. 31. The movement of the mirror
surface is identical to the movement of the rotary knob. WARNING
■ Convex (curved outward) exterior mirrors increase the field of vision. They
do, however, make objects appear smaller in the mirror. These mirrors are
therefore only of limited use for estimating distances to the following vehi-
cles.
■ Whenever possible use the interior mirror for estimating the distances to
the following vehicles. Note
■ The exterior mirror heater only operates when the engine is running.
■ Do not touch the surface of the exterior mirrors if the exterior mirror heater is
switched on. £
42 Using the system
Page 53 of 180
›
The mounts of the cover 3
» Fig. 41 must be positioned above the holders 2
of the side trim panel.
› Interlock the cover by lightly knocking on the top side of the cover in the area
between the holders.
› Hook the support straps 1
on the boot lid.
WARNING
No objects should be placed on the boot cover, the vehicle occupants could be
endangered if there is sudden braking or the vehicle collides with something. CAUTION
■ The maximum permissible load of the luggage compartment cover is 1 kg.
■ When closing the boot lid, jamming and damage to the luggage compartment
cover or the side trim panel can occur if handled in an unprofessional way. The
following guidelines must be observed. ■ The mounts of the cover 3
» Fig. 41 must be interlocked in the holders of the
side trim panel 2
.
■ The items which are transported must not exceed the height of the luggage
compartment cover. ■ The cover must not be jammed in the seal of the boot lid when it is in the
opened position.
■ There must be no object in the gap between the opened cover and the rear
backrest. Note
Opening the boot lid also lifts up the boot cover. ÐRoof rack system
ä
Introduction
This chapter contains information on the following subjects:
Attachment points 52
Roof load 52 WARNING
■ The items which you transport on the roof bar system must be reliably at-
tached – risk of accident!
■ Always secure the load with appropriate and undamaged lashing straps or
tensioning straps.
■ Distribute the load evenly over the roof rack system.
■ The handling properties of your vehicle change when you transport heavy or
bulky items on the roof bar system as a result of the displacement of the cen-
tre of gravity and the increased wind attack area – risk of accident! The style
of driving and speed must therefore be adapted to the current circumstances. ■ Avoid abrupt and sudden driving/braking manoeuvres.
■ Adjust the speed and driving style to the visibility, weather, road and traffic
conditions. ■ The permissible roof load, permissible axle loads and gross permissible
weight of your vehicle must not be exceeded under any circumstances – risk
of accident! CAUTION
■ Only use roof rack systems approved by
ŠKODA.
■ If other roof rack systems are used or if the roof bars are not fitted correctly,
any resulting damage to the vehicle is not covered by the warranty. It is therefore
essential that the supplied fitting instructions for the roof rack system are ob-
served.
■ On models fitted with a power sliding/tilting roof, ensure that the opened slid-
ing/tilting roof does not strike any items of luggage transported on the roof. ■ Ensure that the boot lid does not hit the roof load when opened.
■ The height of the vehicle changes after mounting a roof luggage rack system
and the load that is secured to it. Compare the vehicle height with available clear-
ances, such as underpasses and garage doors.
■ Always remove the roof luggage rack system before entering an automated car
wash. ■ Ensure the roof aerial is not impaired by the secured load. For the sake of the environment
The increased aerodynamic drag results in a higher fuel consumption. Ð
51
Seats and Stowage
Page 61 of 180

Heating and air conditioning system
Heating and air conditioning system
Introductory information
The heating effect is dependent upon the coolant temperature, thus full heat
output only occurs when the engine has reached its operating temperature.
If the cooling system is switched on, the temperature and air humidity drops in
the vehicle. The well-being of the occupants of the car is enhanced as a result of
this particularly at high outside temperatures and a high air humidity. The system
prevents the windows misting up during the cold season of the year.
It is possible to briefly activate recirculated air mode to enhance the cooling ef-
fect.
The air inlet in front of the windscreen must be free of ice, snow or leaves to en-
sure that the heating and cooling system operates properly.
After switching on the cooling Condensation from the evaporator of the air condi-
tioning may drip down and form a puddle below the vehicle. This is quite normal
and not an indication of a leak! WARNING
■ For your own safety and that of other road users, ensure that all the win-
dows are free of ice, snow and misting. Please familiarize yourself about how
to correctly operate the heating and ventilation systems, how to demist and
defrost the windows, as well as with the cooling mode.
■ Do not leave recirculated air mode on over a longer period of time, as “stale”
air can cause fatigue of the driver and passengers, reduce attention levels and
also cause the windows to mist up. The risk of having an accident increases.
Switch off recirculated air mode as soon as the windows start to mist up. Note
■ The used air streams out through the vents in the boot.
■ We recommend that you do not smoke in the vehicle when the recirculating air
mode is operating since the smoke which is drawn at the evaporator from the in-
terior of the vehicle forms deposits in the evaporator of the air conditioning sys- tem. This produces a permanent odour when the air conditioning system is oper-
ating which can only be eliminated through considerable effort and expense (re-
placement of compressor). ■ To ensure that the heating and air conditioning systems work properly, do not
block up the air outlet vents with any objects. Ð Using the air conditioning system economically
The compressor on the air conditioning system uses power from the engine when
in cooling mode which will effect the fuel consumption.
It recommended to open the windows or the doors of a vehicle for which the inte-
rior has been strongly heated through the effect of direct sunlight in order to al-
low the heated air to escape.
The cooling system should not be switched on while travelling when the window
is open.
If the desired interior temperature can also be achieved without activating the
cooling system, fresh air mode should be selected. For the sake of the environment
Pollutant emissions are also reduced when fuel is saved. Ð Operational problems
If the cooling system does not operate at outside temperatures higher than +5 °C,
there is a problem in the system. The reasons for this may be.
› One of the fuses has blown. Check the fuse and replace if necessa-
ry »
page 156 .
› The cooling system has switched off automatically for a short time because the
coolant temperature of the engine is too hot » page 9.
If you cannot rectify the functional fault yourself, or the cooling capacity decrea-
ses, the cooling system must be switched off. Visit a ŠKODA specialist garage. Ð
59
Heating and air conditioning system
Page 75 of 180

The TCS should normally always be switched on. It may be advisable to switch off
the system in certain exceptional circumstances, such as:
›
when driving with snow chains;
› when driving in deep snow or on a very loose surface;
› when it is necessary to
“rock a vehicle free” when it has got stuck.
Ensure the TCS is switched on again afterwards.
Hydraulic brake assist (HBA)
The HBA is activated by the very quick operation of the brake pedal. It increases
the braking effect and helps to shorten the braking distance. To achieve the
shortest possible braking distance, the brake pedal must be applied firmly and
held in this position until the vehicle has come to a complete standstill.
The ABS is activated faster and more effectively with the intervention of the
brake assist system.
The brake assist function is automatically switched off when the brake pedal is
released.
Hill hold control (HHC)
The HHC makes it easier to start off on steep hills. The system holds the brake
pressure produced by the activation of the brake pedal for approx. 2 seconds af-
ter the brake pedal is released. The driver can therefore move his foot from the
brake pedal to the accelerator pedal and start off on the slope, without having to
actuate the handbrake. The brake pressure drops gradually the more you operate
the accelerator pedal. If the vehicle does not start off within 2 seconds, it starts
to roll back.
The HHC is active as of a 5 % slope, if the driver door is closed. It is always active
on slopes when in forward or reverse start off. When driving downhill, it is inac-
tive. ÐAntilock brake system (ABS)
First read and observe the introductory information and safety warn-
ings on page 70.
ABS prevents the wheels locking when braking. Thus helping the driver to main-
tain control of the vehicle.
ä The intervention of the ABS is noticeable from the
pulsating movements of the
brake pedal which is accompanied by noises.
Do not reduce the pressure on the brake pedal during the intervention of the
ABS. The ABS deactivates if the brake pedal is released. Never interrupt the appli-
cation of the brakes during the intervention of the ABS! Ð Traction control (ASR)
First read and observe the introductory information and safety warn-
ings on page 70.
If the wheels are slipping, the TCS adapts the engine speed to the conditions of
the road surface. The TCS makes it much easier to start off, accelerate and climb
steep hills even if the conditions of the road surface are unfavourable.
During an intervention of the system, the TCS warning light 1)
flashes in the in-
strument cluster. Ð Electronic differential lock (EDL)
First read and observe the introductory information and safety warn-
ings on page 70.
If one of the wheels starts to spin, the EDL system brakes the spinning wheel and
transfers the driving force to the other wheels. This ensures the stability of the
vehicle and a quick journey.
The EDL switches off automatically if unusually severe stresses exist in order to
avoid excessive heat generation in the disc brake on the wheel which is being
braked. The vehicle can continue to be driven and has the same characteristics as
a vehicle not fitted with EDL. The EDL switches on again automatically as soon as
the brake has cooled down. Ð
ä
ä
1)
Valid for vehicles without Electronic Stability Control (ESC).
73
Starting-off and Driving
Page 99 of 180

Fastening and unfastening seat belts
Fig. 79
Fastening/unfastening the seat belt Fig. 80
Routing of belt webbing over the shoulders and the lap belt/Rout-
ing of belt webbing for an expectant mother
First read and observe the introductory information and safety warn-
ings on page 95.
Fasten
› Correctly adjust the front seat and head restraint 1)
before fastening the seat
belt » page 46.
› Use the lock tongue to slowly pull the webbing over your chest and pelvis.
› Insert the lock tongue into the belt buckle
» Fig. 79 –
that is part of the seat
until it clicks into place.
› Pull on the belt to check that it has engaged correctly in the lock.
ä A plastic knob in the belt webbing holds the belt tongue in a position which is
easy to get hold of.
It is important that the belt webbing is properly routed to ensure seat belts offer
the maximum protection. The shoulder part of the seat belt must never run
across the neck but must roughly run over the middle of the shoulder and fit
snugly against the chest. The lap part of the belt must run across the pelvis, must
not be positioned across the stomach and must always fit snugly
» Fig. 80 – .
Expectant women must also always wear a seat belt. This is the only way of en-
suring optimal protection for the unborn child. On expectant mothers, the lap part
of the belt must be positioned as low as possible on the pelvis to avoid exerting
any pressure on the lower abdomen » Fig. 80 – .
Release
Release the seat belt only when the vehicle is stationary.
› Press the red button in the belt buckle
» Fig. 79 – , the lock tongue pops out.
› Manually guide the belt back so that it is easier to fully roll up the webbing, the
seat belt does not twist.
Belt inertia reel
Each seat belt is equipped with an inertia reel. This inertia reel offers you com-
plete freedom of movement if the belt is unreeled slowly. If the brakes are ap-
plied suddenly, the inertia reel will block. The belts also block when the car accel-
erates, when driving downhill and when cornering. CAUTION
When releasing the seatbelt ensure that the tongue of the lock does not damage
the door trim or other parts of the interior. Ð1)
Not valid for sports seat.
97
Seat belts
Page 102 of 180

Deployment factors
It is not possible to generally determine which deployment conditions apply to
the airbag system in every situation. An important role is played by factors such
as the type of object that the vehicle hits (hard, soft), the impact angle, vehicle
speed, etc.
A decisive factor for the deployment of the airbags is the deceleration which oc-
curs. The control unit analyses the nature of the collision and activates the rele-
vant restraint system. If the vehicle deceleration which occurs and is measured
during the collision remains below the prescribed reference values specified in
the control unit, the airbags are not deployed although the vehicle may well suf-
fer severe damage to the bodywork as a consequence of the accident.
The following will be deployed in the event of a severe frontal collision:
› driver’s front airbag;
› passenger’s front airbag.
The following will be deployed in the event of a severe side collision: › front side airbag on the side of the accident;
› head airbags on the side of the accident.
In the event of an accident in which the airbags are deployed:
› the interior lighting comes on (if the switch for the interior light is in the door
contact position),
› the hazard warning light is switched on;
› all the doors are unlocked;
› the fuel supply to the engine is interrupted. Note
A grey white or red, non-harmful gas is released when the airbag is inflated. This
is perfectly normal and is not an indication of a fire in the vehicle. Ð Front airbags
Fig. 82
Driver airbag in the steering wheel/front passenger airbag in the
dashboard Fig. 83
Safe distance to steering wheel/inflated airbags.
In the event of a severe frontal collision, the front airbag system offers additional
protection for the head and chest area of the driver and front passenger.
The front airbag for the driver is housed in the steering wheel » Fig. 82 – .
The front airbag for the front seat passenger is located in the dash panel above
the stowage compartment
– » Fig. 82.
If the airbags are deployed, the airbags are filled with a propellant gas and infla-
ted in front of the driver and front passenger » Fig. 83 – . The forward move-
ment of the driver and of the front passenger is cushioned when they make con-
tact with the fully inflated airbag and the risk of injury to head and chest is thus
reduced. £
100 Safety
Page 119 of 180

General Maintenance
Taking care of and cleaning the vehicle
Taking care of your vehicle
ä
Introduction
This chapter contains information on the following subjects:
Washing the vehicle 118
Automatic car wash systems 118
Washing by hand 118
Washing with a high-pressure cleaner 118
Preserving and polishing the vehicle paintwork 119
Chrome parts 119
Paint damage 119
Plastic parts 119
De-icing windows and exterior mirrors 120
Radio reception and aerial 120
Headlight lenses 120
Rubber seals 120
Door lock cylinders 120
Wheels 121
Underbody protection 121
Protection of hollow spaces 121
Artificial leather and materials 122
Fabric covers on electrically heated seats 122
Natural leather 122
Seat belts 123
Regular and proper care help to retain the efficiency and value of your vehicle. It
may also be one of the requirements for the acceptance of warranty claims relat-
ing to corrosion damage and paint defects on the bodywork.
We recommend using care products from
ŠKODA Original Accessories that are
available from ŠKODA Service Partners. The instructions for use on the package
must be observed. WARNING
■ Care products may be harmful to your health if not used according to the in-
structions.
■ Always store care products in a safe place, out of the reach of children – risk
of poisoning! ■ When washing your vehicle in the winter: Water and ice in the brake system
can affect the braking efficiency – risk of accident! ■ Only wash the vehicle when the ignition is switched off – risk of accident!
■ Protect your hands and arms from sharp-edged metal parts when cleaning
the underfloor, the inside of the wheel housings or the wheel trims – risk of
cuts!
■ Air fresheners and scents can be hazardous to heath when the temperature
inside the vehicle is high. CAUTION
■ Be sure to check clothing for colourfastness to avoid any damage or visible
stains on the material (leather), panels and textiles.
■ Cleaners containing solvents can damage the material being cleaned.
■ Do not wash your vehicle in bright sunlight – risk of paint damage.
■ If washing the vehicle in the winter using a hose or high-pressure cleaner, en-
sure that the jet of water is not aimed directly at the locking cylinders or the
door/panel joints – risk of freezing!
■ Do not use any insect sponges, rough kitchen sponges or similar cleaning prod-
ucts – risk of damaging the surface of paintwork. ■ Do not stick any stickers on the inside of the rear windows, in the vicinity of the
heating elements or near the window aerial. These may get damaged. With re-
gard to the antenna, they may interfere with the radio or navigation system.
■ Do not clean the inside of the windows with sharp-edged objects or corrosive
and acidic cleaning agents – risk of damaging the heating elements or window
aerial.
■ Do not attach scents and air fresheners to the dashboard – risk of damage to
the dashboard.
■ To avoid damaging the parking aid sensors while cleaning with high-pressure
cleaners or steam jets, the sensors must only be directly sprayed for short periods
while a minimum distance of 10 cm must be observed.
■ Do not clean the roof trim with a brush – risk of damage to the trim surface. £
117
Taking care of and cleaning the vehicle
Page 122 of 180

De-icing windows and exterior mirrors
First read and observe the introductory information and safety warn-
ings on page 117.
Use a plastic ice scraper for removing snow and ice from the windows and mir-
rors. The ice scraper should not be moved forward and backward but in one direc-
tion to avoid any damage to the surface of the glass.
Clean the windows from the inside on a regular basis.
Dry the glass surfaces with a clean chamois leather or a cloth intended for this
purpose.
When drying the windows after washing the vehicle, do not use window leathers
that have been used to polish the bodywork. Residues of preservatives in the
window leather can dirty the window and reduce visibility. CAUTION
■ Never remove snow or ice from glass parts using warm or hot water – risk of
formation of cracks in the glass!
■ When removing snow or ice from windows and mirror lenses ensure that the
paintwork of the vehicle is not to damage.
■ Snow or ice that is contaminated with coarse dirt such as fine gravel, sand, and
salt must not be removed from the window glass and mirrors – risk of damage to
the surface of the windows and mirrors. ÐRadio reception and aerial
First read and observe the introductory information and safety warn-
ings on page 117.
Car parks, tunnels, tall buildings or mountains can disrupt the radio signal even
causing it to fail completely.
With factory-fitted radios and navigation systems, the aerial for the radio recep-
tion can be installed at different locations in the vehicle:
› on the inside of the rear window along with the rear window heater;
› on the roof. Ð
ä
ä Headlight lenses
First read and observe the introductory information and safety warn-
ings on page 117.
Use soap and clean water to clean the plastic headlight lenses.
CAUTION
■ Never wipe the headlights dry and do not use any sharp objects to clean the
plastic lenses, this may damage the protective paintwork and consequently cause
the formation of cracks on the headlight lenses.
■ Do not use any aggressive cleaning or chemical solvent products to clean the
headlights – risk of damaging the headlight lenses. Ð Rubber seals
First read and observe the introductory information and safety warn-
ings on page 117.
The rubber seals on doors and other windows remain smoother and last longer if
the seals are treated regularly with a suitable rubber care product. This helps to
prevent leakages and premature wear of the seals. Rubber seals which are well
cared for also do not stick together in cold winter weather.
Ð Door lock cylinders
First read and observe the introductory information and safety warn-
ings on page 117.
Specific products must be used for de-icing door lock cylinders.
Note
■ When washing your vehicle, ensure as little water as possible gets into the lock-
ing cylinders. ■ We recommend that suitable materials from ŠKODA Original Accessories are
used for maintaining the door lock cylinders. Ð
ä
ä
ä
120 General Maintenance
Page 124 of 180
Artificial leather and materials
First read and observe the introductory information and safety warn-
ings on page 117.
The artificial leather can be cleaned using a damp cloth. If this does not prove to
be adequate, these parts can only be treated with special
solvent-free plastic
cleaning and care products .
Clean upholstery cover materials and cloth trims on doors, boot cover, etc. using
specific cleaning agents, e.g., dry foam. Use a soft sponge, brush, or commercially
available microfibre cloth. Use a cloth and a specific cleaning agent to clean the
roof trim.
Some clothing materials, such as dark denim, do, in part, not have sufficient col-
our fastness. This can cause damage or clearly visible discolouration to seat cov-
ers (fabric or leather) even when used correctly. This particularly applies to light
seat covers (fabric or leather). This is not a defect in the seat cover, but poor col-
our fastness of the clothing textiles. ÐFabric covers on electrically heated seats
First read and observe the introductory information and safety warn-
ings on page 117.
Do not clean the seat covers
using moisture as this can damage the seat heating
system.
Use a specific cleaning agent such as dry foam or similar to clean the covers. ÐNatural leather
First read and observe the introductory information and safety warn-
ings on page 117.
Depending on the amount of wear-and-tear, the leather should be cleaned on a
regular basis.
Normal cleaning
Clean soiled areas of the leather with slightly moistened cotton or woollen cloth.
ä
ä
ä
Severe soiling
Ensure that the leather is not soaked through at any point and that no water gets
into the stitching of the seams.
Dry off the leather with a soft, dry cloth.
Removing stains
Remove fresh water-based stains (e.g., coffee, tea, juices, blood) with an absorb-
ent cloth or household cleaning paper. A specific cleaning agent is required for
dried-on stains.
Remove fresh grease-based stains (e.g. butter, mayonnaise, chocolate, etc.) with
an absorbent cloth, household cleaning paper, or use a suitable cleaner if the
stain has not yet penetrated into the surface.
Use a grease solvent for grease stains which have dried in .
Remove specific stains (e.g. ball-point pens, marker pen, nail varnish, dispersion
paint, shoe polish, etc.) with a special stain remover suitable for leather.
Leather care
Treat the leather roughly every six months with a suitable leather care product.
Apply only a small amount of the cleaning and care product.
Dry off the leather with a soft, dry cloth. CAUTION
■ Avoid leaving the vehicle for lengthy periods in bright sunlight to avoid the
leather from bleaching. If the vehicle is parked in the open for lengthy periods,
protect the leather from direct sunlight by covering it.
■ Sharp-edged objects on items of clothing such as zip fasteners, rivets, sharp-
edged belts, jewellery and pendants may leave permanent scratches or signs of
rubbing on the surface.
■ The use of a mechanical steering wheel lock may damage the leather surface of
the steering wheel. Note
■ Use a care cream with light blocker and impregnation effect on a regular basis
and each time after cleaning. The cream nourishes the leather, allows it to
breathe and keeps it supple and also provides moisture. It also creates surface
protection. ■ Clean the leather every 2 to 3 months, remove any fresh stains as they occur. £
122 General Maintenance