handbrake SKODA RAPID 2012 1.G User Guide
[x] Cancel search | Manufacturer: SKODA, Model Year: 2012, Model line: RAPID, Model: SKODA RAPID 2012 1.GPages: 180, PDF Size: 4.36 MB
Page 85 of 180
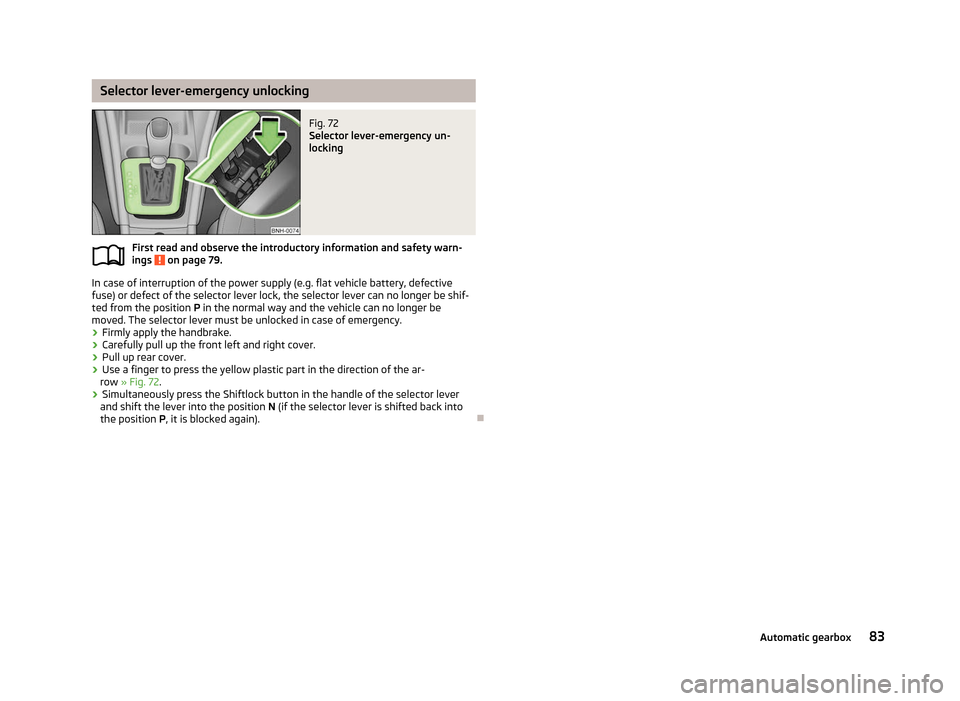
Selector lever-emergency unlocking
Fig. 72
Selector lever-emergency un-
locking
First read and observe the introductory information and safety warn-
ings on page 79.
In case of interruption of the power supply (e.g. flat vehicle battery, defective
fuse) or defect of the selector lever lock, the selector lever can no longer be shif-
ted from the position
P in the normal way and the vehicle can no longer be
moved. The selector lever must be unlocked in case of emergency.
› Firmly apply the handbrake.
› Carefully pull up the front left and right cover.
› Pull up rear cover.
› Use a finger to press the yellow plastic part in the direction of the ar-
row » Fig. 72.
› Simultaneously press the Shiftlock button in the handle of the selector lever
and shift the lever into the position N (if the selector lever is shifted back into
the position P , it is blocked again). Ðä
83
Automatic gearbox
Page 118 of 180

Immediately reduce your speed as soon as even the slightest swaying of the trail-
er is detected. Never attempt to stop the trailer from “swaying” by accelerating.
Brakes
Apply the brakes in good time! If the trailer is fitted with a trailer brake, apply the
brakes gently at first, then brake firmly. This will avoid brake jolts resulting from
the trailer wheels locking. On downhill sections shift down a gear in good time to
also use the engine as a brake.
Trailer is connected to the anti-theft alarm system.
› If the vehicle is factory-fitted with an anti-theft alarm system and a towing de-
vice.
› If the trailer is electrically connected to the towing vehicle by means of the trail-
er socket.
› If the electrical system of the vehicle and trailer is fully functional.
› If the vehicle is locked with the car key and the anti-theft alarm system is acti-
vated.
When the vehicle is locked, the alarm is activated as soon as the electrical con-
nection to the trailer is interrupted.
Always deactivate the anti-theft alarm system before a trailer is connected/dis-
connected. Otherwise, the anti-theft alarm system could accidentally be trig-
gered » page 29, Anti-theft alarm system .
Engine overheating
If the needle for the coolant temperature gauge moves into the right-hand area
or the red area of the scale, the speed must be reduced immediately. Stop and
switch off the engine if the warning light in the instrument cluster starts to
flash. Wait a few minutes and check the level of coolant in the coolant expansion
bottle » page 130, Checking the coolant level .
The following guidelines must be observed » page 19, Coolant temperature/cool-
ant level .
The coolant temperature can be reduced by switching on the heating. WARNING
■ Adapt your speed to the conditions of the road surface and to the traffic sit-
uation.
■ Improper or incorrectly connected electric cables can energise the trailer and
cause functional faults to the vehicle's entire electrical system as well as acci-
dents and severe injuries.
■ Any work on the electrical system must be carried out only by ŠKODA spe-
cialist garages.
■ Never directly connect the trailer's electrical system with the electrical con-
nections for the tail lights or other current sources. CAUTION
■ Avoid abrupt and sudden driving/braking manoeuvres.
■ When the ball rod is removed, the mounting shaft must be sealed with an ap-
propriate cover. This prevents foreign matter from penetrating into the mounting
shaft. See the fitting instructions for the towing device. Note
■ We recommend that you also have your vehicle inspected between service in-
tervals if you tow a trailer frequently. ■ The handbrake on the towing vehicle must be put on when coupling and decou-
pling the trailer.
■ For technical reasons, trailers with rear LED lights cannot be connected to the
anti-theft alarm system. Ð
116 Driving Tips
Page 128 of 180

Diesel fuel
First read and observe the introductory information and safety warn-
ings on page 124.
Your vehicle can only be operated with
diesel fuel, which complies with the
standard EN
590 (standard DIN 51628 in Germany, standard ÖNORM C 1590 in
Austria, GOST R 52368-2005/EN 590:2004 in Russia).
Operation in winter – Winter-grade diesel fuel
In the winter, only use diesel fuel, which complies with the standard EN 590
(standard DIN 51628 in Germany, standard ÖNORM C 1590 in Austria,
GOST R 52368-2005/EN 590:2004 in Russia). “Winter-grade diesel fuel” will still
operate properly even at a temperature of -20 °C.
It is often the case in countries with different climatic conditions that diesel fuels
available have a different temperature characteristic. The ŠKODA Service Partners
and filling stations in the relevant country will be able to provide you with infor-
mation regarding the diesel fuels available.
Preheating fuel
The vehicle is fitted with a fuel filter preheating system. This secures operation of
a vehicle using diesel fuel down to an environmental temperature of -25 °C.
Fuel additives
Fuel additives, so-called “flow improvers” (petrol and similar products) must not
be added to the diesel fuel. CAUTION
■ Just filling the tank once with diesel fuel that does not comply with the stand-
ard, can cause severe damage to parts of the engine, the fuel and exhaust sys-
tem!
■ If a different fuel other than diesel fuel, which complies to the above mentioned
standards (e.g. petrol) is used by mistake do not start the engine or switch on the
ignition! Extensive damage to engine parts can occur! We recommend that the
fuel system is cleaned by a
ŠKODA Service Partner.
■ Water which has collected in the fuel filter can cause engine faults.
■ Your vehicle is not adapted for use of biofuel (RME), therefore this fuel must not
be refuelled and driven. The use of biofuel (RME) can cause considerable damage
to parts of the engine or fuel system. Ð
ä Engine compartment
ä
Introduction
This chapter contains information on the following subjects:
Opening and closing the bonnet 128
Engine compartment overview 128
Checking the engine oil level 129
Replenishing the engine oil 129
Changing engine oil 130
Coolant 130
Checking the coolant level 130
Replenishing the coolant 131
Radiator fan 131
Checking the brake fluid 132
Brake fluid change 132
Windscreen washer system 132
There is a risk of injuries, scalding, accidents and fire when working in the en-
gine compartment, e.g. inspecting and replenishing oil and other fluids. For this
reason, it is essential to comply with the warning instructions stated below and
with the general applicable rules of safety. The vehicle's engine compartment is
a hazardous area . WARNING
■ Never open the bonnet if you can see steam or coolant flowing out of the
engine compartment – risk of scalding! Wait until the steam or coolant has
stopped escaping.
■ Turn off the engine and withdraw the ignition key.
■ If the vehicle is fitted with a manual gearbox, move the gearshift lever into
Neutral, or if the vehicle is fitted with an automatic gearbox, move the selec-
tor lever into position P .
■ Firmly apply the handbrake.
■ Allow the engine to cool.
■ For safety reasons, the bonnet must always be properly closed when driving.
This is why after closing the bonnet, the lock must always be checked to en-
sure it has engaged properly. £
126 General Maintenance
Page 149 of 180

Note
■ The anti-theft wheel bolt set and adapter can be purchased from a ŠKODA Serv-
ice Partner. ■ The national legal requirements must be observed when changing a wheel. ÐPreliminary work
First read and observe the introductory information and safety warn-
ings on page 146.
The following steps must be carried out before actually changing the wheel:
›
In the event of a puncture, park the vehicle as far away as possible from the
flow of traffic. The place you choose should be level.
› Let all of the occupants get out.
While changing a tyre, the occupants of the
vehicle should not stand on the road (instead they should remain behind a crash
barrier).
› Switch off the engine and move the gearshift lever into
Neutral or move the
selector lever
for the automatic gearbox into position P .
› Firmly apply the
handbrake.
› If a trailer is connected, remove it.
› Remove the vehicle tool kit
» page 145 and the spare wheel » page 140, Spare
wheel from the boot. ÐChanging a wheel
First read and observe the introductory information and safety warn-
ings on page 146.
Always change a wheel on a level surface as far as possible.
›
Remove the full wheel trim
» page 141 or caps » page 141.
› First of all slacken the anti-theft wheel bolt and then the other wheel
bolts » page 148.
› Jack up the vehicle until the wheel that needs changing is clear of the
ground » page 148.
› Unscrew the wheel bolts and place them on a clean surface (cloth, paper, etc.).
› Remove the wheel.
› Attach the spare wheel and slightly screw on the wheel bolts.
› Lower the vehicle.
› Alternately tighten the wheel bolts opposite each other using the wheel
wrench (crosswise) and then tighten the anti-theft wheel bolt » page 148.
ä
ä
›
Replace the wheel trim or the caps. Note
■ All bolts must be clean and must turn easily.
■ Under no circumstances grease or oil the wheel bolts!
■ When fitting unidirectional tyres, ensure that the direction of rotation is cor-
rect »
page 140 , Unidirectional tyres . Ð Subsequent steps
First read and observe the introductory information and safety warn-
ings on page 146.
The following steps must also be performed after changing the wheel.
›
Stow and attach the replaced wheel in the spare wheel well using a special
screw » page 140, Spare wheel.
› Stow the vehicle tool kit in the space provided.
› Check
the tyre pressure
on the installed spare wheel as soon as possible.
› Have the
tightening torque of the wheel bolts checked with a torque wrench
as soon as possible.
› Change the damaged wheel or consult a ŠKODA specialist garage about repair
possibilities. Note
■ If it is determined that the wheel bolts are corroded and difficult to turn when
changing the wheel, the bolts must be replaced before checking the tightening
torque. ■ Drive cautiously and only at a moderate speed until the tightening torque has
been checked. Ð
ä
147
Do-it-yourself
Page 152 of 180

WARNING (Continued)
■ Do not drive faster than 80 km/h (50 mph).
■ Avoid accelerating at full throttle, sharp braking and fast cornering.
■ Check the tyre inflation pressure after driving for 10 minutes!
■ The sealant is hazardous to heath. Remove immediately if it comes into con-
tact with the skin. For the sake of the environment
Used sealant or sealant whose expiry date has passed must be disposed of in ac-
cordance with environmental protection regulations. Note
■ Observe the manufacturer's usage instructions for the breakdown kit.
■ A new bottle of sealant can be purchased from ŠKODA Original Accessories.
■ Immediately replace the wheel that was repaired using the breakdown kit or
consult a ŠKODA specialist garage about repair possibilities. ÐComponents of the breakdown kit
Fig. 116
Components of the breakdown kit
First read and observe the introductory information and safety warn-
ings on page 149.
ä The breakdown kit contains the following parts:
Valve remover
Sticker with speed designation
“max. 80 km/h”/“max. 50 mph”
Inflation hose with plug
Air compressor
Tyre inflation hose
Tyre inflation pressure indicator
Air release valve
ON and OFF switch
12 volt cable connector
Tyre inflator bottle with sealing agent
Replacement valve core
The valve remover 1
has a slot at its lower end which fits into the valve core.
This is the only way in which you can remove and re-install the valve core from
the tyre valve. The same also applies to the replacement valve core 11
.
Ð Preparing to use the breakdown kit
First read and observe the introductory information and safety warn-
ings on page 149.
The following preparatory work must be carried out before using the breakdown
kit.
›
In the event of a puncture, park the vehicle as far away as possible from the
flow of traffic. Park on as flat and firm a surface as possible.
› Let all of the occupants get out.
While changing a tyre, the occupants of the
vehicle should not stand on the road (instead they should remain behind a crash
barrier).
› Switch off the engine and move the gearshift lever into
Neutral or move the
selector lever
for the automatic gearbox into position P .
› Firmly apply the
handbrake.
› Check that you can carry out the repairs with the breakdown kit
» page 149.
› If a trailer is connected, remove it.
› Remove the breakdown kit
from the boot.
› Stick the sticker 2
»
Fig. 116
on page 150 on the dash panel in view of the driv-
er.
› Do not remove the foreign body, e.g. screw or nail, from the tyre.
› Unscrew the valve cap.
£ 1
2
3
4
5
6
7
8
9
10
11
ä
150 Do-it-yourself
Page 172 of 180
Index
A
ABS 73
Warning light 20
Accessories 144
Adjusting Exterior mirror 42
Adjusting seats 92
Adjustment Seat 45
Aerial 118
see Radio reception 120
Airbag 99
Deployment 99
Front airbag 100
Head airbag 102
Side airbag 101
Airbag system 99
Air conditioning system Air outlet vents 60
Climatronic 65
Manual air conditioning system 62
Alarm 29
Anti-theft alarm system 29
Antilock brake system 73
Armrest 45
rear 48
Ashtray 53
ASR 73
Assist systems ABS 20, 73
ASR 73
Cruise control systems (CCS) 75
EDL 73
ESC 19, 72
Parking aid 74START/STOP 77
TCS 20
Auto Check Control 16
Automatic gearbox 79
Dynamic shift programme 82
Emergency programme 82
Information for driving 79
Kickdown 82
Manual shifting of gears 81
Parking 80
Selector lever-emergency unlocking 83
Selector lever lock 81
Selector lever positions 80
Starting off 80
Stopping 80
Tiptronic 81
Automatic load deactivation 136
AUX-IN 90
Avoiding damage to your vehicle 113
B
Before setting off 91
Belts 95
Belt tensioners 98
Bonnet Closing 128
Opening 128
Boot Class
N1 vehicles 49
Cover 50
Emergency unlocking 31
Fastening elements 49
Fixing nets 50
Hooks 50
Light 49
see Boot lid 31
Unlocking the boot lid 31
Boot lid 31
Automatic locking 31
Brake assist 72Brake booster 72
Brake fluid Checking 132
Brakes Brake booster 72
Handbrake 72
Running in 109
Warning light 17
Braking Brake fluid 132
Breakdown kit 149
Bulbs Replacing 159
Button in the driver's door Electrical power windows 31
C
Car computer see Multifunction display 11
Car jack 145
Carrier 51
Catalytic converter 109
Central locking button 27
Central locking system 25
lock 27
unlock 26
Changes 144
Changing Engine oil 130
Wheel 146
Charging a vehicle battery 135
Checking Battery electrolyte level 135
Brake fluid 132
Coolant level 130
Engine oil 129
Oil level 129
Windscreen washer fluid 132
Children and safety 105
170 Index
Page 174 of 180

F
Fire extinguisher 145
First-aid kit 145
Floor mats 74
Front airbag 100
Front seats 44
Fuel 124
Diesel 126
Fuel gauge 9
refer to Fuel 124
Refuelling 124
Unleaded petrol 125
Fuel consumption 110
Fuses Assignment 156
Replacing 156
G
Gear Recommended gear 11
General view Cockpit 7
Glow plug system – indicator light 21
GSM 84
H
Handbrake 72
HBA 72
Head airbag 102
Headlight cleaning system Headlight cleaning system 41
Headlights Driving abroad 113
Headlight cleaning system 41
Head restraint 46Heating 60
Defrosting windows 61
Exterior mirror 42
Rear window 39
Recirculated air mode 61
Seats 46
Heating rear window 39
HHC 72
Horn 7
I
Ignition 70
Ignition lock 70
Immobiliser 69
Information display see MAXI DOT 14
Instrument cluster 8
see Instrument cluster 8
Interior monitor 29
ISOFIX 107
J
Jacking points Raise vehicle 148
Jump-starting 152
L
Lever Main beam 36
Turn signal 36
Light Cockpit 38
Fog lights 35
Fog lights with the function CORNER 37
Hazard warning light system 37
Headlight flasher 36
Main beam 36
Parking light 34Rear fog light 35
Replacing bulbs 159
Turn signal 36
Lights Daytime running lights 35
Headlamp range adjustment 36
Low beam 34
Parking light 37
Parking light on both sides 37
Switching lights on and off 34
Warning lights 16
Loads 164
Lock Central locking system 27
Locking Emergency locking 30
Remote control 28
Locking and unlocking from the inside 27
M
MAXI DOT 14
Main menu 14
Settings 15
Maximum speed 167
MDI 90
Mirror Exterior mirror 42
Make-up 39
Manual dimming interior mirror 42
Mobile phone 84
Connecting to the hands-free system 86
Multifunction display Functions 11
Memory 12
Operation 12
Multimedia 89
172 Index