seats SKODA RAPID 2013 1.G Owner's Guide
[x] Cancel search | Manufacturer: SKODA, Model Year: 2013, Model line: RAPID, Model: SKODA RAPID 2013 1.GPages: 226, PDF Size: 15.16 MB
Page 143 of 226
Deactivating airbagsFirst read and observe the introductory information given on page 139.
Deactivating an airbag should be considered in cases such as the ones below.› If using a rear-facing child seat on the front passenger seat (due to different le-
gal regulations, the airbag must be deactivated if using a forwards-facing child
seat in some countries) » page 142, Transporting children safely .
› If it is not possible to maintain a distance of at least 25 cm between the middle
of the steering wheel and chest, despite the driver's seat being correctly adjus-
ted.
› If special attachments are required in the area of the steering wheel because of
a physical disability.
› If different seats have been fitted (e.g. orthopaedic seats without side airbags).
The front passenger airbag can be switched off with the key-operated
switch » page 140 .
We recommend that you ask a ŠKODA service partner to deactivate any other air- bags.
Monitoring the airbag system
The operational capability of the airbag system is monitored electronically, includ-
ing when one of the airbags is switched off.
Airbag deactivated using diagnostic equipment
› The warning light
lights up for approximately 4 seconds after the ignition is
switched on and then flashes again for approximately 12 seconds.
Front passenger airbag deactivated using the key switch in the storage com-
partment
› The warning light
lights up for approximately 3 seconds after the ignition is
switched on.
› The indicator light
3
» Fig. 123 on page 140 lights up after the ignition is
switched on.
Note■ The national regulations for switching off airbags must be observed.■A ŠKODA service partner will be able to inform you which, if any, of your vehi-
cle's airbags can or must be deactivated.
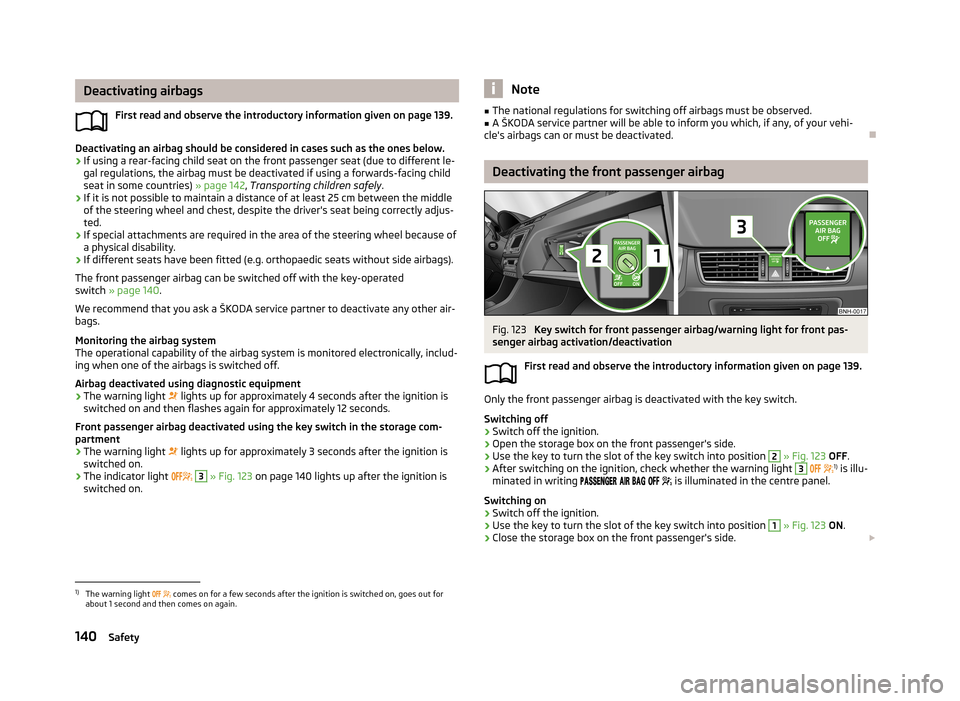
Deactivating the front passenger airbag
Fig. 123
Key switch for front passenger airbag/warning light for front pas-
senger airbag activation/deactivation
First read and observe the introductory information given on page 139.
Only the front passenger airbag is deactivated with the key switch.
Switching off
›
Switch off the ignition.
›
Open the storage box on the front passenger's side.
›
Use the key to turn the slot of the key switch into position
2
» Fig. 123 OFF .
›
After switching on the ignition, check whether the warning light
3
1)
is illu-
minated in writing
is illuminated in the centre panel.
Switching on
›
Switch off the ignition.
›
Use the key to turn the slot of the key switch into position
1
» Fig. 123 ON .
›
Close the storage box on the front passenger's side.
1)
The warning light
comes on for a few seconds after the ignition is switched on, goes out for
about 1 second and then comes on again.
140Safety
Page 145 of 226
Transporting children safely
Child seat
Introduction
This chapter contains information on the following subjects:
Use of a child seat on the front passenger seat
143
Child safety and side airbag
144
Classification of child seats
144
Use of child seats fastened with a seat belt
144
Children are generally safer on the rear seats than on the front passenger seat.
In contrast to adults, the muscles and bone structure of children are not yet fully developed. Thus children are exposed to increased risk of injury.
Children should be transported in accordance with the relevant statutory provi-sions.
Child seats complying with the ECE-R 44 standard must be used. ECE-R stands
for: Economic Commission for Europe – Regulation.
Child seats that comply with the ECE-R 44 standard are identified with a testmark that cannot be removed: a large E within a circle with the test number be-
low.
WARNING■ The national legal requirements must be observed when using child seats.■One should never carry children, and also not babies! - on one's lap.■
Never leave children unattended in the vehicle. Certain outside climatic con-
ditions can cause life-threatening temperatures in the vehicle.
■
The child must be secured in the vehicle during the entire journey! Other-
wise, the child would be thrown through the vehicle in the event of an acci-
dent, causing fatal injuries to both the child and other occupants.
WARNING (Continued)■ Children are exposed to an increased risk of injury in the event of an acci-
dent if they lean forward or adopt an incorrect seated position when the vehi-
cle is moving. This particularly applies to children who are transported on the
front passenger seat as they can suffer severe, or even fatal injuries if the air-
bag system is deployed!■
Pay particular attention to the information provided by the manufacturer of
the child safety seat regarding the correct routing of the belt. Seat belts which are not correctly adjusted can themselves cause injuries even in minor
accidents.
■
Safety belts must be checked to ensure that they are running properly. One
should also ensure that the belt is not damaged by sharp-edged fittings.
■
The front passenger airbag must be deactivated if using a rear-facing child
seat on the front passenger seat. Further information » page 143, Use of a
child seat on the front passenger seat .
CAUTION
When installing a child seat in which the child faces forward, adjust the head re-
straints so that they are as high as possible.
Note
We recommend that you use child seats from ŠKODA Original Accessories. Thesechild seats were developed and also tested for use in ŠKODA vehicles. They meet
the ECE-R 44 standard.
142Safety
Page 146 of 226
Use of a child seat on the front passenger seat
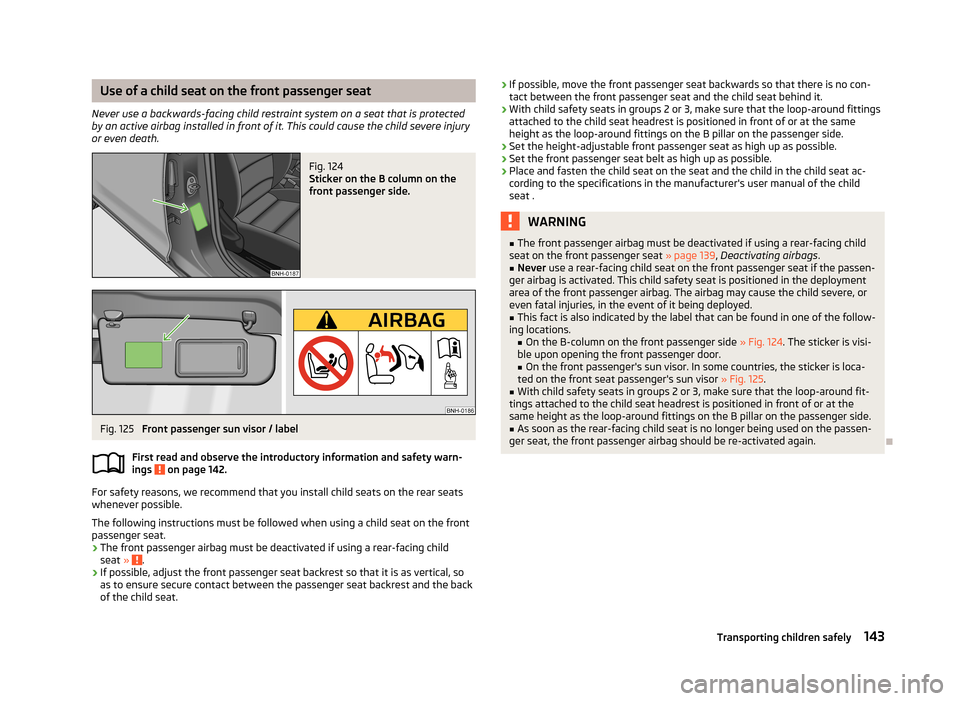
Never use a backwards-facing child restraint system on a seat that is protected by an active airbag installed in front of it. This could cause the child severe injury
or even death.Fig. 124
Sticker on the B column on the
front passenger side.
Fig. 125
Front passenger sun visor / label
First read and observe the introductory information and safety warn-
ings
on page 142.
For safety reasons, we recommend that you install child seats on the rear seats
whenever possible.
The following instructions must be followed when using a child seat on the front passenger seat.
› The front passenger airbag must be deactivated if using a rear-facing child
seat »
.
› If possible, adjust the front passenger seat backrest so that it is as vertical, so
as to ensure secure contact between the passenger seat backrest and the back of the child seat.
› If possible, move the front passenger seat backwards so that there is no con-
tact between the front passenger seat and the child seat behind it.
› With child safety seats in groups 2 or 3, make sure that the loop-around fittings
attached to the child seat headrest is positioned in front of or at the same
height as the loop-around fittings on the B pillar on the passenger side.
› Set the height-adjustable front passenger seat as high up as possible.
› Set the front passenger seat belt as high up as possible.
› Place and fasten the child seat on the seat and the child in the child seat ac-
cording to the specifications in the manufacturer's user manual of the child seat .WARNING■ The front passenger airbag must be deactivated if using a rear-facing child
seat on the front passenger seat » page 139, Deactivating airbags .■
Never use a rear-facing child seat on the front passenger seat if the passen-
ger airbag is activated. This child safety seat is positioned in the deployment
area of the front passenger airbag. The airbag may cause the child severe, or
even fatal injuries, in the event of it being deployed.
■
This fact is also indicated by the label that can be found in one of the follow-
ing locations. ■ On the B-column on the front passenger side » Fig. 124. The sticker is visi-
ble upon opening the front passenger door. ■ On the front passenger's sun visor. In some countries, the sticker is loca-
ted on the front seat passenger's sun visor » Fig. 125.
■
With child safety seats in groups 2 or 3, make sure that the loop-around fit-
tings attached to the child seat headrest is positioned in front of or at the
same height as the loop-around fittings on the B pillar on the passenger side.
■
As soon as the rear-facing child seat is no longer being used on the passen-
ger seat, the front passenger airbag should be re-activated again.
143Transporting children safely
Page 147 of 226
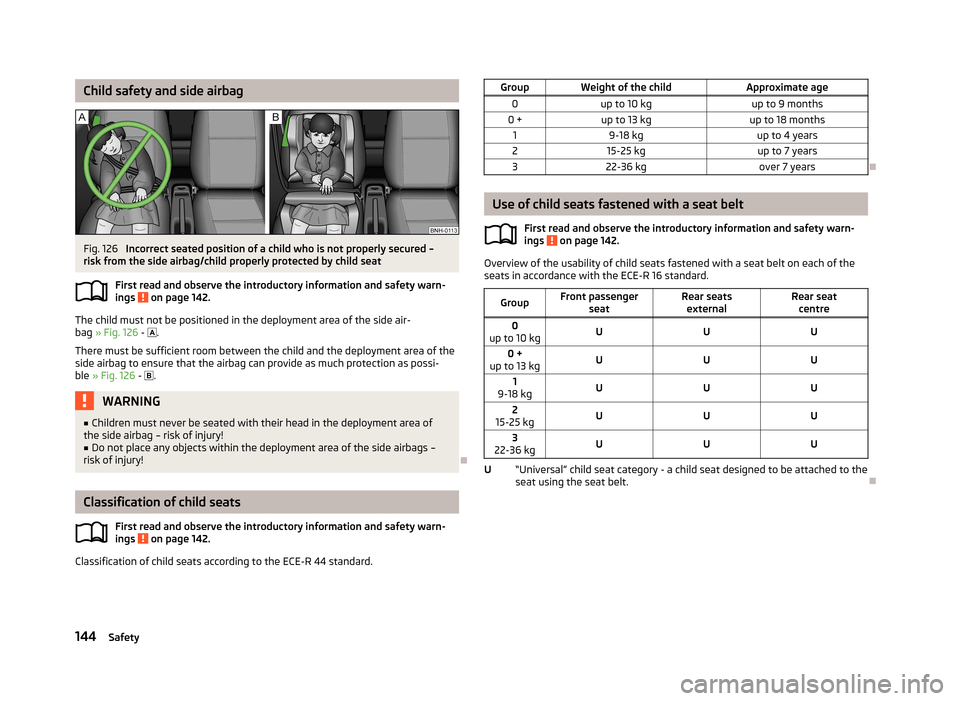
Child safety and side airbagFig. 126
Incorrect seated position of a child who is not properly secured –
risk from the side airbag/child properly protected by child seat
First read and observe the introductory information and safety warn-
ings
on page 142.
The child must not be positioned in the deployment area of the side air-
bag » Fig. 126 -
.
There must be sufficient room between the child and the deployment area of the
side airbag to ensure that the airbag can provide as much protection as possi-
ble » Fig. 126 -
.
WARNING■
Children must never be seated with their head in the deployment area of
the side airbag – risk of injury!■
Do not place any objects within the deployment area of the side airbags –
risk of injury!
Classification of child seats
First read and observe the introductory information and safety warn-
ings
on page 142.
Classification of child seats according to the ECE-R 44 standard.
GroupWeight of the childApproximate age0up to 10 kgup to 9 months0 +up to 13 kgup to 18 months19-18 kgup to 4 years215-25 kgup to 7 years322-36 kgover 7 years
Use of child seats fastened with a seat belt
First read and observe the introductory information and safety warn-ings
on page 142.
Overview of the usability of child seats fastened with a seat belt on each of the
seats in accordance with the ECE-R 16 standard.
GroupFront passenger seatRear seatsexternalRear seat centre0
up to 10 kgUUU0 +
up to 13 kgUUU1
9-18 kgUUU2
15-25 kgUUU3
22-36 kgUUU
“Universal” child seat category - a child seat designed to be attached to the
seat using the seat belt.
U144Safety
Page 148 of 226
Fastening systems
Introduction
This chapter contains information on the following subjects:
Anchor eyelets for the ISOFIX system
145
Use of child seats with the ISOFIX system
145
Anchor eyelets for the TOP TETHER system
146
Anchor eyelets for the ISOFIX system
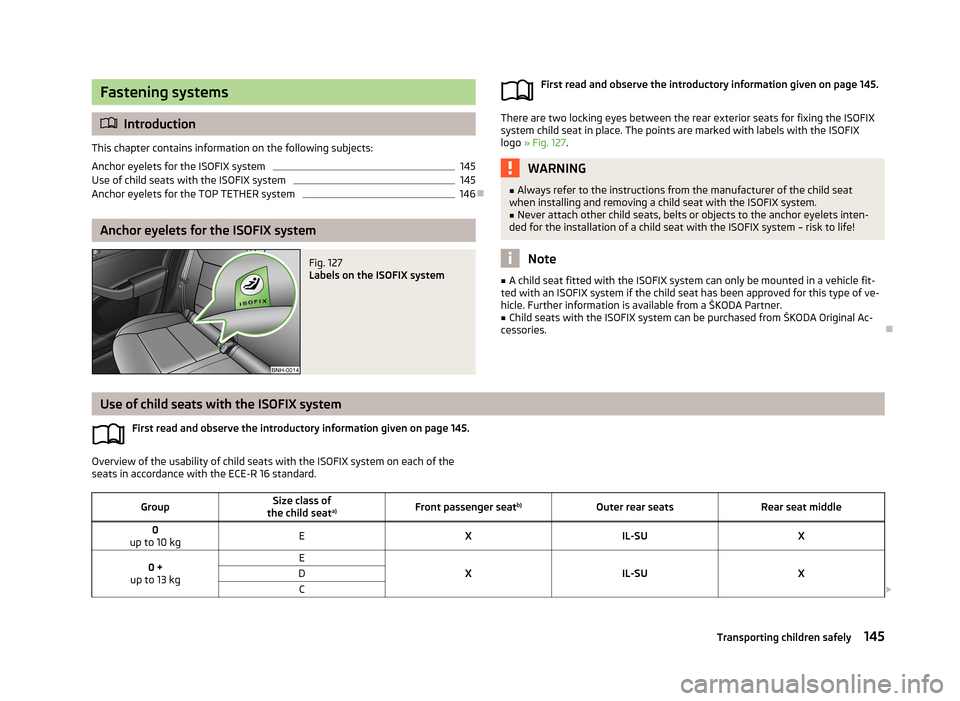
Fig. 127
Labels on the ISOFIX system
First read and observe the introductory information given on page 145.
There are two locking eyes between the rear exterior seats for fixing the ISOFIX
system child seat in place. The points are marked with labels with the ISOFIX logo » Fig. 127 .
WARNING■
Always refer to the instructions from the manufacturer of the child seat
when installing and removing a child seat with the ISOFIX system.■
Never attach other child seats, belts or objects to the anchor eyelets inten-
ded for the installation of a child seat with the ISOFIX system – risk to life!
Note
■ A child seat fitted with the ISOFIX system can only be mounted in a vehicle fit-
ted with an ISOFIX system if the child seat has been approved for this type of ve-
hicle. Further information is available from a ŠKODA Partner.■
Child seats with the ISOFIX system can be purchased from ŠKODA Original Ac-
cessories.
Use of child seats with the ISOFIX system
First read and observe the introductory information given on page 145.
Overview of the usability of child seats with the ISOFIX system on each of the
seats in accordance with the ECE-R 16 standard.
GroupSize class of
the child seat a)Front passenger seat b)Outer rear seatsRear seat middle0
up to 10 kgEXIL-SUX0 +
up to 13 kgE
XIL-SUX
DC 145Transporting children safely
Page 149 of 226
GroupSize class of
the child seat a)Front passenger seat b)Outer rear seatsRear seat middle
1
9-18 kg
D
XIL-SU IUFX
CBB1Aa)
The size category is shown on the label attached to the child seat.
b)
If the front passenger seat is fitted with the ISOFIX system attachment points, it is suited for the installation of an ISOFIX child seat with the “Semi-Universal” approval.
The seat is suited for installation of an ISOFIX child seat with “Semi-
Universal” approval. The “Semi-Universal” category means that the child
seat with the ISOFIX system is approved for your vehicle. Observe the list of vehicles that comes with the child seat.
The seat is suitable for the installation of an ISOFIX child seat with
“Universal” approval and attachment with the TOP TETHER belt.
The seat is not fitted with fixing eyes for the ISOFIX system.
Anchor eyelets for the TOP TETHER system
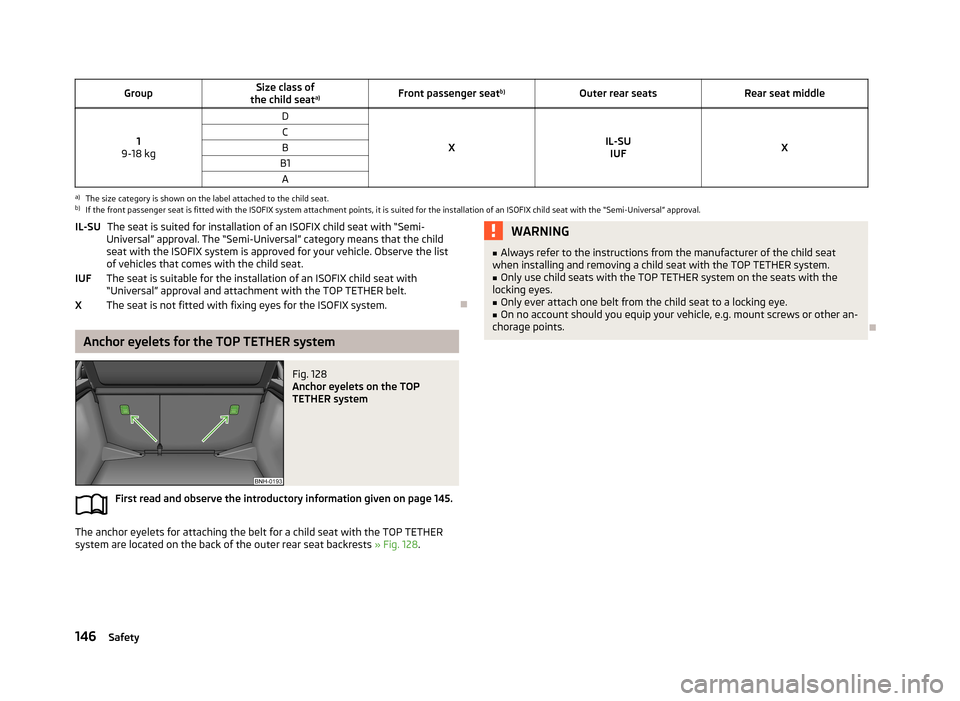
Fig. 128
Anchor eyelets on the TOP
TETHER system
First read and observe the introductory information given on page 145.
The anchor eyelets for attaching the belt for a child seat with the TOP TETHER
system are located on the back of the outer rear seat backrests » Fig. 128.
IL-SU
IUFXWARNING■
Always refer to the instructions from the manufacturer of the child seat
when installing and removing a child seat with the TOP TETHER system.■
Only use child seats with the TOP TETHER system on the seats with the
locking eyes.
■
Only ever attach one belt from the child seat to a locking eye.
■
On no account should you equip your vehicle, e.g. mount screws or other an-
chorage points.
146Safety
Page 154 of 226
ŠKODA Genuine AccessoriesFirst read and observe the introductory information and safety warn-ings
on page 149.
If you wish to fit accessories to your vehicle, you should remember the following:
We recommend that you use ŠKODA Genuine Accessories in your vehicle. ŠKODA
AUTO a.s. has selected these accessories to ensure that they are reliable, safe
and suitable for your particular vehicle. Although we constantly monitor the mar- ket, we are not able to assess or vouch for other products even though in some
instances such parts may have operational approval or may have been approved
by a nationally recognised testing laboratory.
All accessory products are subjected to a challenging process in the areas of tech-
nical development (technical testing) and quality inspection (customer testing), and the product only becomes a ŠKODA Genuine Accessory if all tests are passed.
Our ŠKODA Genuine Accessories service also includes expert advice and profes-
sional fitting if required by the customer.
ŠKODA Service Partners are liable for any defects of ŠKODA Genuine Accessories
for a period of 2 years after installation or delivery in accordance with the materi-
als defect liability, unless agreed otherwise in the purchase agreement or any
other agreements. You should keep the approved warranty certificate and the in-
voices for these accessories for this period of time, so that the commencement of
the term can be verified.
ŠKODA Service Partners also stock a range of suitable car care products and all
parts that are subject to natural wear-and-tear, such as tyres, batteries, bulbs
and wiper blades.
Note
The accessories authorized by the company ŠKODA AUTO a.s. will be offered by
the ŠKODA Partners in all countries where the company ŠKODA AUTO a.s. has a
sales and after-sales service network. This will usually be in the form of a printed
catalogue of ŠKODA Genuine Accessories, in the form of separate printed bro-
chures or in the form of ŠKODA Genuine Accessories on the ŠKODA Partner web-
sites.
Spoiler
First read and observe the introductory information and safety warn-ings
on page 149.
If your new vehicle is fitted with a spoiler on the front bumper in combination
with the spoiler on the luggage compartment lid, the following instructions must
be adhered to.
› For safety reasons, the vehicle must only be fitted with a spoiler on the front
bumper in combination with the associated spoiler on the luggage compart-
ment lid.
› This kind of spoiler cannot be left on the front bumper either on its own, in
combination with another spoiler not on the luggage compartment lid or in combination with an unsuitable spoiler on the luggage compartment lid.
› We recommend that you consult the ŠKODA Service Partner for any repairs to or
replacement, addition or removal of spoilers.
WARNINGIf work on your vehicle's spoilers is not carried out properly, this can lead to
operational faults - risk of accident and serious injuries!
Airbags
First read and observe the introductory information and safety warn-
ings
on page 149.
The system components of the airbag system can be situated in the front bump-
er, doors, front seats, roof lining or body.
WARNINGAny work on the airbag system including the installation and removal of sys-
tem components due to other repair work (e.g. removal of the steering wheel) must only be carried out by a specialist garage.■
Modifications, repairs and technical alterations that have been carried out
unprofessionally can cause damage and operational faults, and can also seri-
ously impair the effectiveness of the airbag system – risk of accident and fatal
injury!
■
The airbag system must then be replaced if the airbag has been deployed.
Airbag modules cannot be repaired.
151Vehicle care
Page 162 of 226
Minor changes in colour caused by use are normal.
CAUTION
■Do not use any leather cleaners on Alcantara ®
seat covers.■For Alcantara ®
seat covers do not use any solvents, floor wax, shoe cream, stain
remover, or similar agents.■
Avoid leaving the vehicle in bright sunlight for long periods of time in order to
stop the fabric from bleaching. If the vehicle is parked outside for long periods of
time, cover the fabric to protect it from direct sunlight.
■
Some clothing materials, e.g. dark denim, do not have sufficient colour fastness.
This can cause damage or clearly visible discolouration to seat covers, even when used correctly. This applies particularly to light-coloured seat covers. This does
not relate to a fault in the seat cover, but rather to poor colour fastness of the
clothing textiles.
Seat covers
First read and observe the introductory information and safety warn-
ings
on page 157.
Electrically heated seats
Do not clean the covers by moistening, as this can damage the seat heating sys-
tem.
Use a specific cleaning agent such as dry foam or similar to clean the covers.
Seats without seat heating
Thoroughly vacuum the seat covers with a vacuum cleaner before cleaning.
Clean the seat covers with a damp cloth or cleaning products specially designed for this purpose.
Indented points arising on the fabrics by everyday use, can be removed by brush- ing against the direction of hair with a damp brush.
Always clean all parts of the covers, so that there are no visible edges. Then allow the seat to dry completely.
CAUTION
■ Regularly remove dust from the seat covers using a vacuum cleaner.■Electrically heated seats must not be dried after cleaning by switching on the
heater.■ Do not sit on wet seats - risk of seat deformation.■Always clean the seats “from seam to seam”.
Seat belts
First read and observe the introductory information and safety warn-
ings
on page 157.
The belt webbing must always be kept clean!
Wash dirty seat belts with mild soapy water.
Remove coarse dirt with a soft brush.
Dirty belt webbing may impair the correct functioning of the inertia reel.
WARNING■ The seat belts must not be removed for cleaning.■Never clean the seat belts chemically as chemical cleaning products could
destroy the fabric.■
The seat belts must not be allowed to come into contact with corrosive liq-
uids (e.g. acids).
■
Check the condition of all the seat belts on a regular basis. If any damage to
the belt webbing, seat belt connections, inertia reel or lock is detected, the seat belt must be replaced by a specialist garage.
■
The seat belts must be fully dried before being rolled up.
159Vehicle care
Page 202 of 226
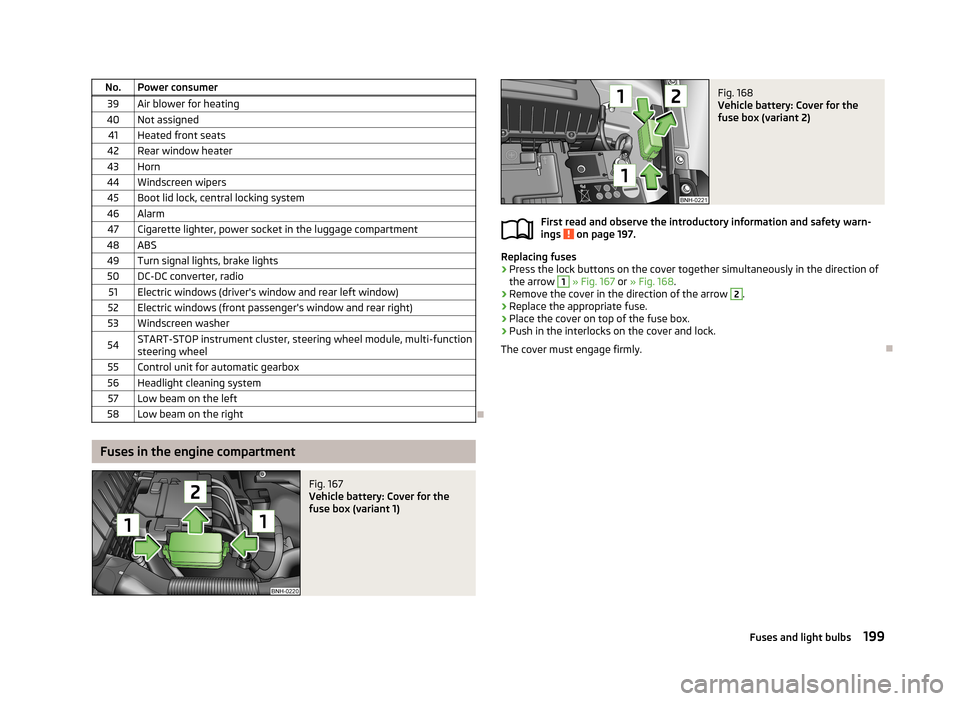
No.Power consumer39Air blower for heating40Not assigned41Heated front seats42Rear window heater43Horn44Windscreen wipers45Boot lid lock, central locking system46Alarm47Cigarette lighter, power socket in the luggage compartment48ABS49Turn signal lights, brake lights50DC-DC converter, radio51Electric windows (driver's window and rear left window)52Electric windows (front passenger's window and rear right)53Windscreen washer54START-STOP instrument cluster, steering wheel module, multi-function
steering wheel55Control unit for automatic gearbox56Headlight cleaning system57Low beam on the left58Low beam on the right
Fuses in the engine compartment
Fig. 167
Vehicle battery: Cover for the
fuse box (variant 1)
Fig. 168
Vehicle battery: Cover for the
fuse box (variant 2)
First read and observe the introductory information and safety warn-
ings on page 197.
Replacing fuses
›
Press the lock buttons on the cover together simultaneously in the direction of
the arrow
1
» Fig. 167 or » Fig. 168 .
›
Remove the cover in the direction of the arrow
2
.
›
Replace the appropriate fuse.
›
Place the cover on top of the fuse box.
›
Push in the interlocks on the cover and lock.
The cover must engage firmly.
199Fuses and light bulbs
Page 215 of 226
Index
A
Abroad Driving abroad
110
Unleaded petrol110
ABS Function
112
Warning light18
Accessories149
Adjusting Belt height
133
Exterior mirror50
Head restraints53
Interior mirror50
Manual air conditioning81
Seat53
Seats52
Steering wheel96
Adjusting the seats52, 127
Adjustment Beam range
41
Aerial153
Airbag135
Deactivating140
Deactivating the front passenger airbag140
Deployment135
Front airbag137
Head airbag139
Indicator light20
Modifications and damage to the airbag system151
Side airbag138
Airbag system135
Air conditioning system Air outlets
76
Climatronic82
Manual air conditioning system79
Air outlets76
Alarm Switching off36
Triggering36
Anti-theft alarm system Activating/deactivating
36
Trailer125
Antilock Braking System112
Armrest Front
55
Rear55
Artificial leather158
Ashtray59
ASR warning light
17
Assist system ABS
112
Assist systems111
ABS18
ASR17
Cruise Control System114
EDL112
ESC17, 111
HBA112
HHC112
Parking aid113
START-STOP116
TCS112
Auto Check Control13
Automatic gearbox Selector lever-emergency unlocking
195
Starting-off and driving103
Tiptronic103
Automatic load deactivation174
Automatic transmission101
Kickdown104
Malfunction104
Selector lever lock103
Using the selector lever102
AUX95
Avoiding damage to the vehicle Driving through water
109
Avoiding damage to your vehicle109
B
Ball head Check fitting
121
Fitting121
Ready position120
Removing122
Battery In the remote control key
193
Belts130
Belt tensioners133
Bonnet Closing
164
Opening164
Boot Class N1 vehicles
65
Double-sided floor covering70
Flexible storage compartment69
Hooks66
Meshed pocket for storage70
See Boot lid38
Storage compartments in the boot69
Boot cover Parking position
68
Boot lid Automatic locking
38
Closing38
Opening38
Brake booster100
Brake fluid170
Changing171
Checking170
Information messages15
Brakes Brake assist systems
111
Brake booster100
Brake fluid170
Handbrake100
212Index