instrument cluster SKODA RAPID 2013 1.G Owner's Manual
[x] Cancel search | Manufacturer: SKODA, Model Year: 2013, Model line: RAPID, Model: SKODA RAPID 2013 1.GPages: 226, PDF Size: 15.16 MB
Page 6 of 226
Table of Contents
Materials defect liability and ŠKODA warranty for
new cars5
Mobility warranty and ŠKODA extended
warranty
6
Abbreviations
Using the system
Cockpit
9
Overview
8
Instruments and Indicator Lights
10
Instrument cluster
10
Indicator lights
14
Information system
22
Driver information system
22
Multifunction display (MFD)
25
MAXI DOT display
27
Service interval display
28
Unlocking and opening
31
Unlocking and locking
31
Anti-theft alarm system
36
Luggage compartment lid
37
Electrical power windows
38
Lights and visibility
41
Lights
41
Interior lighting
45
Visibility
46
Windscreen wipers and washers
48
Rear mirror
49Seats and useful equipment52Adjusting the seats52
Seat features
54
Practical equipment
56
Luggage compartment
64
Variable loading floor in the luggage
compartment (Rapid Spaceback)
70
Roof rack system
74
Heating and air-conditioning
76
Heating, ventilation, cooling
76
Heating
77
Air conditioning system (manual air conditioning system)
79
Climatronic (automatic air conditioning
system)
82
Communication and multimedia
85
Universal telephone installation GSM II
85
Voice control
90
Multimedia
92
Driving
Starting-off and Driving
96
Steering
96
Starting and stopping the engine
97
Brakes
99
Manual gear changing and pedals
101
Automatic transmission
101
Running in
104
Economical driving and environmental
sustainability
105
Avoiding damage to your vehicle
109
Driving abroad
110
Assist systems
111
Brake assist systems
111
Parking aid
113Cruise Control System114START-STOP116
Towing a trailer
119
Towing device
119
Trailer
123
Safety
Passive Safety
126
General information
126
Correct seated position
127
Seat belts
130
Using seat belts
130
Inertia reels and belt tensioners
133
Airbag system
135
Description of the airbag system
135
Airbag overview
136
Deactivating airbags
139
Transporting children safely
142
Child seat
142
Fastening systems
145
General Maintenance
Vehicle care
147
Service intervals
147
Service work, adjustments and technical alterations
149
Washing your car
152
Taking care of your vehicle exterior
153
Taking care of the interior
157
Inspecting and replenishing
160
Fuel
160
Engine compartment
162
Engine oil
166
Coolant
1683Table of Contents
Page 12 of 226
Using the system
Cockpit
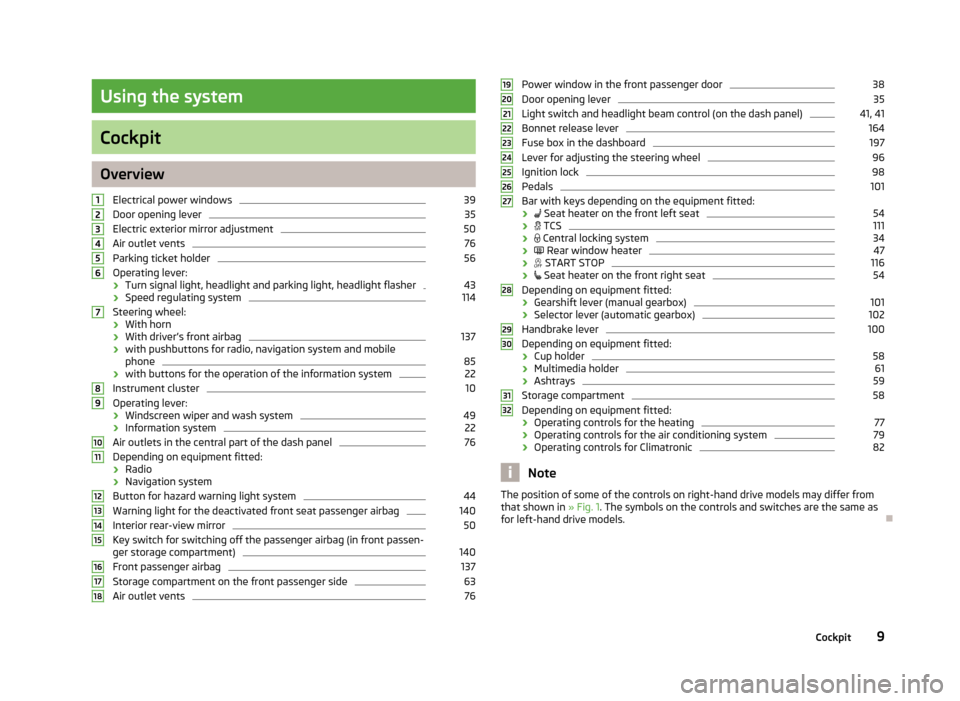
OverviewElectrical power windows
39
Door opening lever
35
Electric exterior mirror adjustment
50
Air outlet vents
76
Parking ticket holder
56
Operating lever:
› Turn signal light, headlight and parking light, headlight flasher
43
›
Speed regulating system
114
Steering wheel:
› With horn
› With driver’s front airbag
137
›with pushbuttons for radio, navigation system and mobile
phone
85
› with buttons for the operation of the information system
22
Instrument cluster
10
Operating lever:
› Windscreen wiper and wash system
49
›
Information system
22
Air outlets in the central part of the dash panel
76
Depending on equipment fitted:
› Radio
› Navigation system
Button for hazard warning light system
44
Warning light for the deactivated front seat passenger airbag
140
Interior rear-view mirror
50
Key switch for switching off the passenger airbag (in front passen-
ger storage compartment)
140
Front passenger airbag
137
Storage compartment on the front passenger side
63
Air outlet vents
76123456789101112131415161718Power window in the front passenger door38Door opening lever35
Light switch and headlight beam control (on the dash panel)
41, 41
Bonnet release lever
164
Fuse box in the dashboard
197
Lever for adjusting the steering wheel
96
Ignition lock
98
Pedals
101
Bar with keys depending on the equipment fitted:
›
Seat heater on the front left seat
54
›
TCS
111
›
Central locking system
34
›
Rear window heater
47
›
START STOP
116
›
Seat heater on the front right seat
54
Depending on equipment fitted:
› Gearshift lever (manual gearbox)
101
›Selector lever (automatic gearbox)
102
Handbrake lever
100
Depending on equipment fitted:
› Cup holder
58
›
Multimedia holder
61
›Ashtrays
59
Storage compartment
58
Depending on equipment fitted:
› Operating controls for the heating
77
›
Operating controls for the air conditioning system
79
›Operating controls for Climatronic
82
Note
The position of some of the controls on right-hand drive models may differ from
that shown in » Fig. 1. The symbols on the controls and switches are the same as
for left-hand drive models.19202122232425262728293031329Cockpit
Page 13 of 226
Instruments and Indicator Lights
Instrument cluster
Introduction
This chapter contains information on the following subjects:
Overview
10
Revolution counter
11
Display
11
Speedometer
11
Coolant temperature gauge
11
Fuel gauge
12
Counter for distance driven
12
Digital clock
13
Display of the second speed
13
Auto Check Control
13
When the ignition is on, the instrument cluster is illuminated 1)
.
Fault display
If there is a fault in the instrument cluster, the Error message will appear in the
display. Have the fault rectified as soon as possible by a specialist garage.
WARNING■ Concentrate fully at all times on your driving! As the driver you are fully re-
sponsible for road safety.■
Never operate the controls in the instrument cluster while driving, only
when the vehicle is stationary!
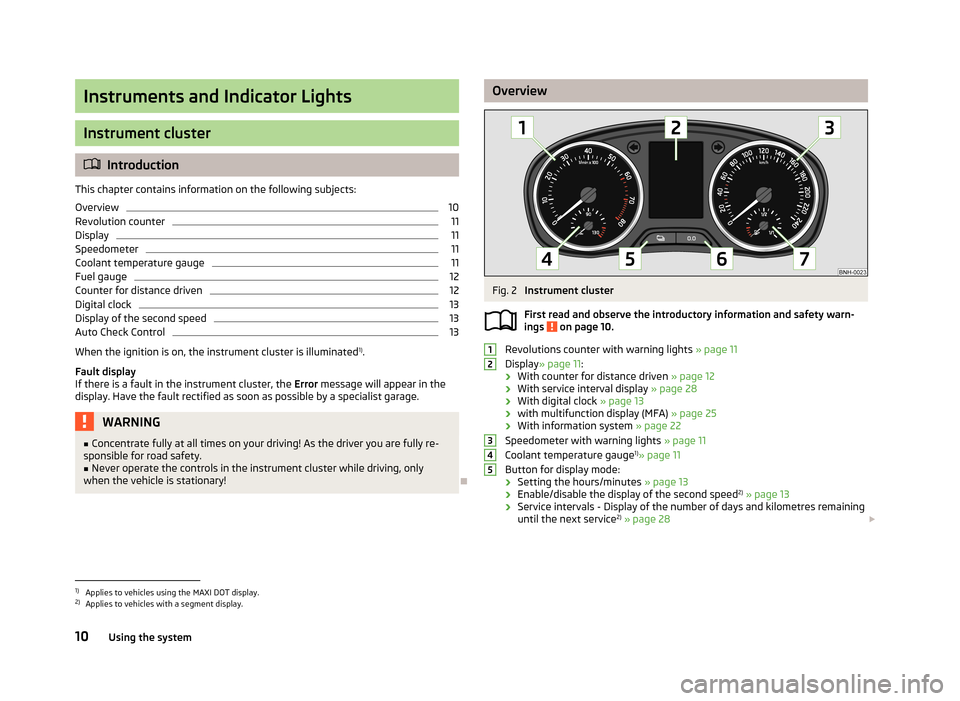
OverviewFig. 2
Instrument cluster
First read and observe the introductory information and safety warn-
ings
on page 10.
Revolutions counter with warning lights » page 11
Display » page 11 :
› With counter for distance driven
» page 12
› With service interval display
» page 28
› With digital clock
» page 13
› with multifunction display (MFA)
» page 25
› With information system
» page 22
Speedometer with warning lights » page 11
Coolant temperature gauge 1)
» page 11
Button for display mode:
› Setting the hours/minutes
» page 13
› Enable/disable the display of the second speed 2)
» page 13
› Service intervals - Display of the number of days and kilometres remaining
until the next service 2)
» page 28
123451)
Applies to vehicles using the MAXI DOT display.
2)
Applies to vehicles with a segment display.
10Using the system
Page 14 of 226
Button for:
› Reset daily trip counter
» page 12
› Set hours/minutes
› enable / disable the mode selected by means of the 5
key
Fuel gauge 1)
» page 12
Revolution counter
First read and observe the introductory information and safety warn-ings
on page 10.
The red scale of the revolution counter
1
» Fig. 2 on page 10 indicates the range
in which the system begins to limit the engine speed. The system automatically
restricts the engine speed to a steady limit.
You should shift into the next highest gear before the red scale of the revolution
counter is reached, or select mode D on the automatic gearbox.
Follow the recommended gear to prevent engine speeds that are too high or too
low » page 24 .
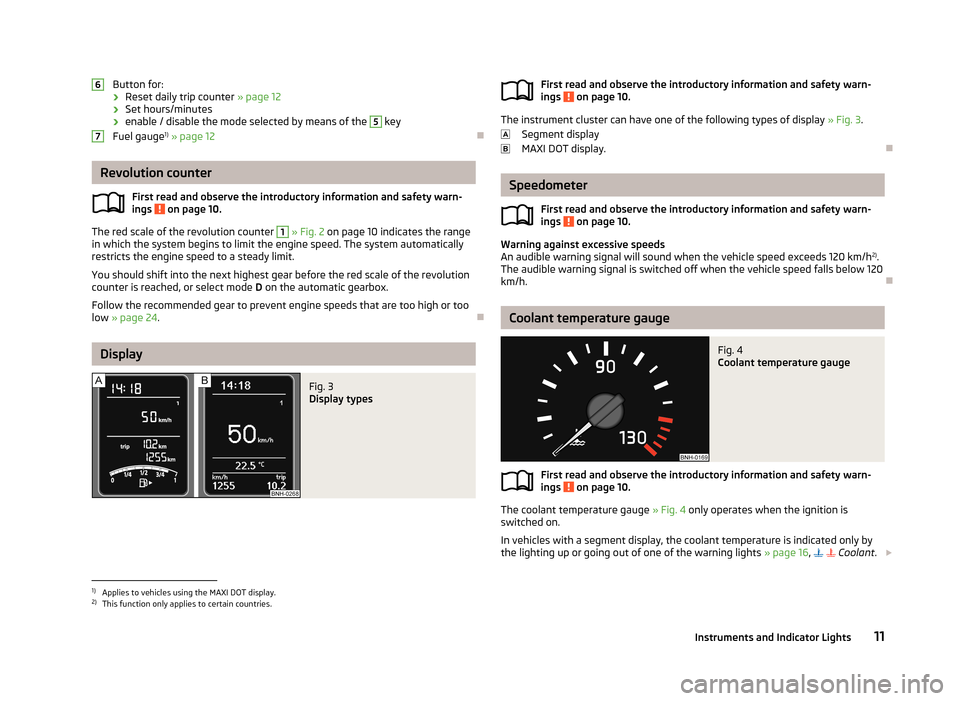
Display
Fig. 3
Display types
67First read and observe the introductory information and safety warn-
ings on page 10.
The instrument cluster can have one of the following types of display » Fig. 3.
Segment display
MAXI DOT display.
Speedometer
First read and observe the introductory information and safety warn-
ings
on page 10.
Warning against excessive speeds
An audible warning signal will sound when the vehicle speed exceeds 120 km/h 2)
.
The audible warning signal is switched off when the vehicle speed falls below 120
km/h.
Coolant temperature gauge
Fig. 4
Coolant temperature gauge
First read and observe the introductory information and safety warn-
ings on page 10.
The coolant temperature gauge » Fig. 4 only operates when the ignition is
switched on.
In vehicles with a segment display, the coolant temperature is indicated only by
the lighting up or going out of one of the warning lights » page 16,
Coolant
.
1)
Applies to vehicles using the MAXI DOT display.
2)
This function only applies to certain countries.
11Instruments and Indicator Lights
Page 15 of 226
Cold range
If the pointer is still in the left area of the scale, this indicates that the engine has not yet reached its operating temperature. Avoid high speeds, full throttle and
high engine loads. This prevents possible damage to the engine.
The operating range
The engine has reached its operating temperature as soon as the pointer moves into the mid-range of the scale. At very high ambient temperatures or heavy en- gine loads, the pointer may move even further to the right.
High temperature range
If the pointer reaches the red area of the scale, the coolant temperature is too high. Further information » page 16, Coolant .
CAUTION
Additional headlights and other attached components in front of the air inlet im-
pair the cooling efficiency of the coolant.
Fuel gauge
Fig. 5
Fuel gauge
First read and observe the introductory information and safety warn-
ings
on page 10.
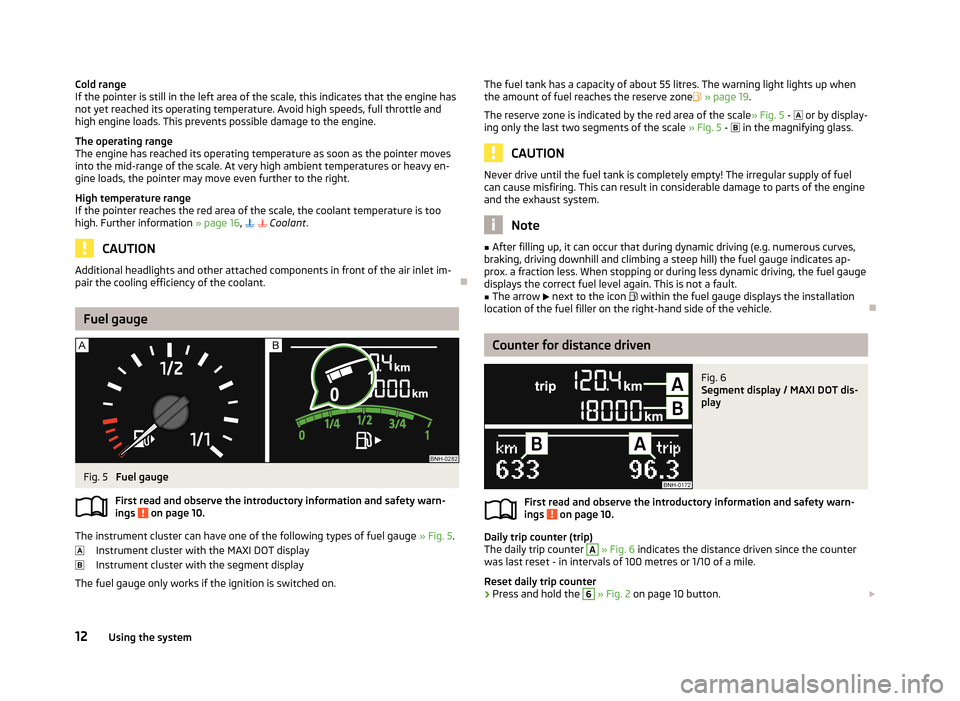
The instrument cluster can have one of the following types of fuel gauge » Fig. 5.
Instrument cluster with the MAXI DOT display
Instrument cluster with the segment display
The fuel gauge only works if the ignition is switched on.
The fuel tank has a capacity of about 55 litres. The warning light lights up when the amount of fuel reaches the reserve zone » page 19 .
The reserve zone is indicated by the red area of the scale » Fig. 5 - or by display-
ing only the last two segments of the scale » Fig. 5 - in the magnifying glass.
CAUTION
Never drive until the fuel tank is completely empty! The irregular supply of fuel
can cause misfiring. This can result in considerable damage to parts of the engine
and the exhaust system.
Note
■ After filling up, it can occur that during dynamic driving (e.g. numerous curves,
braking, driving downhill and climbing a steep hill) the fuel gauge indicates ap-
prox. a fraction less. When stopping or during less dynamic driving, the fuel gauge displays the correct fuel level again. This is not a fault.■
The arrow next to the icon within the fuel gauge displays the installation
location of the fuel filler on the right-hand side of the vehicle.
Counter for distance driven
Fig. 6
Segment display / MAXI DOT dis-
play
First read and observe the introductory information and safety warn-
ings on page 10.
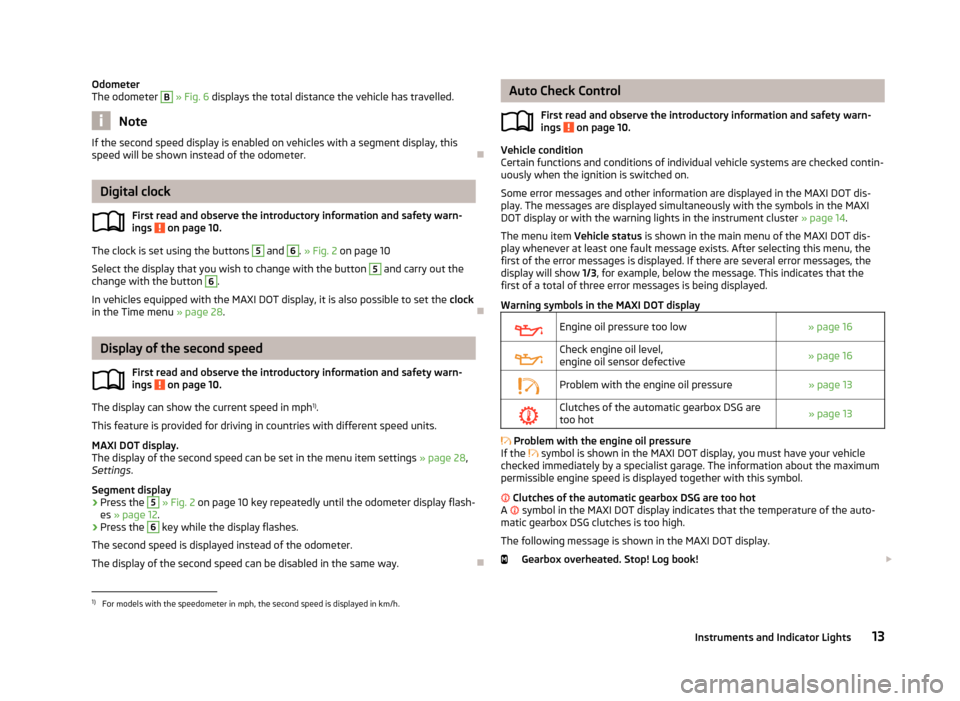
Daily trip counter (trip)
The daily trip counter
A
» Fig. 6 indicates the distance driven since the counter
was last reset - in intervals of 100 metres or 1/10 of a mile.
Reset daily trip counter
›
Press and hold the
6
» Fig. 2 on page 10 button.
12Using the system
Page 16 of 226
Odometer
The odometer B » Fig. 6 displays the total distance the vehicle has travelled.
Note
If the second speed display is enabled on vehicles with a segment display, this
speed will be shown instead of the odometer.
Digital clock
First read and observe the introductory information and safety warn-ings
on page 10.
The clock is set using the buttons
5
and
6
. » Fig. 2 on page 10
Select the display that you wish to change with the button
5
and carry out the
change with the button
6
.
In vehicles equipped with the MAXI DOT display, it is also possible to set the clock
in the Time menu » page 28.
Display of the second speed
First read and observe the introductory information and safety warn-
ings
on page 10.
The display can show the current speed in mph 1)
.
This feature is provided for driving in countries with different speed units.
MAXI DOT display.
The display of the second speed can be set in the menu item settings » page 28,
Settings .
Segment display
›
Press the
5
» Fig. 2 on page 10 key repeatedly until the odometer display flash-
es » page 12 .
›
Press the
6
key while the display flashes.
The second speed is displayed instead of the odometer. The display of the second speed can be disabled in the same way.
Auto Check Control
First read and observe the introductory information and safety warn-
ings
on page 10.
Vehicle condition
Certain functions and conditions of individual vehicle systems are checked contin-
uously when the ignition is switched on.
Some error messages and other information are displayed in the MAXI DOT dis-play. The messages are displayed simultaneously with the symbols in the MAXI DOT display or with the warning lights in the instrument cluster » page 14.
The menu item Vehicle status is shown in the main menu of the MAXI DOT dis-
play whenever at least one fault message exists. After selecting this menu, the
first of the error messages is displayed. If there are several error messages, the
display will show 1/3, for example, below the message. This indicates that the
first of a total of three error messages is being displayed.
Warning symbols in the MAXI DOT display
Engine oil pressure too low» page 16Check engine oil level,
engine oil sensor defective» page 16Problem with the engine oil pressure» page 13Clutches of the automatic gearbox DSG are too hot» page 13
Problem with the engine oil pressure
If the
symbol is shown in the MAXI DOT display, you must have your vehicle
checked immediately by a specialist garage. The information about the maximum
permissible engine speed is displayed together with this symbol.
Clutches of the automatic gearbox DSG are too hot
A
symbol in the MAXI DOT display indicates that the temperature of the auto-
matic gearbox DSG clutches is too high.
The following message is shown in the MAXI DOT display. Gearbox overheated. Stop! Log book!
1)
For models with the speedometer in mph, the second speed is displayed in km/h.
13Instruments and Indicator Lights
Page 17 of 226
do not continue to drive! Stop the vehicle, switch off the engine, and wait until
the icon goes out – risk of gearbox damage! You can continue your journey as
soon as the symbol disappears.WARNINGIf you have to stop for technical reasons, then park the vehicle at a safe dis- tance from the traffic, switch off the engine and switch on the hazard warning
lights » page 44 . The warning triangle must be set up at the prescribed dis-
tance - observe the national legal provisions when doing so.
Note
■ If the MAXI DOT display shows warning messages, these messages must be
confirmed in order to access the main menu » page 22, Using the information
system .■
As long as the operational faults are not rectified, the symbols are always indi-
cated again. After they are displayed for the first time, the symbols continue to be
indicated without any extra messages for the driver.
Indicator lights
Introduction
This chapter contains information on the following subjects:
Handbrake
14
Brake system
15
Seat belt warning light
15
Generator
15
Open door
15
Engine Oil
16
Coolant
16
Power steering
17
Electronic Stability Control (ESC)
17
Traction Control System (ASR)
17
Antilock brake system (ABS)
18
Rear fog light
18
Bulb failure
18 Exhaust inspection system18 Glow plug system (diesel engine)18
Engine performance check (petrol engine)
19
Diesel particle filter (diesel engine)
19
Fuel reserve
19
Airbag system
20
Tyre inflation pressure
20
Windscreen washer fluid level
20
Turn signal system
20
Fog lights
21
Cruise control system
21
Selector lever lock
21
Main beam
21
The indicator lights show the current status of certain functions/faults and may
be accompanied by audible signals.
WARNING■ Ignoring illuminated indicator lights and related messages or instructions in
the instrument cluster display may lead to serious personal injury or damage
to the vehicle.■
If you have to stop for technical reasons, then park the vehicle at a safe dis-
tance from the traffic, switch off the engine and switch on the hazard warning
lights » page 44 . The warning triangle must be set up at the prescribed dis-
tance - observe the national legal provisions when doing so.
■
The engine compartment of your car is a hazardous area. The following
warning notes must be followed at all times when working in the engine com-
partment » page 162 , Engine compartment .
Handbrake
First read and observe the introductory information and safety warn-
ings
on page 14.
The warning light
comes on if the handbrake is applied.
An acoustic signal will sound if you drive the vehicle above 6 km/h for at least 3
seconds while the handbrake is applied.
14Using the system
Page 25 of 226
Information system
Driver information system
Introduction
This chapter contains information on the following subjects:
Using the information system
22
Ice warning
23
Gear recommendation
24
Door, boot or engine compartment warning
24
Compass point display
24
The information system provides the driver with alerts and messages about in-
dividual vehicle systems. This information and advice is shown in the instrument
cluster display or indicated by the illumination of the corresponding indicator light in the instrument cluster.
Depending on the vehicle equipment, the information system provides the fol-
lowing advice and information.
› Ice warning
» page 23.
› Recommended gear
» page 24.
› Door, boot lid or bonnet warning
» page 24.
› Compass display
» page 24.
› Data relating to the multi-function display (MFD)
» page 25.
› Warning against excessive speed
» page 27.
› Data relating to the Maxi DOT display
» page 27.
› Service interval display
» page 28.
› Auto Check Control
» page 13.
› Selector lever positions for an automatic gearbox
» page 102.WARNINGConcentrate fully on your driving at all times! As the driver, you are fully re-
sponsible for the operation of your vehicle.
Using the information system
Fig. 7
Buttons/adjustment wheel: on the operating lever/on the multifunc-
tion steering wheel
First read and observe the introductory information and safety warn-
ings on page 22.
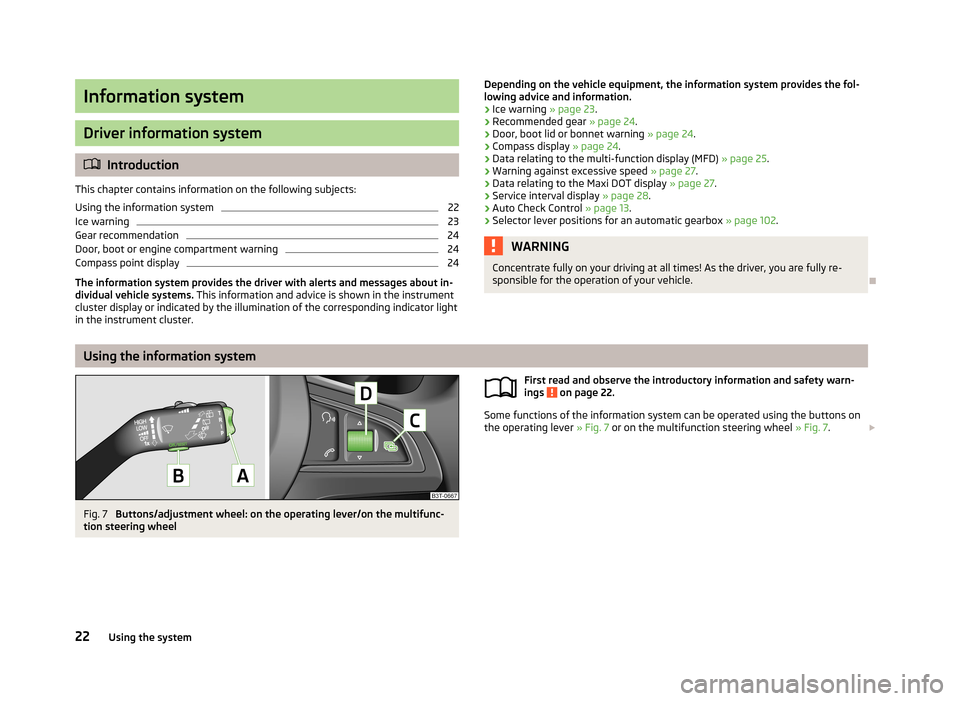
Some functions of the information system can be operated using the buttons on
the operating lever » Fig. 7 or on the multifunction steering wheel » Fig. 7.
22Using the system
Page 27 of 226
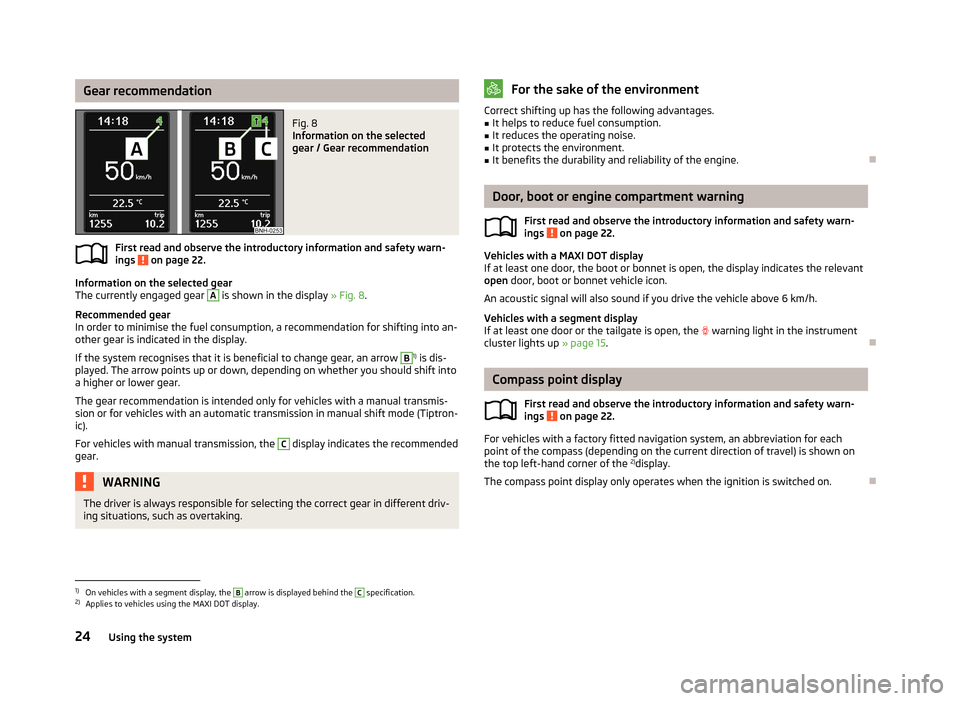
Gear recommendationFig. 8
Information on the selected
gear / Gear recommendation
First read and observe the introductory information and safety warn-
ings on page 22.
Information on the selected gear
The currently engaged gear
A
is shown in the display » Fig. 8.
Recommended gear
In order to minimise the fuel consumption, a recommendation for shifting into an-
other gear is indicated in the display.
If the system recognises that it is beneficial to change gear, an arrow
B
1) is dis-
played. The arrow points up or down, depending on whether you should shift into a higher or lower gear.
The gear recommendation is intended only for vehicles with a manual transmis-
sion or for vehicles with an automatic transmission in manual shift mode (Tiptron-
ic).
For vehicles with manual transmission, the
C
display indicates the recommended
gear.
WARNINGThe driver is always responsible for selecting the correct gear in different driv-
ing situations, such as overtaking.For the sake of the environmentCorrect shifting up has the following advantages.■It helps to reduce fuel consumption.■
It reduces the operating noise.
■
It protects the environment.
■
It benefits the durability and reliability of the engine.
Door, boot or engine compartment warning
First read and observe the introductory information and safety warn-ings
on page 22.
Vehicles with a MAXI DOT display
If at least one door, the boot or bonnet is open, the display indicates the relevant
open door, boot or bonnet vehicle icon.
An acoustic signal will also sound if you drive the vehicle above 6 km/h.
Vehicles with a segment display
If at least one door or the tailgate is open, the
warning light in the instrument
cluster lights up » page 15.
Compass point display
First read and observe the introductory information and safety warn-
ings
on page 22.
For vehicles with a factory fitted navigation system, an abbreviation for each
point of the compass (depending on the current direction of travel) is shown on
the top left-hand corner of the 2)
display.
The compass point display only operates when the ignition is switched on.
1)
On vehicles with a segment display, the
B
arrow is displayed behind the
C
specification.
2)
Applies to vehicles using the MAXI DOT display.
24Using the system
Page 32 of 226
Before the next service interval is reached, a message concerning the kilometres
and days remaining until the next service is due is shown for about 10 seconds
after the ignition is switched on. Alternatively, this information can be displayed
manually at any time if required.
The kilometre indicator or the days indicator reduces in steps of 100 km or, where
applicable, days until the service due date is reached.
Note
■ Information is retained in the Service Interval Display even after the vehicle bat-
tery is disconnected.■
If the instrument cluster is exchanged after a repair, the correct values must be
entered in the counter for the Service Interval Display. This work is carried out by a specialist garage.
■
In certain national versions, the displays appear with Imperial values.
■
For more information on the service intervals, see » page 147, Service intervals .
Prompt in the segment display
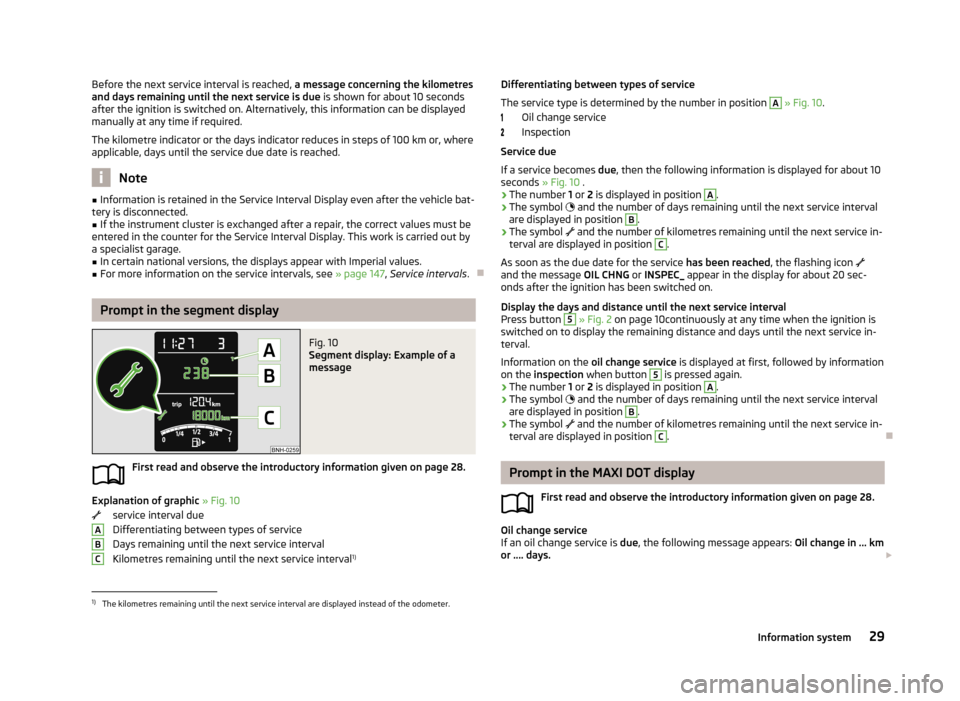
Fig. 10
Segment display: Example of a
message
First read and observe the introductory information given on page 28.
Explanation of graphic » Fig. 10
service interval due
Differentiating between types of service Days remaining until the next service interval
Kilometres remaining until the next service interval 1)
ABCDifferentiating between types of service
The service type is determined by the number in position A
» Fig. 10 .
Oil change service
Inspection
Service due
If a service becomes due, then the following information is displayed for about 10
seconds » Fig. 10 .
› The number
1 or 2 is displayed in position
A
.
› The symbol
and the number of days remaining until the next service interval
are displayed in position
B
.
› The symbol
and the number of kilometres remaining until the next service in-
terval are displayed in position
C
.
As soon as the due date for the service has been reached, the flashing icon
and the message OIL CHNG or INSPEC_ appear in the display for about 20 sec-
onds after the ignition has been switched on.
Display the days and distance until the next service interval
Press button
5
» Fig. 2 on page 10continuously at any time when the ignition is
switched on to display the remaining distance and days until the next service in- terval.
Information on the oil change service is displayed at first, followed by information
on the inspection when button
5
is pressed again.
› The number
1 or 2 is displayed in position
A
.
› The symbol
and the number of days remaining until the next service interval
are displayed in position
B
.
› The symbol
and the number of kilometres remaining until the next service in-
terval are displayed in position
C
.
Prompt in the MAXI DOT display
First read and observe the introductory information given on page 28.
Oil change service
If an oil change service is due, the following message appears: Oil change in ... km
or .... days.
1)
The kilometres remaining until the next service interval are displayed instead of the odometer.
29Information system