stop start SKODA RAPID 2014 1.G Owner's Guide
[x] Cancel search | Manufacturer: SKODA, Model Year: 2014, Model line: RAPID, Model: SKODA RAPID 2014 1.GPages: 200, PDF Size: 25.57 MB
Page 149 of 200

Checking the battery electrolyte levelFig. 124
Electrolyte level indicator
Read and observe and on page 145 first.
On vehicles with a vehicle battery fitted with a colour indicator » Fig. 124, the
electrolyte level can be determined by looking at the change in colour of this
display.
Air bubbles can influence the colour of the indicator. For this reason carefully
knock on the indicator before carrying out the check.
› Black colour – electrolyte level is correct.
› Colourless or light yellow colour – electrolyte level too low, the battery must
be replaced.
Vehicles with a START-STOP system are fitted with a battery control unit for
checking the energy level for the recurring engine start.
We recommend that you have the acid level checked regularly by a specialist
garage, especially in the following cases.
› High external temperatures.
› Longer day trips.
› After each charge.
Winter time
The vehicle battery only has a proportion of the starting power in lower tem-
peratures. A discharged vehicle battery may already freeze at temperatures
just below 0 °C .
We therefore recommend that you have the battery checked and, if necessary,
recharged by a specialist garage before the start of the winter.
Note■ The battery acid level is also checked regularly by a specialist garage as part
of the inspection service.■
For technical reasons, on vehicles with the description “AGM”, the electrolyte
level cannot be checked.
Charging
Read and observe
and on page 145 first.
A properly charged vehicle battery is essential for reliably starting the engine.A charging operation can be performed if the following conditions are satis-
fied.
The engine is turned off.
The ignition is switched off.
All consumers are turned off.
The bonnet is open.
“Fast charging” with high currents
›
Disconnect both battery cables (first of all “negative”, then “positive”).
›
Attach the terminal clamps of the charger to the battery terminals (red =
“positive”, black = “negative”).
›
Plug the mains cable of the charger into the power socket and switch on the
device.
›
After charging has been successful: Switch off the charger and remove the
mains cable from the power socket.
›
Only then disconnect the charger's terminal clamps.
›
Reconnect the cables to the battery (first “positive”, then “negative”).
Charging with low voltages
It is not necessary to disconnect the cables from the battery if you recharge
the vehicle battery, for example from a mini-charger.
Refer to the instructions of the charger manufacturer .
A charging current of 0.1 multiple of the total vehicle battery capacity (or low-
er) must be used until full charging is achieved.
The vent plugs of the vehicle battery should not be opened for charging.
146General Maintenance
Page 150 of 200

WARNING■When you charge a battery, hydrogen is released, and a highly explosive
gas mixture is also produced. An explosion can be caused through sparkling
over during unclamping or loosening of the cable plug while the ignition is
on.■
Creating a bridge between the poles on the battery (e.g. with metal ob-
jects - cables) creates a short circuit - risk of damage to the battery, explo-
sion and burning of the battery, jets of acid spurting out.
■
Avoid creating sparks when working with cables and electrical devices.
Strong sparking represents a risk of injury.
■
Before carrying out any work on the electrical system, switch off the en-
gine, the ignition and all electrical consumers and disconnect the negative
terminal
.
■
“Quick-charging” the vehicle battery is dangerous and requires a special
charger and specialist knowledge.
■
We therefore recommend that vehicle batteries be “rapidly charged” by a
specialist garage.
CAUTION
On vehicles with the START/STOP system, the pole terminal of the charger
must not be connected directly to the negative terminal of the vehicle battery,
but only to the engine earth » page 163, Jump-starting using the battery from
another vehicle .
Replacing
Read and observe
and on page 145 first.
The new vehicle battery must have the same capacity, voltage, current and
size as the original battery. Suitable vehicle battery types can be purchased
from a specialist garage.
We recommend having the battery replaced by a specialist garage, where the
new vehicle battery will be installed properly and the original battery will be
disposed of in accordance with national regulations.
Disconnecting and reconnecting
Read and observe
and on page 145 first.
Disconnecting
›
Switch off the ignition.
›First, disconnect the negative terminal
first, then the positive terminal
of the battery.
Connecting›
First, connect the positive
first, then the negative
battery terminal.
After disconnecting and re-connecting the vehicle battery, the following func-
tions or devices are partially or completely inoperative.
Function / deviceOperating measureRadio or navigation systemEnter code number » User radio
manual or » navigation system
user manualTime settings» page 33
CAUTION
■ Disconnect the vehicle battery only with the ignition turned off - there is a
risk of damaging the electrical system of the vehicle.■
Under no circumstances must the battery cables be connected incorrectly –
risk of a cable fire.
Note
■ After disconnecting and re-connecting the vehicle battery, we recommend
having the vehicle checked by a specialist to ensure that the full functionality
of all electrical systems is guaranteed.■
The data of the multi-function display will be reset.
Automatic load deactivation
Read and observe
and on page 145 first.
The vehicle voltage control unit automatically prevents the battery from dis-
charging when the battery is put under high levels of strain. This manifests it-
self by the following.
› The idling speed is raised to allow the generator to deliver more electricity to
the electrical system.
› Where necessary, large convenience consumers such as seat heaters and
rear window heaters have their power limited or are shut off completely in
the event of an emergency.
147Inspecting and replenishing
Page 162 of 200
›Grasp the end of the wrench and turn the bolt about
one turn in the direction
of the arrow » Fig. 133.
Tightening›
Push the wheel wrench onto the wheel bolt to the stop 1)
.
›
Grasp the end of the wrench and turn the bolt against the direction of the
arrow » Fig. 133 until it is tight.
After tightening the wheel bolts, the covering caps must be replaced.
WARNINGIf it proves difficult to undo the bolts, carefully apply pressure to the end of
the wrench with your foot. Keep hold of the vehicle when doing so, and
make sure you keep your footing.
Raising the vehicle
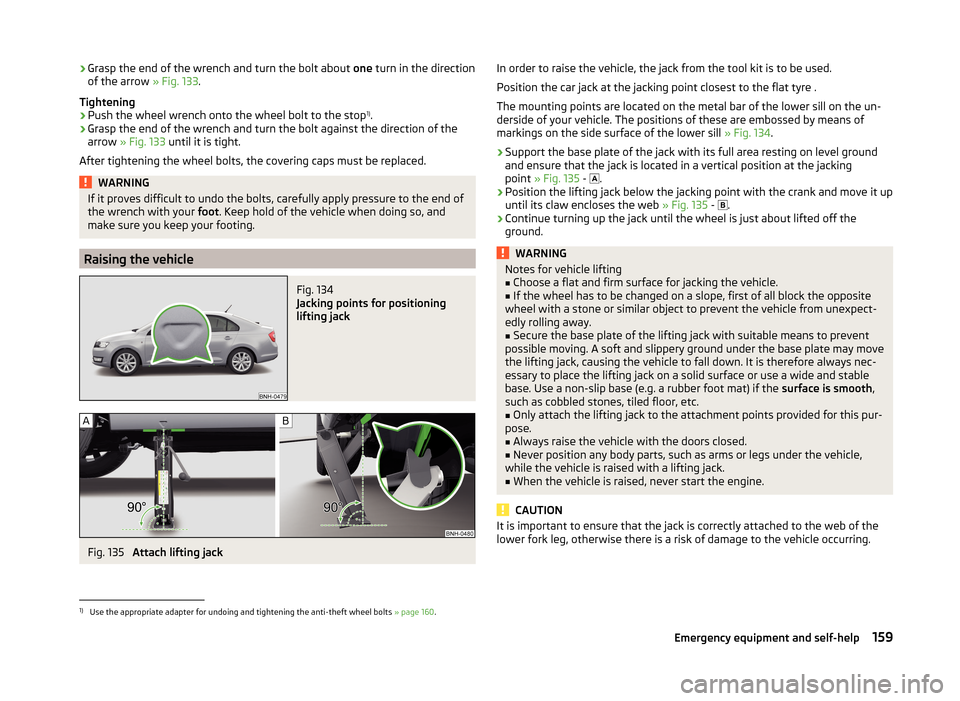
Fig. 134
Jacking points for positioning
lifting jack
Fig. 135
Attach lifting jack
In order to raise the vehicle, the jack from the tool kit is to be used.
Position the car jack at the jacking point closest to the flat tyre .
The mounting points are located on the metal bar of the lower sill on the un-
derside of your vehicle. The positions of these are embossed by means of
markings on the side surface of the lower sill » Fig. 134.›
Support the base plate of the jack with its full area resting on level ground
and ensure that the jack is located in a vertical position at the jacking
point » Fig. 135 -
.
›
Position the lifting jack below the jacking point with the crank and move it up
until its claw encloses the web » Fig. 135 -
.
›
Continue turning up the jack until the wheel is just about lifted off the
ground.
WARNINGNotes for vehicle lifting■Choose a flat and firm surface for jacking the vehicle.■
If the wheel has to be changed on a slope, first of all block the opposite
wheel with a stone or similar object to prevent the vehicle from unexpect-
edly rolling away.
■
Secure the base plate of the lifting jack with suitable means to prevent
possible moving. A soft and slippery ground under the base plate may move
the lifting jack, causing the vehicle to fall down. It is therefore always nec-
essary to place the lifting jack on a solid surface or use a wide and stable
base. Use a non-slip base (e.g. a rubber foot mat) if the surface is smooth,
such as cobbled stones, tiled floor, etc.
■
Only attach the lifting jack to the attachment points provided for this pur-
pose.
■
Always raise the vehicle with the doors closed.
■
Never position any body parts, such as arms or legs under the vehicle,
while the vehicle is raised with a lifting jack.
■
When the vehicle is raised, never start the engine.
CAUTION
It is important to ensure that the jack is correctly attached to the web of the
lower fork leg, otherwise there is a risk of damage to the vehicle occurring.1)
Use the appropriate adapter for undoing and tightening the anti-theft wheel bolts » page 160.
159Emergency equipment and self-help
Page 166 of 200

The battery of another vehicle can be used to jump-start your vehicle if the en-
gine will not start because the battery is flat.WARNING■ Pay attention to the warning instructions relating to working in the en-
gine compartment » page 137.■
A discharged vehicle battery may already freeze at temperatures just be-
low 0 °C. If the battery is frozen, do not jump start with the battery of an-
other vehicle – there is a risk of explosion.
■
Keep any sources of ignition (naked flame, smouldering cigarettes, etc.)
away from the battery – risk of explosion!
■
Never jump-start vehicle batteries with insufficient acid levels – risk of
explosion and chemical burns.
■
The vent screws of the battery cells must be tightened firmly.
Note
We recommend you buy jump-start cables from a car battery specialist.
Jump-starting using the battery from another vehicle
Fig. 138
Jump-starting: A – flat battery, B
– battery providing current
Fig. 139
Engine earth: START-STOP system
Read and observe on page 163 first.
The starting process using the battery of another vehicle requires the use of
jumper cables.
The jump-start cables must be attached in the following sequence.
›
Attach clamp
1
to the positive terminal of the discharged battery
A
» Fig. 138 .
›
Attach clamp
2
to the positive terminal of the battery supplying power
B
.
›
Attach clamp
3
to the negative terminal of the battery supplying power
B
.
›
Attach the clamp
4
to a solid metal component firmly connected to the en-
gine block or to the engine block itself.
Starting engine
›
Start the engine on the vehicle providing the power and allow it to idle.
›
Start the engine of the vehicle with the discharged battery.
›
If the engine does not start, halt the attempt to start the engine after 10 sec-
onds and wait for 30 seconds before repeating the process.
›
Remove the jumper cables exactly in the reverse sequence as for clamping.
On vehicles with the START-STOP system, the jump-start cable of the charger
must never be connected directly to the negative pole of the vehicle battery,
but only to the engine earth.
› 1.2 l/63 kW TSI and 1.2 l/77 kW TSI engines
» Fig. 139 -
› 1.4 l/90 kW engine
» Fig. 139 -
› 1.6 l/77 kW TDI CR engine
» Fig. 139 -
Both batteries must have a rated voltage of 12 V. The capacity (Ah) of the bat-
tery supplying the power must not be significantly less than the capacity of
the discharged battery in your vehicle.
Jump-start cables
Only use jump-start cables which have an adequately large cross-section and
insulated terminal clamps. Observe the instructions of the jumper lead manu-
facturer.
Positive cable – colour coding in the majority of cases is red.
Negative cable – colour coding in the majority of cases is black.
163Emergency equipment and self-help
Page 173 of 200
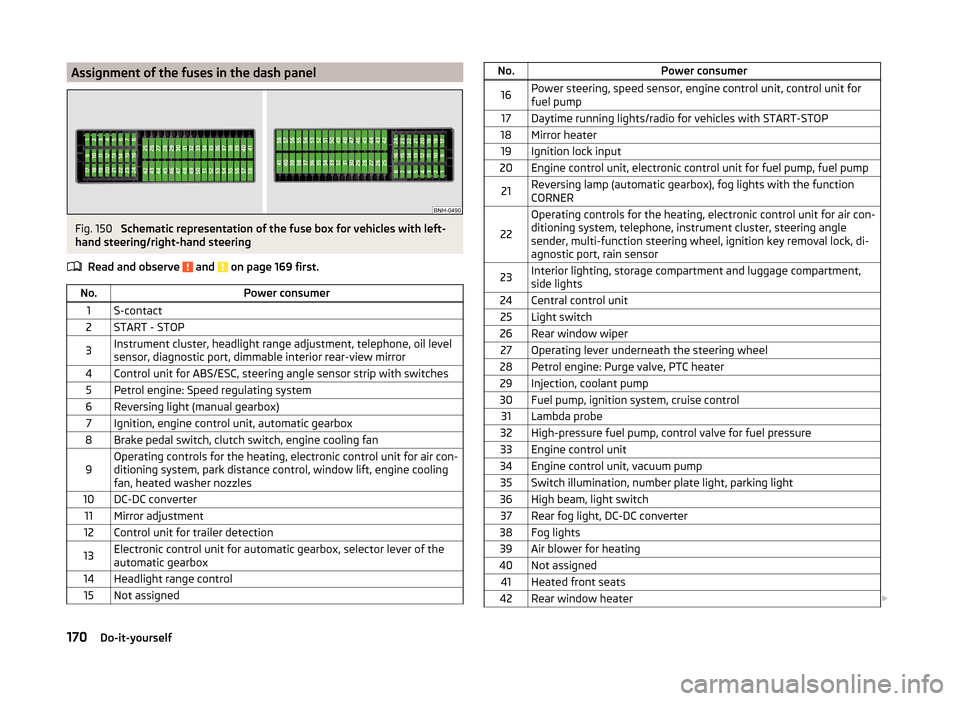
Assignment of the fuses in the dash panelFig. 150
Schematic representation of the fuse box for vehicles with left-
hand steering/right-hand steering
Read and observe
and on page 169 first.
No.Power consumer1S-contact2START - STOP3Instrument cluster, headlight range adjustment, telephone, oil level
sensor, diagnostic port, dimmable interior rear-view mirror4Control unit for ABS/ESC, steering angle sensor strip with switches5Petrol engine: Speed regulating system6Reversing light (manual gearbox)7Ignition, engine control unit, automatic gearbox8Brake pedal switch, clutch switch, engine cooling fan9Operating controls for the heating, electronic control unit for air con-
ditioning system, park distance control, window lift, engine cooling
fan, heated washer nozzles10DC-DC converter11Mirror adjustment12Control unit for trailer detection13Electronic control unit for automatic gearbox, selector lever of the
automatic gearbox14Headlight range control15Not assignedNo.Power consumer16Power steering, speed sensor, engine control unit, control unit for
fuel pump17Daytime running lights/radio for vehicles with START-STOP18Mirror heater19Ignition lock input20Engine control unit, electronic control unit for fuel pump, fuel pump21Reversing lamp (automatic gearbox), fog lights with the function
CORNER
22
Operating controls for the heating, electronic control unit for air con-
ditioning system, telephone, instrument cluster, steering angle
sender, multi-function steering wheel, ignition key removal lock, di-
agnostic port, rain sensor23Interior lighting, storage compartment and luggage compartment,
side lights24Central control unit25Light switch26Rear window wiper27Operating lever underneath the steering wheel28Petrol engine: Purge valve, PTC heater29Injection, coolant pump30Fuel pump, ignition system, cruise control31Lambda probe32High-pressure fuel pump, control valve for fuel pressure33Engine control unit34Engine control unit, vacuum pump35Switch illumination, number plate light, parking light36High beam, light switch37Rear fog light, DC-DC converter38Fog lights39Air blower for heating40Not assigned41Heated front seats42Rear window heater 170Do-it-yourself
Page 174 of 200
No.Power consumer43Horn44Windscreen wipers45Boot lid lock, central locking system46Alarm47Cigarette lighter48ABS49Turn signal lights, brake lights50DC-DC converter, radio51Electric windows (driver's window and rear left window)52Electric windows (front passenger's window and rear right)53Windscreen washer54START-STOP instrument cluster, operating lever under the steering
wheel, multifunction steering wheel55Control unit for automatic gearbox56Headlight cleaning system57Headlights front, rear58Headlights front, rear
Fuses in the engine compartment
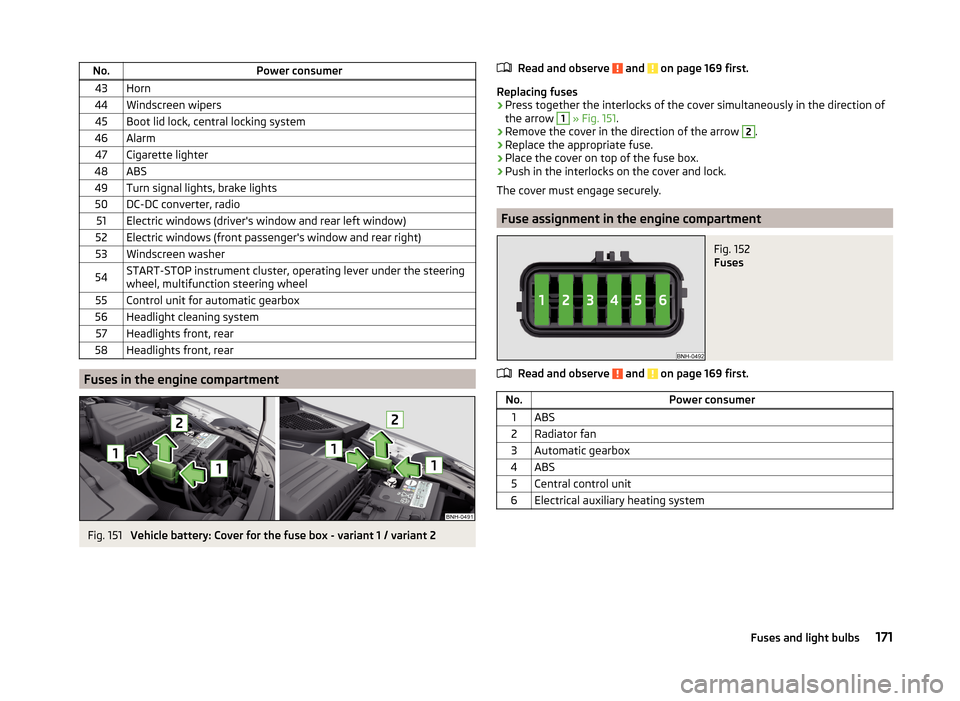
Fig. 151
Vehicle battery: Cover for the fuse box - variant 1 / variant 2
Read and observe and on page 169 first.
Replacing fuses
›
Press together the interlocks of the cover simultaneously in the direction of
the arrow
1
» Fig. 151 .
›
Remove the cover in the direction of the arrow
2
.
›
Replace the appropriate fuse.
›
Place the cover on top of the fuse box.
›
Push in the interlocks on the cover and lock.
The cover must engage securely.
Fuse assignment in the engine compartment
Fig. 152
Fuses
Read and observe and on page 169 first.
No.Power consumer1ABS2Radiator fan3Automatic gearbox4ABS5Central control unit6Electrical auxiliary heating system171Fuses and light bulbs
Page 188 of 200
Index
A
abroad lead-free petrol
135
Abroad Headlights
63
ABS Function
109
Warning light37
Acceptance and recycling of used vehicles127
Accessories124
Adjusting Belt height
15
Exterior mirror68
head restraints70
Interior mirror67
Seat69
Steering wheel10
Adjusting the seats9
Adjustment Beam range
58
Air-conditioning system Air outlet vents
86
Airbag16
Deactivating20
Deactivating the front passenger airbag20
Deployment16
Front airbag17
Head airbag19
Indicator light39
Modifications and damage to the airbag system 126 Side airbag
18
Airbag system16
Air conditioning85
Air distribution control87
Climatronic88
manual air conditioning88
Air distribution control87
Air outlet vents86
Alarm Switching off
53
Triggering53
Alcantara cleaning
133
Anti-theft alarm system Activating/deactivating
54
Trailer122
Anti-theft wheel bolts160
Antilock Braking System109
Armrest Front
72
Rear72
artificial leather133
Ashtray76
ASR warning light
37
Assembling the bar ball, Step 1
118
bar ball, Step 2118
Assist system ABS
109
Assist systems109
ABS37
ASR37
Cruise Control System111
EDL110
ESC37, 109
HBA110
HHC110
Parking aid110
START-STOP112
TCS109
Audio see radio / navigation system
4
Auto Check Control33
Automatic driving lamp control60
Automatic gearbox104
Manual shifting of gears106
Selector lever-emergency unlocking167
Selector lever lock105
Starting-off and driving106
Tiptronic106
Using the selector lever105
Automatic gearbox modes105
Automatic load deactivation147
automatic transmission selector lever lock defect
106
Automatic transmission Kickdown
106
Selector lever lock105
AUX97
B
Ball head Check fitting
119
Ready position117
Battery In the remote control key
166
Belts12
Belt tensioners15
Bonnet Closing
138
Opening138
Boot Cargo element
83
Class N1 vehicles84
Double-sided floor covering84
Hooks82
See Boot lid55
Storage compartments83
Boot cover Parking position
83
Boot lid automatic locking
55
Closing55
Opening55
185Index
Page 194 of 200
Refuelling135
Fuel135
Remote control Locking
50
Replacing the battery166
Synchronisation process166
Unlocking50
Remote control key Replacing the battery
166
Removing the bar ball, Step 1
119
bar ball, Step 2119
Repairs and technical alterations124
Replacing Bulb for main beam, daytime running lights andparking light
173
Bulb for the fog light174
Bulb for the licence plate light175
Bulb in rear light176
Fuses169
Fuses in the dash panel169
Fuses in the engine compartment171
High beam bulb (halogen headlights)173
Rear window wiper blade168
Vehicle battery147
windscreen wiper blades168
Replenishing Coolant
143
Engine oil142
Windscreen washer fluid139
Retraction and economical driving107
Revolution counter31
Roof Load
85
Roof rack84
mounting points85
Roof load85
Rubber seals129
S
SAFE See Safe securing system
51
SAFELOCK See Safe securing system
51
Safe securing system51
Safety8
Child safety22
Child safety seats22
Correct seated position9
Head restraints70
ISOFIX25
TOP TETHER26
Save electrical energy107
Save fuel107
Seals Vehicle care
129
Seat Adjusting
69
Seat belt warning light
35
Seat belts12
Belt tensioners15
fastening and unfastening14
Height adjustment15
Inertia reels15
The physical principle of a frontal collision13
Seat features71
Seats Front armrest
72
Head restraints70
Heating71
Rear armrest72
Seat backrests72
Seats and head restraint69
Selector lever Refer to Selector lever
105
Service125
Service interval display47
Setting33
seats and head restraints69
Setting the33
Side airbag18
SmartGate connection
98
Password99
Settings99
Smart Gate Website
99
Snow chains153
Spare change
156
spare wheel155
change156
instructions156
Speedometer31
See speedometer31
Speed symbol See Wheels
151
Spoiler126
Staring engine Jump-starting
163
START-STOP112
Jump-starting163
Manually deactivating/activating the system114
Operating conditions of the system113
operation in vehicles with automatic gearbox113
operation in vehicles with manual gearbox113
system-related automatic start-up114
Start engine101
Starting engine Jump-starting
162
START STOP Information messages
114
Stating and turning off the engine100
Steering wheel10
Stopping103
Storage73
191Index