ignition SKODA RAPID 2014 1.G Owner's Guide
[x] Cancel search | Manufacturer: SKODA, Model Year: 2014, Model line: RAPID, Model: SKODA RAPID 2014 1.GPages: 200, PDF Size: 25.57 MB
Page 68 of 200
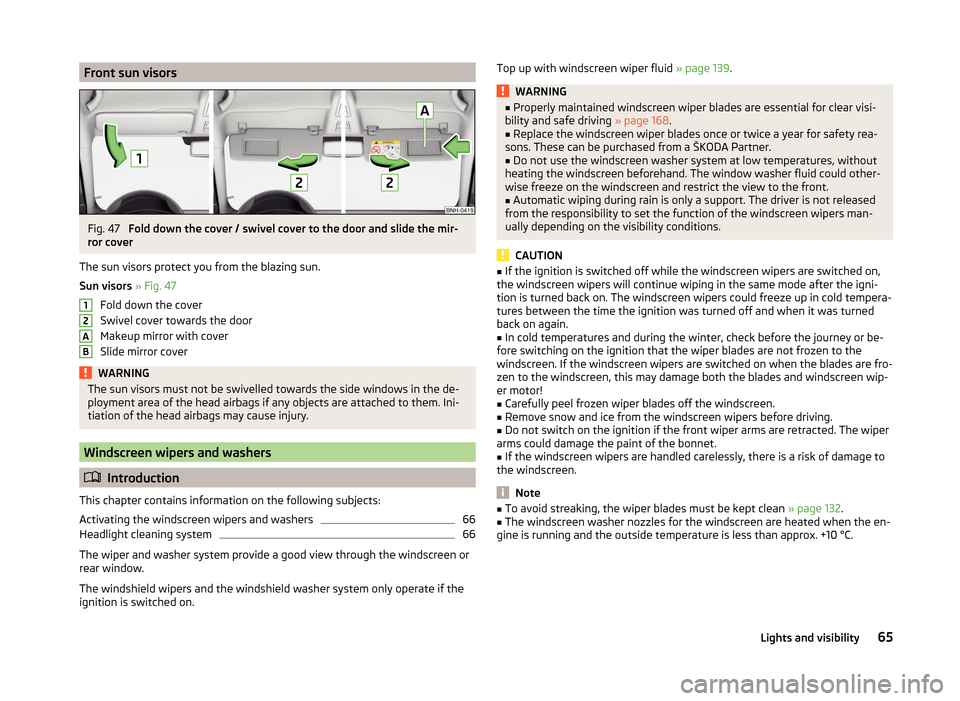
Front sun visorsFig. 47
Fold down the cover / swivel cover to the door and slide the mir-
ror cover
The sun visors protect you from the blazing sun.
Sun visors » Fig. 47
Fold down the cover
Swivel cover towards the door
Makeup mirror with cover
Slide mirror cover
WARNINGThe sun visors must not be swivelled towards the side windows in the de-
ployment area of the head airbags if any objects are attached to them. Ini-
tiation of the head airbags may cause injury.
Windscreen wipers and washers
Introduction
This chapter contains information on the following subjects:
Activating the windscreen wipers and washers
66
Headlight cleaning system
66
The wiper and washer system provide a good view through the windscreen or
rear window.
The windshield wipers and the windshield washer system only operate if the
ignition is switched on.
12ABTop up with windscreen wiper fluid » page 139.WARNING■
Properly maintained windscreen wiper blades are essential for clear visi-
bility and safe driving » page 168.■
Replace the windscreen wiper blades once or twice a year for safety rea-
sons. These can be purchased from a ŠKODA Partner.
■
Do not use the windscreen washer system at low temperatures, without
heating the windscreen beforehand. The window washer fluid could other-
wise freeze on the windscreen and restrict the view to the front.
■
Automatic wiping during rain is only a support. The driver is not released
from the responsibility to set the function of the windscreen wipers man-
ually depending on the visibility conditions.
CAUTION
■ If the ignition is switched off while the windscreen wipers are switched on,
the windscreen wipers will continue wiping in the same mode after the igni-
tion is turned back on. The windscreen wipers could freeze up in cold tempera-
tures between the time the ignition was turned off and when it was turned
back on again.■
In cold temperatures and during the winter, check before the journey or be-
fore switching on the ignition that the wiper blades are not frozen to the
windscreen. If the windscreen wipers are switched on when the blades are fro-
zen to the windscreen, this may damage both the blades and windscreen wip-
er motor!
■
Carefully peel frozen wiper blades off the windscreen.
■
Remove snow and ice from the windscreen wipers before driving.
■
Do not switch on the ignition if the front wiper arms are retracted. The wiper
arms could damage the paint of the bonnet.
■
If the windscreen wipers are handled carelessly, there is a risk of damage to
the windscreen.
Note
■ To avoid streaking, the wiper blades must be kept clean » page 132.■The windscreen washer nozzles for the windscreen are heated when the en-
gine is running and the outside temperature is less than approx. +10 °C.65Lights and visibility
Page 69 of 200
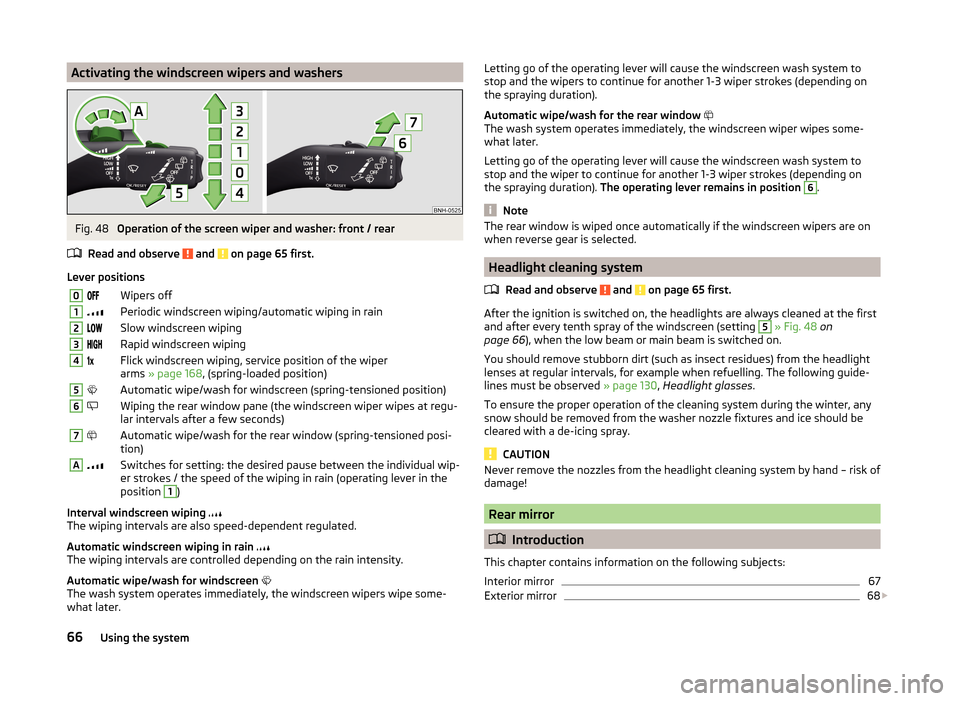
Activating the windscreen wipers and washersFig. 48
Operation of the screen wiper and washer: front / rear
Read and observe
and on page 65 first.
Lever positions
0Wipers off1Periodic windscreen wiping/automatic wiping in rain2Slow windscreen wiping3Rapid windscreen wiping4 Flick windscreen wiping, service position of the wiper
arms » page 168 , (spring-loaded position)5Automatic wipe/wash for windscreen (spring-tensioned position)6Wiping the rear window pane (the windscreen wiper wipes at regu-
lar intervals after a few seconds)7Automatic wipe/wash for the rear window (spring-tensioned posi-
tion)ASwitches for setting: the desired pause between the individual wip-
er strokes / the speed of the wiping in rain (operating lever in the
position 1
)
Interval windscreen wiping
The wiping intervals are also speed-dependent regulated.
Automatic windscreen wiping in rain
The wiping intervals are controlled depending on the rain intensity.
Automatic wipe/wash for windscreen
The wash system operates immediately, the windscreen wipers wipe some-
what later.
Letting go of the operating lever will cause the windscreen wash system to
stop and the wipers to continue for another 1-3 wiper strokes (depending on
the spraying duration).
Automatic wipe/wash for the rear window
The wash system operates immediately, the windscreen wiper wipes some-
what later.
Letting go of the operating lever will cause the windscreen wash system to
stop and the wiper to continue for another 1-3 wiper strokes (depending on
the spraying duration). The operating lever remains in position 6
.
Note
The rear window is wiped once automatically if the windscreen wipers are on
when reverse gear is selected.
Headlight cleaning system
Read and observe
and on page 65 first.
After the ignition is switched on, the headlights are always cleaned at the first
and after every tenth spray of the windscreen (setting
5
» Fig. 48 on
page 66 ), when the low beam or main beam is switched on.
You should remove stubborn dirt (such as insect residues) from the headlight
lenses at regular intervals, for example when refuelling. The following guide-
lines must be observed » page 130, Headlight glasses .
To ensure the proper operation of the cleaning system during the winter, any
snow should be removed from the washer nozzle fixtures and ice should be
cleared with a de-icing spray.
CAUTION
Never remove the nozzles from the headlight cleaning system by hand – risk of
damage!
Rear mirror
Introduction
This chapter contains information on the following subjects:
Interior mirror
67
Exterior mirror
68
66Using the system
Page 78 of 200
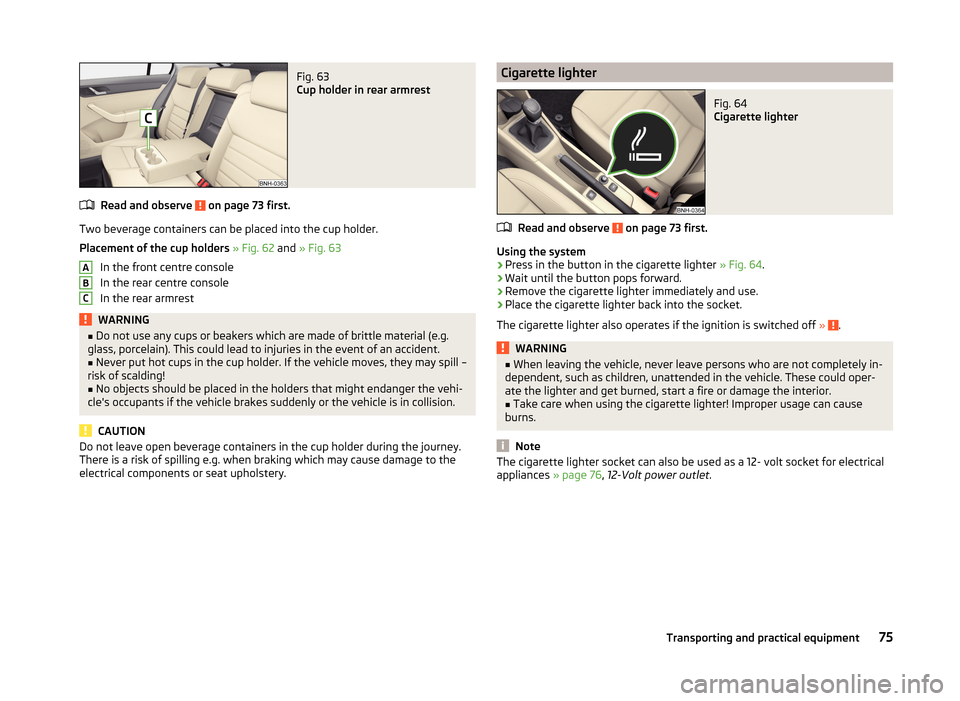
Fig. 63
Cup holder in rear armrest
Read and observe on page 73 first.
Two beverage containers can be placed into the cup holder.
Placement of the cup holders » Fig. 62 and » Fig. 63
In the front centre console
In the rear centre console
In the rear armrest
WARNING■ Do not use any cups or beakers which are made of brittle material (e.g.
glass, porcelain). This could lead to injuries in the event of an accident.■
Never put hot cups in the cup holder. If the vehicle moves, they may spill –
risk of scalding!
■
No objects should be placed in the holders that might endanger the vehi-
cle's occupants if the vehicle brakes suddenly or the vehicle is in collision.
CAUTION
Do not leave open beverage containers in the cup holder during the journey.
There is a risk of spilling e.g. when braking which may cause damage to the
electrical components or seat upholstery.ABCCigarette lighterFig. 64
Cigarette lighter
Read and observe on page 73 first.
Using the system
›
Press in the button in the cigarette lighter » Fig. 64.
›
Wait until the button pops forward.
›
Remove the cigarette lighter immediately and use.
›
Place the cigarette lighter back into the socket.
The cigarette lighter also operates if the ignition is switched off »
.
WARNING■
When leaving the vehicle, never leave persons who are not completely in-
dependent, such as children, unattended in the vehicle. These could oper-
ate the lighter and get burned, start a fire or damage the interior.■
Take care when using the cigarette lighter! Improper usage can cause
burns.
Note
The cigarette lighter socket can also be used as a 12- volt socket for electrical
appliances » page 76, 12-Volt power outlet .75Transporting and practical equipment
Page 79 of 200
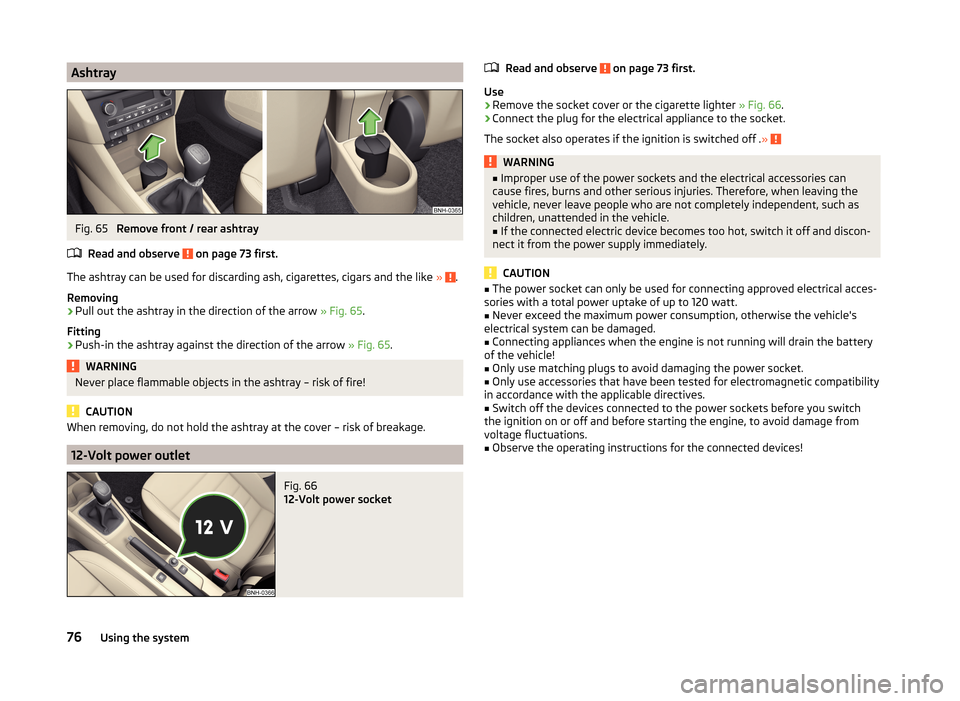
AshtrayFig. 65
Remove front / rear ashtray
Read and observe
on page 73 first.
The ashtray can be used for discarding ash, cigarettes, cigars and the like » .
Removing
›
Pull out the ashtray in the direction of the arrow » Fig. 65.
Fitting
›
Push-in the ashtray against the direction of the arrow » Fig. 65.
WARNINGNever place flammable objects in the ashtray – risk of fire!
CAUTION
When removing, do not hold the ashtray at the cover – risk of breakage.
12-Volt power outlet
Fig. 66
12-Volt power socket
Read and observe on page 73 first.
Use
›
Remove the socket cover or the cigarette lighter » Fig. 66.
›
Connect the plug for the electrical appliance to the socket.
The socket also operates if the ignition is switched off . »
WARNING■
Improper use of the power sockets and the electrical accessories can
cause fires, burns and other serious injuries. Therefore, when leaving the
vehicle, never leave people who are not completely independent, such as
children, unattended in the vehicle.■
If the connected electric device becomes too hot, switch it off and discon-
nect it from the power supply immediately.
CAUTION
■ The power socket can only be used for connecting approved electrical acces-
sories with a total power uptake of up to 120 watt.■
Never exceed the maximum power consumption, otherwise the vehicle's
electrical system can be damaged.
■
Connecting appliances when the engine is not running will drain the battery
of the vehicle!
■
Only use matching plugs to avoid damaging the power socket.
■
Only use accessories that have been tested for electromagnetic compatibility
in accordance with the applicable directives.
■
Switch off the devices connected to the power sockets before you switch
the ignition on or off and before starting the engine, to avoid damage from
voltage fluctuations.
■
Observe the operating instructions for the connected devices!
76Using the system
Page 83 of 200
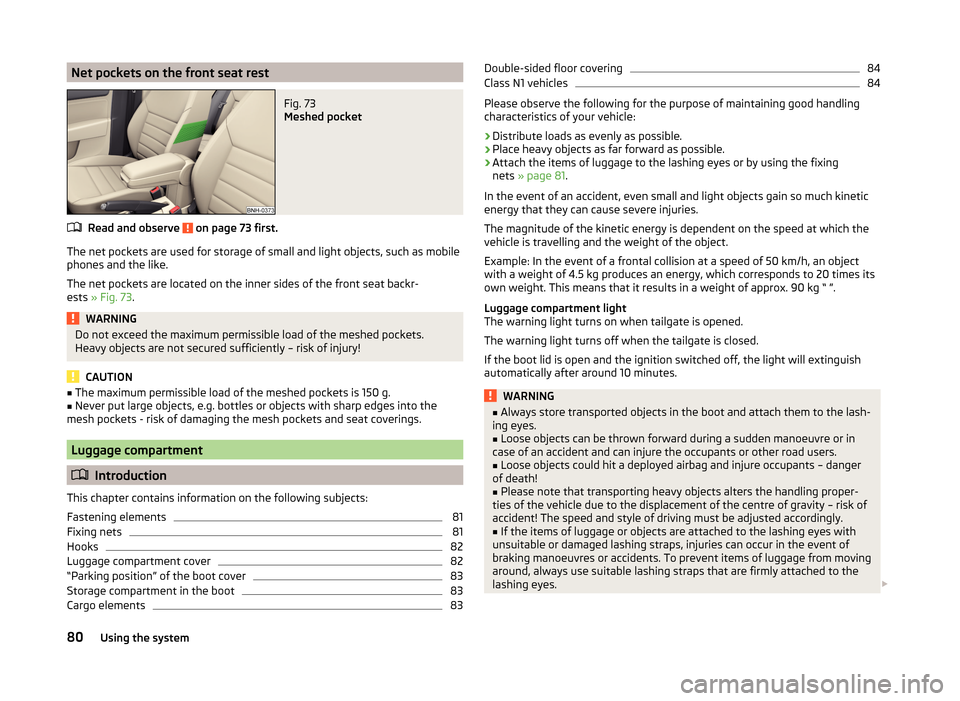
Net pockets on the front seat restFig. 73
Meshed pocket
Read and observe on page 73 first.
The net pockets are used for storage of small and light objects, such as mobile
phones and the like.
The net pockets are located on the inner sides of the front seat backr-
ests » Fig. 73 .
WARNINGDo not exceed the maximum permissible load of the meshed pockets.
Heavy objects are not secured sufficiently – risk of injury!
CAUTION
■ The maximum permissible load of the meshed pockets is 150 g.■Never put large objects, e.g. bottles or objects with sharp edges into the
mesh pockets - risk of damaging the mesh pockets and seat coverings.
Luggage compartment
Introduction
This chapter contains information on the following subjects:
Fastening elements
81
Fixing nets
81
Hooks
82
Luggage compartment cover
82
“Parking position” of the boot cover
83
Storage compartment in the boot
83
Cargo elements
83Double-sided floor covering84Class N1 vehicles84
Please observe the following for the purpose of maintaining good handling
characteristics of your vehicle:
›
Distribute loads as evenly as possible.
›
Place heavy objects as far forward as possible.
›
Attach the items of luggage to the lashing eyes or by using the fixing
nets » page 81 .
In the event of an accident, even small and light objects gain so much kinetic
energy that they can cause severe injuries.
The magnitude of the kinetic energy is dependent on the speed at which the
vehicle is travelling and the weight of the object.
Example: In the event of a frontal collision at a speed of 50 km/h, an object
with a weight of 4.5 kg produces an energy, which corresponds to 20 times its
own weight. This means that it results in a weight of approx. 90 kg “ ”.
Luggage compartment light
The warning light turns on when tailgate is opened.
The warning light turns off when the tailgate is closed.
If the boot lid is open and the ignition switched off, the light will extinguish
automatically after around 10 minutes.
WARNING■ Always store transported objects in the boot and attach them to the lash-
ing eyes.■
Loose objects can be thrown forward during a sudden manoeuvre or in
case of an accident and can injure the occupants or other road users.
■
Loose objects could hit a deployed airbag and injure occupants – danger
of death!
■
Please note that transporting heavy objects alters the handling proper-
ties of the vehicle due to the displacement of the centre of gravity – risk of
accident! The speed and style of driving must be adjusted accordingly.
■
If the items of luggage or objects are attached to the lashing eyes with
unsuitable or damaged lashing straps, injuries can occur in the event of
braking manoeuvres or accidents. To prevent items of luggage from moving
around, always use suitable lashing straps that are firmly attached to the
lashing eyes.
80Using the system
Page 96 of 200
Symbols in the displayRead and observe
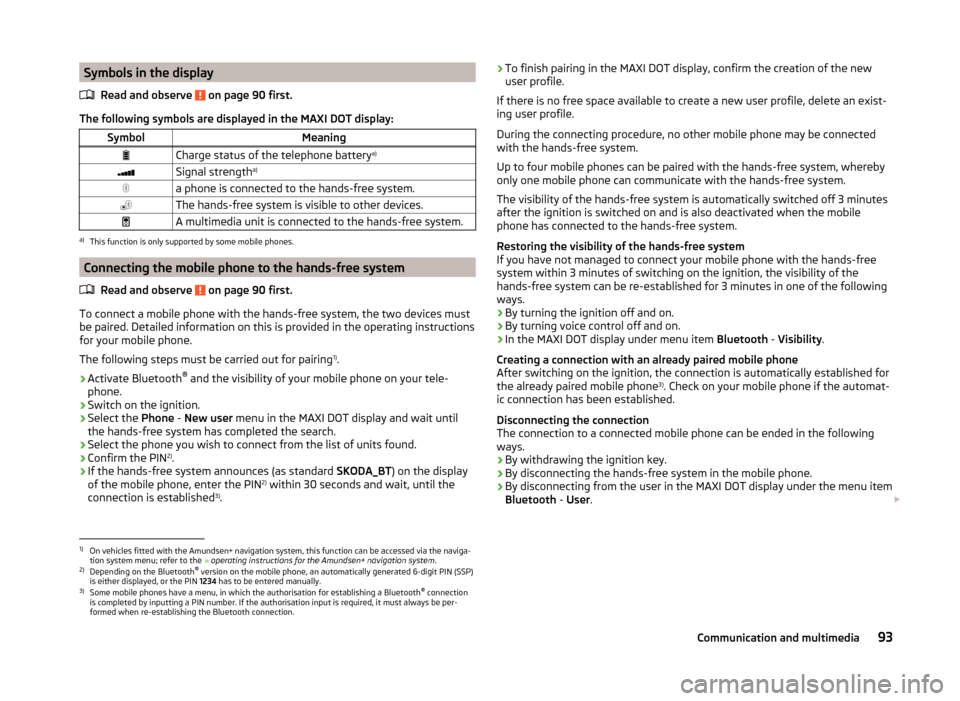
on page 90 first.
The following symbols are displayed in the MAXI DOT display:
SymbolMeaningCharge status of the telephone battery a)Signal strengtha)a phone is connected to the hands-free system.The hands-free system is visible to other devices.A multimedia unit is connected to the hands-free system.a)
This function is only supported by some mobile phones.
Connecting the mobile phone to the hands-free system
Read and observe
on page 90 first.
To connect a mobile phone with the hands-free system, the two devices mustbe paired. Detailed information on this is provided in the operating instructions
for your mobile phone.
The following steps must be carried out for pairing 1)
.
›
Activate Bluetooth ®
and the visibility of your mobile phone on your tele-
phone.
›
Switch on the ignition.
›
Select the Phone - New user menu in the MAXI DOT display and wait until
the hands-free system has completed the search.
›
Select the phone you wish to connect from the list of units found.
›
Confirm the PIN 2)
.
›
If the hands-free system announces (as standard SKODA_BT) on the display
of the mobile phone, enter the PIN 2)
within 30 seconds and wait, until the
connection is established 3)
.
› To finish pairing in the MAXI DOT display, confirm the creation of the new
user profile.
If there is no free space available to create a new user profile, delete an exist- ing user profile.
During the connecting procedure, no other mobile phone may be connected
with the hands-free system.
Up to four mobile phones can be paired with the hands-free system, whereby
only one mobile phone can communicate with the hands-free system.
The visibility of the hands-free system is automatically switched off 3 minutes
after the ignition is switched on and is also deactivated when the mobile
phone has connected to the hands-free system.
Restoring the visibility of the hands-free system
If you have not managed to connect your mobile phone with the hands-free
system within 3 minutes of switching on the ignition, the visibility of the
hands-free system can be re-established for 3 minutes in one of the following
ways.
› By turning the ignition off and on.
› By turning voice control off and on.
› In the MAXI DOT display under menu item
Bluetooth - Visibility .
Creating a connection with an already paired mobile phone
After switching on the ignition, the connection is automatically established for
the already paired mobile phone 3)
. Check on your mobile phone if the automat-
ic connection has been established.
Disconnecting the connection
The connection to a connected mobile phone can be ended in the following
ways.
› By withdrawing the ignition key.
› By disconnecting the hands-free system in the mobile phone.
› By disconnecting from the user in the MAXI DOT display under the menu item
Bluetooth - User . 1)
On vehicles fitted with the Amundsen+ navigation system, this function can be accessed via the naviga-
tion system menu; refer to the » operating instructions for the Amundsen+ navigation system .
2)
Depending on the Bluetooth®
version on the mobile phone, an automatically generated 6-digit PIN (SSP)
is either displayed, or the PIN 1234 has to be entered manually.
3)
Some mobile phones have a menu, in which the authorisation for establishing a Bluetooth ®
connection
is completed by inputting a PIN number. If the authorisation input is required, it must always be per-
formed when re-establishing the Bluetooth connection.
93Communication and multimedia
Page 101 of 200
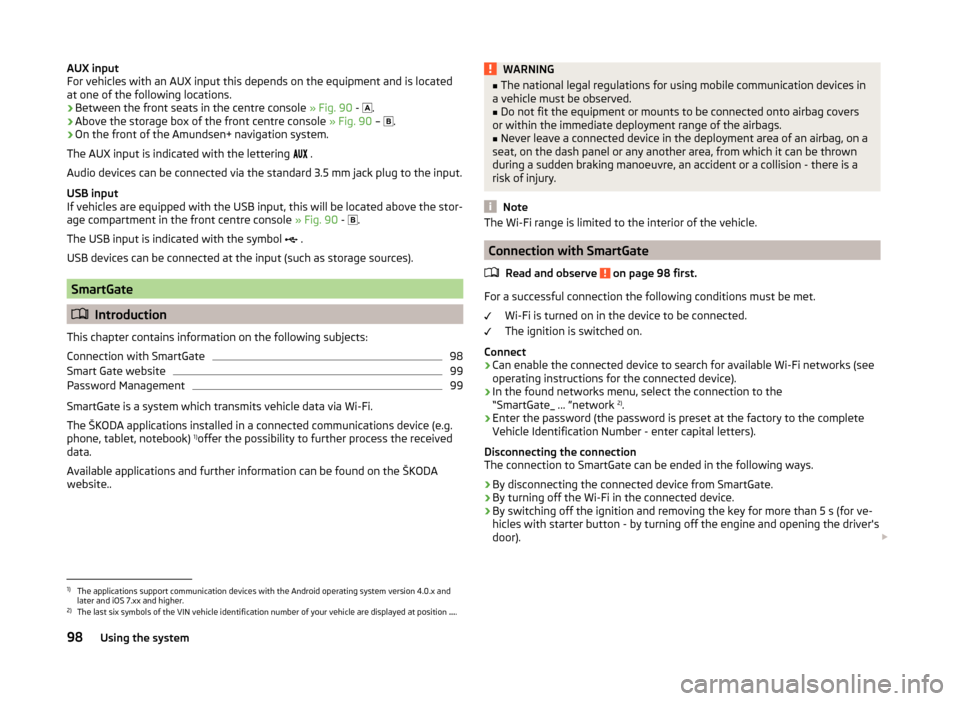
AUX input
For vehicles with an AUX input this depends on the equipment and is located
at one of the following locations.
› Between the front seats in the centre console
» Fig. 90 -
.
› Above the storage box of the front centre console
» Fig. 90 –
.
› On the front of the Amundsen+ navigation system.
The AUX input is indicated with the lettering
.
Audio devices can be connected via the standard 3.5 mm jack plug to the input.
USB input
If vehicles are equipped with the USB input, this will be located above the stor-
age compartment in the front centre console » Fig. 90 -
.
The USB input is indicated with the symbol .
USB devices can be connected at the input (such as storage sources).
SmartGate
Introduction
This chapter contains information on the following subjects:
Connection with SmartGate
98
Smart Gate website
99
Password Management
99
SmartGate is a system which transmits vehicle data via Wi-Fi.
The ŠKODA applications installed in a connected communications device (e.g.
phone, tablet, notebook) 1)
offer the possibility to further process the received
data.
Available applications and further information can be found on the ŠKODA
website..
WARNING■ The national legal regulations for using mobile communication devices in
a vehicle must be observed.■
Do not fit the equipment or mounts to be connected onto airbag covers
or within the immediate deployment range of the airbags.
■
Never leave a connected device in the deployment area of an airbag, on a
seat, on the dash panel or any another area, from which it can be thrown
during a sudden braking manoeuvre, an accident or a collision - there is a
risk of injury.
Note
The Wi-Fi range is limited to the interior of the vehicle.
Connection with SmartGate
Read and observe
on page 98 first.
For a successful connection the following conditions must be met. Wi-Fi is turned on in the device to be connected.
The ignition is switched on.
Connect
›
Can enable the connected device to search for available Wi-Fi networks (see
operating instructions for the connected device).
›
In the found networks menu, select the connection to the
“SmartGate_ ... ”network 2)
.
›
Enter the password (the password is preset at the factory to the complete
Vehicle Identification Number - enter capital letters).
Disconnecting the connection
The connection to SmartGate can be ended in the following ways.
›
By disconnecting the connected device from SmartGate.
›
By turning off the Wi-Fi in the connected device.
›
By switching off the ignition and removing the key for more than 5 s (for ve-
hicles with starter button - by turning off the engine and opening the driver's
door).
1)
The applications support communication devices with the Android operating system version 4.0.x and
later and iOS 7.xx and higher.
2)
The last six symbols of the VIN vehicle identification number of your vehicle are displayed at position ....
98Using the system
Page 102 of 200
Automatic connection
The connection to SmartGate is automatically restored under the following
conditions.
Wi-Fi is turned on in the device to be connected.
The ignition is switched on.
The device to be connected stores the password required for the connec-
tion check.
Connection problems
If the connection fails, check the following points.
› Are the conditions for a successful connection fulfilled?
› Is Smart Gate available in the list of available Wi-Fi networks?
› Has the password required for the connection check been entered?
› Is the password is required for the connection check correct?
› Is the device to be connected still connected to another Wi-Fi network?
If the above items are ok but the connection still fails, contact a ŠKODA part-
ner.
Note
Up to four devices can be connected to SmartGate at a time.
Smart Gate website
Read and observe
on page 98 first.
There is a special website for the SmartGate system.
The following address must be entered in the web browser of the connected
device.
HTTP://192.168.123.1
This website contains information about the vehicle, the Wi-Fi connection and
SmartGate.
In the Configuration area the Wi-Fi connection settings can be adjusted.
Save the setting changes
The setting changes are only applied after performing the following steps.
› The changes are saved by pressing the “Save” button.
› SmartGate is restarted by pressing the “Reboot ”button.
Password Management
Read and observe
on page 98 first.
Password management can be done in the connected device on the Smart-
Gate website » page 99, Smart Gate website .
The changes are applied after saving and restarting SmartGate » page 99,
Save the setting changes .
Change password
›
Enter a new password in the Configuration area in menu option WPA / WPA2 key.
The password must be 8-17 characters without diacritics or special characters
(for example, -, /, etc.).
Connection option without entering a password
›
In the Configuration area set the value Open in the menu item Security .
Forgot password
If you have forgotten your password, SmartGate must be reset to factory set-
tings in a specialized workshop.
99Communication and multimedia
Page 103 of 200
Driving
Starting-off and Driving
Starting and turning off the engine
Introduction
This chapter contains information on the following subjects:
Electronic immobilizer
100
Lock/unlock steering lock
101
Ignition on / off and start the engine
101
Switching off the engine
101
With the key in the ignition, the ignition can be switched on and off and the
engine can be started / stopped.
WARNING■ While driving with the engine stopped, the ignition must always be
switched on » page 101, Ignition on / off and start the engine .
■ With the ignition off, the steering may lock » page 101 - danger of an
accident!■
Do not withdraw the ignition key from the ignition lock until the vehicle
has come to a stop » page 103, Parking . Otherwise, the steering could be
blocked – risk of accident!
■
Never leave the key in the vehicle when you exit the vehicle. Unauthor-
ized persons, such as children, for example, could lock the car, turn on the
ignition or start the engine - there is a danger of injury, accidents and dam-
age!
■
Never leave the vehicle unattended with the engine running - there is
risk of accident, damage or theft!
■
Never switch off the engine before the vehicle is stationary – risk of acci-
dent!
WARNING■ Never (e.g. in garages) run the engine in a closed place - there is the dan-
ger of poisoning and death!■
Do not leave any items (e.g. cloths or tools) in the engine compartment.
This presents a fire hazard and the risk of engine damage.
■
Never cover the engine with additional insulation material (e.g. with a
cover) – risk of fire!
CAUTION
■ Only start the engine when the engine and the vehicle are stationary - there
is a danger of starter and engine damage!■
Do not push-start the engine – there is a risk of damaging the engine and
the catalytic converter. The battery from another vehicle can be used as a
jump-start aid » page 162.
Note
Do not warm up the engine while the vehicle is stationary. If possible, start
your journey as soon as the engine has started. Through this, the engine rea-
ches its operating temperature faster.
Electronic immobilizer
Read and observe
and on page 100 first.
The electronic immobilizer makes a possible attempted theft or unauthorizeduse of your vehicle more difficult.
An electronic chip is integrated in the head of the key. The immobiliser is deac-
tivated with the aid of this chip when the key is inserted in the ignition lock.
The electronic immobiliser is automatically activated when the ignition key is
withdrawn from the lock.
The engine will not start if a non-authorized ignition key is used.
The following message is shown in the information cluster display. Immobilizer active.
IMMOBILIZER
100Driving
Page 104 of 200

Lock/unlock steering lockRead and observe
and on page 100 first.
The steering lock (steering lock) deters any attempted theft of your vehicle.
Locking
›
Withdraw the ignition key.
›
Turn the steering wheel to the left or right until the steering lock clicks into
place.
Unlocking
›
Insert the key into the ignition lock.
›
Switch on the ignition » page 101.
The steering lock is unlocked.
If the ignition switch cannot be turned on, then turn the steering wheel back and forth slightly and thereby unlock the steering lock.
Ignition on / off and start the engine
Fig. 91
Positions of the vehicle key in the ignition lock
Read and observe and on page 100 first.
Positions of the vehicle key in the ignition lock » Fig. 91
Ignition switched off, engine switched off
Ignition switched on
Starting engine
Switching ignition on/off
›
Turn key to position
2
.
The ignition is switched on.
›
Turn key to position
1
.
123The ignition is switched off.
Procedure for starting the engine›
Firmly apply the handbrake.
›
For vehicles with manual transmission , shift gear stick to neutral, depress
the clutch pedal and hold it there until the engine starts.
›
On vehicles with automatic transmission , place the selector lever in position
P or N and depress the brake pedal until the engine starts.
›
Turn the key into position
3
to the stop and release immediately after the
engine has been started – do not apply the accelerator.
After letting go, the vehicle key will return to position
2
.
For vehicles with diesel engines the glow plug warning light
goes on during
starting. The engine can be started after the indicator light goes out.
If the engine does not start within 10 seconds, turn the key to position
1
. Re-
peat the start-up process after approx. half a minute.
Vehicles with the START-STOP system and manual gearbox
The engine will not start if the clutch pedal is not depressed.
The following message is shown in the information cluster display. Depress clutch to start!
CLUTCH
Vehicles with the START-STOP system and automatic gearbox
The engine will not start if the brake pedal is not depressed.
The following message is shown in the information cluster display. Depress brake to start.
BRAKE
Note
■ The engine running noises may louder at first be louder for a short time after
starting the cold engine. This is quite normal and is not an operating problem.■
You should not switch on any major electrical components during the heat-
ing period otherwise the vehicle battery will be drained unnecessarily.
Switching off the engine
Read and observe
and on page 100 first.
›
Stop the vehicle » page 103, Parking .
›
Turn key to position
1
» Fig. 91 on page 101 .
101Starting-off and Driving