headrest SKODA RAPID 2014 1.G Owner's Manual
[x] Cancel search | Manufacturer: SKODA, Model Year: 2014, Model line: RAPID, Model: SKODA RAPID 2014 1.GPages: 200, PDF Size: 25.57 MB
Page 26 of 200
Use of a child seat on the front passenger seat
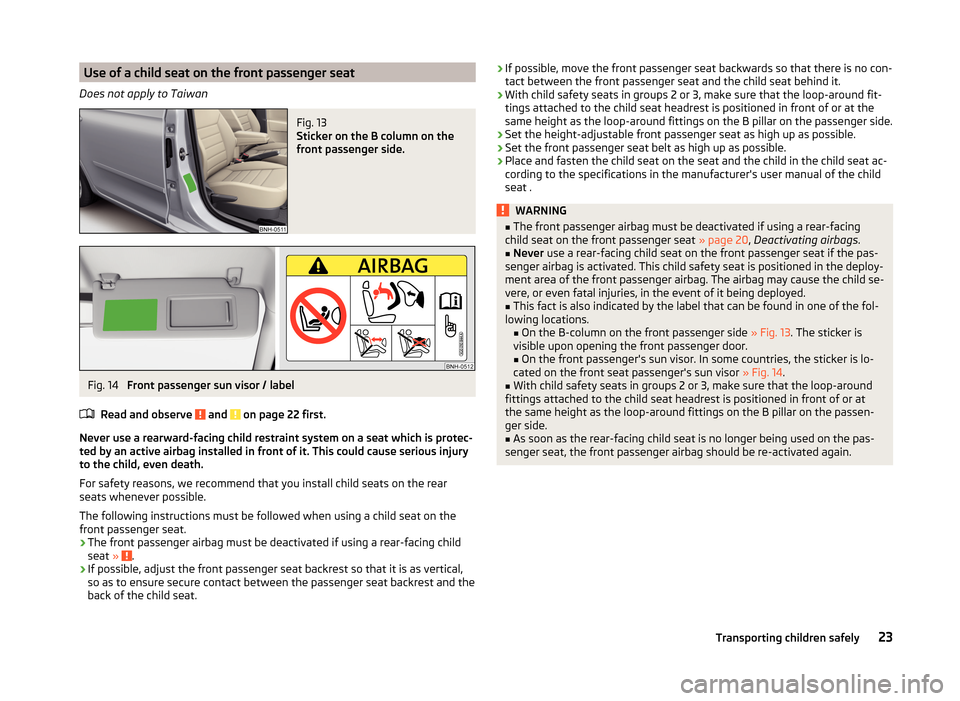
Does not apply to TaiwanFig. 13
Sticker on the B column on the
front passenger side.
Fig. 14
Front passenger sun visor / label
Read and observe
and on page 22 first.
Never use a rearward-facing child restraint system on a seat which is protec-
ted by an active airbag installed in front of it. This could cause serious injury
to the child, even death.
For safety reasons, we recommend that you install child seats on the rear
seats whenever possible.
The following instructions must be followed when using a child seat on the
front passenger seat.
› The front passenger airbag must be deactivated if using a rear-facing child
seat »
.
› If possible, adjust the front passenger seat backrest so that it is as vertical,
so as to ensure secure contact between the passenger seat backrest and the
back of the child seat.
› If possible, move the front passenger seat backwards so that there is no con-
tact between the front passenger seat and the child seat behind it.
› With child safety seats in groups 2 or 3, make sure that the loop-around fit-
tings attached to the child seat headrest is positioned in front of or at the
same height as the loop-around fittings on the B pillar on the passenger side.
› Set the height-adjustable front passenger seat as high up as possible.
› Set the front passenger seat belt as high up as possible.
› Place and fasten the child seat on the seat and the child in the child seat ac-
cording to the specifications in the manufacturer's user manual of the child
seat .WARNING■ The front passenger airbag must be deactivated if using a rear-facing
child seat on the front passenger seat » page 20, Deactivating airbags .■
Never use a rear-facing child seat on the front passenger seat if the pas-
senger airbag is activated. This child safety seat is positioned in the deploy-
ment area of the front passenger airbag. The airbag may cause the child se-
vere, or even fatal injuries, in the event of it being deployed.
■
This fact is also indicated by the label that can be found in one of the fol-
lowing locations. ■ On the B-column on the front passenger side » Fig. 13. The sticker is
visible upon opening the front passenger door.
■ On the front passenger's sun visor. In some countries, the sticker is lo-
cated on the front seat passenger's sun visor » Fig. 14.
■
With child safety seats in groups 2 or 3, make sure that the loop-around
fittings attached to the child seat headrest is positioned in front of or at
the same height as the loop-around fittings on the B pillar on the passen-
ger side.
■
As soon as the rear-facing child seat is no longer being used on the pas-
senger seat, the front passenger airbag should be re-activated again.
23Transporting children safely
Page 72 of 200
Seats and head restraints
Seats and head restraints
Introduction
This chapter contains information on the following subjects:
Adjusting the front seats
69
Head restraints - adjusting height
70
Headrests - removing and installing
70
The driver's seat should be adjusted in such a way that the pedals can be fully
pressed to the floor with slightly bent legs.
The seat backrest on the driver's seat should be adjusted in such a way that the upper point of the steering wheel can be easily reached with slightly bent
arms.
Correct adjustment of the seats is particularly important for the following: › Reaching the controls safely and quickly,
› A relaxed and fatigue-free body position.
› Achieving the maximum protection offered by the seat belts and the airbag
system.
WARNING■ Only adjust the driver's seat when the vehicle is stationary – risk of acci-
dent!■
Caution when adjusting the seat! You may suffer injuries or bruises as a
result of adjusting the seat without paying proper attention.
■
Never carry more people than the number of seats in the vehicle.
■
Do not carry any objects on the front passenger seat, except objects de-
signed for this purpose (e.g. child seats) – risk of accident!
Note
After a certain time, play can develop within the adjustment mechanism of the
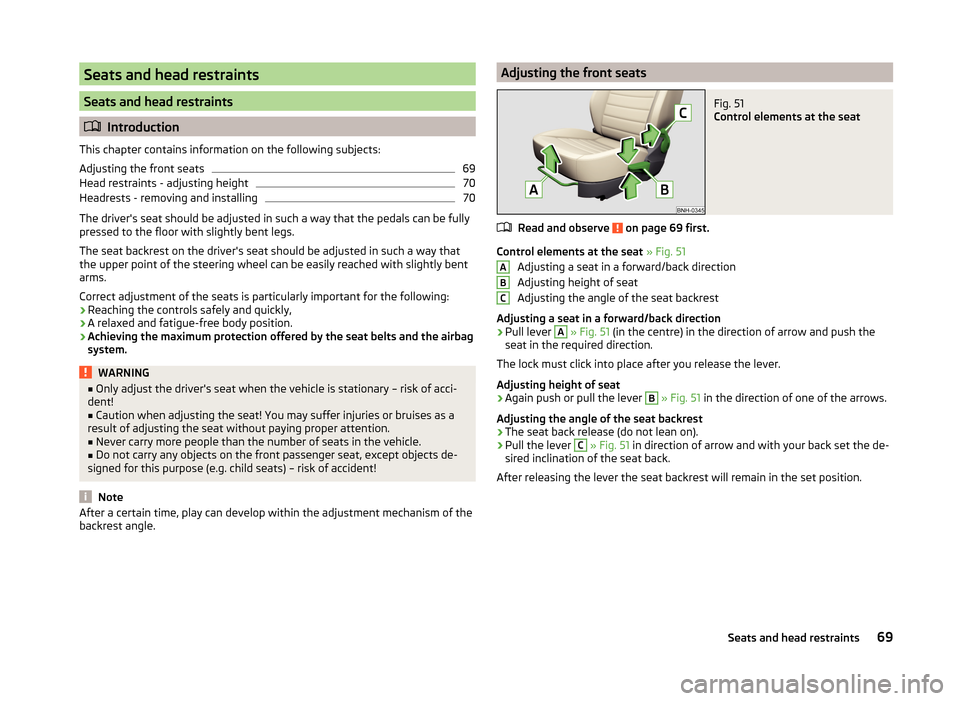
backrest angle.Adjusting the front seatsFig. 51
Control elements at the seat
Read and observe on page 69 first.
Control elements at the seat » Fig. 51
Adjusting a seat in a forward/back direction
Adjusting height of seat
Adjusting the angle of the seat backrest
Adjusting a seat in a forward/back direction
›
Pull lever
A
» Fig. 51 (in the centre) in the direction of arrow and push the
seat in the required direction.
The lock must click into place after you release the lever.
Adjusting height of seat
›
Again push or pull the lever
B
» Fig. 51 in the direction of one of the arrows.
Adjusting the angle of the seat backrest
›
The seat back release (do not lean on).
›
Pull the lever
C
» Fig. 51 in direction of arrow and with your back set the de-
sired inclination of the seat back.
After releasing the lever the seat backrest will remain in the set position.
ABC69Seats and head restraints
Page 73 of 200
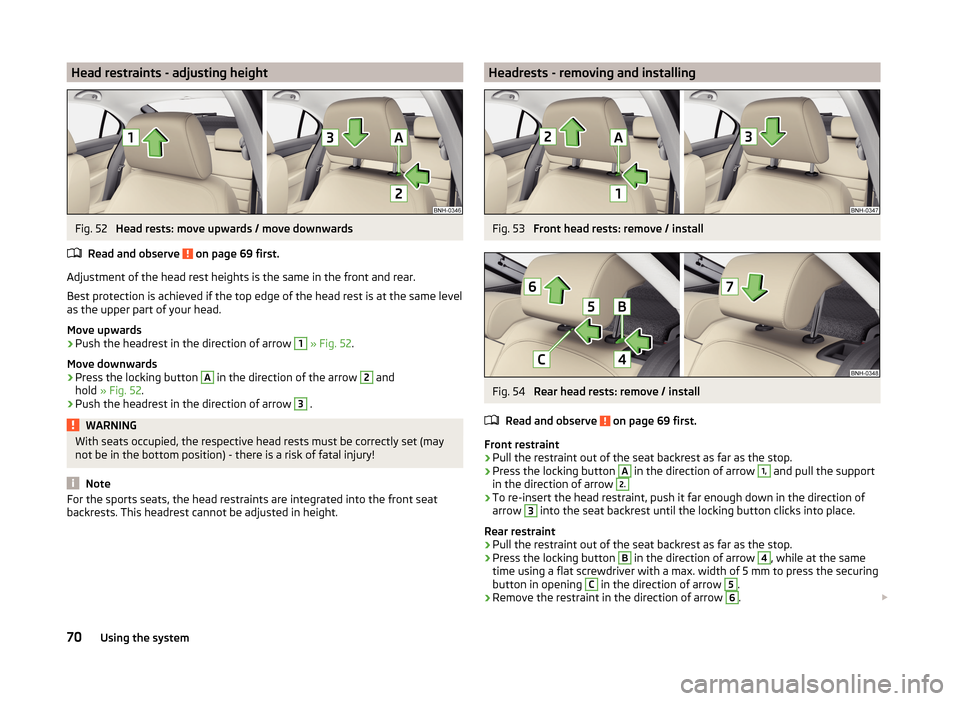
Head restraints - adjusting heightFig. 52
Head rests: move upwards / move downwards
Read and observe
on page 69 first.
Adjustment of the head rest heights is the same in the front and rear.
Best protection is achieved if the top edge of the head rest is at the same level as the upper part of your head.
Move upwards
›
Push the headrest in the direction of arrow
1
» Fig. 52 .
Move downwards
›
Press the locking button
A
in the direction of the arrow
2
and
hold » Fig. 52 .
›
Push the headrest in the direction of arrow
3
.
WARNINGWith seats occupied, the respective head rests must be correctly set (may
not be in the bottom position) - there is a risk of fatal injury!
Note
For the sports seats, the head restraints are integrated into the front seat
backrests. This headrest cannot be adjusted in height.Headrests - removing and installingFig. 53
Front head rests: remove / install
Fig. 54
Rear head rests: remove / install
Read and observe
on page 69 first.
Front restraint
›
Pull the restraint out of the seat backrest as far as the stop.
›
Press the locking button
A
in the direction of arrow
1,
and pull the support
in the direction of arrow
2.›
To re-insert the head restraint, push it far enough down in the direction of
arrow
3
into the seat backrest until the locking button clicks into place.
Rear restraint
›
Pull the restraint out of the seat backrest as far as the stop.
›
Press the locking button
B
in the direction of arrow
4
, while at the same
time using a flat screwdriver with a max. width of 5 mm to press the securing button in opening
C
in the direction of arrow
5
.
›
Remove the restraint in the direction of arrow
6
.
70Using the system
Page 74 of 200
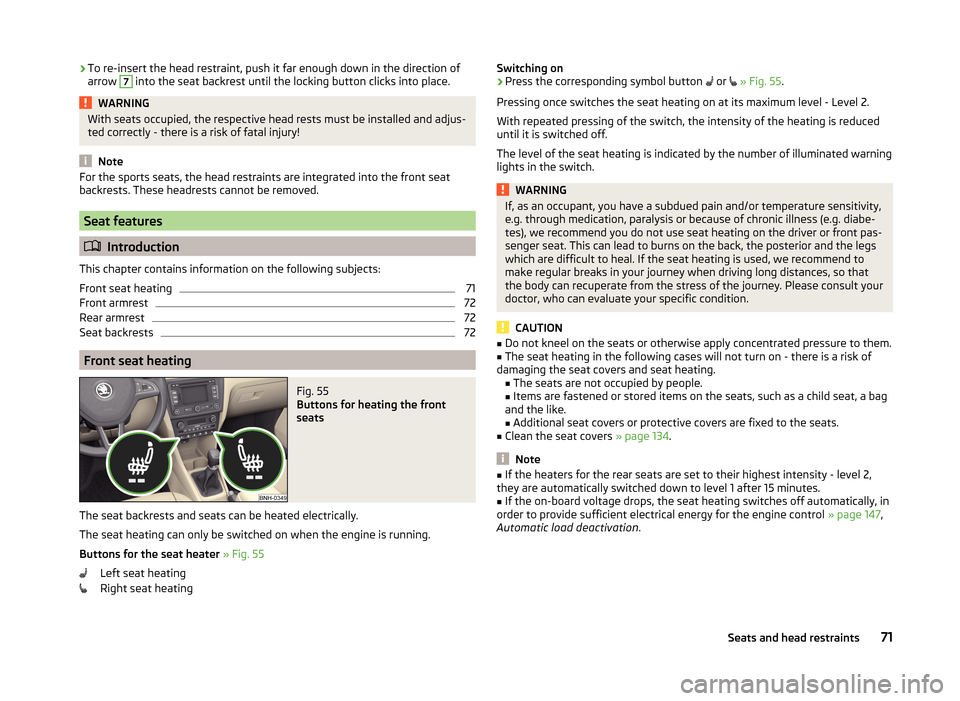
›To re-insert the head restraint, push it far enough down in the direction of
arrow 7 into the seat backrest until the locking button clicks into place.WARNINGWith seats occupied, the respective head rests must be installed and adjus- ted correctly - there is a risk of fatal injury!
Note
For the sports seats, the head restraints are integrated into the front seat
backrests. These headrests cannot be removed.
Seat features
Introduction
This chapter contains information on the following subjects:
Front seat heating
71
Front armrest
72
Rear armrest
72
Seat backrests
72
Front seat heating
Fig. 55
Buttons for heating the front
seats
The seat backrests and seats can be heated electrically.
The seat heating can only be switched on when the engine is running.
Buttons for the seat heater » Fig. 55
Left seat heating
Right seat heating
Switching on›Press the corresponding symbol button or » Fig. 55 .
Pressing once switches the seat heating on at its maximum level - Level 2.
With repeated pressing of the switch, the intensity of the heating is reduced
until it is switched off.
The level of the seat heating is indicated by the number of illuminated warning
lights in the switch.WARNINGIf, as an occupant, you have a subdued pain and/or temperature sensitivity,
e.g. through medication, paralysis or because of chronic illness (e.g. diabe-
tes), we recommend you do not use seat heating on the driver or front pas-
senger seat. This can lead to burns on the back, the posterior and the legs
which are difficult to heal. If the seat heating is used, we recommend to
make regular breaks in your journey when driving long distances, so that
the body can recuperate from the stress of the journey. Please consult your
doctor, who can evaluate your specific condition.
CAUTION
■ Do not kneel on the seats or otherwise apply concentrated pressure to them.■The seat heating in the following cases will not turn on - there is a risk of
damaging the seat covers and seat heating. ■The seats are not occupied by people.
■ Items are fastened or stored items on the seats, such as a child seat, a bag
and the like.
■ Additional seat covers or protective covers are fixed to the seats.■
Clean the seat covers » page 134.
Note
■
If the heaters for the rear seats are set to their highest intensity - level 2,
they are automatically switched down to level 1 after 15 minutes.■
If the on-board voltage drops, the seat heating switches off automatically, in
order to provide sufficient electrical energy for the engine control » page 147,
Automatic load deactivation .
71Seats and head restraints
Page 191 of 200
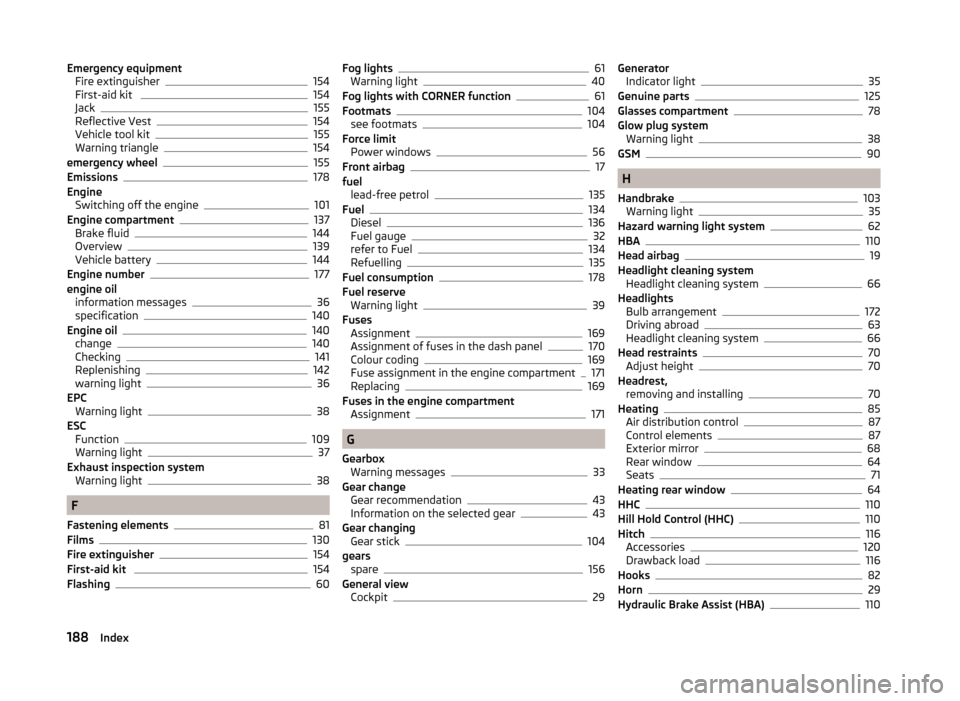
Emergency equipmentFire extinguisher154
First-aid kit 154
Jack155
Reflective Vest154
Vehicle tool kit155
Warning triangle154
emergency wheel155
Emissions178
Engine Switching off the engine
101
Engine compartment137
Brake fluid144
Overview139
Vehicle battery144
Engine number177
engine oil information messages
36
specification140
Engine oil140
change140
Checking141
Replenishing142
warning light36
EPC Warning light
38
ESC Function
109
Warning light37
Exhaust inspection system Warning light
38
F
Fastening elements
81
Films130
Fire extinguisher154
First-aid kit 154
Flashing60
Fog lights61
Warning light40
Fog lights with CORNER function61
Footmats104
see footmats104
Force limit Power windows
56
Front airbag17
fuel lead-free petrol
135
Fuel134
Diesel136
Fuel gauge32
refer to Fuel134
Refuelling135
Fuel consumption178
Fuel reserve Warning light
39
Fuses Assignment
169
Assignment of fuses in the dash panel170
Colour coding169
Fuse assignment in the engine compartment171
Replacing169
Fuses in the engine compartment Assignment
171
G
Gearbox Warning messages
33
Gear change Gear recommendation
43
Information on the selected gear43
Gear changing Gear stick
104
gears spare
156
General view Cockpit
29
Generator Indicator light35
Genuine parts125
Glasses compartment78
Glow plug system Warning light
38
GSM90
H
Handbrake
103
Warning light35
Hazard warning light system62
HBA110
Head airbag19
Headlight cleaning system Headlight cleaning system
66
Headlights Bulb arrangement
172
Driving abroad63
Headlight cleaning system66
Head restraints70
Adjust height70
Headrest, removing and installing
70
Heating85
Air distribution control87
Control elements87
Exterior mirror68
Rear window64
Seats71
Heating rear window64
HHC110
Hill Hold Control (HHC)110
Hitch116
Accessories120
Drawback load116
Hooks82
Horn29
Hydraulic Brake Assist (HBA)110
188Index