boot SKODA RAPID 2015 1.G User Guide
[x] Cancel search | Manufacturer: SKODA, Model Year: 2015, Model line: RAPID, Model: SKODA RAPID 2015 1.GPages: 204, PDF Size: 27.52 MB
Page 61 of 204
Lights and visibility
Lights
Introduction
This chapter contains information on the following subjects:
Operating the light function
59
Daytime running lights(DAY LIGHT)
60
Turn signal and main beam
60
Automatic driving lamp control
61
Front and rear fog light
61
Fog lights with the CORNER function
62
COMING HOME / LEAVING HOME
62
Hazard warning light system
62
Parking light
63
Driving abroad
63
Unless otherwise stated, the lights only work when the ignition is switched on.
The layout of the controls on right-hand drive vehicles differs partially from
that shown in » Fig. 46 on page 59 . The symbols which mark the individual
positions of the controls are identical.
WARNINGThe automatic driving lamp control only operates as a support and
does not release the driver from his responsibility to check the lights and, if
necessary, to switch on the light depending on the prevailing light condi-
tions.
Note
■ The headlights may mist up temporarily. When the driving lights are switched
on, the light outlet surfaces are free from mist after a short period, although
the headlight lenses may still be misted up in the peripheral areas. This mist
has no influence on the life of the lighting system.■
If the visibility is poor and the lights are not on (except daytime running light)
the brightness of the instrument lighting reduces to alert the driver to switch
on the lights in due time.
■
The brightness of the instrument lighting with the lights on (except daytime
running lights) can be set in the Infotainment » Owner´s Manual Infotainment ,
chapter CAR - Vehicle Settings .
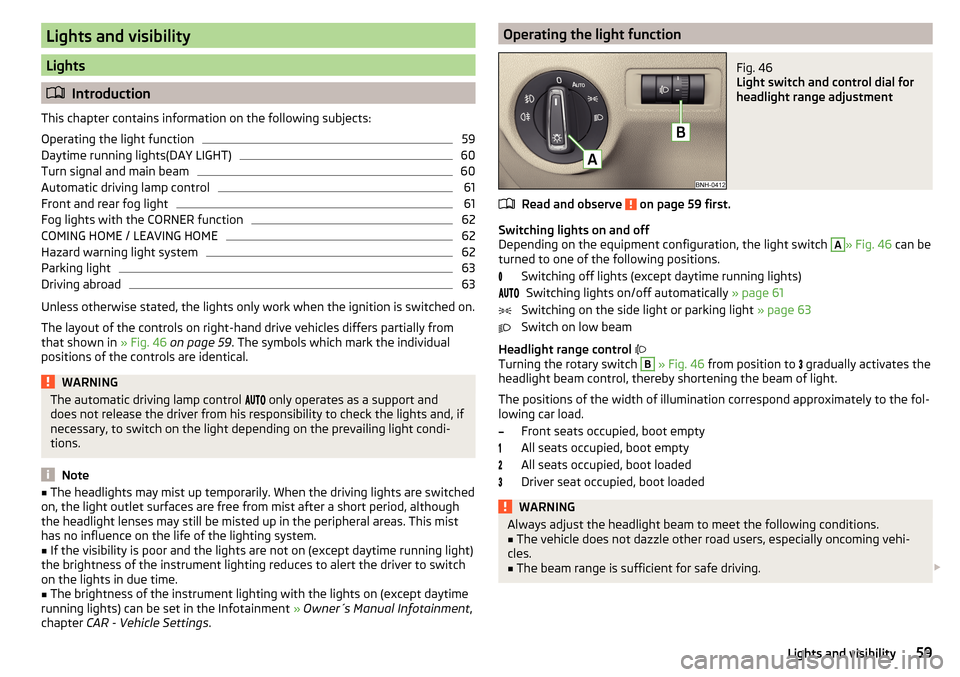
Operating the light functionFig. 46
Light switch and control dial for
headlight range adjustment
Read and observe on page 59 first.
Switching lights on and off
Depending on the equipment configuration, the light switch
A
» Fig. 46 can be
turned to one of the following positions.
Switching off lights (except daytime running lights)Switching lights on/off automatically » page 61
Switching on the side light or parking light » page 63
Switch on low beam
Headlight range control
Turning the rotary switch
B
» Fig. 46 from position to
gradually activates the
headlight beam control, thereby shortening the beam of light.
The positions of the width of illumination correspond approximately to the fol- lowing car load.
Front seats occupied, boot empty
All seats occupied, boot empty
All seats occupied, boot loaded
Driver seat occupied, boot loaded
WARNINGAlways adjust the headlight beam to meet the following conditions.■The vehicle does not dazzle other road users, especially oncoming vehi-
cles.■
The beam range is sufficient for safe driving.
59Lights and visibility
Page 83 of 204
Multifunction pocket82Hooks82
Luggage compartment cover
83
“Parking position” of the boot cover
83
Storage compartment in the boot
84
Cargo elements
84
Floor covering on both sides
84
Class N1 vehicles
85
When transporting cargo the following the instructions must be adhered to
▶ When transporting heavy objects, the driving characteristics change due to
the shift in centre-of-gravity. The speed and style of driving must be adjus-
ted accordingly.
▶ The cargo is stowed in the luggage compartment. To prevent this from mov-
ing it should be secured with suitable lashing straps to the lashing eyes or
secured with fixing nets.
▶ Distribute loads as evenly as possible.
▶ Place heavy objects as far forward as possible.
▶ The transported items must be stowed in such a way that no objects are able
to slip forward on sudden driving or braking manoeuvres – risk of injury!
▶ Tyre pressure is to match the load.
▶ When transporting loads in the luggage compartment that has been en-
larged by folding the rear seats forward, ensure the safety of the passengers
transported on the other rear seats .
In the event of an accident, even small and light objects gain so much kinetic energy that they can cause severe injuries.
The magnitude of the kinetic energy is dependent on the speed at which the
vehicle is travelling and the weight of the object.
Example: In the event of a frontal collision at a speed of 50 km/h, an object
with a weight of 4.5 kg produces an energy, which corresponds to 20 times its
own weight. This means that it results in a weight of approx. 90 kg “ ”.
Luggage compartment light
The warning light turns on when tailgate is opened.
The warning light turns off when the tailgate is closed.
If the boot lid is open and the ignition switched off, the light will extinguish
automatically after around 10 minutes.
WARNING■ Never exceed the maximum permissible load of the respective fasteners,
nets, hooks etc. as heavy objects are not e sufficiently secured - there is a
risk of injury!■
If the cargo is tied down with unsuitable or damaged lashing straps, inju-
ries can occur in the event of braking manoeuvres or accidents.
■
Loose cargo can be thrown forward during a sudden manoeuvre or in case
of an accident and can injure the occupants or other road users.
■
Loose cargo could hit a deployed airbag and injure occupants – danger of
death!
CAUTION
■ Never exceed the maximum permissible load of the respective fasteners,
nets, hooks etc. - these could be damaged.■
Please ensure that the heating elements for the rear window heater are not
damaged as a result of abrasive objects.
Fastening elements
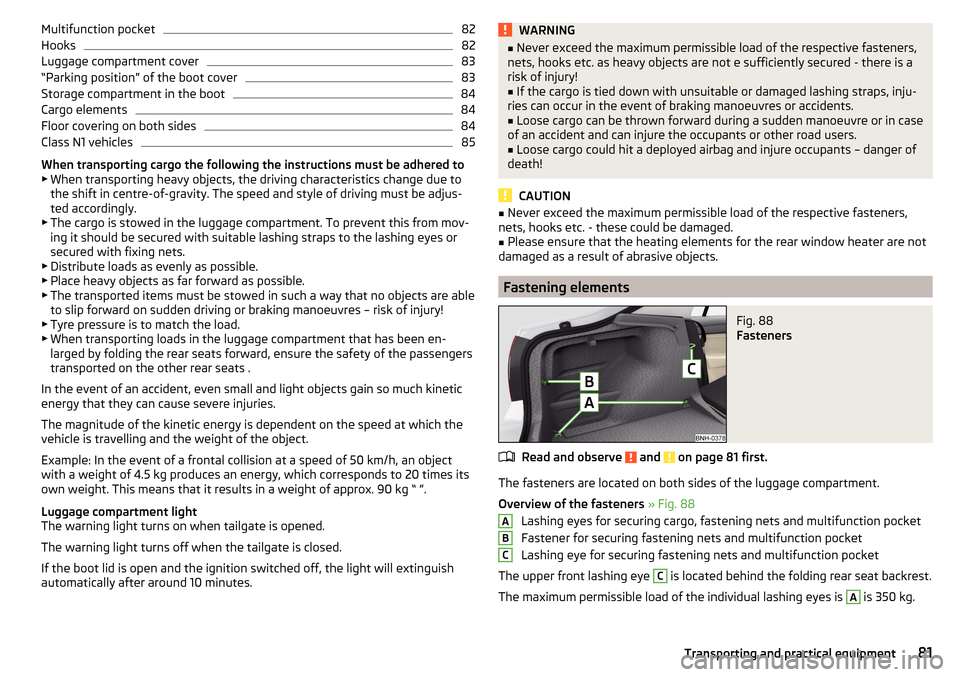
Fig. 88
Fasteners
Read and observe and on page 81 first.
The fasteners are located on both sides of the luggage compartment.
Overview of the fasteners » Fig. 88
Lashing eyes for securing cargo, fastening nets and multifunction pocket
Fastener for securing fastening nets and multifunction pocket
Lashing eye for securing fastening nets and multifunction pocket
The upper front lashing eye
C
is located behind the folding rear seat backrest.
The maximum permissible load of the individual lashing eyes is
A
is 350 kg.
ABC81Transporting and practical equipment
Page 85 of 204
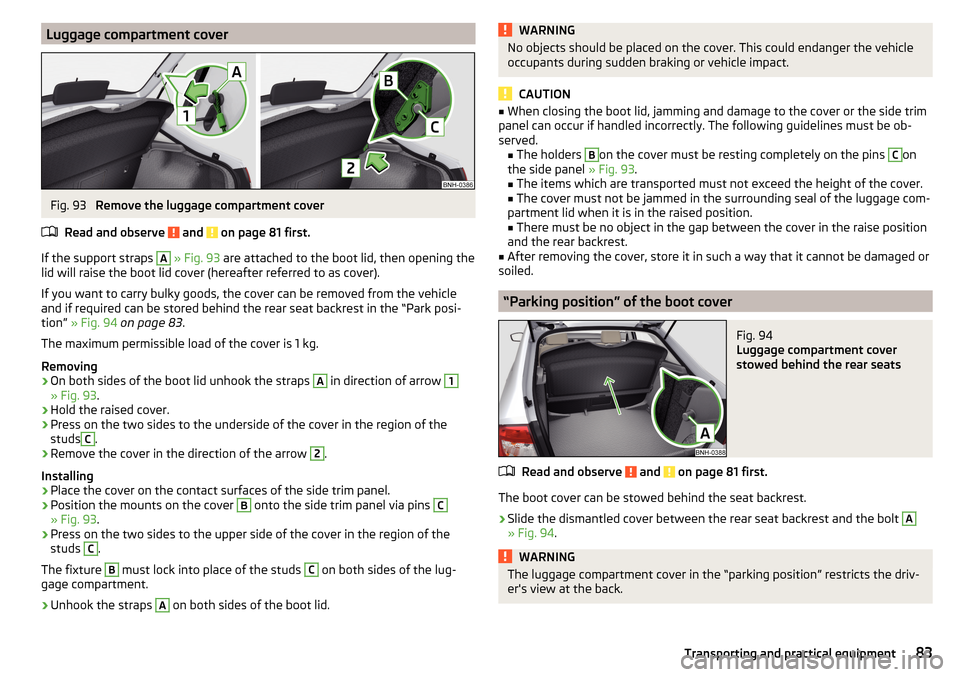
Luggage compartment coverFig. 93
Remove the luggage compartment cover
Read and observe
and on page 81 first.
If the support straps
A
» Fig. 93 are attached to the boot lid, then opening the
lid will raise the boot lid cover (hereafter referred to as cover).
If you want to carry bulky goods, the cover can be removed from the vehicle
and if required can be stored behind the rear seat backrest in the “Park posi-
tion” » Fig. 94 on page 83 .
The maximum permissible load of the cover is 1 kg.
Removing
›
On both sides of the boot lid unhook the straps
A
in direction of arrow
1
» Fig. 93 .
›
Hold the raised cover.
›
Press on the two sides to the underside of the cover in the region of the
studs
C
.
›
Remove the cover in the direction of the arrow
2
.
Installing
›
Place the cover on the contact surfaces of the side trim panel.
›
Position the mounts on the cover
B
onto the side trim panel via pins
C
» Fig. 93 .
›
Press on the two sides to the upper side of the cover in the region of the
studs
C
.
The fixture
B
must lock into place of the studs
C
on both sides of the lug-
gage compartment.
›
Unhook the straps
A
on both sides of the boot lid.
WARNINGNo objects should be placed on the cover. This could endanger the vehicle
occupants during sudden braking or vehicle impact.
CAUTION
■ When closing the boot lid, jamming and damage to the cover or the side trim
panel can occur if handled incorrectly. The following guidelines must be ob-
served. ■ The holders B
on the cover must be resting completely on the pins
C
on
the side panel » Fig. 93.
■ The items which are transported must not exceed the height of the cover.
■ The cover must not be jammed in the surrounding seal of the luggage com-
partment lid when it is in the raised position. ■ There must be no object in the gap between the cover in the raise position
and the rear backrest.
■
After removing the cover, store it in such a way that it cannot be damaged or
soiled.
“Parking position” of the boot cover
Fig. 94
Luggage compartment cover
stowed behind the rear seats
Read and observe and on page 81 first.
The boot cover can be stowed behind the seat backrest.
›
Slide the dismantled cover between the rear seat backrest and the bolt
A
» Fig. 94 .
WARNINGThe luggage compartment cover in the “parking position” restricts the driv-
er's view at the back.83Transporting and practical equipment
Page 86 of 204
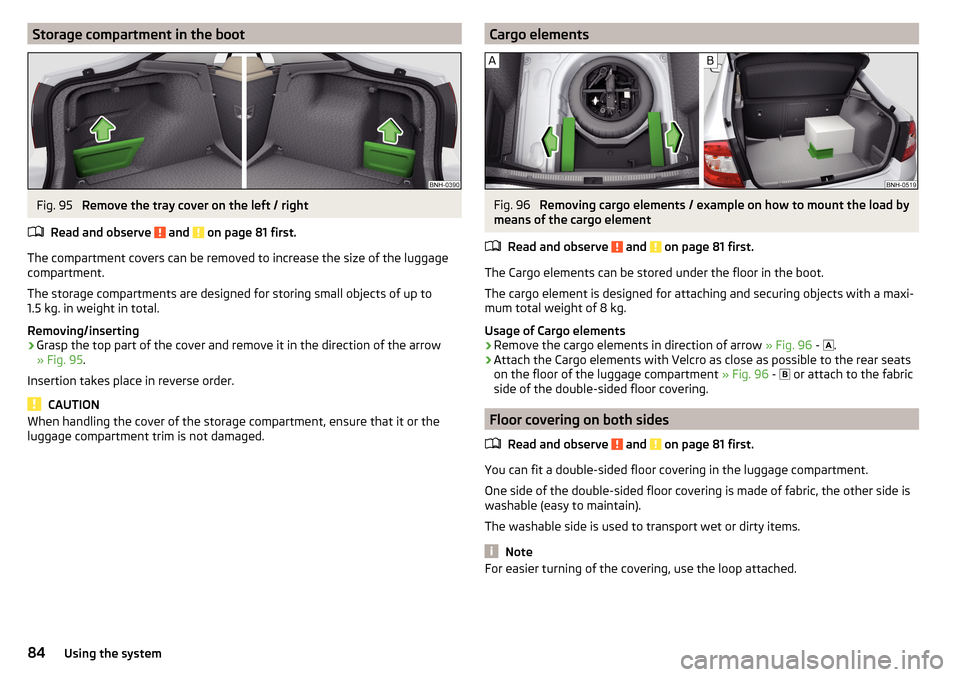
Storage compartment in the bootFig. 95
Remove the tray cover on the left / right
Read and observe
and on page 81 first.
The compartment covers can be removed to increase the size of the luggage
compartment.
The storage compartments are designed for storing small objects of up to
1.5 kg. in weight in total.
Removing/inserting
›
Grasp the top part of the cover and remove it in the direction of the arrow
» Fig. 95 .
Insertion takes place in reverse order.
CAUTION
When handling the cover of the storage compartment, ensure that it or the
luggage compartment trim is not damaged.Cargo elementsFig. 96
Removing cargo elements / example on how to mount the load by
means of the cargo element
Read and observe
and on page 81 first.
The Cargo elements can be stored under the floor in the boot.
The cargo element is designed for attaching and securing objects with a maxi-
mum total weight of 8 kg.
Usage of Cargo elements
›
Remove the cargo elements in direction of arrow » Fig. 96 -
.
›
Attach the Cargo elements with Velcro as close as possible to the rear seats
on the floor of the luggage compartment » Fig. 96 -
or attach to the fabric
side of the double-sided floor covering.
Floor covering on both sides
Read and observe
and on page 81 first.
You can fit a double-sided floor covering in the luggage compartment.
One side of the double-sided floor covering is made of fabric, the other side is
washable (easy to maintain).
The washable side is used to transport wet or dirty items.
Note
For easier turning of the covering, use the loop attached.84Using the system
Page 87 of 204
Class N1 vehiclesRead and observe
and on page 81 first.
In class N1 vehicles that are not fitted with a protective grille, a lashing set that
complies with the EN 12195 standard (1 - 4) must be used for fastening the
load.
Proper functioning of the electrical installation is essential for safe vehicle op-
eration. It is important to ensure that the electrical installation is not damaged
during the adjustment process or when the storage area is being loaded and
unloaded.
Roof rack
Introduction
This chapter contains information on the following subjects:
fixing points for base support
85
Roof load
86WARNINGWhen transporting cargo the following the instructions must be adhered
to.■
The transported items on the roof rack must always be securely attached
– risk of accident!
■
Always secure the load with appropriate and undamaged lashing straps
or tensioning straps.
■
Distribute the load evenly over the roof rack system.
■
When transporting heavy objects or objects which take up a large area on
the roof rack system, handling of the car may change as a result of the dis-
placement of the centre of gravity. The style of driving and speed must
therefore be adapted to the current circumstances.
■
Avoid abrupt and sudden driving/braking manoeuvres.
■
The permissible roof load, permissible axle loads and permissible total ve-
hicle weight must not be exceeded under any circumstance – risk of acci-
dent!
CAUTION■ On models fitted with an electrical sliding/tilting roof, ensure that the slid-
ing/tilting roof does not strike any items of luggage transported on the roof
when tilting.■
Ensure that the boot lid does not hit the roof load when opened.
■
The height of the vehicle changes after mounting a roof luggage rack system
including the load that is being transported. Compare the vehicle height with
available clearances, such as underpasses and garage doors.
■
Ensure the roof aerial is not impaired by the load being transported.
Note
We recommend that you use a roof rack from ŠKODA Original Accessories.
fixing points for base support
Fig. 97
Attachment points
Read and observe
and on page 85 first.
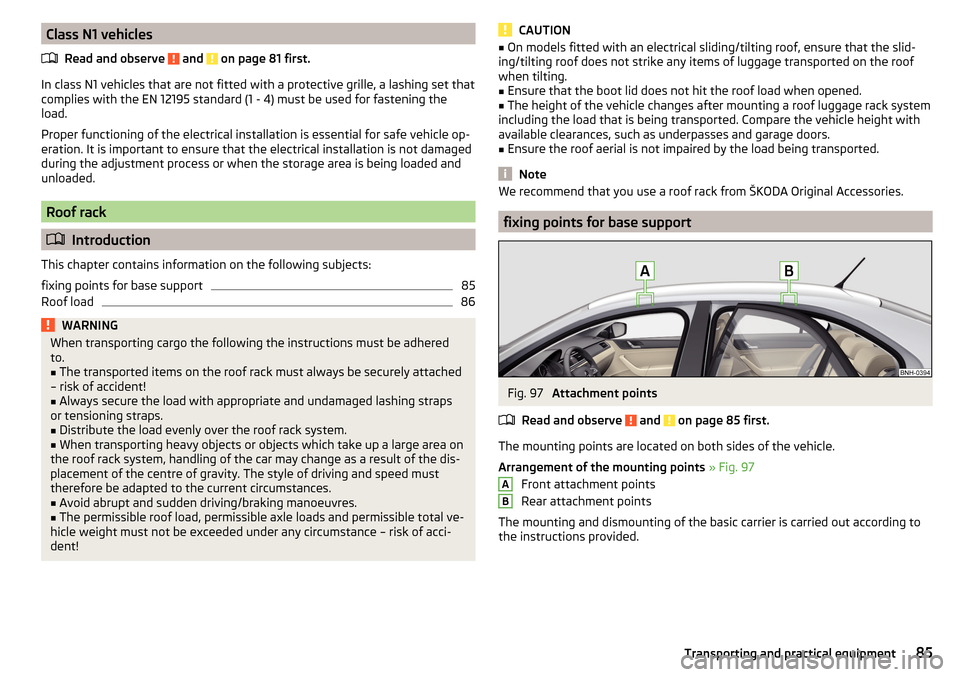
The mounting points are located on both sides of the vehicle.
Arrangement of the mounting points » Fig. 97
Front attachment points
Rear attachment points
The mounting and dismounting of the basic carrier is carried out according to
the instructions provided.
AB85Transporting and practical equipment
Page 123 of 204
Removing the bar ball - Step 1.Fig. 136
Remove cap from the lock / insert key into the lock
Fig. 137
Unlock lock
Read and observe and on page 117 first.
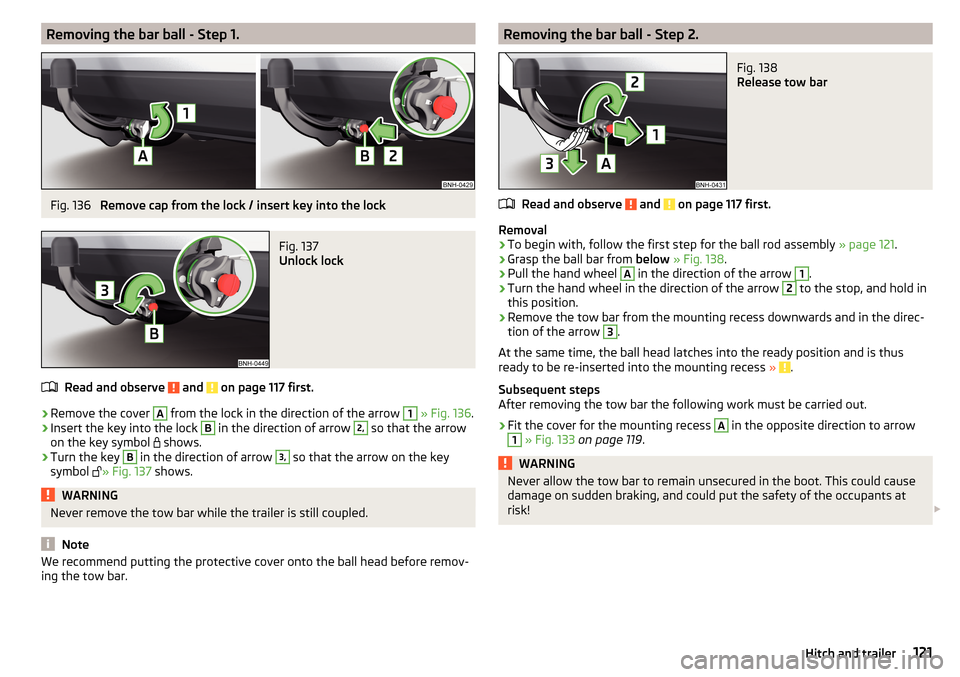
›
Remove the cover
A
from the lock in the direction of the arrow
1
» Fig. 136 .
›
Insert the key into the lock
B
in the direction of arrow
2,
so that the arrow
on the key symbol shows.
›
Turn the key
B
in the direction of arrow
3,
so that the arrow on the key
symbol » Fig. 137
shows.
WARNINGNever remove the tow bar while the trailer is still coupled.
Note
We recommend putting the protective cover onto the ball head before remov-
ing the tow bar.Removing the bar ball - Step 2.Fig. 138
Release tow bar
Read and observe and on page 117 first.
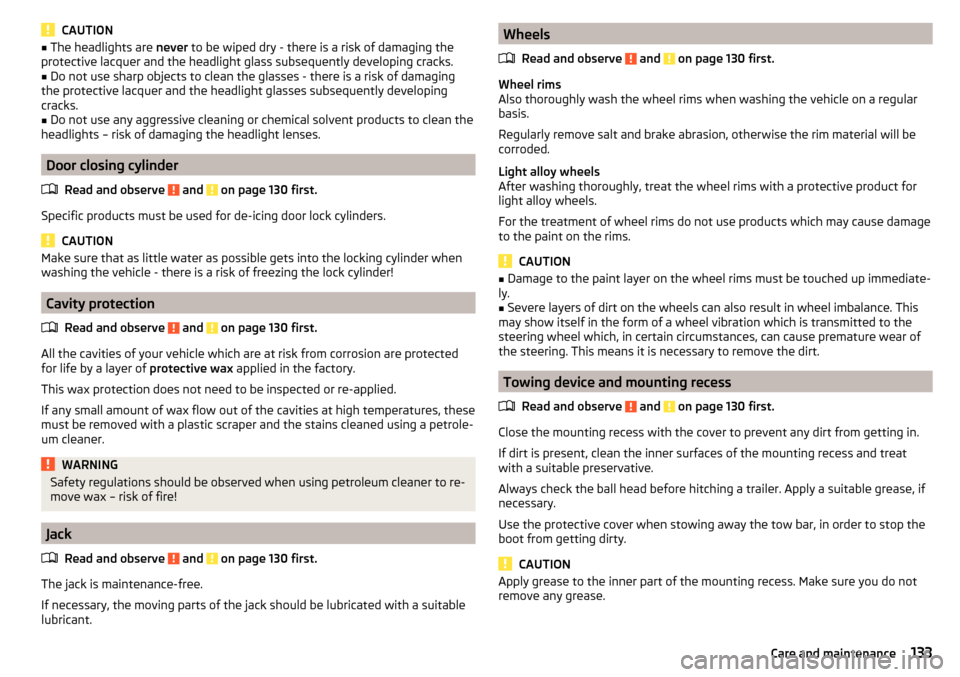
Removal
›
To begin with, follow the first step for the ball rod assembly » page 121.
›
Grasp the ball bar from below » Fig. 138 .
›
Pull the hand wheel
A
in the direction of the arrow
1
.
›
Turn the hand wheel in the direction of the arrow
2
to the stop, and hold in
this position.
›
Remove the tow bar from the mounting recess downwards and in the direc-
tion of the arrow
3
.
At the same time, the ball head latches into the ready position and is thus
ready to be re-inserted into the mounting recess »
.
Subsequent steps
After removing the tow bar the following work must be carried out.
›
Fit the cover for the mounting recess
A
in the opposite direction to arrow
1
» Fig. 133 on page 119 .
WARNINGNever allow the tow bar to remain unsecured in the boot. This could cause
damage on sudden braking, and could put the safety of the occupants at
risk! 121Hitch and trailer
Page 135 of 204
CAUTION■The headlights are never to be wiped dry - there is a risk of damaging the
protective lacquer and the headlight glass subsequently developing cracks.■
Do not use sharp objects to clean the glasses - there is a risk of damaging
the protective lacquer and the headlight glasses subsequently developing
cracks.
■
Do not use any aggressive cleaning or chemical solvent products to clean the
headlights – risk of damaging the headlight lenses.
Door closing cylinder
Read and observe
and on page 130 first.
Specific products must be used for de-icing door lock cylinders.
CAUTION
Make sure that as little water as possible gets into the locking cylinder when
washing the vehicle - there is a risk of freezing the lock cylinder!
Cavity protection
Read and observe
and on page 130 first.
All the cavities of your vehicle which are at risk from corrosion are protectedfor life by a layer of protective wax applied in the factory.
This wax protection does not need to be inspected or re-applied.
If any small amount of wax flow out of the cavities at high temperatures, these
must be removed with a plastic scraper and the stains cleaned using a petrole-
um cleaner.
WARNINGSafety regulations should be observed when using petroleum cleaner to re-
move wax – risk of fire!
Jack
Read and observe
and on page 130 first.
The jack is maintenance-free.
If necessary, the moving parts of the jack should be lubricated with a suitable lubricant.
Wheels
Read and observe
and on page 130 first.
Wheel rims
Also thoroughly wash the wheel rims when washing the vehicle on a regular basis.
Regularly remove salt and brake abrasion, otherwise the rim material will be
corroded.
Light alloy wheels
After washing thoroughly, treat the wheel rims with a protective product for
light alloy wheels.
For the treatment of wheel rims do not use products which may cause damage
to the paint on the rims.
CAUTION
■ Damage to the paint layer on the wheel rims must be touched up immediate-
ly.■
Severe layers of dirt on the wheels can also result in wheel imbalance. This
may show itself in the form of a wheel vibration which is transmitted to the
steering wheel which, in certain circumstances, can cause premature wear of
the steering. This means it is necessary to remove the dirt.
Towing device and mounting recess
Read and observe
and on page 130 first.
Close the mounting recess with the cover to prevent any dirt from getting in.
If dirt is present, clean the inner surfaces of the mounting recess and treat
with a suitable preservative.
Always check the ball head before hitching a trailer. Apply a suitable grease, if
necessary.
Use the protective cover when stowing away the tow bar, in order to stop the
boot from getting dirty.
CAUTION
Apply grease to the inner part of the mounting recess. Make sure you do not
remove any grease.133Care and maintenance
Page 137 of 204
Dust and dirt in pores and creases cause abrasions on the surface and lead to
premature embrittlement of the leather surface. Therefore, they must be re-
moved regularly at short intervals with a cloth or vacuum cleaner.
Clean soiled leather surfaces with a water-dampened cotton or woollen cloth
and then dry with a clean, dry cloth »
.
Clean severely soiled areas with a cloth soaked in a mild soap solution (2 ta-
blespoons of neutral soap to 1 litre of water).
To remove stains , use a cleaning agent specially designed for this purpose.
Treat the leather periodically with a suitable leather protector and use a skin
care cream with light blocker and impregnation after each cleaning.
CAUTION
■ Ensure that no part of the leather is soaked through during cleaning and that
no water gets into the seams. Otherwise, the leather could become brittle or
cracked.■
Avoid leaving the vehicle for lengthy periods in bright sunlight to prevent the
leather from bleaching. If the vehicle is parked in the open for lengthy periods,
protect the leather from direct sunlight by covering it.
■
The use of an additional mechanical steering wheel lock may damage the
leather surface of the steering wheel.
■
Some clothing materials, e.g. dark denim, do not have sufficient colour fast-
ness. This can cause damage or clearly visible discolouration to seat covers,
even when used correctly. This applies particularly to light-coloured seat cov-
ers. This does not relate to a fault in the seat cover, but rather to poor colour
fastness of the clothing textiles.
■
Sharp-edged objects on items of clothing such as zip fasteners, rivets, sharp-
edged belts etc. may leave permanent scratches or signs of rubbing on the
surface or damage these. Such damage cannot be subsequently recognised as
a justified complaint.
Note
When using the vehicle, minor visible changes may occur to the leather parts
of the covers (e.g. wrinkles or creases) as a result of the stress applied to the
covers.Artificial leather, materials and Alcantara ®
Read and observe
and on page 134 first.
Artificial leather
Clean artificial leather with a damp cloth.
If this method does not completely clean the artificial leather, use a mild soap solution or cleaning products specially designed for this purpose.
Fabric
Clean upholstery cover materials and cloth trims on doors, boot cover, etc. us-
ing specific cleaning agents, e.g., dry foam.
Use a soft sponge, brush, or commercially available microfibre cloth.
Use a cloth and a cleaning agent specifically designed for this purpose to clean
the roof trim.
Remove any lumps on the cover fabric and any fabric residue using a brush.
Remove stubborn hair using a “cleaning glove”.
Alcantara ®
Dust and dirt in pores, creases and seams may chafe and damage the surface.
Therefore, they must be removed regularly at short intervals with a cloth or
vacuum cleaner.
Minor changes in colour caused by use are normal.
CAUTION
■ For Alcantara ®
seat covers, do not use any solvents, floor wax, shoe cream,
stain remover, leather cleaners or similar agents.■
Avoid leaving the vehicle in bright sunlight for long periods of time in order
to stop the artificial leather, materials or Alcantara ®
from bleaching. During ex-
tended periods of standing outdoors, protect artificial leather, fabrics or Alcan-
tara ®
by covering.
■
Some clothing materials, e.g. dark denim, do not have sufficient colour fast-
ness. This can cause damage or clearly visible discolouration to seat covers,
even when used correctly. This applies particularly to light-coloured seat cov-
ers. This does not relate to a fault in the seat cover, but rather to poor colour
fastness of the clothing textiles.
135Care and maintenance
Page 158 of 204
Do-it-yourself
Emergency equipment and self-help
Emergency equipment
Introduction
This chapter contains information on the following subjects:
First aid kit and warning triangle
156
reflective vest
156
fire extinguisher
156
Vehicle tool kit
157
First aid kit and warning triangle
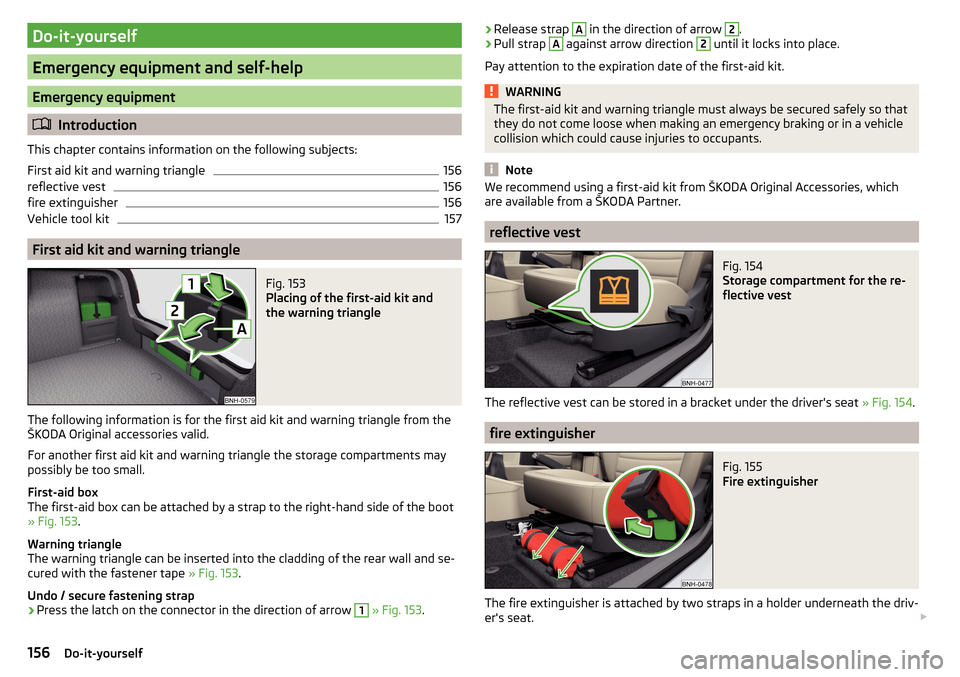
Fig. 153
Placing of the first-aid kit and
the warning triangle
The following information is for the first aid kit and warning triangle from the
ŠKODA Original accessories valid.
For another first aid kit and warning triangle the storage compartments may
possibly be too small.
First-aid box
The first-aid box can be attached by a strap to the right-hand side of the boot
» Fig. 153 .
Warning triangle
The warning triangle can be inserted into the cladding of the rear wall and se-
cured with the fastener tape » Fig. 153.
Undo / secure fastening strap
›
Press the latch on the connector in the direction of arrow
1
» Fig. 153 .
›Release strap A in the direction of arrow 2.›Pull strap A against arrow direction 2 until it locks into place.
Pay attention to the expiration date of the first-aid kit.WARNINGThe first-aid kit and warning triangle must always be secured safely so that
they do not come loose when making an emergency braking or in a vehicle
collision which could cause injuries to occupants.
Note
We recommend using a first-aid kit from ŠKODA Original Accessories, which
are available from a ŠKODA Partner.
reflective vest
Fig. 154
Storage compartment for the re-
flective vest
The reflective vest can be stored in a bracket under the driver's seat » Fig. 154.
fire extinguisher
Fig. 155
Fire extinguisher
The fire extinguisher is attached by two straps in a holder underneath the driv-
er's seat.
156Do-it-yourself
Page 159 of 204
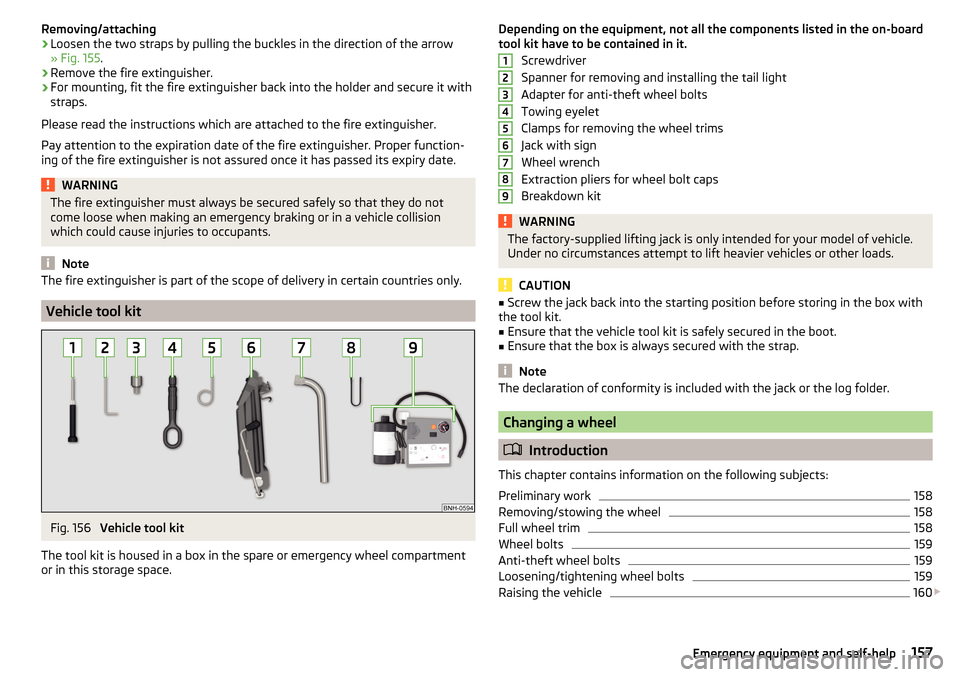
Removing/attaching›Loosen the two straps by pulling the buckles in the direction of the arrow
» Fig. 155 .›
Remove the fire extinguisher.
›
For mounting, fit the fire extinguisher back into the holder and secure it with
straps.
Please read the instructions which are attached to the fire extinguisher.
Pay attention to the expiration date of the fire extinguisher. Proper function-
ing of the fire extinguisher is not assured once it has passed its expiry date.
WARNINGThe fire extinguisher must always be secured safely so that they do not
come loose when making an emergency braking or in a vehicle collision
which could cause injuries to occupants.
Note
The fire extinguisher is part of the scope of delivery in certain countries only.
Vehicle tool kit
Fig. 156
Vehicle tool kit
The tool kit is housed in a box in the spare or emergency wheel compartment
or in this storage space.
Depending on the equipment, not all the components listed in the on-board
tool kit have to be contained in it.
Screwdriver
Spanner for removing and installing the tail light
Adapter for anti-theft wheel bolts
Towing eyelet
Clamps for removing the wheel trims
Jack with sign
Wheel wrench
Extraction pliers for wheel bolt caps
Breakdown kitWARNINGThe factory-supplied lifting jack is only intended for your model of vehicle.
Under no circumstances attempt to lift heavier vehicles or other loads.
CAUTION
■ Screw the jack back into the starting position before storing in the box with
the tool kit.■
Ensure that the vehicle tool kit is safely secured in the boot.
■
Ensure that the box is always secured with the strap.
Note
The declaration of conformity is included with the jack or the log folder.
Changing a wheel
Introduction
This chapter contains information on the following subjects:
Preliminary work
158
Removing/stowing the wheel
158
Full wheel trim
158
Wheel bolts
159
Anti-theft wheel bolts
159
Loosening/tightening wheel bolts
159
Raising the vehicle
160
123456789157Emergency equipment and self-help