tow SKODA RAPID 2015 1.G Owner's Manual
[x] Cancel search | Manufacturer: SKODA, Model Year: 2015, Model line: RAPID, Model: SKODA RAPID 2015 1.GPages: 204, PDF Size: 27.52 MB
Page 5 of 204
Do-it-yourself
Emergency equipment and self-help156
Emergency equipment
156
Changing a wheel
157
Puncture set
161
Jump-starting
164
Towing the vehicle
165
Remote control
167
Emergency unlocking/locking
168
Replacing windscreen wiper blades
169
Fuses and light bulbs
170
Fuses
170
Replacing bulbs
173
Technical data
Technical data
179
Basic vehicle data
179
Vehicle-specific details per engine type
184
Index
3Table of Contents
Page 13 of 204
Seat belts
Using seat belts
Introduction
This chapter contains information on the following subjects:
The physical principle of a frontal collision
12
Correct routing of seat belt
12
Fastening and unfastening seat belts
13
Seat belts that are fastened correctly offer good protection in the event of an
accident. They reduce the risk of an injury and increase the chance of survival
in the event of a major accident.
Properly fastened seat belts hold occupants to correctly set seats in the right
seat position.
Particular safety aspects must be observed when transporting children in the
vehicle » page 19 .
WARNING■
Fasten your seat belt before each journey – even when driving in town!
This also applies to other passengers - there is a danger of injury!■
Maximum seat belt protection is only achieved if you are correctly seated
» page 8 , Correct and safe seated position .
■
The seat backrests of the front seats must not be tilted too far to the rear
otherwise the seatbelts can lose their effectiveness.
WARNINGInformation on the correct routing of the belt■Always ensure that the webbing of the seat belts is properly routed. Seat
belts which are not correctly adjusted can themselves cause injuries even
in minor accidents.■
Adjust the height of the belt in such a way that the shoulder part of the
belt is roughly positioned across the middle of your shoulder – on no ac-
count across your neck.
WARNING (Continued)■ A seat belt which is hanging too loose can result in injuries as your body is
moved forward by the kinetic energy produced in an accident and is then
suddenly held firm by the belt.■
The belt webbing must not run across solid or fragile objects (e.g. specta-
cles, ball-point pens, bunches of keys etc.). Such objects can cause injury.
WARNINGInformation on dealing with the safety belts■The belt webbing must not be jammed in-between at any point or twis-
ted, or chafe against any sharp edges.■
Make sure you do not catch the seat belt in the door when closing it.
WARNINGInformation on the proper use of the safety belts■No two persons (also not children) should ever use a single seat belt to-
gether.■
The lock tongue should only be inserted into the lock which is the correct
one for your seat. Wrong use of the safety belt will reduce its capacity to
protect and the risk of injury increases.
■
The slot of the belt tongue must not be blocked, otherwise the belt
tongue will not lock in place properly.
■
Many layers of clothing and loose clothing (e. g. a winter coat over a jack-
et) do not allow you to be correctly seated and impairs proper operation of
the seat belts.
■
Do not use clamps or other objects to adjust seat belts (e.g. for shorten-
ing the belts for smaller persons).
■
The seat belts for the rear seats can only fulfil their function reliably
when the seat backrests are correctly locked into position » page 71.
WARNINGInformation on the care and maintenance of the safety belts■The belt webbing must always be kept clean. Dirty belt webbing may im-
pair the correct functioning of the inertia reel.■
The seat belts must not be removed or changed in any way. Do not at-
tempt to repair the seat belts yourself.
11Seat belts
Page 37 of 204
If the warning light flashes after starting the engine again, there is a system
error.
Seek help from a specialist garage.
Disconnecting the vehicle battery
If the vehicle's battery has been disconnected and reconnected, the indicator
light
comes on after switching on the ignition.
The warning light should go out after driving a short distance.
If, after a short drive, the indicator light does not go out, there is a system er-
ror.
Seek help from a specialist garage.
Other incidents
The illumination of the warning light can have the following reasons.
▶ The vehicle is loaded on one side. Distribute loads as evenly as possible.
▶ The wheels of one axle are loaded more heavily (e.g. when towing a trailer or
when driving uphill or downhill).
▶ Snow chains are mounted.
▶ A wheel has been changed.
CAUTION
Under certain circumstances (e.g. sporty style of driving, wintry or unpaved
roads) the warning light in the instrument cluster may be delayed or not
light up at all.
Fuel reserve
Read and observe
on page 32 first.
illuminates – the fuel level in the fuel tank is at the reserve level (approxi-
mately 7 litres).
Please refuel. Range: ...
kmPLEASE REFUEL RANGE …
km
An audible signal sounds as a warning.
Note
The text in the display goes out after refuelling and driving a short distance. Turn signal system
Read and observe
on page 32 first.
flashes – the left turn signal is turned on.
flashes – the right turn signal is turned on.
If there is a fault in the turn signal system, the warning light flashes at twice
its normal rate. This does not apply when towing a trailer.
When the hazard warning light system is switched on, this will cause all of the
turn signal lights as well as both warning lights to flash.
Trailer turn signal lights
Read and observe
on page 32 first.
flashes – the trailer lights are switched on.
If a trailer is hitched and the warning light is not flashing, one of the trailer
turn signal lights has failed.
An example message in the display of the instrument cluster
Trailer: check left turn signal!TRAILER TURN SIG_ CHECK LEFT
Check the trailer bulbs.
Fog lights
Read and observe
on page 32 first.
illuminates – the fog lights are switched on.
Cruise control system
Read and observe
on page 32 first.
illuminates – the vehicle speed is regulated by the cruise control.
Brake pedal (automatic gearbox)
Read and observe
on page 32 first.
illuminates – apply the brake.
35Instruments and Indicator Lights
Page 43 of 204
Range
The detail provides information about the distance in km, that can be travelled
with the current tank and with the same driving style.
If you drive more efficiently this value can increase.
Average fuel consumption
The indication is calculated continuously since the last deletion of the memory.
After erasing the memory, no data will appear for the first 100 m driven.
Current fuel consumption
You can use this information to adapt your driving style to the desired fuel
consumption.
When the vehicle is stationary or slowly moving the fuel consumption is dis-
played in l/h (on models for some countries the following appears --,- km/l).
Oil temperature
If the engine oil temperature is in the range of 80-110 °C, the engine operating
temperature has been reached.
If the oil temperature is lower than 80 °C or above 110 °C, avoid high engine
revs, full throttle and high engine loads.
If the oil temperature is lower than 50 °C or if there is a fault in the system for
checking the oil temperature are displayed instead of the oil temperature.
Warning against excessive speeds
Set the speed limit, for example, for the maximum permissible speed in town
» page 41 .
Current driving speed
The display is identical to the display on the speedometer.
Average speed
The indication is calculated continuously since the last deletion of the memory.
After erasing the memory, no data will appear for the first 300 m driven.
Distance travelled
The distance travelled since the memory was last erased is displayed.
The maximum distance indicated is 9,999 km. The indicator is automatically
set back to zero if this period is exceeded.
Driving time
The time travelled since the memory was last erased is displayed.The maximum distance indicated is 99 hours and 59 minutes. The indicator is
automatically set back to zero if this period is exceeded.
Coolant temperature
If the engine oil temperature is in the range 80-110 °C, the engine operating
temperature is reached.
If the temperature lies below 80 °C or above 110 °C, avoid high engine revs, full
throttle and high engine loads.
Warning when exceeding the set speed
Read and observe
on page 40 first.
The system offers the possibility to set a speed limit beyond which an audiblealarm will sound and the following warning message appears.
Speed ... exceeded.SPEED TOO HIGH
Adjust the speed limit while the vehicle is stationary
›
Select the menu item
Warning at
at ( ) or
(
) and confirm.
›
Set the desired speed limit.
›
Confirm the set value, or wait several seconds; your settings will be saved
automatically.
The speed limit can be set in 5 km/h intervals.
Adjusting the speed limit while the vehicle is moving
›
Select the menu item
Warning at
at ( ) or
(
) and confirm.
›
Drive at the desired speed.
›
Confirm the current speed as the speed limit.
The set speed limit can be manually adjusted later if needed.
Deactivate speed limit
›
Select the menu item
Warning at
at ( ) or
(
) and confirm.
›
Confirm the stored value of the speed limits.
The speed limit will be disabled.
The set driving mode remains stored even after switching the ignition on and
off. After a gap between driving exceeding 2 hours, the pre-set speed limit is
deactivated.
41Information system
Page 54 of 204

The locking is shown by the illuminated symbol .
The central locking system also operates if the ignition is switched off.
The following applies after locking. ▶ Opening the doors and the boot lid from the outside is not possible.
▶ The doors can be unlocked and opened from the inside by a single pull on the
opening lever of the respective door.WARNINGDoors locked from the inside make it difficult for rescuers to get into the
vehicle in an emergency – risk to life!
Safe securing system
Read and observe
and on page 50 first.
As soon as the vehicle is locked from the outside, the safe lock prevents open-
ing the doors from the inside.
This function is pointed out by the following message on the display of the in-
strument cluster after switching out the ignition.
Check SAFELOCK! Owner´s manualCHECK SAFELOCK
After locking the vehicle, the warning light in the driver's door flashes for
around 2 seconds in quick succession, afterwards it begins to flash evenly at
longer intervals.
Switching off
The safe lock can be switched off in one of the following ways.
▶ By locking twice within 2 seconds.
▶ By disabling the button for interior monitoring and anti-towing » page 54.
The indicator light in the driver door flashes for about 2 seconds fast, goes out
and starts to flash at longer intervals after about 30 seconds.
If the vehicle is locked and the safe securing system is switched off, the door
can be opened separately from the inside by a single pull on opening lever.
The SafeLock switches on the next time the vehicle is locked.
WARNINGIf the car is locked and the safe securing system activated, no people must
remain in the car as it will then not be possible to either unlock a door or
open a window from the inside. The locked doors make it more difficult for
rescuers to get into the vehicle in an emergency – risk to life!
Individual settings
Read and observe
and on page 50 first.
The following functions of the central locking can be set in the Infotainment
» Owner´s Manual Infotainment , chapter CAR - Vehicle Settings or be set by a
specialist company.
Opening a single door
The function allows you to unlock only the driver's door and the fuel filler flap
with the radio remote control. KESSY makes possible the release of individual
doors as well as the fuel filler flap, depending on the area in which the key is
located. The other doors and the boot lid are only unlocked when the unlock-
ing is repeated.
Unlocking a vehicle side door
This function enables you to unlock both doors on the driver's side and the
fuel filler flap with the radio remote control unit. KESSY makes possible the re-
lease of both doors on one side as well as the fuel filler flap, depending on the
area in which the key is located. The other doors and the boot lid are only un-
locked when the unlocking is repeated.
Unlock all doors
The function allows you to unlock all doors, the boot lid and the fuel filler flap.
Automatic locking/unlocking
The function allows you to lock all doors and the boot lid from a speed of
about 15 km/h. The button in the handle of the boot lid is deactivated.
Renewed automatic unlocking of all doors as well as the luggage compartment
door when removing the ignition key or by opening any of the doors. In vehi-
cles with the system KESSY this is when any door is opened.
The vehicle can also be unlocked by pressing the central locking button
» page 51 .
52Using the system
Page 56 of 204
Failure of the system KESSY
If the following message is displayed in the display of the instrument cluster,
then help is required from a specialist company.Keyless access system faulty.KEYLESS ACCESS SYSTEM FAULTY
Key battery discharged
If the voltage of the key battery is too low, the following message appears in
the display of the instrument cluster.
Change the key battery!KEY BATTERY PLEASE CHANGE
Replace the battery » page 167.
Anti-theft alarm system
Introduction
This chapter contains information on the following subjects:
Interior monitor and towing protection
54
The anti-theft alarm system (hereinafter referred to as alarm system) increa-
ses protection against theft and break-in attempts into the vehicle.
The alarm system is activated automatically approximately 30 seconds after
the vehicle is locked. This is automatically disabled after release.
The alarm system triggers audible and visual signals if an attempt is made to
break into the vehicle (hereafter referred to as alarm).
Triggering the alarm
The alarm is triggered when the following unauthorized actions are carried out
on the locked vehicle.
▶ Opening the bonnet.
▶ Opening the boot lid.
▶ Opening the doors.
▶ Manipulation of the ignition lock.
▶ Towing the vehicle.
▶ Movement in the vehicle.
▶ Sudden and significant voltage drop of the electrical system.
▶ Uncoupling the trailer.
If the driver's door of a vehicle is unlocked and opened by the lock cylinder,
then the alarm is triggered.
Switching off the alarm
The alarm is turned off by pressing the button on the key or switching on
the ignition.
CAUTION
Before leaving the vehicle, it must be checked that all of the windows, doors
and the sliding/tilting roof are locked in order to ensure the full functionality of
the anti-theft alarm system.
Note
The alarm system has its own power source. The working life of the power
supply source is 5 years.
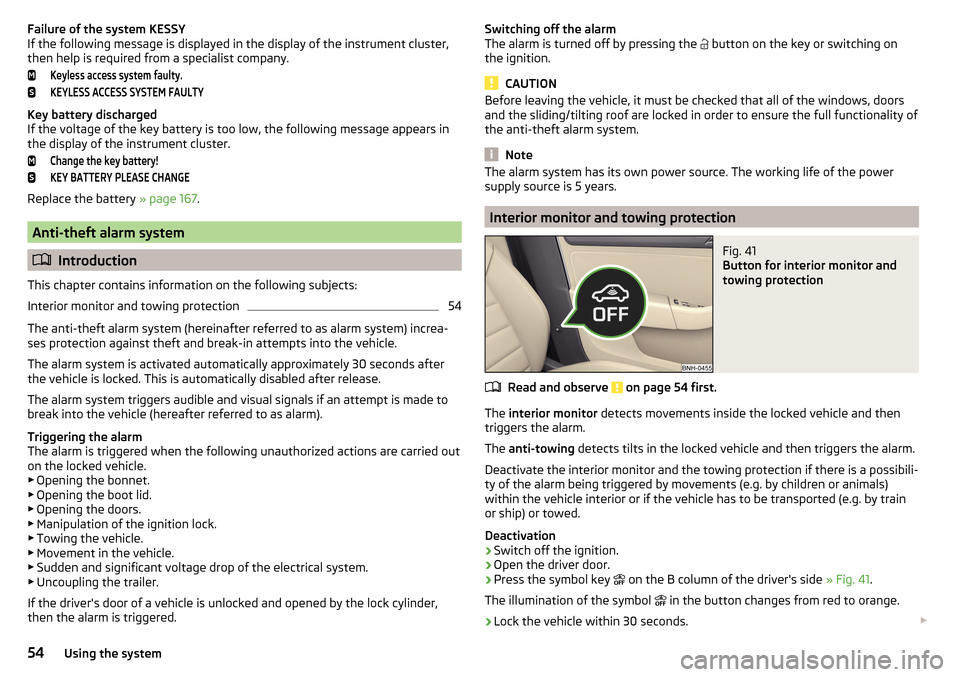
Interior monitor and towing protection
Fig. 41
Button for interior monitor and
towing protection
Read and observe on page 54 first.
The interior monitor detects movements inside the locked vehicle and then
triggers the alarm.
The anti-towing detects tilts in the locked vehicle and then triggers the alarm.
Deactivate the interior monitor and the towing protection if there is a possibili-
ty of the alarm being triggered by movements (e.g. by children or animals)
within the vehicle interior or if the vehicle has to be transported (e.g. by train
or ship) or towed.
Deactivation
›
Switch off the ignition.
›
Open the driver door.
›
Press the symbol key
on the B column of the driver's side » Fig. 41.
The illumination of the symbol
in the button changes from red to orange.
›
Lock the vehicle within 30 seconds.
54Using the system
Page 57 of 204
By disabling the interior monitoring and the anti-towing the safe lock is
switched off.
CAUTION
The opened glasses storage compartment reduces the effectiveness of the in-
terior monitor. To ensure the full functionality of the interior monitor, the
glasses storage compartment must always be closed before locking the vehi-
cle.
Luggage compartment lid
Introduction
This chapter contains information on the following subjects:
Boot lid opening/closing
55
Delayed locking of the boot lid
55
When closing the boot lid does do not press on the rear window.
Ensure that the lock is properly engaged after closing the boot lid.
The function of the button in the grip above the licence plate is deactivated when starting off or at a speed of 5 km/hour or more for vehicles with central
locking. The function is restored after the vehicle stops and the door is
opened.
WARNING■ Never drive with the boot lid open or unlatched, as otherwise exhaust
gases may get into the interior of the vehicle – risk of poisoning!■
Make sure that when closing the boot lid, no body parts are crushed -
there is danger of injury!
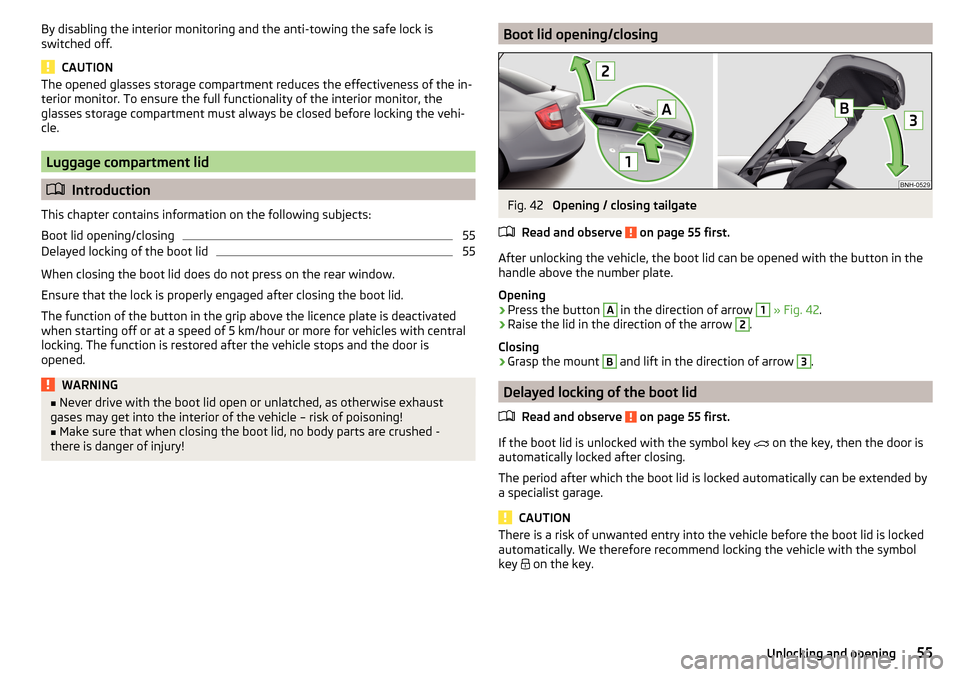
Boot lid opening/closingFig. 42
Opening / closing tailgate
Read and observe
on page 55 first.
After unlocking the vehicle, the boot lid can be opened with the button in the
handle above the number plate.
Opening
›
Press the button
A
in the direction of arrow
1
» Fig. 42 .
›
Raise the lid in the direction of the arrow
2
.
Closing
›
Grasp the mount
B
and lift in the direction of arrow
3
.
Delayed locking of the boot lid
Read and observe
on page 55 first.
If the boot lid is unlocked with the symbol key on the key, then the door is
automatically locked after closing.
The period after which the boot lid is locked automatically can be extended by
a specialist garage.
CAUTION
There is a risk of unwanted entry into the vehicle before the boot lid is locked
automatically. We therefore recommend locking the vehicle with the symbol
key
on the key.55Unlocking and opening
Page 62 of 204

Note■The light switch is in position or and the ignition is turned off, the low
beam is switched off automatically 1)
and the status light is lit. The side light is
switched off when the ignition key is removed, for vehicles with the start but-
ton after switching off the ignition and opening the driver's door.■
If there is a fault in the light switch, the low beam comes on automatically.
Daytime running lights(DAY LIGHT)
Read and observe
on page 59 first.
The daytime running light (hereinafter referred to as "function") lights the
front and rear vehicle area (only valid for some countries).
The lights are switched on automatically if the following conditions are met. The light switch is in the position or
.
The ignition is switched on.
The function is activated.
Activating/deactivating function on vehicles with Infotainment
The function can be disabled/enabled in the Infotainment » Owner´s Manual
Infotainment , chapter CAR - vehicle settings .
Deactivating on vehicles without Infotainment
›
Switch off the ignition.
›
Pull the indicator / main beam lever towards the steering wheel, push down
and hold in this position.
›
Switch on the ignition.
›
Wait until the left turn signal light flashes 4 times.
›
Switch off the ignition – an audible signal sounds which confirms the deacti-
vation of the function.
›
Release the turn signal stalk.
Activating on vehicles without Infotainment
›
Switch off the ignition.
›
Pull the indicator / main beam lever towards the steering wheel, push up and
hold in this position.
›
Switch on the ignition.
›
Wait until the right turn signal light flashes 4 times.
› Switch off the ignition – an audible signal sounds which confirms the activa-
tion of the function.›
Release the turn signal stalk.
WARNINGAlways switch on the low beam when visibility is poor.
Turn signal and main beam
Fig. 47
Operating lever: Turn signal and
main beam operation
Read and observe on page 59 first.
Lever positions » Fig. 47
When the right turn signal light is switched on, the warning light flashes in
the instrument cluster
When the left turn signal light is switched on, the warning light flashes in
the instrument cluster
Switch on main beam (spring setting) – the warning light illuminates in the
instrument cluster
Switching off main beam / switching on headlamp flasher (spring-loaded position)
The main beam can only be switched on when the low beam lights are on.
The headlight flasher can be operated even if the ignition is switched off.
The turn signal light switches itself off automatically when driving around a
curve or after making a turn.
ABCD1)
Does not apply to the position
, as long as the conditions are met for the COMING HOME function
» page 62 .
60Using the system
Page 64 of 204
Switching off takes place in reverse order.
If the vehicle is not fitted with fog lights, the rear fog light is switched on by
pulling out the light switch directly to the only possible setting.
Note
While driving with an accessory connected to the trailer socket (e.g. trailer,
bike carrier) only the equipment is illuminated by the fog light. The towing de-
vice must be installed at the factory or from the ŠKODA original accessories.
Fog lights with the CORNER function
Read and observe
on page 59 first.
The function CORNER provides better illumination of the nearby environmentwhen turning, manoeuvring or anything similar.
The function automatically switches on the fog lights on each side of the ve- hicle, if the following conditions are met.
The turn signal is switched on or the front wheels are turned sharply 1)
.
The vehicle speed is below 40 km/h.
The low beam is switched on.
The fog lights are not switched on.
Note
The two fog lights are switched on when you shift into the reverse gear.
COMING HOME / LEAVING HOME
Read and observe
on page 59 first.
The function COMING HOME ensures that the vehicle's environment is illumi-
nated after switching off the ignition and opening the driver's door.
The function LEAVING HOME ensures that the vehicle's environment is illumi-
nated after unlocking the vehicle with the radio remote control unit.
The function switches the light on only if there is poorer visibility and the light
switch is in the position
.
Enabling / disabling and setting functions
The functions and setting of the lighting duration can be activated or deactiva-
ted in the Infotainment system » Owner´s Manual Infotainment , chap-
ter CARVehicle settings .
CAUTION
■
Poorer visibility is detected by a sensor mounted below the windscreen in
the holder of the inside mirror or in the control panel. Do not attach any stick-
ers or similar objects in front of the sensor in order to avoid impairing the func-
tion or its reliability.■
If this option is always enabled, then the battery is heavily loaded.
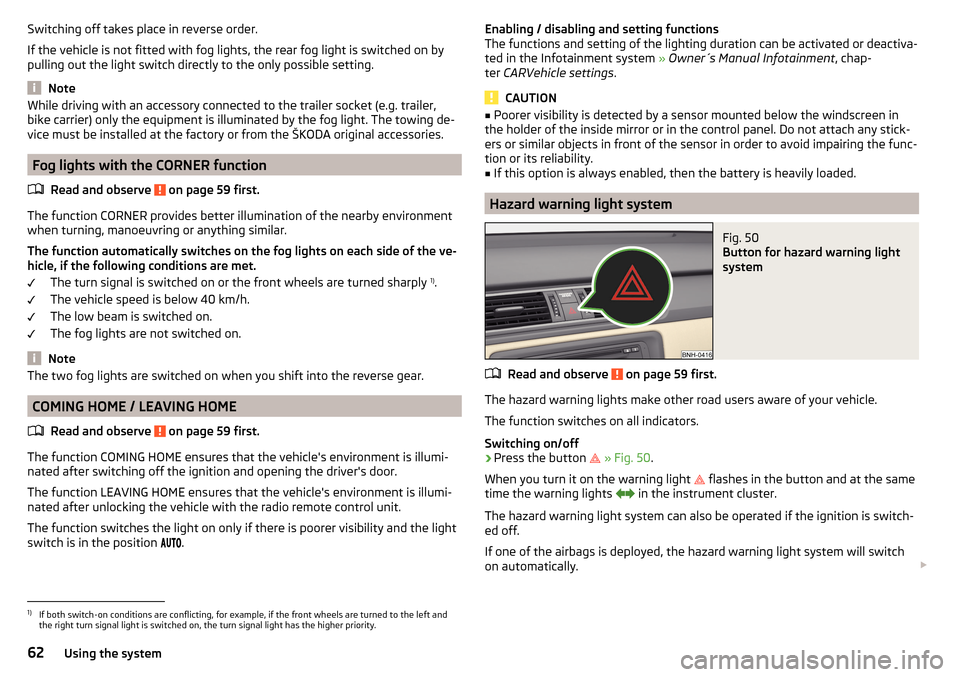
Hazard warning light system
Fig. 50
Button for hazard warning light
system
Read and observe on page 59 first.
The hazard warning lights make other road users aware of your vehicle.
The function switches on all indicators.
Switching on/off
›
Press the button
» Fig. 50 .
When you turn it on the warning light
flashes in the button and at the same
time the warning lights
in the instrument cluster.
The hazard warning light system can also be operated if the ignition is switch-
ed off.
If one of the airbags is deployed, the hazard warning light system will switch
on automatically.
1)
If both switch-on conditions are conflicting, for example, if the front wheels are turned to the left and
the right turn signal light is switched on, the turn signal light has the higher priority.
62Using the system
Page 67 of 204

Front sun visorsFig. 54
Fold down the cover / swivel cover to the door and slide the mir-
ror cover
Read and observe
on page 64 first.
Operation and description of the sun visor » Fig. 54
Fold down the cover
Swivel cover towards the door
Make-up mirror with cover
Slide mirror cover
WARNINGWhen objects are attached to the sun visor, the visor can not be pivoted to
the side windows. This might result in injuries to the occupants if the head
airbag is deployed.
Windscreen wipers and washers
Introduction
This chapter contains information on the following subjects:
Activating the windscreen wipers and washers
66
Headlight cleaning system
66
The windshield wipers and the windshield washer system only operate if the
ignition is switched on.
12ABWinter setting of the windscreen wiper
If the windscreen wipers are in rest position, they cannot be folded out from
the windscreen. For this reason we recommend adjusting the windscreen wip-
ers in winter so that they can be folded out from the windscreen easily.
▶ Switch on the windscreen wipers.
▶ Switch off the ignition.
The windscreen wipers remain in the position in which they were when
switching off the ignition.
The service position can also be used as a winter position » page 169.WARNING■
Properly maintained windscreen wiper blades are essential for clear visi-
bility and safe driving » page 169.■
Do not use the windscreen washer system at low temperatures, without
heating the windscreen beforehand. The window washer fluid could other-
wise freeze on the windscreen and restrict the view to the front.
CAUTION
■ In cold temperatures and during the winter, check before switching on the
ignition that the wiper blades are not frozen to the windscreen. If the wind-
screen wipers are switched on when the blades are frozen to the windscreen,
this may damage both the blades and windscreen wiper motor!■
Carefully peel frozen wiper blades off the windscreen.
■
Remove snow and ice from the windscreen wipers before driving.
■
If the windscreen wipers are handled carelessly, there is a risk of damage to
the windscreen.
■
Do not switch on the ignition if the front wiper arms are retracted. The wiper
arms could damage the paint of the bonnet.
Note
Depending on vehicle equipment, the windscreen washer jets can be heated
automatically after starting the engine.65Lights and visibility