low beam SKODA RAPID 2016 1.G User Guide
[x] Cancel search | Manufacturer: SKODA, Model Year: 2016, Model line: RAPID, Model: SKODA RAPID 2016 1.GPages: 184, PDF Size: 27.06 MB
Page 156 of 184
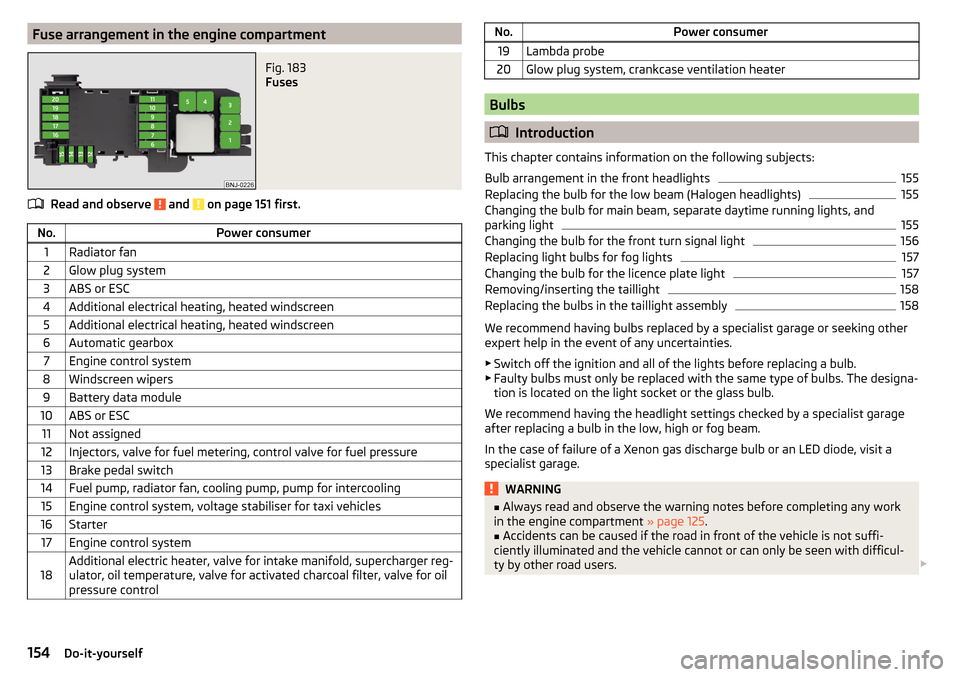
Fuse arrangement in the engine compartmentFig. 183
Fuses
Read and observe and on page 151 first.
No.Power consumer1Radiator fan2Glow plug system3ABS or ESC4Additional electrical heating, heated windscreen5Additional electrical heating, heated windscreen6Automatic gearbox7Engine control system8Windscreen wipers9Battery data module10ABS or ESC11Not assigned12Injectors, valve for fuel metering, control valve for fuel pressure13Brake pedal switch14Fuel pump, radiator fan, cooling pump, pump for intercooling15Engine control system, voltage stabiliser for taxi vehicles16Starter17Engine control system18Additional electric heater, valve for intake manifold, supercharger reg-
ulator, oil temperature, valve for activated charcoal filter, valve for oil
pressure controlNo.Power consumer19Lambda probe20Glow plug system, crankcase ventilation heater
Bulbs
Introduction
This chapter contains information on the following subjects:
Bulb arrangement in the front headlights
155
Replacing the bulb for the low beam (Halogen headlights)
155
Changing the bulb for main beam, separate daytime running lights, and
parking light
155
Changing the bulb for the front turn signal light
156
Replacing light bulbs for fog lights
157
Changing the bulb for the licence plate light
157
Removing/inserting the taillight
158
Replacing the bulbs in the taillight assembly
158
We recommend having bulbs replaced by a specialist garage or seeking other
expert help in the event of any uncertainties.
▶ Switch off the ignition and all of the lights before replacing a bulb.
▶ Faulty bulbs must only be replaced with the same type of bulbs. The designa-
tion is located on the light socket or the glass bulb.
We recommend having the headlight settings checked by a specialist garage after replacing a bulb in the low, high or fog beam.
In the case of failure of a Xenon gas discharge bulb or an LED diode, visit a
specialist garage.
WARNING■ Always read and observe the warning notes before completing any work
in the engine compartment » page 125.■
Accidents can be caused if the road in front of the vehicle is not suffi-
ciently illuminated and the vehicle cannot or can only be seen with difficul-
ty by other road users.
154Do-it-yourself
Page 157 of 184

WARNING (Continued)■H7 and H15 bulbs are pressurised and may burst when changing the bulb -
risk of injury! We therefore recommended wearing gloves and safety
glasses when changing a bulb.■
Do not carry out any work on the Xenon gas discharge lamps - risk of
death!
CAUTION
■ Do not take hold of the glass bulb with naked fingers (even the smallest
amount of dirt reduces the working life of the light bulb). Use a clean cloth,
napkin, or similar.■
The cap of the filament bulb must always be seated correctly in the head-
light, otherwise this may allow water and debris to enter the headlight - risk of
damage to the headlights.
Note
■ This Owner's Manual only describes the replacement of bulbs where it is pos-
sible to replace the bulbs on your own without any complications arising. Other
bulbs must be replaced by a specialist garage.■
We recommend that a box of replacement bulbs always be carried in the ve-
hicle.
Bulb arrangement in the front headlights
Fig. 184
Left headlight
Read and observe and on page 154 first.
Bulb arrangement » Fig. 184
Low beam or low beam with Xenon gas discharge bulb
Main beam, separate daytime running lights, and parking light
Turn signal light (at the front)
ABCReplacing the bulb for the low beam (Halogen headlights)Fig. 185
Changing the bulb for the low beam
Read and observe
and on page 154 first.
›
Remove the protective cap
A
» Fig. 184 on page 155 .
›
Remove the socket with the bulb by jiggling it out in the direction of arrow
1
» Fig. 185 .
›
Remove the connector.
›
Insert the connector with the new bulb in the direction of arrow
2
so that
the fixing lug
A
fits the bulb into the recess on the reflector.
›
Attach the connector.
›
Fit the protective cap
A
» Fig. 184 on page 155 .
Changing the bulb for main beam, separate daytime running
lights, and parking light
Fig. 186
Replacing the bulb for main
beam and separate daytime run-
ning lights
155Fuses and light bulbs
Page 173 of 184
Gear changeGear recommendation38
Information on the selected gear38
Gear changing Gear stick
88
Genuine parts116
Glasses compartment71
GPS See Owner´s Manual -Infotainment
6
H
Handbrake
87
Warning light30
Hazard warning light system57
HBA95
Headrests64
Heating79, 80
Air distribution control81
Exterior mirrors62
Seats65
Windscreen and rear window59
Help in an emergency8
HHC95
Hill Start Assist (HHC)95
Hitch108
Hooks76
Horn27
I
I-PAD holder
73
Ignition lock84
Images See Owner´s Manual -Infotainment
6
Immobiliser83
Inertia reels14
Information about the towing process146
Information system37
Auto Check Control37
Door alarm37
Gear recommendation38
MAXI DOT display41
Multifunction display39
Service interval display42
Infotainment6
Instrument cluster28
See instrument cluster28
Warning lights29
Interior light58
Interior lighting58
Interior monitor50
ISOFIX22, 23
J
Jack
139
Jacking points Raise vehicle
142
Jump-starting145
K
KESSY Unlocking/locking
47
Key Change battery
148
Lock46
Starting / stopping the engine84
Switch on/off ignition84
Unlock46
L
Lamp failure Warning light
36
Lamps Warning light
36
LEAVING HOME56
Lever Cruise control101
Front Assist105
Operation of the information system39
Speed regulating system102
Turn signal/main beam55
Windscreen wipers60
Light Cockpit
57
COMING HOME / LEAVING HOME56
Daytime running lights54
Flash55
Parking light57
Replacing bulbs154
Turn signal/main beam55
Light bulbs Replacing
154
Lighting Interior lighting
57
Luggage compartment74
Lights53
Automatic driving light control55
Beam range adjustment54
Driving abroad57
Fog lights/rear fog light56
Fog lights with the CORNER function56
Hazard warning light system57
Headlight cleaning system61
Low beam54
Parking light54
Switching on/off54
Warning lights29
Load161
Lock Individual settings
48
Key46
Locking Central locking button
47
in case of emergency149
KESSY47
Remote control46
171Index
Page 174 of 184
Lock steering lock83
Low beam54
Low tyre pressure warning refer to the tyre pressure monitoring
106
Luggage compartment74
Cover76
Fastening elements75
Fixing nets75
Floor covering on both sides78
Lighting74
See boot lid51
unlock manually149
Unlock the boot lid149
Luggage compartment cover76
Luggage compartment lid50
M
Main beam
55
Warning light34
Manual air conditioning Air distribution control
81
Controls80
Manual gear changing see gear changing
88
Materials defect liability4
MAXI DOT See MAXI DOT display
41
MAXI DOT display Main menu
41
Menu item assist systems42
Menu item Audio41
Menu item navigation41
Menu item telephone42
Operation39
Maximum speed165
MCB95
Mechanical windows51
Open/close52
Media AUX67
See Owner´s Manual -Infotainment6
USB67
Memory40
Mirror61
Vanity59
Mobility warranty5
Modes of the automatic transmission89
Modifications and technical alterations115
MSR94
Multi collision brake (MCB)95
Multifunction display Functions
39
Information40
Memory40
Multifunction pocket76
Multifunction steering wheel39
Multimedia holder70
N
N1
78
Nameplate160
Navigation S Owner´s Manual -Infotainment
6
Nets75
O
oil see Engine oil
129
Oil Information messages
35
Oil changing Engine oil
128
On-board computer see multifunction display
39
Operating weight161
Original accessories116
Overview Cockpit27
Engine compartment127
Fuses151
Warning lights29
P
Parking
88
Parking aid96
Reversing camera98
Parking aid96
Automatic system activation when moving for- ward
98
Function96
Parking assistance Activation / deactivation
97
Display in the Infotainment display97
Parking light54
Parking the vehicle see Parking
88
Park Pilot96
Parts replacement115
Passive safety Before setting off
10
Driving safety10
Passive Safety10
Pedals88
Footmats88
Petrol124
Pocketin the luggage compartment76
Pockets72
Power steering31
Practical features Pockets
72
Storage compartment for umbrella72
Waste container68
Preheating unit32
172Index