brake SKODA RAPID 2016 1.G Owner's Guide
[x] Cancel search | Manufacturer: SKODA, Model Year: 2016, Model line: RAPID, Model: SKODA RAPID 2016 1.GPages: 184, PDF Size: 27.06 MB
Page 129 of 184
›Raise the bonnet in the direction of the arrow 3.›Remove the lid prop in the direction of arrow 4 from the holder.›
Secure the open flap inserting the end of the post into the opening in the di-
rection of arrow
5
.
Close the flap
›
Lift the bonnet.
›
Decouple the bonnet support and press into the holder designed to hold it.
›
Drop down the bonnet lid from a height of about 20 cm applying light pres-
sure until it clicks safely into place.
WARNING■ Never drive with the bonnet lid not properly closed - risk of accident!■Make sure that when closing the bonnet, no body parts are crushed -
there is danger of injury!
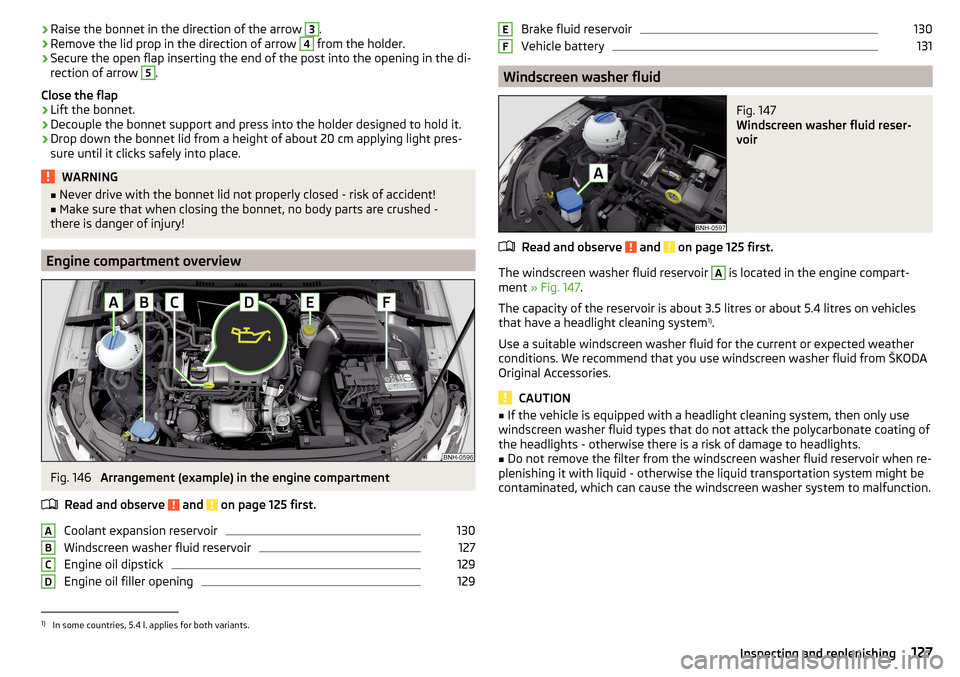
Engine compartment overview
Fig. 146
Arrangement (example) in the engine compartment
Read and observe
and on page 125 first.
Coolant expansion reservoir
130
Windscreen washer fluid reservoir
127
Engine oil dipstick
129
Engine oil filler opening
129ABCDBrake fluid reservoir130
Vehicle battery
131
Windscreen washer fluid
Fig. 147
Windscreen washer fluid reser-
voir
Read and observe and on page 125 first.
The windscreen washer fluid reservoir
A
is located in the engine compart-
ment » Fig. 147 .
The capacity of the reservoir is about 3.5 litres or about 5.4 litres on vehicles
that have a headlight cleaning system 1)
.
Use a suitable windscreen washer fluid for the current or expected weather
conditions. We recommend that you use windscreen washer fluid from ŠKODA
Original Accessories.
CAUTION
■ If the vehicle is equipped with a headlight cleaning system, then only use
windscreen washer fluid types that do not attack the polycarbonate coating of
the headlights - otherwise there is a risk of damage to headlights.■
Do not remove the filter from the windscreen washer fluid reservoir when re-
plenishing it with liquid - otherwise the liquid transportation system might be
contaminated, which can cause the windscreen washer system to malfunction.
EF1)
In some countries, 5.4 l. applies for both variants.
127Inspecting and replenishing
Page 132 of 184
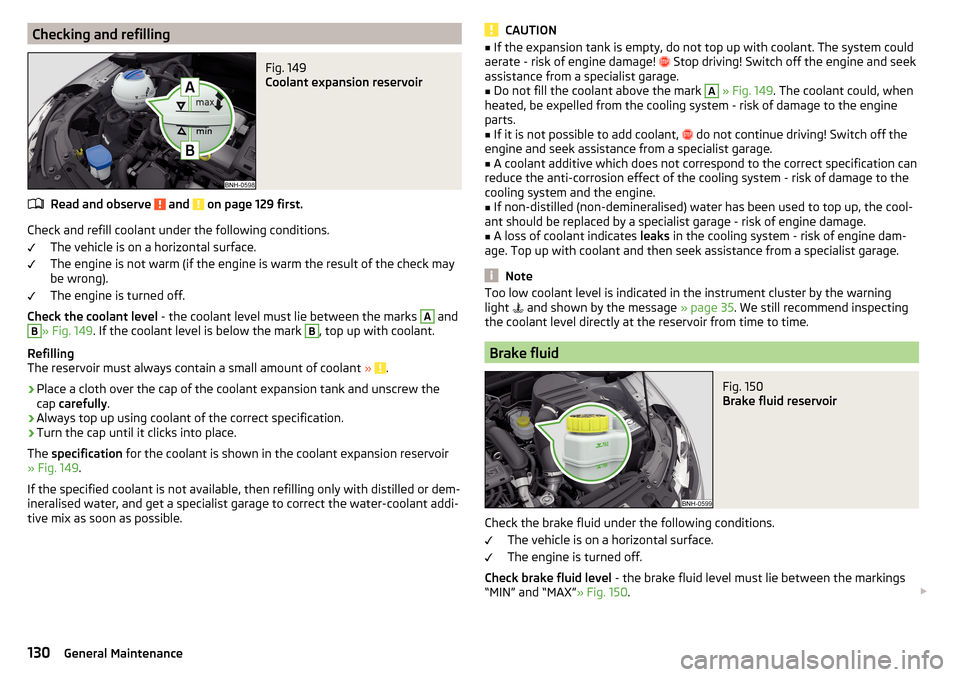
Checking and refillingFig. 149
Coolant expansion reservoir
Read and observe and on page 129 first.
Check and refill coolant under the following conditions.The vehicle is on a horizontal surface.
The engine is not warm (if the engine is warm the result of the check may
be wrong).
The engine is turned off.
Check the coolant level - the coolant level must lie between the marks
A
and
B
» Fig. 149. If the coolant level is below the mark
B
, top up with coolant.
Refilling
The reservoir must always contain a small amount of coolant »
.
›
Place a cloth over the cap of the coolant expansion tank and unscrew the
cap carefully .
›
Always top up using coolant of the correct specification.
›
Turn the cap until it clicks into place.
The specification for the coolant is shown in the coolant expansion reservoir
» Fig. 149 .
If the specified coolant is not available, then refilling only with distilled or dem-
ineralised water, and get a specialist garage to correct the water-coolant addi-
tive mix as soon as possible.
CAUTION■ If the expansion tank is empty, do not top up with coolant. The system could
aerate - risk of engine damage! Stop driving! Switch off the engine and seek
assistance from a specialist garage.■
Do not fill the coolant above the mark
A
» Fig. 149 . The coolant could, when
heated, be expelled from the cooling system - risk of damage to the engine
parts.
■
If it is not possible to add coolant,
do not continue driving! Switch off the
engine and seek assistance from a specialist garage.
■
A coolant additive which does not correspond to the correct specification can
reduce the anti-corrosion effect of the cooling system - risk of damage to the
cooling system and the engine.
■
If non-distilled (non-demineralised) water has been used to top up, the cool-
ant should be replaced by a specialist garage - risk of engine damage.
■
A loss of coolant indicates leaks in the cooling system - risk of engine dam-
age. Top up with coolant and then seek assistance from a specialist garage.
Note
Too low coolant level is indicated in the instrument cluster by the warning
light and shown by the message » page 35. We still recommend inspecting
the coolant level directly at the reservoir from time to time.
Brake fluid
Fig. 150
Brake fluid reservoir
Check the brake fluid under the following conditions.
The vehicle is on a horizontal surface.
The engine is turned off.
Check brake fluid level - the brake fluid level must lie between the markings
“MIN” and “MAX” » Fig. 150.
130General Maintenance
Page 133 of 184
Specification - the brake fluid must comply with the standard VW 501 14 (this
standard meets the requirements of FMVSS 116 DOT4).WARNING■ The following instructions must be followed at all times when working on
the engine compartment » page 125.■
If the fluid level drops significantly within a short time or if it drops below
the “MIN” » Fig. 150mark, this may be an indication of a leak in the brake
system.
Stop driving - There is a risk of an accident! Seek help from a
specialist garage.
Note
■ The brake fluid is changed as part of a compulsory inspection service.■Too low brake fluid level is indicated by the warning light being shown on
the display of the instrument cluster as well as the corresponding message
» page 30 . We still recommend inspecting the brake fluid level in the reservoir
from time to time.
Vehicle battery
Introduction
This chapter contains information on the following subjects:
Check condition
132
Charging
132
Disconnect/reconnect and change
133
The vehicle battery represents a power source for the motor to start and for the supply of electrical consumers in the car.
Depending on the engine, the vehicle battery is either in the engine compart-
ment or the luggage compartment.
Automatic shutdown of consumers - vehicle battery discharge protection
The on-board power supply system tries to prevent the vehicle battery from
discharging in the following ways when it is subject to heavy loading. ▶ By increasing the engine idle speed.
▶ Through the power limitation of certain consumers.
▶ By switching off some consumers (heated seats, heated rear window) for as
long as necessary.
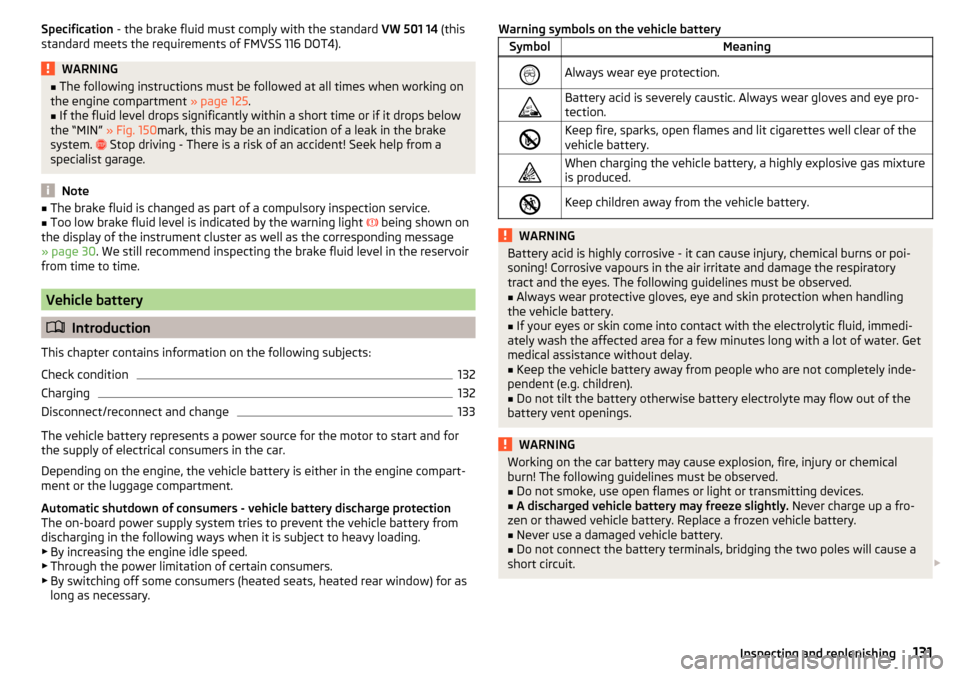
Warning symbols on the vehicle batterySymbolMeaningAlways wear eye protection.Battery acid is severely caustic. Always wear gloves and eye pro-
tection.Keep fire, sparks, open flames and lit cigarettes well clear of the
vehicle battery.When charging the vehicle battery, a highly explosive gas mixture
is produced.Keep children away from the vehicle battery.WARNINGBattery acid is highly corrosive - it can cause injury, chemical burns or poi-
soning! Corrosive vapours in the air irritate and damage the respiratory
tract and the eyes. The following guidelines must be observed.■
Always wear protective gloves, eye and skin protection when handling
the vehicle battery.
■
If your eyes or skin come into contact with the electrolytic fluid, immedi-
ately wash the affected area for a few minutes long with a lot of water. Get
medical assistance without delay.
■
Keep the vehicle battery away from people who are not completely inde-
pendent (e.g. children).
■
Do not tilt the battery otherwise battery electrolyte may flow out of the
battery vent openings.
WARNINGWorking on the car battery may cause explosion, fire, injury or chemical
burn! The following guidelines must be observed.■
Do not smoke, use open flames or light or transmitting devices.
■
A discharged vehicle battery may freeze slightly. Never charge up a fro-
zen or thawed vehicle battery. Replace a frozen vehicle battery.
■
Never use a damaged vehicle battery.
■
Do not connect the battery terminals, bridging the two poles will cause a
short circuit.
131Inspecting and replenishing
Page 141 of 184
WARNINGAlways properly secure the fire extinguisher - there is a risk of injury in the
event of sudden braking or a vehicle collision.
Vehicle tool kit
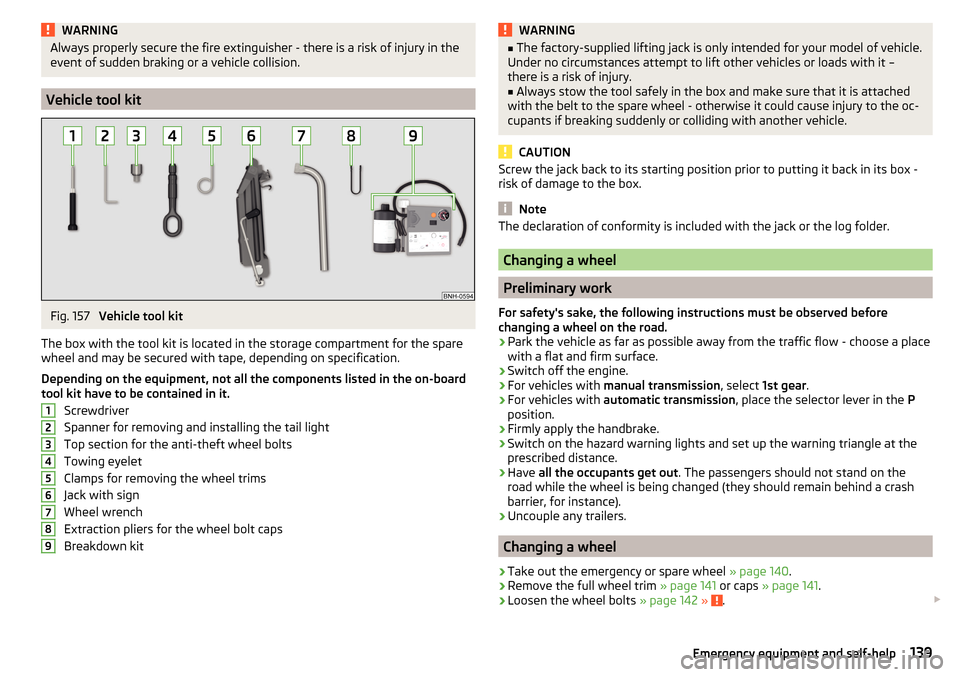
Fig. 157
Vehicle tool kit
The box with the tool kit is located in the storage compartment for the spare
wheel and may be secured with tape, depending on specification.
Depending on the equipment, not all the components listed in the on-board
tool kit have to be contained in it.
Screwdriver
Spanner for removing and installing the tail light
Top section for the anti-theft wheel bolts
Towing eyelet
Clamps for removing the wheel trims
Jack with sign
Wheel wrench
Extraction pliers for the wheel bolt caps
Breakdown kit
123456789WARNING■ The factory-supplied lifting jack is only intended for your model of vehicle.
Under no circumstances attempt to lift other vehicles or loads with it –
there is a risk of injury.■
Always stow the tool safely in the box and make sure that it is attached
with the belt to the spare wheel - otherwise it could cause injury to the oc-
cupants if breaking suddenly or colliding with another vehicle.
CAUTION
Screw the jack back to its starting position prior to putting it back in its box -
risk of damage to the box.
Note
The declaration of conformity is included with the jack or the log folder.
Changing a wheel
Preliminary work
For safety's sake, the following instructions must be observed before
changing a wheel on the road.
›
Park the vehicle as far as possible away from the traffic flow - choose a place
with a flat and firm surface.
›
Switch off the engine.
›
For vehicles with manual transmission , select 1st gear .
›
For vehicles with automatic transmission , place the selector lever in the P
position.
›
Firmly apply the handbrake.
›
Switch on the hazard warning lights and set up the warning triangle at the
prescribed distance.
›
Have all the occupants get out . The passengers should not stand on the
road while the wheel is being changed (they should remain behind a crash
barrier, for instance).
›
Uncouple any trailers.
Changing a wheel
›
Take out the emergency or spare wheel » page 140.
›
Remove the full wheel trim » page 141 or caps » page 141 .
›
Loosen the wheel bolts » page 142 » .
139Emergency equipment and self-help
Page 143 of 184
Full wheel trim
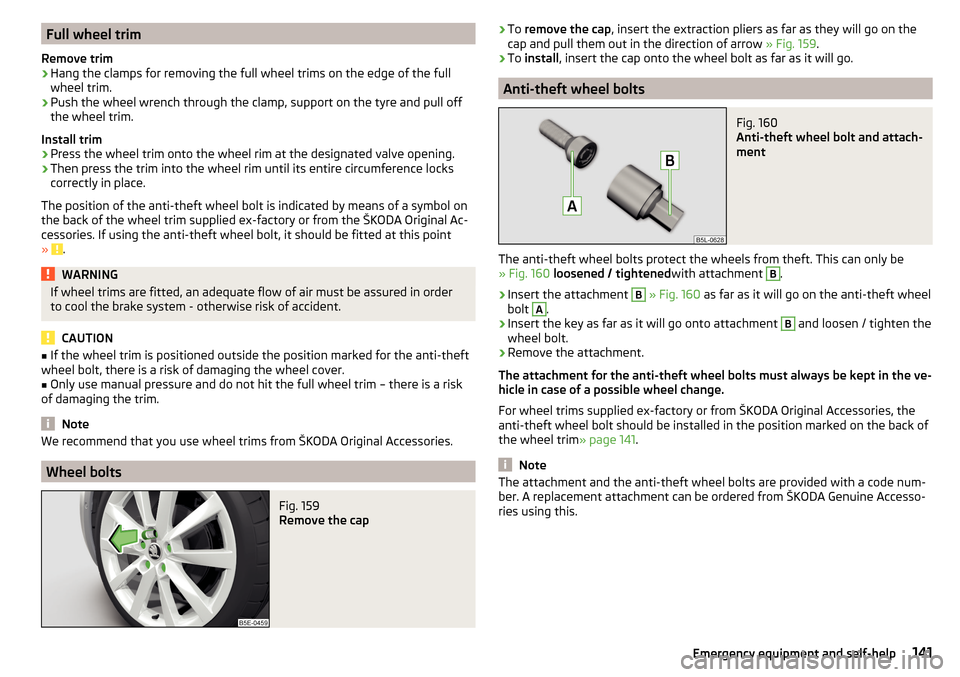
Remove trim›
Hang the clamps for removing the full wheel trims on the edge of the full
wheel trim.
›
Push the wheel wrench through the clamp, support on the tyre and pull off
the wheel trim.
Install trim
›
Press the wheel trim onto the wheel rim at the designated valve opening.
›
Then press the trim into the wheel rim until its entire circumference locks
correctly in place.
The position of the anti-theft wheel bolt is indicated by means of a symbol on
the back of the wheel trim supplied ex-factory or from the ŠKODA Original Ac-
cessories. If using the anti-theft wheel bolt, it should be fitted at this point
»
.
WARNINGIf wheel trims are fitted, an adequate flow of air must be assured in order
to cool the brake system - otherwise risk of accident.
CAUTION
■ If the wheel trim is positioned outside the position marked for the anti-theft
wheel bolt, there is a risk of damaging the wheel cover.■
Only use manual pressure and do not hit the full wheel trim – there is a risk
of damaging the trim.
Note
We recommend that you use wheel trims from ŠKODA Original Accessories.
Wheel bolts
Fig. 159
Remove the cap
› To
remove the cap , insert the extraction pliers as far as they will go on the
cap and pull them out in the direction of arrow » Fig. 159.›
To install , insert the cap onto the wheel bolt as far as it will go.
Anti-theft wheel bolts
Fig. 160
Anti-theft wheel bolt and attach-
ment
The anti-theft wheel bolts protect the wheels from theft. This can only be » Fig. 160 loosened / tightened with attachment
B
.
›
Insert the attachment
B
» Fig. 160 as far as it will go on the anti-theft wheel
bolt
A
.
›
Insert the key as far as it will go onto attachment
B
and loosen / tighten the
wheel bolt.
›
Remove the attachment.
The attachment for the anti-theft wheel bolts must always be kept in the ve-
hicle in case of a possible wheel change.
For wheel trims supplied ex-factory or from ŠKODA Original Accessories, the
anti-theft wheel bolt should be installed in the position marked on the back of
the wheel trim » page 141.
Note
The attachment and the anti-theft wheel bolts are provided with a code num-
ber. A replacement attachment can be ordered from ŠKODA Genuine Accesso-
ries using this.141Emergency equipment and self-help
Page 146 of 184
Preparing to use the breakdown kitRead and observe
on page 143 first.
For safety's sake, the following instructions must be observed before
undertaking a wheel repair on a road.
›
Park the vehicle as far as possible away from the traffic flow - choose a place
with a flat and firm surface.
›
Switch off the engine.
›
For vehicles with manual transmission , select 1st gear .
›
For vehicles with automatic transmission , place the selector lever in the P
position.
›
Firmly apply the handbrake.
›
Switch on the hazard warning lights and set up the warning triangle at the
prescribed distance.
›
Have all the occupants get out . While the repair is being carried out, the pas-
sengers should not stand on the road (instead they should remain behind a
crash barrier, for instance).
›
Uncouple any trailers.
Sealing and inflating tyres
Read and observe
on page 143 first.
Sealing
›
Unscrew the valve cap from the damaged tyre.
›
Insert the valve remover
2
» Fig. 164 on page 143 on the valve insert, so that
the valve insert fits into the slot of the valve remover.
›
Unscrew the valve insert and place it on a clean base (rag, paper etc.).
›
Forcefully shake bottle
10
» Fig. 164 on page 143 several times.
›
Firmly screw the inflation hose
3
onto the tyre inflater bottle
10
. The film on
the bottle cap is pierced.
›
Remove the plug from the inflation hose
3
and insert the bottle onto the
tyre valve.
›
Hold the bottle
10
with the bottom facing upwards and fill all of the sealing
agent from the tyre inflator bottle into the tyre.
›
Remove the filler plug from the tyre valve.
›
Screw in the valve insert with the valve remover
2
.
Inflating
›
Screw the tyre inflation hose
7
» Fig. 164 on page 143 firmly onto the tyre
valve.
› For vehicles with
manual transmission , set the lever in the neutral position.›On vehicles with automatic transmission , place the selector lever in the P
position.›
Start the engine.
›
Plug the connector
6
into the 12-volt socket » page 70.
›
Switch on the air compressor with the ON and OFF switch
9
.
›
Once tyre inflation pressure of 2.0-2.5 bar has been reached, turn off the air
compressor. Maximum run time of 6 minutes » .
›
If you cannot reach an air pressure of 2.0 - 2.5 bar, unscrew the tyre inflation
hose
7
from the tyre valve.
›
Drive the vehicle 10 metres forwards or backwards to allow the sealing agent
to “distribute” in the tyre.
›
Firmly screw the tyre inflation hose
7
back onto the tyre valve and repeat
the inflation process.
›
Stick the sticker
1
» Fig. 164 on page 143 on the dashboard in the driver's
field of view.
At a tyre inflation pressure of 2.0 – 2.5 bar, the journey can be continued at a maximum speed of 80 km/h or 50 mph.
WARNING■ If the tire does not inflate at least. 2.0 bar, the damage is too great. The
sealing agent cannot be used to seal the tyre. Do not drive the vehicle.
Seek help from a specialist garage.■
The tyre inflation hose and air compressor may get hot as the tyre is be-
ing inflated – there is a risk of burning.
CAUTION
Switch off the air compressor if it has been running for as long as 6 minutes –
risk of damage to the compressor! Allow the air compressor to cool a few mi-
nutes before switching it on again.
Information on driving with repaired tyres
Read and observe
on page 143 first.
The inflation pressure of the repaired tyre must be checked after driving for 10minutes.
If the tyre pressure is 1.3 bar or less
›
The tyre cannot be properly sealed with the breakdown kit.
Do not contin-
ue to drive! Seek help from a specialist garage.
144Do-it-yourself
Page 148 of 184
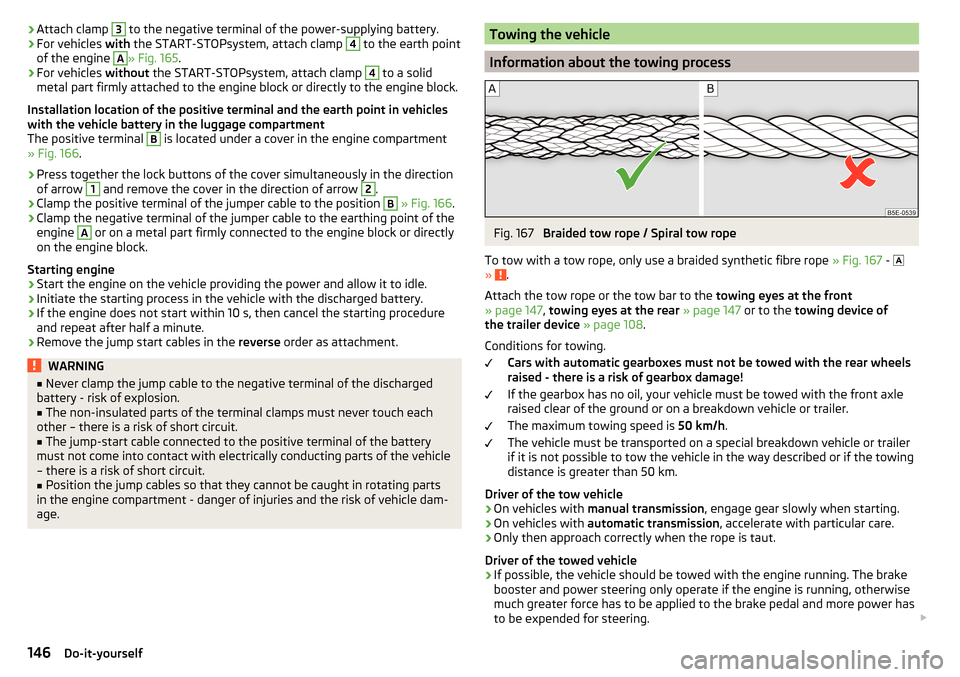
›Attach clamp 3 to the negative terminal of the power-supplying battery.›For vehicles
with the START-STOPsystem, attach clamp 4 to the earth point
of the engine A
» Fig. 165 .
›
For vehicles without the START-STOPsystem, attach clamp
4
to a solid
metal part firmly attached to the engine block or directly to the engine block.
Installation location of the positive terminal and the earth point in vehicles
with the vehicle battery in the luggage compartment
The positive terminal
B
is located under a cover in the engine compartment
» Fig. 166 .
›
Press together the lock buttons of the cover simultaneously in the direction
of arrow
1
and remove the cover in the direction of arrow
2
.
›
Clamp the positive terminal of the jumper cable to the position
B
» Fig. 166 .
›
Clamp the negative terminal of the jumper cable to the earthing point of the
engine
A
or on a metal part firmly connected to the engine block or directly
on the engine block.
Starting engine
›
Start the engine on the vehicle providing the power and allow it to idle.
›
Initiate the starting process in the vehicle with the discharged battery.
›
If the engine does not start within 10 s, then cancel the starting procedure
and repeat after half a minute.
›
Remove the jump start cables in the reverse order as attachment.
WARNING■
Never clamp the jump cable to the negative terminal of the discharged
battery - risk of explosion.■
The non-insulated parts of the terminal clamps must never touch each
other – there is a risk of short circuit.
■
The jump-start cable connected to the positive terminal of the battery
must not come into contact with electrically conducting parts of the vehicle
– there is a risk of short circuit.
■
Position the jump cables so that they cannot be caught in rotating parts
in the engine compartment - danger of injuries and the risk of vehicle dam-
age.
Towing the vehicle
Information about the towing process
Fig. 167
Braided tow rope / Spiral tow rope
To tow with a tow rope, only use a braided synthetic fibre rope » Fig. 167 -
»
.
Attach the tow rope or the tow bar to the towing eyes at the front
» page 147 , towing eyes at the rear » page 147 or to the towing device of
the trailer device » page 108 .
Conditions for towing. Cars with automatic gearboxes must not be towed with the rear wheels
raised - there is a risk of gearbox damage!
If the gearbox has no oil, your vehicle must be towed with the front axle
raised clear of the ground or on a breakdown vehicle or trailer.
The maximum towing speed is 50 km/h.
The vehicle must be transported on a special breakdown vehicle or trailer
if it is not possible to tow the vehicle in the way described or if the towing
distance is greater than 50 km.
Driver of the tow vehicle
›
On vehicles with manual transmission , engage gear slowly when starting.
›
On vehicles with automatic transmission , accelerate with particular care.
›
Only then approach correctly when the rope is taut.
Driver of the towed vehicle
›
If possible, the vehicle should be towed with the engine running. The brake
booster and power steering only operate if the engine is running, otherwise
much greater force has to be applied to the brake pedal and more power has
to be expended for steering.
146Do-it-yourself
Page 151 of 184
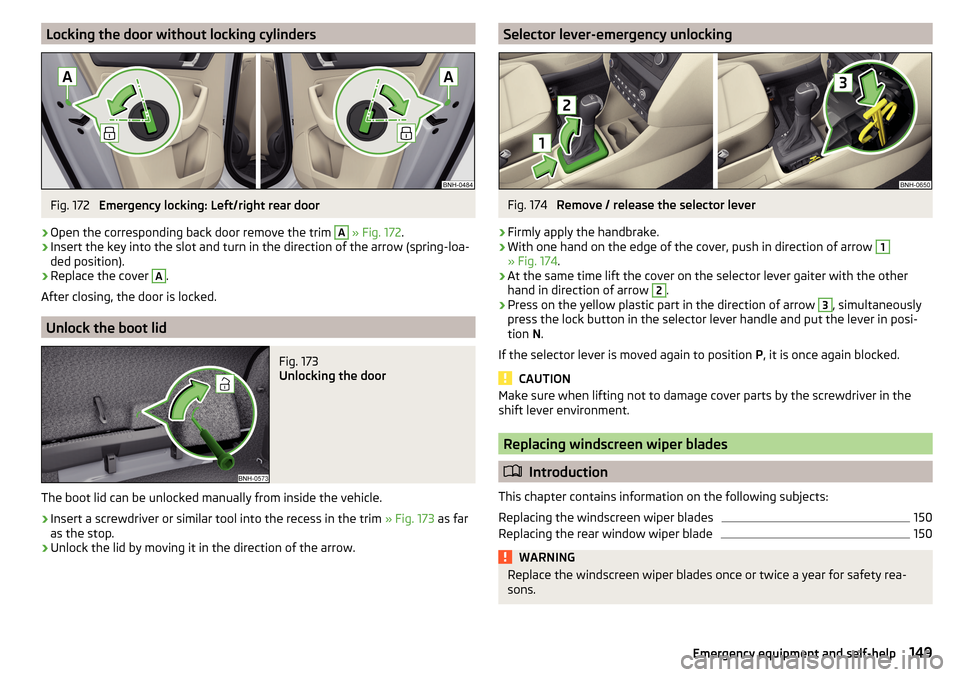
Locking the door without locking cylindersFig. 172
Emergency locking: Left/right rear door
›
Open the corresponding back door remove the trim
A
» Fig. 172 .
›
Insert the key into the slot and turn in the direction of the arrow (spring-loa-
ded position).
›
Replace the cover
A
.
After closing, the door is locked.
Unlock the boot lid
Fig. 173
Unlocking the door
The boot lid can be unlocked manually from inside the vehicle.
›
Insert a screwdriver or similar tool into the recess in the trim » Fig. 173 as far
as the stop.
›
Unlock the lid by moving it in the direction of the arrow.
Selector lever-emergency unlockingFig. 174
Remove / release the selector lever
›
Firmly apply the handbrake.
›
With one hand on the edge of the cover, push in direction of arrow
1
» Fig. 174 .
›
At the same time lift the cover on the selector lever gaiter with the other
hand in direction of arrow
2
.
›
Press on the yellow plastic part in the direction of arrow
3
, simultaneously
press the lock button in the selector lever handle and put the lever in posi-
tion N.
If the selector lever is moved again to position P, it is once again blocked.
CAUTION
Make sure when lifting not to damage cover parts by the screwdriver in the
shift lever environment.
Replacing windscreen wiper blades
Introduction
This chapter contains information on the following subjects:
Replacing the windscreen wiper blades
150
Replacing the rear window wiper blade
150WARNINGReplace the windscreen wiper blades once or twice a year for safety rea-
sons.149Emergency equipment and self-help
Page 156 of 184
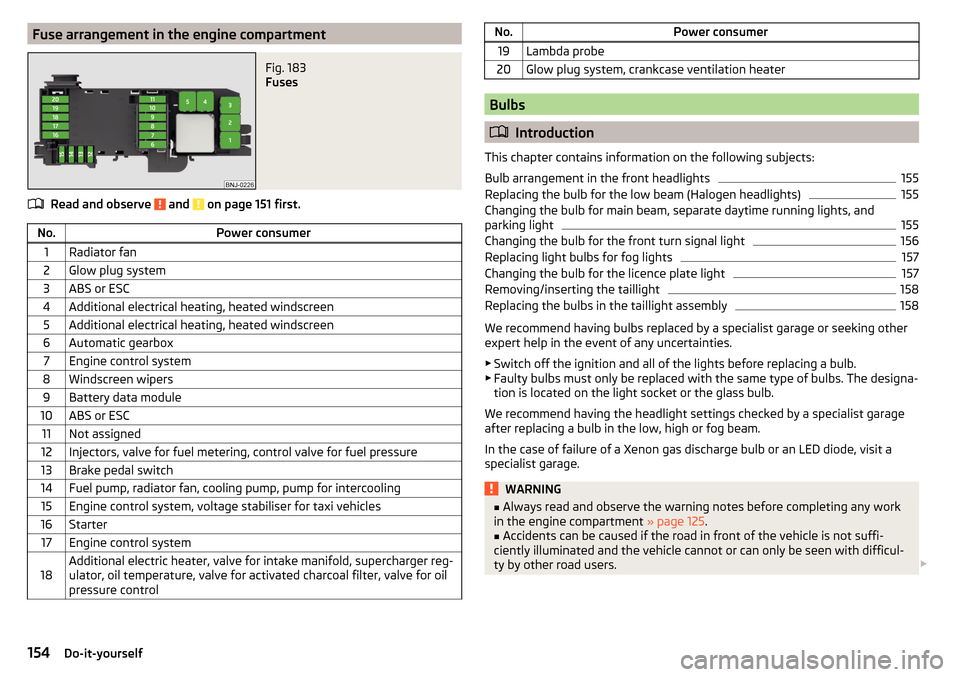
Fuse arrangement in the engine compartmentFig. 183
Fuses
Read and observe and on page 151 first.
No.Power consumer1Radiator fan2Glow plug system3ABS or ESC4Additional electrical heating, heated windscreen5Additional electrical heating, heated windscreen6Automatic gearbox7Engine control system8Windscreen wipers9Battery data module10ABS or ESC11Not assigned12Injectors, valve for fuel metering, control valve for fuel pressure13Brake pedal switch14Fuel pump, radiator fan, cooling pump, pump for intercooling15Engine control system, voltage stabiliser for taxi vehicles16Starter17Engine control system18Additional electric heater, valve for intake manifold, supercharger reg-
ulator, oil temperature, valve for activated charcoal filter, valve for oil
pressure controlNo.Power consumer19Lambda probe20Glow plug system, crankcase ventilation heater
Bulbs
Introduction
This chapter contains information on the following subjects:
Bulb arrangement in the front headlights
155
Replacing the bulb for the low beam (Halogen headlights)
155
Changing the bulb for main beam, separate daytime running lights, and
parking light
155
Changing the bulb for the front turn signal light
156
Replacing light bulbs for fog lights
157
Changing the bulb for the licence plate light
157
Removing/inserting the taillight
158
Replacing the bulbs in the taillight assembly
158
We recommend having bulbs replaced by a specialist garage or seeking other
expert help in the event of any uncertainties.
▶ Switch off the ignition and all of the lights before replacing a bulb.
▶ Faulty bulbs must only be replaced with the same type of bulbs. The designa-
tion is located on the light socket or the glass bulb.
We recommend having the headlight settings checked by a specialist garage after replacing a bulb in the low, high or fog beam.
In the case of failure of a Xenon gas discharge bulb or an LED diode, visit a
specialist garage.
WARNING■ Always read and observe the warning notes before completing any work
in the engine compartment » page 125.■
Accidents can be caused if the road in front of the vehicle is not suffi-
ciently illuminated and the vehicle cannot or can only be seen with difficul-
ty by other road users.
154Do-it-yourself
Page 170 of 184
Index
A
ABS Operation
94
Warning light32
Acceptance and recycling of used vehicles
117
Accessories115
Adjusting Steering wheel
11
Adjusting the seats10
Adjustment Beam range
54
Advance warning / emergency braking37
Advice on tyre/wheel usage133
Air-conditioning system Air outlet vents
82
Airbag15
Adjustments and impairments to the airbag system
116
Deactivating18
deactivation18
Deployment16
Warning light32
Airbag system15
Air conditioning79
Air distribution control81
Climatronic80
Manual air conditioning80
Air distribution control81
Air outlet vents82
Alarm49
Trailer114
All-year tyres136
Anti-lock braking system (ABS)94
Anti-theft alarm system49
Trailer114
Anti-theft wheel bolts141
Armrest Front63
Rear64
Ashtray69
Assembling the bar ball, Step 1
110
bar ball, Step 2110
Assist systems93
Auto Check Control38
Automatic drive Selector lever
89
Automatic driving light control55
Automatic gearbox89
Kickdown91
Malfunction34
Selector lever emergency unlocking149
Selector lever lock90
Starting-off and driving91
Warning light34
Automatic shutdown of consumers131
Automatic transmission Selector lever lock
90
Tiptronic90
AUX67
Avoiding damage to your vehicle92
B
Ball bar Standy position
109
Ball head Check fitting
111
Ready position109
Battery Change in key
148
Belts12
Belt tensioners14
Bluetooth See Owner´s Manual -Infotainment
6
Bonnet Closing126
Opening126
Boot Cargo element
78
Class N1 vehicles78
Hooks76
Storage compartments77
Boot cover Parking position
77
Boot lid Automatic locking
51
Open/Close51
Brake Assist (HBA)95
Brake booster86
Brake fluid130
Check130
specification130
Brake pads new
86
Brake pedal (automatic transmission) Warning light
34
Brakes Brake booster
86
Brake fluid130
Braking and stabilisation systems93
Handbrake87
Information on braking86
Warning lights30
Brake system93
Braking Running in
91
Breakdown kit143
Breakdown service See Help in an emergency
8
Buttons in the door Electric windows
52
168Index