tow SKODA RAPID SPACEBACK 2013 1.G User Guide
[x] Cancel search | Manufacturer: SKODA, Model Year: 2013, Model line: RAPID SPACEBACK, Model: SKODA RAPID SPACEBACK 2013 1.GPages: 193, PDF Size: 14.8 MB
Page 70 of 193
Folding forward
Before folding the seat backrests forwards, adapt the position of the front
seats in such a way that they are not damaged by the folded seat backrests 1)
.›
Put the belt tongue into the opening
A
» Fig. 57 into the side cladding -
safety position.
›
Press the release lever
B
and fold the back seat rest forward in the direc-
tion of the arrow.
Folding backwards
›
If you removed the head restraint, you need to reinsert it with the backrest
tilted slightly forwards.
›
Then push the seat backrest back into the upright position until the locking
button
B
clicks into place – check by pulling on the seat backrest » .
›
Make sure that the red pin
C
is hidden.
WARNING■
The seat belts and the belt locks must be in their original position after
folding back the seat backrests – they must be ready to use.■
The seat backrests must be securely locked in position so that no objects
in the luggage compartment can slide into the passenger compartment on
sudden braking – risk of injury.
■
Ensure that the rear seat backrests are properly engaged. Only then can
the seat belt for the middle seat reliably fulfil its function.
CAUTION
Ensure that the seat belts are not damaged when operating the seat backr-
ests. Under no circumstances must the seat belts be jammed by the folded
back seat backrests.Transporting and practical equipment
Useful equipment
Introduction
This chapter contains information on the following subjects:
Car park ticket holder
69
stowage compartments in the doors
69
Storage compartment in the centre console
69
Cup holders
70
Cigarette lighter
70
Ashtray
71
12-Volt power outlet
71
Waste container
72
Multimedia holder
72
Storage compartment in the front arm rest
73
Glasses compartment
73
Storage compartment on the front passenger side
73
Clothes hook
74
Storage pockets on the front seats
74
Net pockets on the front seat rest
74WARNING■ Do not place anything on the dash panel. These objects might slide or fall
down when driving (when accelerating or cornering) and may distract you
from concentrating on the traffic – there is the risk of an accident!■
When driving, ensure that no objects from the centre console or from oth-
er storage compartments can get into the driver's footwell. You would not
be able to brake, operate the clutch pedal or accelerate - danger of causing
an accident!
■
No objects should be placed in the storage compartments nor in the
drinks holders; the vehicle occupants could be endangered if there is sud-
den braking or the vehicle collides with something.
■
Ash, cigarettes, cigars and the like. may only be placed in the ashtray!
1)
If the front seats are too far back, we recommend that you have the rear head restraints removed before
the seat backrests are folded forward. Store the removed head restraints in such a way that they are not
be damaged or soiled.
68Using the system
Page 71 of 193
Car park ticket holderFig. 58
Parking ticket holder
Read and observe on page 68 first.
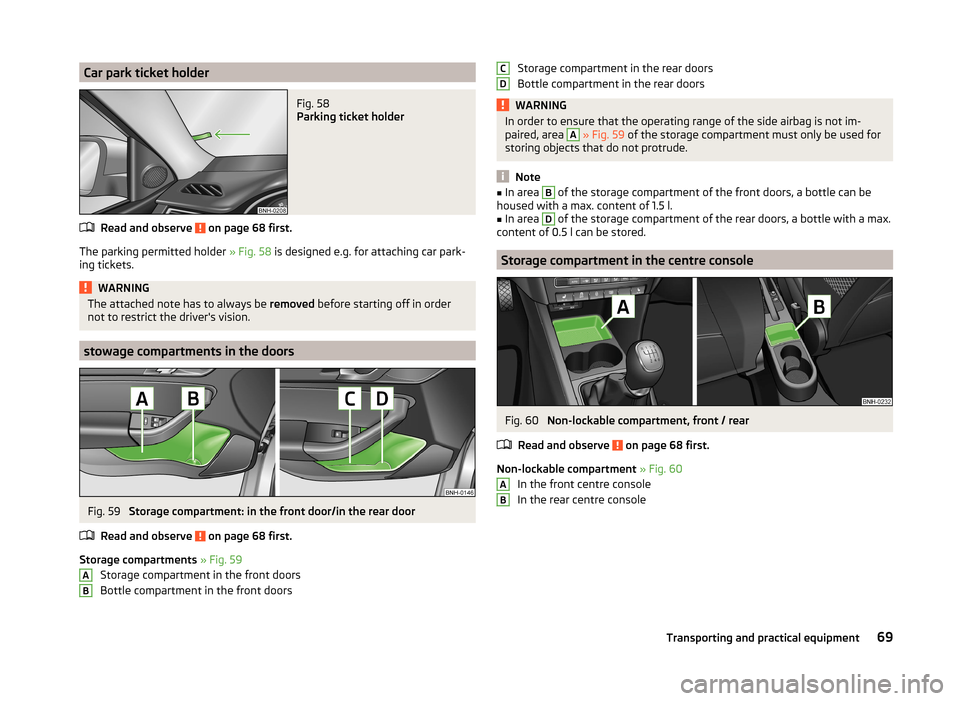
The parking permitted holder » Fig. 58 is designed e.g. for attaching car park-
ing tickets.
WARNINGThe attached note has to always be removed before starting off in order
not to restrict the driver's vision.
stowage compartments in the doors
Fig. 59
Storage compartment: in the front door/in the rear door
Read and observe
on page 68 first.
Storage compartments » Fig. 59
Storage compartment in the front doors
Bottle compartment in the front doors
ABStorage compartment in the rear doors
Bottle compartment in the rear doorsWARNINGIn order to ensure that the operating range of the side airbag is not im-
paired, area A » Fig. 59 of the storage compartment must only be used for
storing objects that do not protrude.
Note
■ In area B of the storage compartment of the front doors, a bottle can be
housed with a max. content of 1.5 l.■
In area
D
of the storage compartment of the rear doors, a bottle with a max.
content of 0.5 l can be stored.
Storage compartment in the centre console
Fig. 60
Non-lockable compartment, front / rear
Read and observe
on page 68 first.
Non-lockable compartment » Fig. 60
In the front centre console
In the rear centre console
CDAB69Transporting and practical equipment
Page 77 of 193

The net pockets are located on the inner sides of the front seat backr-
ests » Fig. 72 .WARNINGDo not exceed the maximum permissible load of the meshed pockets.
Heavy objects are not secured sufficiently – risk of injury!
CAUTION
■ The maximum permissible load of the meshed pockets is 150 g.■Never put large objects into the meshed pockets, e.g. bottles or objects with
sharp edges – risk of damaging the meshed pockets.
Luggage compartment
Introduction
This chapter contains information on the following subjects:
Fastening elements
76
Fixing nets
76
Hooks
77
Luggage compartment cover
77
“Parking position” of the boot cover
78
Storage compartments in the boot
78
Flexible storage compartment
79
Storage net bag
79
Double-sided floor covering
79
Class N1 vehicles
79
Please observe the following for the purpose of maintaining good handling
characteristics of your vehicle:
›
Distribute loads as evenly as possible.
›
Place heavy objects as far forward as possible.
›
Attach the items of luggage to the lashing eyes or by using the fixing
nets » page 76 .
In the event of an accident, even small and light objects gain so much kinetic
energy that they can cause severe injuries.
The magnitude of the kinetic energy is dependent on the speed at which the
vehicle is travelling and the weight of the object.
Example: In the event of a frontal collision at a speed of 50 km/h, an object
with a weight of 4.5 kg produces an energy, which corresponds to 20 times its
own weight. This means that it results in a weight of approx. 90 kg “ ”.
Luggage compartment light
The warning light turns on when tailgate is opened.
The warning light turns off when the tailgate is closed.
If the boot lid is open and the ignition switched off, the light will extinguish
automatically after around 10 minutes.WARNING■ Store the objects in the boot and attach them to the lashing eyes.■Loose objects can be thrown forward during a sudden manoeuvre or in
case of an accident and can injure the occupants or other road users.■
Loose objects could hit a deployed airbag and injure occupants – danger
of death!
■
Please note that transporting heavy objects alters the handling proper-
ties of the vehicle due to the displacement of the centre of gravity – risk of
accident! The speed and style of driving must be adjusted accordingly.
■
If the items of luggage or objects are attached to the lashing eyes with
unsuitable or damaged lashing straps, injuries can occur in the event of
braking manoeuvres or accidents. To prevent items of luggage from moving
around, always use suitable lashing straps that are firmly attached to the
lashing eyes.
■
The transported items must be stowed in such a way that no objects are
able to slip forward on sudden driving or braking manoeuvres – risk of in-
jury!
■
When transporting objects in the luggage compartment that has been en-
larged by folding the rear seats forward, ensure the safety of the passen-
gers transported on the other rear seats » page 9, Correct seated position
for the passengers in the rear seats .
■
If the rear seat next to the folded forward seat is occupied, ensure maxi-
mum safety, e.g. by placing the goods to be transported in such a way that
the seat is prevented from folding back in case of a rear collision.
■
Do not drive with the luggage compartment lid open or unlatched, other-
wise exhaust gases may get into the interior of the vehicle – risk of poison-
ing!
■
Do not exceed the permissible axle loads and permissible gross weight of
the vehicle – risk of accident!
■
Do not transport people in the boot!
75Transporting and practical equipment
Page 79 of 193
HooksFig. 76
Hooks
Read and observe and on page 75 first.
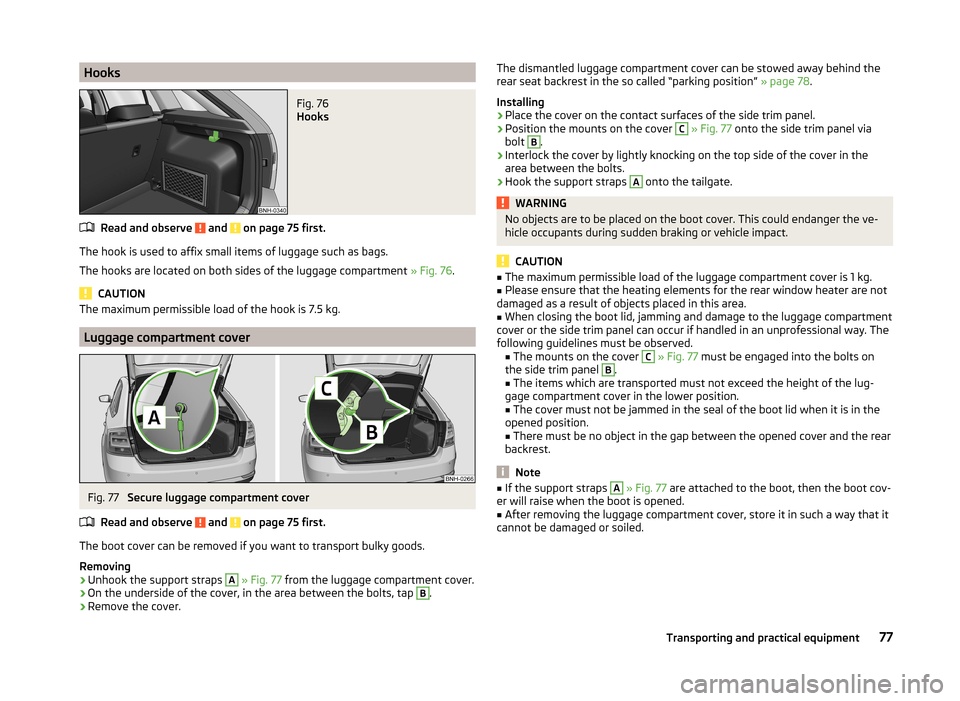
The hook is used to affix small items of luggage such as bags.
The hooks are located on both sides of the luggage compartment » Fig. 76.
CAUTION
The maximum permissible load of the hook is 7.5 kg.
Luggage compartment cover
Fig. 77
Secure luggage compartment cover
Read and observe
and on page 75 first.
The boot cover can be removed if you want to transport bulky goods.
Removing
›
Unhook the support straps
A
» Fig. 77 from the luggage compartment cover.
›
On the underside of the cover, in the area between the bolts, tap
B
.
›
Remove the cover.
The dismantled luggage compartment cover can be stowed away behind the
rear seat backrest in the so called “parking position” » page 78.
Installing›
Place the cover on the contact surfaces of the side trim panel.
›
Position the mounts on the cover
C
» Fig. 77 onto the side trim panel via
bolt
B
.
›
Interlock the cover by lightly knocking on the top side of the cover in the
area between the bolts.
›
Hook the support straps
A
onto the tailgate.
WARNINGNo objects are to be placed on the boot cover. This could endanger the ve-
hicle occupants during sudden braking or vehicle impact.
CAUTION
■ The maximum permissible load of the luggage compartment cover is 1 kg.■Please ensure that the heating elements for the rear window heater are not
damaged as a result of objects placed in this area.■
When closing the boot lid, jamming and damage to the luggage compartment
cover or the side trim panel can occur if handled in an unprofessional way. The
following guidelines must be observed. ■ The mounts on the cover
C
» Fig. 77 must be engaged into the bolts on
the side trim panel
B
.
■ The items which are transported must not exceed the height of the lug-
gage compartment cover in the lower position.
■ The cover must not be jammed in the seal of the boot lid when it is in the
opened position.
■ There must be no object in the gap between the opened cover and the rear
backrest.
Note
■ If the support straps A » Fig. 77 are attached to the boot, then the boot cov-
er will raise when the boot is opened.■
After removing the luggage compartment cover, store it in such a way that it
cannot be damaged or soiled.
77Transporting and practical equipment
Page 80 of 193

“Parking position” of the boot coverFig. 78
Parking position of the luggage
compartment cover
Read and observe and on page 75 first.
The boot cover can be stowed behind the seat backrest.
Adjusting
›
Slide the dismantled cover between bolt
A
and contact surface
B
of the
side panel » Fig. 78.
WARNINGWhen adjusting the “parking position”, the boot cover must be between
the bolt A and the rear seat backrest - risk of damaging the rear seat
backrest and the boot cover.
CAUTION
■ Before setting the “parking position” of the luggage compartment cover, the
variable loading floor must be put in the desired position » page 80.■
If the luggage compartment cover is in the “parking position”, the “parking
position” of the variable loading floor cannot be set » page 82.
Storage compartments in the bootFig. 79
Remove the tray cover on the left / right
Read and observe
and on page 75 first.
The side compartment covers can be removed to increase the size of the lug- gage compartment.
Removing/Inserting
›
Grasp the top part of the cover and remove it in the direction of the ar-
row » Fig. 79 .
Insertion takes place in reverse order.
CAUTION
■ The storage compartments are designed for storing small objects of up to
1.5 kg. in weight in total.■
When using the storage compartment, take care not to damage the storage
compartment or the luggage compartment lining.
78Using the system
Page 81 of 193

Flexible storage compartmentFig. 80
Flexible storage compartment
Read and observe and on page 75 first.
The flexible storage compartment can be installed on the right-hand side ofthe boot » Fig. 80.
Installing
›
Place both ends of the storage compartment into the openings on the right
side panel of the luggage compartment.
›
Push the storage compartment down to lock it.
Removing
›
Grasp the storage compartment on the two upper corners.
›
Remove the storage compartment by pulling upwards and then towards you.
CAUTION
The storage compartment is designed for storing small objects with a maxi-
mum total weight of 8 kg.
Note
The flexible storage compartment cannot be installed on vehicles with the var-
iable loading floor » page 80.Storage net bagFig. 81
Meshed pocket for storage
Read and observe and on page 75 first.
The meshed pocket for storage is located on the right-hand side of the
boot » Fig. 81 .
CAUTION
The meshed pocket for storage is designed for storing small objects of up to
1.5 kg. in weight in total.
Double-sided floor covering
Read and observe
and on page 75 first.
You can fit a double-sided floor covering in the luggage compartment.
One side of the double-sided floor covering is made of fabric, the other side is
washable (easy to maintain).
The washable side is used to transport wet or dirty items.
Note
For easier turning of the covering, use the loop attached.
Class N1 vehicles
Read and observe
and on page 75 first.
In class N1 vehicles that are not fitted with a protective grille, a lashing set that
complies with the EN 12195 standard (1 - 4) must be used for fastening the
load.
79Transporting and practical equipment
Page 96 of 193
The microphone for voice control is housed in the moulded headliner and di-
rected towards the driver and front passenger. Therefore, the driver and the
front passenger can operate the equipment.
Entering a phone number
The telephone number can be entered as a continuous sequence of numbers
spoken one after the other (the whole number at once) or in the form of digit
blocks (separated by short pauses). After each string of digits (separated by a
brief pause in speaking), all of the digits detected up to now are repeated by
the system.
The digits 0-9 and symbols
+, , # are permitted. The system does not recog-
nize any combination of connected numbers, e.g. "twenty-three".
Switching on voice control
Briefly press button 1
» Fig. 95 on the multifunction steering wheel.
Switching off voice control
If the system is currently playing a message, the message that is currently be-
ing played must be terminated by briefly pressing button
1
» Fig. 95 on the
multifunction steering wheel.
If the system is expecting a voice command, you can end the dialogue yourself:
› with the
CANCEL voice command;
› by briefly pressing the button
1
» Fig. 95 on the multifunction steering
wheel.
Note
■ The dialogue is immediately terminated in the event of an incoming call.■The voice control is only possible in vehicles fitted with a multifunction
steering wheel with telephone control.
Voice commands
Basic voice commands
Voice commandActionHELPAfter this command the system repeats all possible
commands.CALL XYZThis command calls up the contact from the phone
book.PHONE BOOKAfter this command, for example, the phone book
can be repeated back to you, a voice entry for the
contact can be updated or deleted, etc.Voice commandActionCALL HISTORYLists of dialled numbers, missed calls, etc.DIAL NUMBERAfter this command, a telephone number can be
entered to establish a connection with the reques-
ted party.REDIALAfter this command the system calls the last dial-
led number.MUSIC a)Play music from the mobile phone or another
paired device.FURTHER OPTIONSAfter this command the system offers additional
context-dependent commands.SETTINGSSelection for setting Bluetooth ®
, dialogue etc.CANCELThe dialogue is ended.a)
On vehicles fitted with the Amundsen+ navigation system, this function can be accessed via the naviga-
tion system menu; refer to the » operating instructions for the Amundsen+ navigation system .
If a voice command is not detected, the system answers with “ Sorry?” and a
new entry can be completed. After the 2nd unsuccessful attempt, the system
repeats the help. After the 3rd unsuccessful attempt, the answer “ Cancelled”
is given and the dialogue is ended.
Store voice recording of a contact
If automatic name recognition does not work reliably for some contacts, you
can choose to save your own voice tag for the contact in the Phone book -
Voice tag - Record menu item.
Your own voice entry can also be saved using the voice control in the menu
FURTHER OPTIONS .
Multimedia
Introduction
This chapter contains information on the following subjects:
Music playback via Bluetooth ®
95
Operating the radio and navigation system on the multifunction steering
wheel
95
AUX and MDI inputs
9694Using the system
Page 99 of 193
Driving
Starting-off and Driving
Starting and turning off the engine
Introduction
This chapter contains information on the following subjects:
Electronic immobilizer
97
Lock/unlock steering lock
97
Switch on the ignition and start the engine
98
Switching off the engine
98
With the key in the ignition, the ignition can be switched on and off and the
engine can be started / stopped.
WARNING■ While driving with the engine stopped, the ignition must always be
switched on » page 98, Switch on the ignition and start the engine .
■ With the ignition off, the steering may lock » page 97 - danger of an
accident!■
Do not withdraw the ignition key from the ignition lock until the vehicle
has come to a stop » page 100, Parking . Otherwise, the steering could be
blocked – risk of accident!
■
Never leave the key in the vehicle when you exit the vehicle. Unauthor-
ized persons, such as children, for example, could lock the car, turn on the
ignition or start the engine - there is a danger of injury and accidents!
■
Never leave the vehicle unattended with the engine running - there is
risk of accident, damage or theft!
■
Never switch off the engine before the vehicle is stationary – risk of acci-
dent!
WARNING■ Never (e.g. in garages) run the engine in a closed place - there is the dan-
ger of poisoning and death!■
Do not leave any items (e.g. cloths or tools) in the engine compartment.
This presents a fire hazard and the risk of engine damage.
■
Never cover the engine with additional insulation material (e.g. with a
cover) – risk of fire!
CAUTION■ Only start the engine when the engine and the vehicle are stationary - there
is a danger of starter and engine damage!■
Do not tow start the engine – there is a risk of damaging the engine and the
catalytic converter! The battery from another vehicle can be used as a jump-
start aid » page 157 .
Note
Do not warm up the engine while the vehicle is stationary. If possible, start
your journey as soon as the engine has started. Through this, the engine rea-
ches its operating temperature faster.
Electronic immobilizer
Read and observe
and on page 97 first.
The electronic immobilizer makes a possible attempted theft or unauthorized
use of your vehicle more difficult.
An electronic chip is integrated in the head of the key. The immobiliser is deac-
tivated with the aid of this chip when the key is inserted in the ignition lock.
The electronic immobiliser is automatically activated when the ignition key is
withdrawn from the lock.
The engine will not start if a non-authorized ignition key is used.
The following message is shown in the information cluster display. Immobilizer active.
IMMOBILIZER
Lock/unlock steering lock
Read and observe
and on page 97 first.
The steering lock (steering lock) deters any attempted theft of your vehicle.
Locking
›
Withdraw the ignition key.
›
Turn the steering wheel to the left or right until the steering lock clicks into
place.
Unlocking
›
Insert the key into the ignition lock.
›
Switch on the ignition » page 98.
97Starting-off and Driving
Page 101 of 193

Brakes and parking
Introduction
This chapter contains information on the following subjects:
Information on braking
99
Handbrake
100
Parking
100WARNING■ Greater physical effort is required for braking when the engine is switch-
ed off – risk of accident!■
The clutch pedal must be actuated when braking on a vehicle with man-
ual transmission, when the vehicle is in gear and at low revs. Otherwise,
the functionality of the brake system may be impaired – risk of accident!
■
When leaving the vehicle, never leave persons who might, for example,
release the handbrake or take the vehicle out of gear unattended in the ve-
hicle. The vehicle could then start to move – risk of accident!
■
Observe the recommendations on the new brake pads » page 104, New
brake pads .
CAUTION
Never let the brakes slip with light pressure on the pedal if braking is not nec-
essary. This causes the brakes to overheat and can also result in a longer brak-
ing distance and excessive wear.
Information on braking
Read and observe
and on page 99 first.
Wear-and-tear
The wear of the brake pads is dependent on the operating conditions and driv-
ing style.
The brake pads wear more quickly if a lot of journeys are completed in towns
and over short distances or if a very sporty style of driving is adopted.
Under these severe conditions , the thickness of the brake pads must also be
checked by a specialist garage between service intervals.
Wet roads or road salt
The performance of the brakes can be delayed as the brake discs and brake
pads may be moist or have a coating of ice or layer of salt on them in winter.
The brakes are cleaned and dried by applying the brakes several times »
.
Corrosion
Corrosion on the brake discs and dirt on the bake pads occur if the vehicle has
been parked for a long period and if you do not make much use of the braking
system. The brakes are cleaned and dried by applying the brakes several
times »
.
Long or steep slopes
Before travelling a long distance with a steep gradient, reduce speed and shift
into the next lowest gear. As a result, the braking effect of the engine will be
used, reducing the load on the brakes. Any additional braking should be com-
pleted intermittently, not continuously.
Emergency brake display
If the brakes are applied in full and the control unit for the braking system con-
siders the situation to be dangerous for the following traffic, the brake light
flashes automatically.
After the speed was reduced below around 10 km/h or the vehicle was stop-
ped, the brake light stops flashing and the hazard warning light system
switches on. The hazard warning light system is switched off automatically af- ter accelerating or driving off again.
Faults in the brake surface
If it is found that the braking distance has suddenly become longer and that
the brake pedal can be depressed further, the brake system may be faulty.
Visit a specialist garage immediately and adjust your style of driving appropri-
ately, as you will not know the exact extent of the damage.
Low brake fluid level
An insufficient level of brake fluid may result in problems in the brake system.
The level of the brake fluid is monitored electronically » page 31,
Brake sys-
tem .
Brake booster
The brake booster increases the pressure generated with the brake pedal. The
brake booster only operates when the engine is running.
99Starting-off and Driving
Page 105 of 193
The selector lever is not locked when quickly moving across the position N
(e.g. from R to D). This, for example, helps to rock out a vehicle that is stuck,
e.g. in a bank of snow. The selector lever lock will engage if the lever is in posi-
tion N for more than approx. 2 seconds without the brake pedal being de-
pressed.
Releasing selector lever from mode P or N (selector lever lock)›
Press the brake pedal and the lock button at the same time in the direction
of the arrow » Fig. 102 on page 102 .
Just depress the brake pedal, if you would like to change from the mode N to
D .
Defective selector lever lock
If the selector lever lock is defective or its power supply is interrupted (e.g. dis-
charged vehicle battery, faulty fuse), the selector lever can no longer be moved
out of position P in the normal manner and the vehicle can no longer be driven.
The selector lever must be emergency released » page 162.
Note
If you want to move the selector lever from mode P to mode D or vice versa,
move the selector lever quickly. This prevents modes R or N from being acci-
dentally selected.
Manual shifting of gears (Tiptronic)
Fig. 103
Selector lever
Read and observe and on page 101 first.
Tiptronic mode makes it possible to manually shift gears on the selector lever. This mode can be selected both while stopping and while driving.
The currently selected gear is indicated in the » Fig. 101 on page 102 display.
The gear shift indicator must be observed when changing gear » page 38.
Switching to manual shifting›Push the gear selector from mode D towards the right, or left in a right-hand
drive vehicle.
Shifting up gears›
Push the selector lever
+
» Fig. 103 forwards.
Shifting down gears
›
Push the selector lever
-
» Fig. 103 backwards.
Note
■
It may be beneficial, for example, when travelling downhill, to use manual
shifting of gears. Shifting to a lower gear reduces the load on the brakes and
hence the wear on the brakes » page 99, Information on braking .■
When accelerating, the gearbox automatically shifts up into the higher gear
just before the maximum permissible engine speed is reached.
■
If a lower gear is selected, the gearbox does not shift down until there is no
risk of the engine over-revving.
Starting-off and driving
Read and observe
and on page 101 first.
Starting off
›
Start the engine.
›
Firmly depress and hold the brake pedal.
›
Press the lock button in the direction of the arrow » Fig. 102 on page 102 and
keep pressing.
›
Move the selector lever into the desired position » page 102and then release
the lock button.
›
Release the brake pedal and accelerate.
Stopping (while the car is moving)
›
Depress the brake pedal and bring the vehicle to a stop.
›
Keep holding the brake pedal until driving is resumed.
The selector lever position N does not have to be selected when stopping for a
short time, such as at a cross roads.
Kickdown
The kickdown function allows you to achieve the maximum acceleration of
your vehicle while driving.
When the accelerator pedal is fully depressed, the kickdown function is activa-
ted in any forward driving mode.
103Starting-off and Driving