boot SKODA RAPID SPACEBACK 2015 1.G Owner's Guide
[x] Cancel search | Manufacturer: SKODA, Model Year: 2015, Model line: RAPID SPACEBACK, Model: SKODA RAPID SPACEBACK 2015 1.GPages: 208, PDF Size: 29.2 MB
Page 141 of 208
Dust and dirt in pores and creases cause abrasions on the surface and lead to
premature embrittlement of the leather surface. Therefore, they must be re-
moved regularly at short intervals with a cloth or vacuum cleaner.
Clean soiled leather surfaces with a water-dampened cotton or woollen cloth
and then dry with a clean, dry cloth »
.
Clean severely soiled areas with a cloth soaked in a mild soap solution (2 ta-
blespoons of neutral soap to 1 litre of water).
To remove stains , use a cleaning agent specially designed for this purpose.
Treat the leather periodically with a suitable leather protector and use a skin
care cream with light blocker and impregnation after each cleaning.
CAUTION
■ Ensure that no part of the leather is soaked through during cleaning and that
no water gets into the seams! Otherwise, the leather could become brittle or
cracked.■
Avoid leaving the vehicle for lengthy periods in bright sunlight to prevent the
leather from bleaching. If the vehicle is parked in the open for lengthy periods,
protect the leather from direct sunlight by covering it.
■
The use of an additional mechanical steering wheel lock may damage the
leather surface of the steering wheel.
■
Some clothing materials, e.g. dark denim, do not have sufficient colour fast-
ness. This can cause damage or clearly visible discolouration to seat covers,
even when used correctly. This applies particularly to light-coloured seat cov-
ers. This does not relate to a fault in the seat cover, but rather to poor colour
fastness of the clothing textiles.
■
Sharp-edged objects on items of clothing such as zip fasteners, rivets, sharp-
edged belts etc. may leave permanent scratches or signs of rubbing on the
surface or damage these. Such damage cannot be subsequently recognised as
a justified complaint.
Note
When using the vehicle, minor visible changes may occur to the leather parts
of the covers (e.g. wrinkles or creases) as a result of the stress applied to the
covers.Artificial leather, materials and Alcantara ®
Read and observe
and on page 138 first.
Artificial leather
Clean artificial leather with a damp cloth.
If this method does not completely clean the artificial leather, use a mild soap
solution or cleaning products specially designed for this purpose.
Fabric
Clean upholstery cover materials and cloth trims on doors, boot cover, etc. us-
ing specific cleaning agents, e.g., dry foam.
Use a soft sponge, brush, or commercially available microfibre cloth.
Use a cloth and a cleaning agent specifically designed for this purpose to clean
the roof trim.
Remove any lumps on the cover fabric and any fabric residue using a brush.
Remove stubborn hair using a “cleaning glove”.
Alcantara ®
Dust and dirt in pores, creases and seams may chafe and damage the surface.
Therefore, they must be removed regularly at short intervals with a cloth or
vacuum cleaner.
Minor changes in colour caused by use are normal.
CAUTION
■ For Alcantara ®
seat covers, do not use any solvents, floor wax, shoe cream,
stain remover, leather cleaners or similar agents.■
Avoid leaving the vehicle in bright sunlight for long periods of time in order
to stop the artificial leather, materials or Alcantara ®
from bleaching. During ex-
tended periods of standing outdoors, protect artificial leather, fabrics or Alcan-
tara ®
by covering.
■
Some clothing materials, e.g. dark denim, do not have sufficient colour fast-
ness. This can cause damage or clearly visible discolouration to seat covers,
even when used correctly. This applies particularly to light-coloured seat cov-
ers. This does not relate to a fault in the seat cover, but rather to poor colour
fastness of the clothing textiles.
139Care and maintenance
Page 162 of 208

Do-it-yourself
Emergency equipment and self-help
Emergency equipment
Introduction
This chapter contains information on the following subjects:
First aid kit and warning triangle
160
reflective vest
160
fire extinguisher
160
Vehicle tool kit
161
First aid kit and warning triangle
Fig. 161
Placing of the first-aid kit and the warning triangle
The following information is for the first aid kit and warning triangle from the
ŠKODA Original accessories valid.
For another first aid kit and warning triangle the storage compartments may
possibly be too small.
First-aid box
The first-aid box can be attached by a strap to the right-hand side of the boot
» Fig. 161 .
Warning triangle – version 1
The warning triangle can be attached to the rear wall trim panel with rubber
straps » Fig. 161 -
.
Warning triangle – version 2
On vehicles with the vehicle battery in the boot warning triangle can be stow-
ed in a box under the floor covering in the luggage compartment » Fig. 161 -
,
Pay attention to the expiration date of the first-aid kit.WARNINGThe first-aid kit and warning triangle must always be secured safely so that
they do not come loose when making an emergency braking or in a vehicle
collision which could cause injuries to occupants.
Note
We recommend using a first-aid kit from ŠKODA Original Accessories, which
are available from a ŠKODA Partner.
reflective vest
Fig. 162
Storage compartment for the re-
flective vest
The reflective vest can be stored in a bracket under the driver's seat » Fig. 162.
fire extinguisher
Fig. 163
Fire extinguisher
160Do-it-yourself
Page 163 of 208
The fire extinguisher is attached by two straps in a holder underneath the driv-
er's seat.
Removing/attaching›
Loosen the two straps by pulling the buckles in the direction of the arrow
» Fig. 163 .
›
Remove the fire extinguisher.
›
For mounting, fit the fire extinguisher back into the holder and secure it with
straps.
Please read the instructions which are attached to the fire extinguisher.
Pay attention to the expiration date of the fire extinguisher. Proper function-
ing of the fire extinguisher is not assured once it has passed its expiry date.
WARNINGThe fire extinguisher must always be secured safely so that they do not
come loose when making an emergency braking or in a vehicle collision
which could cause injuries to occupants.
Note
The fire extinguisher is part of the scope of delivery in certain countries only.
Vehicle tool kit
Fig. 164
Vehicle tool kit
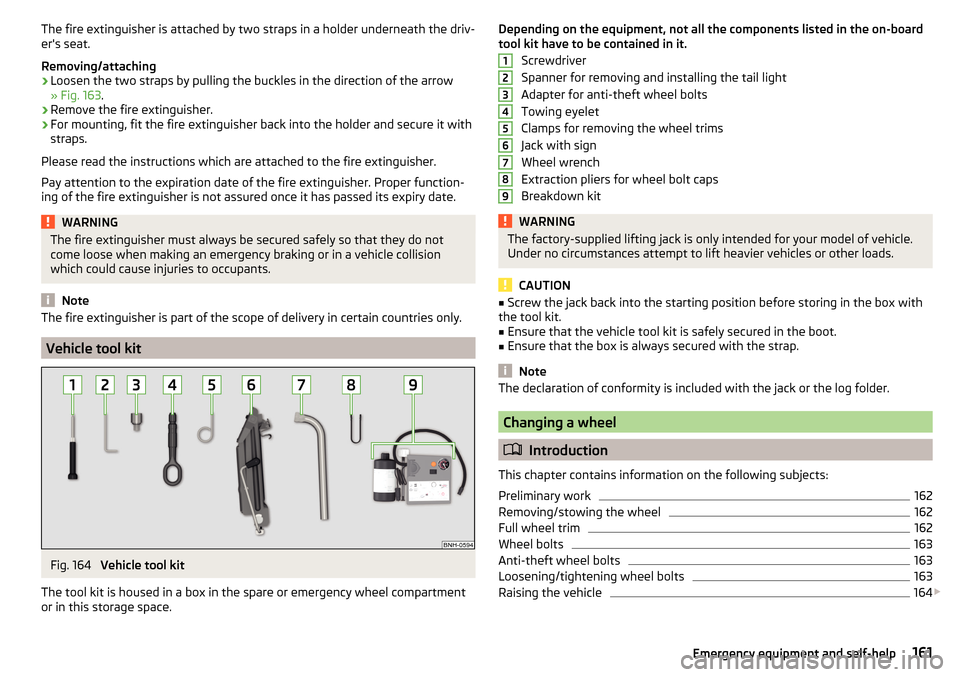
The tool kit is housed in a box in the spare or emergency wheel compartment
or in this storage space.
Depending on the equipment, not all the components listed in the on-board
tool kit have to be contained in it.
Screwdriver
Spanner for removing and installing the tail light
Adapter for anti-theft wheel bolts
Towing eyelet
Clamps for removing the wheel trims
Jack with sign
Wheel wrench
Extraction pliers for wheel bolt caps
Breakdown kitWARNINGThe factory-supplied lifting jack is only intended for your model of vehicle.
Under no circumstances attempt to lift heavier vehicles or other loads.
CAUTION
■ Screw the jack back into the starting position before storing in the box with
the tool kit.■
Ensure that the vehicle tool kit is safely secured in the boot.
■
Ensure that the box is always secured with the strap.
Note
The declaration of conformity is included with the jack or the log folder.
Changing a wheel
Introduction
This chapter contains information on the following subjects:
Preliminary work
162
Removing/stowing the wheel
162
Full wheel trim
162
Wheel bolts
163
Anti-theft wheel bolts
163
Loosening/tightening wheel bolts
163
Raising the vehicle
164
123456789161Emergency equipment and self-help
Page 164 of 208
Remove the wheel / fix165Follow-up work165
For your own safety and the safety of the passengers, the following instruc-
tions must be observed before changing a wheel on the road.
Switch on the hazard warning lights system.
Place the warning triangle at the prescribed distance.
Park the vehicle as far away as possible from the flowing traffic.
Choose a location with a flat, solid surface.
Have all the occupants get out. The passengers should not stand on the
road (instead they should remain behind a crash barrier, for instance) while
the wheel is being changed.
Preliminary work
Before changing the wheel, the following work must be carried out.
›
Switch off the engine.
›
For vehicles with manual transmission select gear 1.
›
On vehicles with automatic transmission , place the selector lever in the P
position.
›
Firmly apply the handbrake.
›
Uncouple trailer, if attached.
Removing/stowing the wheel
Fig. 165
Take out the wheel
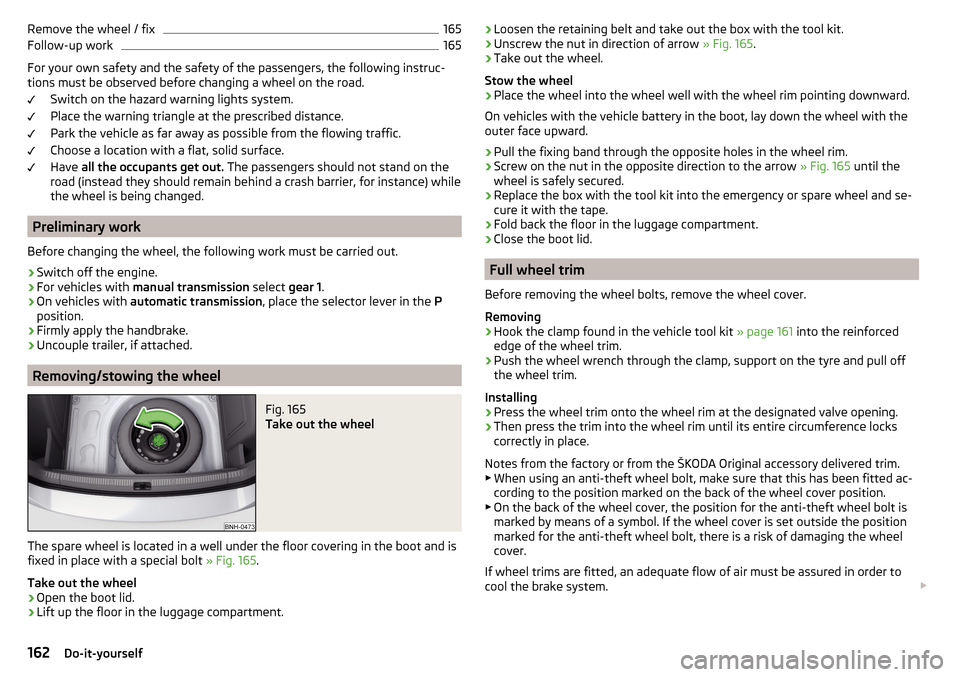
The spare wheel is located in a well under the floor covering in the boot and is
fixed in place with a special bolt » Fig. 165.
Take out the wheel
›
Open the boot lid.
›
Lift up the floor in the luggage compartment.
› Loosen the retaining belt and take out the box with the tool kit.›Unscrew the nut in direction of arrow
» Fig. 165.›
Take out the wheel.
Stow the wheel
›
Place the wheel into the wheel well with the wheel rim pointing downward.
On vehicles with the vehicle battery in the boot, lay down the wheel with the
outer face upward.
›
Pull the fixing band through the opposite holes in the wheel rim.
›
Screw on the nut in the opposite direction to the arrow » Fig. 165 until the
wheel is safely secured.
›
Replace the box with the tool kit into the emergency or spare wheel and se-
cure it with the tape.
›
Fold back the floor in the luggage compartment.
›
Close the boot lid.
Full wheel trim
Before removing the wheel bolts, remove the wheel cover.
Removing
›
Hook the clamp found in the vehicle tool kit » page 161 into the reinforced
edge of the wheel trim.
›
Push the wheel wrench through the clamp, support on the tyre and pull off
the wheel trim.
Installing
›
Press the wheel trim onto the wheel rim at the designated valve opening.
›
Then press the trim into the wheel rim until its entire circumference locks
correctly in place.
Notes from the factory or from the ŠKODA Original accessory delivered trim.
▶ When using an anti-theft wheel bolt, make sure that this has been fitted ac-
cording to the position marked on the back of the wheel cover position.
▶ On the back of the wheel cover, the position for the anti-theft wheel bolt is
marked by means of a symbol. If the wheel cover is set outside the position
marked for the anti-theft wheel bolt, there is a risk of damaging the wheel
cover.
If wheel trims are fitted, an adequate flow of air must be assured in order to
cool the brake system.
162Do-it-yourself
Page 169 of 208

Preparations for using the breakdown kitRead and observe
on page 166 first.
The following preparatory work must be carried out before using the puncture
repair kit.
›
Switch off the engine.
›
For vehicles with manual transmission select gear 1.
›
On vehicles with automatic transmission , place the selector lever in the P
position.
›
Firmly apply the handbrake.
›
Check that you can carry out the repairs with the breakdown kit » page 166,
General information .
›
Uncouple trailer, if attached.
›
Remove the breakdown kit from the boot.
›
Stick the sticker
1
» Fig. 171 on page 166 on the dashboard in the driver's
field of view.
›
Unscrew the valve cap.
›
Use the valve remover
2
to unscrew the valve core and place it on a clean
surface (rag, paper, etc.).
Sealing and inflating the tyre
Read and observe
on page 166 first.
Sealing
›
Forcefully shake the tyre inflater bottle
10
» Fig. 171 on page 166 back and
forth several times.
›
Firmly screw the inflation hose
3
onto the tyre inflater bottle
10
. The film on
the cap is pierced automatically.
›
Remove the plug from the inflation hose
3
and plug the open end fully onto
the tyre valve.
›
Hold the bottle
10
with the bottom facing upwards and fill all of the sealing
agent from the tyre inflater bottle into the tyre.
›
Remove the filler plug from the tyre valve.
›
Screw the valve core back into the tyre valve using the valve remover
2
.
Inflating
›
Screw the tyre inflation hose
7
» Fig. 171 on page 166 of the air compressor
firmly onto the tyre valve.
›
For vehicles with manual transmission the lever into the neutral position.
›On vehicles with
automatic transmission , place the selector lever in the P
position.›
Start the engine and run it in idle.
›
Plug the connector
6
into the 12-volt socket » page 75.
›
Switch on the air compressor with the ON and OFF switch
9
.
›
Allow the air compressor to run until a pressure of 2.0 - 2.5 bar is achieved.
Maximum run time of 8 minutes » .
›
Switch off the air compressor.
›
If you cannot reach an air pressure of 2.0 - 2.5 bar, unscrew the tyre inflation
hose
7
from the tyre valve.
›
Drive the vehicle 10 metres forwards or backwards to allow the sealing agent
to “distribute” in the tyre.
›
Firmly screw the tyre inflation hose
7
back onto the tyre valve and repeat
the inflation process.
›
Switch off the air compressor.
›
Remove the tyre inflation hose
7
from the tyre valve.
Once a tyre inflation pressure of 2.0 - 2.5 bar is achieved, you can continue the journey.
WARNING■ If the tyre cannot be inflated to at least. 2.0 bar, the damage is too great.
The sealing agent cannot be used to seal the tyre. Do not continue to
drive! Seek help from a specialist garage.■
The tyre inflation hose and air compressor may get hot as the tyre is be-
ing inflated – there is a risk of burning.
CAUTION
Switch off the air compressor after running 8 minutes at the latest – there is a
risk of overheating! Allow the air compressor to cool a few minutes before
switching it on again.
Notes for driving with tyre repaired
Read and observe
on page 166 first.
The inflation pressure of the repaired tyre must be checked after driving for 10
minutes.
If the tyre pressure is 1.3 bar or less
›
Do not continue to drive! The tyre cannot be properly sealed with the
breakdown kit.
167Emergency equipment and self-help
Page 171 of 208

The jump-start cable must be connected to the engine earthing point C» Fig. 172 only on vehicles with the START-STOP system.
Starting engine›
Start the engine on the vehicle providing the power and allow it to idle.
›
Start the engine of the vehicle with the discharged battery.
›
If the engine does not start, halt the attempt to start the engine after 10 sec-
onds and wait for 30 seconds before repeating the process.
›
Remove the jump start cables in the reverse order as attachment.
Engines in vehicles with the vehicle battery in the boot
The positive terminal
A
is located under a cover in the engine compartment
» Fig. 173 .
›
Unlock the retainer tab on the cover in direction of arrow
1
.
›
Open the cover in the direction of the arrow
2
.
›
Clamp the positive terminal of the jumper cable to the position
A
» Fig. 173 .
›
Clamp the negative terminal of the jumper cable to the earthing point of the
engine
D
» Fig. 172 or to a metal part firmly connected to the engine block or
directly to the engine block.
›
Remove the jump start cables in the reverse order as attachment.
Both batteries must have a rated voltage of 12 V. The capacity (Ah) of the bat-
tery supplying the power must not be significantly less than the capacity of
the discharged battery in your vehicle.
Jump-start cables
Only use jump-start cables which have an adequately large cross-section and
insulated terminal clamps. Observe the instructions of the jumper lead manu-
facturer.
Positive cable – colour coding in the majority of cases is red.
Negative cable – colour coding in the majority of cases is black.
WARNING■
Do not clamp the jump-start cable to the negative terminal of the dis-
charged battery. There is the risk of detonating gas seeping out of the bat-
tery being ignited by the strong spark resulting from the engine being star-
ted.■
The non-insulated parts of the terminal clamps must never touch each
other – there is a risk of short circuit!
WARNING (Continued)■ The jump-start cable connected to the positive terminal of the battery
must not come into contact with electrically conducting parts of the vehicle
– there is a risk of short circuit!■
Route the jump-start cables so that they cannot be caught by any rotat-
ing parts in the engine compartment.
Towing the vehicle
Introduction
Fig. 174
Braided tow rope / Spiral tow rope
This chapter contains information on the following subjects:
Front towing eye
170
Rear towing eye
171
Vehicles with a tow hitch
171
For towing a braided tow rope is to be used » Fig. 174-
.
When towing, the following guidelines must be observed.
Vehicles with manual transmission may be towed in with a tow bar or a tow
rope or with the front or rear wheels raised.
Vehicles with automatic transmission may be towed in with a tow bar or a tow
rope or with the front wheels raised. If the vehicle is raised at the rear, the au-
tomatic gearbox will be damaged! If possible, the vehicle should be towed with
the engine running or at least with the ignition on.
Driver of the tow vehicle
›
Engage the clutch gently when starting off or depress the accelerator partic-
ularly gently if the vehicle is fitted with an automatic gearbox.
169Emergency equipment and self-help
Page 174 of 208
›Insert the new battery.›Insert the battery cover A and press it down until it clicks audibly into place.
Synchronising the remote control
Read and observe
on page 171 first.
If the vehicle does not unlock when pressing the remote control, the key may
not be synchronised. This can occur when the buttons on the remote control
key are actuated a number of times outside of the operative range of the
equipment or the battery in the remote control key has been replaced.
Synchronise the key as follows.
›
Press any button on the remote control key.
›
Unlock the door with the key in the lock cylinder within 1 minute of pressing the button.
Emergency unlocking/locking
Introduction
This chapter contains information on the following subjects:
Locking the door without a locking cylinder
172
Unlock the boot lid
172
Selector lever-emergency unlocking
172
Locking the door without a locking cylinder
Fig. 178
Emergency locking: Left/right rear door
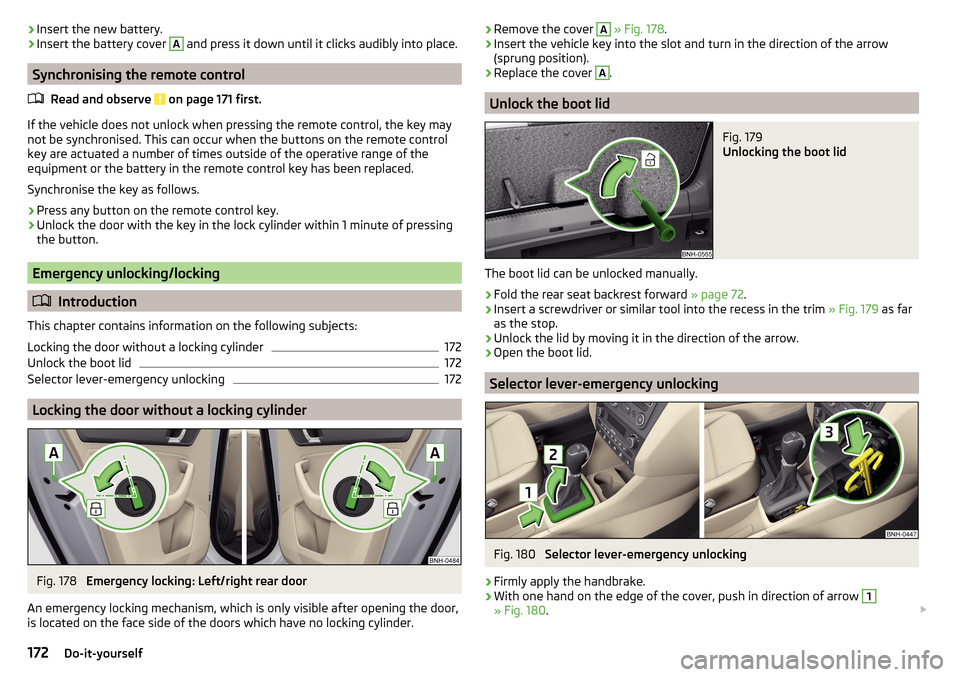
An emergency locking mechanism, which is only visible after opening the door,
is located on the face side of the doors which have no locking cylinder.
› Remove the cover A
» Fig. 178 .›Insert the vehicle key into the slot and turn in the direction of the arrow
(sprung position).›
Replace the cover
A
.
Unlock the boot lid
Fig. 179
Unlocking the boot lid
The boot lid can be unlocked manually.
›
Fold the rear seat backrest forward » page 72.
›
Insert a screwdriver or similar tool into the recess in the trim » Fig. 179 as far
as the stop.
›
Unlock the lid by moving it in the direction of the arrow.
›
Open the boot lid.
Selector lever-emergency unlocking
Fig. 180
Selector lever-emergency unlocking
›
Firmly apply the handbrake.
›
With one hand on the edge of the cover, push in direction of arrow
1
» Fig. 180 .
172Do-it-yourself
Page 180 of 208
Replacing the bulb for the licence plate light181Rear Light181
Replacing bulbs in rear light
182
Some manual skills are required to change a bulb. For this reason, we recom-
mend having bulbs replaced by a specialist garage or seeking other expert help
in the event of any uncertainties.
▶ Switch off the ignition and the relevant lights before replacing a bulb.
▶ Faulty bulbs must only be replaced with the same type of bulbs. The designa-
tion is located on the light socket or the glass bulb.
A stowage compartment for replacement bulbs is located in a plastic box in
the spare wheel or underneath the floor covering in the boot.
We recommend having the headlight settings checked by a specialist garage
after replacing a bulb in the low, high or fog beam.
In case of failure of a xenon gas discharge lamp or an LED diode, visit a special- ist garage.
WARNING■ Always read and observe the warning notes before completing any work
in the engine compartment » page 143.■
Accidents can be caused if the road in front of the vehicle is not suffi-
ciently illuminated and the vehicle cannot or can only be seen with difficul-
ty by other road users.
■
H7 and H15 bulbs are pressurised and may burst when changing the bulb -
risk of injury! We therefore recommended wearing gloves and safety
glasses when changing a bulb.
■
Do not carry out any work on the Xenon gas discharge lamps - risk of
death!
CAUTION
■ Do not take hold of the glass bulb with naked fingers (even the smallest
amount of dirt reduces the working life of the light bulb). Use a clean cloth,
napkin, or similar.■
The protective cap of the bulb must always be properly inserted into the
headlamp. Water and dirt may get into the headlamp if the cover is not re-
placed properly - there is a risk of damage to the headlamp!
Note■ This Owner's Manual only describes the replacement of bulbs where it is pos-
sible to replace the bulbs on your own without any complications arising. Other
bulbs must be replaced by a specialist garage.■
We recommend that a box of replacement bulbs always be carried in the ve-
hicle. Replacement bulbs can be purchased from ŠKODAOriginal Accessories.
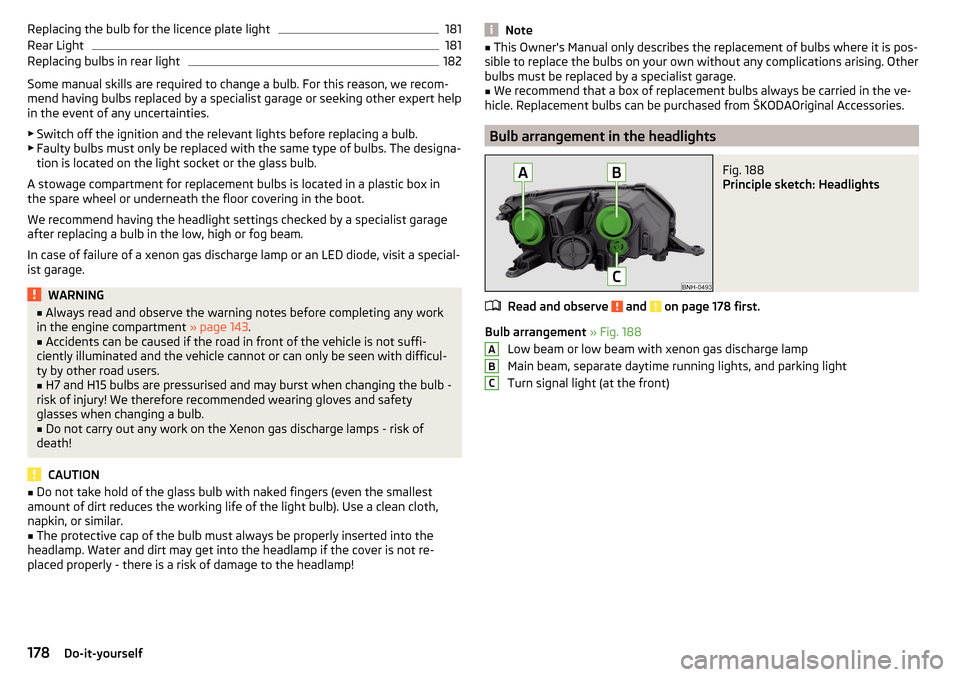
Bulb arrangement in the headlights
Fig. 188
Principle sketch: Headlights
Read and observe and on page 178 first.
Bulb arrangement » Fig. 188
Low beam or low beam with xenon gas discharge lamp
Main beam, separate daytime running lights, and parking light
Turn signal light (at the front)
ABC178Do-it-yourself
Page 183 of 208

›Attach the connector.
Refit the headlight and grille›
Replace the fog light by inserting it in the opposite direction of the arrow
4
» Fig. 193 and tightening.
›
Insert the protective grille and carefully press it in.
The protective grille must engage firmly.
Replacing the bulb for the licence plate light
Fig. 194
Remove the number plate light/replace the bulb
Read and observe
and on page 178 first.
›
Open the boot lid.
›
Push in the lamp in the direction of the arrow
1
» Fig. 194 .
The lamp comes loose.
›
Swivel out the lamp in the direction of the arrow
2
and remove it.
›
Remove the faulty bulb from the holder in the direction of the arrow
3
.
›
Insert a new bulb into the holder.
›
Reinsert the lamp in the opposite direction to the arrow
1
.
›
Push on the light until the spring clicks into place.
Check that the light is securely inserted.
Rear LightFig. 195
Remove light / pull out connector
Read and observe
and on page 178 first.
Removing
›
Open the boot lid.
›
Insert the clamps for removing the full wheel covers » page 161, Vehicle tool
kit into opening
A
» Fig. 195 .
›
Remove the cover by pulling the hook in the direction of arrow
1
.
›
Unscrew the screws
B
with the key from the tool kit.
›
Grasp the lamp and carefully remove in the direction of arrow
2
.
›
Press the latch on the connector in the direction of arrow
3
.
›
Carefully remove the connector from the tail lamp assembly in the direction
of the arrow
4
.
Fitting
›
Insert the bulb holder into the lamp.
The lock on the plug must be inserted securely.
›
Insert the lamp with the pin
B
» Fig. 196 on page 182 into the recesses
C
» Fig. 195 in the body.
181Fuses and light bulbs
Page 192 of 208
Index
A
abroad lead-free petrol
141
Abroad Headlights
63
ABS Operation
110
Warning light33
Acceptance and recycling of used vehicles133
Accessories130
Adjusting Exterior mirror
68
head restraints69
Seat69
Steering wheel9
Adjusting the seats8
Adjustment Beam range
59
Advance warning/emergency braking Warning light
38
Air-conditioning system Air outlet vents
94
Airbag14
Deactivating18
Deactivating the front passenger airbag18
Deployment15
Front airbag15
Head airbag17
Modifications and damage to the airbag system 132
Side airbag
16
Warning light34
Airbag system14
Air conditioning90
Air distribution control93
Climatronic92
Manual air conditioning91
Air distribution control93
Air outlet vents94
Alarm Enable/disable
54
Switch off54
Trailer128
Triggering54
Alcantara cleaning
139
Anodized parts Refer to vehicle maintenance
136
Anti-lock braking system (ABS)110
Anti-theft alarm system Enable/disable
54
Trailer128
Anti-theft wheel bolts163
Armrest Front
71
Rear71
artificial leather139
Ashtray75
Assembling the tow bar, Step 1
123
tow bar, Step 2124
Assist systems109
Auto-check control39
Automatic driving lamp control61
Automatic gearbox104
Selector lever-emergency unlocking172
Selector lever lock105
Starting-off and driving106
Tiptronic105
Using the selector lever104
Automatic gearbox modes104
Automatic load deactivation153
automatic transmission selector lever lock defect
105
Automatic transmission Kick-down
106
Malfunctions36
Selector lever lock105
Warning light36
Warning messages36
AUX80
Avoiding damage to your vehicle108
B
Bags on the backs of the front seats
79
Ball head Check fitting
124
Ready position122, 123
Battery In the remote control key
171
Belts11
Belt tensioners13
Bonnet Closing
144
Opening144
Boot Cargo element
85
Class N1 vehicles86
Hooks83
See Boot lid55
Storage compartments85
Boot cover Parking position
84
Boot lid automatic locking
55
Closing55
Opening55
Brake Assist (HBA)111
Brake booster102
brake fluid specification
150
Brake fluid149
Checking150
Information messages32
190Index