ECU SKODA RAPID SPACEBACK 2015 1.G Owner's Manual
[x] Cancel search | Manufacturer: SKODA, Model Year: 2015, Model line: RAPID SPACEBACK, Model: SKODA RAPID SPACEBACK 2015 1.GPages: 208, PDF Size: 29.2 MB
Page 10 of 208
Safety
Passive Safety
General information
Introduction
This chapter contains information on the following subjects:
Before setting off
8
Driving safety
8
In this section of the instructions you will find important information, tips and
notes on the subject of passive safety.
We have combined everything here which you should be familiar with, for ex-
ample, regarding seat belts, airbags, safety of children and anything similar.
You can find further information on safety concerning you and those travelling
with you in the following chapters of this Owner's Manual.
The complete on-board literature should therefore always be in the vehicle.
This applies in particular, if you rent out or sell the vehicle.
Before setting off
For your own safety and the safety of the people travelling with you, please
pay attention to the following points before setting off.
▶ Ensure that the lighting and the turn signal system are functioning properly.
▶ Ensure that the function of the wipers and the condition of the wiper blades
are free of any defects.
▶ Ensure that all of the windows offer good visibility to the outside.
▶ Adjust the rear-view mirror so that vision to the rear is guaranteed.
▶ Ensure that the mirrors are not covered.
▶ Check the tyre inflation pressure.
▶ Check the engine oil, brake fluid and coolant level.
▶ Secure all items of luggage.
▶ Do not exceed the permissible axle loads and permissible gross weight of the
vehicle.
▶ Close all doors as well as the bonnet and boot lid.
▶ Ensure that no objects can obstruct the pedals.
▶
Protect children in suitable child seats with correctly fastened seat belts
» page 19 , Transporting children safely .
▶ Adopt the correct seated position » page 8, Correct and safe seated posi-
tion . Tell your passengers to assume the correct seated position.
Driving safety
The driver is fully responsible for himself and passengers, especially children. If
your driving safety is effected, you place yourself and the oncoming traffic at
risk.
The following guidelines must therefore be observed. ▶ Do not become distracted from concentrating on the traffic situation, (e.g. by
your passengers or mobile phone calls).
▶ Never drive when your driving ability is impaired, (e.g. due to medication, al-
cohol or drugs).
▶ Keep to the traffic regulations and the permissible speed limit.
▶ Always adjust the driving speed to the road, traffic and weather conditions.
▶ Take regular breaks on long journeys (at least every two hours).
The following list contains instructions for the Passenger which, if not ob-
served, may cause serious injuries or death. ▶ Do not lean against the dash panel.
▶ Do not put your feet on the dash panel.
The following list contains instructions for all Passengers which, if not ob-
served, may cause serious injuries or death. ▶ Do not sit only on the front part of the seat.
▶ Do not sit facing to the side.
▶ Do not lean out of the window.
▶ Do not put your limbs out of the window.
▶ Do not put your feet on the seat cushion.
Correct and safe seated position
Introduction
This chapter contains information on the following subjects:
Correct seat position of the driver
9
Adjusting the steering wheel position
9
Correct seated position for the front passenger
10
Correct seated position for the passengers in the rear seats
10
8Safety
Page 21 of 208
›Use the key to turn the slot of the key switch
» Fig. 12 carefully into the
position .›
Pull the key out of the slot in the key switch » .
›
Close the storage box on the front passenger's side.
›
Check that the warning light
1)
under the text
» Fig. 12 -
lights up after the ignition is switched on.
Switching on
›
Switch off the ignition.
›
Open the storage box on the front passenger's side.
›
Fold the key bit out completely for the radio key » .
›
Carefully insert the key into the key slot in the key switch as far as the stop.
›
Use the key to turn the slot of the key switch » Fig. 12
carefully into the
position .
›
Pull the key out of the slot in the key switch
» .
›
Close the storage box on the front passenger's side.
›
Check that the warning light
under the text
» Fig. 12
-
does not illuminate after the ignition is switched on.
WARNING■ The driver is responsible for whether the airbag is switched on or switch-
ed off.■
Only switch off the airbag when the ignition is switched off! Otherwise a
fault can occur in the system for deactivating the airbag.
■
If the
warning light is flashing, the front passenger airbag will not
be deployed in an accident! Have the airbag system checked by a specialist
garage immediately.
■
Do not leave the key inserted in the key-operated switch while driving -
vibrations can cause the key to turn in the slot and switch on the airbag!
The airbag could be triggered unexpectedly in an accident - it may result in
injury or death!
CAUTION
An insufficiently folded out key bit can damage the key switch!Transporting children safely
Child seat
Introduction
This chapter contains information on the following subjects:
Use of a child seat on the front passenger seat
20
Use of the child seat in the front passenger seat
21
Child safety and side airbag
21
Classification of child seats
21
Use of child seats fastened with a seat belt
21
To avoid serious injury or death children are always to be in an appropriate
child safety seat with regards to height, weight, and age.
For safety reasons, we recommend that you always transport child seats on the rear seats.
Child seats complying with the ECE-R 44 Economic Commission for Europe
standard must be used.
Child seats that comply with the ECE-R 44 standard are identified with a test
mark that cannot be removed: a capital E in a circle, with the test number be-
low.
With child safety seats in groups 2 and 3, make sure that the loop-around fit-
tings attached to the child seat headrest is positioned in front of or at the
same height as the loop-around fittings on the B pillar on the passenger side.
WARNING■ One should never carry children, and also not babies! - on one's lap.■Never leave children unattended in the vehicle. Certain outside climatic
conditions can cause life-threatening temperatures in the vehicle.■
The child must be secured in the vehicle during the entire journey! Other-
wise, the child would be thrown through the vehicle in the event of an acci-
dent, causing fatal injuries to both the child and other occupants.
1)
The warning light
comes on for a few seconds after the ignition is switched on, goes out for about
1 second and then comes on again.
19Transporting children safely
Page 22 of 208
WARNING (Continued)■Children are exposed to an increased risk of injury in the event of an acci-
dent if they lean forward or adopt an incorrect seated position when the
vehicle is moving. This particularly applies to children who are transported
on the front passenger seat as they can suffer severe, or even fatal injuries
if the airbag system is deployed!■
Pay particular attention to the information provided by the manufacturer
of the child safety seat regarding the correct routing of the belt. Seat belts
which are not correctly adjusted can themselves cause injuries even in mi-
nor accidents.
■
Safety belts must be checked to ensure that they are running properly.
One should also ensure that the belt is not damaged by sharp-edged fit-
tings.
■
The front passenger airbag must be deactivated if using a rear-facing
child seat on the front passenger seat. Further information » page 20,
Use of a child seat on the front passenger seat .
■
When installing the child seat on the back seat, the corresponding front
seat must be adjusted so that there is no contact between the front seat
and the child seat or the child being transported in a child seat.
CAUTION
■ When installing a child seat in which the child faces forward, adjust the head
restraints so that they are as high as possible.■
If the head restraints still prevent the child seat from being installed, even in
the highest position, you will need to remove them » page 70. After remov-
ing the child seat, refit the head restraints.
Note
We recommend that you use child seats from ŠKODA Original Accessories.
These child seats were developed and also tested for use in ŠKODA vehicles.
They meet the ECE-R 44 standard.Use of a child seat on the front passenger seat
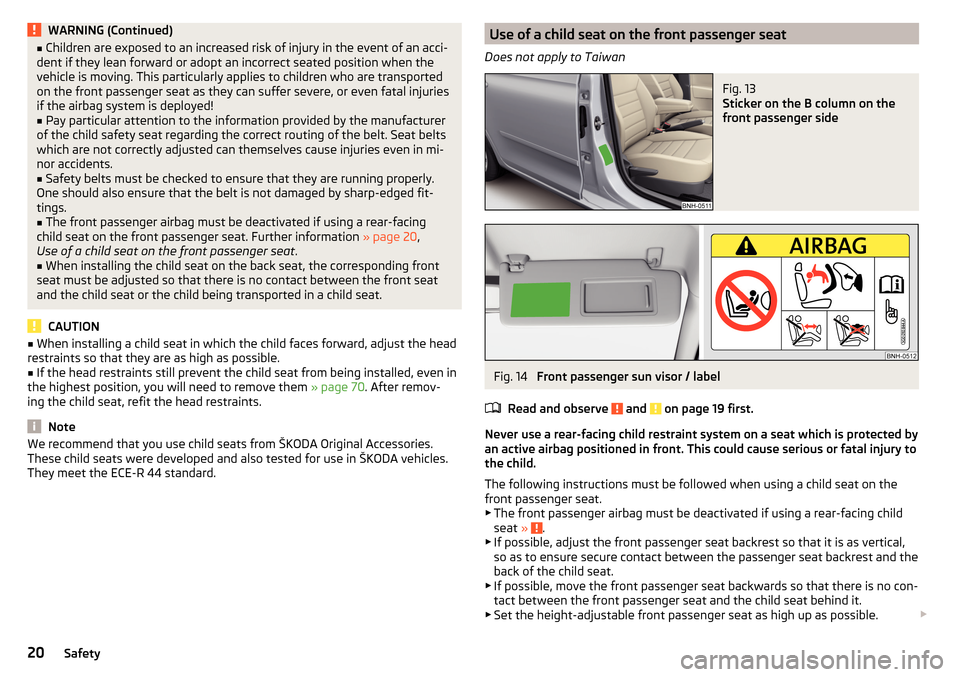
Does not apply to TaiwanFig. 13
Sticker on the B column on the
front passenger side
Fig. 14
Front passenger sun visor / label
Read and observe
and on page 19 first.
Never use a rear-facing child restraint system on a seat which is protected by
an active airbag positioned in front. This could cause serious or fatal injury to
the child.
The following instructions must be followed when using a child seat on the
front passenger seat.
▶ The front passenger airbag must be deactivated if using a rear-facing child
seat »
.
▶ If possible, adjust the front passenger seat backrest so that it is as vertical,
so as to ensure secure contact between the passenger seat backrest and the
back of the child seat.
▶ If possible, move the front passenger seat backwards so that there is no con-
tact between the front passenger seat and the child seat behind it.
▶ Set the height-adjustable front passenger seat as high up as possible.
20Safety
Page 23 of 208
▶Set the front passenger seat belt as high up as possible.
▶ When using a child seat where there is a height adjuster in the upper area,
the height of the passenger seat belt is to be set so that the belt is not
“kinked” in the height adjuster. In the event of an accident, there is the risk
of injury to the neck of the child carried due to the seat belt!WARNING■ Never use a rear-facing child seat on the front passenger seat if the pas-
senger airbag is activated. This child safety seat is positioned in the deploy-
ment area of the front passenger airbag. The airbag may cause the child se-
vere, or even fatal injuries, in the event of it being deployed.■
This fact is also indicated by the label that can be found in one of the fol-
lowing locations. ■On the B-column on the front passenger side » Fig. 13. The sticker is
visible upon opening the front passenger door.
■ On the front passenger's sun visor. In some countries, the sticker is lo-
cated on the front seat passenger's sun visor » Fig. 14.
■
As soon as the rear-facing child seat is no longer being used on the pas-
senger seat, the front passenger airbag should be re-activated again.
Use of the child seat in the front passenger seat
Applies to Taiwan
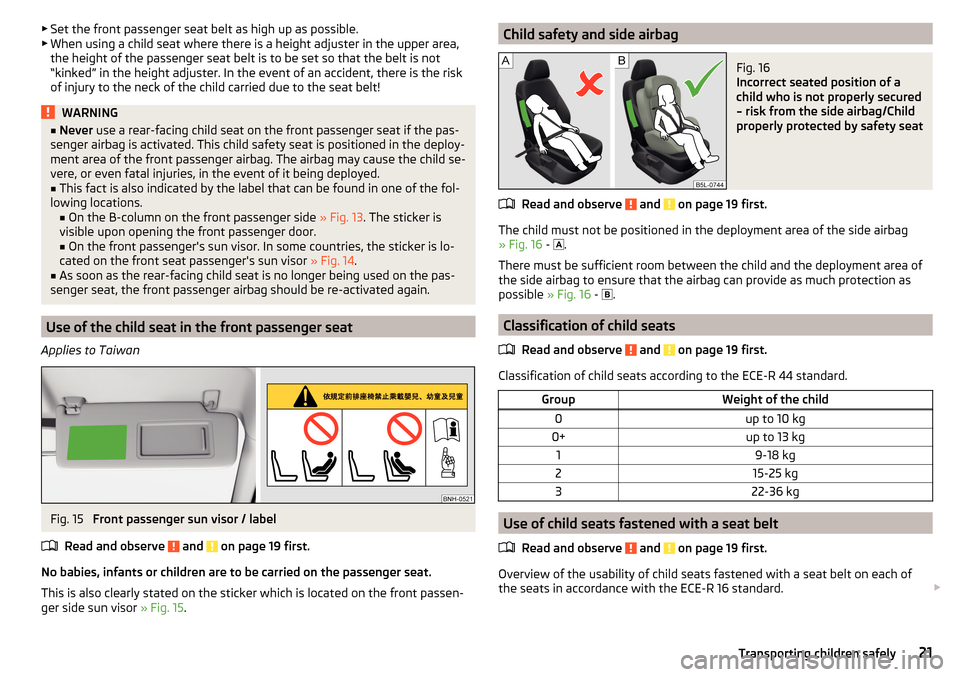
Fig. 15
Front passenger sun visor / label
Read and observe
and on page 19 first.
No babies, infants or children are to be carried on the passenger seat.
This is also clearly stated on the sticker which is located on the front passen- ger side sun visor » Fig. 15.
Child safety and side airbagFig. 16
Incorrect seated position of a
child who is not properly secured
– risk from the side airbag/Child
properly protected by safety seat
Read and observe and on page 19 first.
The child must not be positioned in the deployment area of the side airbag
» Fig. 16 -
.
There must be sufficient room between the child and the deployment area of
the side airbag to ensure that the airbag can provide as much protection as
possible » Fig. 16 -
.
Classification of child seats
Read and observe
and on page 19 first.
Classification of child seats according to the ECE-R 44 standard.
GroupWeight of the child0up to 10 kg0+up to 13 kg19-18 kg215-25 kg322-36 kg
Use of child seats fastened with a seat belt Read and observe
and on page 19 first.
Overview of the usability of child seats fastened with a seat belt on each ofthe seats in accordance with the ECE-R 16 standard.
21Transporting children safely
Page 24 of 208

GroupFront passengerseatRear seatsExternalRear seat Centre0
up to 10 kgUUU0+
up to 13 kgUUU1
9-18 kgUUU2
15-25 kgUUU a)3
22-36 kgUUU a)a)
If the middle rear seat is not provided with a headrest, then a child seat of Group 2 or 3 is only to be used
if this has its own built-in headrest. If the child seat of Group 2 or 3 does not have its own built-in head-
rest, the child seat must be attached to the outer rear seat.
“Universal” child seat category - a child seat designed to be attached to
the seat using the seat belt.
Fastening systems
Introduction
This chapter contains information on the following subjects:
Attachment points of the -system
22
Use of child seats with the
-system
23
Attachment points of the
-system
24
Attachment points of the -system
Fig. 17
Labels of the system
U
is a system for securing child seats quickly and safely.
There are two locking eyes between the rear exterior seats for fixing the child in place using the
-system » Fig. 17.WARNING■
Always refer to the instructions from the manufacturer of the child seat
when installing and removing a child seat with the -system.■
Never attach other child seats, belts or objects to the attachment points
eyes intended for the installation of a child seat with the
-system – risk
of death!
Note
■ A child seat fitted with the system can only be mounted in a vehicle fit-
ted with a system if the child seat has been approved for this type of ve-
hicle. Further information is available from a ŠKODA Partner.■
Child seats with the
-system can be purchased from ŠKODA Original Ac-
cessories.
22Safety
Page 49 of 208

SmartGate
Introduction
Fig. 34
ŠKODA websites
This chapter contains information on the following subjects:
Connection to SmartGate using Wi-Fi
47
Connection to SmartGate using Wi-Fi Direct
48
SmartGate web interface
48
Password/PIN code change
49
SmartGate is a system that transmits certain driving data (such as fuel con-
sumption, speed or similar) via Wi-Fi or Wi-Fi Direct.
The ŠKODA compatible communications device (e.g. phone, tablet, notebook)
offer the possibility to further transmit the received data.
More information on available applications, a list of compatible communication
devices and information about SmartGate, can be found on the following
ŠKODA website » Fig. 34.
http://www.skoda-auto.com
WARNING■ The general binding country-specific regulations for operating communi-
cation devices in the vehicle must be observed.■
Never leave a communication device in the deployment area of an airbag,
on a seat, on the dash panel or any another area, from which it can be
thrown during a sudden braking manoeuvre, an accident or a collision - risk
of injury!
■
Never connect or disconnect a communication device while driving - risk
of accident!
CAUTION
■ To increase the access security to the transmitted vehicle data, once the
ŠKODA application has been started, you are requested to change the pass-
word/PIN code if the default password/PIN code has not yet been changed
» page 49 , Password/PIN code change . It is not possible to start the ŠKODA
application without having made this change.■
ŠKODA accepts no responsibility for any problems caused by incompatibility
or improper functioning of the communication devices.
Note
The ŠKODA applications, support communications devices with the Android
operating system version 4.x.x and later and iOS 7.x.x and higher.
Connection to SmartGate using Wi-Fi
Read and observe
and on page 47 first.
Connecting to an Android communication device
›
Switch on the ignition.
›
Switch on the Wi-Fi on the communication device to be connected.
›
Start the SmartGate application using the communication device to be con-
nected.
›
Then follow the instructions in the manual, which are included in the
SmartGate application.
With SmartGate, a maximum of four communication devices can be connected
simultaneously using Wi-Fi, with as many launched ŠKODA applications as re-
quired.
47Information system
Page 51 of 208

Password/PIN code changeRead and observe
and on page 47 first.
The factory set password for the Wi-Fi connection is the complete vehicle
identification number (upper case); the factory set PIN code for the Wi-Fi Direct
connection is the last 6 digits of the vehicle identification number.
After changing the password/PIN, the connection to SmartGate must be re-es- tablished on the communication device to be connected using the new pass-
word or new PIN code.
If the password/PIN code is still set to the preset factory password/PIN code,
you are requested to change the password/PIN code after starting the ŠKODA
application. Without changing the password/PIN code, you are unable to use
the application.
Changing the password for the Wi-Fi connection
›
Open the SmartGate web interface.
›
In the “WPA / WPA2 key:” menu item, enter the new password (8 to 63 al-
phanumeric characters and special characters, upper and lower case).
›
Confirm the password change by tapping on the “Save” button.
›
Restart SmartGate by tapping on the “Reboot” 1)
button.
Changing the PIN code for the Wi-Fi Direct connection
›
Open the SmartGate web interface.
›
In the “WiFi Direct PIN:” menu item, enter the new PIN code (6 digits).
›
Confirm the PIN code change by tapping on the “Save” button.
›
Restart SmartGate by tapping on the “Reboot” 1)
button.
Note
If you have forgotten your password/PIN code for connecting to SmartGate,
SmartGate must be reset to the factory settings in a specialised workshop.Unlocking and opening
Unlocking and locking
Introduction
This chapter contains information on the following subjects:
With the key on the lock cylinder unlock / lock
50
Unlocking/locking with the remote control key
50
Unlocking / locking - KESSY
51
Locking and unlocking the vehicle with the central locking button
51
Safe securing system
52
Individual settings
52
Opening/closing a door
53
Child safety lock
53
Malfunctions
53
Your car is equipped with a central locking system.
The central locking system allows you to lock and unlock all doors, the fuel fill-
er flap and boot lid at the same time. The functions of the central locking sys-
tem can be individually adjusted » page 52.
After unlocking, depending on vehicle equipment and setting the following is
valid for the central locking. ▶ The turn signal lights flash twice as confirmation that the vehicle has been
unlocked.
▶ The doors, the boot lid and the fuel filler flap are unlocked.
▶ The interior lamp illuminates.
▶ The SafeLock system is switched off.
▶ The indicator light in the driver door stops flashing.
▶ The anti-theft alarm system is deactivated.
After locking, depending on vehicle equipment and setting the following is
valid for the central locking. ▶ The turn signal lights flash once as confirmation that the vehicle has been
locked.
▶ The doors, the boot lid and the fuel filler flap are locked.
▶ The interior lamp goes out.
▶ The SafeLock system is switched on.
1)
If the “Reboot” interface is not displayed, you must manually restore the web browser display.
49Unlocking and opening
Page 54 of 208
The locking is shown by the illuminated symbol .
The central locking system also operates if the ignition is switched off.
The following applies after locking. ▶ Opening the doors and the boot lid from the outside is not possible.
▶ The doors can be unlocked and opened from the inside by a single pull on the
opening lever of the respective door.WARNINGDoors locked from the inside make it difficult for rescuers to get into the
vehicle in an emergency – risk to life!
Safe securing system
Read and observe
and on page 50 first.
As soon as the vehicle is locked from the outside, the safe lock prevents open-
ing the doors from the inside.
This function is pointed out by the following message on the display of the in-
strument cluster after switching out the ignition.
Check SAFELOCK! Owner's manual!CHECK SAFELOCK
After locking the vehicle, the warning light in the driver's door flashes for
around 2 seconds in quick succession, afterwards it begins to flash evenly at
longer intervals.
Switching off
The safe lock can be switched off in one of the following ways.
▶ By locking twice within 2 seconds.
▶ By disabling the button for interior monitoring and anti-towing » page 54.
The indicator light in the driver door flashes for about 2 seconds fast, goes out
and starts to flash at longer intervals after about 30 seconds.
If the vehicle is locked and the safe securing system is switched off, the door
can be opened separately from the inside by a single pull on opening lever.
The SafeLock switches on the next time the vehicle is locked.
WARNINGIf the car is locked and the safe securing system activated, no people must
remain in the car as it will then not be possible to either unlock a door or
open a window from the inside. The locked doors make it more difficult for
rescuers to get into the vehicle in an emergency – risk to life!
Individual settings
Read and observe
and on page 50 first.
The following functions of the central locking can be set in the Infotainment
» Owner´s Manual Infotainment , chapter CAR - Vehicle Settings or be set by a
specialist company.
Opening a single door
The function allows you to unlock only the driver's door and the fuel filler flap
with the radio remote control. KESSY makes possible the release of individual
doors as well as the fuel filler flap, depending on the area in which the key is
located. The other doors and the boot lid are only unlocked when the unlock-
ing is repeated.
Unlocking a vehicle side door
This function enables you to unlock both doors on the driver's side and the
fuel filler flap with the radio remote control unit. KESSY makes possible the re-
lease of both doors on one side as well as the fuel filler flap, depending on the
area in which the key is located. The other doors and the boot lid are only un-
locked when the unlocking is repeated.
Unlock all doors
The function allows you to unlock all doors, the boot lid and the fuel filler flap.
Automatic locking/unlocking
This function allows you to lock all doors and the boot lid from a speed of
about 15 km/h. The button in the handle of the boot lid is deactivated.
Renewed automatic unlocking of all doors as well as the luggage compartment
door when removing the ignition key or by opening any of the doors. In vehi-
cles with the system KESSY this is when any door is opened.
The vehicle can also be unlocked by pressing the central locking button
» page 51 .
52Using the system
Page 73 of 208

Buttons for the seat heating » Fig. 63
Left seat heating
Right seat heating
Switching on›
Press button
or
» Fig. 63 .
Pressing once switches the seat heating on at its maximum level - Level 2.
With repeated pressing of the switch, the intensity of the heating is reduced
until it is switched off.
The level of the seat heating is indicated by the number of illuminated warning
lights in the switch.
WARNINGIf you have a subdued pain and/or temperature sensitivity, e.g. through
medication, paralysis or because of chronic illness (e.g. diabetes), we rec-
ommend not to use the seat heating. There may be difficult to heal burns. If
the seat heating is used, we recommend to make regular breaks in your
journey when driving long distances, so that the body can recuperate from
the stress of the journey. Please consult your doctor, who can evaluate
your specific condition.
CAUTION
The following instructions must be observed to avoid damage to the seats.■Do not kneel on the seats or otherwise apply concentrated pressure to them.■
Do not turn on any of the seat heaters if seats are not occupied.
■
Do not switch on the relevant seat heating if the seats have objects attached
to or placed on them, for example a child seat, a bag, etc.
■
When there are additional protective covers or protective covers mounted on
each of the seats, do not turn the seat heating on.
Note
■ If the heaters for the rear seats are set to their highest intensity - level 2,
they are automatically switched down to level 1 after 10 minutes.■
If the on-board voltage decreases, the seat heating switches off automati-
cally » page 153 , Automatic load deactivation .
Front armrest settingFig. 64
Raise armrest
The armrest is adjustable in height.
Raise
›
Lift the armrest in the direction of arrow into one of the five locking positions
» Fig. 64 .
Folding down
›
Raise the armrest in the direction of the arrow until it stops » Fig. 64.
›
Fold down the rear armrest.
Rear armrest setting
Fig. 65
Fold down armrest
The armrest can be folded down to increase comfort.
Lowering / raising
›
Pull on the loop
A
and fold down the armrest forward in the direction of the
arrow » Fig. 65 .
Raising takes place in reverse order.
71Seats and head restraints
Page 74 of 208
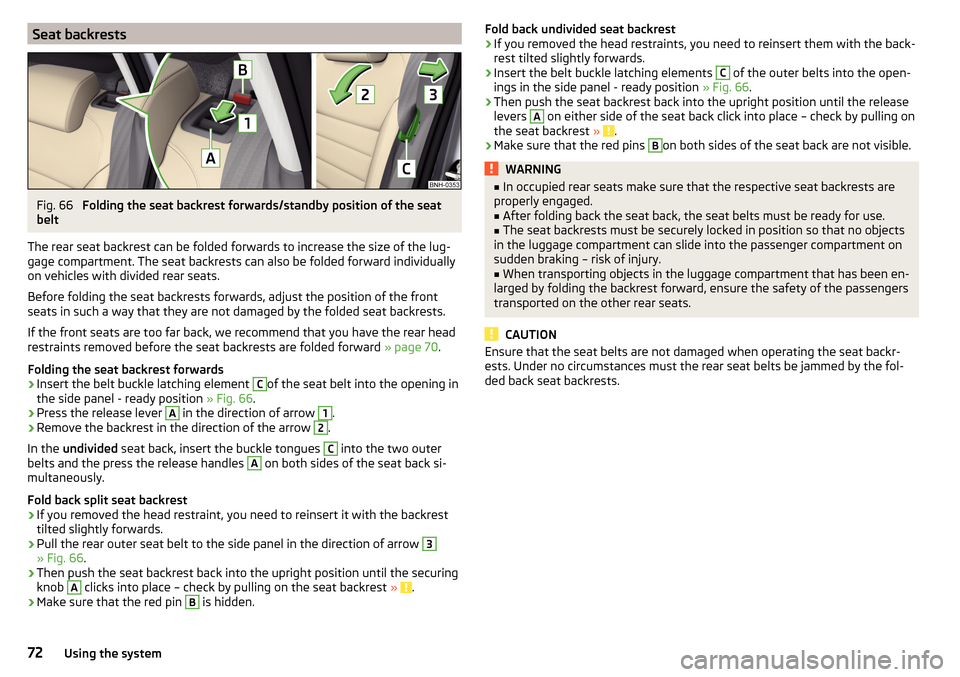
Seat backrestsFig. 66
Folding the seat backrest forwards/standby position of the seat
belt
The rear seat backrest can be folded forwards to increase the size of the lug-
gage compartment. The seat backrests can also be folded forward individually
on vehicles with divided rear seats.
Before folding the seat backrests forwards, adjust the position of the front
seats in such a way that they are not damaged by the folded seat backrests.
If the front seats are too far back, we recommend that you have the rear head
restraints removed before the seat backrests are folded forward » page 70.
Folding the seat backrest forwards
›
Insert the belt buckle latching element
C
of the seat belt into the opening in
the side panel - ready position » Fig. 66.
›
Press the release lever
A
in the direction of arrow
1
.
›
Remove the backrest in the direction of the arrow
2
.
In the undivided seat back, insert the buckle tongues
C
into the two outer
belts and the press the release handles
A
on both sides of the seat back si-
multaneously.
Fold back split seat backrest
›
If you removed the head restraint, you need to reinsert it with the backrest
tilted slightly forwards.
›
Pull the rear outer seat belt to the side panel in the direction of arrow
3
» Fig. 66 .
›
Then push the seat backrest back into the upright position until the securing
knob
A
clicks into place – check by pulling on the seat backrest » .
›
Make sure that the red pin
B
is hidden.
Fold back undivided seat backrest›If you removed the head restraints, you need to reinsert them with the back-
rest tilted slightly forwards.›
Insert the belt buckle latching elements
C
of the outer belts into the open-
ings in the side panel - ready position » Fig. 66.
›
Then push the seat backrest back into the upright position until the release
levers
A
on either side of the seat back click into place – check by pulling on
the seat backrest » .
›
Make sure that the red pins
B
on both sides of the seat back are not visible.
WARNING■
In occupied rear seats make sure that the respective seat backrests are
properly engaged.■
After folding back the seat back, the seat belts must be ready for use.
■
The seat backrests must be securely locked in position so that no objects
in the luggage compartment can slide into the passenger compartment on
sudden braking – risk of injury.
■
When transporting objects in the luggage compartment that has been en-
larged by folding the backrest forward, ensure the safety of the passengers
transported on the other rear seats.
CAUTION
Ensure that the seat belts are not damaged when operating the seat backr-
ests. Under no circumstances must the rear seat belts be jammed by the fol-
ded back seat backrests.72Using the system