mirror SKODA RAPID SPACEBACK 2016 1.G User Guide
[x] Cancel search | Manufacturer: SKODA, Model Year: 2016, Model line: RAPID SPACEBACK, Model: SKODA RAPID SPACEBACK 2016 1.GPages: 184, PDF Size: 28.1 MB
Page 118 of 184
Exterior mirrors
You should have additional exterior mirrors fitted if you are not able to see the
traffic behind the trailer using the standard rear-view mirrors.
Headlights
The front of the vehicle may lift up when a trailer (accessory) is being towed
and the headlights may dazzle other road users. Set the range of the head-
lights » page 54 .
Power supply of the trailer / accessory power system
In the electrical connection between the vehicle and trailer (accessory), the
trailer (accessories) is supplied with power from the vehicle (with ignition
switched on and off).
With the engine switched off, the vehicle battery is discharged by the connec-
ted consumers.
At low charge state of the vehicle battery, the power supply to the trailer (ac-
cessories) is interrupted.WARNING■ An improperly connected electrical installation of the trailer (accessories)
may result in an accident or serious injury from electrical shock.■
Do not make any adjustments to the electrical installation of the vehicle
and the trailer (accessories) - risk of an accident or serious injury from elec-
trical shock.
WARNING (Continued)■ After the electrical connection between the vehicle and trailer (accessory)
the trailer / accessory lights should be checked for function.■
Never use the securing eye to tow - risk of accident!
CAUTION
■ An improperly connected electrical installation of the trailer (accessories) can
lead to the inoperability of the vehicle electronics.■
The total power consumption of all the connected consumers to the trailer
power supply must not exceed 350 watts, otherwise there is a risk of damage
to the electrical system of the vehicle.
Loading a trailer
Correct the tyre inflation pressure on the vehicle for “full load” » page 137.
Distribution of the cargo
Distribute the cargo in the trailer in such a way that heavy items are located as
close to the trailer axle as possible. Secure the load from slipping.
The distribution of the weight is very poor if your vehicle is unladen and the
trailer is laden. Nevertheless, maintain a particularly low speed if you cannot
avoid driving with this combination.
WARNINGA sliding cargo can significantly adversely affect stability and driving safety
- there is a risk of accident!
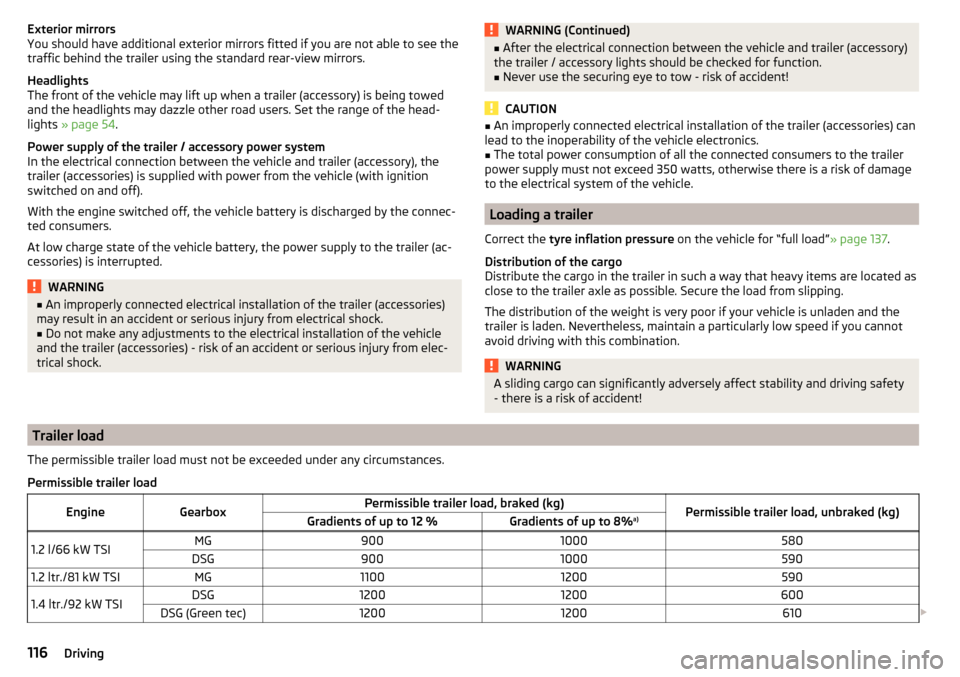
Trailer load
The permissible trailer load must not be exceeded under any circumstances.Permissible trailer loadEngineGearboxPermissible trailer load, braked (kg)Permissible trailer load, unbraked (kg)Gradients of up to 12 %Gradients of up to 8% a)1.2 l/66 kW TSIMG9001000580DSG90010005901.2 ltr./81 kW TSIMG110012005901.4 ltr./92 kW TSIDSG12001200600DSG (Green tec)12001200610
116Driving
Page 125 of 184
WARNING■When washing your vehicle in the winter: Water and ice in the braking
system can affect the braking efficiency – risk of accident!■
Take care when cleaning the underbody or the inside of the wheel wells -
there is a risk of injury from sharp metal parts!
CAUTION
■ Do not wash the vehicle in direct sunlight, do not exert pressure on the body
while washing. The temperature of the washing water should be no more than
60 °C max. - otherwise there is a risk of damaging the vehicle paint.■
Before driving through a car wash fold in the exterior mirrors - risk of dam-
age.
■
For vehicles with roof antenna the antenna rod should be unscrewed before
driving through a car wash - there is a risk of damage.
CAUTION
Washing the vehicle with high-pressure cleaners■Films should not be washed with any high-pressure cleaners - risk of dam-
age.■
Do not aim the water jet directly at the lock cylinders or the door or opening
joints when washing the vehicle in the winter – there is a risk of freezing.
■
Hold a large spraying distance to the rear camera lens, to plastic parts (e.g.
Roof racks, spoilers, protective strips and the like), as well as soft materials
such as rubber hoses or insulation material.
■
The sensors of the parking aid can be sprayed only for a short time and there
must be a minimum distance of 10 cm - there is a risk of damage.
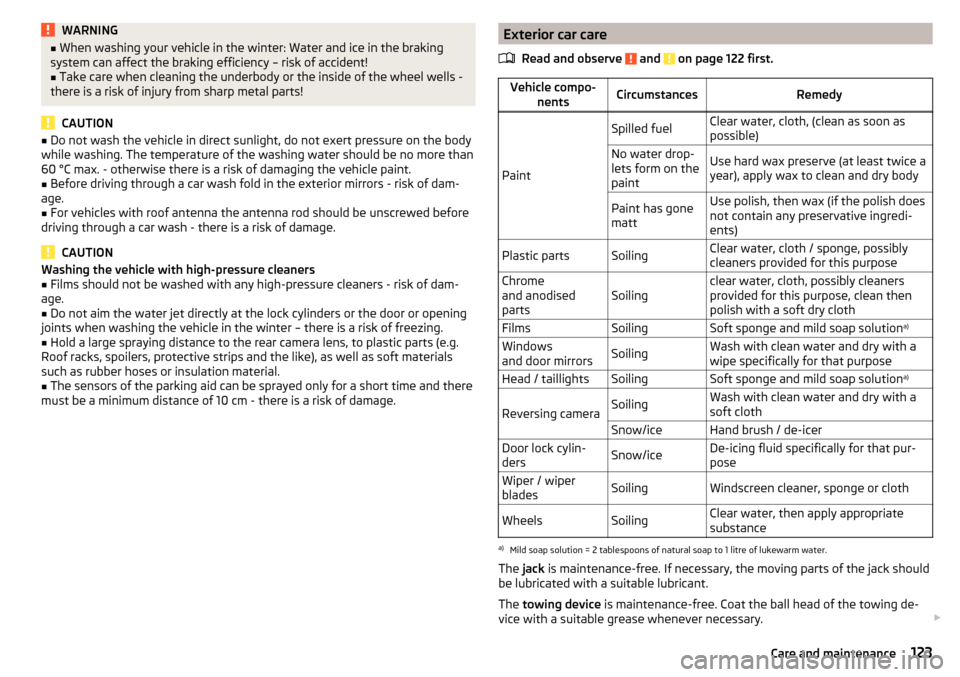
Exterior car care
Read and observe
and on page 122 first.
Vehicle compo- nentsCircumstancesRemedy
Paint
Spilled fuelClear water, cloth, (clean as soon as
possible)No water drop-
lets form on the
paintUse hard wax preserve (at least twice a
year), apply wax to clean and dry bodyPaint has gone
mattUse polish, then wax (if the polish does
not contain any preservative ingredi-
ents)Plastic partsSoilingClear water, cloth / sponge, possibly
cleaners provided for this purposeChrome
and anodised
partsSoilingclear water, cloth, possibly cleaners
provided for this purpose, clean then
polish with a soft dry clothFilmsSoilingSoft sponge and mild soap solution a)Windows
and door mirrorsSoilingWash with clean water and dry with a
wipe specifically for that purposeHead / taillightsSoilingSoft sponge and mild soap solution a)
Reversing cameraSoilingWash with clean water and dry with a
soft clothSnow/iceHand brush / de-icerDoor lock cylin-
dersSnow/iceDe-icing fluid specifically for that pur-
poseWiper / wiper
bladesSoilingWindscreen cleaner, sponge or clothWheelsSoilingClear water, then apply appropriate
substancea)
Mild soap solution = 2 tablespoons of natural soap to 1 litre of lukewarm water.
The jack is maintenance-free. If necessary, the moving parts of the jack should
be lubricated with a suitable lubricant.
The towing device is maintenance-free. Coat the ball head of the towing de-
vice with a suitable grease whenever necessary.
123Care and maintenance
Page 126 of 184
Protection of cavities
All the cavities of your vehicle which are at risk from corrosion are protected by
a layer of long-lasting protective wax applied in the factory.
If any small amount of wax flow out of the cavities at high temperatures, these
must be removed with a plastic scraper and the stains cleaned using a petrole-
um cleaner.
Underbody
The underside of your vehicle is already permanently protected by the factory
against chemical and mechanical influences.
We recommend having the protective coating checked — preferably before the
beginning of winter and at the end of winter.
Product life of the films
Environmental influences (e.g. sunlight, humidity, air pollution, rockfall) affect
the life of the films. Films will age and become brittle – this is entirely normal;
this is not a fault.
Sunlight may also affect the strength of the film colour.
When transporting a load on the roof rack (e.g. roof box or similar), there is an
increased risk of film damage (e.g. of chipping from the secured load).
CAUTION
■ Vehicle paint
■ Repair damaged areas as soon as possible.
■ Matt-painted parts should not be treated with polishes or hard waxes.
■ Do not polish in a dusty environment - risk of paint scratches.
■ Do not apply any paint care products to door seals or window guides.■
Plastic parts
■ Do not use paint polish.
■
Chromed and anodised parts
■ Do not polish in a dusty environment - risk of surface scratches.
■
Films
The following instructions must be observed, otherwise there is a risk of film
damage. ■ Do not use dirty cloths or sponges for cleaning.
■ Do not use a scraper or other means to remove ice and snow.
■ Do not polish the films
■ Do not use a high pressure cleaner on the films.
■
Rubber seals
■ Do not treat the door seals and window guides deal with anything - the
protective varnish coating could be damaged.
■ Windows and door mirrors
■ Do not clean the insides of the windows/mirrors with sharp objects - risk of
damage to the filaments or the antenna. ■ Do not use a cloth which has been used to polish the body - this could dirty
the window and impair visibility.■
Head / taillights
■ Do not wipe head/taillights dry, do not use any sharp objects - risk of dam-
age to the protective coating and cracks forming on the headlight glass cov-
ers.
■
Reversing camera
The following instructions must be observed, otherwise there is a risk of
camera damage.
■ Do not remove snow / ice with warm / hot water.
■ To wash, never use a pressure washer or steam jet.
■ For cleaning, do not use abrasive cleaners.
■
Door lock cylinders
■ Make sure that as little water as possible gets into the locking cylinder
when washing the vehicle - there is a risk of freezing the lock cylinder!
■
Wheels
■ Heavy soiling of the wheels can affect the balance of the wheels - the re-
sult can be a vibration, which can cause premature wear of the steering.
Removing ice and snow from the windows
Fig. 148
Installation location of the ice
scraper, removing the scraper
Read and observe and on page 122 first.
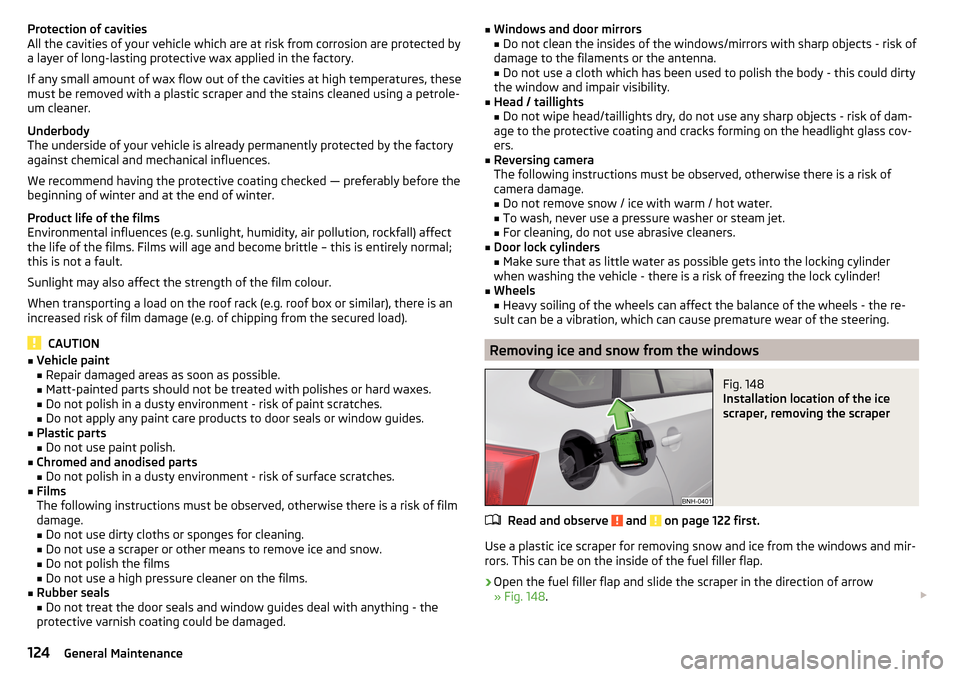
Use a plastic ice scraper for removing snow and ice from the windows and mir-
rors. This can be on the inside of the fuel filler flap.
›
Open the fuel filler flap and slide the scraper in the direction of arrow
» Fig. 148 .
124General Maintenance
Page 156 of 184
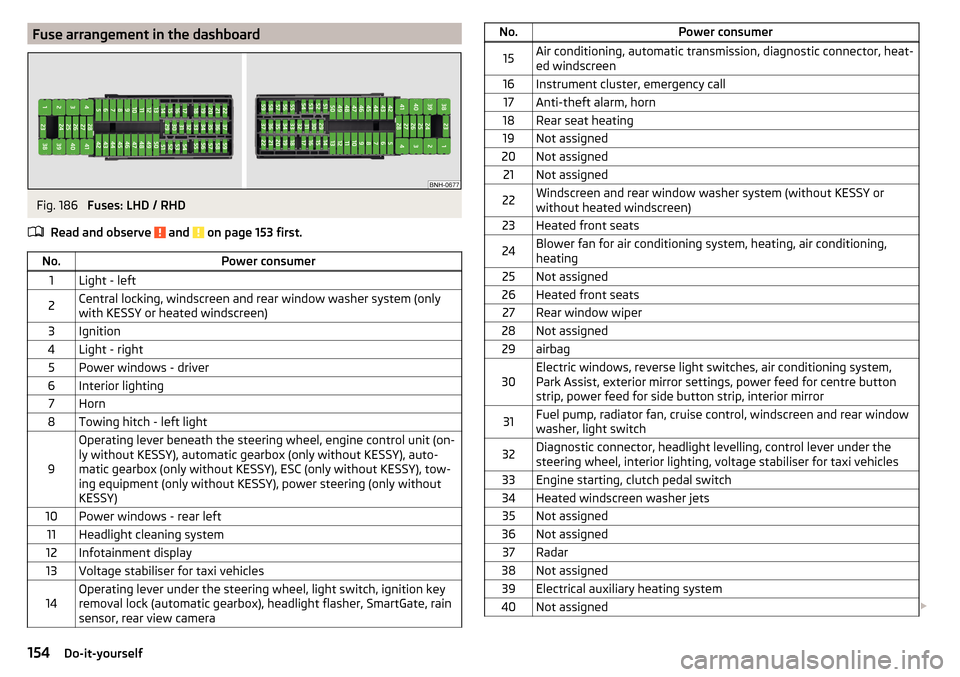
Fuse arrangement in the dashboardFig. 186
Fuses: LHD / RHD
Read and observe
and on page 153 first.
No.Power consumer1Light - left2Central locking, windscreen and rear window washer system (only
with KESSY or heated windscreen)3Ignition4Light - right5Power windows - driver6Interior lighting7Horn8Towing hitch - left light
9
Operating lever beneath the steering wheel, engine control unit (on-
ly without KESSY), automatic gearbox (only without KESSY), auto-
matic gearbox (only without KESSY), ESC (only without KESSY), tow-
ing equipment (only without KESSY), power steering (only without
KESSY)10Power windows - rear left11Headlight cleaning system12Infotainment display13Voltage stabiliser for taxi vehicles14Operating lever under the steering wheel, light switch, ignition key
removal lock (automatic gearbox), headlight flasher, SmartGate, rain
sensor, rear view cameraNo.Power consumer15Air conditioning, automatic transmission, diagnostic connector, heat-
ed windscreen16Instrument cluster, emergency call17Anti-theft alarm, horn18Rear seat heating19Not assigned20Not assigned21Not assigned22Windscreen and rear window washer system (without KESSY or
without heated windscreen)23Heated front seats24Blower fan for air conditioning system, heating, air conditioning,
heating25Not assigned26Heated front seats27Rear window wiper28Not assigned29airbag30Electric windows, reverse light switches, air conditioning system,
Park Assist, exterior mirror settings, power feed for centre button
strip, power feed for side button strip, interior mirror31Fuel pump, radiator fan, cruise control, windscreen and rear window
washer, light switch32Diagnostic connector, headlight levelling, control lever under the
steering wheel, interior lighting, voltage stabiliser for taxi vehicles33Engine starting, clutch pedal switch34Heated windscreen washer jets35Not assigned36Not assigned37Radar38Not assigned39Electrical auxiliary heating system40Not assigned 154Do-it-yourself
Page 157 of 184
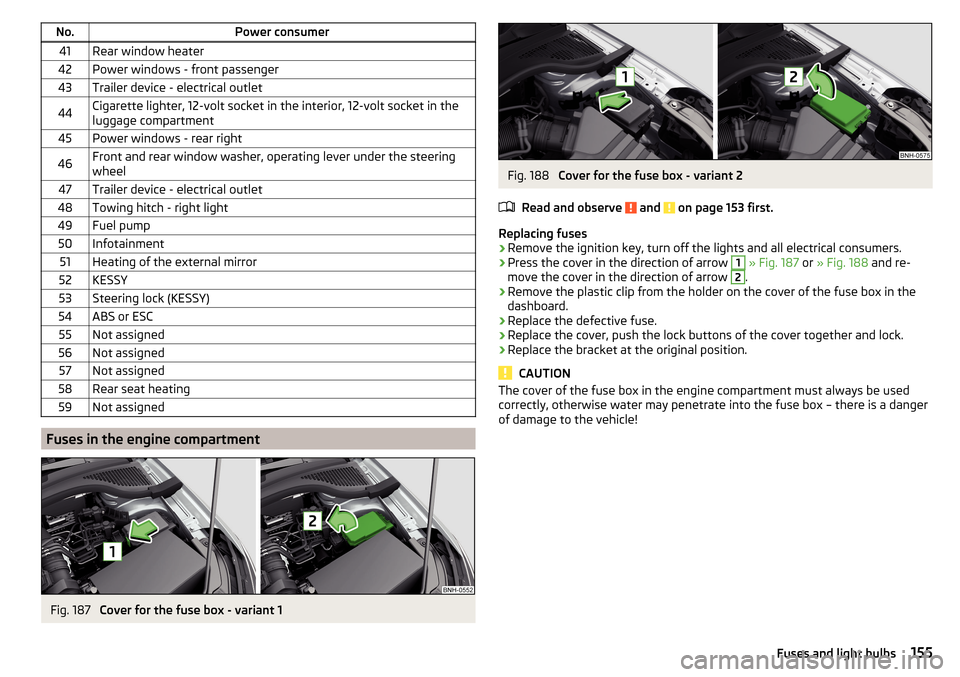
No.Power consumer41Rear window heater42Power windows - front passenger43Trailer device - electrical outlet44Cigarette lighter, 12-volt socket in the interior, 12-volt socket in the
luggage compartment45Power windows - rear right46Front and rear window washer, operating lever under the steering
wheel47Trailer device - electrical outlet48Towing hitch - right light49Fuel pump50Infotainment51Heating of the external mirror52KESSY53Steering lock (KESSY)54ABS or ESC55Not assigned56Not assigned57Not assigned58Rear seat heating59Not assigned
Fuses in the engine compartment
Fig. 187
Cover for the fuse box - variant 1
Fig. 188
Cover for the fuse box - variant 2
Read and observe
and on page 153 first.
Replacing fuses
›
Remove the ignition key, turn off the lights and all electrical consumers.
›
Press the cover in the direction of arrow
1
» Fig. 187 or » Fig. 188 and re-
move the cover in the direction of arrow
2
.
›
Remove the plastic clip from the holder on the cover of the fuse box in the
dashboard.
›
Replace the defective fuse.
›
Replace the cover, push the lock buttons of the cover together and lock.
›
Replace the bracket at the original position.
CAUTION
The cover of the fuse box in the engine compartment must always be used
correctly, otherwise water may penetrate into the fuse box – there is a danger
of damage to the vehicle!155Fuses and light bulbs
Page 167 of 184
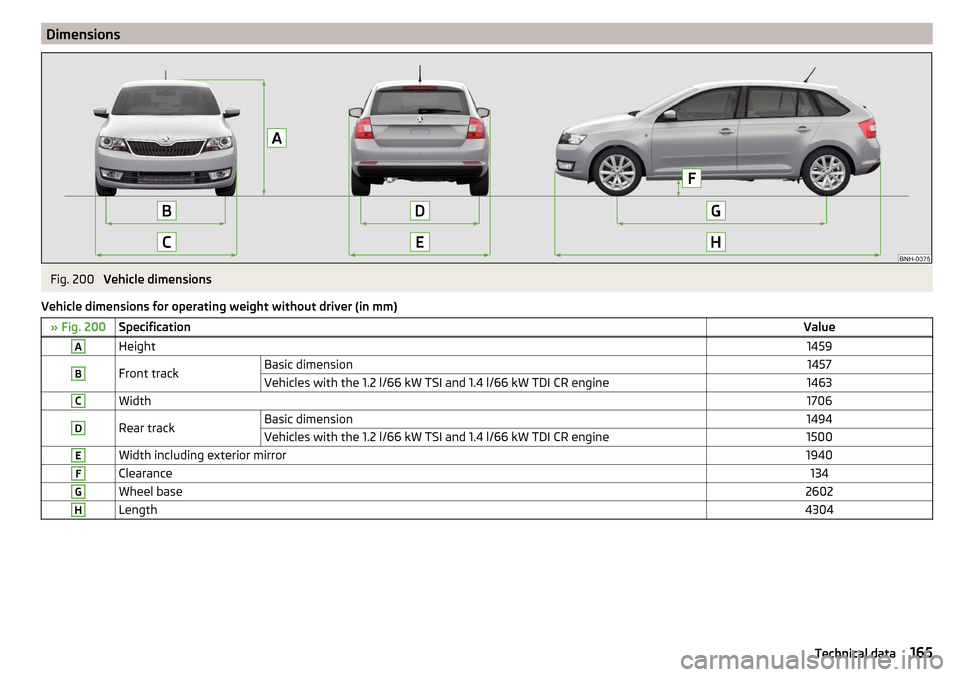
DimensionsFig. 200
Vehicle dimensions
Vehicle dimensions for operating weight without driver (in mm)
» Fig. 200SpecificationValueAHeight1459BFront trackBasic dimension1457Vehicles with the 1.2 l/66 kW TSI and 1.4 l/66 kW TDI CR engine1463CWidth1706DRear trackBasic dimension1494Vehicles with the 1.2 l/66 kW TSI and 1.4 l/66 kW TDI CR engine1500EWidth including exterior mirror1940FClearance134GWheel base2602HLength4304165Technical data
Page 174 of 184
Gear changeGear recommendation38
Information on the selected gear38
Gear changing Gear stick
91
Genuine parts119
Glasses compartment72
GPS See Owner´s Manual -Infotainment
6
H
Handbrake
90
Warning light30
Hazard warning light system57
HBA98
Headrests65
Heating82
Air distribution control84
Mirrors62
Seats66
Windscreen and rear window59
Help in an emergency8
HHC98
Hill Start Assist (HHC)98
Hitch111
Hooks77
Horn27
I
Ignition lock
87
Images See Owner´s Manual -Infotainment
6
Immobiliser86
In an emergency Changing a wheel
141
Inertia reels14
Information about the towing process148
Information system37
Auto Check Control37
Door alarm37
Gear recommendation38
MAXI DOT display41
Multifunction display39
Service interval display42
Infotainment6
Instrument cluster28
See instrument cluster28
Warning lights29
interior light58
Interior lighting58
Interior monitor50
iPad holder74
ISOFIX22, 23
J
Jack
141
Jacking points Raise vehicle
144
Jump-starting147
K
KESSY Unlocking/locking
47
key Switch on/off ignition
87
Key Change battery
150
Lock46
Starting / stopping the engine87
Unlock46
L
Lamp failure Warning light
36
Lamps Warning light
36
LEAVING HOME56
Lever Cruise control
104
Front Assist108
Operation of the information system39
Speed regulating system105
Turn signal/main beam55
Windscreen wipers60, 61
Light Automatic driving light control
55
Beam range adjustment54
Cockpit57
COMING HOME / LEAVING HOME56
Daytime running lights54
Driving abroad57
Flash55
Fog lights/rear fog light56
Fog lights with the CORNER function56
Hazard warning light system57
Headlight cleaning system61
Low beam54
Parking light54, 57
Replacing bulbs156
Switching on/off54
Turn signal/main beam55
Light bulbs Replacing
156
Lighting Interior lighting
57
Luggage compartment75
Lights53
Warning lights29
Load163
Lock Individual settings
48
Key46
Locking Central locking button
47
in case of emergency151
KESSY47
Remote control46
172Index
Page 175 of 184
Lock steering lock86
Low beam54
Low tyre pressure warning refer to the tyre pressure monitoring
109
Luggage compartment75
Cover77
Fastening elements76
Fixing nets76
Floor covering on both sides79
Lighting75
unlock manually151
Unlock the boot lid151
Variable loading floor80
Luggage compartment cover77
Luggage compartment lid50
Luggage Storage Storage net bag
79
M
Main beam
55
Warning light34
Manual air conditioning Air distribution control
84
Controls82
Manual gear changing see Gear changing
91
Materials defect liability4
MAXI DOT See MAXI DOT display
41
MAXI DOT display Main menu
41
Menu item assist systems42
Menu item Audio41
Menu item navigation41
Menu item telephone42
Operation39
Maximum speed167
MCB98
Mechanical window51
Open and close52
Media AUX
68
See Owner´s Manual -Infotainment6
USB68
Memory40
Mirror61
Vanity59
mobility warranty5
Modes of the automatic transmission92
Modifications and technical alterations118
MSR97
Multi collision brake (MCB)98
Multifunction display Functions
39
Information40
Memory40
Multifunction pocket77
Multifunction steering wheel39
Multimedia holder71
N
N1
79
Nameplate162
Navigation S Owner´s Manual -Infotainment
6
Nets76
O
oil See engine oil
131
Oil Information messages
35
Oil changing Engine oil
130
On-board computer see multifunction display
39
Operating weight163
Original accessories119
Overview Cockpit
27
Engine compartment129
Fuses153
Warning lights29
P
Parking
91
Parking assistance99
Reversing camera101
Parking aid Automatic system activation when moving for-ward
101
Function99
Parking assistance99
Activation / deactivation100
Display in the Infotainment display100
Parking light54
Parking the vehicle See Parking
91
Park Pilot99
Parts replacement118
Passive safety Before setting off
10
Driving safety10
Passive Safety10
Pedals91
Footmats91
Petrol126
Pocket in the luggage compartment77
Pockets73
Power steering31
Practical features Pockets
73
Storage compartment for umbrella73
Waste container69
Preheating unit32
173Index
Page 176 of 184
R
Radio See Owner´s Manual - Infotainment
6
Raise vehicle144
Rear fog light56
Warning light32
Rear seats64
Rear view camera Function keys
102
Operation102
Orientation lines102
Rear view mirror61
Rear window - heating59
Refilling Coolant
132
Engine oil131
Windscreen washer fluid130
Reflective vest140
Refuelling126
Fuel126
Remote Change battery
150
Synchronization process49
Remote control Unlocking/locking the vehicle
46
Removing the tow bar, Step 1
114
tow bar, Step 2114
Repairs and technical alterations118
Replacing Bulbs
156
Fuses153
Windscreen wiper blades152
Rev counter28
Reversing camera101
Rims136
Roof Load
81
Roof rack81
Running in Brake pads
89
Engine94
Tyres136
S
SafeLock
48
Safety10
Airbag15
Child safety19
Child safety seats19
Correct seated position10
Headrests65
ISOFIX22, 23
TOP TETHER24
SAFE, SAFELOCK See SafeLock
48
Saving electrical energy94
Saving fuel94
SD card See Owner´s Manual -Infotainment
6
Seat belt height adjustment
13
Warning light34
Seat belts12
Belt tensioners14
fastening and unfastening14
Inertia reels14
Warning light30
Seats Adjusting the front seats
63
front63
Front armrest64
Headrests65
Heating66
Rear64
Rear armrest65
Rear seat backrests64
Setting63
Seats and head restraint63
Selector lever92
Selector lever control92
Selector lever lock Warning light
34
Service118
Service interval display42
Warning light37
Service intervals120
Service Plan121
Set lower position of the variable loading floor
80
upper position of the variable loading floor80
Setting Headrests
65
Mirror62
Seat belt height13
Seats63
Setting the Clock
38
Shifting Tiptronic
93
SmartGate Connection via Wi-Fi
43
introductory information43
Password/PIN code change44
Setting44
Wi-Fi direct connection44
SmartLink See Owner´s Manual -Infotainment
6
Snow chains139
Sockets 12-volt socket in the interior
71
12-volt socket in the luggage compartment71
Sound See Owner´s Manual -Infotainment
6
Spare wheel138
Removing / stowing142
Speed control system103
174Index