airbag SKODA RAPID SPACEBACK 2016 1.G Owner's Guide
[x] Cancel search | Manufacturer: SKODA, Model Year: 2016, Model line: RAPID SPACEBACK, Model: SKODA RAPID SPACEBACK 2016 1.GPages: 184, PDF Size: 28.1 MB
Page 78 of 184
WARNING■Never exceed the maximum permissible load of the respective fasteners,
nets, hooks etc. Heavy objects were not secured sufficiently – risk of injury!■
Do not exceed the permissible axle loads and permissible gross weight of
the vehicle – risk of accident!
■
An unsecured dirt or improperly attached load could slip during a sudden
manoeuvre or in an accident - danger of injury!
■
Loose cargo could hit a deployed airbag and injure occupants – danger of
death!
■
When transporting loads in the luggage compartment that has been en-
larged by folding the rear seats forward, ensure the safety of the passen-
gers transported on the other rear seats .
CAUTION
■ Never exceed the maximum permissible load of the respective fasteners,
nets, hooks etc. - these could be damaged.■
Please ensure that the heating elements for the rear window heater are not
damaged as a result of abrasive objects.
■
Do not place sharp objects in the nets and storage compartments in the lug-
gage compartment - there is a risk of damage to the net as well as the com-
partments.
■
Put the items in the storage compartments carefully and do not put point-
shaped objects - there is a risk of damage to the compartments.
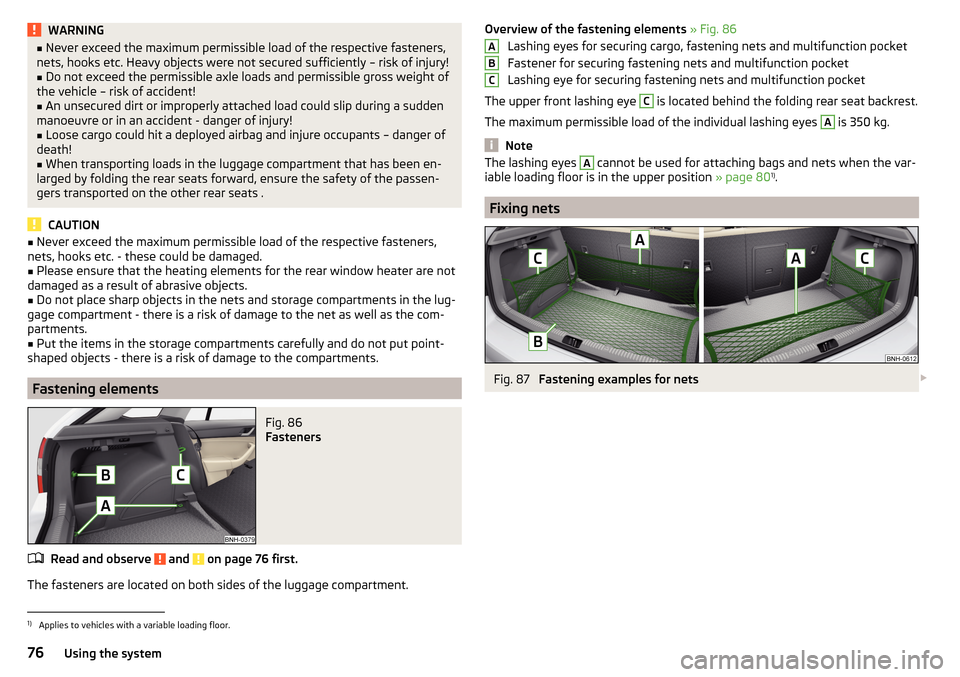
Fastening elements
Fig. 86
Fasteners
Read and observe and on page 76 first.
The fasteners are located on both sides of the luggage compartment.
Overview of the fastening elements » Fig. 86
Lashing eyes for securing cargo, fastening nets and multifunction pocket
Fastener for securing fastening nets and multifunction pocket
Lashing eye for securing fastening nets and multifunction pocket
The upper front lashing eye C
is located behind the folding rear seat backrest.
The maximum permissible load of the individual lashing eyes
A
is 350 kg.
Note
The lashing eyes A cannot be used for attaching bags and nets when the var-
iable loading floor is in the upper position » page 801)
.
Fixing nets
Fig. 87
Fastening examples for nets
ABC1)
Applies to vehicles with a variable loading floor.
76Using the system
Page 106 of 184

Operation descriptionFig. 125
Cruise control system controls
Read and observe on page 103 first.
Overview of the CCS controls » Fig. 125AActivate CCS (control deactivated) Interrupt control (sprung position) Deactivate CCS (delete set speed)BTake control again a)
/ Increase speedCStart control / reduce speedDSwitching between CCS and speed limitera)
If no speed is set the current speed is adopted.
Once the controls are activated, the CCS maintains the vehicle at the set
speed; the warning light lights up in the instrument cluster.
Controls are automatically interrupted if any of the following occur.
▶ The brake pedal is operated.
▶ When one of the brake assist systems (e.g. ESC) intervenes.
▶ Through an airbag deployment.
▶ By pressing the
D
button.
WARNING■ Always deactivate the cruise control system after use to prevent the sys-
tem being switched on unintentionally.■
Control may only be resumed if the set speed is not too high for the cur-
rent traffic conditions.
Note■ During control, speed can be increased by pressing the accelerator pedal. Re-
leasing the accelerator pedal will cause the speed to drop again to the set
speed.■
By pressing the
D
button during the regulation, this is cancelled and the
speed limiter is activated.
Speed limiter
Introduction
This chapter contains information on the following subjects:
Operation
104
Description of operation
105
The speed limiter limits the maximum driving speed to the set speed limit.
This limit can only be exceeded by depressing the accelerator pedal fully.
The condition in which the Speed Limiter monitors a potential set speed limit
excess is referred to as regulation.
WARNINGThe general information relating to the use of assistance systems must be
observed » page 96, in section Introduction .
Operation
Fig. 126
MAXI DOT display: Examples of speed limiter status displays
104Driving
Page 120 of 184
General Maintenance
Care and maintenance
Service work, adjustments and technical alterations
Introduction
This chapter contains information on the following subjects:
Vehicle operating under different weather conditions
118
Statutory checks
118
ŠKODA service partner
118
ŠKODA Original parts
119
ŠKODA Original accessories
119
Spoiler
119
Component protection
119
Airbags
119
Acceptance and recycling of used vehicles
120
The instructions and guidelines from ŠKODA AUTO must be observed when us-
ing accessories or carrying out any modifications, repairs or technical altera-
tions to your vehicle.
Adhering to these instructions and guidelines helps ensure road safety and
helps keep your vehicle in a good technical condition.
WARNING■ Adjustments, repairs and technical changes to the vehicle should only be
carried out by a specialist. Work carried out incorrectly (including work on
the electronic components and their software) can result in malfunctions -
there is a risk of accident and, potentially, increased wear on parts!■
We recommend that you use only ŠKODA Original Accessories and ŠKODA
Original Parts which have been expressly approved for use on your vehicle.
Reliability, safety and suitability for your vehicle are guaranteed with these.
■
Do not use any products which have not been approved by ŠKODA AUTO,
even though these may be products with a type approval or which have
been approved by a nationally recognised testing laboratory.
Vehicle operating under different weather conditions
Read and observe
on page 118 first.
If you would like to operate your vehicle in countries other than those with its
intended weather conditions, you should contact a ŠKODA Partner. He or she
will advise you if certain precautions need to be taken to ensure the full func-
tioning of the vehicle or to prevent damage (e.g. coolant, changing the battery
or similar).
Statutory checks
Read and observe
on page 118 first.
Many countries have legislation requiring the operational reliability, safety and,
where applicable, roadworthiness and/or exhaust gas properties of a vehicle
to be tested at regular intervals. These tests can be carried out by workshops
or testing stations that have been legally authorised for this purpose.
The ŠKODA Service partners can prepare your vehicle for the official inspec-
tions, so as to ensure that it passes.
Even if you want to take your vehicle to an officially approved test centre for
prior checking in preparation for a legally required test, we recommend that
you consult your ŠKODA Service Partner beforehand.
ŠKODA service partner
Read and observe
on page 118 first.
All ŠKODA service partners work according to the instructions and guidelines
from ŠKODA AUTO. All service and repair work is therefore carried out on time
and to the appropriate quality. Adhering to these guidelines and instructions
helps ensure road safety and helps keep your vehicle in a good technical con-
dition.
We therefore advise you to have all modifications, repairs and technical altera-
tions to your vehicle carried out by a ŠKODA Service Partner.
118General Maintenance
Page 121 of 184
ŠKODA Original partsRead and observe
on page 118 first.
We recommend the use of ŠKODA Genuine Parts for your vehicle, as these
parts are approved by ŠKODA AUTO. These parts comply wholly with ŠKODA
AUTO regulations and are identical to the parts used in series production.
ŠKODA AUTO is able to warrant the safety, suitability, and long life of these
products.
ŠKODA Service Partners are liable for any defects of ŠKODA Genuine Parts for
a period of 2 years after sale in accordance with the materials defect liability,
unless agreed otherwise in the purchase agreement.
ŠKODA Original accessories
Read and observe
on page 118 first.
If you wish to fit accessories to your vehicle, you should remember the follow-
ing.
We recommend that you use ŠKODA Genuine Accessories in your vehicle.
ŠKODA AUTO has selected these accessories to ensure that they are reliable,
safe and suitable for your particular vehicle. Although we constantly monitor
the market, we are not able to assess or vouch the suitability of other products
for your vehicle, despite the fact that some products may have operational ap-
proval or may have been approved by a nationally recognised testing laborato-
ry.
ŠKODA Service Partners are liable for any defects of ŠKODA Genuine Accesso-
ries for a period of 2 years after installation or delivery in accordance with the
materials defect liability, unless agreed otherwise in the purchase agreement
or any other agreements.
Spoiler
Read and observe
on page 118 first.
WARNINGIf your vehicle is equipped with a Genuine Accessories spoiler on the front
bumper in combination with the spoiler on the boot lid, the following in-
structions must be observed - otherwise there is a risk of accidents and se-
rious injuries!■
The vehicle can only be equipped with a spoiler on the front bumper in
combination with the corresponding spoiler on the boot lid.
■
A Genuine Accessories spoiler cannot be fitted to the front bumper either
on its own (without a spoiler on the boot lid) or in combination with an un-
suitable spoiler on the boot lid.
■
We recommend that you consult the ŠKODA Service Partner for any re-
pairs to or replacement, addition or removal of spoilers.
■
Unprofessional work carried out on the spoilers of your vehicle may result
in some functions/vehicle systems malfunctioning.
Component protection
Read and observe
on page 118 first.
Some electronic vehicle components (such as the instrument cluster) are fac-
tory-equipped with component protection. This ensures the functional limita-
tion of these components in a non-legitimate installation in another vehicle
(e.g. after a theft) or operation outside the vehicle.
Airbags
Read and observe
on page 118 first.
WARNING■Modifications, repairs and technical alterations that have been carried out
unprofessionally can cause damage and operational faults, and can also se-
riously impair the effectiveness of the airbag system – risk of accident and
fatal injury!■
A change to the vehicle's wheel suspension, including the use of non-ap-
proved wheels and tire combinations, can impair the functioning of the air-
bag system - risk of accident and fatal injury!
119Care and maintenance
Page 122 of 184
WARNING■No changes may be made to airbag system components, the front bump-
er and the bodywork.■
Any work on the airbag system including the installation and removal of
system components due to other repair work (e.g. removal of the steering
wheel) must only be carried out by a specialist garage.
■
Do not manipulate individual parts of the airbag system, as this might re-
sult in the airbag being deployed.
■
If the airbag has been deployed, the airbag system must be replaced.
Acceptance and recycling of used vehicles
Read and observe
on page 118 first.
All new ŠKODA vehicles are 95% recyclable.
Service intervals
Introduction
This chapter contains information on the following subjects:
Overview of service intervals
120
Fixed service intervals QI1 - QI4
121
Variable service interval QI6
121
Digital Service Plan
121
The service interval display in the display of the instrument cluster will remind
you to carry out every service stipulated by the manufacturer at the right time
in order to prevent you from forgetting any » page 42.
The completion of services can be verified through the printed verification
from the digital service schedule and the respective receipts.
The specified service intervals are tailored to normal operating conditions.
In the case of aggravated operating conditions, it will be necessary to have
some service work carried out before the date of the next regular service or
between the specified service intervals. This applies mainly to the cleaning or
the replacement of the air filter insert in regions with heavy dust pollution as
well as checking and replacing the toothed belt, but also to vehicles with die-
sel particle filters, which can put greater strain on the engine oil.
The following is taken to mean aggravated operating conditions:
▶ Fuel containing sulphur.
▶ Frequent short trips.
▶ Longer periods of engine idling (e.g. taxis).
▶ Operation in areas with heavy dust pollution.
▶ Frequent trailer operation.
▶ Predominantly stop-and-go traffic as is e.g. often the case in city driving.
▶ Operation predominantly during winter.
You will be told at the specialist garage whether the operating conditions of
your vehicle may make it necessary for service work to be carried out between
the normal service intervals.
Different service charges may apply according to the particular scope of work
required, the vehicle type and specification, and your vehicle’s condition.
Note
■ The customer is responsible for covering the cost of all services including
changing or replenishing the oil, even during the warranty period, unless sta-
ted otherwise in the ŠKODA AUTO warranty terms or other agreements.■
You will be informed about the service checks and actions at each service by
the specialist garage.
Overview of service intervals
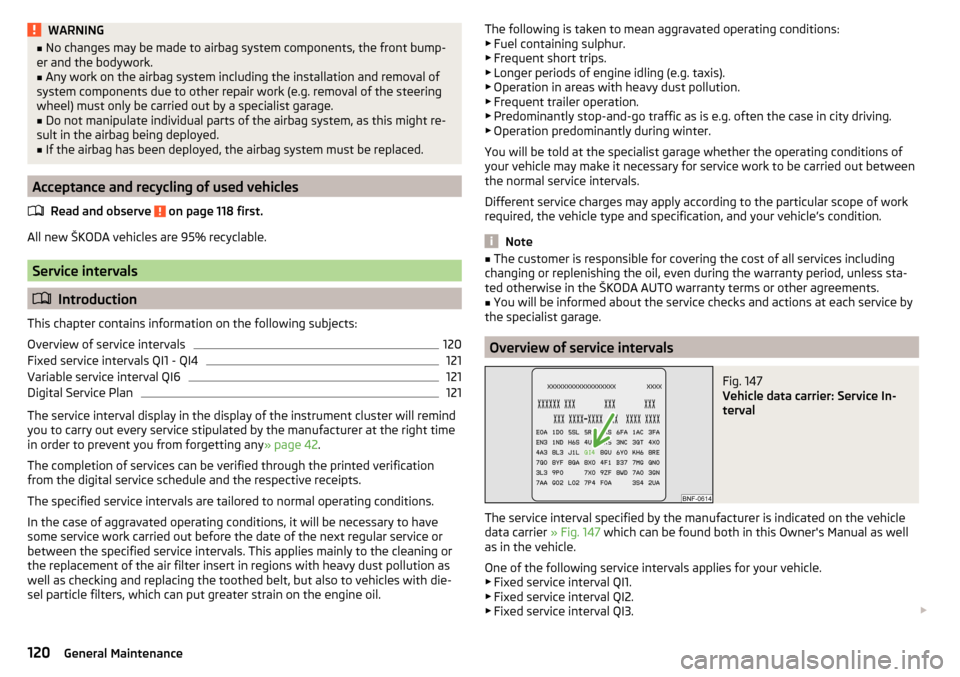
Fig. 147
Vehicle data carrier: Service In-
terval
The service interval specified by the manufacturer is indicated on the vehicle
data carrier » Fig. 147 which can be found both in this Owner's Manual as well
as in the vehicle.
One of the following service intervals applies for your vehicle. ▶ Fixed service interval QI1.
▶ Fixed service interval QI2.
▶ Fixed service interval QI3.
120General Maintenance
Page 156 of 184
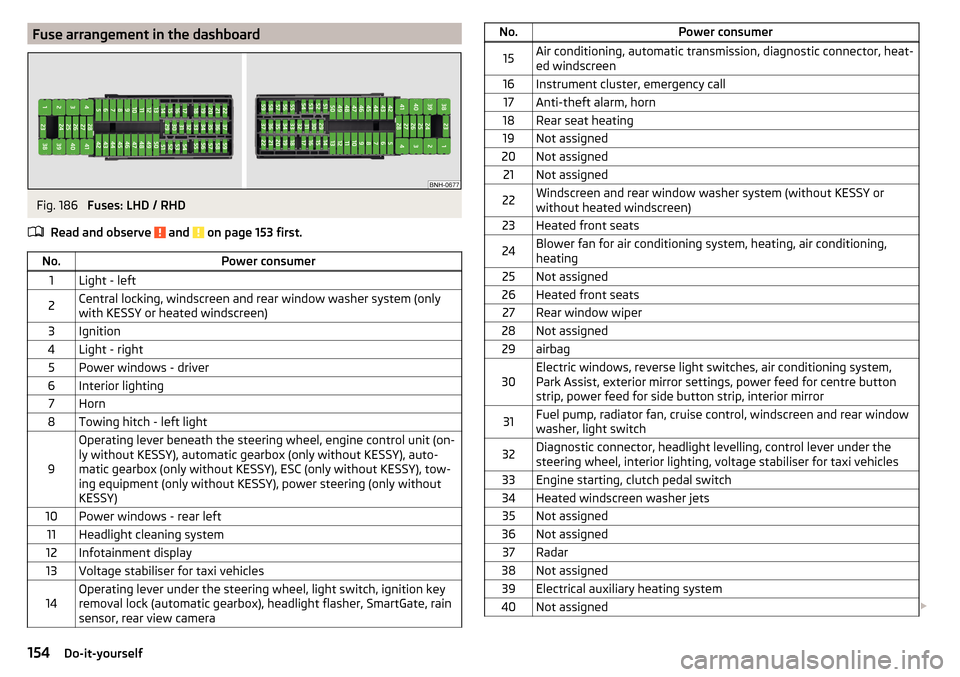
Fuse arrangement in the dashboardFig. 186
Fuses: LHD / RHD
Read and observe
and on page 153 first.
No.Power consumer1Light - left2Central locking, windscreen and rear window washer system (only
with KESSY or heated windscreen)3Ignition4Light - right5Power windows - driver6Interior lighting7Horn8Towing hitch - left light
9
Operating lever beneath the steering wheel, engine control unit (on-
ly without KESSY), automatic gearbox (only without KESSY), auto-
matic gearbox (only without KESSY), ESC (only without KESSY), tow-
ing equipment (only without KESSY), power steering (only without
KESSY)10Power windows - rear left11Headlight cleaning system12Infotainment display13Voltage stabiliser for taxi vehicles14Operating lever under the steering wheel, light switch, ignition key
removal lock (automatic gearbox), headlight flasher, SmartGate, rain
sensor, rear view cameraNo.Power consumer15Air conditioning, automatic transmission, diagnostic connector, heat-
ed windscreen16Instrument cluster, emergency call17Anti-theft alarm, horn18Rear seat heating19Not assigned20Not assigned21Not assigned22Windscreen and rear window washer system (without KESSY or
without heated windscreen)23Heated front seats24Blower fan for air conditioning system, heating, air conditioning,
heating25Not assigned26Heated front seats27Rear window wiper28Not assigned29airbag30Electric windows, reverse light switches, air conditioning system,
Park Assist, exterior mirror settings, power feed for centre button
strip, power feed for side button strip, interior mirror31Fuel pump, radiator fan, cruise control, windscreen and rear window
washer, light switch32Diagnostic connector, headlight levelling, control lever under the
steering wheel, interior lighting, voltage stabiliser for taxi vehicles33Engine starting, clutch pedal switch34Heated windscreen washer jets35Not assigned36Not assigned37Radar38Not assigned39Electrical auxiliary heating system40Not assigned 154Do-it-yourself
Page 171 of 184

Index
A
ABS Operation
97
Warning light32
Acceptance and recycling of used vehicles
120
Accessories118
Adjusting Steering wheel
11
Adjusting the seats10
Adjustment Beam range
54
Advance warning / emergency braking37
Advice on tyre/wheel usage136
Air-conditioning system Air outlet vents
84
Airbag15
Adjustments and impairments to the airbag system
119
Deactivation18
Deployment16
Warning light32
Airbag system15
Air conditioning82
Air distribution control84
Climatronic83
Manual air conditioning82
Air distribution control84
Air outlet vents84
Alarm49
Trailer117
All-year tyres139
Anti-lock braking system (ABS)97
Anti-theft alarm system49
Trailer117
Anti-theft wheel bolts143
Armrest Front64
Rear65
Ashtray70
Assembling the tow bar, Step 1
113
tow bar, Step 2113
Assist systems96
Auto Check Control38
Automatic drive Selector lever
92
Automatic driving light control55
Automatic gearbox92
Kickdown94
Malfunction34
Selector lever-emergency unlocking151
Selector lever lock93
Starting-off and driving94
Tiptronic93
Warning light34
Automatic shutdown of consumers133
Automatic transmission Selector lever lock
93
AUX68
Avoiding damage to your vehicle95
B
Ball bar Standby position
112
Ball head Check fitting
114
Ready position112
Battery Change in key
150
Belts12
Belt tensioners14
Bluetooth See Owner´s Manual -Infotainment
6
Bonnet Closing129
Opening129
Boot Cargo element
79
Class N1 vehicles79
Hooks77
See boot lid51
Storage compartments78
Boot cover Parking position
78
Boot lid Automatic locking
51
Open/Close51
Brake Assist (HBA)98
Brake booster89
Brake fluid133
Check133
specification133
Brake pads New
89
Brake pedal (automatic transmission) Warning light
34
Brakes Brake booster
89
Brake fluid133
Braking and stabilisation systems96
Handbrake90
Information on braking89
Warning lights30
Brake system96
Braking Running in
94
Breakdown kit145
Breakdown service see Help in an emergency
8
Buttons in the door Electric window
52
169Index
Page 172 of 184
C
Camera See reversing camera
101
CAR See Owner´s Manual -Infotainment
6
Car battery Check condition
134
Cover134
Disconnecting and reconnecting135
Replacing135
Warning light34
Winter operation134
CAR button See Owner´s Manual -Infotainment
6
Car care Exterior
123
Interior125
Outside124
Car computer see multifunction display
39
Care and maintenance118
Cargo element79
Carrier81
Car washing122
Exterior123
Interior125
Washing122
Central locking45
Problems49
Central locking button47
Change battery
150
Changing Windscreen wiper blades
152
Changing a wheel141
Changing141
Changing gear Selector lever
92
Changing wheelsWheels141
Charging a vehicle battery135
Check Brake fluid
133
Engine oil131
Fit ball head properly114
Oil level131
Checking Battery status
134
Coolant132
Checks Statutory checks
118
Children and safety19
Child safety lock49
Child seat19
Classification21
Installation location21, 23
ISOFIX22, 23
on the front passenger seat20, 21
TOP TETHER24
Cigarette lighter70
Cleaning the vehicle Outside
124
Windows124
Climatronic82
air distribution control84
Automatic mode84
Operating elements83
Clothes hook73
Cockpit27
Lighting57
Comfort signalling55
COMING HOME56
Compartments67
Component protection119
Computer see multifunction display
39
Coolant131
Checking132
Refilling132
Temperature display29
Warning light35
CORNER See Fog lights with the CORNER function
56
Correct routing of seat belt
13
Correct seated position10
Correct seating position12
Cup holders69
D
DAY LIGHT See Daytime running lights
54
Daytime running lights54
Dazzle60
De-icing the windscreen and rear window59
Deactivation Airbag
18
Delayed locking of the boot lid See boot lid
51
Departure angle166
Diesel127
Diesel fuel127
Diesel particle filter (DPF)36
Digital Clock38
Digital Service Plan121
Dipstick131
Display Cardinal points
37
Coolant temperature29
Fuel level29
Gear changes38
In the instrument cluster37
MAXI DOT41
Service intervals42
170Index
Page 176 of 184
R
Radio See Owner´s Manual - Infotainment
6
Raise vehicle144
Rear fog light56
Warning light32
Rear seats64
Rear view camera Function keys
102
Operation102
Orientation lines102
Rear view mirror61
Rear window - heating59
Refilling Coolant
132
Engine oil131
Windscreen washer fluid130
Reflective vest140
Refuelling126
Fuel126
Remote Change battery
150
Synchronization process49
Remote control Unlocking/locking the vehicle
46
Removing the tow bar, Step 1
114
tow bar, Step 2114
Repairs and technical alterations118
Replacing Bulbs
156
Fuses153
Windscreen wiper blades152
Rev counter28
Reversing camera101
Rims136
Roof Load
81
Roof rack81
Running in Brake pads
89
Engine94
Tyres136
S
SafeLock
48
Safety10
Airbag15
Child safety19
Child safety seats19
Correct seated position10
Headrests65
ISOFIX22, 23
TOP TETHER24
SAFE, SAFELOCK See SafeLock
48
Saving electrical energy94
Saving fuel94
SD card See Owner´s Manual -Infotainment
6
Seat belt height adjustment
13
Warning light34
Seat belts12
Belt tensioners14
fastening and unfastening14
Inertia reels14
Warning light30
Seats Adjusting the front seats
63
front63
Front armrest64
Headrests65
Heating66
Rear64
Rear armrest65
Rear seat backrests64
Setting63
Seats and head restraint63
Selector lever92
Selector lever control92
Selector lever lock Warning light
34
Service118
Service interval display42
Warning light37
Service intervals120
Service Plan121
Set lower position of the variable loading floor
80
upper position of the variable loading floor80
Setting Headrests
65
Mirror62
Seat belt height13
Seats63
Setting the Clock
38
Shifting Tiptronic
93
SmartGate Connection via Wi-Fi
43
introductory information43
Password/PIN code change44
Setting44
Wi-Fi direct connection44
SmartLink See Owner´s Manual -Infotainment
6
Snow chains139
Sockets 12-volt socket in the interior
71
12-volt socket in the luggage compartment71
Sound See Owner´s Manual -Infotainment
6
Spare wheel138
Removing / stowing142
Speed control system103
174Index