warning lights SKODA RAPID SPACEBACK 2016 1.G Owner's Guide
[x] Cancel search | Manufacturer: SKODA, Model Year: 2016, Model line: RAPID SPACEBACK, Model: SKODA RAPID SPACEBACK 2016 1.GPages: 184, PDF Size: 28.1 MB
Page 58 of 184
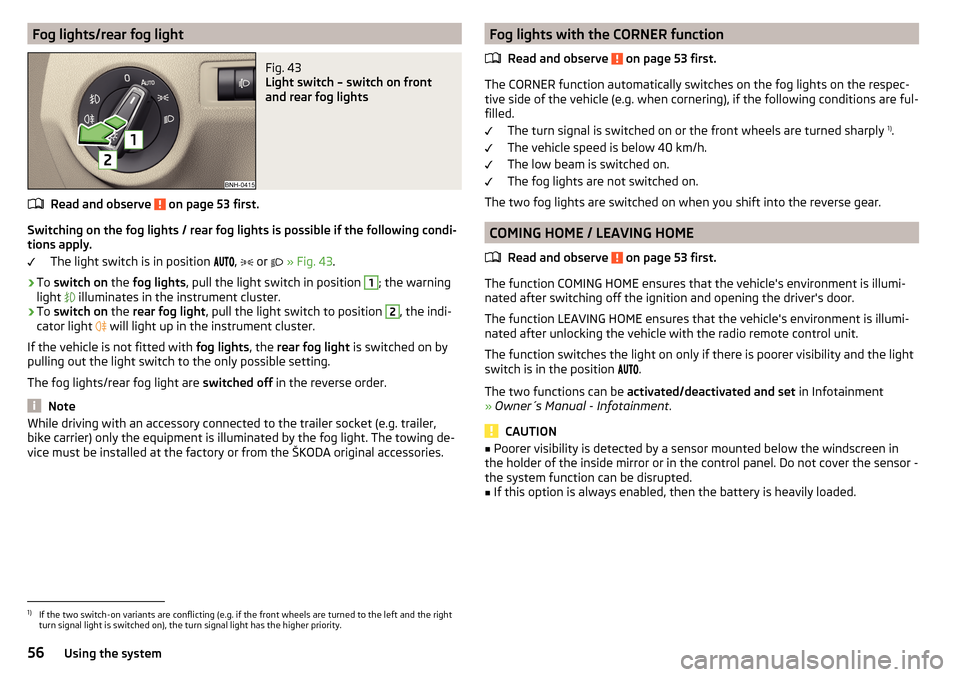
Fog lights/rear fog lightFig. 43
Light switch – switch on front
and rear fog lights
Read and observe on page 53 first.
Switching on the fog lights / rear fog lights is possible if the following condi-
tions apply.
The light switch is in position ,
or
» Fig. 43 .
›
To switch on the fog lights , pull the light switch in position
1
; the warning
light illuminates in the instrument cluster.
›
To
switch on the rear fog light , pull the light switch to position
2
, the indi-
cator light will light up in the instrument cluster.
If the vehicle is not fitted with fog lights, the rear fog light is switched on by
pulling out the light switch to the only possible setting.
The fog lights/rear fog light are switched off in the reverse order.
Note
While driving with an accessory connected to the trailer socket (e.g. trailer,
bike carrier) only the equipment is illuminated by the fog light. The towing de-
vice must be installed at the factory or from the ŠKODA original accessories.Fog lights with the CORNER function
Read and observe
on page 53 first.
The CORNER function automatically switches on the fog lights on the respec-tive side of the vehicle (e.g. when cornering), if the following conditions are ful-
filled.
The turn signal is switched on or the front wheels are turned sharply 1)
.
The vehicle speed is below 40 km/h.
The low beam is switched on.
The fog lights are not switched on.
The two fog lights are switched on when you shift into the reverse gear.
COMING HOME / LEAVING HOME
Read and observe
on page 53 first.
The function COMING HOME ensures that the vehicle's environment is illumi-
nated after switching off the ignition and opening the driver's door.
The function LEAVING HOME ensures that the vehicle's environment is illumi-
nated after unlocking the vehicle with the radio remote control unit.
The function switches the light on only if there is poorer visibility and the light
switch is in the position .
The two functions can be activated/deactivated and set in Infotainment
» Owner´s Manual - Infotainment .
CAUTION
■
Poorer visibility is detected by a sensor mounted below the windscreen in
the holder of the inside mirror or in the control panel. Do not cover the sensor -
the system function can be disrupted.■
If this option is always enabled, then the battery is heavily loaded.
1)
If the two switch-on variants are conflicting (e.g. if the front wheels are turned to the left and the right
turn signal light is switched on), the turn signal light has the higher priority.
56Using the system
Page 59 of 184
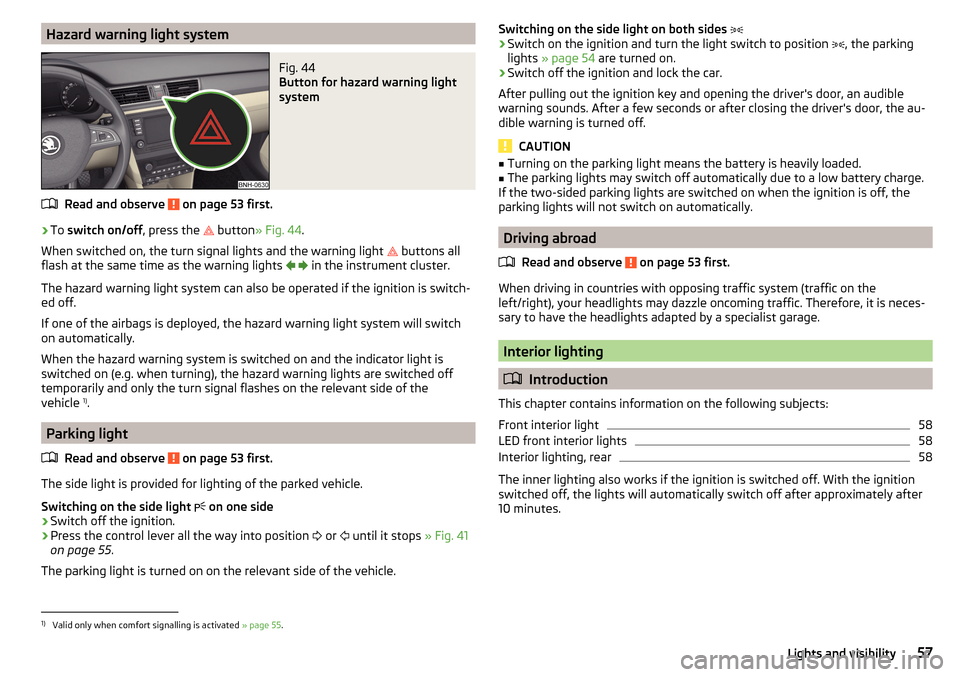
Hazard warning light systemFig. 44
Button for hazard warning light
system
Read and observe on page 53 first.
›
To switch on/off , press the
button
» Fig. 44 .
When switched on, the turn signal lights and the warning light buttons all
flash at the same time as the warning lights
in the instrument cluster.
The hazard warning light system can also be operated if the ignition is switch-
ed off.
If one of the airbags is deployed, the hazard warning light system will switch
on automatically.
When the hazard warning system is switched on and the indicator light is
switched on (e.g. when turning), the hazard warning lights are switched off
temporarily and only the turn signal flashes on the relevant side of the
vehicle 1)
.
Parking light
Read and observe
on page 53 first.
The side light is provided for lighting of the parked vehicle.
Switching on the side light on one side
›
Switch off the ignition.
›
Press the control lever all the way into position
or
until it stops
» Fig. 41
on page 55 .
The parking light is turned on on the relevant side of the vehicle.
Switching on the side light on both sides ›Switch on the ignition and turn the light switch to position , the parking
lights » page 54 are turned on.›
Switch off the ignition and lock the car.
After pulling out the ignition key and opening the driver's door, an audible
warning sounds. After a few seconds or after closing the driver's door, the au-
dible warning is turned off.
CAUTION
■ Turning on the parking light means the battery is heavily loaded.■The parking lights may switch off automatically due to a low battery charge.
If the two-sided parking lights are switched on when the ignition is off, the
parking lights will not switch on automatically.
Driving abroad
Read and observe
on page 53 first.
When driving in countries with opposing traffic system (traffic on the
left/right), your headlights may dazzle oncoming traffic. Therefore, it is neces-
sary to have the headlights adapted by a specialist garage.
Interior lighting
Introduction
This chapter contains information on the following subjects:
Front interior light
58
LED front interior lights
58
Interior lighting, rear
58
The inner lighting also works if the ignition is switched off. With the ignition
switched off, the lights will automatically switch off after approximately after
10 minutes.
1)
Valid only when comfort signalling is activated » page 55.
57Lights and visibility
Page 61 of 184
The rear light - variant 1 is operated together with the automatic operation of
the light at the front 1)
.
▶ When the front lighting is switched on, the rear lighting also turns on auto-
matically.
▶ When the front lighting is switched off, the rear lighting can be switched
on/off as required.
Visibility
Introduction
This chapter contains information on the following subjects:
Windscreen and rear window heater
59
Sun visors
59
Sun screen of the panoramic roof
60WARNINGNo objects should be attached to the sun visor that could restrict the view
or endanger the vehicle occupants during sudden braking or in a collision.
Windscreen and rear window heater
Fig. 47
Buttons for the windscreen and
rear window heater
Read and observe on page 59 first.
The heating for quick defrosting and ventilation of the windscreen and rear window.
The heating only works when the engine is running.
Buttons for the heating (depending on vehicle equipment) » Fig. 47
Switching on/off the windscreen heater
Switch on/off the rear window heater
When the heater is switched on, a lamp illuminates inside the button.
The heating automatically switches off after ten minutes.
Note
■ If the on-board voltage decreases, the heating switches off automatically
» page 133 , Automatic shutdown of consumers - vehicle battery discharge
protection .■
If the light is flashing inside the button, the heater will not function due to
low battery.
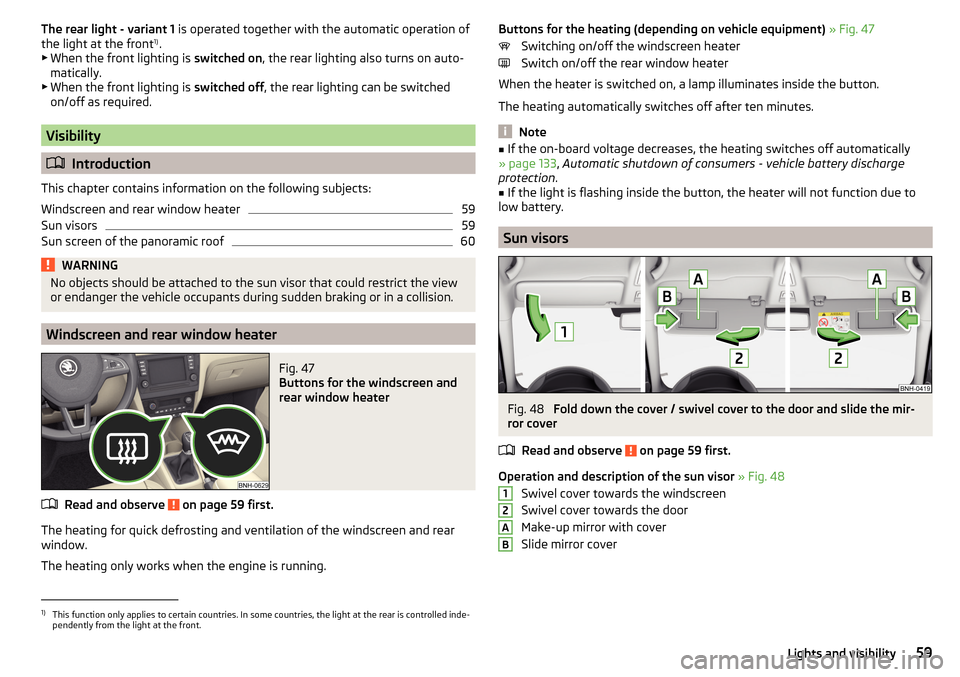
Sun visors
Fig. 48
Fold down the cover / swivel cover to the door and slide the mir-
ror cover
Read and observe
on page 59 first.
Operation and description of the sun visor » Fig. 48
Swivel cover towards the windscreen
Swivel cover towards the door
Make-up mirror with cover
Slide mirror cover
12AB1)
This function only applies to certain countries. In some countries, the light at the rear is controlled inde-
pendently from the light at the front.
59Lights and visibility
Page 63 of 184
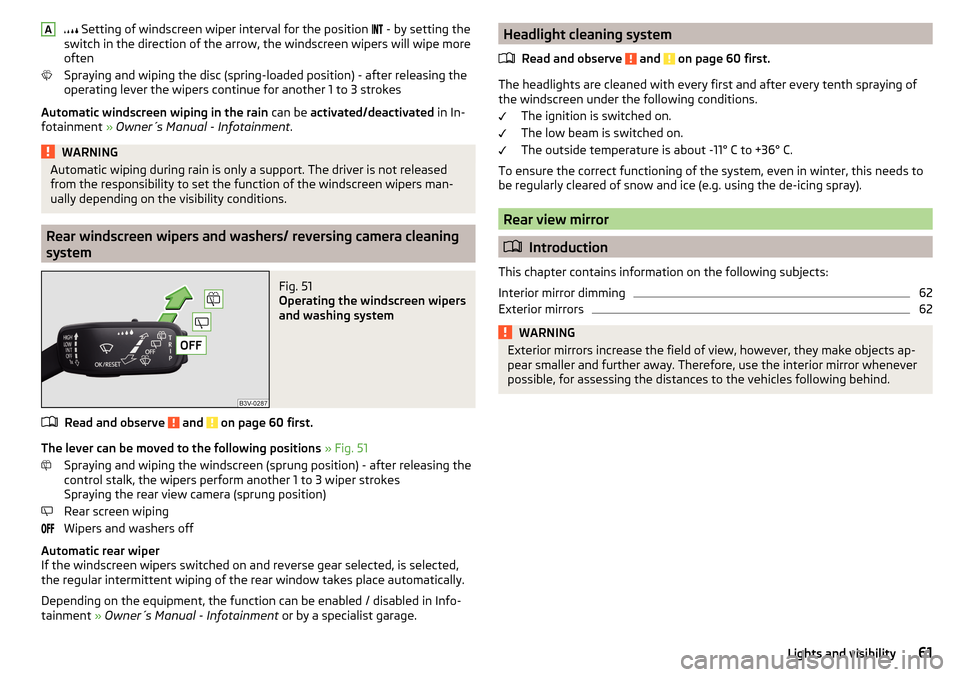
Setting of windscreen wiper interval for the position - by setting the
switch in the direction of the arrow, the windscreen wipers will wipe more
often
Spraying and wiping the disc (spring-loaded position) - after releasing the
operating lever the wipers continue for another 1 to 3 strokes
Automatic windscreen wiping in the rain can be activated/deactivated in In-
fotainment » Owner´s Manual - Infotainment .WARNINGAutomatic wiping during rain is only a support. The driver is not released
from the responsibility to set the function of the windscreen wipers man-
ually depending on the visibility conditions.
Rear windscreen wipers and washers/ reversing camera cleaning
system
Fig. 51
Operating the windscreen wipers
and washing system
Read and observe and on page 60 first.
The lever can be moved to the following positions » Fig. 51
Spraying and wiping the windscreen (sprung position) - after releasing the
control stalk, the wipers perform another 1 to 3 wiper strokes
Spraying the rear view camera (sprung position)
Rear screen wiping
Wipers and washers off
Automatic rear wiper
If the windscreen wipers switched on and reverse gear selected, is selected,
the regular intermittent wiping of the rear window takes place automatically.
Depending on the equipment, the function can be enabled / disabled in Info-
tainment » Owner´s Manual - Infotainment or by a specialist garage.
AHeadlight cleaning system
Read and observe
and on page 60 first.
The headlights are cleaned with every first and after every tenth spraying of
the windscreen under the following conditions.
The ignition is switched on.
The low beam is switched on.
The outside temperature is about -11° C to +36° C.
To ensure the correct functioning of the system, even in winter, this needs to be regularly cleared of snow and ice (e.g. using the de-icing spray).
Rear view mirror
Introduction
This chapter contains information on the following subjects:
Interior mirror dimming
62
Exterior mirrors
62WARNINGExterior mirrors increase the field of view, however, they make objects ap-
pear smaller and further away. Therefore, use the interior mirror whenever
possible, for assessing the distances to the vehicles following behind.61Lights and visibility
Page 64 of 184
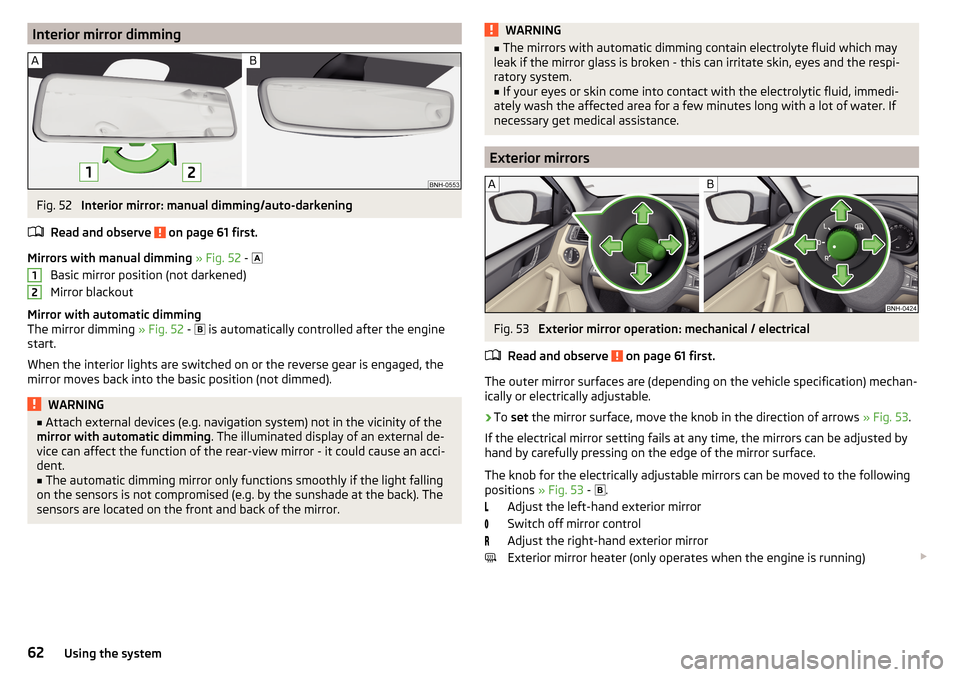
Interior mirror dimmingFig. 52
Interior mirror: manual dimming/auto-darkening
Read and observe
on page 61 first.
Mirrors with manual dimming » Fig. 52 -
Basic mirror position (not darkened)
Mirror blackout
Mirror with automatic dimming
The mirror dimming » Fig. 52 -
is automatically controlled after the engine
start.
When the interior lights are switched on or the reverse gear is engaged, the
mirror moves back into the basic position (not dimmed).
WARNING■ Attach external devices (e.g. navigation system) not in the vicinity of the
mirror with automatic dimming . The illuminated display of an external de-
vice can affect the function of the rear-view mirror - it could cause an acci-
dent.■
The automatic dimming mirror only functions smoothly if the light falling
on the sensors is not compromised (e.g. by the sunshade at the back). The
sensors are located on the front and back of the mirror.
12WARNING■ The mirrors with automatic dimming contain electrolyte fluid which may
leak if the mirror glass is broken - this can irritate skin, eyes and the respi-
ratory system.■
If your eyes or skin come into contact with the electrolytic fluid, immedi-
ately wash the affected area for a few minutes long with a lot of water. If
necessary get medical assistance.
Exterior mirrors
Fig. 53
Exterior mirror operation: mechanical / electrical
Read and observe
on page 61 first.
The outer mirror surfaces are (depending on the vehicle specification) mechan-
ically or electrically adjustable.
›
To set the mirror surface, move the knob in the direction of arrows » Fig. 53.
If the electrical mirror setting fails at any time, the mirrors can be adjusted by
hand by carefully pressing on the edge of the mirror surface.
The knob for the electrically adjustable mirrors can be moved to the following
positions » Fig. 53 -
.
Adjust the left-hand exterior mirror
Switch off mirror control
Adjust the right-hand exterior mirror
Exterior mirror heater (only operates when the engine is running)
62Using the system
Page 68 of 184
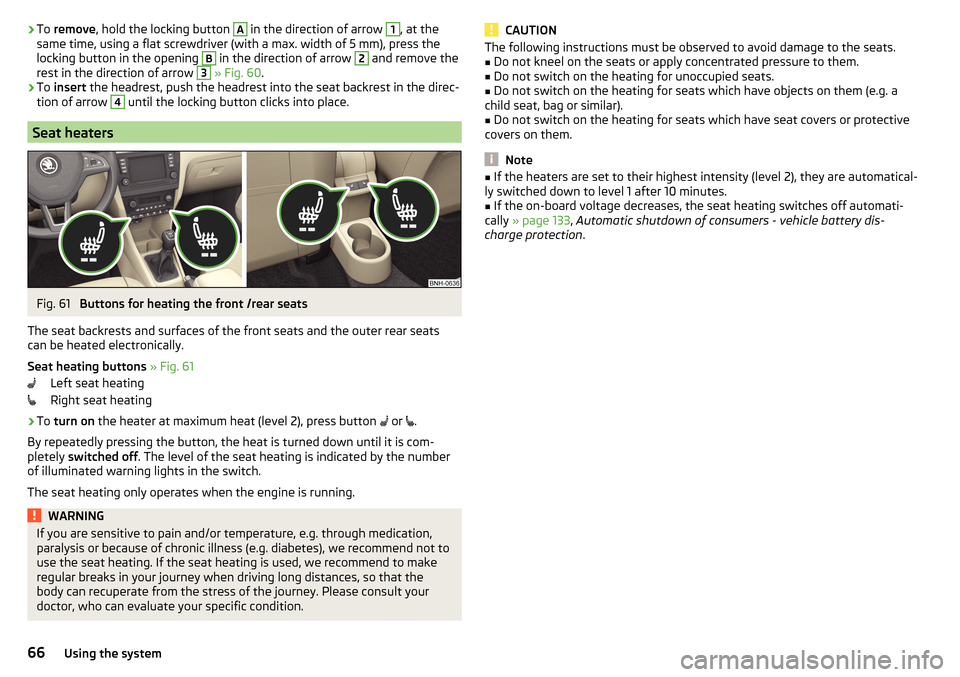
›To
remove , hold the locking button A in the direction of arrow 1, at the
same time, using a flat screwdriver (with a max. width of 5 mm), press the
locking button in the opening B
in the direction of arrow
2
and remove the
rest in the direction of arrow
3
» Fig. 60 .
›
To insert the headrest, push the headrest into the seat backrest in the direc-
tion of arrow
4
until the locking button clicks into place.
Seat heaters
Fig. 61
Buttons for heating the front /rear seats
The seat backrests and surfaces of the front seats and the outer rear seats
can be heated electronically.
Seat heating buttons » Fig. 61
Left seat heating
Right seat heating
›
To turn on the heater at maximum heat (level 2), press button
or
.
By repeatedly pressing the button, the heat is turned down until it is com-
pletely switched off . The level of the seat heating is indicated by the number
of illuminated warning lights in the switch.
The seat heating only operates when the engine is running.
WARNINGIf you are sensitive to pain and/or temperature, e.g. through medication,
paralysis or because of chronic illness (e.g. diabetes), we recommend not to
use the seat heating. If the seat heating is used, we recommend to make
regular breaks in your journey when driving long distances, so that the
body can recuperate from the stress of the journey. Please consult your
doctor, who can evaluate your specific condition.CAUTIONThe following instructions must be observed to avoid damage to the seats.■Do not kneel on the seats or apply concentrated pressure to them.■
Do not switch on the heating for unoccupied seats.
■
Do not switch on the heating for seats which have objects on them (e.g. a
child seat, bag or similar).
■
Do not switch on the heating for seats which have seat covers or protective
covers on them.
Note
■ If the heaters are set to their highest intensity (level 2), they are automatical-
ly switched down to level 1 after 10 minutes.■
If the on-board voltage decreases, the seat heating switches off automati-
cally » page 133 , Automatic shutdown of consumers - vehicle battery dis-
charge protection .
66Using the system
Page 84 of 184
Heating and ventilation
Heating, manual air conditioning system, Climatronic
Introduction
This chapter contains information on the following subjects:
Heating and manual air conditioning
82
Climatronic (automatic air conditioning)
83
Climatronic - automatic mode
84
Air distribution control
84
Air outlet vents
84
The heater heats and ventilates the vehicle interior. The air conditioning sys-
tem also cools and dehumidifies the vehicle interior.
The heating effect is dependent upon the coolant temperature, thus full heat
output only occurs when the engine has reached its operating temperature.
The cooling system works under the following conditions. The cooling system is switched on.
The engine is running.
The outside temperature is above 2 °C.
The blower is switched on.
When the cooling system is switched on, it prevents misting of the windscreen
and windows.
It is possible to boost the effectiveness of the cooling system by briefly acti-
vating the air recirculation system » page 84.
Health protection
To reduce health risks (e.g. common colds), the following instructions for the
use of the cooling system are to be observed. ▶ The difference between the outside temperature and the inside temperature
should not be greater than 5 °C.
▶ The cooling system should be turned off about 10 minutes before the end of
the journey.
▶ Once a year, a disinfection of the air conditioner is to be carried out by a spe-
cialist company.
WARNING■ The blower should always be on to prevent the windows from misting.
Otherwise there is a risk of accident.■
Under certain circumstances, air at a temperature of about 5 °C can flow
out of the vents when the cooling system is switched on.
Note
■ The air inlet in front of the windscreen must be free of e.g. ice, snow or
leaves to ensure that the heating and cooling system operates properly.■
After switching on the cooling Condensation from the evaporator of the air
conditioning may drip down and form a puddle below the vehicle. This is not a
leak!
■
If the coolant temperature is too high, the cooling system is switched off to
ensure that the engine cools down.
Heating and manual air conditioning
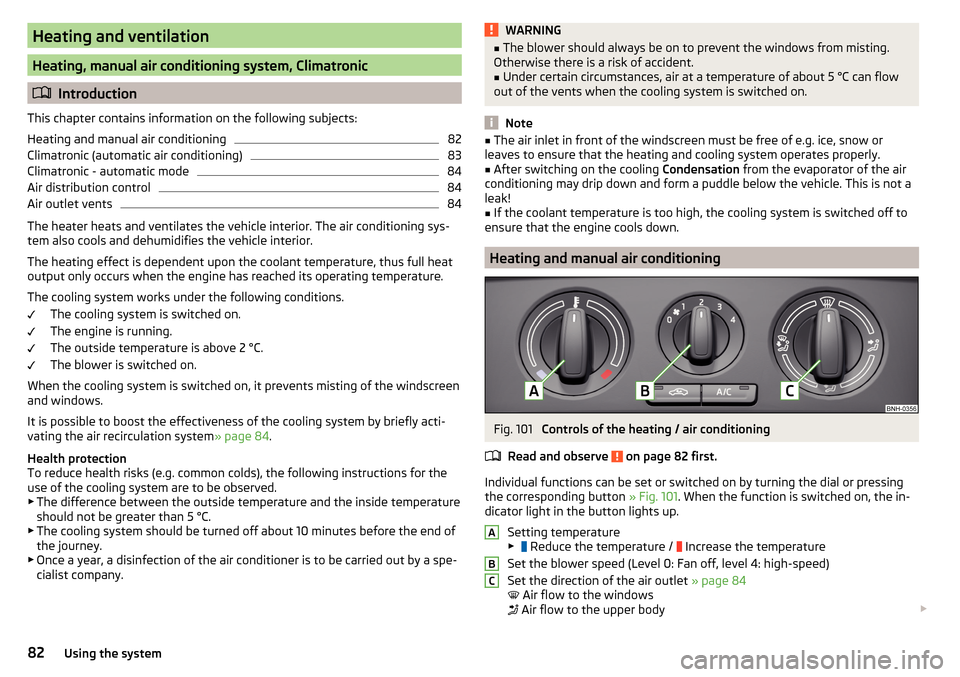
Fig. 101
Controls of the heating / air conditioning
Read and observe
on page 82 first.
Individual functions can be set or switched on by turning the dial or pressing the corresponding button » Fig. 101. When the function is switched on, the in-
dicator light in the button lights up.
Setting temperature
▶ Reduce the temperature /
Increase the temperature
Set the blower speed (Level 0: Fan off, level 4: high-speed)
Set the direction of the air outlet » page 84
Air flow to the windows
Air flow to the upper body
ABC82Using the system
Page 85 of 184
Air flow in the footwell
Air flow to the windows and the footwell
Switch recirculation on/off » page 84
Switch the cooling system on/off
Information on the cooling system
After pressing the button
» Fig. 101 , the warning light on the button lights
up, even if not all the conditions for the cooling system have been met. The
cooling system starts to work as soon as the following conditions have been
met » page 82 .
Note
To ensure adequate thermal comfort, during operation of the manual air condi-
tioning there could be an increase in the engine idle speed in some circum-
stances.
Climatronic (automatic air conditioning)
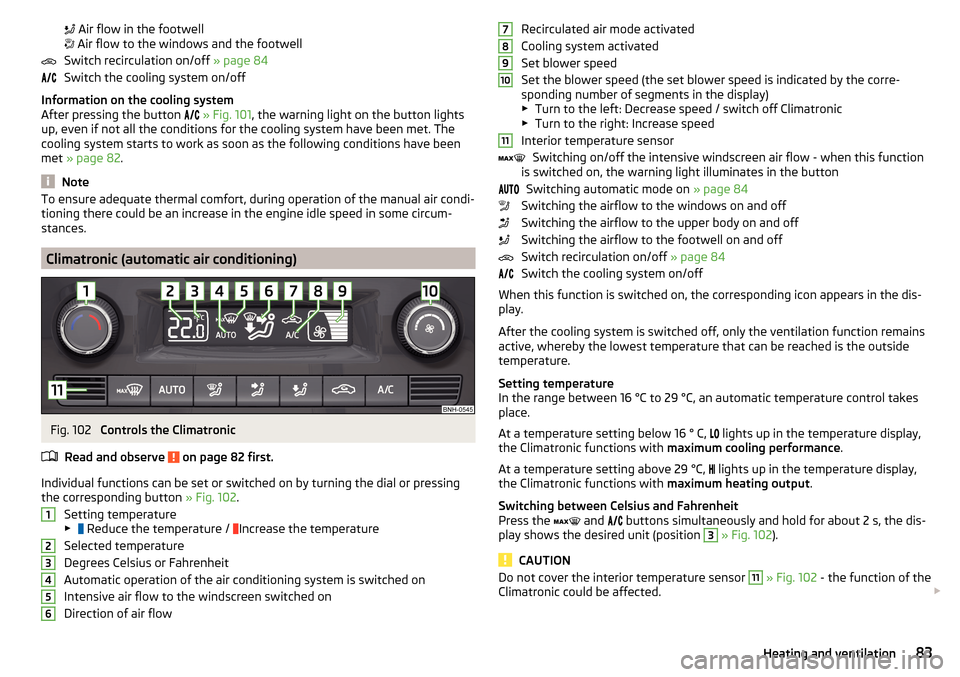
Fig. 102
Controls the Climatronic
Read and observe
on page 82 first.
Individual functions can be set or switched on by turning the dial or pressing the corresponding button » Fig. 102.
Setting temperature
▶ Reduce the temperature /
Increase the temperature
Selected temperature
Degrees Celsius or Fahrenheit
Automatic operation of the air conditioning system is switched on
Intensive air flow to the windscreen switched on
Direction of air flow
123456Recirculated air mode activated
Cooling system activated
Set blower speed
Set the blower speed (the set blower speed is indicated by the corre-
sponding number of segments in the display)
▶ Turn to the left: Decrease speed / switch off Climatronic
▶ Turn to the right: Increase speed
Interior temperature sensor Switching on/off the intensive windscreen air flow - when this function
is switched on, the warning light illuminates in the button
Switching automatic mode on » page 84
Switching the airflow to the windows on and off
Switching the airflow to the upper body on and off
Switching the airflow to the footwell on and off
Switch recirculation on/off » page 84
Switch the cooling system on/off
When this function is switched on, the corresponding icon appears in the dis-
play.
After the cooling system is switched off, only the ventilation function remains
active, whereby the lowest temperature that can be reached is the outside
temperature.
Setting temperature
In the range between 16 °C to 29 °C, an automatic temperature control takes
place.
At a temperature setting below 16 ° C, lights up in the temperature display,
the Climatronic functions with maximum cooling performance .
At a temperature setting above 29 °C, lights up in the temperature display,
the Climatronic functions with maximum heating output.
Switching between Celsius and Fahrenheit
Press the and
buttons simultaneously and hold for about 2 s, the dis-
play shows the desired unit (position 3
» Fig. 102 ).
CAUTION
Do not cover the interior temperature sensor 11 » Fig. 102 - the function of the
Climatronic could be affected. 789101183Heating and ventilation
Page 92 of 184
The wear and tear on the brake pads is dependent on the operating condi-
tions and driving style. In difficult conditions (e.g. urban, sporty driving), the
condition of the brakes should be checked between services by a specialist ga-
rage.
Brake response can be slower if the brakes are covered in moisture or, in win-
ter, have a layer of ice or salt on them . The brakes should be cleaned and
dried by applying the brakes many times over »
.
Corrosion on the brake discs and dirt on the brake pads can occur if the vehicle
has been parked for a long period and if you do not make much use of the
braking system. The brakes are cleaned by applying the brakes several times
over »
.
Before negotiating a long or steep gradient , reduce speed and shift down a
gear. As a result, the braking effect of the engine will be used, reducing the
load on the brakes. If, nevertheless, there is a need for additional braking, it
should be carried out at intervals.
Emergency braking warning - if it is necessary to brake hard, the system may
cause the brake lights to automatically flash, to alert the traffic behind.
New brake pads must first be “run in” because these do not initially have the
best possible braking effect. Drive especially carefully for the first 200 km or
so.
If the brake fluid level is too low, it can cause faults in the braking system ;
the warning light will light up in the instrument cluster
» page 30,
Braking
system . If the warning light does not light up, yet the stopping distance is per-
ceived to be longer than before, the driving style should be adapted in view of
the unknown cause of the problem, and braking kept to a minimum - seek the
help of a specialist garage without delay.
The brake booster increases the pressure generated with the brake pedal. The
brake booster only operates when the engine is running.
WARNING■ Greater physical effort is required for braking when the engine is switch-
ed off – risk of accident!■
The clutch pedal must be actuated when braking on a vehicle with man-
ual transmission, when the vehicle is in gear and at low revs. Otherwise,
the functionality of the brake system may be impaired – risk of accident!
WARNING (Continued)■ Do not depress the brake pedal if there is no requirement to slow down.
This causes the brakes to overheat and can also result in a longer braking
distance and excessive wear - risk of accident!■
Only brake for the purpose of drying and cleaning the brake discs if the
traffic conditions permit this. Do not place any other road users in jeopardy.
■
Recommendations for new brake pads should be followed.
■
When stopping and parking, the parking brake should always be applied
firmly, otherwise the vehicle could move off - risk of accident!
■
If a front spoiler, full wheel trim, etc. is mounted retrospectively, it must
be ensured that the air supply to the front wheel brakes is not reduced.
Otherwise, the front brakes could be in danger of overheating – risk of acci-
dent!
Handbrake
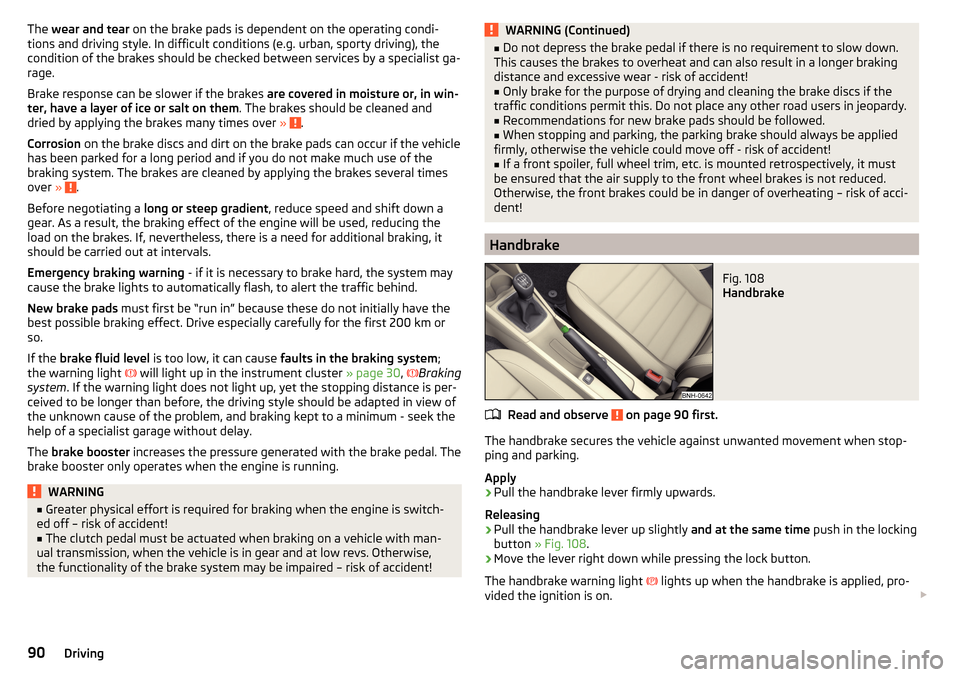
Fig. 108
Handbrake
Read and observe on page 90 first.
The handbrake secures the vehicle against unwanted movement when stop-
ping and parking.
Apply
›
Pull the handbrake lever firmly upwards.
Releasing
›
Pull the handbrake lever up slightly and at the same time push in the locking
button » Fig. 108 .
›
Move the lever right down while pressing the lock button.
The handbrake warning light
lights up when the handbrake is applied, pro-
vided the ignition is on.
90Driving
Page 93 of 184
A warning signal sounds if the vehicle is inadvertently driven off with the
handbrake applied. The handbrake warning is activated if the vehicle is driven
at a speed of over 5 km/h for more than 3 seconds.WARNINGDisengage the handbrake completely. A handbrake which is only partially
disengaged can result in the rear brakes overheating. This can have a nega-
tive effect on the operation of the brake system – risk of accident!
Parking
Read and observe
on page 90 first.
When stopping and parking, look for a place with a suitable surface » .
Only carry out the activities while parking in the specified order.
›
Bring the vehicle to a stop and depress the brake pedal.
›
Firmly apply the handbrake.
›
On vehicles with automatic transmission , place the selector lever in the P
position.
›
Switch off the engine.
›
For vehicles with manual transmission , select gear 1 or reverse gear R .
›
Release the brake pedal.
WARNING■
The parts of the exhaust system can become very hot. Therefore, never
stop the vehicle in places where the underside of your vehicle could come
into contact with flammable materials (e.g. dry grass, leaves, spilled fuel or
the like). - Risk of fire and serious injury can occur!■
When leaving the vehicle, never leave people unattended in the car who
could, for example, lock the vehicle or release the brake - risk of accidents
and injury!
Manual gear changing and pedals
Introduction
This chapter contains information on the following subjects:
Manual gear changing
91
Pedals
91Manual gear changingFig. 109
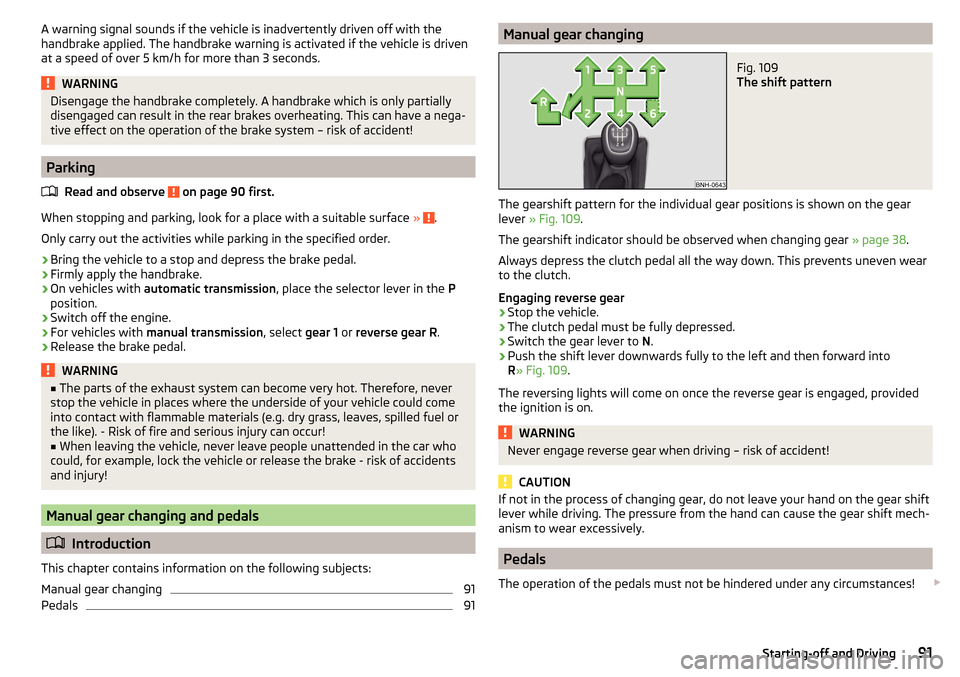
The shift pattern
The gearshift pattern for the individual gear positions is shown on the gear
lever » Fig. 109 .
The gearshift indicator should be observed when changing gear » page 38.
Always depress the clutch pedal all the way down. This prevents uneven wear
to the clutch.
Engaging reverse gear
›
Stop the vehicle.
›
The clutch pedal must be fully depressed.
›
Switch the gear lever to N.
›
Push the shift lever downwards fully to the left and then forward into
R » Fig. 109 .
The reversing lights will come on once the reverse gear is engaged, provided
the ignition is on.
WARNINGNever engage reverse gear when driving – risk of accident!
CAUTION
If not in the process of changing gear, do not leave your hand on the gear shift
lever while driving. The pressure from the hand can cause the gear shift mech-
anism to wear excessively.
Pedals
The operation of the pedals must not be hindered under any circumstances!
91Starting-off and Driving