dashboard SKODA RAPID SPACEBACK 2016 1.G Owner's Manual
[x] Cancel search | Manufacturer: SKODA, Model Year: 2016, Model line: RAPID SPACEBACK, Model: SKODA RAPID SPACEBACK 2016 1.GPages: 184, PDF Size: 28.1 MB
Page 14 of 184
WARNING■Never adjust the steering wheel when the vehicle is moving only when
the vehicle is stationary!■
The safety lever must always be locked so that the steering wheel cannot
accidentally change position – risk of accident!
Correct seating position for the front passenger
Read and observe
on page 11 first.
For passenger safety and to reduce the risk of injury in an accident, the follow-ing instructions must be observed.
Position the front passenger seat back as far as possible. The front pas-
senger must maintain a distance of at least 25 cm to the dash panel so
that the airbag offers the greatest possible safety if it is deployed.
Adjust the headrest so that the top edge of the headrest is at the same
level as the upper part of your head » Fig. 2 on page 11 -
B
(not for seats
with integrated headrest).
Correctly fasten the seat belt » page 12.
WARNING■
A distance of least 25 cm to the dashboard should be maintained, other-
wise the airbag system will not be able to protect you - hazard!■
Always keep your feet in the footwell when the car is being driven – nev-
er place your feet on the instrument panel, out of the window or on the
surface of the seats! You will be exposed to increased risk of injury if it be-
comes necessary to apply the brake or in the event of an accident. If an air-
bag is deployed, you could suffer fatal injuries by adopting an incorrect
seated position!
Correct seating position for the passengers in the rear seats
Read and observe
on page 11 first.
For the safety of the passengers in the rear seats, and to reduce the risk of
injury in an accident, the following instructions must be observed.
Adjust the headrest such that the top edge of the headrest is at the same
level as the upper part of the head » Fig. 2 on page 11 -
B
.
Correctly fasten the seat belt » page 12, Using seat belts .
Seat belts
Using seat belts
Introduction
This chapter contains information on the following subjects:
Correct routing of seat belt
13
Fastening and unfastening seat belts
14
Seat belts that are fastened correctly offer good protection in the event of an
accident. They reduce the risk of an injury and increase the chance of survival
in the event of a major accident.
The seat belts reduce the kinetic energy (energy of motion) to a considerable
extent. They also prevent uncontrolled movements which, in turn, may well re-
sult in severe injuries.
When transporting a child the following instructions must be observed
» page 19 , Transporting children safely .
WARNING■
Fasten seat belts before every ride! This also applies to other passengers
- there is a danger of injury!■
Maximum seat belt protection is only achieved if you are correctly seated
» page 10 , Correct and safe seated position .
■
The seat backrests of the front seats must not be tilted too far to the rear
otherwise the seatbelts can lose their effectiveness.
WARNINGInformation on dealing with the safety belts■The belt webbing must not be jammed in-between at any point or twis-
ted, or chafe against any sharp edges.■
Make sure you do not catch the seat belt in the door when closing it.
WARNINGInformation on the proper use of the safety belts■Adjust the height of the belt in such a way that the shoulder part of the
belt is roughly positioned across the middle of your shoulder – on no ac-
count across your neck. 12Safety
Page 18 of 184
Front airbags - the forward thrust of the driver and of the front passenger is
cushioned when they make contact with the fully-inflated airbag, and the risk
of injury to head and chest is thus reduced.
The front airbags can be identified by the lettering
featured on the steer-
ing wheel and on the dashboard on the passenger side.
Side airbags - the load of the occupants is cushioned when plunged into the
fully inflated airbag. The risk of injury to the entire upper body (chest, stomach
and pelvis) is reduced on the side facing the door.
The side air bags can be identified by a label with the lettering
marked on
the front seat backrests.
Head airbags - the forward movement of the body is cushioned when it makes
contact with the fully inflated airbag, and the risk of injury to head and chest is
thus reduced.
The head airbags are provided with the lettering marked on the B-pillar
cladding.
Depending on the vehicle equipment, the airbag system consists of the
following parts. ▶ Individual airbags.
▶ Warning light in the instrument cluster
» page 32.
▶ Key switch for the front passenger airbag » page 18.
▶ Warning light for the front passenger airbag in the middle of the dash panel
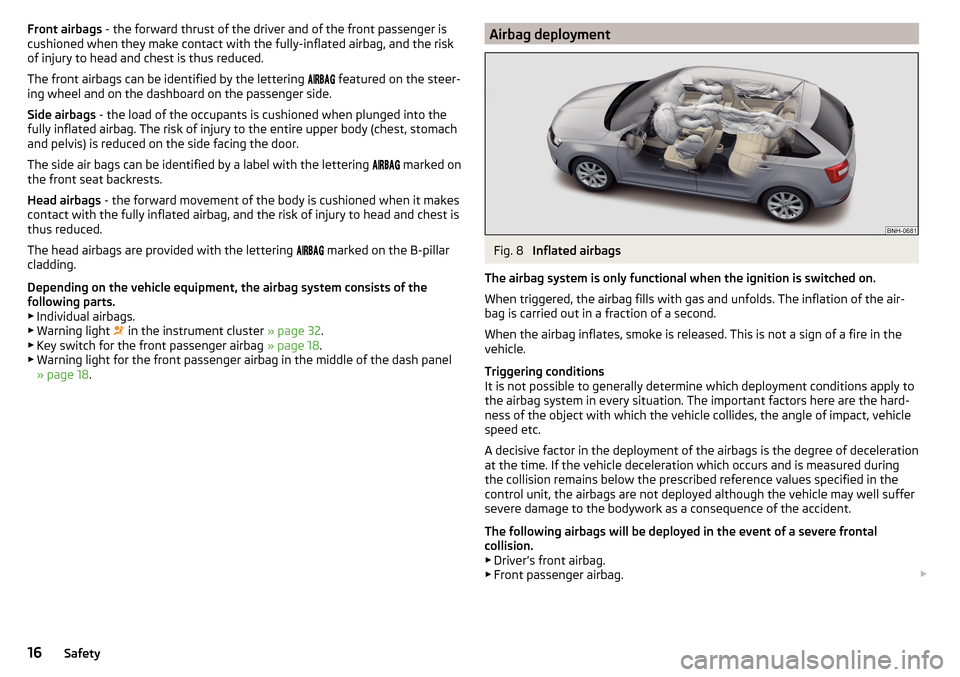
» page 18 .Airbag deploymentFig. 8
Inflated airbags
The airbag system is only functional when the ignition is switched on.
When triggered, the airbag fills with gas and unfolds. The inflation of the air- bag is carried out in a fraction of a second.
When the airbag inflates, smoke is released. This is not a sign of a fire in the
vehicle.
Triggering conditions
It is not possible to generally determine which deployment conditions apply to
the airbag system in every situation. The important factors here are the hard-
ness of the object with which the vehicle collides, the angle of impact, vehicle
speed etc.
A decisive factor in the deployment of the airbags is the degree of deceleration
at the time. If the vehicle deceleration which occurs and is measured during
the collision remains below the prescribed reference values specified in the
control unit, the airbags are not deployed although the vehicle may well suffer
severe damage to the bodywork as a consequence of the accident.
The following airbags will be deployed in the event of a severe frontal
collision.
▶ Driver’s front airbag.
▶ Front passenger airbag.
16Safety
Page 19 of 184
The following airbags will be deployed in the event of a severe side collision.
▶ Front side airbag.
▶ Head airbag.
When an airbag is deployed, the following events occur. ▶ The hazard warning lights are switched on.
▶ All the doors are unlocked.
▶ The fuel supply to the engine is interrupted.
▶ The interior light comes on (if the automatic operation of the interior light is
switched on - position
).
When there is no air bag deployment?
With minor frontal and side collisions, rear collision, overturning of the vehicle
or vehicle roll-over there is no airbag deployment.
Safety instructions
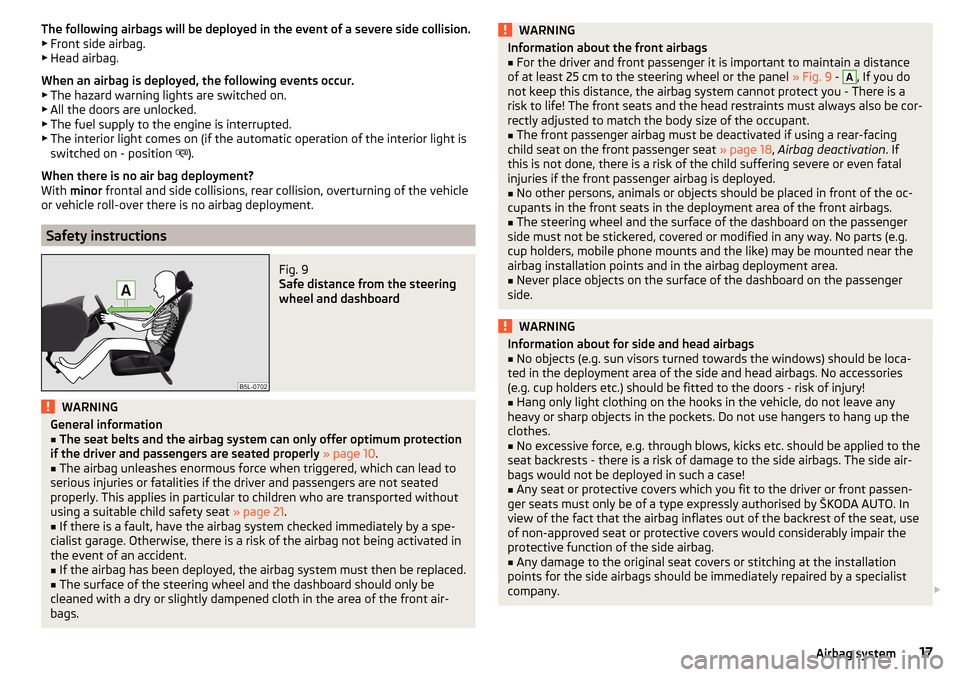
Fig. 9
Safe distance from the steering
wheel and dashboard
WARNINGGeneral information■The seat belts and the airbag system can only offer optimum protection
if the driver and passengers are seated properly » page 10 .■
The airbag unleashes enormous force when triggered, which can lead to
serious injuries or fatalities if the driver and passengers are not seated
properly. This applies in particular to children who are transported without
using a suitable child safety seat » page 21.
■
If there is a fault, have the airbag system checked immediately by a spe-
cialist garage. Otherwise, there is a risk of the airbag not being activated in
the event of an accident.
■
If the airbag has been deployed, the airbag system must then be replaced.
■
The surface of the steering wheel and the dashboard should only be
cleaned with a dry or slightly dampened cloth in the area of the front air-
bags.
WARNINGInformation about the front airbags■For the driver and front passenger it is important to maintain a distance
of at least 25 cm to the steering wheel or the panel » Fig. 9 - A
, If you do
not keep this distance, the airbag system cannot protect you - There is a
risk to life! The front seats and the head restraints must always also be cor-
rectly adjusted to match the body size of the occupant.
■
The front passenger airbag must be deactivated if using a rear-facing
child seat on the front passenger seat » page 18, Airbag deactivation . If
this is not done, there is a risk of the child suffering severe or even fatal
injuries if the front passenger airbag is deployed.
■
No other persons, animals or objects should be placed in front of the oc-
cupants in the front seats in the deployment area of the front airbags.
■
The steering wheel and the surface of the dashboard on the passenger
side must not be stickered, covered or modified in any way. No parts (e.g.
cup holders, mobile phone mounts and the like) may be mounted near the
airbag installation points and in the airbag deployment area.
■
Never place objects on the surface of the dashboard on the passenger
side.
WARNINGInformation about for side and head airbags■No objects (e.g. sun visors turned towards the windows) should be loca-
ted in the deployment area of the side and head airbags. No accessories
(e.g. cup holders etc.) should be fitted to the doors - risk of injury!■
Hang only light clothing on the hooks in the vehicle, do not leave any
heavy or sharp objects in the pockets. Do not use hangers to hang up the
clothes.
■
No excessive force, e.g. through blows, kicks etc. should be applied to the
seat backrests - there is a risk of damage to the side airbags. The side air-
bags would not be deployed in such a case!
■
Any seat or protective covers which you fit to the driver or front passen-
ger seats must only be of a type expressly authorised by ŠKODA AUTO. In
view of the fact that the airbag inflates out of the backrest of the seat, use
of non-approved seat or protective covers would considerably impair the
protective function of the side airbag.
■
Any damage to the original seat covers or stitching at the installation
points for the side airbags should be immediately repaired by a specialist
company.
17Airbag system
Page 29 of 184
Using the system
Cockpit
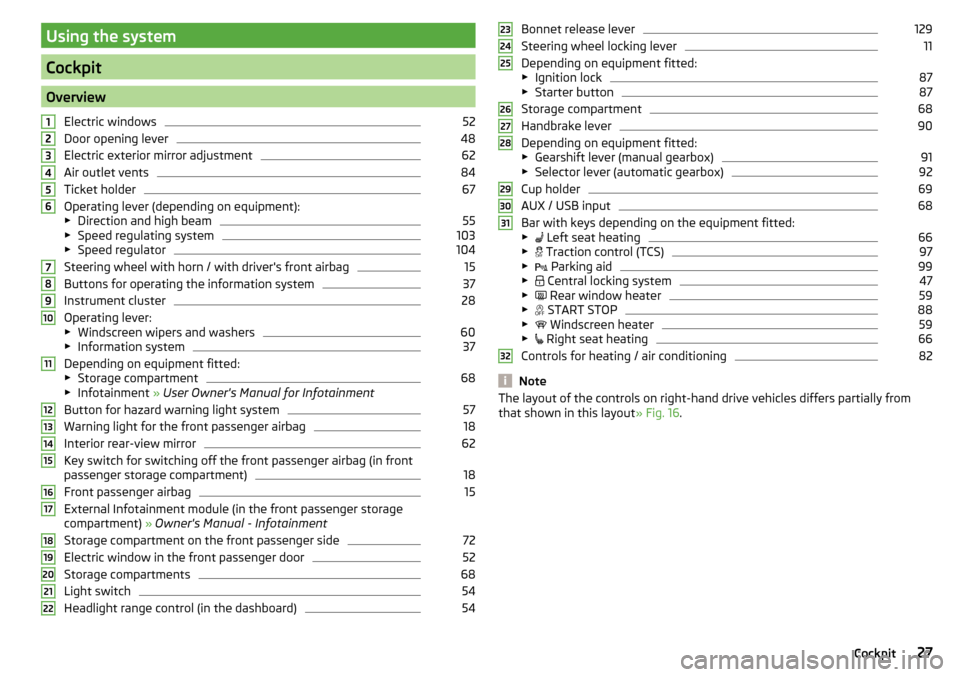
OverviewElectric windows
52
Door opening lever
48
Electric exterior mirror adjustment
62
Air outlet vents
84
Ticket holder
67
Operating lever (depending on equipment):
▶ Direction and high beam
55
▶Speed regulating system
103
▶Speed regulator
104
Steering wheel with horn / with driver's front airbag
15
Buttons for operating the information system
37
Instrument cluster
28
Operating lever:
▶ Windscreen wipers and washers
60
▶Information system
37
Depending on equipment fitted:
▶ Storage compartment
68
▶Infotainment » User Owner's Manual for Infotainment
Button for hazard warning light system
57
Warning light for the front passenger airbag
18
Interior rear-view mirror
62
Key switch for switching off the front passenger airbag (in front
passenger storage compartment)
18
Front passenger airbag
15
External Infotainment module (in the front passenger storage
compartment) » Owner's Manual - Infotainment
Storage compartment on the front passenger side
72
Electric window in the front passenger door
52
Storage compartments
68
Light switch
54
Headlight range control (in the dashboard)
5412345678910111213141516171819202122Bonnet release lever129
Steering wheel locking lever
11
Depending on equipment fitted:
▶ Ignition lock
87
▶Starter button
87
Storage compartment
68
Handbrake lever
90
Depending on equipment fitted:
▶ Gearshift lever (manual gearbox)
91
▶Selector lever (automatic gearbox)
92
Cup holder
69
AUX / USB input
68
Bar with keys depending on the equipment fitted:
▶ Left seat heating
66
▶
Traction control (TCS)
97
▶
Parking aid
99
▶
Central locking system
47
▶
Rear window heater
59
▶
START STOP
88
▶
Windscreen heater
59
▶
Right seat heating
66
Controls for heating / air conditioning
82
Note
The layout of the controls on right-hand drive vehicles differs partially from
that shown in this layout » Fig. 16.2324252627282930313227Cockpit
Page 69 of 184
Useful features
Interior fittings
Introduction
This chapter contains information on the following subjects:
Ticket holder
67
stowage compartments in the doors
68
Storage compartment in the centre console
68
USB and AUX input
68
Storage compartment on the dashboard
68
Cup holders
69
Waste container
69
Cigarette lighter
70
Ashtray
70
12-volt socket
71
Multimedia holder
71
Storage compartment in the front arm rest
72
Glasses compartment
72
Storage compartment on the front passenger side
72
Storage compartment for umbrella
73
Clothes hook
73
Storage pockets on the backs of the front seats
73
Storage pockets on the inner sides of the front seats
73WARNING■ Do not place anything on the dashboard. These objects might slide or fall
down when driving and may distract you from concentrating on the traffic –
risk of accident!■
Make sure that while driving no objects can enter the driver's footwell -
they could cause an accident!
■
Do not carry any objects on the front passenger seat, except objects de-
signed for this purpose (e.g. child seats) – risk of accident!
■
No objects should be placed in the storage compartments nor in the
drinks holders; the vehicle occupants could be endangered if there is sud-
den braking or the vehicle collides with something.
WARNING (Continued)■ For safety reasons, lockable storage compartments should be closed
while driving - there is a risk of injury from the opened lid or through the
loose objects in the compartment.■
Make sure no objects protrude from the storage compartments - danger
of injury!
■
Do not exceed the permissible loads for the storage compartments and
pockets - risk of injury and risk of damage to the compartments and pock-
ets!
■
Ash, cigarettes, cigars and the like should only be stored in the ashtray -
danger of fire/burns!
■
The storage compartments, multimedia holder and waste container are
not a substitute for the ashtray and must not be used for such purposes –
risk of fire!
CAUTION
Do not place any large or sharp objects in the storage compartments and pock-
ets - there is a risk of damage to the compartments and pockets.
Ticket holder
Fig. 62
Ticket holder
Read and observe and on page 67 first.
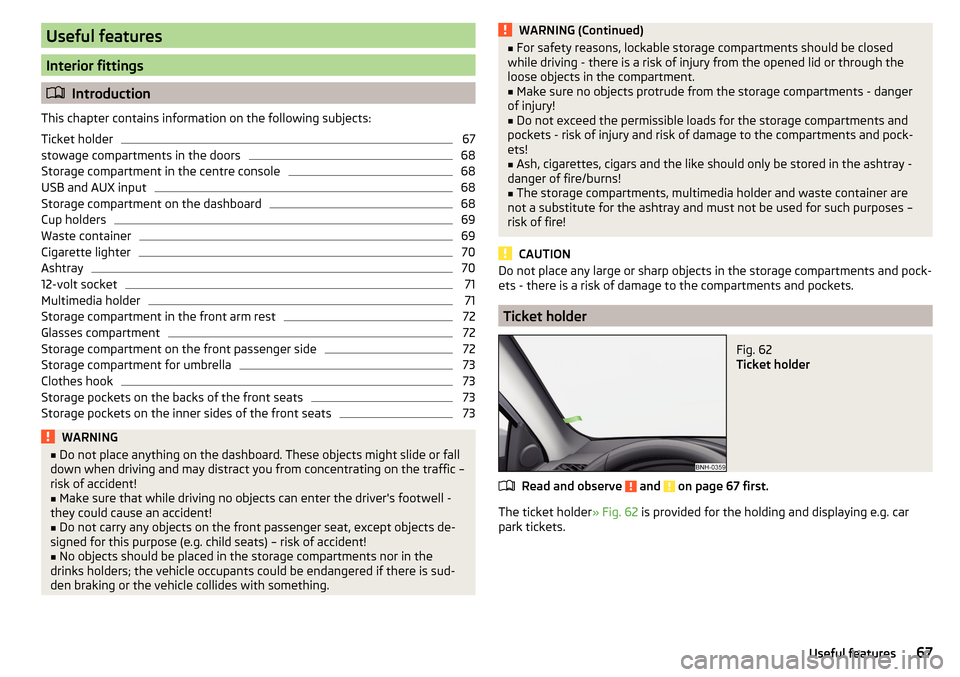
The ticket holder » Fig. 62 is provided for the holding and displaying e.g. car
park tickets.
67Useful features
Page 70 of 184
stowage compartments in the doorsFig. 63
Storage compartment: in the front door/in the rear door
Read and observe
and on page 67 first.
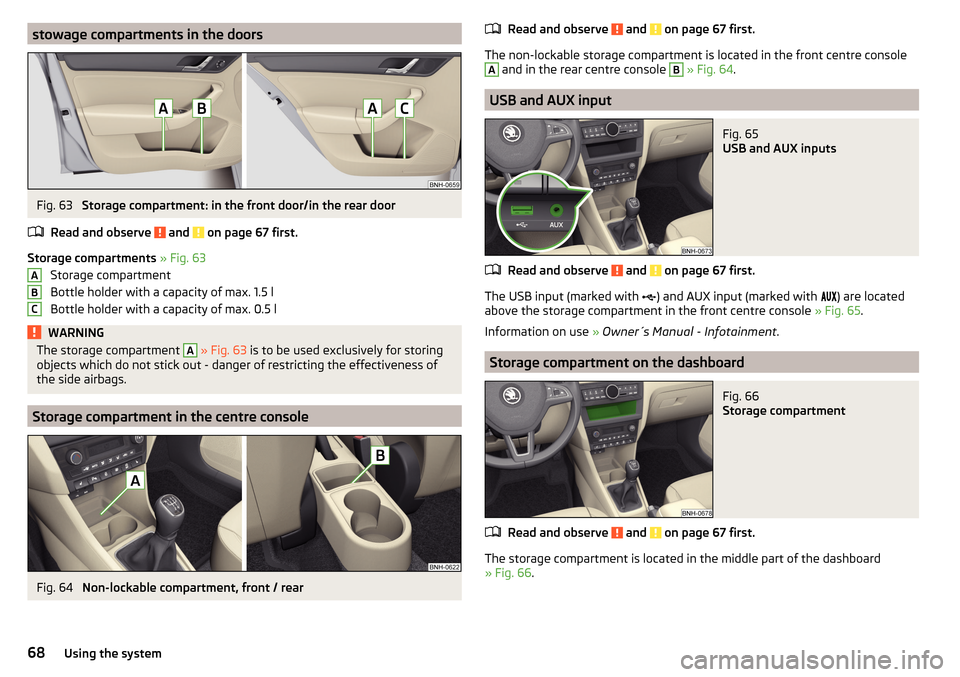
Storage compartments » Fig. 63
Storage compartment
Bottle holder with a capacity of max. 1.5 l
Bottle holder with a capacity of max. 0.5 l
WARNINGThe storage compartment A » Fig. 63 is to be used exclusively for storing
objects which do not stick out - danger of restricting the effectiveness of
the side airbags.
Storage compartment in the centre console
Fig. 64
Non-lockable compartment, front / rear
ABCRead and observe and on page 67 first.
The non-lockable storage compartment is located in the front centre console
A
and in the rear centre console
B
» Fig. 64 .
USB and AUX input
Fig. 65
USB and AUX inputs
Read and observe and on page 67 first.
The USB input (marked with
) and AUX input (marked with
) are located
above the storage compartment in the front centre console » Fig. 65.
Information on use » Owner´s Manual - Infotainment .
Storage compartment on the dashboard
Fig. 66
Storage compartment
Read and observe and on page 67 first.
The storage compartment is located in the middle part of the dashboard
» Fig. 66 .
68Using the system
Page 73 of 184

12-volt socketFig. 73
12-volt socket cover: in the front centre console / in the luggage
compartment
Read and observe
and on page 67 first.
›
To use , remove the cover of the socket » Fig. 73 -
or open the cover of the
socket » Fig. 73 -
.
›
Connect the plug for the electrical appliance to the socket.
WARNING■
Do not place anything on the dashboard. These objects might slide or fall
down when driving and may distract you from concentrating on the traffic –
risk of accident!■
Make sure that while driving no objects can enter the driver's footwell -
they could cause an accident!
■
Stow all devices safely during the journey to prevent them from being
thrown around the interior in the event of a sudden braking manoeuvre or
an accident – risk of death!
■
The devices may warm up during operation – risk of injury or fire!
■
Improper use of the power sockets and the electrical accessories can
cause fires, burns and other serious injuries.
■
The socket also works if the ignition is switched off. When leaving the ve-
hicle, never leave persons who are not completely independent, such as
children, unattended in the vehicle.
CAUTION■ The sockets can only be used for the connection of approved electrical ac-
cessories with a total power consumption of up to 120 watts - otherwise the
electrical system of the vehicle may be damaged.■
Connecting appliances when the engine is not running will drain the battery
of the vehicle!
■
Before switching the ignition on / off or before starting the engine, switch
off the devices which are connected to the sockets - there is a risk of damage
to the equipment due to voltage fluctuations.
Multimedia holder
Fig. 74
Multimedia holder
Read and observe and on page 67 first.
Multimedia holder » Fig. 74
Storage compartment for storing two coins
Storage compartment for storing the vehicle key
Storage compartment for storing a mobile phone
ABC71Useful features
Page 127 of 184
CAUTION■Move the scraper in one direction only, otherwise there is a risk of damage to
the glass surface.■
Do not remove snow / ice on the surface that is soiled (e.g. pea gravel, sand,
road salt) - there is a risk of damaging the surface.
■
Remove snow / ice carefully, otherwise there is a risk of damaging the labels
that have been fitted by the factory.
Caring for the interior
Read and observe
and on page 122 first.
Vehicle compo- nentsCircumstancesRemedy
Natural leather /
Faux leather /
Alcantara ®
/
Material
Dust, surface
soilingVacuum cleanerSoiling (fresh)Water, slightly damp cotton / wool
cloth, if necessary, mild soap solution a)
,
then wipe off with a soft clothStubborn stainsCleaning fluid specifically for this taskCare (natural
leather)Treat the leather periodically with a
leather protecting fluid / use a care
cream with light blocker and impregna-
tion after each cleaningCare (Alcan-
tara ®
/ material)Remove stubborn hair using a “cleaning
glove”
Remove pills from materials with a
brushPlastic partsSoilingWater, slightly damp cloth or sponge, if
necessary cleaners specifically for this
purposeWindowsSoilingWash with clean water and dry with a
wipe specifically for that purposeCovers on electri-
cally heated seatsSoilingCleaners specifically for this purposeSeat belts » Soilingsoft cloth and mild soap solution a)a)
Mild soap solution = 2 tablespoons of natural soap to 1 litre of lukewarm water.
WARNING■
Never clean the seat belts chemically as chemical cleaning products could
destroy the fabric.■
Air fresheners and scents can be hazardous to heath when the tempera-
ture inside the vehicle is high.
CAUTION
■ Natural leather /Faux leather / Alcantara ®
/ material
■ Avoid standing for lengthy periods in bright sunlight, and protect the mate-
rials by covering to prevent them from fading.
■ Remove fresh stains (e.g. from pens, lipstick, shoe polish and similar) as
soon as possible.
■ Ensure that no part of the leather is soaked through during cleaning and
that no water gets into the seams - risk of damaging the leather!
■ Do not clean the roof panelling with a brush – risk of damage to the surface
of the panelling.
■ Do not use leather cleaners, floor wax, shoe cream, stain remover or similar
agents on Alcantara ®
seat upholstery.
■ Some clothing fabrics (e.g. dark denim) do not have sufficient colour fast-
ness - this could lead to clearly visible discolouration on the upholstery. This
is not a defect in the fabric.
■ Sharp objects on garments (e.g. zips, rivets, sharp- edged belts) can dam-
age the upholstery fabrics in the vehicle. Such damage will not be recognised
as a justified complaint.■
Plastic parts
■ Do not attach scents or air fresheners to the dashboard – risk of damage to
the dashboard.
■
Windows
■ Do not attach any stickers to the filaments or glass antenna - there is risk
of damage.
■
Covers on electrically heated seats ■ Do not clean either with water or with other liquids - risk of damage to the
heating system.
■ Do not dry by switching on the heating.
■
Seat belts
■ After cleaning the belts, allow them to dry before retracting them.
Note
During vehicle use, some minor changes may become visible on the leather
and Alcantara ®
(due to e.g. folds, discolouration).125Care and maintenance
Page 131 of 184
Opening and closing the bonnetFig. 151
Opening the bonnet
Read and observe
and on page 128 first.
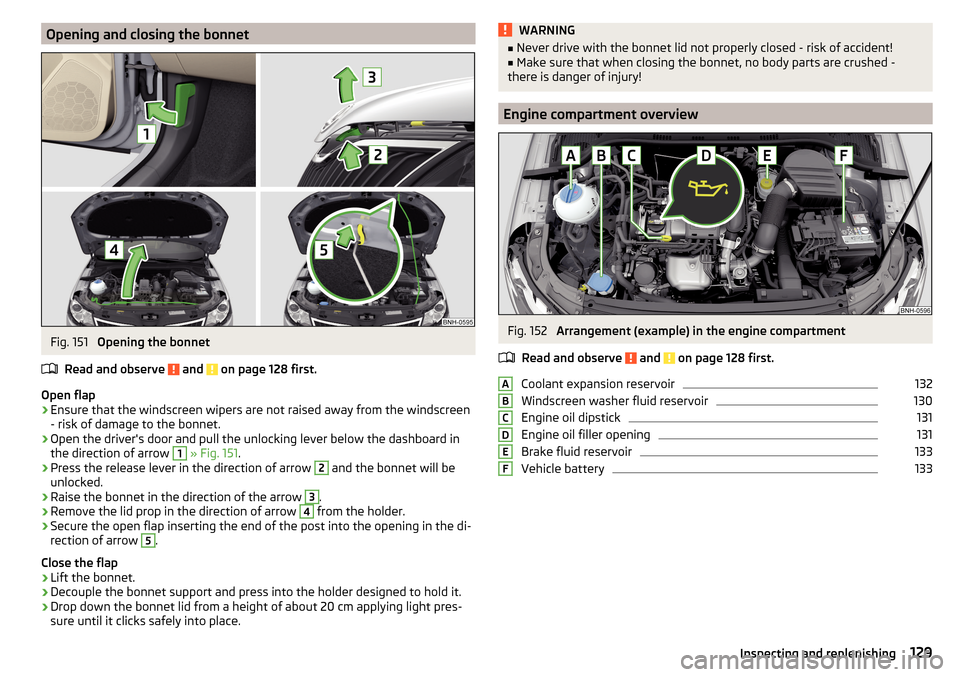
Open flap
›
Ensure that the windscreen wipers are not raised away from the windscreen
- risk of damage to the bonnet.
›
Open the driver's door and pull the unlocking lever below the dashboard in
the direction of arrow
1
» Fig. 151 .
›
Press the release lever in the direction of arrow
2
and the bonnet will be
unlocked.
›
Raise the bonnet in the direction of the arrow
3
.
›
Remove the lid prop in the direction of arrow
4
from the holder.
›
Secure the open flap inserting the end of the post into the opening in the di-
rection of arrow
5
.
Close the flap
›
Lift the bonnet.
›
Decouple the bonnet support and press into the holder designed to hold it.
›
Drop down the bonnet lid from a height of about 20 cm applying light pres-
sure until it clicks safely into place.
WARNING■ Never drive with the bonnet lid not properly closed - risk of accident!■Make sure that when closing the bonnet, no body parts are crushed -
there is danger of injury!
Engine compartment overview
Fig. 152
Arrangement (example) in the engine compartment
Read and observe
and on page 128 first.
Coolant expansion reservoir
132
Windscreen washer fluid reservoir
130
Engine oil dipstick
131
Engine oil filler opening
131
Brake fluid reservoir
133
Vehicle battery
133ABCDEF129Inspecting and replenishing
Page 148 of 184
Preparing to use the breakdown kitRead and observe
on page 145 first.
For safety's sake, the following instructions must be observed before
undertaking a wheel repair on a road.
›
Park the vehicle as far as possible away from the traffic flow - choose a place
with a flat and firm surface.
›
Switch off the engine.
›
For vehicles with manual transmission , select 1st gear .
›
For vehicles with automatic transmission , place the selector lever in the P
position.
›
Firmly apply the handbrake.
›
Switch on the hazard warning lights and set up the warning triangle at the
prescribed distance.
›
Have all the occupants get out . While the repair is being carried out, the pas-
sengers should not stand on the road (instead they should remain behind a
crash barrier, for instance).
›
Uncouple any trailers.
Sealing and inflating tyres
Read and observe
on page 145 first.
Sealing
›
Unscrew the valve cap from the damaged tyre.
›
Insert the valve remover
2
» Fig. 170 on page 145 on the valve insert, so that
the valve insert fits into the slot of the valve remover.
›
Unscrew the valve insert and place it on a clean base (rag, paper etc.).
›
Forcefully shake bottle
10
» Fig. 170 on page 145 several times.
›
Firmly screw the inflation hose
3
onto the tyre inflater bottle
10
. The film on
the bottle cap is pierced.
›
Remove the plug from the inflation hose
3
and insert the bottle onto the
tyre valve.
›
Hold the bottle
10
with the bottom facing upwards and fill all of the sealing
agent from the tyre inflater bottle into the tyre.
›
Remove the filler plug from the tyre valve.
›
Screw in the valve insert with the valve remover
2
.
Inflating
›
Screw the tyre inflation hose
7
» Fig. 170 on page 145 firmly onto the tyre
valve.
› For vehicles with
manual transmission , set the lever in the neutral position.›On vehicles with automatic transmission , place the selector lever in the P
position.›
Start the engine.
›
Plug the connector
6
into the 12-volt socket » page 71.
›
Switch on the air compressor with the ON and OFF switch
9
.
›
Once tyre inflation pressure of 2.0-2.5 bar has been reached, turn off the air
compressor. Maximum run time of 6 minutes » .
›
If you cannot reach an air pressure of 2.0 - 2.5 bar, unscrew the tyre inflation
hose
7
from the tyre valve.
›
Drive the vehicle 10 metres forwards or backwards to allow the sealing agent
to “distribute” in the tyre.
›
Firmly screw the tyre inflation hose
7
back onto the tyre valve and repeat
the inflation process.
›
Stick the sticker
1
» Fig. 170 on page 145 on the dashboard in the driver's
field of view.
At a tyre inflation pressure of 2.0 – 2.5 bar, the journey can be continued at a
maximum speed of 80 km/h or 50 mph.
WARNING■ If the tire does not inflate at least. 2.0 bar, the damage is too great. The
sealing agent cannot be used to seal the tyre. Stop driving! Seek help
from a specialist garage.■
The tyre inflation hose and air compressor may get hot as the tyre is be-
ing inflated – there is a risk of burning.
CAUTION
Switch off the air compressor if it has been running for as much as 6 minutes –
risk of damage to the compressor! Allow the air compressor to cool a few mi-
nutes before switching it on again.
Information on driving with repaired tyres
Read and observe
on page 145 first.
The inflation pressure of the repaired tyre must be checked after driving for 10minutes.
If the tyre pressure is 1.3 bar or less
›
The tyre cannot be properly sealed with the breakdown kit.
Do not contin-
ue to drive! Seek help from a specialist garage.
146Do-it-yourself