display SKODA ROOMSTER 2006 1.G Owner's Guide
[x] Cancel search | Manufacturer: SKODA, Model Year: 2006, Model line: ROOMSTER, Model: SKODA ROOMSTER 2006 1.GPages: 274, PDF Size: 48.64 MB
Page 121 of 274
Automatic gearbox
120
WARNING
•Do not depress the accelerator when changing the position of
the selector lever if the car is stationary and the engine is running
- risk of accident!
•Never move the selector lever into position R or P when driving
- risk of an accident!
•When the engine is running and the vehicle is stationary, it is
necessary to hold the car with the brake pedal in all the positions
of the selector lever (except P and N) since the power transmission
is never completely interrupted, also not when the engine is idling
- the vehicle "creeps".
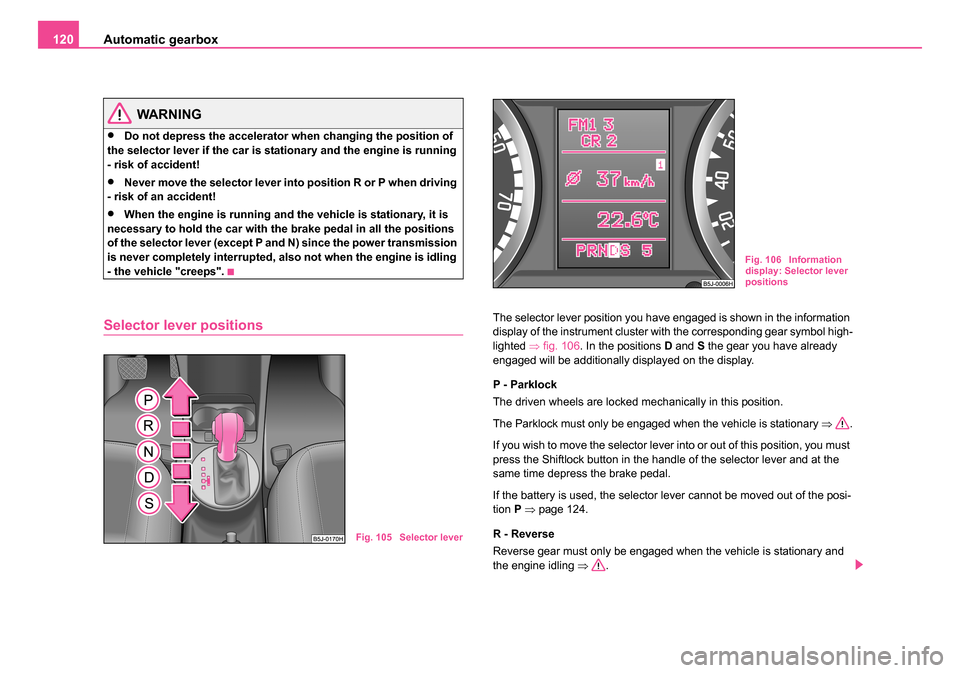
Selector lever positionsThe selector lever position you have engaged is shown in the information
display of the instrument cluster with the corresponding gear symbol high-
lighted ⇒fig. 106 . In the positions D and S the gear you have already
engaged will be additionally displayed on the display.
P - Parklock
The driven wheels are locked mechanically in this position.
The Parklock must only be engaged when the vehicle is stationary ⇒.
If you wish to move the selector lever into or out of this position, you must
press the Shiftlock button in the handle of the selector lever and at the
same time depress the brake pedal.
If the battery is used, the selector lever cannot be moved out of the posi-
tion P ⇒ page 124.
R - Reverse
Reverse gear must only be engaged when the vehicle is stationary and
the engine idling ⇒.
Fig. 105 Selector lever
Fig. 106 Information
display: Selector lever
positions
NKO 20 A05.book Page 120 Wednesday, June 21, 2006 1:42 PM
Page 124 of 274
Automatic gearbox123
Using the systemSafetyDriving TipsGeneral MaintenanceBreakdown assistanceTechnical Data
gear matching the speed of the car and this allows you to accelerate
rapidly (e.g. when overtaking) without having to depress the accelerator
pedal fully into the kickdown range. The original programme will be reac-
tivated to match your particular style of driving once the gearbox has
shifted up again.
When driving in hilly regions, the gears are selected to match uphill and
downhill sections. This avoids the gearbox frequently shifting up and down
when negotiating an uphill stretch. When driving downhill, it is possible to
shift down into the Tiptronic position, in order to exploit the engine brake
torque.
Tiptronic
The Tiptronic allows the driver to also shift gears manually.
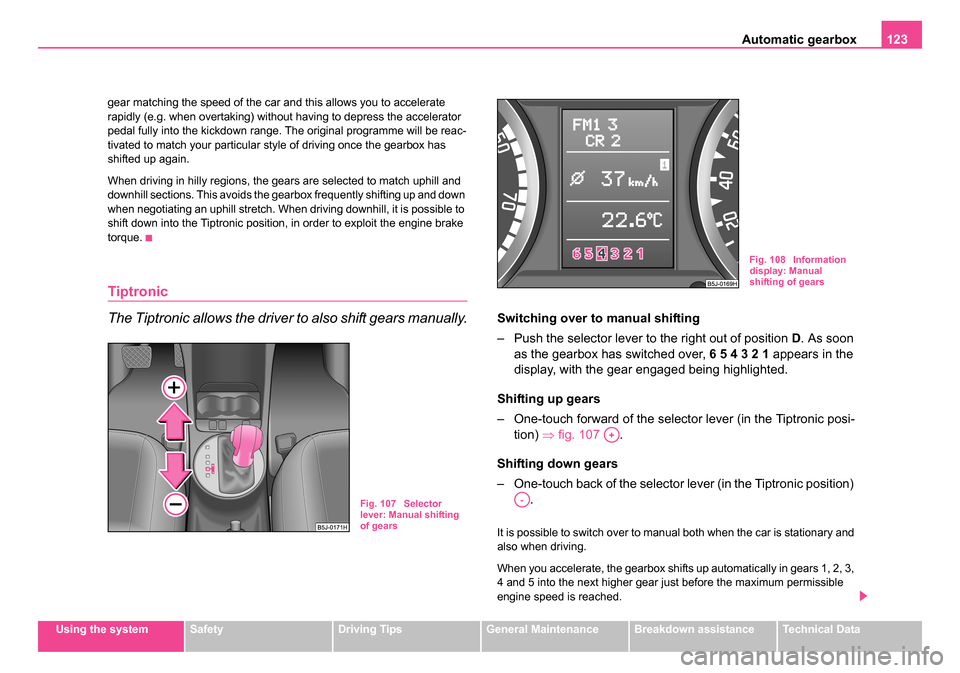
Switching over to
manual shifting
– Push the selector lever to the right out of position D. As soon
as the gearbox has switched over, 6 5 4 3 2 1 appears in the
display, with the gear engaged being highlighted.
Shifting up gears
– One-touch forward of the selector lever (in the Tiptronic posi- tion) ⇒fig. 107 .
Shifting down gears
– One-touch back of the selector lever (in the Tiptronic position) .
It is possible to switch over to manual both when the car is stationary and
also when driving.
When you accelerate, the gearbox shifts up automatically in gears 1, 2, 3,
4 and 5 into the next higher gear just before the maximum permissible
engine speed is reached.
Fig. 107 Selector
lever: Manual shifting
of gears
Fig. 108 Information
display: Manual
shifting of gears
A+
A-
NKO 20 A05.book Page 123 Wednesday, June 21, 2006 1:42 PM
Page 125 of 274
Automatic gearbox
124
If you select a lower gear, the automatic gearbox does not shift down until
there is no risk of the engine overrevving. (Does not apply for the shifting
from 2nd to 1st gear.)
If you operate the kickdown function, the gearbox shifts into a lower gear
in line with the vehicle speed and engine speed.
Emergency programme
An emergency programme exists in the event of a fault in
the system.
The gearbox operates in a corresponding emergency programme if there
are functional faults in the gearbox electronics. This is indicated by all of
the segments in the display lighting up or going out.
It is possible to continue to move the selector lever into all the positions.
In the positions D and S the gearbox remains engaged in the 3rd gear. It
is also possible to continue to engage reverse gear in the position R.
The manual shift programme (Tiptronic) is switched off in the emergency
mode.
If the gearbox has switched over to emergency mode, drive to the
nearest specialist garage in order to have the fault rectified.
Selector lever-emergency unlocking
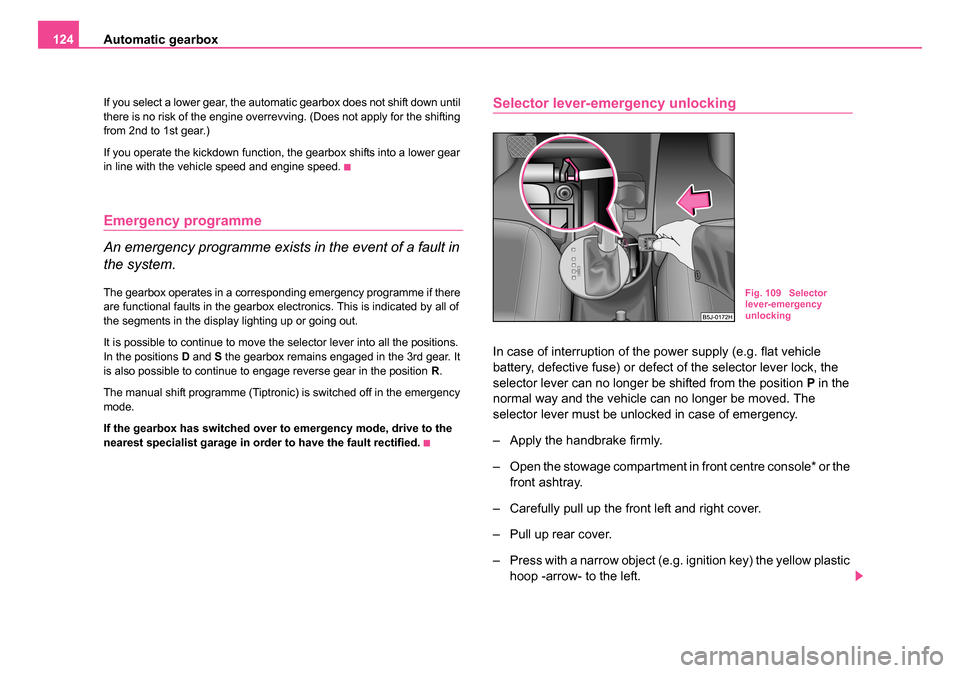
In case of interruption of the power supply (e.g. flat vehicle
battery, defective fuse) or defect of the selector lever lock, the
selector lever can no longer be shifted from the position P in the
normal way and the vehicle can no longer be moved. The
selector lever must be unlocked in case of emergency.
– Apply the handbrake firmly.
– Open the stowage compartment in front centre console* or the front ashtray.
– Carefully pull up the front left and right cover.
– Pull up rear cover.
– Press with a narrow object (e.g. ignition key) the yellow plastic hoop -arrow- to the left.
Fig. 109 Selector
lever-emergency
unlocking
NKO 20 A05.book Page 124 Wednesday, June 21, 2006 1:42 PM
Page 131 of 274
Communication
130
This enables you to make full use of the advantages of a normal carphone
(“handsfree system” using a microphone integrated in the vehicle, optimal
transmission of signals using an external aerial etc.). The battery of the
mobile phone is also constantly charged.
Mobile phone operation
If you select the menu PHONE in the information display and the phone is
not in the adapter, INSERT PHONE is shown on the display. After inserting the phone in the adapter, the system begins to load the
phone book from the phone into the information display. The following is
shown one after the other on the display:
PLEASE WAIT
LOADING... LAST CALLS
LOADING... ACCEPTED CALLS
LOADING... MISSED CALLS
LOADING... PHONE BOOK
After loading is completed, phone book, last calls, accepted calls, missed
calls and memory appear in the display.
Using the system
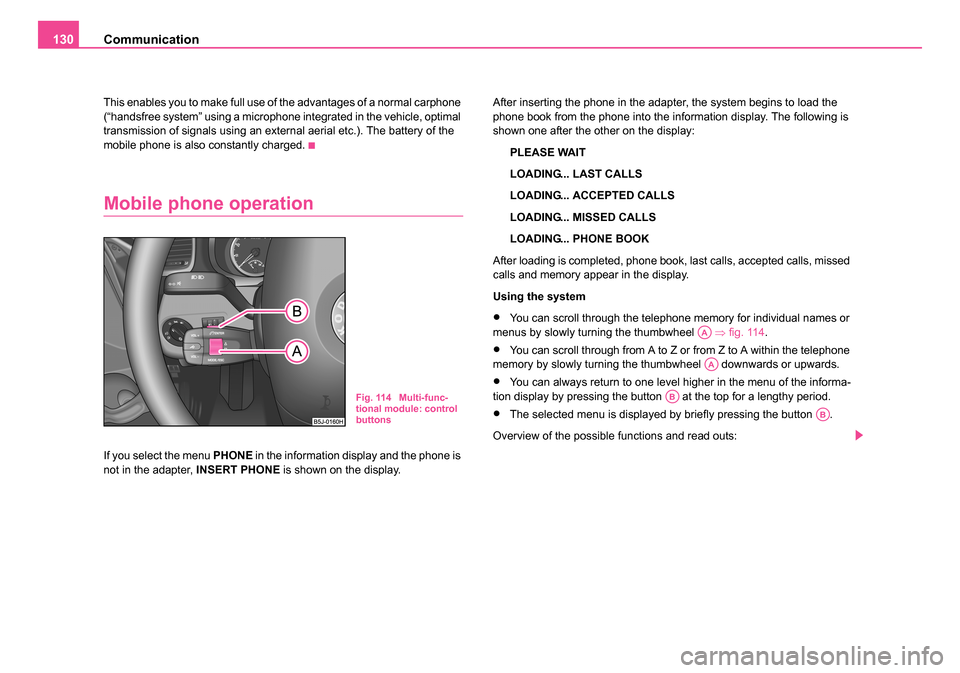
•You can scroll through the telephone memory for individual names or
menus by slowly turning the thumbwheel ⇒fig. 114 .
•You can scroll through from A to Z or from Z to A within the telephone
memory by slowly turning the thumbwheel downwards or upwards.
•You can always return to one level higher in the menu of the informa-
tion display by pressing the button at the top for a lengthy period.
•The selected menu is displayed by briefly pressing the button .
Overview of the possible functions and read outs:
Fig. 114 Multi-func-
tional module: control
buttons
AA
AA
AB
AB
NKO 20 A05.book Page 130 Wednesday, June 21, 2006 1:42 PM
Page 132 of 274
Communication131
Using the systemSafetyDriving TipsGeneral MaintenanceBreakdown assistanceTechnical Data
You can operate the mobile phone via the voice control
⇒page 128 or via
the buttons of the multi-functional module* ⇒page 127.
Note
It a yellow or red warning symbol lights up in the information display, the
menu phonebook cannot be selected.
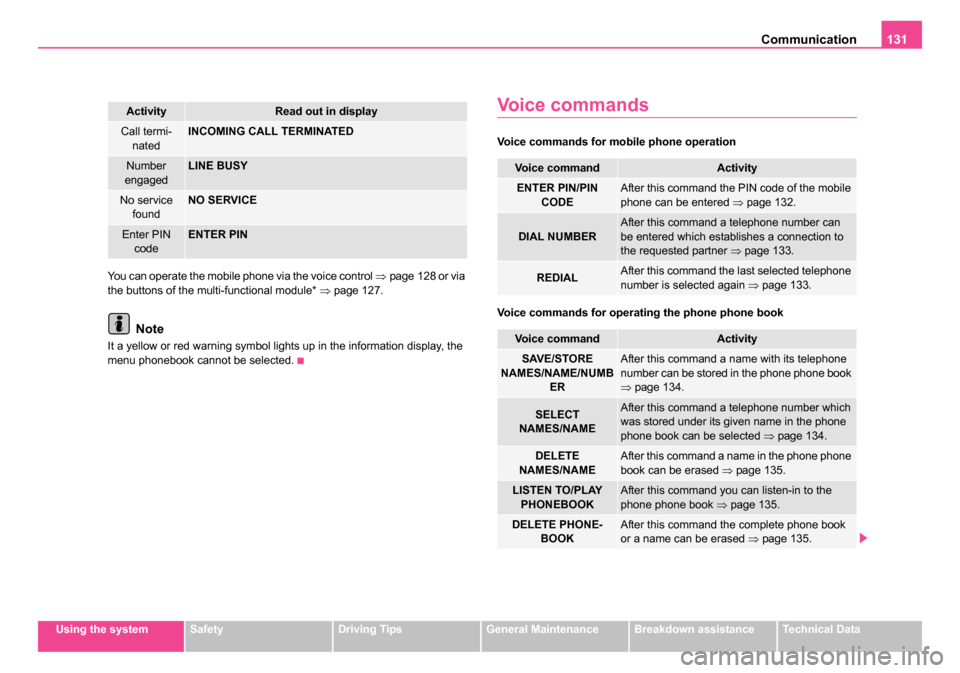
Voice commands
Voice commands for mobile phone operation
Voice commands for operating the phone phone book
ActivityRead out in display
Call termi-
natedINCOMING CALL TERMINATED
Number
engagedLINE BUSY
No service foundNO SERVICE
Enter PIN
codeENTER PIN
Voice commandActivity
ENTER PIN/PIN CODEAfter this command the PIN code of the mobile
phone can be entered ⇒page 132.
DIAL NUMBERAfter this command a telephone number can
be entered which establishes a connection to
the requested partner ⇒page 133.
REDIALAfter this command the last selected telephone
number is selected again ⇒page 133.
Voice commandActivity
SAVE/STORE
NAMES/NAME/NUMB ERAfter this command a name with its telephone
number can be stored in the phone phone book
⇒page 134.
SELECT
NAMES/NAMEAfter this command a telephone number which
was stored under its given name in the phone
phone book can be selected ⇒page 134.
DELETE
NAMES/NAMEAfter this command a name in the phone phone
book can be erased ⇒page 135.
LISTEN TO/PLAY
PHONEBOOKAfter this command you can listen-in to the
phone phone book ⇒page 135.
DELETE PHONE-
BOOKAfter this command the complete phone book
or a name can be erased ⇒page 135.
NKO 20 A05.book Page 131 Wednesday, June 21, 2006 1:42 PM
Page 135 of 274
Communication
134
Phone voice phonebook*
Store name
– Press the PTT button.
– Give the command SAVE/STORE NAMES/NAME/NUMBER
after the signal tone.
After giving this command, the system requests the entry of a name and
a telephone number which should be stored in the phone voice phone-
book. In the phone voice phonebook up to 50 entries can be stored.
The telephone number can be entered as an interconnected spoken row
of digits (complete number), in the form of order of digits (separation
through a brief voice pause) or through individually spoken digits. After
each order of digits (separation through brief voice pause) the detected
digits are repeated.
The digits zero to nine are permitted. The system detects no continuous
digit combinations such as twenty-three, but only individually spoken
digits (two, three).
When entering more than 20 digits, the system answers with voice
response “ The number is too long ”.
Additionally a Plus (+) has to be entered in front of the 20 digits.
The stored entry is displayed on the information display* with an arrow in
front of the name.
For similar names additional information (e.g. first names) should be
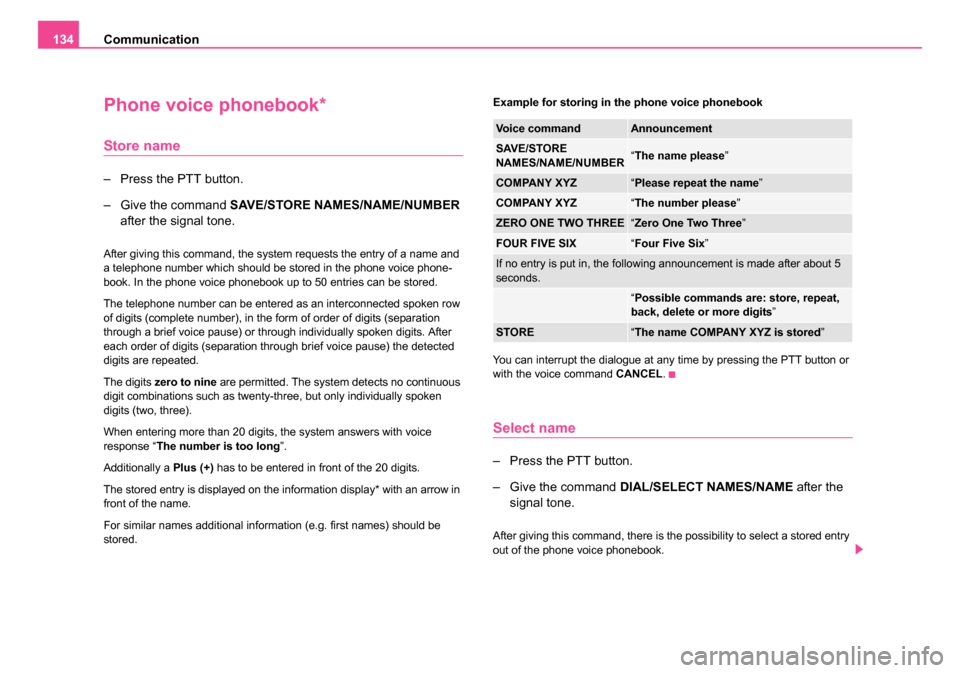
stored. Example for storing in the phone voice phonebook
You can interrupt the dialogue at any time by pressing the PTT button or
with the voice command
CANCEL.
Select name
– Press the PTT button.
– Give the command DIAL/SELECT NAMES/NAME after the
signal tone.
After giving this command, there is the possibility to select a stored entry
out of the phone voice phonebook.
Voice commandAnnouncement
SAVE/STORE
NAMES/NAME/NUMBER“ The name please ”
COMPANY XYZ“Please repeat the name ”
COMPANY XYZ“The number please ”
ZERO ONE TWO THREE“Zero One Two Three ”
FOUR FIVE SIX“Four Five Six ”
If no entry is put in, the following announcement is made after about 5
seconds.
“Possible commands are: store, repeat,
back, delete or more digits ”
STORE“The name COMPANY XYZ is stored ”
NKO 20 A05.book Page 134 Wednesday, June 21, 2006 1:42 PM
Page 138 of 274
Communication137
Using the systemSafetyDriving TipsGeneral MaintenanceBreakdown assistanceTechnical Data
– Select the corresponding menu option on the mobile phone,
which searches for suitable Bluetooth devices (hands-free
system).
– If the hands-free system on the display of the mobile tele- phone announces Skoda UHV, enter the PIN 1234 within 30
seconds and wait, until the connection is established.
4)
In the modern business world as well as within the private sector the
mobile communication gains increasingly on importance. Mobile phones
from different manufacturers can be connected with the hands-free
system by means of Bluetooth. During the connecting procedure, no other
mobile phone may be connected via Bluetooth with the hands-free
system.
Up to four mobile phones can be connected to the hands-free system by
means of Bluetooth, whereby only one mobile phone can communicate
via Bluetooth with the hands-free system. If a fifth mobile phone is
connected to the handsfree-system, then the telephone, which has not
been used together with the handsfree system for the longest period, is
disconnected.
Establishing the Bluetooth connection
After switching on the ignition, the Bluetooth connection is automatically
established for the already adapted mobile phone
4). You can hear an
increasing tone sequence from the loudspeakers of the vehicle.
Disconnecting the Bluetooth connection
After withdrawing the ignition key, the Bluetooth connection is dison-
nected. You can hear an increasing tone sequence from the loudspeakers
of the vehicle.
WARNING
•Pay attention primarily to the traffic situation! As the driver you
are fully responsible for the traffic safety. Use the telephone system
only to such an extent, so that you are in full control of your vehicle
at any time - risk of accident!
•In the event of air transport, the Bluetooth function of the hands-
free-system must be switched off by a specialist garage.
Caution
Taking the mobile phone out of the adapter during the call can lead to
interruption of the connection. When taking out the mobile phone, the
connection to the factory-fitted antenna is interrupted, this reduces the
quality of the transmitting and receiving signal. This might result addition-
ally in harmful radiation from the mobile phone in the interior of the vehicle
and the charging of the telephone battery is interrupted.
Note
•Not valid for all mobile phones which enable a communication via
Bluetooth.
•Please operate your mobile phone exclusively with a suitable adapter,
in order to keep a low radiation in the vehicle.
•Inserting the mobile phone into the adapter ensures an optimal
sending and receiving power and offers at the same time the advantage
of the battery charging.
•If you insert the mobile telephone into the adapter, the connection is
established via the interface in the adapter set and the Bluetooth connec-
tion is disconnected. You can hear an increasing tone sequence from the
loudspeakers of the vehicle.
•Note that the range of the Bluetooth connection to the handsfree-
system is limited to the vehicle interior. The range is dependent on local
factors, e.g. obstacles between the devices and interferences with other 4)Some mobile phones have a menu, in which the authorization for establishing a
Bluetooth connection is performed via the input of a code. If the input for the au-
thorization is necessary, it must always be performed when re-establishing the
Bluetooth connection.
NKO 20 A05.book Page 137 Wednesday, June 21, 2006 1:42 PM
Page 139 of 274
Communication
138
devices. If your mobile phone is e.g. in a jacket pocket, this can lead to
difficulties when establishing the Bluetooth connection with the handsfree-
system or the data transfer.
•If you have set the Portuguese language in the information display, it
is used automatically for the mobile phone operation, as this is the
language, which was entered during coding of the handsfree-system.
Mobile phones and two-way radio
systems
We recommend that you have the installation of a mobile phone and two-
way radio system in a vehicle carried out by a Škoda Service Partner.
Škoda Auto a.s. permits the operation of mobile phones and two-way
radio systems with a professionally installed external aerial and a
maximum transmission power of up to 10 watts.
Our Škoda Service Partners are also happy to inform you about the possi-
bilities available for installing and operating mobile telephones and radio
transmitters which have an output greater than 10 watts. The Škoda
Service Partners can provide you with details about the technical possibil-
ities for retrofitting of mobile telephones and radio transmitters.
Operation of mobile phones or two-way radio systems may interfere with
functioning of the electronic systems of your vehicle. The reasons for this
may be:
•no external aerial,
•external aerial incorrectly installed,
•transmission power greater than 10 watts.
You should therefore not operate a mobile phone or two-way radio
system inside the vehicle without the use of an external aerial, or with
an external aerial which has been incorrectly installed. You should also be aware of the fact that only an
external aerial makes it
possible to achieve the optimal range of such equipment.
WARNING
•If a mobile phone or two-way radio system is operated inside the
vehicle without using an external aer ial, or with an external aerial
which has been incorrectly installed, the result can be excessive
electromagnetic fields which ma y cause harm to your health.
•Please always pay full attention to the traffic situation around
you!
•You must not install two-way radio systems, mobile phones or
mounts on the covers of the airbags or within the immediate
deployment range of airbags. This might result in injuries to the
occupants in the event of an accident!
Note
Please also refer to the operating instructions of the mobile phones and
two-way radio systems.
Input AUX-IN*
The input for external audio sources AUX-IN is located next to the
handbrake and is marked with
. This input serves for
connecting external audio sources (e.g. portable mp3 player) to
the your radio system. The input AUX-IN* is only available in
combination with a radio installed in the factory. The description
on how to operate AUX-IN* can be found in the relevant oper-
ating instructions of the radio.
NKO 20 A05.book Page 138 Wednesday, June 21, 2006 1:42 PM
Page 161 of 274
Airbag system
160
A grey white, non harmful gas is released when airbag is inflated. This is
perfectly normal and is not an indication of a fire in the vehicle.
The load of the occupants is cushioned when plunging into the fully
inflated airbag and the risk of injury to the entire upper body (chest,
stomach and pelvis) is reduced on the side facing the door.
Important safety informat ion on the side airbag
Correct use of the airbag system considerably reduces the
risk of injury!
WARNING
•It is essential to always switch off ⇒page 163, “Deactivating an
airbag” the front passenger airbag when attaching a child safety
seat on the front passenger seat where the child is seated with its
back facing in direction of travel (in some countries also when the
child is facing the direction of travel ). If this is not done, there is a
risk of the child suffering severe or even fatal injuries if the front
passenger airbag is deployed. In certain countries national legal
provisions also require that the side passenger airbags be deacti-
vated. When transporting a child on the front passenger seat,
please comply with the appropriate national regulations regarding
the use of child safety seats.
•Your head should never be positioned in the deployment area of
the side airbag. You might suffer severe injuries in the event of an
accident. This applies in particular to children who are transported
without using a suitable child safety seat ⇒page 169, “Child safety
and Side airbag*”.
•If children adopt an incorrect seated position when travelling,
they may be exposed to an increase d risk of injury in the event of an accident. This can result in serious injuries
⇒page 166, “What
you should know about transporting children!”.
•There must not be any further persons, animals as well as
objects positioned between the occupants and the deployment
area of the airbag. There must also be no accessories such as cup
holders, attached to the doors to enable the side airbags to activate
properly.
•Only hang light items of clothing on the clothes hooks to the
vehicle. Never leave any heavy or sharp-edged objects in the
pockets of the items of clothing.
•Ensure that there are no excessive forces, such as violent
knocks, kicks etc., impact on the backrests of the seats otherwise
the system may be damaged. The side airbags would not be
deployed in such a case!
•Any seat or protective covers which you fit to the driver or front
passenger seats must only be of the type expressly authorized by
Škoda Auto. In view of the fact th at the airbag inflates out of the
backrest of the seat, use of non-approved seat or protective covers
would considerably impair the protective function of the side
airbag.
•Any damage to the original seat covers in the area of the side
airbag module must be repaired without delay by your specialist
garage.
•The airbag modules in the front seats must not display any
damage, cracks or deep scratches. It is not permissible to use force
in order to open the modules.
•Any work on the side airbag system including removing and
installing system components beca use of other repair work (e.g.
removing seats) must only be carried out by a specialist garage.
WARNING (continued)
NKO 20 A05.book Page 160 Wednesday, June 21, 2006 1:42 PM
Page 267 of 274
Index
266
Child safety lock . . . . . . . . . . . . . . . . . . . . . . 42
Child safety seat
on the front passenger seat . . . . . . . . . 168
Safety information . . . . . . . . . . . . . . . . . 166
Child seat . . . . . . . . . . . . . . . . . . . . . . . . . . 170 Classification into groups . . . . . . . . . . . 170
ISOFIX system . . . . . . . . . . . . . . . . . . . 174
Children and safety . . . . . . . . . . . . . . . . . . . 166
Chrome parts . . . . . . . . . . . . . . . . . . . . . . . 200
Cigarette lighter . . . . . . . . . . . . . . . . . . . . . . 88
Cleaning . . . . . . . . . . . . . . . . . . . . . . . . . . . 197
Climatronic Air outlet vents . . . . . . . . . . . . . . . . . . . 108
Defrosting windows . . . . . . . . . . . . . . . . 106
Recirculated air mode . . . . . . . . . . . . . . 107
Setting temperature . . . . . . . . . . . . . . . . 107
Clock . . . . . . . . . . . . . . . . . . . . . . . . . . . . . . . 17
Clothes hooks . . . . . . . . . . . . . . . . . . . . . . . . 95
Cockpit General view . . . . . . . . . . . . . . . . . . . . . . 11
Compartments . . . . . . . . . . . . . . . . . . . . . . . 90
Computer . . . . . . . . . . . . . . . . . . . . . . . . . . . 17
Convenience operation . . . . . . . . . . . . . . . . . 53
Converting/masking over headlights . . . . . . 192
Coolant . . . . . . . . . . . . . . . . . . . . . . . . . . . . 215 replenishing . . . . . . . . . . . . . . . . . . . . . . 217
Warning light . . . . . . . . . . . . . . . . . . . . . . 31
Coolant level Warning light . . . . . . . . . . . . . . . . . . . . . . 31
Coolant temperature gauge . . . . . . . . . . . . . 14 Coolant temperature/coolant level
Warning light . . . . . . . . . . . . . . . . . . . . . . 31
Cornering lights . . . . . . . . . . . . . . . . . . . . . . . 56 Warning light . . . . . . . . . . . . . . . . . . . . . . 29
Correct seated position . . . . . . . . . . . . . . . . 143
Counter for distance driven . . . . . . . . . . . . . . 15
Cruise control system . . . . . . . . . . . . . . . . . 116
Cup holder front . . . . . . . . . . . . . . . . . . . . . . . . . . . . . 86
rear . . . . . . . . . . . . . . . . . . . . . . . . . . . . . 86
D
Deactivating an airbag . . . . . . . . . . . . . . . . 163
Defrosting rear window . . . . . . . . . . . . . . . . . 62
Defrosting windows . . . . . . . . . . . . . . . . 97, 101
De-icing the windows . . . . . . . . . . . . . . . . . 200
Diesel . . . . . . . . . . . . . . . . . . . . . . . . . . . . . 205
Diesel enginesStarting the engine . . . . . . . . . . . . . . . . 112
Diesel particle filter Warning light . . . . . . . . . . . . . . . . . . . . . . 37
Digital clock . . . . . . . . . . . . . . . . . . . . . . . . . . 17
Direction indicators . . . . . . . . . . . . . . . . . . . . 59 Warning light . . . . . . . . . . . . . . . . . . . . . . 29
Display . . . . . . . . . . . . . . . . . . . . . . . . . . . . . 22
Distance driven . . . . . . . . . . . . . . . . . . . . . . . 15
Door Child safety lock . . . . . . . . . . . . . . . . . . . 42
Warning light . . . . . . . . . . . . . . . . . . . . . . 33
Door, tailgate and bonnet ajar warning . . . . . 24 Driving economically . . . . . . . . . . . . . . . . . . 187
Driving time . . . . . . . . . . . . . . . . . . . . . . . . . . 21
E
EDL . . . . . . . . . . . . . . . . . . . . . . . . . . . . . . . 179
Electric power-operated window
Operational faults . . . . . . . . . . . . . . . . . . . 53
Electrically adjustable rear mirror . . . . . . . . . 66
Electronic Differential Lock . . . . . . . . . . . . . 179 Warning light . . . . . . . . . . . . . . . . . . . . . . 35
Electronic Differential Lock (EDL) . . . . . . . . 179
Electronic immobiliser . . . . . . . . . . . . . . . 32, 41 Warning light . . . . . . . . . . . . . . . . . . . . . . 32
Electronic stability programme (ESP) . . . . . 177 Warning light . . . . . . . . . . . . . . . . . . . . . . 35
Emergency locking of the door . . . . . . . . . . . 46
Engine starting . . . . . . . . . . . . . . . . . . . . . . . . . . 111
switching off . . . . . . . . . . . . . . . . . . . . . . 112
Engine compartment Safety information . . . . . . . . . . . . . . . . . 210
Engine electronics Warning light . . . . . . . . . . . . . . . . . . . . . . 30
Engine oil . . . . . . . . . . . . . . . . . . . . . . . . . . . 212 change . . . . . . . . . . . . . . . . . . . . . . . . . . 215
check . . . . . . . . . . . . . . . . . . . . . . . . . . . 213
replenishing . . . . . . . . . . . . . . . . . . . . . . 214
Warning light . . . . . . . . . . . . . . . . . . . . . . 32
Engine revolutions counter . . . . . . . . . . . . . . 14
Environment . . . . . . . . . . . . . . . . . . . . . . . . 187
NKO 20 A05.book Page 266 Wednesday, June 21, 2006 1:42 PM