SKODA ROOMSTER 2006 1.G Repair Manual
Manufacturer: SKODA, Model Year: 2006, Model line: ROOMSTER, Model: SKODA ROOMSTER 2006 1.GPages: 274, PDF Size: 48.64 MB
Page 61 of 274
Lights and Visibility
60
Main beam
– Switch on the low beam.
– Push the lever forwards - the main beam and warning light in the instrument cluster come on.
– Pull the lever back into the initial position in order to switch the main beam off again.
Headlight flasher
– Pull on the lever of the steering wheel (sprung position) - the main beam and warning light in the instrument cluster come
on.
Parking light
– Switch off the ignition.
– Push the lever up or down - the right-hand or left-hand parking light is switched on.
Information concerning the function of the lights.
•The turn signal system only operates when the ignition is switched
on. The corresponding indicator light or in the instrument cluster also
flashes.
•The turn signal is automatically cancelled after negotiating a curve.
•The side light and rear light on the appropriate side of the vehicle are
switched on when the parking light is selected. The parking light function
only operates if the ignition is switched off.
•An acoustic warning signal will sound when the driver's door is opened
if the lever is not in the middle position after removing the ignition key. The
acoustic warning signal will stop just as soon as the driver's door is closed.
Caution
Use main beam or the headlight flasher only if this does not risk dazzling
other road users.
Note
Use only in accordance with the legal requirements the described lighting
and signal systems.
Interior lighting
Front interior lighting and storage compartment on
front passenger side
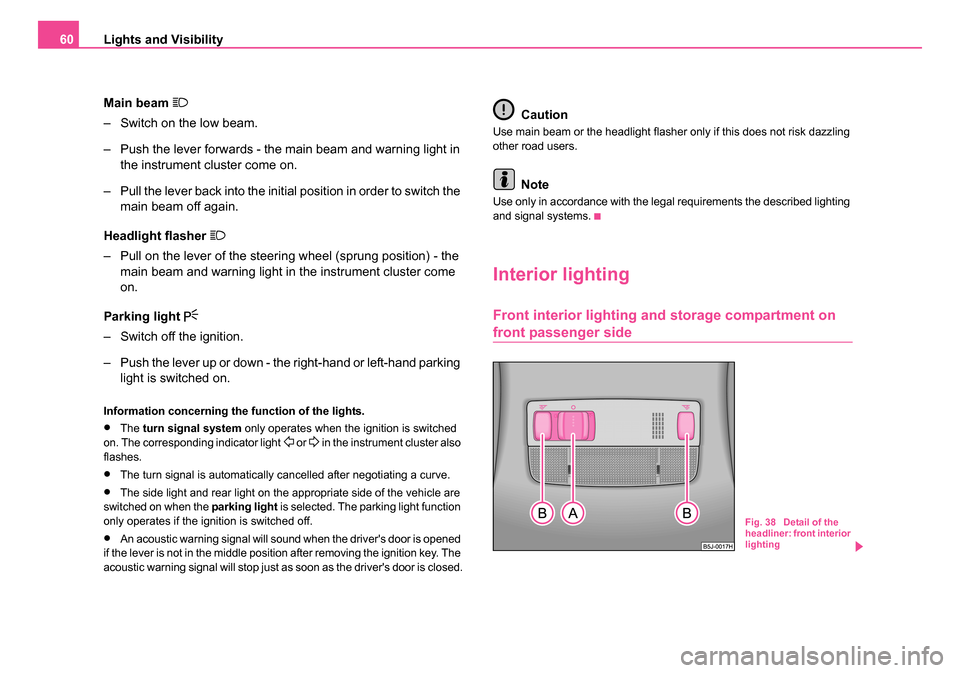
Fig. 38 Detail of the
headliner: front interior
lighting
NKO 20 A05.book Page 60 Wednesday, June 21, 2006 1:42 PM
Page 62 of 274
Lights and Visibility61
Using the systemSafetyDriving TipsGeneral MaintenanceBreakdown assistanceTechnical Data
Door contact switching mechan ism (on the front and rear*
door)
– Press the switch to the right into position
⇒ page 60,
fig. 38 .
– On the version without reading lights press the switch into the middle position
.
Switching the interior light on
– Press the switch to the left into position
.
Switching the interior light off
– Press the switch into the middle position O.
– On the version without reading lights press the switch to the right, the symbol O appears.
Reading lights
– Press on one of the switches ⇒page 60, fig. 38 in order to
switch the right or left reading light on or off.
Lighting of storage compar tment on the front passenger
side
– When opening the flap of the storage compartment on the front passenger side the lighting in the storage compartment
comes on.
– The light switches on automatically when the parking light is switched on and goes out when the flap is closed.
The interior light is switched on for about 20 seconds when a vehicle with
a central locking system is unlocked, when a door is opened or when the ignition key is removed. The requirement for this is that the switch is in the
door contact position. The inner light goes out out immediately after the
ignition is switched on.
A time delay switch* causes the inner lighting on vehicles without a central
locking system stays on for a few seconds after the doors have been
closed. The inner light goes out out immediately after the ignition is
switched on.
The interior lighting is switched off after about 30 minutes when a door has
been left open in order to avoid discharging the battery of the vehicle.
Rear interior lighting*
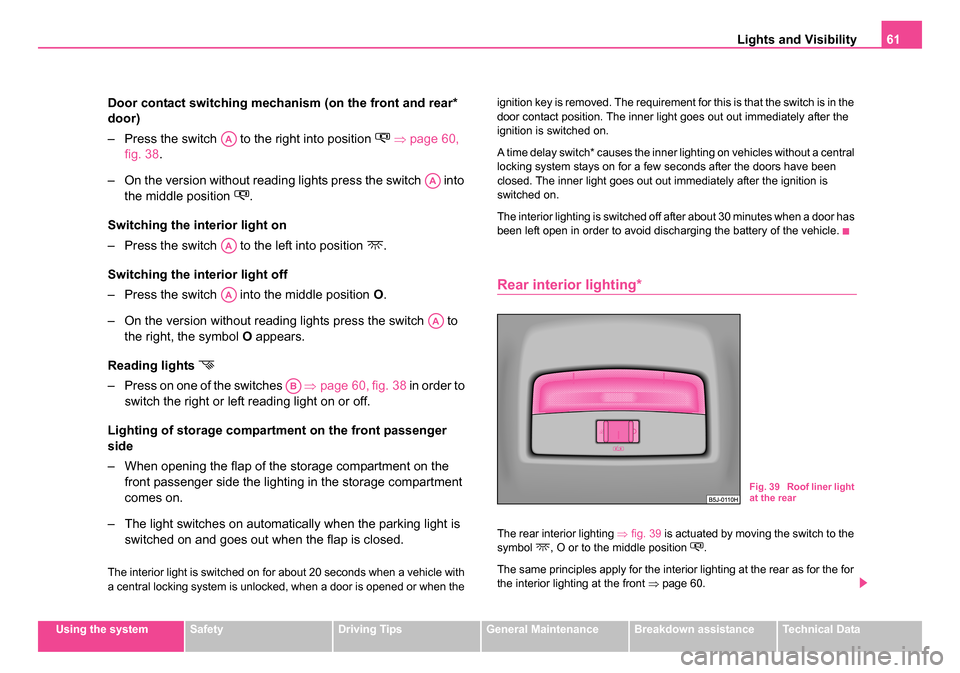
The rear interior lighting
⇒fig. 39 is actuated by moving the switch to the
symbol , O or to the middle position .
The same principles apply for the interior lighting at the rear as for the for
the interior lighting at the front ⇒page 60.
AA
AA
AA
AA
AA
AB
Fig. 39 Roof liner light
at the rear
NKO 20 A05.book Page 61 Wednesday, June 21, 2006 1:42 PM
Page 63 of 274
Lights and Visibility
62
Note
We recommend having the bulb replaced by a specialist garage.
Luggage compartment light
The lighting comes on automatically when the tailgate is opened. The
luggage compartment lighting will switch off again automatically if the boot
lid remains open for more than about 30 minutes.
Visibility
Rear window heater
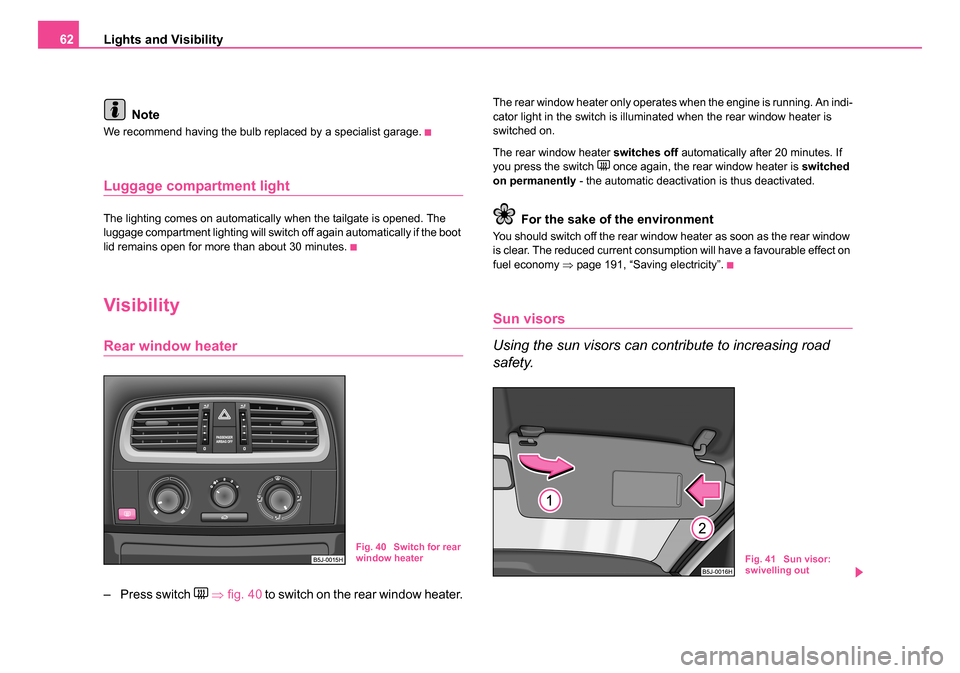
– Press switch ⇒ fig. 40 to switch on the rear window heater.
The rear window heater only operates when the engine is running. An indi-
cator light in the switch is illuminated when the rear window heater is
switched on.
The rear window heater switches off automatically after 20 minutes. If
you press the switch
once again, the rear window heater is switched
on permanently - the automatic deactivation is thus deactivated.
For the sake of the environment
You should switch off the rear window heater as soon as the rear window
is clear. The reduced current consumption will have a favourable effect on
fuel economy ⇒page 191, “Saving electricity”.
Sun visors
Using the sun visors can contribute to increasing road
safety.
Fig. 40 Switch for rear
window heaterFig. 41 Sun visor:
swivelling out
NKO 20 A05.book Page 62 Wednesday, June 21, 2006 1:42 PM
Page 64 of 274
Lights and Visibility63
Using the systemSafetyDriving TipsGeneral MaintenanceBreakdown assistanceTechnical Data
You can pull the sun visor for the driver or front passenger out of the fixture
and swivel it toward the door in the direction of the arrow
⇒page 62,
fig. 41 .
A vanity mirror*, which is provided with a cover, is located in the sun visor
on the front passenger side. Push the cover in direction of arrow .
WARNING
The sun visors must not be swivelled to the side windows into the
deployment area of the head airbags if any objects, such as ball-
point pens etc. are attached to them. This might result in injuries to
the occupants if the head airbag is deployed.
Windshield wiper and wash system
Windshield wiper
You can operate the windscreen wipers and automatic
wipe/wash using the windscreen wiper lever.
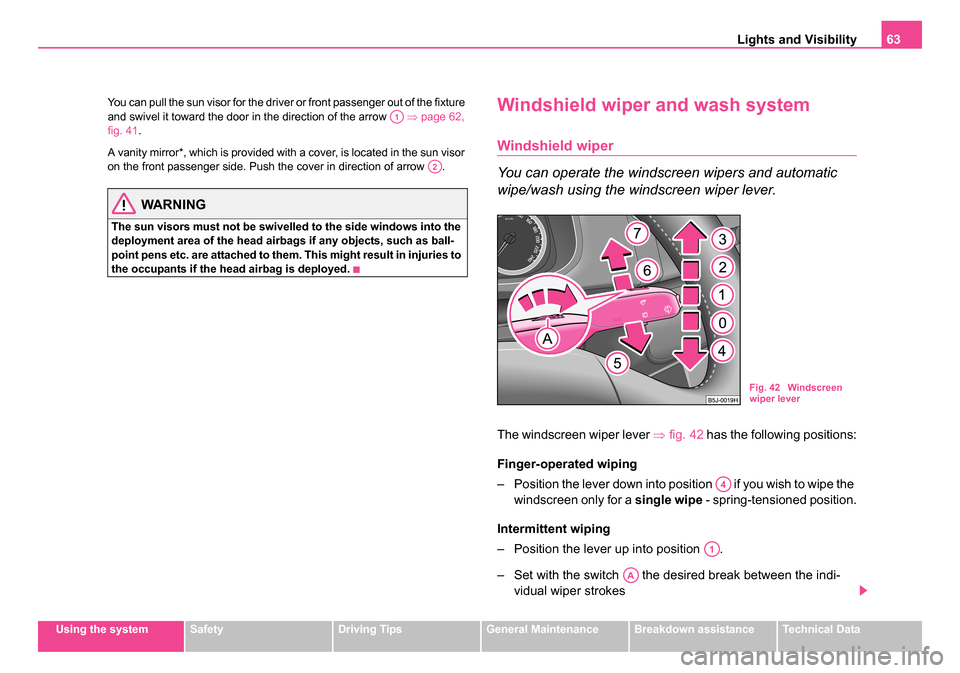
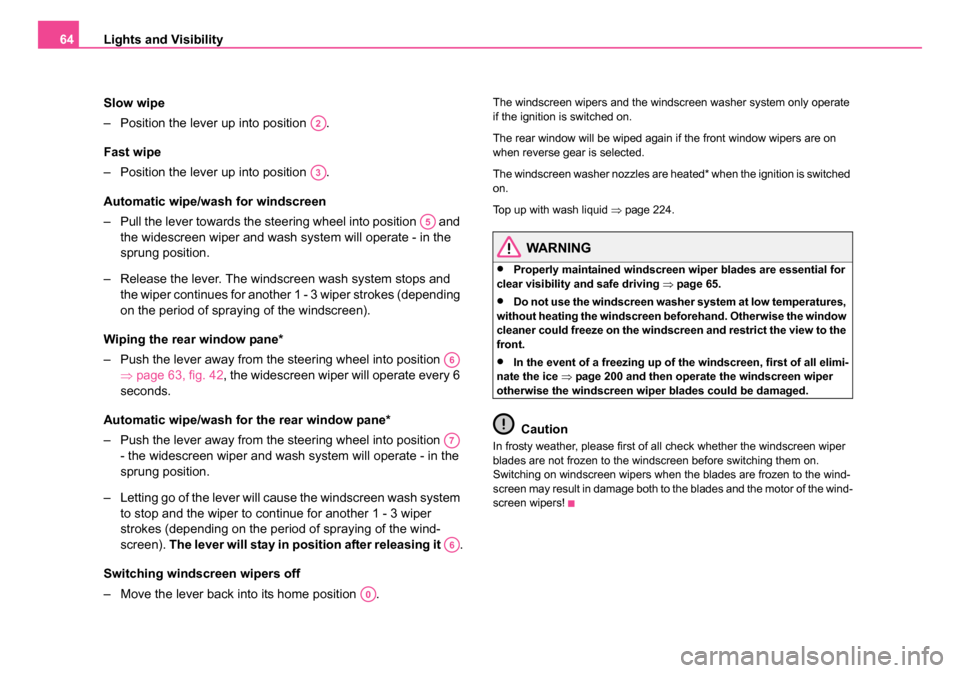
The windscreen wiper lever ⇒fig. 42 has the following positions:
Finger-operated wiping
– Position the lever down into position if you wish to wipe the windscreen only for a single wipe - spring-tensioned position.
Intermittent wiping
– Position the lever up into position .
– Set with the switch the desired break between the indi- vidual wiper strokes
A1
A2
Fig. 42 Windscreen
wiper lever
A4
A1
AA
NKO 20 A05.book Page 63 Wednesday, June 21, 2006 1:42 PM
Page 65 of 274
Lights and Visibility
64
Slow wipe
– Position the lever up into position .
Fast wipe
– Position the lever up into position .
Automatic wipe/wash for windscreen
– Pull the lever towards the steering wheel into position and the widescreen wiper and wash system will operate - in the
sprung position.
– Release the lever. The winds creen wash system stops and
the wiper continues for another 1 - 3 wiper strokes (depending
on the period of spraying of the windscreen).
Wiping the rear window pane*
– Push the lever away from the steering wheel into position ⇒page 63, fig. 42 , the widescreen wiper will operate every 6
seconds.
Automatic wipe/wash for the rear window pane*
– Push the lever away from the steering wheel into position - the widescreen wiper and wash system will operate - in the
sprung position.
– Letting go of the lever will cause the windscreen wash system to stop and the wiper to continue for another 1 - 3 wiper
strokes (depending on the period of spraying of the wind-
screen). The lever will stay in position after releasing it .
Switching windscreen wipers off
– Move the lever back into its home position .
The windscreen wipers and the windscreen washer system only operate
if the ignition is switched on.
The rear window will be wiped again if the front window wipers are on
when reverse gear is selected.
The windscreen washer nozzles are heated* when the ignition is switched
on.
Top up with wash liquid ⇒page 224.
WARNING
•Properly maintained windscreen wiper blades are essential for
clear visibility and safe driving ⇒page 65.
•Do not use the windscreen washer system at low temperatures,
without heating the windscreen beforehand. Otherwise the window
cleaner could freeze on the windscreen and restrict the view to the
front.
•In the event of a freezing up of the windscreen, first of all elimi-
nate the ice ⇒page 200 and then operate the windscreen wiper
otherwise the windscreen wiper blades could be damaged.
Caution
In frosty weather, please first of all check whether the windscreen wiper
blades are not frozen to the windscreen before switching them on.
Switching on windscreen wipers when the blades are frozen to the wind-
screen may result in damage both to the blades and the motor of the wind-
screen wipers!
A2
A3
A5
A6
A7
A6
A0
NKO 20 A05.book Page 64 Wednesday, June 21, 2006 1:42 PM
Page 66 of 274
Lights and Visibility65
Using the systemSafetyDriving TipsGeneral MaintenanceBreakdown assistanceTechnical Data
Headlight cleaning system*
The headlights are being cleaned after the windscreen washer system
has been operated for the fifth time, the low beam or main beam are
switched on as well as the windscreen wiper lever is held in the position
⇒ page 63, fig. 42 for about 1 second.
You should remove stubborn dirt (such as insect residues) from the head-
light lenses at regular intervals, for example when refuelling. Please refer
to the following guidelines ⇒page 201, “The headlight lenses”.
You should remove any snow from the fixtures of the washer nozzles and
clear ice in winter with a de-icing spray in order to ensure proper operation
of the cleaning system.
Replacing wiper blades for the windscreen wipers
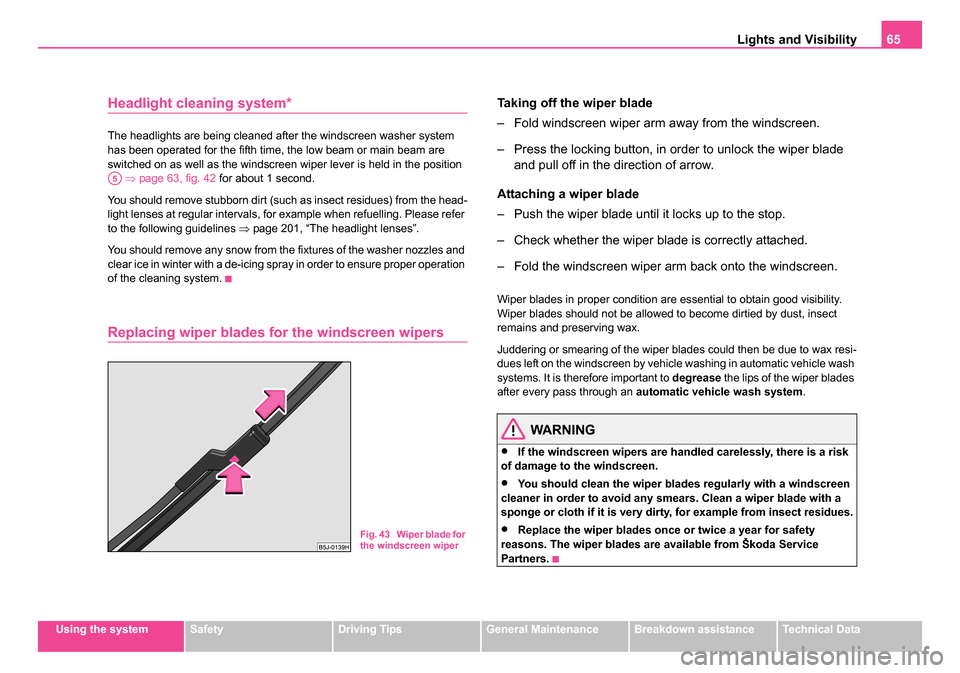
Taking off the wiper blade
– Fold windscreen wiper arm away from the windscreen.
– Press the locking button, in order to unlock the wiper blade and pull off in the direction of arrow.
Attaching a wiper blade
– Push the wiper blade until it locks up to the stop.
– Check whether the wiper blade is correctly attached.
– Fold the windscreen wiper arm back onto the windscreen.
Wiper blades in proper condition are essential to obtain good visibility.
Wiper blades should not be allowed to become dirtied by dust, insect
remains and preserving wax.
Juddering or smearing of the wiper blades could then be due to wax resi-
dues left on the windscreen by vehicle washing in automatic vehicle wash
systems. It is therefore important to degrease the lips of the wiper blades
after every pass through an automatic vehicle wash system .
WARNING
•If the windscreen wipers are handled carelessly, there is a risk
of damage to the windscreen.
•You should clean the wiper blades regularly with a windscreen
cleaner in order to avoid any smears. Clean a wiper blade with a
sponge or cloth if it is very dirty, for example from insect residues.
•Replace the wiper blades once or twice a year for safety
reasons. The wiper blades are available from Škoda Service
Partners.
A5
Fig. 43 Wiper blade for
the windscreen wiper
NKO 20 A05.book Page 65 Wednesday, June 21, 2006 1:42 PM
Page 67 of 274
Lights and Visibility
66
Replacing the wiper blade on the rear window wiper
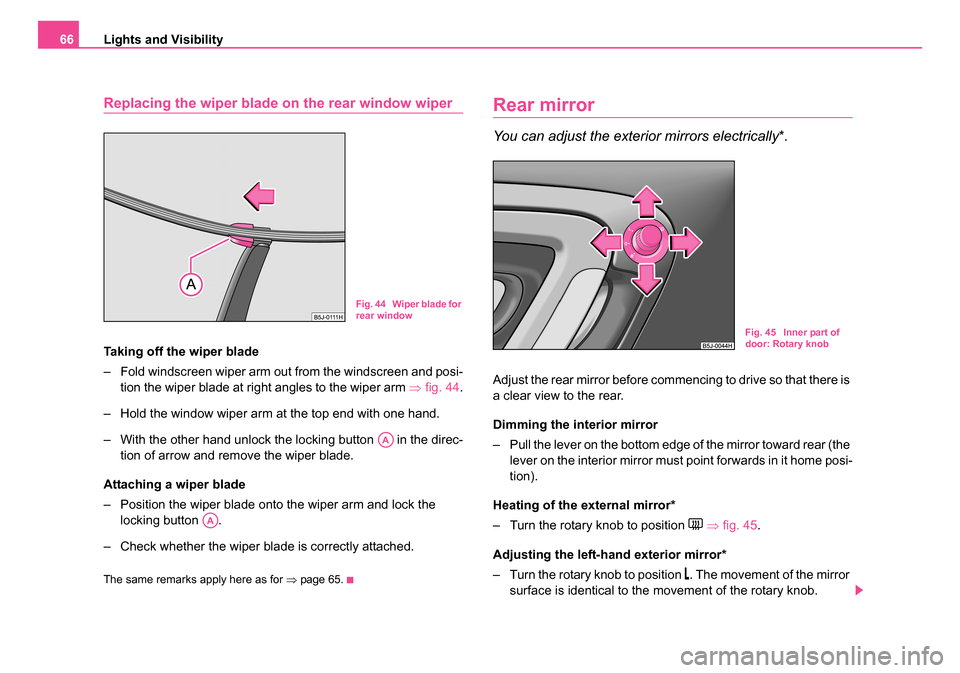
Taking off the wiper blade
– Fold windscreen wiper arm out from the windscreen and posi-
tion the wiper blade at right angles to the wiper arm ⇒fig. 44 .
– Hold the window wiper arm at the top end with one hand.
– With the other hand unlock the locking button in the direc- tion of arrow and remove the wiper blade.
Attaching a wiper blade
– Position the wiper blade onto the wiper arm and lock the locking button .
– Check whether the wiper blade is correctly attached.
The same remarks apply here as for ⇒page 65.
Rear mirror
You can adjust the exterior mirrors electrically*.
Adjust the rear mirror before commencing to drive so that there is
a clear view to the rear.
Dimming the interior mirror
– Pull the lever on the bottom edge of the mirror toward rear (the
lever on the interior mirror must point forwards in it home posi-
tion).
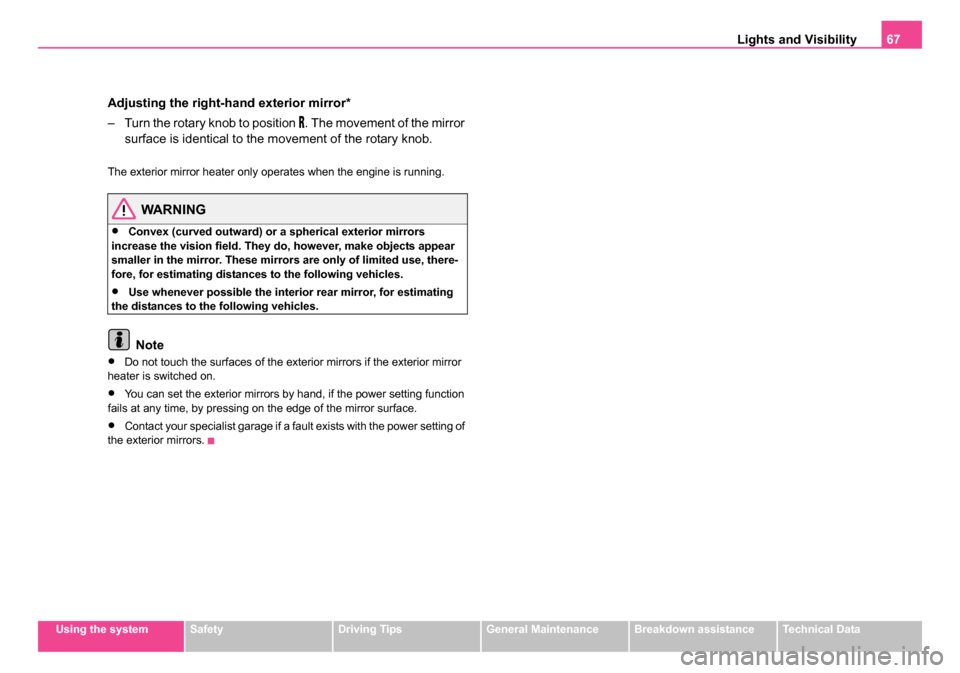
Heating of the external mirror*
– Turn the rotary knob to position
⇒ fig. 45 .
Adjusting the left-h and exterior mirror*
– Turn the rotary knob to position
. The movement of the mirror
surface is identical to the movement of the rotary knob.
Fig. 44 Wiper blade for
rear window
AA
AA
Fig. 45 Inner part of
door: Rotary knob
NKO 20 A05.book Page 66 Wednesday, June 21, 2006 1:42 PM
Page 68 of 274
Lights and Visibility67
Using the systemSafetyDriving TipsGeneral MaintenanceBreakdown assistanceTechnical Data
Adjusting the right-hand exterior mirror*
– Turn the rotary knob to position
. The movement of the mirror
surface is identical to the movement of the rotary knob.
The exterior mirror heater only operates when the engine is running.
WARNING
•Convex (curved outward) or a spherical exterior mirrors
increase the vision field. They do, however, make objects appear
smaller in the mirror. These mirror s are only of limited use, there-
fore, for estimating distances to the following vehicles.
•Use whenever possible the interior rear mirror, for estimating
the distances to the following vehicles.
Note
•Do not touch the surfaces of the exterior mirrors if the exterior mirror
heater is switched on.
•You can set the exterior mirrors by hand, if the power setting function
fails at any time, by pressing on the edge of the mirror surface.
•Contact your specialist garage if a fault exists with the power setting of
the exterior mirrors.
NKO 20 A05.book Page 67 Wednesday, June 21, 2006 1:42 PM
Page 69 of 274
Seats and Stowage
68
Seats and Stowage
Front seats
Basic information
The front seats have a wide range of different settings and can thus be
matched to the physical characteristics of the driver and front passenger.
Correct adjustment of the seats is particularly important for
•safely and quickly reaching the controls,
•a relaxed, fatigue-free body position,
•achieving the maximum protection offered by the seat belts and
the airbag system.
The chapters which follow describe the procedure which you should adopt
for adjusting the seats.
WARNING
•Never transport more occupants than the maximum seating in
the vehicle.
•Each occupant must correctly fasten the seat belt belonging to
the seat. Children must be fastened ⇒page 166, “Transporting
children safely” with a suitable restraint system.
•The front seats and the head restraints must always be adjusted
to match the body size of the seat occupant as well as the seat belts
must always be correctly fastened in order to provide an optimal
protection for you and your occupants.
•Always keep your feet in the footwell when the car is being
driven - never place your feet on the instrument panel, out of the
window or on the surfaces of the seats. This is particularly impor- tant for the front seat passenger. You will be exposed to increased
risk of injury if it becomes nece
ssary to apply the brake or in the
event of an accident. If an airbag is deployed, you may suffer fatal
injuries when adopting an incorrect seated position!
•It is important for the driver and front passenger to maintain a
distance of at least 25 cm from the steering wheel or dash panel.
Not maintaining this minimum distance will mean that the airbag
system will not be able to properly protect you - hazard! The front
seats and the head restraints must always also be correctly
adjusted to match the body size of the occupant.
•Ensure that there are no objects in the footwell as any objects
may get behind the pedals during a driving or braking manoeuvre.
You would then no longer be able to operate the clutch, to brake or
accelerate.
WARNING (continued)
NKO 20 A05.book Page 68 Wednesday, June 21, 2006 1:42 PM
Page 70 of 274
Seats and Stowage69
Using the systemSafetyDriving TipsGeneral MaintenanceBreakdown assistanceTechnical Data
Adjusting the front seats
Adjusting a seat in a forward/back direction
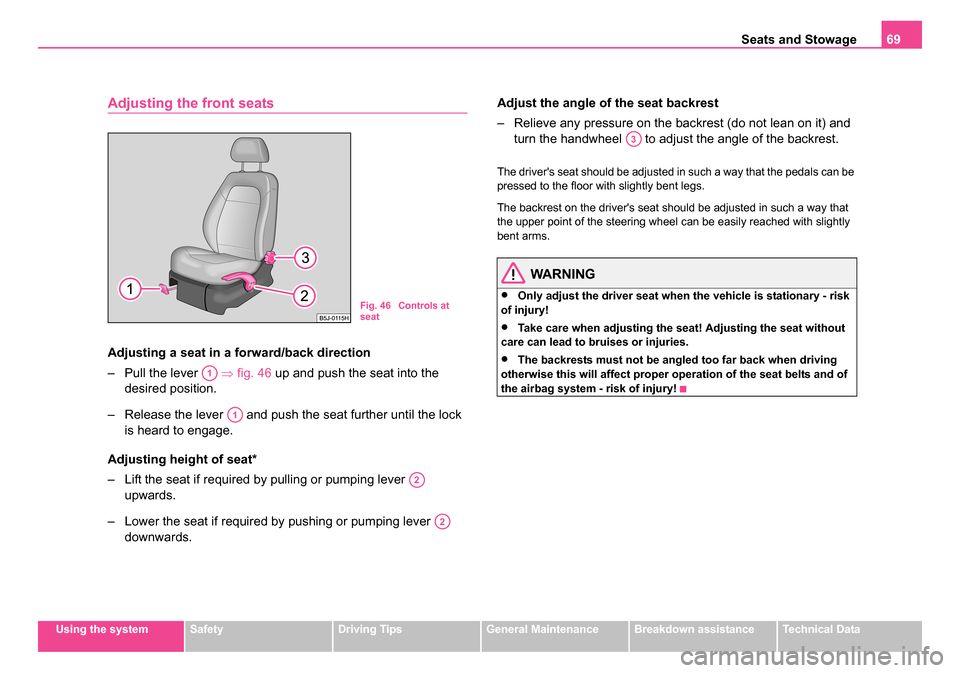
– Pull the lever ⇒fig. 46 up and push the seat into the
desired position.
– Release the lever and push the seat further until the lock is heard to engage.
Adjusting height of seat*
– Lift the seat if required by pulling or pumping lever upwards.
– Lower the seat if required by pushing or pumping lever downwards. Adjust the angle of
the seat backrest
– Relieve any pressure on the backrest (do not lean on it) and turn the handwheel to adjust the angle of the backrest.
The driver's seat should be adjusted in such a way that the pedals can be
pressed to the floor with slightly bent legs.
The backrest on the driver's seat should be adjusted in such a way that
the upper point of the steering wheel can be easily reached with slightly
bent arms.
WARNING
•Only adjust the driver seat when the vehicle is stationary - risk
of injury!
•Take care when adjusting the sea t! Adjusting the seat without
care can lead to bruises or injuries.
•The backrests must not be angled too far back when driving
otherwise this will affect proper operation of the seat belts and of
the airbag system - risk of injury!
Fig. 46 Controls at
seat
A1
A1
A2
A2
A3
NKO 20 A05.book Page 69 Wednesday, June 21, 2006 1:42 PM