SKODA ROOMSTER 2011 1.G Owner's Manual
Manufacturer: SKODA, Model Year: 2011, Model line: ROOMSTER, Model: SKODA ROOMSTER 2011 1.GPages: 212, PDF Size: 3.3 MB
Page 171 of 212
WARNING
● If you find yourself in flowing traffic switch on the hazard warning lights
system and place the warning triangle on the side of the road at the prescri-
bed distance from your vehicle. Comply with the national legal regulations. In
this way you are protecting not only yourself but also other road users.
● Never start the engine with the vehicle sitting on the raised jack - danger
of suffering injury. CAUTION
If you have to change a wheel on a slope first block the opposite wheel with a
stone or similar object in order to secure the vehicle from unexpectedly rolling
away. Note
Comply with the national legal regulations.
Changing a wheel Always change a wheel on a level surface as far as possible.
–
Take off the full wheel trim ⇒ page 170 or the caps ⇒ page 170.
– Slacken the wheel bolts ⇒ page 170.
– Jack up the vehicle until the wheel to be changed is clear of the ground
⇒ page 171.
– Unscrew the wheel bolts and place them on a clean surface (cloth, paper, etc.).
– Take off the wheel.
– Fit on the spare wheel and tighten the wheel bolts slightly.
– Lower the car.
– Tighten the wheel bolts firmly, alternately and diagonally using the wrench
(crosswise) ⇒ page 170.
– Mount the full wheel trim/wheel trim cap or the caps. Note
● All bolts must be clean and must turn easily.
● You must never grease or oil the wheel bolts!
● When fitting on unidirectional tyres, ensure that the tyres rotate in the correct
direction ⇒ page 161
.
Subsequent steps After changing the wheel, you must perform the following steps.
–
Stow the vehicle tool kit in the space provided.
– Stow the replaced wheel in the luggage compartment.
– Check the tyre pressure on the spare wheel just mounted as soon as possible.
– Have the tightening torque of the wheel bolts checked with a torque wrench
as soon as possible. Steel and light alloy wheels must be tightened to a tight-
ening torque of 120
Nm.
– Change the damaged wheel or consult a specialist garage about possibilities
for getting repairs done. WARNING
It is necessary to observe the guidelines given on ⇒
page 163, New tyres and
wheels if the vehicle is subsequently fitted with tyres which are different to
those it was fitted with at the works. Note
● If you find, when changing the wheel, that the wheel bolts are corroded and
difficult to turn, the bolts must be replaced before checking the tightening torque.
● Drive cautiously and only at a moderate speed to a workshop where the tight-
ening torque can be checked. 169
Breakdown assistance Using the system Safety Driving Tips General Maintenance Breakdown assis-
tance Praktik Technical data
Page 172 of 212
Full wheel trim
Fig. 135 Removing the full wheel trim
Pulling off
– Hook the clamp found in the vehicle tool kit into the reinforced edge of the full
wheel trim.
– Push the wheel key through the clamp, support the wheel key on the tyre and
pull off the wheel trim ⇒ fig. 135 .
Install
– First press the full wheel trim onto the wheel at the valve opening provided.
Then press the full wheel trim into the wheel in such a way that its entire cir-
cumference locks correctly in place. CAUTION
● Use the pressure of your hand, do not knock on the full wheel trim! Heavy
knocks mainly on the points where the full wheel trim has not been inserted into
the wheel, can result in damage to the guide and centring elements of the full
wheel trim.
● Check for yourself that the safety wheel bolt is located in the hole in the area
of the valve before fitting the full wheel trim onto a steel wheel which is attached
with a safety wheel bolt ⇒
page 172, Securing wheels against being stolen. Wheel bolts with caps The caps are designed to protect the wheel bolts.
Fig. 136 : Pull off cap from the wheel
bolt
Pulling off
– Insert the plastic clip (in the car tool kit) sufficiently far onto the cap until the
inner catches of the clip are positioned at the collar of the cap.
– Pull the cap off with the plastic clip ⇒ fig. 136 .
Install
– Insert the caps onto the bolts.
Slackening and tightening wheel bolts Loosen the wheel bolts before jacking up the vehicle.
Fig. 137 : Loosening the wheel bolts
£170
Breakdown assistance
Page 173 of 212
Loosening the wheel bolts
–
Insert the wheel wrench fully onto the wheel bolt 1)
.
– Grasp the end of the wrench and turn the bolt about one turn to the left
⇒ fig. 137.
Tightening wheel bolts
– Insert the wheel wrench fully onto the wheel bolt 1 )
.
– Grasp the end of the wrench and turn the bolt to the right until it is tight. WARNING
Loosen the wheel bolts only a little (about one turn) while the vehicle has not
yet been jacked up - risk of an accident!. Note
● Apply pressure carefully with your foot to the end of the wrench if it is difficult
to loosen the bolts. Hold tight on the vehicle when doing this and ensure that you
have a steady position.
Raise vehicle You have to raise the vehicle with a lifting jack in order to be able
to take off the wheel.
Fig. 138 Changing a wheel: Jacking
points for positioning lifting jack Fig. 139 Attach lifting jack
Position the lifting jack by selecting the jacking point which is closest to the wheel
to be removed
⇒ fig. 138 . The jacking point is located directly below the engraving
in the lower sill.
– Position the lifting jack below the jacking point and move it up until its claw is
positioned directly below the vertical web of the lower sill.
– Align the lifting jack so that its claw grasps the web ⇒ fig. 139 at the right be-
low the embossing in the side surface of the base plate.
– Make sure that the base plate of the lifting jack rests with its entire surface on
level ground and is located vertical to the point ⇒
fig. 139 where the claw
grasps the web.
– Turn the lifting jack up further until the wheel is just clear of the ground. WARNING
● Always raise the vehicle with the doors closed - risk of injury.
● Never position any body parts such as arms or legs under the vehicle, while
the vehicle is raised with a lifting jack. £1)
Use the appropriate adapter for loosening and tightening the safety wheel bolts ⇒ page 172. 171
Breakdown assistance Using the system Safety Driving Tips General Maintenance Breakdown assis-
tance Praktik Technical data
Page 174 of 212
WARNING (Continued)
● Secure the base plate of the lifting jack with suitable means to prevent
possible moving. A soft and slippery ground under the base plate may move
the lifting jack, causing the vehicle to fall down. It is therefore always neces-
sary to place the lifting jack on a solid surface or use a wide and stable base.
Use a non-slip base (e.g. a rubber foot mat) if the
surface is smooth, such as
cobbled stones, a tiled floor, etc.
● Attach the lifting jack only at the attachment points provided for this pur-
pose.
Securing wheels against being stolen You need a special adapter for loosening the safety wheel bolts.
Fig. 140 Illustration image: Safety
wheel bolt with adapter
– Pull off the full wheel trim/cap from the wheel hub or cap from the safety
wheel bolt.
– Insert the adapter B with its toothed side into the inner toothing of the head
of the safety wheel bolt A
⇒
fig. 140 .
– Insert the wheel wrench fully onto the adapter B .
– Slacken the wheel bolt, or tighten it firmly ⇒ page 170.
– Reinstall the full wheel trim/wheel cap after removing the adapter or place the
cap onto the safety wheel bolt.
– Have the tightening torque checked with a torque wrench as soon as possi-
ble. Steel and light alloy wheels must be tightened to a tightening torque of
120
Nm. The safety wheel bolts on vehicles fitted with them (one safety wheel bolt per
wheel) can only be loosened or tighten up by using the adapter provided.
It is meaningful to note the code number hammered into the rear side of the
adapter or the rear side of the safety wheel bolts. You can obtain a replacement
adapter from an authorised
ŠKODA Service Partner, if necessary, by quoting this
number.
We recommend that you always carry the adapter for the wheel bolts with you in
the vehicle. It should be stowed in the vehicle tool kit. CAUTION
● Damage can occur to the adapter and safety wheel bolt if the safety wheel
bolt is tightened up too much.
● On steel wheels, the theft-deterrent wheel bolt must always be installed in
the hole, which is close to the valve. Otherwise the full wheel trim cannot be
mounted and the full wheel trim can be damaged during the assembly. Note
The set of safety wheel bolts can be obtained from a specialist garage.
Tyre repair kit General information The tyre repair kit is located in a box under the carpet in the luggage compart-
ment.
Use the tyre repair kit to reliably repair tyre damage caused by foreign bodies or a
puncture with diameters up to 4 mm. Do not remove foreign bodies, e.g. screws or
nails, from the tyre!
The repair can be undertaken on the vehicle immediately.
The repair with the tyre repair kit is not at all intended to replace a permanent
repair on the tyre, this repair only serves to reach the next specialist garage.
Do not use the tyre repair kit:
● to repair wheel damage,
● in outside temperatures of less than -20 °C (-4 °F),
● with tears or punctures greater than 4 mm in size,
● to repair damage to the tyre wall, £172
Breakdown assistance
Page 175 of 212
●
when driving with very low tyre pressure or with a completely flat tyre,
● if the use-by-date (see inflation bottle) has passed. WARNING
● If you find yourself in flowing traffic switch on the hazard warning lights
system and place the warning triangle on the side of the road at the prescri-
bed distance from your vehicle. Comply with the national legal regulations. In
this way you are protecting not only yourself but also other road users.
● Park the vehicle as far away as possible from the traffic flow. Park on as
flat and firm a surface as possible.
● A tyre filled with sealant has the same driving characteristics as a standard
tyre.
● Do not drive faster than 80 km/h, 50 mph.
● Avoid accelerating at full throttle, sharp braking and fast cornering.
● Check the tyre inflation pressure after driving 10 minutes.
● Sealant is hazardous to heath. Remove immediately if it comes into con-
tact with the skin. For the sake of the environment
Used sealant or sealant whose expiry date has passed must be disposed of in ac-
cordance with environmental protection regulations. Note
● Observe the manufacturer's usage instructions for the tyre repair kit.
● You can purchase a new bottle of sealant from the range of the ŠKODA Origi-
nal Accessories.
● Change the wheel that was repaired using the tyre repair kit or consult a spe-
cialist garage about possibilities for getting repairs done. Components of the tyre repair kit
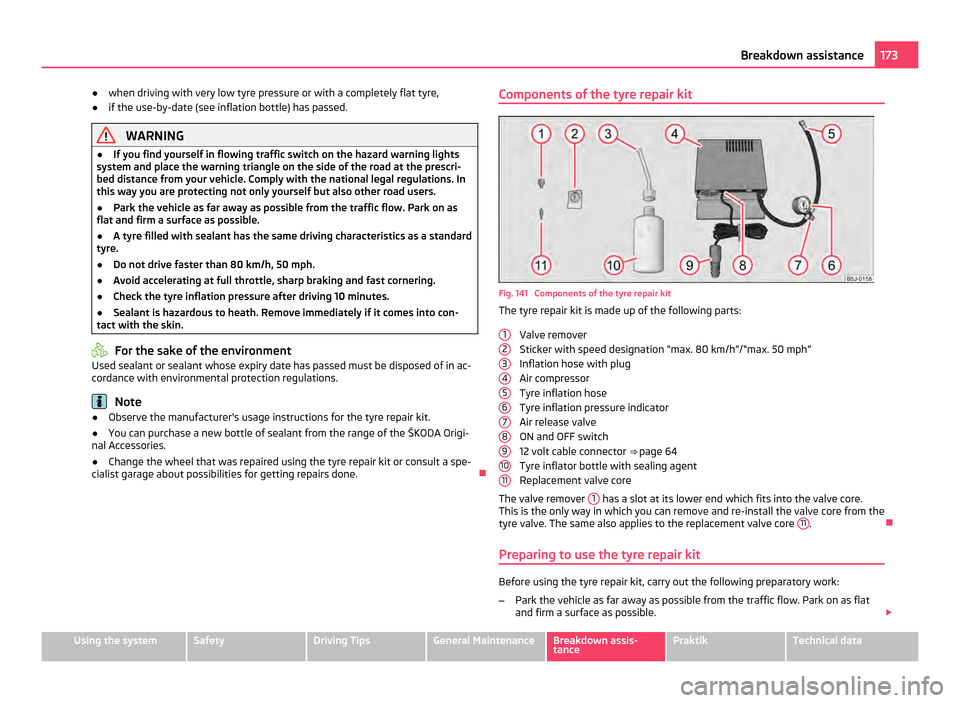
Fig. 141 Components of the tyre repair kit
The tyre repair kit is made up of the following parts:
Valve remover
Sticker with speed designation
“max. 80 km/h”/“max. 50 mph”
Inflation hose with plug
Air compressor
Tyre inflation hose
Tyre inflation pressure indicator
Air release valve
ON and OFF switch
12 volt cable connector ⇒ page 64
Tyre inflator bottle with sealing agent
Replacement valve core
The valve remover 1 has a slot at its lower end which fits into the valve core.
This is the only way in which you can remove and re-install the valve core from the
tyre valve. The same also applies to the replacement valve core 11 .
Preparing to use the tyre repair kit Before using the tyre repair kit, carry out the following preparatory work:
–
Park the vehicle as far away as possible from the traffic flow. Park on as flat
and firm a surface as possible. £
1 2
3
4
5
6
7
8
9
10
11 173
Breakdown assistance Using the system Safety Driving Tips General Maintenance Breakdown assis-
tance Praktik Technical data
Page 176 of 212
–
Have all the occupants get out. While changing a tyre, the occupants of the
vehicle should not stand on the road (instead they should remain behind a
crash barrier, for example).
– Switch off the engine and engage 1st gear or if your vehicle is fitted with an
automatic gearbox, position the selector lever into position P .
– Apply the handbrake firmly.
– Check whether you can carry out the repairs with the tyre repair kit
⇒ page 172, General information.
– If a trailer is coupled, uncouple it.
– Remove the tyre repair kit from the luggage compartment.
– Stick the sticker 2
⇒
fig. 141 on the dash panel in view of the driver.
– Do not remove the foreign body, e.g. screw or nail, from the tyre.
– Unscrew the valve cap.
– Use the valve remover 1 to remove the valve core and place it down on a
clean surface.
Seal and inflate tyres Sealing tyres
–
Forcefully shake the tyre inflator bottle 10
⇒ fig. 141 several times.
– Firmly screw inflation hose 3 onto the tyre inflator bottle in a clockwise direc-
tion 10 . The film on the cap is pierced automatically.
– Remove the plug from the inflation hose 3 and plug the open end fully into
the tyre valve.
– Hold the bottle 10 with the floor facing upwards and fill the whole sealing
agent in the tyre inflator bottle into the tyres.
– Remove the empty tyre inflator bottle from the valve.
– Screw the valve core back into the tyre valve using the valve remover 1 .
Pumping up the tyres
– Screw the tyre inflation hose 5
⇒
fig. 141 of the air compressor firmly onto the
tyre valve.
– Check whether the air release valve 7 is closed.–
On vehicles fitted with a manual gearbox, move the gearshift lever into Neu-
tral.
– Start the engine and run it in idle.
– Plug the connector 9 into 12 Volt socket ⇒
page 64.
– Switch on the air compressor with the ON and OFF switch 8 .
– Allow the air compressor to run until reaching a pressure of 2.0 - 2.5 bar. Maxi-
mum run time of 8 minutes ⇒ !
– Switch off the air compressor with the ON and OFF switch.
– If you cannot reach an air pressure of 2.0 – 2.5 bar, unscrew the tyre inflation
hose 5 from the tyre valve.
– Drive the vehicle approx. 10 metres forwards or backwards to allow the sealing
agent to distribute in the tyre.
– Screw the tyre inflation hose of the air compressor 5 firmly back onto the
tyre valve and repeat the inflation procedure.
– If you cannot reach the required tyre inflation pressure here either, this means
the tyre has sustained too much damage. You cannot seal with tyre with the
breakdown kit ⇒ .
– Switch off the air compressor with the ON and OFF switch.
– Remove the tyre inflation hose 5 from the tyre valve.
After reaching a tyre inflation pressure of 2.0 – 2.5 bar, drive at a maximum speed
of 80 km/h (50
mph).
Check the tyre inflation pressure after driving 10 minutes ⇒ page 175, Check after
driving for 10 minutes. WARNING
● During inflation, the tyre inflation hose and air compressor may get hot-
risk of injury!
● Do not place hot tyre inflation hoses or hot air compressors on flammable
materials - risk of fire!
● If you cannot inflate the tyre to at least 2.0 bar, this means the damage
sustained was too serious. The sealing agent cannot be used to seal the tyre.
Do not drive the vehicle. Get professional assistance. £174
Breakdown assistance
Page 177 of 212
CAUTION
Switch off the air compressor after running 8 minutes at the latest - danger of
overheating! Allow the air compressor to cool a few moments before switching it
on again.
Check after driving for 10 minutes Check the tyre inflation pressure after driving 10 minutes.
If the tyre inflation pressure is 1.3 bar or less:
–
Do not drive the vehicle! You cannot properly seal with tyre with the break-
down kit.
– Contact a Škoda dealer to obtain professional assistance.
If the tyre inflation pressure is 1.3 bar or more:
– Adjust the tyre inflation pressure to the correct value (see inside of fuel filler
cap).
– Continue driving carefully to the nearest specialist garage at a maximum
speed of 80 km/h (50 mph).
Jump-starting Initial steps You can use the battery of another vehicle for jump-starting yours if the engine
does not start because the battery on your vehicle is flat. You will require jump-
start cables for this purpose.
Both batteries must have a rated voltage of 12 V. The capacity
(Ah) of the battery
supplying the power must not be significantly less than the capacity of the dis-
charged battery in your vehicle.
Jump-start cables
Only use jump-start cables which have an adequately large cross-section and in-
sulated terminal clamps. Please pay attention to the manufacturer's instructions.
Positive cable - colour coding in the majority of cases red.
Negative cable -
colour coding in the majority of cases black. WARNING
● A discharged battery may already freeze at temperatures just below 0 °C.
In case of frozen battery carry out no jump-starting - risk of explosion! Also af-
ter thawing of the battery there is a risk of caustic burns due to leaking acid.
Replace the frozen battery.
● Please pay attention to the warning instructions relating to working in the
engine compartment ⇒ page 150
. Note
● There must not be any contact between the two vehicles otherwise current
may flow as soon as the negative terminals are connected.
● The discharged battery must be properly connected to the system of the vehi-
cle.
● Switch off the car phone. Heed the advice concerning the use of mobile
phones in such a situation.
● We recommend you buy jump-start cables from a car battery specialist.
Start engine Fig. 142 Jump-starting using the battery
from another vehicle: A - flat vehicle bat-
tery, B - battery providing current
It is important to connect the jump-start cables in the correct order.
Connecting positive terminals
– Attach one end 1 to the positive terminal
⇒ fig. 142 of the discharged battery
A .
– Attach the other end 2 to the positive terminal of the battery supplying the
power B .
£ 175
Breakdown assistance Using the system Safety Driving Tips General Maintenance Breakdown assis-
tance Praktik Technical data
Page 178 of 212
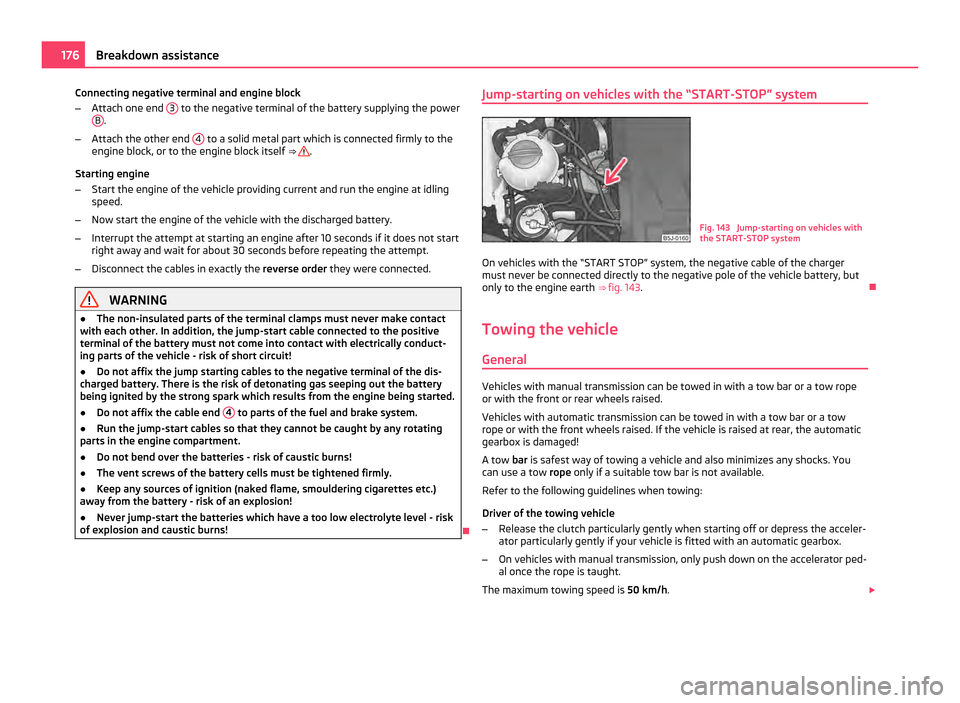
Connecting negative terminal and engine block
– Attach one end 3 to the negative terminal of the battery supplying the power
B .
– Attach the other end 4 to a solid metal part which is connected firmly to the
engine block, or to the engine block itself ⇒ .
Starting engine
– Start the engine of the vehicle providing current and run the engine at idling
speed.
– Now start the engine of the vehicle with the discharged battery.
– Interrupt the attempt at starting an engine after 10 seconds if it does not start
right away and wait for about 30 seconds before repeating the attempt.
– Disconnect the cables in exactly the reverse order they were connected.WARNING
● The non-insulated parts of the terminal clamps must never make contact
with each other. In addition, the jump-start cable connected to the positive
terminal of the battery must not come into contact with electrically conduct-
ing parts of the vehicle - risk of short circuit!
● Do not affix the jump starting cables to the negative terminal of the dis-
charged battery. There is the risk of detonating gas seeping out the battery
being ignited by the strong spark which results from the engine being started.
● Do not affix the cable end 4 to parts of the fuel and brake system.
● Run the jump-start cables so that they cannot be caught by any rotating
parts in the engine compartment.
● Do not bend over the batteries - risk of caustic burns!
● The vent screws of the battery cells must be tightened firmly.
● Keep any sources of ignition (naked flame, smouldering cigarettes etc.)
away from the battery - risk of an explosion!
● Never jump-start the batteries which have a too low electrolyte level - risk
of explosion and caustic burns! Jump-starting on vehicles with the “START-STOP” system
Fig. 143 Jump-starting on vehicles with
the START-STOP system
On vehicles with the “START STOP” system, the negative cable of the charger
must never be connected directly to the negative pole of the vehicle battery, but
only to the engine earth ⇒ fig. 143 .
Towing the vehicle General Vehicles with manual transmission can be towed in with a tow bar or a tow rope
or with the front or rear wheels raised.
Vehicles with automatic transmission can be towed in with a tow bar or a tow
rope or with the front wheels raised. If the vehicle is raised at rear, the automatic
gearbox is damaged!
A tow bar
is safest way of towing a vehicle and also minimizes any shocks. You
can use a tow rope only if a suitable tow bar is not available.
Refer to the following guidelines when towing:
Driver of the towing vehicle
– Release the clutch particularly gently when starting off or depress the acceler-
ator particularly gently if your vehicle is fitted with an automatic gearbox.
– On vehicles with manual transmission, only push down on the accelerator ped-
al once the rope is taught.
The maximum towing speed is 50 km/h. £176
Breakdown assistance
Page 179 of 212
Driver of the towed vehicle
–
Switch the ignition on so that the steering wheel is not blocked and you can
also operate the turn signal lights, the headlight flasher, the windshield wipers
and windshield washer system.
– Take the vehicle out of gear or move the selector lever into position N if your
vehicle is fitted with an automatic gearbox.
Note that the brake servo unit and power steering only operate if the engine is
running. You will require significantly greater physical force to depress the brake
pedal and to steer the vehicle if the engine is not running.
Ensure that the tow rope is always kept taught. CAUTION
● Do not tow start the engine - danger of damaging the engine. On vehicles with
a catalytic converter, unburnt fuel may get into the catalytic converter where it
may ignite. This in turn may damage or destroy the catalytic converter. You can
use the battery of another vehicle as a jump-start aid ⇒ page 175,
Jump-starting.
● If the gearbox of your vehicle no longer contains any oil because of a defect,
your vehicle must only be towed in with the driven wheels raised clear of the
ground, or on a special vehicle transporter or trailer.
● The vehicle must be transported on a special vehicle or trailer if it is not possi-
ble to tow in the vehicle in the way described or if the towing distance is greater
than 50
km.
● To protect both vehicles when tow-starting or towing, the tow rope should be
elastic. Thus one should only use plastic fibre rope or a rope made out of a similar-
ly elastic material.
● One should be constantly vigilant not to allow impermissibly high towing
forces or jerky loadings. There is always a risk of excessive stresses and damage
resulting at the points to which you attach the tow rope or tow bar when you at-
tempt to tow a vehicle which is not standing on a paved road.
● Attach the tow rope or the tow bar only to the towing eyes provided for this
purpose ⇒ page 177
, Front towing eye and ⇒ page 178, Rear towing eye. Note
● We recommend a tow rope from the range of
ŠKODA Original Accessories that
you can purchase from an authorised ŠKODA Service Partner.
● Towing another vehicle requires a certain amount of practice. Both drivers
should be familiar with the particular points about towing a vehicle. Unskilled driv-
ers should not attempt to tow in another vehicle or to be towed in. ●
When towing, respect the national legal provisions, especially those which re-
late to the identification of the towing vehicle and the vehicle being towed.
● The tow rope must not be twisted as it may in certain circumstances result in
the front towing eye being unscrewed out of your vehicle.
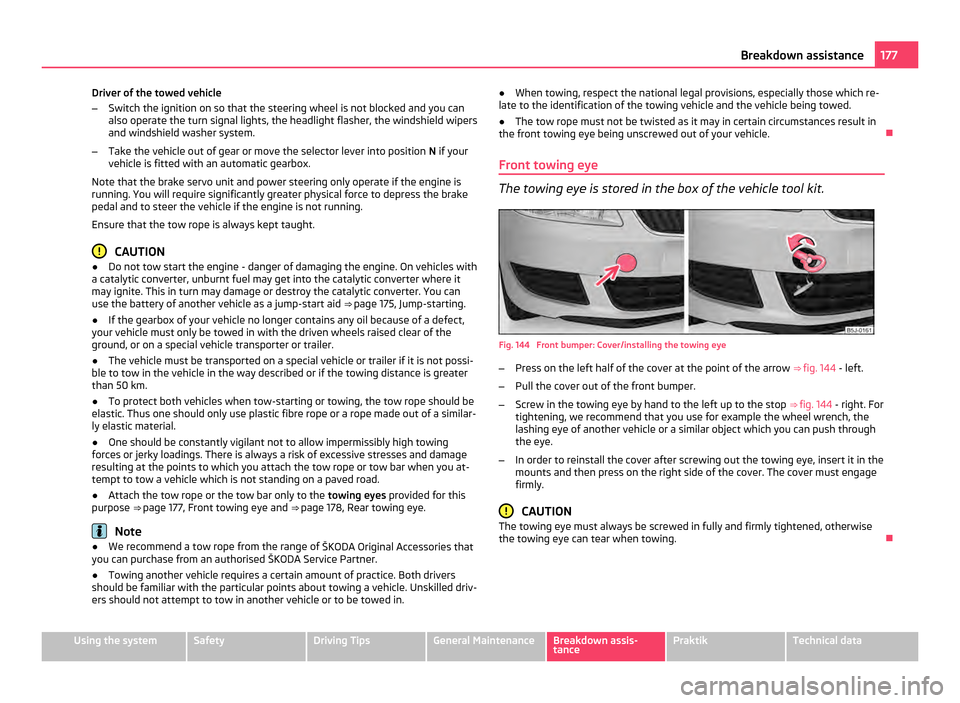
Front towing eye The towing eye is stored in the box of the vehicle tool kit.
Fig. 144 Front bumper: Cover/installing the towing eye
–
Press on the left half of the cover at the point of the arrow ⇒
fig. 144 - left.
– Pull the cover out of the front bumper.
– Screw in the towing eye by hand to the left up to the stop ⇒ fig. 144 - right. For
tightening, we recommend that you use for example the wheel wrench, the
lashing eye of another vehicle or a similar object which you can push through
the eye.
– In order to reinstall the cover after screwing out the towing eye, insert it in the
mounts and then press on the right side of the cover. The cover must engage
firmly. CAUTION
The towing eye must always be screwed in fully and firmly tightened, otherwise
the towing eye can tear when towing. 177
Breakdown assistance Using the system Safety Driving Tips General Maintenance Breakdown assis-
tance Praktik Technical data
Page 180 of 212
Rear towing eye
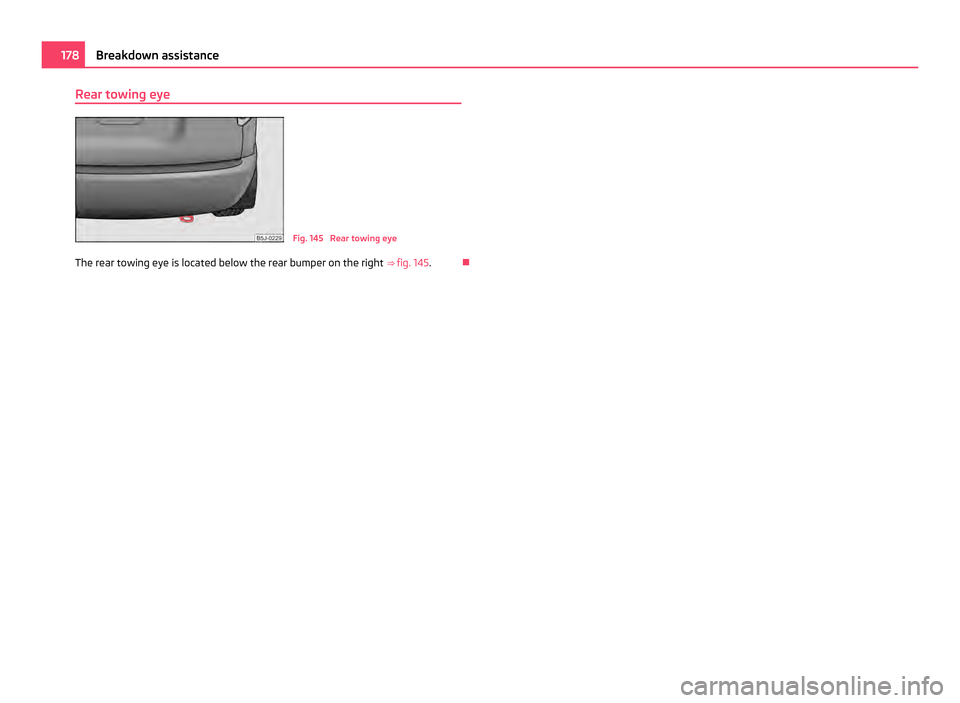
Fig. 145 Rear towing eye
The rear towing eye is located below the rear bumper on the right ⇒ fig. 145 . 178
Breakdown assistance