technical data SKODA ROOMSTER 2011 1.G Owner's Guide
[x] Cancel search | Manufacturer: SKODA, Model Year: 2011, Model line: ROOMSTER, Model: SKODA ROOMSTER 2011 1.GPages: 212, PDF Size: 3.3 MB
Page 41 of 212
Lights and Visibility
Lights
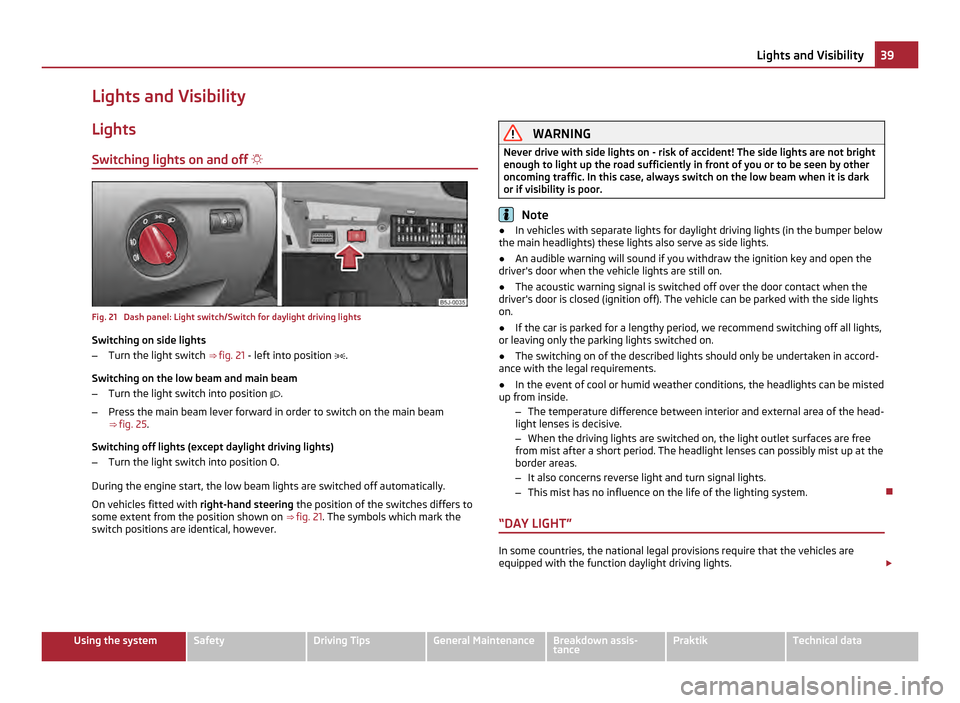
Switching lights on and off Fig. 21 Dash panel: Light switch/Switch for daylight driving lights
Switching on side lights
– Turn the light switch ⇒ fig. 21 - left into position
.
Switching on the low beam and main beam
– Turn the light switch into position .
– Press the main beam lever forward in order to switch on the main beam
⇒ fig. 25 .
Switching off lights (except daylight driving lights)
– Turn the light switch into position O.
During the engine start, the low beam lights are switched off automatically.
On vehicles fitted with right-hand steering the position of the switches differs to
some extent from the position shown on ⇒ fig. 21 . The symbols which mark the
switch positions are identical, however. WARNING
Never drive with side lights on - risk of accident! The side lights are not bright
enough to light up the road sufficiently in front of you or to be seen by other
oncoming traffic. In this case, always switch on the low beam when it is dark
or if visibility is poor. Note
● In vehicles with separate lights for daylight driving lights (in the bumper below
the main headlights) these lights also serve as side lights.
● An audible warning will sound if you withdraw the ignition key and open the
driver's door when the vehicle lights are still on.
● The acoustic warning signal is switched off over the door contact when the
driver's door is closed (ignition off). The vehicle can be parked with the side lights
on.
● If the car is parked for a lengthy period, we recommend switching off all lights,
or leaving only the parking lights switched on.
● The switching on of the described lights should only be undertaken in accord-
ance with the legal requirements.
● In the event of cool or humid weather conditions, the headlights can be misted
up from inside.
–The temperature difference between interior and external area of the head-
light lenses is decisive.
– When the driving lights are switched on, the light outlet surfaces are free
from mist after a short period. The headlight lenses can possibly mist up at the
border areas.
– It also concerns reverse light and turn signal lights.
– This mist has no influence on the life of the lighting system.
“DAY LIGHT” In some countries, the national legal provisions require that the vehicles are
equipped with the function daylight driving lights. £ 39
Lights and Visibility Using the system Safety Driving Tips General Maintenance Breakdown assis-
tance Praktik Technical data
Page 43 of 212
–
Turn the control dial for headlamp beam adjustment from the position - to the
position 3 ⇒ page 42.
Deactivating tourist light
Before deactivating the tourist light, the following conditions must be met:
Ignition switched off, light switched off (light switch in the position O), control dial
for the headlamp beam adjustment in the position 3, no gear engaged or selector
lever in the position N (automatic gearbox), tourist light activated.
– Switch on the ignition.
Up to 10 seconds after the ignition is switched on:
– Turn the light switch to the position ⇒ page 39.
– Engage the reverse gear (manual gearbox) or move the selector lever into the
position R
(automatic gearbox).
– Turn the control dial for headlamp beam adjustment from the position 3 to the
position - ⇒ page 42.
The adaptation of the halogen projector headlights must be performed as follows
⇒ page 137
. Note
When the “tourist light” mode is active, the warning light flashes for about 10
seconds each time the ignition is switched on.
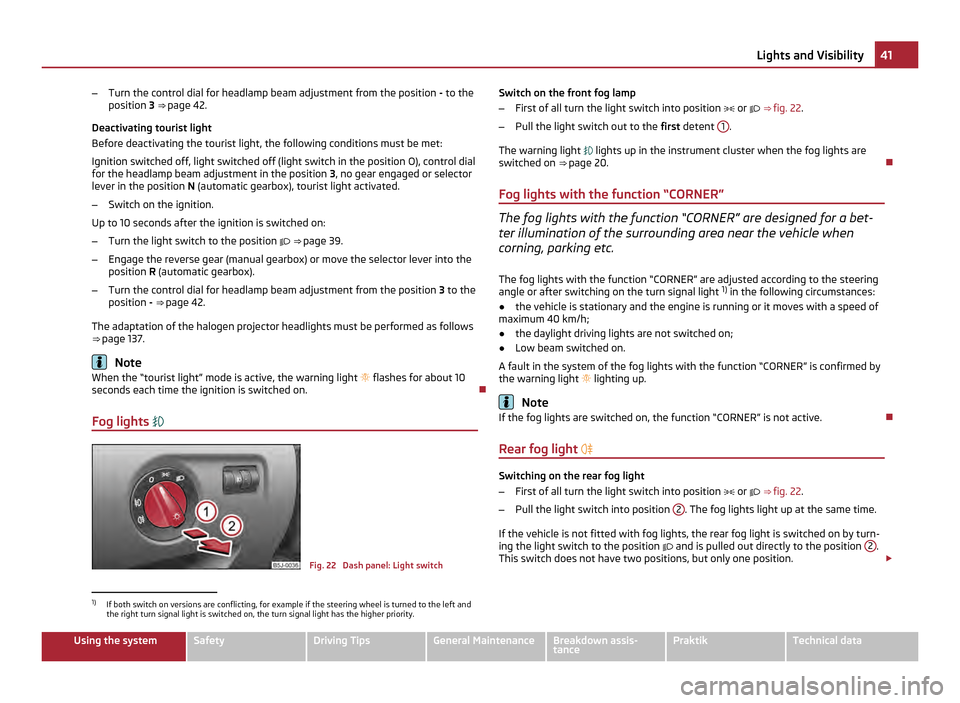
Fog lights Fig. 22 Dash panel: Light switchSwitch on the front fog lamp
–
First of all turn the light switch into position or ⇒
fig. 22.
– Pull the light switch out to the first detent 1 .
The warning light lights up in the instrument cluster when the fog lights are
switched on ⇒
page 20.
Fog lights with the function “CORNER” The fog lights with the function “CORNER” are designed for a bet-
ter illumination of the surrounding area near the vehicle when
corning, parking etc.
The fog lights with the function
“CORNER” are adjusted according to the steering
angle or after switching on the turn signal light 1)
in the following circumstances:
● the vehicle is stationary and the engine is running or it moves with a speed of
maximum 40 km/h;
● the daylight driving lights are not switched on;
● Low beam switched on.
A fault in the system of the fog lights with the function
“CORNER” is confirmed by
the warning light lighting up. Note
If the fog lights are switched on, the function “CORNER” is not active.
Rear fog light Switching on the rear fog light
–
First of all turn the light switch into position or ⇒
fig. 22.
– Pull the light switch into position 2 . The fog lights light up at the same time.
If the vehicle is not fitted with fog lights, the rear fog light is switched on by turn-
ing the light switch to the position and is pulled out directly to the position 2 .
This switch does not have two positions, but only one position. £1)
If both switch on versions are conflicting, for example if the steering wheel is turned to the left and
the right turn signal light is switched on, the turn signal light has the higher priority. 41
Lights and Visibility Using the system Safety Driving Tips General Maintenance Breakdown assis-
tance Praktik Technical data
Page 45 of 212
The turn signal
and main beam lever The parking lights and headlight flasher are also switched on and
off using the turn signal and main beam lever.
Fig. 25 Turn signal and main beam lever
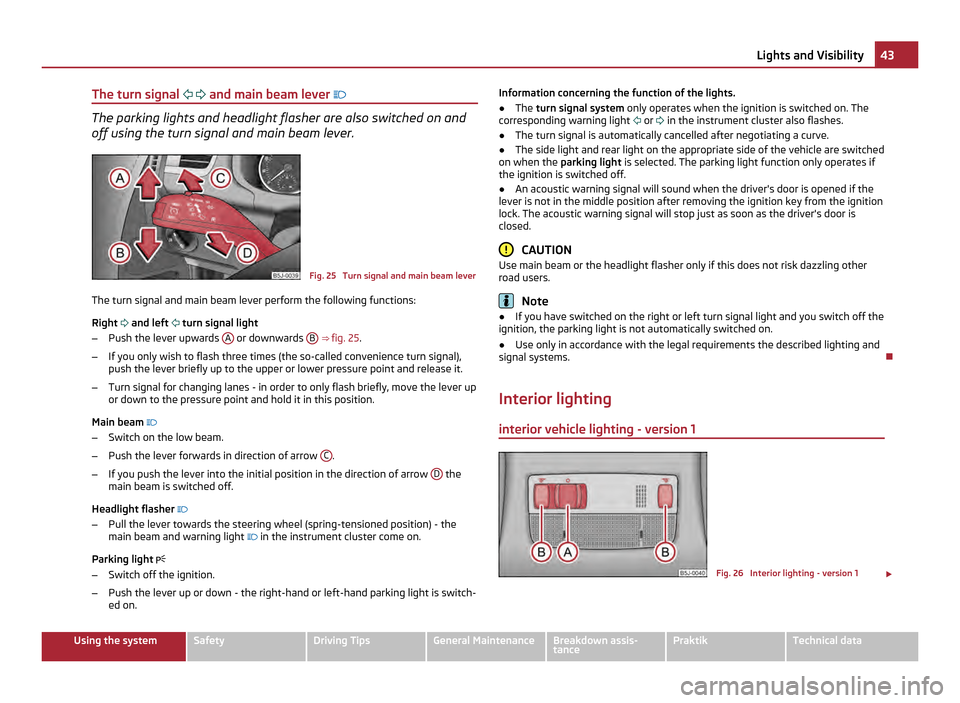
The turn signal and main beam lever perform the following functions:
Right and left turn signal light
– Push the lever upwards A or downwards
B
⇒ fig. 25.
– If you only wish to flash three times (the so-called convenience turn signal),
push the lever briefly up to the upper or lower pressure point and release it.
– Turn signal for changing lanes - in order to only flash briefly, move the lever up
or down to the pressure point and hold it in this position.
Main beam
– Switch on the low beam.
– Push the lever forwards in direction of arrow C .
– If you push the lever into the initial position in the direction of arrow D the
main beam is switched off.
Headlight flasher
– Pull the lever towards the steering wheel (spring-tensioned position) - the
main beam and warning light in the instrument cluster come on.
Parking light
– Switch off the ignition.
– Push the lever up or down - the right-hand or left-hand parking light is switch-
ed on. Information concerning the function of the lights.
●
The turn signal system only operates when the ignition is switched on. The
corresponding warning light or in the instrument cluster also flashes.
● The turn signal is automatically cancelled after negotiating a curve.
● The side light and rear light on the appropriate side of the vehicle are switched
on when the parking light is selected. The parking light function only operates if
the ignition is switched off.
● An acoustic warning signal will sound when the driver's door is opened if the
lever is not in the middle position after removing the ignition key from the ignition
lock. The acoustic warning signal will stop just as soon as the driver's door is
closed. CAUTION
Use main beam or the headlight flasher only if this does not risk dazzling other
road users. Note
● If you have switched on the right or left turn signal light and you switch off the
ignition, the parking light is not automatically switched on.
● Use only in accordance with the legal requirements the described lighting and
signal systems.
Interior lighting interior vehicle lighting - version 1 Fig. 26 Interior lighting - version 1
£ 43
Lights and Visibility Using the system Safety Driving Tips General Maintenance Breakdown assis-
tance Praktik Technical data
Page 47 of 212
Visibility
Rear window heater Fig. 28 Switch for rear window heater
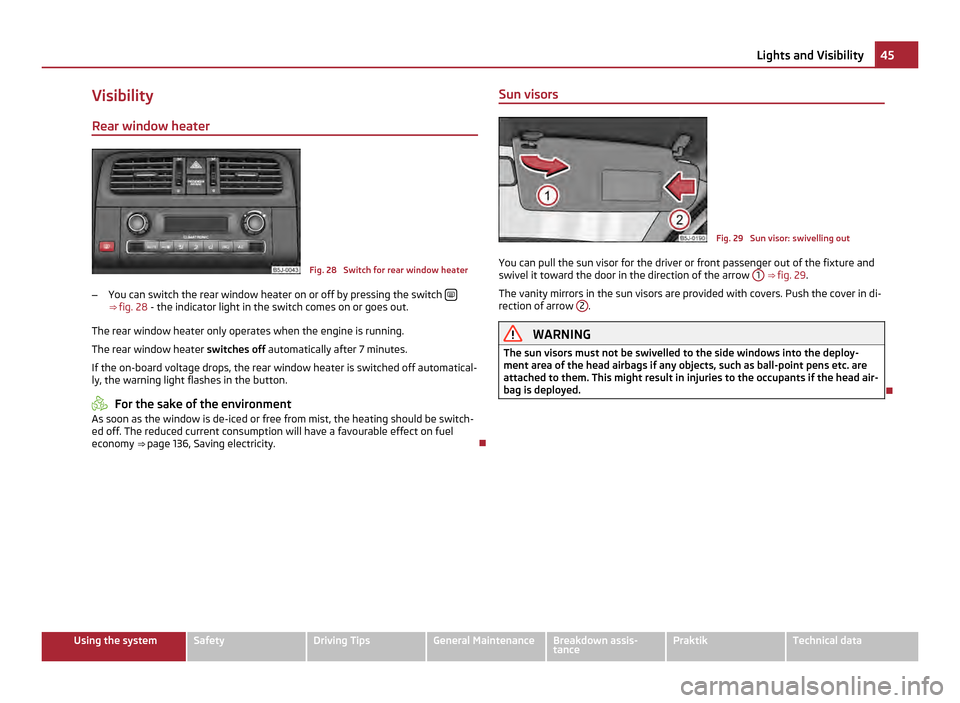
– You can switch the rear window heater on or off by pressing the switch ⇒
fig. 28 - the indicator light in the switch comes on or goes out.
The rear window heater only operates when the engine is running.
The rear window heater switches off automatically after 7 minutes.
If the on-board voltage drops, the rear window heater is switched off automatical-
ly, the warning light flashes in the button. For the sake of the environment
As soon as the window is de-iced or free from mist, the heating should be switch-
ed off. The reduced current consumption will have a favourable effect on fuel
economy ⇒ page 136, Saving electricity. Sun visors Fig. 29 Sun visor: swivelling out
You can pull the sun visor for the driver or front passenger out of the fixture and
swivel it toward the door in the direction of the arrow 1
⇒ fig. 29 .
The vanity mirrors in the sun visors are provided with covers. Push the cover in di-
rection of arrow 2 .
WARNING
The sun visors must not be swivelled to the side windows into the deploy-
ment area of the head airbags if any objects, such as ball-point pens etc. are
attached to them. This might result in injuries to the occupants if the head air-
bag is deployed. 45
Lights and Visibility Using the system Safety Driving Tips General Maintenance Breakdown assis-
tance Praktik Technical data
Page 49 of 212
CAUTION
● In cold temperatures and in winter, check before the trip or before switching
on the ignition that the wiper blades are not frozen. Switching on windshield wip-
ers when the blades are frozen to the windshield may result in damage both to
the blades and the motor of the windshield wipers!
● If you switch off the ignition while the windshield wipers are on, the wipers
will sweep in the same mode the next time the ignition is switched on. At low
temperatures, the wipers may freeze to the window between switching off the ig-
nition and the next time you switch the ignition on again.
● Carefully detach frozen wiper blades from the front or rear window.
● Remove snow and ice from the window wipers before driving. Note
The content of the windshield wiper reservoir is 3.5 litres. On vehicles which are
equipped with a headlight cleaning system, the content of the reservoir is 5.4 li-
tres.
Headlight cleaning system The headlights are being cleaned after the windshield washer system has been
operated for the fifth time, the low beam or main beam are switched on as well as
the windshield wiper lever is held in the position
5
⇒
fig. 30 for about 1 second.
You should remove stubborn dirt (such as insect residues) from the headlight len-
ses at regular intervals, for example when refuelling. Please refer to the following
guidelines ⇒ page 144, The headlight lenses.
You should remove any snow from the fixtures of the washer nozzles and clear ice
in winter with a de-icing spray in order to ensure proper operation of the cleaning
system. CAUTION
Never remove the nozzles from the headlamp cleaning system by hand - risk of
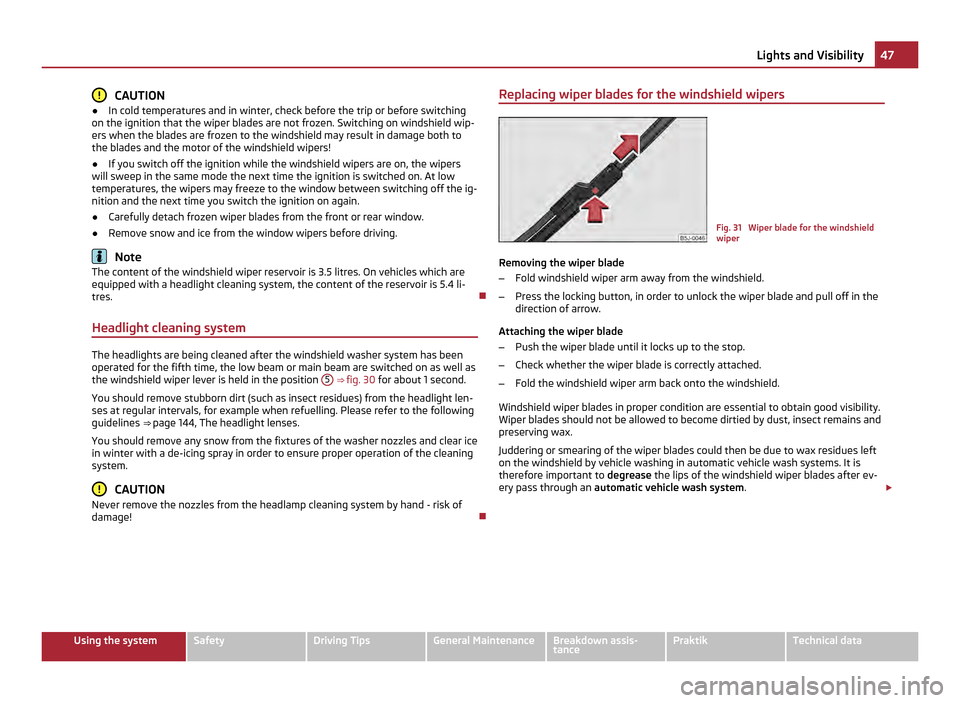
damage! Replacing wiper blades for the windshield wipers Fig. 31 Wiper blade for the windshield
wiper
Removing the wiper blade
– Fold windshield wiper arm away from the windshield.
– Press the locking button, in order to unlock the wiper blade and pull off in the
direction of arrow.
Attaching the wiper blade
– Push the wiper blade until it locks up to the stop.
– Check whether the wiper blade is correctly attached.
– Fold the windshield wiper arm back onto the windshield.
Windshield wiper blades in proper condition are essential to obtain good visibility.
Wiper blades should not be allowed to become dirtied by dust, insect remains and
preserving wax.
Juddering or smearing of the wiper blades could then be due to wax residues left
on the windshield by vehicle washing in automatic vehicle wash systems. It is
therefore important to degrease the lips of the windshield wiper blades after ev-
ery pass through an automatic vehicle wash system .£ 47
Lights and Visibility Using the system Safety Driving Tips General Maintenance Breakdown assis-
tance Praktik Technical data
Page 51 of 212
Adjusting the right-hand exterior mirror
– Turn the rotary knob to position . The movement of the mirror surface is iden-
tical to the movement of the rotary knob. WARNING
● Convex (curved outward) exterior mirrors increase the field of vision. They
do, however, make objects appear smaller in the mirror. These mirrors are only
of limited use, therefore, for estimating distances to the following vehicles.
● Use whenever possible the interior rear mirror, for estimating the distan-
ces to the following vehicles. Note
● The exterior mirror heater only operates when the engine is running.
● Do not touch the surfaces of the exterior mirrors if the exterior mirror heater is
switched on.
● You can set the exterior mirrors by hand, if the power setting function fails at
any time, by pressing on the edge of the mirror surface.
● Contact your specialist garage if a fault exists with the power setting of the
exterior mirrors. 49
Lights and Visibility Using the system Safety Driving Tips General Maintenance Breakdown assis-
tance Praktik Technical data
Page 53 of 212
Adjust the angle of the seat backrest
–
Relieve any pressure on the seat backrest (do not lean on it) and turn the
handwheel 3 to adjust the angle of the backrest.
The driver's seat should be adjusted in such a way that the pedals can be fully
pressed to the floor with slightly bent legs.
The seat backrest on the driver's seat should be adjusted in such a way that the
upper point of the steering wheel can be easily reached with slightly bent arms. WARNING
● Only adjust the driver seat when the vehicle is stationary - risk of injury!
● Take care when adjusting the seat! Adjusting the seat without care can
lead to bruises or injuries.
● The seat backrests must not be angled too far back when driving other-
wise this will affect proper operation of the seat belts and of the airbag sys-
tem - risk of injury!
Head restraints Fig. 35 Head restraint: Adjusting/pulling out
Best protection is achieved if the top edge of the head restraint is at the same
level as the upper part of your head.
Adjusting the height of a head restraint
–
Grasp the side of the head restraint with both hands and push it in upward di-
rection as desired ⇒ fig. 35 - left. –
Move the head restraint downwards if required by pressing and holding the
safety button with one hand ⇒ fig. 35 - right and by pressing with the other
hand the head restraint downwards.
Removing and installing a head restraint
– Pull the head restraint out of the seat backrest as far as the stop.
– Press the locking button in the direction of arrow ⇒ fig. 35 - right and pull the
head restraint out.
– To re-insert the head restraint, push it down into the seat backrest far enough
until you hear the locking button engage.
The position of the front, rear outer head restraints and the rear middle head re-
straint is adjustable for height.
The head restraints must be adjusted to match the size of the seat occupant. Cor-
rectly adjusted head restraints together with the seat belts offer effective protec-
tion for the occupants ⇒ page 102. WARNING
● The head restraints must be correctly adjusted in order to offer effective
protection for the occupants in the event of an accident.
● Do not drive under any circumstance with removed head restraints - risk of
injury!
● If the rear seats are occupied, the rear head restraint must not be in the
lower position.
Heating the front seats Fig. 36 Rocker switch: Front seat heat-
ing
£ 51
Seats and Stowage Using the system Safety Driving Tips General Maintenance Breakdown assis-
tance Praktik Technical data
Page 55 of 212
Adjust the angle of the seat backrest
–
Pull the lever ⇒ fig. 38 and adjust the desired angle of the seat backrest.
Folding rear seats forwards Fig. 39 Fold seat fully forwards/Secure folded forward seats
Fold seats fully forwards and secure
–
Insert the seat belt tongue into the opening of the respective read side trim
panel - safety position.
– Move the seat as far as possible to the rear ⇒ page 52.
– Pull the lever ⇒
fig. 38 and fold the seat backrest fully fowards.
– Pull the lever ⇒
fig. 39 up and then fold the seat fully forwards.
– Secure the folded forward seat with the aid of the fixing belt to a guide rod of
the head restraint for the front seat ⇒ fig. 39 on the right. WARNING
● Immediately secure the folded forward seat with the aid of the fixing belt
to a guide rod of the head restraint for the front seat - there is a risk of injury
as soon as the vehicle starts off.
● If the seat is not in the rear end position, damage can occur to the locking
bolts if the seat is unlocked. Note
Please refer to the following guidelines ⇒
page 103, Correct seated position for
the occupants on the rear seats. Removing seats
Fig. 40 Unlocking the folded forward seat/carrying handle on the seat cushion
Unlocking and removing seats
–
Unlock the folded forward seat by pressing the seat locks in the direction of
arrow ⇒ fig. 40 .
– Remove the seat with the carrying handle on the seat cushion ⇒
fig. 40 on the
right. Note
● The outer seats are not mutually interchangeable. In the rear area the left seat
is marked with the letter L and the right seat with the letter R.
● Please refer to the following guidelines ⇒ page 103.
Adjusting seats in crosswise direction Fig. 41 Locking the seat
£ 53
Seats and Stowage Using the system Safety Driving Tips General Maintenance Breakdown assis-
tance Praktik Technical data
Page 57 of 212
Pedals
Concerning a secure depressing of the pedal, you should use only footmats from
the ŠKODA Original Accessories.
Operation of the pedals must not be hindered! WARNING
● Greater pedal distances may be needed when there is a fault in the brake
system.
● Do not place any footmats or other additional floor coverings in the area of
the pedals in order to ensure that all the pedals can be fully depressed and are
able to return unobstructed to their initial position - risk of accident!
● There must be no objects on the floor which could roll under the pedals.
You would then no longer be able to apply the brakes, operate the clutch or
accelerator - risk of accident!
luggage compartment
Loading the luggage compartment Please observe the following in the interest of maintaining good handling charac-
teristics of your vehicle:
– Distribute the items of luggage as evenly as possible.
– Place heavy objects as far forward as possible.
– Attach the items of luggage to the lashing eyes or the fixing net
⇒
page 56.
In the event of an accident, there is such a high kinetic energy which is produced
by small and light objects that they can cause severe injuries. The magnitude of
the kinetic energy depends on the speed at which the vehicle is travelling and on
the weight of the object. The speed at which the vehicle is travelling is in this case
the more significant factor.
Example: In the event of a frontal collision at a speed of 50 km/h, an unsecured
object with a weight of 4.5 kg produces an energy, which corresponds to 20 times
its own weight. This means that it results in a weight of approx. 90 kg. You can
imagine the injuries that can occur, if this “bullet” is flying through the interior
compartment and hits an occupant. WARNING
● Store the objects in the luggage compartment and attach them to the
lashing eyes.
● Loose objects in the passenger compartment can be thrown forward dur-
ing a sudden manoeuvre or in case of an accident and can injure the occupants
or other oncoming traffic. This risk is still increased, if the objects which are
flying around are hit by a deployed airbag. In this case, the objects which are
thrown back can injure the occupants - hazard.
● Please note that the handling properties of your vehicle may be affected
when transporting heavy objects as a result of the displacement of the centre
of gravity. The speed and style of driving must be adjusted accordingly.
● The items carried in the luggage compartment should be stored in such a
way that no objects are able to slip forward if there are any sudden driving or
braking manoeuvres undertaken - risk of injury!
● When transporting fastened objects which are sharp and dangerous in the
luggage compartment enlarged by folding the rear seats forward or removing
the rear seats, ensure the safety of the passengers transported on the other
rear seats ⇒
page 103, Correct seated position for the occupants on the rear
seats.
● If the rear seats next to the folded forward seat are occupied, ensure max-
imum safety, e.g. by placing the goods to be transported in such a way that a
folding back of the seat is prevented in case of a rear collision.
● Never drive with the boot lid fully opened or slightly ajar otherwise ex-
haust gases may get into the interior of the vehicle - risk of poisoning!
● On no account exceed the permissible axle loads and the permissible gross
weight of the vehicle - risk of accident!
● Never transport occupants in the luggage compartment. CAUTION
Please ensure that the heating elements of the rear window heater are not dam-
aged as a result of objects sliding in this area. Note
● Tyre pressure must be adjusted to the load ⇒
fig. 130.
● The circulation of air in the vehicle helps to prevent the windows from misting
up. The used air streams out through the air venting slits which are located under
the bumper in the luggage compartment. Check for yourself that the air venting
slits are not covered. 55
Seats and Stowage Using the system Safety Driving Tips General Maintenance Breakdown assis-
tance Praktik Technical data
Page 59 of 212
The fixing nets and the installation instruction are located in the luggage com-
partment. WARNING
● The strength of the net makes it possible to load the pocket with objects
of up to 1.5 kg in weight. Heavy objects are not secured sufficiently - risk of
injury and net damage!
● The load to be transported must be fixed in place in such a way that it can-
not move during the journey and when braking. CAUTION
Do not place any objects with sharp edges in the nets - risk of net damage.
Fixing floor covering of the luggage compartment You can lean against the raised floor cover between the backrests of the rear
seats and the luggage compartment cover, as if one needs to reach the spare
wheel.
Luggage compartment cover You can use the luggage compartment cover behind the head re-
straints for storing light and soft items.
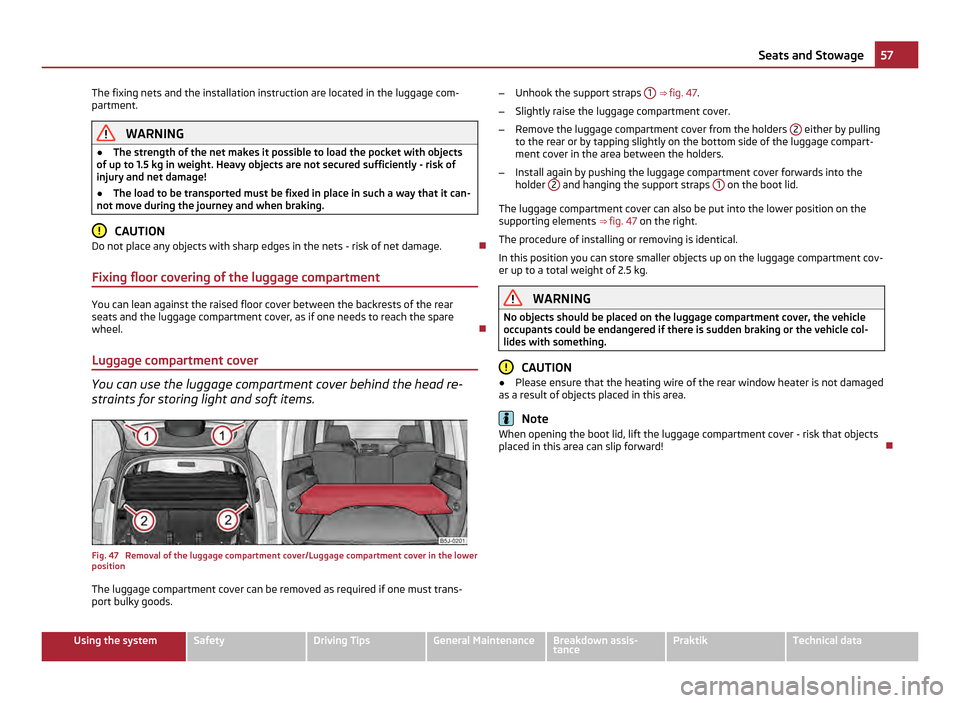
Fig. 47 Removal of the luggage compartment cover/Luggage compartment cover in the lower
position
The luggage compartment cover can be removed as required if one must trans-
port bulky goods. –
Unhook the support straps 1 ⇒ fig. 47.
– Slightly raise the luggage compartment cover.
– Remove the luggage compartment cover from the holders 2 either by pulling
to the rear or by tapping slightly on the bottom side of the luggage compart-
ment cover in the area between the holders.
– Install again by pushing the luggage compartment cover forwards into the
holder 2 and hanging the support straps
1 on the boot lid.
The luggage compartment cover can also be put into the lower position on the
supporting elements ⇒
fig. 47 on the right.
The procedure of installing or removing is identical.
In this position you can store smaller objects up on the luggage compartment cov-
er up to a total weight of 2.5 kg. WARNING
No objects should be placed on the luggage compartment cover, the vehicle
occupants could be endangered if there is sudden braking or the vehicle col-
lides with something. CAUTION
● Please ensure that the heating wire of the rear window heater is not damaged
as a result of objects placed in this area. Note
When opening the boot lid, lift the luggage compartment cover - risk that objects
placed in this area can slip forward! 57
Seats and Stowage Using the system Safety Driving Tips General Maintenance Breakdown assis-
tance Praktik Technical data