technical data SKODA ROOMSTER 2011 1.G Workshop Manual
[x] Cancel search | Manufacturer: SKODA, Model Year: 2011, Model line: ROOMSTER, Model: SKODA ROOMSTER 2011 1.GPages: 212, PDF Size: 3.3 MB
Page 101 of 212
If a voice command is not detected, the system answers with “Sorry?” and a new
entry can be performed. After the 2nd error the system repeats the aid. After the
3rd error the answer
“Procedure cancelled ” is given and the dialogue is ended.
Switch on voice control (dialogue)
You can start the dialogue at any time:
● by briefly pressing the button on the adapter
⇒
fig. 89;
● by pressing the button longer on the multi-function steering wheel
⇒
fig. 90 ;
Switching off voice control (dialogue)
If the system is currently playing a message, you will need to stop the message
currently being played:
● by pressing the button briefly on the adapter;
● by pressing the button longer on the multi-function steering wheel.
If the system expects a voice command, you can end the dialogue yourself:
● Do some with the CANCEL
voice command;
● by pressing the button briefly on the adapter;
● by pressing the button longer on the multi-function steering wheel.
Note
The dialogue of an incoming call is immediately interrupted.
Voice commands Basic voice commands for operating the telephone control unit
Voice command Action
HELP After this command the system repeats all possible
commands.
CALL XYZ With this command you call up the contact from the
phone book ⇒ page 99
.PHONE BOOK After this command, for example the phone book can
be repeated, a voice entry for the contact can be up-
dated or deleted etc. CALL HISTORY Lists of dialled numbers, missed calls, etc. Voice command Action
DIAL NUMBER After this command a phone number can be entered
which establishes a connection to the requested par-
ty. REDIAL After this command the system selects the last se-
lected telephone number.
MUSIC
a) Play music from the mobile phone or another paired
device.
FURTHER OPTIONS After this command the system offers additional con-
text-dependent commands. SETTINGS Selection for setting Bluetooth
®
, dialogue etc. CANCEL The dialogue is ended.
a)
On vehicles fitted with the radio navigation system Amundsen+, this function can be accessed via
the menu of the radio navigation system; see the operating instructions for the Amundsen+.
After giving the command DIAL NUMBER, the system requests the entry of a tele-
phone number. The telephone number can be entered as an interconnected spo-
ken row of digits (complete number), in the form of order of digits (separation
through a brief voice pause) or through individually spoken digits. After each order
of digits (separation through brief voice pause) all of the digits detected up to now
are repeated by the system.
The digits 0 - 9, symbols +, , # are permitted. The system detects no continuous
digit combinations such as twenty-three, but only individually spoken digits (two,
three).
Call name –
Switch on the voice operation ⇒ page 99
, Switch on voice control (dialogue).
– Give the command CALL XYZ after the signal tone.
Example for calling the name from the phone book Voice command Announcement
CALL XYZ “Say home, work, mobile
” e.g.
WORK “XYZ work is dialled.
ӣ 99
Communication Using the system Safety Driving Tips General Maintenance Breakdown assis-
tance Praktik Technical data
Page 103 of 212
Safety
Passive Safety
Basic information
Driving the safe way Passive safety measures reduce the risk of injury in accident situa-
tions.
In this section you will find important information, tips and notes on the subject of
passive safety in your vehicle. We have combined everything here which you
should be familiar with, for example, regarding seat belts, airbags, child seats and
safety of children. Therefore, please follow especially the notes and warnings in
this section in your own interest and in the interest of your passengers. WARNING
● This chapter contains important information on how to use the vehicle for
the driver and his occupants. You will find further information on safety, which
concerns you and those travelling with you, in the following chapters of this
Owner's Manual.
● The complete on-board literature should always be in the vehicle. This ap-
plies in particular, if you rent out or sell the vehicle.
Safety equipment The safety equipment is part of the occupant protection and it can
reduce the risk of injuries in accident situations.
“Do not put at risk
” your safety and the safety of those travelling with you . In the
event of an accident, the safety equipment can reduce the risk of injuries.
The following list contains part of the safety equipment in your vehicle:
● three-point seat belts for all the seats;
● belt force limiters for front seats;
● belt tensioners for front seats; ●
seat belt height adjusters for front seats;
● front airbag for the driver and front passenger;
● side airbags;
● head airbags;
● anchoring points for child seat using the “ISOFIX” system;
● anchoring points for child seat using the “Top Tether” system;
● head restraints adjustable for height;
● adjustable steering column.
The specified safety equipment works together, in order to optimally protect you
and those travelling with you in accident situations. The safety equipment does
not protect you or the people travelling with you, if you or your occupants adopt
an incorrect seated position or the equipment is not correctly adjusted or used.
For this reason you will be provided with information on why these equipment
components are very important, how it protects you and the occupants, what
should be observed when using the equipment and how you and the people trav-
elling with you can make full use of the existing safety equipment. This Owner's
Manual contains important warning notes, which you and those travelling with
you should pay attention to in order to reduce a risk of injury.
Safety concerns everybody!
Before setting off The driver is always fully responsible for his occupants and for the
operating safety of the vehicle.
For your own safety and the safety of the people travelling with you, please pay
attention to the following points before setting off.
● Ensure that the lighting and the turn signal systems are functioning properly.
● Inspect the tyre inflation pressure.
● Ensure that all the windows offer a good visibility to the outside.
● Safely attach the items of luggage ⇒ page 55, Loading the luggage compart-
ment
. £ 101
Passive Safety Using the system Safety Driving Tips General Maintenance Breakdown assis-
tance Praktik Technical data
Page 105 of 212
WARNING
● The front seats and the head restraints must always be adjusted to match
the body size of the seat occupant as well as the seat belts must always be
correctly fastened in order to provide an optimal protection for you and your
occupants.
● The driver must maintain a distance of at least 25 cm to the steering wheel
⇒ fig. 91. Not maintaining this minimum distance will mean that the airbag
system will not be able to properly protect you - hazard!
● When driving, hold the steering wheel with both hands firmly on the outer
edge in the 9 o'clock and 3 o'clock position. Never hold the steering wheel
firmly in the 12 o'clock position or in another way (e.g. in the middle of the
steering wheel or at the inner steering wheel edge). In such cases, injuries to
the arms, the hands and the head can occur when the driver airbag is de-
ployed.
● The seat backrests must not be angled too far back when driving other-
wise this will affect proper operation of the seat belts and of the airbag sys-
tem - risk of injury!
● Ensure that there are no objects in the footwell as any objects may get be-
hind the pedals during a driving or braking manoeuvre. You would then no
longer be able to operate the clutch, to brake or accelerate.
Correct seated position for the front passenger The front passenger must maintain a distance of at least 25 cm
from the dash panel so that the airbag offers him the greatest pos-
sible safety it is deployed.
For the safety of the front passenger and to reduce the risk of injury in the event
of an accident, we recommend the following setting.
● Adjust the front passenger seat as far as possible to the rear.
● Adjust the head restraint so that the top edge of the head restraint is at the
same level as the upper part of your head ⇒
fig. 91 - right.
● Fasten the seat belt correctly ⇒
page 107, How are seat belts correctly fas-
tened?.
In exceptional cases the front passenger airbag can be deactivated ⇒ page 116,
Deactivating airbags.
Adjusting the passenger seat ⇒ page 50, Adjusting the front seats. WARNING
● The front seats and the head restraints must always be adjusted to match
the body size of the seat occupant as well as the seat belts must always be
correctly fastened in order to provide an optimal protection for you and your
occupants.
● The front passenger must maintain a distance of at least 25 cm to the dash
panel. Not maintaining this minimum distance will mean that the airbag sys-
tem will not be able to properly protect you - hazard!
● Always keep your feet in the footwell when the car is being driven - never
place your feet on the instrument panel, out of the window or on the surfaces
of the seats. You will be exposed to increased risk of injury if it becomes nec-
essary to apply the brake or in the event of an accident. If an airbag is de-
ployed, you may suffer fatal injuries when adopting an incorrect seated posi-
tion!
● The seat backrests must not be angled too far back when driving other-
wise this will affect proper operation of the seat belts and of the airbag sys-
tem - risk of injury!
Correct seated position for the occupants on the rear seats Occupants on the rear seats must sit upright, keep the feet in the
footwell and must have their seat belts correctly fastened.
To reduce the risk of injury in the event of a sudden braking manoeuvre or an acci-
dent, the occupants on the rear seats must observe the following.
● Adjust the head restraints so that the top edge of the head restraints is at the
same level as the upper part of your head ⇒ fig. 91
- on the right.
● Fasten the seat belt correctly
⇒ page 107, How are seat belts correctly fas-
tened?.
● If you are transporting
⇒ page 118
, Transporting children safely children in the
vehicle, please use a suitable child restraint system. £ 103
Passive Safety Using the system Safety Driving Tips General Maintenance Breakdown assis-
tance Praktik Technical data
Page 107 of 212
Seat belts
Why seat belts? Fig. 92 Driver wearing seat belt
It is a proven fact that seat belts offer good protection in accidents ⇒ fig. 92 . Thus
wearing a seat belt is a legal requirement in most countries.
Seat belts which have been correctly fastened and adjusted hold the occupants of
the car in the correct seated position ⇒ fig. 92 . The seat belts reduce the kinetic
energy (energy of motion) to a considerable extent. They also prevent uncontrol-
led movements which, in turn, may well result in severe injuries.
The occupants of a vehicle who have fastened and correctly adjusted their seat
belt, profit to a major extent from the fact that the kinetic energy is optimally ab-
sorbed by the belts. The structure of the front end of the vehicle and other pas-
sive safety measures, such as the airbag system, also contribute to reducing the
kinetic energy. The energy produced is thus absorbed and there is less risk of in-
jury.
Accident statistics prove that seat belts which are fastened and properly adjusted
reduce the risk of an injury and enhance the chance of survival in a major accident
⇒ page 105.
It is important that you pay attention to safety measures, particularly when trans-
porting children in the vehicle ⇒
page 118, Transporting children safely. WARNING
● Fasten your seat belt each time before setting off - also when driving in
town! This also applies to the people seated at the rear - risk of injury!
● Expectant women must also always wear a seat belt. This is the only way
of ensuring optimal protection for the unborn child ⇒ page 107, Fastening
three-point seat belts
.
● It is important for the belt webbing to be properly routed if the seat belts
are to offer the maximum protection. You can see a description of how safety
belts should be fitted properly on the next pages. Note
Please comply with any differing legal requirements when using the seat belts.
The physical principle of a frontal collision Fig. 93 The driver is catapulted forward if not wearing a belt/The rear seat occupant is cata-
pulted forward if not wearing a belt
The physical principle of a frontal accident can be explained quite simply:
Motion energy, so-called kinetic energy, is produced as soon as the vehicle is mov-
ing, both for the vehicle and its occupants. The magnitude of this kinetic energy
depends essentially on the speed at which the vehicle is travelling and on the
weight of the vehicle including the occupants. The greater the speed and weight
increase, the greater the amount of energy which has to be absorbed in the event
of an accident. £ 105
Seat belts Using the system Safety Driving Tips General Maintenance Breakdown assis-
tance Praktik Technical data
Page 109 of 212
How are seat belts correctly fastened?
Fastening three-point seat belts Fasten your seat belt before starting!
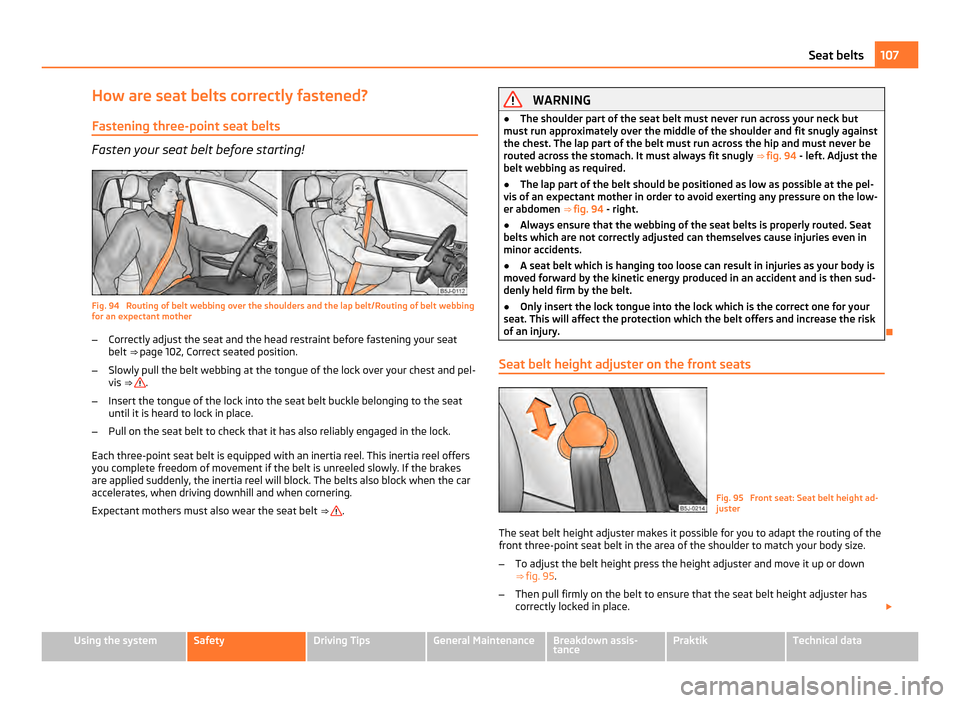
Fig. 94 Routing of belt webbing over the shoulders and the lap belt/Routing of belt webbing
for an expectant mother
–
Correctly adjust the seat and the head restraint before fastening your seat
belt ⇒
page 102, Correct seated position.
– Slowly pull the belt webbing at the tongue of the lock over your chest and pel-
vis ⇒ .
– Insert the tongue of the lock into the seat belt buckle belonging to the seat
until it is heard to lock in place.
– Pull on the seat belt to check that it has also reliably engaged in the lock.
Each three-point seat belt is equipped with an inertia reel. This inertia reel offers
you complete freedom of movement if the belt is unreeled slowly. If the brakes
are applied suddenly, the inertia reel will block. The belts also block when the car
accelerates, when driving downhill and when cornering.
Expectant mothers must also wear the seat belt ⇒ . WARNING
● The shoulder part of the seat belt must never run across your neck but
must run approximately over the middle of the shoulder and fit snugly against
the chest. The lap part of the belt must run across the hip and must never be
routed across the stomach. It must always fit snugly ⇒
fig. 94 - left. Adjust the
belt webbing as required.
● The lap part of the belt should be positioned as low as possible at the pel-
vis of an expectant mother in order to avoid exerting any pressure on the low-
er abdomen ⇒ fig. 94 - right.
● Always ensure that the webbing of the seat belts is properly routed. Seat
belts which are not correctly adjusted can themselves cause injuries even in
minor accidents.
● A seat belt which is hanging too loose can result in injuries as your body is
moved forward by the kinetic energy produced in an accident and is then sud-
denly held firm by the belt.
● Only insert the lock tongue into the lock which is the correct one for your
seat. This will affect the protection which the belt offers and increase the risk
of an injury.
Seat belt height adjuster on the front seats Fig. 95 Front seat: Seat belt height ad-
juster
The seat belt height adjuster makes it possible for you to adapt the routing of the
front three-point seat belt in the area of the shoulder to match your body size.
– To adjust the belt height press the height adjuster and move it up or down
⇒ fig. 95 .
– Then pull firmly on the belt to ensure that the seat belt height adjuster has
correctly locked in place. £ 107
Seat belts Using the system Safety Driving Tips General Maintenance Breakdown assis-
tance Praktik Technical data
Page 111 of 212
WARNING
● Any work on the belt tightener system, including removal and installation
of system components because of other repair work, must only be carried out
by a specialist garage.
● The protective function of the system is only adequate for a single acci-
dent. If the belt tensioners have been deployed, it is then necessary to replace
the entire system.
● The seller must pass on this Owner's manual to the buyer upon purchase
of the vehicle. Note
● Smoke is generated when the belt tensioners are deployed. This is not an indi-
cation of a fire in the vehicle.
● It is essential to pay attention to relevant safety regulations if the vehicle or
individual parts of the system are scrapped. Specialist garages are familiar with
these regulations and will be able to provide you with detailed information in this
respect.
● When disposing of vehicle or parts of the system, it is important to comply
with the national legal requirements. 109
Seat belts Using the system Safety Driving Tips General Maintenance Breakdown assis-
tance Praktik Technical data
Page 113 of 212
It is also possible under certain special accident situations that the front as well as
the side airbags and head airbags are deployed simultaneously.
The airbags are not deployed in the case of minor frontal and side collisions, rear-
end collisions, tilting of the vehicle, and vehicle rollover.
Deployment factors
It is not possible to state globally which deployment conditions apply to the airbag
system in every situation as the circumstances which exist in the case of acci-
dents vary greatly. An important role in this case, for example, is played by factors
such as the type of object against which the vehicle impacts (hard, soft), the angle
of impact, the vehicle speed etc.
A decisive factor for the deployment of the airbags is the deceleration which oc-
curs during a collision. The control unit analyses the nature of the collision and ac-
tivates the relevant restraint system. If the vehicle deceleration which occurs and
is measured during the collision remains below the prescribed reference values
specified in the control unit, the airbags are not deployed although the vehicle
may well suffer severe damage to the bodywork as a consequence of the acci-
dent.
The airbags are not deployed if:
● ignition is switched off;
● a minor frontal collision;
● a minor side collision;
● a rear-end collision;
● Rollover of the vehicle. Note
● A grey white or red, non-harmful gas is released when the airbag is inflated.
This is perfectly normal and is not an indication of a fire in the vehicle.
● In the event of an accident in which the airbags are deployed:
– the interior lighting comes on (if the switch for the interior light is in the
door contact position),
– the hazard warning light is switched on;
– all the doors are unlocked;
– the fuel supply to the engine is interrupted. Front airbags
Description of the front airbags The airbag system is not a substitute for the seat belt!
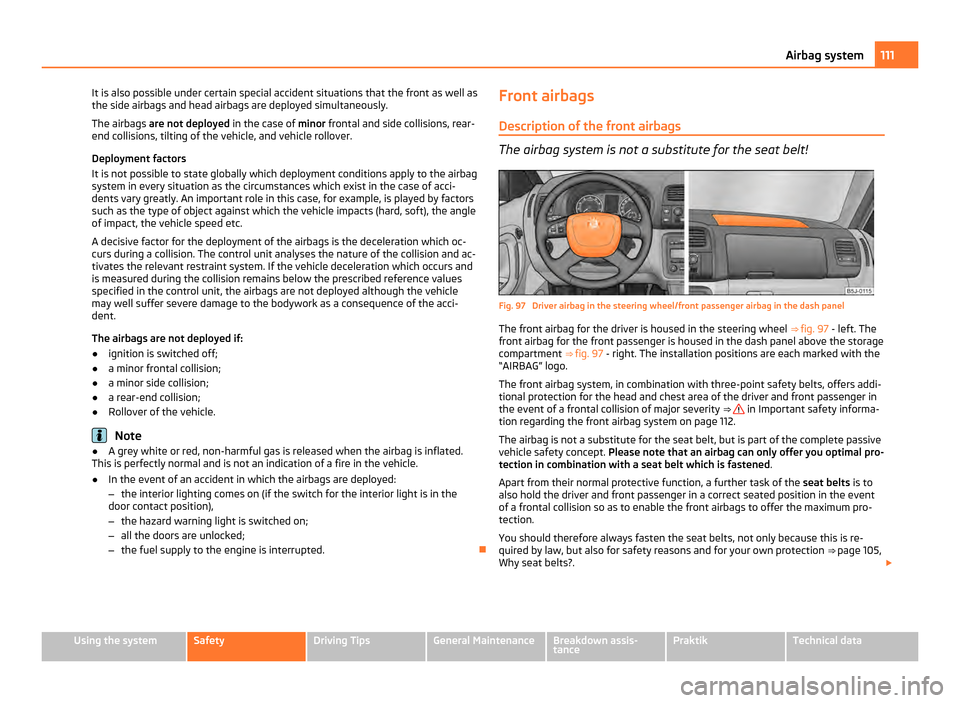
Fig. 97 Driver airbag in the steering wheel/front passenger airbag in the dash panel
The front airbag for the driver is housed in the steering wheel
⇒
fig. 97 - left. The
front airbag for the front passenger is housed in the dash panel above the storage
compartment ⇒ fig. 97 - right. The installation positions are each marked with the
“AIRBAG” logo.
The front airbag system, in combination with three-point safety belts, offers addi-
tional protection for the head and chest area of the driver and front passenger in
the event of a frontal collision of major severity ⇒ in Important safety informa-
tion regarding the front airbag system
on page 112.
The airbag is not a substitute for the seat belt, but is part of the complete passive
vehicle safety concept. Please note that an airbag can only offer you optimal pro-
tection in combination with a seat belt which is fastened .
Apart from their normal protective function, a further task of the seat belts is to
also hold the driver and front passenger in a correct seated position in the event
of a frontal collision so as to enable the front airbags to offer the maximum pro-
tection.
You should therefore always fasten the seat belts, not only because this is re-
quired by law, but also for safety reasons and for your own protection ⇒ page 105,
Why seat belts?. £ 111
Airbag system Using the system Safety Driving Tips General Maintenance Breakdown assis-
tance Praktik Technical data
Page 115 of 212
WARNING (Continued)
● The steering wheel and the surface of the airbag module in the dash panel
on the passenger side must not be stuck onto, covered or modified in any oth-
er way. These parts should only be cleaned with a dry cloth or a cloth mois-
tened with water. No objects such as cup holders, mobile phone mounts, etc.
may be attached to the covers of the airbag modules or be located within the
immediate area.
● No modifications of any kind may be made to parts of the airbag system.
Any work on the airbag system including installing and removing system com-
ponents because of other repair work (e.g. removing the steering wheel) must
only be carried out by a specialist garage.
● Never carry out changes on the front bumper or on the body.
● Never place any objects on the surface of the dash panel on the front pas-
senger side.
Side airbags Description of side airbags The side airbag increases protection of the passenger concerned in
the case of a side impact.
Fig. 100 Driver seat: Installation posi-
tion of airbag
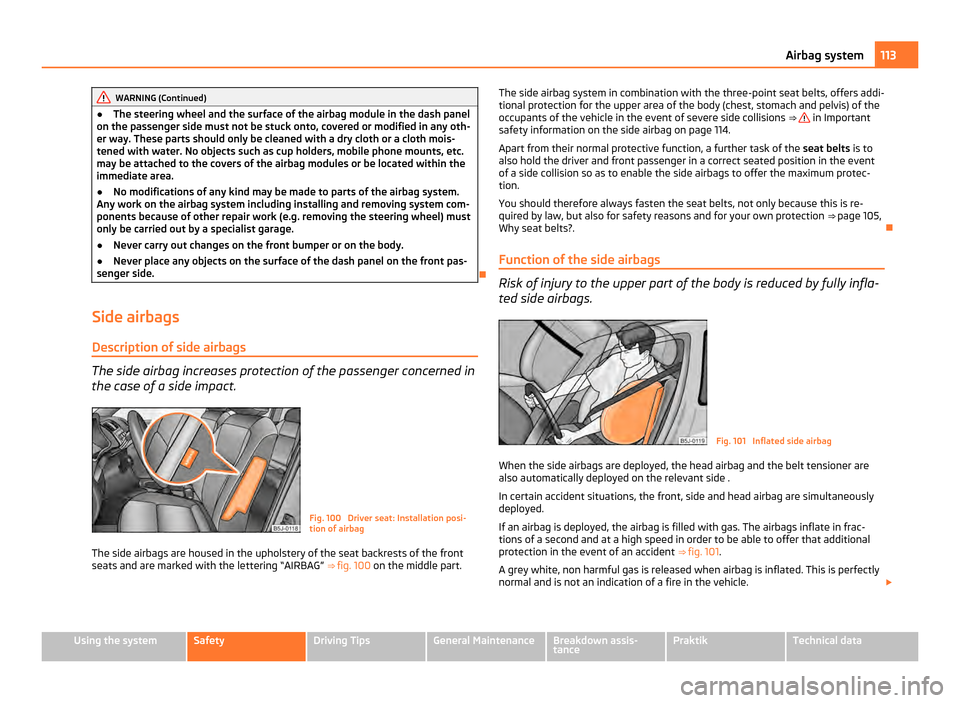
The side airbags are housed in the upholstery of the seat backrests of the front
seats and are marked with the lettering “AIRBAG” ⇒ fig. 100 on the middle part. The side airbag system in combination with the three-point seat belts, offers addi-
tional protection for the upper area of the body (chest, stomach and pelvis) of the
occupants of the vehicle in the event of severe side collisions
⇒ in Important
safety information on the side airbag
on page 114.
Apart from their normal protective function, a further task of the seat belts is to
also hold the driver and front passenger in a correct seated position in the event
of a side collision so as to enable the side airbags to offer the maximum protec-
tion.
You should therefore always fasten the seat belts, not only because this is re-
quired by law, but also for safety reasons and for your own protection ⇒ page 105,
Why seat belts?.
Function of the side airbags Risk of injury to the upper part of the body is reduced by fully infla-
ted side airbags.
Fig. 101 Inflated side airbag
When the side airbags are deployed, the head airbag and the belt tensioner are
also automatically deployed on the relevant side .
In certain accident situations, the front, side and head airbag are simultaneously
deployed.
If an airbag is deployed, the airbag is filled with gas. The airbags inflate in frac-
tions of a second and at a high speed in order to be able to offer that additional
protection in the event of an accident ⇒
fig. 101 .
A grey white, non harmful gas is released when airbag is inflated. This is perfectly
normal and is not an indication of a fire in the vehicle. £ 113
Airbag system Using the system Safety Driving Tips General Maintenance Breakdown assis-
tance Praktik Technical data
Page 117 of 212

The head airbag together with the three-point seat belts and the side airbags, of-
fers additional protection for the head and neck area of the occupants in the
event of a side collision of major severity
⇒
in Important safety information on
the head airbag on page 115.
Apart from their normal protective function, a further task of the seat belts is to
also hold the driver and the occupants in a correct seated position in the event of
a side collision so as to enable the head airbags to offer the maximum protection.
You should therefore always fasten the seat belts, not only because this is re-
quired by law, but also for safety reasons and for your own protection ⇒ page 105
.
Together with other elements (such as cross bars in the doors, stable vehicle
structure) the head airbags are the consequent further development of occupant
protection in the case of side collisions.
Function of the head airbags The risk of injury to the head and neck area is reduced in the event
of a side collision by fully inflated head airbags. Fig. 103 Inflated head airbag
In the case of a side collision the head airbag is deployed together with the rele-
vant side airbag ⇒
fig. 103 and the belt tensioner on the side of the car on which
the accident occurs.
If the system is deployed, the airbag is filled with propellant gas and covers the
entire area of the side window including the door pillars ⇒ fig. 103 .
The protection offered by the head airbags is thus available simultaneously both
to the front occupants of the car seated on the side on which the collision occurs,
as well as to the rear occupants. Any impact of the head against parts of the inte-
rior or objects outside of the car, is cushioned by the inflated head airbag. The re-
duction in any impact to the head and the resultant minimizing of any movements of the head additionally reduce the risk of injuries to the neck area. The head air-
bag also offers additional protection in the case of an offset impact by covering
the front door pillar.
In certain accident situations, the front, side and head airbag are simultaneously
deployed.
The airbags inflate in fractions of a second and at a high speed in order to be able
to offer that additional protection in the event of an accident. A grey white, non
harmful gas is released when airbag is inflated. This is perfectly normal and is not
an indication of a fire in the vehicle.
Important safety information on the head airbag Correct use of the airbag system considerably reduces the risk of
injury! WARNING
● It is essential to always switch off ⇒ page 116 the front passenger front
airbag when attaching a child safety seat on the front passenger seat where
the child is seated with its back facing in direction of travel (in some countries
also when the child is facing the direction of travel). If this is not done, there is
a risk of the child suffering severe or even fatal injuries if the front passenger
front airbag is deployed. When transporting a child on the front passenger
seat, please comply with the appropriate national regulations regarding the
use of child safety seats.
● There must not be any objects in the deployment area of the head airbags
which might prevent the airbags from inflating properly.
● Only hang light items of clothing on the clothes hooks to the vehicle. Nev-
er leave any heavy or sharp-edged objects in the pockets of the items of cloth-
ing. In addition, it is not permitted to use clothes hangers for hanging up
items of clothing.
● The airbag control unit operates together with the sensors, which are at-
tached in the front doors. For this reason no adjustments must be carried out
at the doors as well as at the door panels (for example additional installation
of loudspeakers). Resulting damages can have a negative affect on the opera-
tion of the airbag system. All work on the front doors and their panels must
only be carried out by a specialist garage. £ 115
Airbag system Using the system Safety Driving Tips General Maintenance Breakdown assis-
tance Praktik Technical data
Page 119 of 212
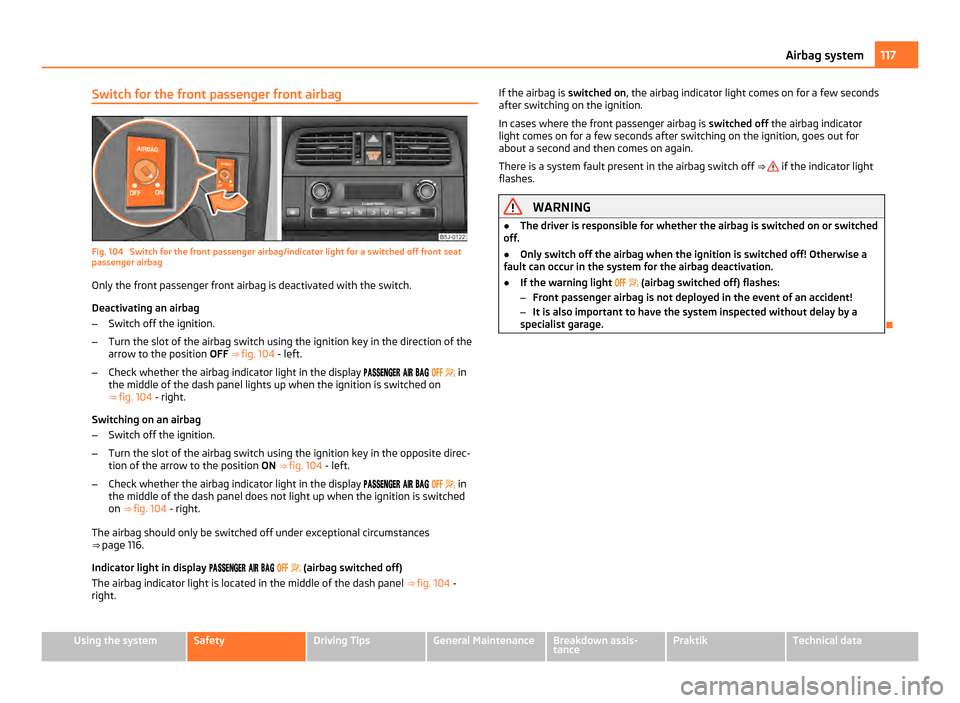
Switch for the front passenger front airbag
Fig. 104 Switch for the front passenger airbag/indicator light for a switched off front seat
passenger airbag
Only the front passenger front airbag is deactivated with the switch.
Deactivating an airbag
– Switch off the ignition.
– Turn the slot of the airbag switch using the ignition key in the direction of the
arrow to the position OFF ⇒
fig. 104 - left.
– Check whether the airbag indicator light in the display
in
the middle of the dash panel lights up when the ignition is switched on
⇒ fig. 104 - right.
Switching on an airbag
– Switch off the ignition.
– Turn the slot of the airbag switch using the ignition key in the opposite direc-
tion of the arrow to the position ON ⇒ fig. 104 - left.
– Check whether the airbag indicator light in the display
in
the middle of the dash panel does not light up when the ignition is switched
on ⇒ fig. 104 - right.
The airbag should only be switched off under exceptional circumstances
⇒ page 116.
Indicator light in display
(airbag switched off)
The airbag indicator light is located in the middle of the dash panel ⇒ fig. 104 -
right. If the airbag is
switched on, the airbag indicator light comes on for a few seconds
after switching on the ignition.
In cases where the front passenger airbag is switched off the airbag indicator
light comes on for a few seconds after switching on the ignition, goes out for
about a second and then comes on again.
There is a system fault present in the airbag switch off ⇒ if the indicator light
flashes. WARNING
● The driver is responsible for whether the airbag is switched on or switched
off.
● Only switch off the airbag when the ignition is switched off! Otherwise a
fault can occur in the system for the airbag deactivation.
● If the warning light
(airbag switched off) flashes:
– Front passenger airbag is not deployed in the event of an accident!
– It is also important to have the system inspected without delay by a
specialist garage. 117
Airbag system Using the system Safety Driving Tips General Maintenance Breakdown assis-
tance Praktik Technical data