heater SKODA ROOMSTER 2011 1.G Owner's Manual
[x] Cancel search | Manufacturer: SKODA, Model Year: 2011, Model line: ROOMSTER, Model: SKODA ROOMSTER 2011 1.GPages: 212, PDF Size: 3.3 MB
Page 11 of 212

Using the system
Cockpit General view This overview will help you to quickly familiarise yourself with the
displays and the control elements.
Power windows . . . . . . . . . . . . . . . . . . . . . . . . . . . . . . . . . . . . . . . . . . . . . . . . . . . . . . . . . 36
Electric exterior mirror adjustment . . . . . . . . . . . . . . . . . . . . . . . . . . . . . . . . . . . . 48
Air outlet vents . . . . . . . . . . . . . . . . . . . . . . . . . . . . . . . . . . . . . . . . . . . . . . . . . . . . . . . . . 70
Lever for the multi-functional switch:
– Turn signal light, headlight and parking light, headlight flasher . .43
– Speed regulating system . . . . . . . . . . . . . . . . . . . . . . . . . . . . . . . . . . . . . . . . . . . . 83
Steering wheel:
– with horn
– with driver airbag . . . . . . . . . . . . . . . . . . . . . . . . . . . . . . . . . . . . . . . . . . . . . . . . . . . . 111
– with controls for radio, radio navigation system and phone . . . . . .93
Instrument cluster: Instruments and indicator lights . . . . . . . . . . . . . . . . .10
Lever for the multi-functional switch:
– Multi-functional indicator . . . . . . . . . . . . . . . . . . . . . . . . . . . . . . . . . . . . . . . . . . . 14
– Windshield wiper and wash system . . . . . . . . . . . . . . . . . . . . . . . . . . . . . . . . 46
Switch for rear window heater . . . . . . . . . . . . . . . . . . . . . . . . . . . . . . . . . . . . . . . . . 45
TCS switch . . . . . . . . . . . . . . . . . . . . . . . . . . . . . . . . . . . . . . . . . . . . . . . . . . . . . . . . . . . . . . 125
Air outlet vents . . . . . . . . . . . . . . . . . . . . . . . . . . . . . . . . . . . . . . . . . . . . . . . . . . . . . . . . . 70
Switch for hazard warning lights . . . . . . . . . . . . . . . . . . . . . . . . . . . . . . . . . . . . . . 42
Indicator light for a switched off front seat passenger airbag . . . . . . .117
Depending on equipment fitted:
– Operating controls for the heating . . . . . . . . . . . . . . . . . . . . . . . . . . . . . . . . .
70
– Operating controls for the air conditioning system . . . . . . . . . . . . . . . .
72
– Operating controls for Climatronic . . . . . . . . . . . . . . . . . . . . . . . . . . . . . . . . . . 75
Storage compartments on the front passenger side . . . . . . . . . . . . . . . . .65
Front passenger airbag . . . . . . . . . . . . . . . . . . . . . . . . . . . . . . . . . . . . . . . . . . . . . . . . . 111
Switch passenger airbag deactivation . . . . . . . . . . . . . . . . . . . . . . . . . . . . . . . . . 117
1 2
3
4
5
6
7
8
9
10
11
12
13
14
15
16 Switch depending on equipment fitted:
–
Release for luggage compartment door . . . . . . . . . . . . . . . . . . . . . . . . . . . .33
– Interior monitor . . . . . . . . . . . . . . . . . . . . . . . . . . . . . . . . . . . . . . . . . . . . . . . . . . . . . . 36
Fuse box in the dash panel . . . . . . . . . . . . . . . . . . . . . . . . . . . . . . . . . . . . . . . . . . . . . 179
Light switch and headlamp beam adjustment . . . . . . . . . . . . . . . . . . . . . . . .39, 42
Release lever engine compartment lid . . . . . . . . . . . . . . . . . . . . . . . . . . . . . . . .150
Lever for adjusting the steering wheel . . . . . . . . . . . . . . . . . . . . . . . . . . . . . . . .78
Ignition lock . . . . . . . . . . . . . . . . . . . . . . . . . . . . . . . . . . . . . . . . . . . . . . . . . . . . . . . . . . . . . 78
Depending on equipment fitted:
– Radio
– Radio navigation system
Rocker switch for the heating on the driver's seat . . . . . . . . . . . . . . . . . . .51
Central locking switch . . . . . . . . . . . . . . . . . . . . . . . . . . . . . . . . . . . . . . . . . . . . . . . . . . 32
Depending on equipment fitted:
– Gearshift lever (manual gearbox) . . . . . . . . . . . . . . . . . . . . . . . . . . . . . . . . . . . 81
– Selector lever (automatic gearbox) . . . . . . . . . . . . . . . . . . . . . . . . . . . . . . . . . 89
Rocker switch for the heating on the driver's seat . . . . . . . . . . . . . . . . . . .51
Depending on equipment fitted:
– Ashtrays . . . . . . . . . . . . . . . . . . . . . . . . . . . . . . . . . . . . . . . . . . . . . . . . . . . . . . . . . . . . . . 63
– Storage compartment . . . . . . . . . . . . . . . . . . . . . . . . . . . . . . . . . . . . . . . . . . . . . . . 66
MDI . . . . . . . . . . . . . . . . . . . . . . . . . . . . . . . . . . . . . . . . . . . . . . . . . . . . . . . . . . . . . . . . . . . . . . 100 Note
● Cars with factory-fitted radio or navigation system are supplied with separate
instructions for operating such equipment.
● The arrangement of the controls and switches and the location of some items
on right-hand drive models may differ from that shown in ⇒
fig. 1. The symbols on
the controls and switches are the same as for left-hand drive models. 17
18
19
20
21
22
23
24
25
26
27
28
29 9
Cockpit Using the system Safety Driving Tips General Maintenance Breakdown assis-
tance Praktik Technical data
Page 47 of 212
Visibility
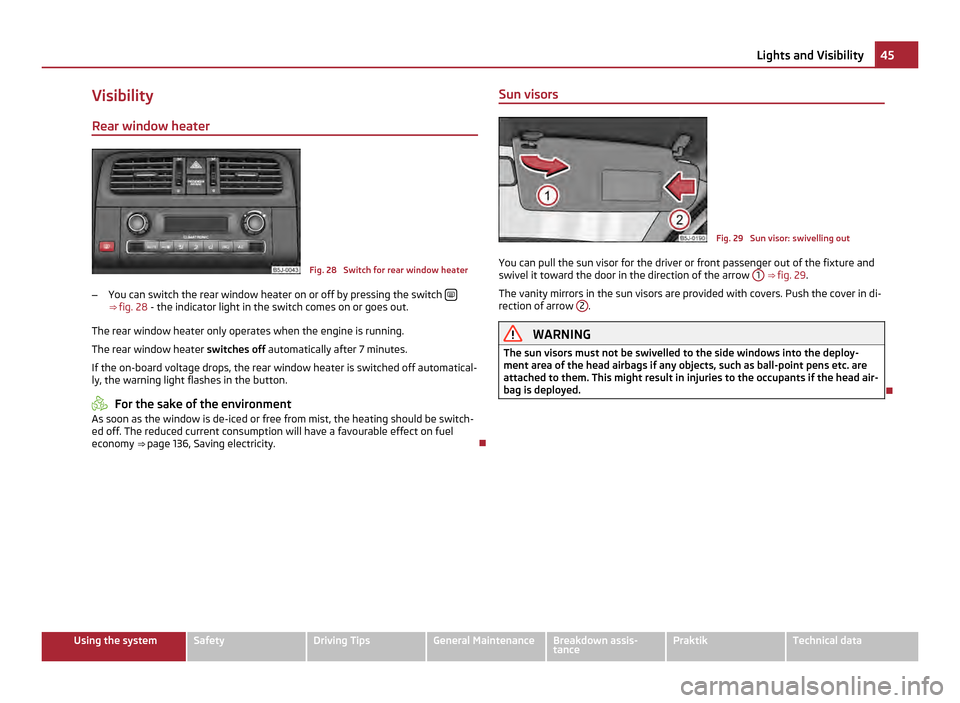
Rear window heater Fig. 28 Switch for rear window heater
– You can switch the rear window heater on or off by pressing the switch ⇒
fig. 28 - the indicator light in the switch comes on or goes out.
The rear window heater only operates when the engine is running.
The rear window heater switches off automatically after 7 minutes.
If the on-board voltage drops, the rear window heater is switched off automatical-
ly, the warning light flashes in the button. For the sake of the environment
As soon as the window is de-iced or free from mist, the heating should be switch-
ed off. The reduced current consumption will have a favourable effect on fuel
economy ⇒ page 136, Saving electricity. Sun visors Fig. 29 Sun visor: swivelling out
You can pull the sun visor for the driver or front passenger out of the fixture and
swivel it toward the door in the direction of the arrow 1
⇒ fig. 29 .
The vanity mirrors in the sun visors are provided with covers. Push the cover in di-
rection of arrow 2 .
WARNING
The sun visors must not be swivelled to the side windows into the deploy-
ment area of the head airbags if any objects, such as ball-point pens etc. are
attached to them. This might result in injuries to the occupants if the head air-
bag is deployed. 45
Lights and Visibility Using the system Safety Driving Tips General Maintenance Breakdown assis-
tance Praktik Technical data
Page 51 of 212
Adjusting the right-hand exterior mirror
– Turn the rotary knob to position . The movement of the mirror surface is iden-
tical to the movement of the rotary knob. WARNING
● Convex (curved outward) exterior mirrors increase the field of vision. They
do, however, make objects appear smaller in the mirror. These mirrors are only
of limited use, therefore, for estimating distances to the following vehicles.
● Use whenever possible the interior rear mirror, for estimating the distan-
ces to the following vehicles. Note
● The exterior mirror heater only operates when the engine is running.
● Do not touch the surfaces of the exterior mirrors if the exterior mirror heater is
switched on.
● You can set the exterior mirrors by hand, if the power setting function fails at
any time, by pressing on the edge of the mirror surface.
● Contact your specialist garage if a fault exists with the power setting of the
exterior mirrors. 49
Lights and Visibility Using the system Safety Driving Tips General Maintenance Breakdown assis-
tance Praktik Technical data
Page 54 of 212
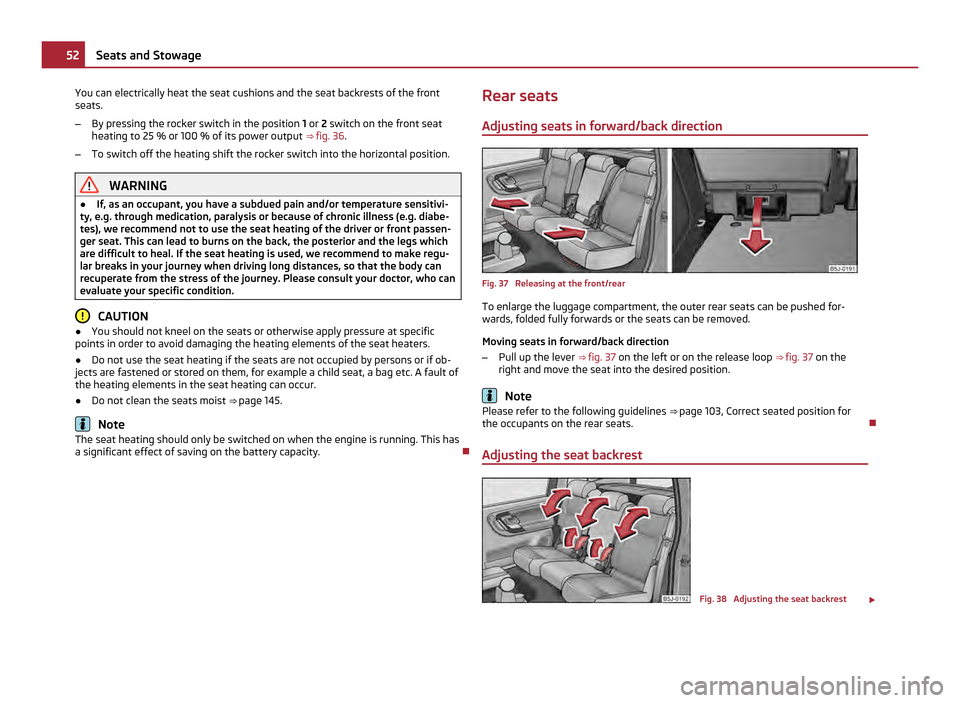
You can electrically heat the seat cushions and the seat backrests of the front
seats.
– By pressing the rocker switch in the position 1 or 2 switch on the front seat
heating to 25 % or 100 % of its power output ⇒ fig. 36.
– To switch off the heating shift the rocker switch into the horizontal position. WARNING
● If, as an occupant, you have a subdued pain and/or temperature sensitivi-
ty, e.g. through medication, paralysis or because of chronic illness (e.g. diabe-
tes), we recommend not to use the seat heating of the driver or front passen-
ger seat. This can lead to burns on the back, the posterior and the legs which
are difficult to heal. If the seat heating is used, we recommend to make regu-
lar breaks in your journey when driving long distances, so that the body can
recuperate from the stress of the journey. Please consult your doctor, who can
evaluate your specific condition. CAUTION
● You should not kneel on the seats or otherwise apply pressure at specific
points in order to avoid damaging the heating elements of the seat heaters.
● Do not use the seat heating if the seats are not occupied by persons or if ob-
jects are fastened or stored on them, for example a child seat, a bag etc. A fault of
the heating elements in the seat heating can occur.
● Do not clean the seats moist ⇒ page 145.Note
The seat heating should only be switched on when the engine is running. This has
a significant effect of saving on the battery capacity. Rear seats
Adjusting seats in forward/back direction Fig. 37 Releasing at the front/rear
To enlarge the luggage compartment, the outer rear seats can be pushed for-
wards, folded fully forwards or the seats can be removed.
Moving seats in forward/back direction
– Pull up the lever ⇒ fig. 37 on the left or on the release loop ⇒ fig. 37 on the
right and move the seat into the desired position. Note
Please refer to the following guidelines ⇒ page 103, Correct seated position for
the occupants on the rear seats.
Adjusting the seat backrest Fig. 38 Adjusting the seat backrest
£52
Seats and Stowage
Page 57 of 212
Pedals
Concerning a secure depressing of the pedal, you should use only footmats from
the ŠKODA Original Accessories.
Operation of the pedals must not be hindered! WARNING
● Greater pedal distances may be needed when there is a fault in the brake
system.
● Do not place any footmats or other additional floor coverings in the area of
the pedals in order to ensure that all the pedals can be fully depressed and are
able to return unobstructed to their initial position - risk of accident!
● There must be no objects on the floor which could roll under the pedals.
You would then no longer be able to apply the brakes, operate the clutch or
accelerator - risk of accident!
luggage compartment
Loading the luggage compartment Please observe the following in the interest of maintaining good handling charac-
teristics of your vehicle:
– Distribute the items of luggage as evenly as possible.
– Place heavy objects as far forward as possible.
– Attach the items of luggage to the lashing eyes or the fixing net
⇒
page 56.
In the event of an accident, there is such a high kinetic energy which is produced
by small and light objects that they can cause severe injuries. The magnitude of
the kinetic energy depends on the speed at which the vehicle is travelling and on
the weight of the object. The speed at which the vehicle is travelling is in this case
the more significant factor.
Example: In the event of a frontal collision at a speed of 50 km/h, an unsecured
object with a weight of 4.5 kg produces an energy, which corresponds to 20 times
its own weight. This means that it results in a weight of approx. 90 kg. You can
imagine the injuries that can occur, if this “bullet” is flying through the interior
compartment and hits an occupant. WARNING
● Store the objects in the luggage compartment and attach them to the
lashing eyes.
● Loose objects in the passenger compartment can be thrown forward dur-
ing a sudden manoeuvre or in case of an accident and can injure the occupants
or other oncoming traffic. This risk is still increased, if the objects which are
flying around are hit by a deployed airbag. In this case, the objects which are
thrown back can injure the occupants - hazard.
● Please note that the handling properties of your vehicle may be affected
when transporting heavy objects as a result of the displacement of the centre
of gravity. The speed and style of driving must be adjusted accordingly.
● The items carried in the luggage compartment should be stored in such a
way that no objects are able to slip forward if there are any sudden driving or
braking manoeuvres undertaken - risk of injury!
● When transporting fastened objects which are sharp and dangerous in the
luggage compartment enlarged by folding the rear seats forward or removing
the rear seats, ensure the safety of the passengers transported on the other
rear seats ⇒
page 103, Correct seated position for the occupants on the rear
seats.
● If the rear seats next to the folded forward seat are occupied, ensure max-
imum safety, e.g. by placing the goods to be transported in such a way that a
folding back of the seat is prevented in case of a rear collision.
● Never drive with the boot lid fully opened or slightly ajar otherwise ex-
haust gases may get into the interior of the vehicle - risk of poisoning!
● On no account exceed the permissible axle loads and the permissible gross
weight of the vehicle - risk of accident!
● Never transport occupants in the luggage compartment. CAUTION
Please ensure that the heating elements of the rear window heater are not dam-
aged as a result of objects sliding in this area. Note
● Tyre pressure must be adjusted to the load ⇒
fig. 130.
● The circulation of air in the vehicle helps to prevent the windows from misting
up. The used air streams out through the air venting slits which are located under
the bumper in the luggage compartment. Check for yourself that the air venting
slits are not covered. 55
Seats and Stowage Using the system Safety Driving Tips General Maintenance Breakdown assis-
tance Praktik Technical data
Page 59 of 212
The fixing nets and the installation instruction are located in the luggage com-
partment. WARNING
● The strength of the net makes it possible to load the pocket with objects
of up to 1.5 kg in weight. Heavy objects are not secured sufficiently - risk of
injury and net damage!
● The load to be transported must be fixed in place in such a way that it can-
not move during the journey and when braking. CAUTION
Do not place any objects with sharp edges in the nets - risk of net damage.
Fixing floor covering of the luggage compartment You can lean against the raised floor cover between the backrests of the rear
seats and the luggage compartment cover, as if one needs to reach the spare
wheel.
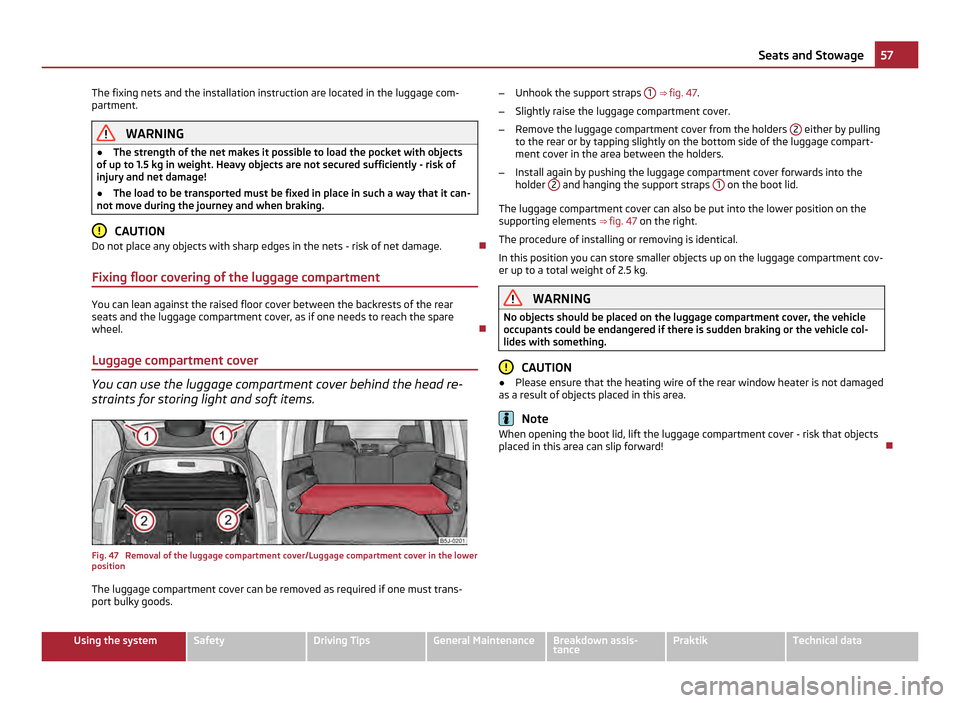
Luggage compartment cover You can use the luggage compartment cover behind the head re-
straints for storing light and soft items.
Fig. 47 Removal of the luggage compartment cover/Luggage compartment cover in the lower
position
The luggage compartment cover can be removed as required if one must trans-
port bulky goods. –
Unhook the support straps 1 ⇒ fig. 47.
– Slightly raise the luggage compartment cover.
– Remove the luggage compartment cover from the holders 2 either by pulling
to the rear or by tapping slightly on the bottom side of the luggage compart-
ment cover in the area between the holders.
– Install again by pushing the luggage compartment cover forwards into the
holder 2 and hanging the support straps
1 on the boot lid.
The luggage compartment cover can also be put into the lower position on the
supporting elements ⇒
fig. 47 on the right.
The procedure of installing or removing is identical.
In this position you can store smaller objects up on the luggage compartment cov-
er up to a total weight of 2.5 kg. WARNING
No objects should be placed on the luggage compartment cover, the vehicle
occupants could be endangered if there is sudden braking or the vehicle col-
lides with something. CAUTION
● Please ensure that the heating wire of the rear window heater is not damaged
as a result of objects placed in this area. Note
When opening the boot lid, lift the luggage compartment cover - risk that objects
placed in this area can slip forward! 57
Seats and Stowage Using the system Safety Driving Tips General Maintenance Breakdown assis-
tance Praktik Technical data
Page 72 of 212
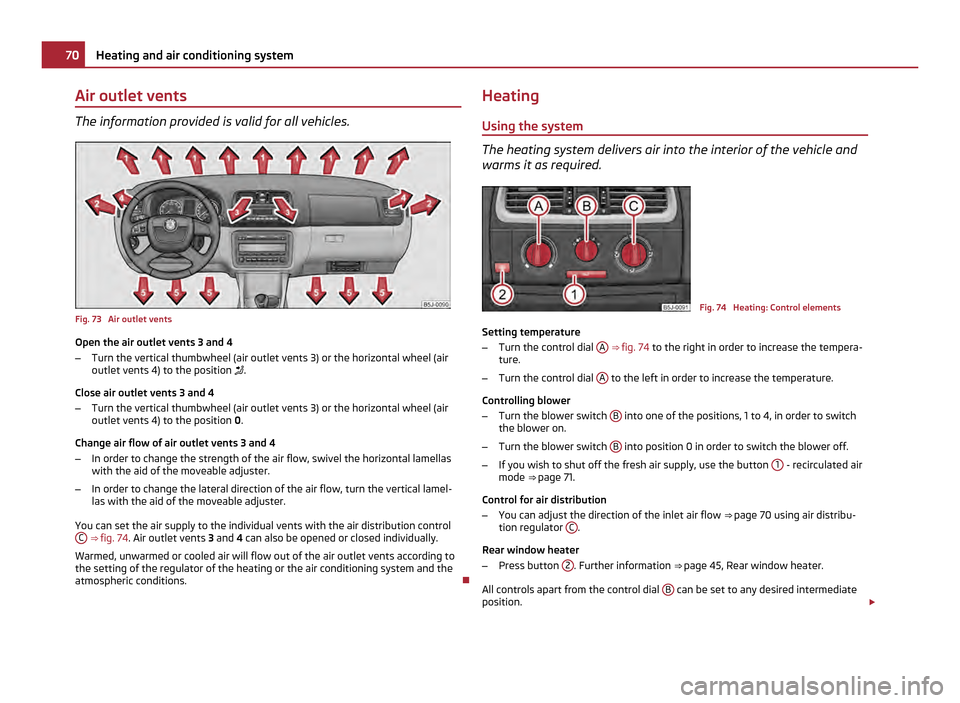
Air outlet vents
The information provided is valid for all vehicles.
Fig. 73 Air outlet vents
Open the air outlet vents 3 and 4
–
Turn the vertical thumbwheel (air outlet vents 3) or the horizontal wheel (air
outlet vents 4) to the position .
Close air outlet vents 3 and 4
– Turn the vertical thumbwheel (air outlet vents 3) or the horizontal wheel (air
outlet vents 4) to the position 0.
Change air flow of air outlet vents 3 and 4
– In order to change the strength of the air flow, swivel the horizontal lamellas
with the aid of the moveable adjuster.
– In order to change the lateral direction of the air flow, turn the vertical lamel-
las with the aid of the moveable adjuster.
You can set the air supply to the individual vents with the air distribution control C
⇒ fig. 74. Air outlet vents 3 and 4 can also be opened or closed individually.
Warmed, unwarmed or cooled air will flow out of the air outlet vents according to
the setting of the regulator of the heating or the air conditioning system and the
atmospheric conditions. Heating
Using the system The heating system delivers air into the interior of the vehicle and
warms it as required.
Fig. 74 Heating: Control elements
Setting temperature
– Turn the control dial A
⇒ fig. 74 to the right in order to increase the tempera-
ture.
– Turn the control dial A to the left in order to increase the temperature.
Controlling blower
– Turn the blower switch B into one of the positions, 1 to 4, in order to switch
the blower on.
– Turn the blower switch B into position 0 in order to switch the blower off.
– If you wish to shut off the fresh air supply, use the button 1 - recirculated air
mode ⇒ page 71.
Control for air distribution
– You can adjust the direction of the inlet air flow ⇒
page 70 using air distribu-
tion regulator C .
Rear window heater
– Press button 2 . Further information
⇒ page 45, Rear window heater.
All controls apart from the control dial B can be set to any desired intermediate
position. £70
Heating and air conditioning system
Page 145 of 212
A new layer of a high-quality hard wax polish can be applied to the clean body-
work after it has dried thoroughly. Even if you use a wax preserver regularly we
still recommend that you treat the paintwork of the vehicle at least twice a year
with hard wax.
CAUTION
Never apply wax to the windows.
Polishing Polishing is only necessary if the paintwork of your vehicle has become unattrac-
tive and if it is no longer possible to achieve a gloss with wax preservers.
You must treat the paintwork with a wax preserver if the polish you use does not
contain any preserving elements ⇒
page 142, Wax treatment. CAUTION
● You must not treat mat painted parts or plastic with polishing products or hard
wax.
● Do not polish the paintwork of the vehicle in a dusty environment, otherwise
the paintwork can be scratched.
Chrome parts First clean the chrome parts with a damp cloth and then polish them with a soft,
dry cloth. If this method does not completely clean chrome parts, use a specific
chrome care product.
CAUTION
Do not polish the chrome parts in a dusty environment, otherwise they can be
scratched.
Paint damage Slight damage to paintwork such as scratches, scuffs or traces of chip damage
must be touched up immediately with paint (Škoda painting pen)
before any cor-
rosion can result. You can of course have this work carried out by authorised
ŠKODA Service Partners.
The authorised
ŠKODA Service Partners have a range of matching touch-up pens
or spray cans available in the colour of your vehicle. The paint number of the original paintwork of your vehicle is indicated on the ve-
hicle data sticker ⇒
page 192.
Any corrosion which has already have formed must be removed thoroughly. Apply
a corrosion protection primer and then the paint to the affected point. You can of
course have this work carried out by authorised ŠKODA Service Partners.
Plastic parts External plastic parts are cleaned by normal washing. Plastic parts and synthetic
leather can also be treated with special solvent-free plastic cleaning agents if a
damp cloth is not sufficient. Paint care products are not suitable for plastic parts. CAUTION
Solvent-free cleaners attack the material and can damage it.
Windows Only use a plastic ice scraper for removing snow and ice from the windows and
mirrors. You should not move the ice scraper forward and backward but in one di-
rection on the window which you are cleaning in order to avoid any damage to the
surface of the glass.
You can best remove residues of rubber, oil, grease, wax or silicone by using a
special window cleaner or a special silicone remover.
You should also clean the windows regularly from the inside.
Do not use window leathers which you have used to polish the vehicle body to dry
off the windows. Residues of preservatives in the window leather can dirty the
window and reduce visibility.
Do not affix any stickers over the inside of the rear window to avoid damage to
the heating wires of the rear window heater . CAUTION
● Never remove snow or ice from the glass parts with warm or hot water - risk of
formation of cracks in the glass!
● When removing snow or ice from the windows and mirror lenses make sure
not to damage the paintwork of the vehicle. 143
Taking care of your vehicle and cleaning the vehicle Using the system Safety Driving Tips General Maintenance Breakdown assis-
tance Praktik Technical data
Page 182 of 212
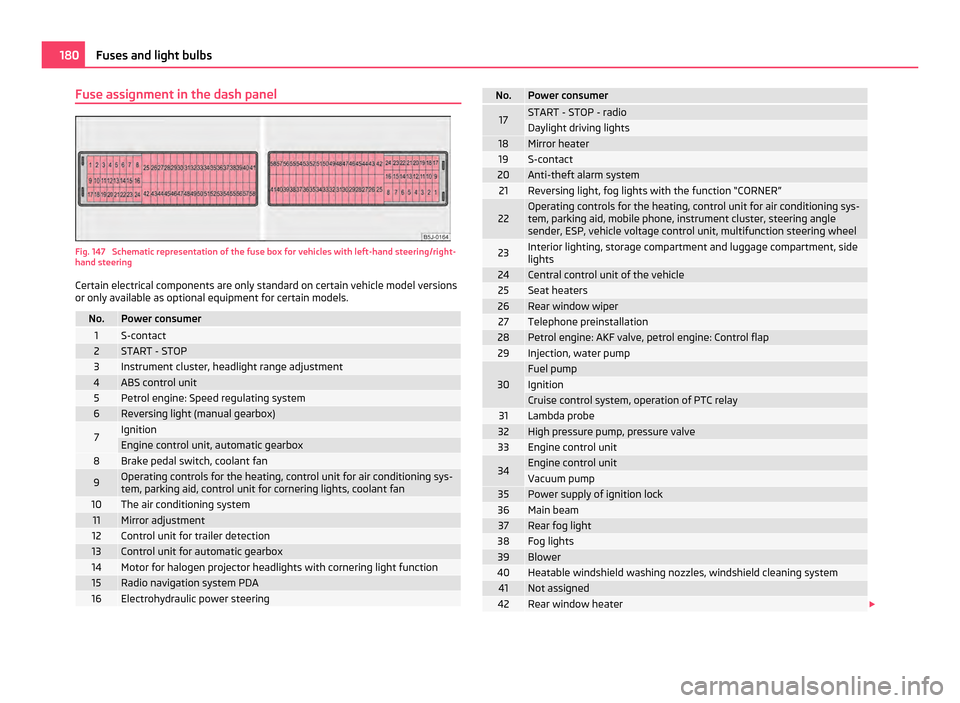
Fuse assignment in the dash panel
Fig. 147 Schematic representation of the fuse box for vehicles with left-hand steering/right-
hand steering
Certain electrical components are only standard on certain vehicle model versions
or only available as optional equipment for certain models. No. Power consumer
1 S-contact
2 START - STOP
3 Instrument cluster, headlight range adjustment
4 ABS control unit
5 Petrol engine: Speed regulating system
6 Reversing light (manual gearbox)
7 Ignition
Engine control unit, automatic gearbox
8 Brake pedal switch, coolant fan
9 Operating controls for the heating, control unit for air conditioning sys-
tem, parking aid, control unit for cornering lights, coolant fan
10 The air conditioning system
11 Mirror adjustment
12 Control unit for trailer detection
13 Control unit for automatic gearbox
14 Motor for halogen projector headlights with cornering light function
15 Radio navigation system PDA
16 Electrohydraulic power steering No. Power consumer
17 START - STOP - radio
Daylight driving lights
18 Mirror heater
19 S-contact
20 Anti-theft alarm system
21 Reversing light, fog lights with the function “CORNER”
22 Operating controls for the heating, control unit for air conditioning sys-
tem, parking aid, mobile phone, instrument cluster, steering angle
sender, ESP, vehicle voltage control unit, multifunction steering wheel
23 Interior lighting, storage compartment and luggage compartment, side
lights
24 Central control unit of the vehicle
25 Seat heaters
26 Rear window wiper
27 Telephone preinstallation
28 Petrol engine: AKF valve, petrol engine: Control flap
29 Injection, water pump
30 Fuel pump
Ignition
Cruise control system, operation of PTC relay
31 Lambda probe
32 High pressure pump, pressure valve
33 Engine control unit
34 Engine control unit
Vacuum pump
35 Power supply of ignition lock
36 Main beam
37 Rear fog light
38 Fog lights
39 Blower
40 Heatable windshield washing nozzles, windshield cleaning system
41 Not assigned
42 Rear window heater
£180
Fuses and light bulbs
Page 206 of 212
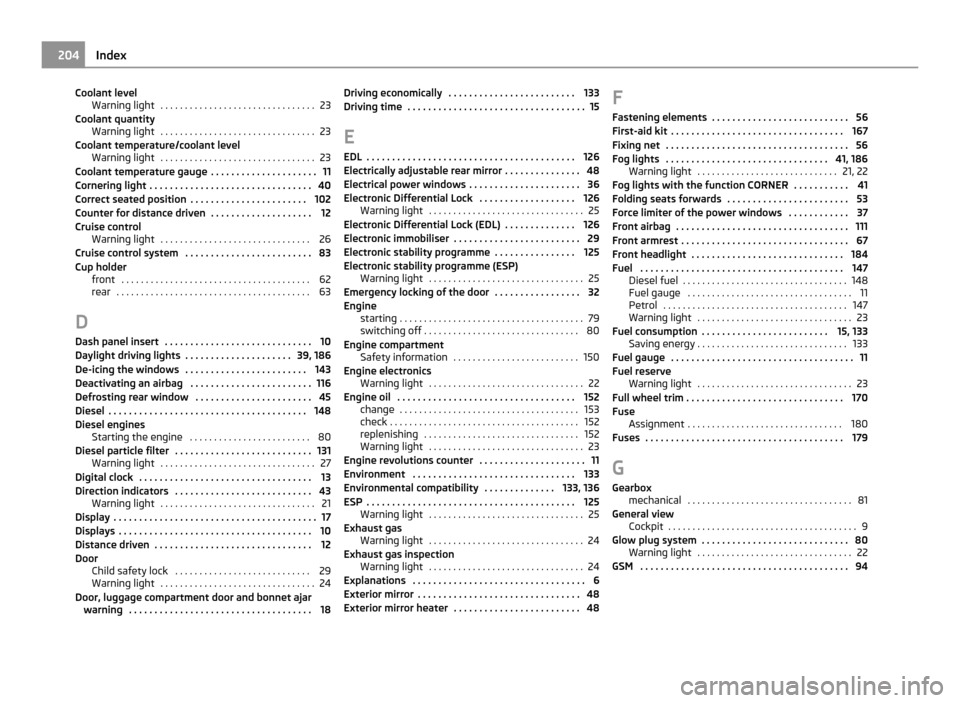
Coolant level
Warning light . . . . . . . . . . . . . . . . . . . . . . . . . . . . . . . . 23
Coolant quantity Warning light . . . . . . . . . . . . . . . . . . . . . . . . . . . . . . . . 23
Coolant temperature/coolant level Warning light . . . . . . . . . . . . . . . . . . . . . . . . . . . . . . . . 23
Coolant temperature gauge . . . . . . . . . . . . . . . . . . . . . 11
Cornering light . . . . . . . . . . . . . . . . . . . . . . . . . . . . . . . . 40
Correct seated position . . . . . . . . . . . . . . . . . . . . . . . 102
Counter for distance driven . . . . . . . . . . . . . . . . . . . . 12
Cruise control Warning light . . . . . . . . . . . . . . . . . . . . . . . . . . . . . . . 26
Cruise control system . . . . . . . . . . . . . . . . . . . . . . . . . 83
Cup holder front . . . . . . . . . . . . . . . . . . . . . . . . . . . . . . . . . . . . . . . 62
rear . . . . . . . . . . . . . . . . . . . . . . . . . . . . . . . . . . . . . . . . 63
D Dash panel insert . . . . . . . . . . . . . . . . . . . . . . . . . . . . . 10
Daylight driving lights . . . . . . . . . . . . . . . . . . . . . 39, 186
De-icing the windows . . . . . . . . . . . . . . . . . . . . . . . . 143
Deactivating an airbag . . . . . . . . . . . . . . . . . . . . . . . . 116
Defrosting rear window . . . . . . . . . . . . . . . . . . . . . . . 45
Diesel . . . . . . . . . . . . . . . . . . . . . . . . . . . . . . . . . . . . . . . 148
Diesel engines Starting the engine . . . . . . . . . . . . . . . . . . . . . . . . . 80
Diesel particle filter . . . . . . . . . . . . . . . . . . . . . . . . . . . 131 Warning light . . . . . . . . . . . . . . . . . . . . . . . . . . . . . . . . 27
Digital clock . . . . . . . . . . . . . . . . . . . . . . . . . . . . . . . . . . 13
Direction indicators . . . . . . . . . . . . . . . . . . . . . . . . . . . 43 Warning light . . . . . . . . . . . . . . . . . . . . . . . . . . . . . . . . 21
Display . . . . . . . . . . . . . . . . . . . . . . . . . . . . . . . . . . . . . . . . 17
Displays . . . . . . . . . . . . . . . . . . . . . . . . . . . . . . . . . . . . . . 10
Distance driven . . . . . . . . . . . . . . . . . . . . . . . . . . . . . . . 12
Door Child safety lock . . . . . . . . . . . . . . . . . . . . . . . . . . . . 29
Warning light . . . . . . . . . . . . . . . . . . . . . . . . . . . . . . . . 24
Door, luggage compartment door and bonnet ajar warning . . . . . . . . . . . . . . . . . . . . . . . . . . . . . . . . . . . . 18 Driving economically . . . . . . . . . . . . . . . . . . . . . . . . . 133
Driving time . . . . . . . . . . . . . . . . . . . . . . . . . . . . . . . . . . . 15
E EDL . . . . . . . . . . . . . . . . . . . . . . . . . . . . . . . . . . . . . . . . . 126
Electrically adjustable rear mirror . . . . . . . . . . . . . . . 48
Electrical power windows . . . . . . . . . . . . . . . . . . . . . . 36
Electronic Differential Lock . . . . . . . . . . . . . . . . . . . 126 Warning light . . . . . . . . . . . . . . . . . . . . . . . . . . . . . . . . 25
Electronic Differential Lock (EDL) . . . . . . . . . . . . . . 126
Electronic immobiliser . . . . . . . . . . . . . . . . . . . . . . . . . 29
Electronic stability programme . . . . . . . . . . . . . . . . 125
Electronic stability programme (ESP) Warning light . . . . . . . . . . . . . . . . . . . . . . . . . . . . . . . . 25
Emergency locking of the door . . . . . . . . . . . . . . . . . 32
Engine starting . . . . . . . . . . . . . . . . . . . . . . . . . . . . . . . . . . . . . . 79
switching off . . . . . . . . . . . . . . . . . . . . . . . . . . . . . . . . 80
Engine compartment Safety information . . . . . . . . . . . . . . . . . . . . . . . . . . 150
Engine electronics Warning light . . . . . . . . . . . . . . . . . . . . . . . . . . . . . . . . 22
Engine oil . . . . . . . . . . . . . . . . . . . . . . . . . . . . . . . . . . . 152 change . . . . . . . . . . . . . . . . . . . . . . . . . . . . . . . . . . . . . 153
check . . . . . . . . . . . . . . . . . . . . . . . . . . . . . . . . . . . . . . . 152
replenishing . . . . . . . . . . . . . . . . . . . . . . . . . . . . . . . . 152
Warning light . . . . . . . . . . . . . . . . . . . . . . . . . . . . . . . . 23
Engine revolutions counter . . . . . . . . . . . . . . . . . . . . . 11
Environment . . . . . . . . . . . . . . . . . . . . . . . . . . . . . . . . 133
Environmental compatibility . . . . . . . . . . . . . . 133, 136
ESP . . . . . . . . . . . . . . . . . . . . . . . . . . . . . . . . . . . . . . . . . 125 Warning light . . . . . . . . . . . . . . . . . . . . . . . . . . . . . . . . 25
Exhaust gas Warning light . . . . . . . . . . . . . . . . . . . . . . . . . . . . . . . . 24
Exhaust gas inspection Warning light . . . . . . . . . . . . . . . . . . . . . . . . . . . . . . . . 24
Explanations . . . . . . . . . . . . . . . . . . . . . . . . . . . . . . . . . . 6
Exterior mirror . . . . . . . . . . . . . . . . . . . . . . . . . . . . . . . . 48
Exterior mirror heater . . . . . . . . . . . . . . . . . . . . . . . . . 48 F
Fastening elements . . . . . . . . . . . . . . . . . . . . . . . . . . . 56
First-aid kit . . . . . . . . . . . . . . . . . . . . . . . . . . . . . . . . . . 167
Fixing net . . . . . . . . . . . . . . . . . . . . . . . . . . . . . . . . . . . . 56
Fog lights . . . . . . . . . . . . . . . . . . . . . . . . . . . . . . . . 41, 186 Warning light . . . . . . . . . . . . . . . . . . . . . . . . . . . . . 21, 22
Fog lights with the function CORNER . . . . . . . . . . . 41
Folding seats forwards . . . . . . . . . . . . . . . . . . . . . . . . 53
Force limiter of the power windows . . . . . . . . . . . . 37
Front airbag . . . . . . . . . . . . . . . . . . . . . . . . . . . . . . . . . . 111
Front armrest . . . . . . . . . . . . . . . . . . . . . . . . . . . . . . . . . 67
Front headlight . . . . . . . . . . . . . . . . . . . . . . . . . . . . . . 184
Fuel . . . . . . . . . . . . . . . . . . . . . . . . . . . . . . . . . . . . . . . . 147 Diesel fuel . . . . . . . . . . . . . . . . . . . . . . . . . . . . . . . . . . 148
Fuel gauge . . . . . . . . . . . . . . . . . . . . . . . . . . . . . . . . . . 11
Petrol . . . . . . . . . . . . . . . . . . . . . . . . . . . . . . . . . . . . . . 147
Warning light . . . . . . . . . . . . . . . . . . . . . . . . . . . . . . . . 23
Fuel consumption . . . . . . . . . . . . . . . . . . . . . . . . . 15, 133 Saving energy . . . . . . . . . . . . . . . . . . . . . . . . . . . . . . . 133
Fuel gauge . . . . . . . . . . . . . . . . . . . . . . . . . . . . . . . . . . . . 11
Fuel reserve Warning light . . . . . . . . . . . . . . . . . . . . . . . . . . . . . . . . 23
Full wheel trim . . . . . . . . . . . . . . . . . . . . . . . . . . . . . . . 170
Fuse Assignment . . . . . . . . . . . . . . . . . . . . . . . . . . . . . . . . 180
Fuses . . . . . . . . . . . . . . . . . . . . . . . . . . . . . . . . . . . . . . . 179
G
Gearbox mechanical . . . . . . . . . . . . . . . . . . . . . . . . . . . . . . . . . . 81
General view Cockpit . . . . . . . . . . . . . . . . . . . . . . . . . . . . . . . . . . . . . . . 9
Glow plug system . . . . . . . . . . . . . . . . . . . . . . . . . . . . . 80 Warning light . . . . . . . . . . . . . . . . . . . . . . . . . . . . . . . . 22
GSM . . . . . . . . . . . . . . . . . . . . . . . . . . . . . . . . . . . . . . . . . 94 204
Index