oil SKODA ROOMSTER 2011 1.G Owner's Manual
[x] Cancel search | Manufacturer: SKODA, Model Year: 2011, Model line: ROOMSTER, Model: SKODA ROOMSTER 2011 1.GPages: 212, PDF Size: 3.3 MB
Page 6 of 212
Tyre pressure monitoring system . . . . . . . . . . . . . . . . . . . 130
Diesel particle filter (diesel engine) . . . . . . . . . . . . . . . . . 131
Driving and the Environment . . . . . . . . . . . . . . . . . . . . . 132
The first 1 500 kilometres and afterwards . . . . . . . . . . . 132
Catalytic converter . . . . . . . . . . . . . . . . . . . . . . . . . . . . . . . . . 132
Driving in an economical and environmentally
conscious manner . . . . . . . . . . . . . . . . . . . . . . . . . . . . . . . . . 133
Environmental compatibility . . . . . . . . . . . . . . . . . . . . . . . . 136
Motoring abroad . . . . . . . . . . . . . . . . . . . . . . . . . . . . . . . . . . . 137
Avoiding damage to your vehicle . . . . . . . . . . . . . . . . . . . 137
Driving through bodies of water on roads . . . . . . . . . . . 138
Towing a trailer . . . . . . . . . . . . . . . . . . . . . . . . . . . . . . . . . . . . 139
Towing a trailer . . . . . . . . . . . . . . . . . . . . . . . . . . . . . . . . . . . 139
General Maintenance . . . . . . . . . . . . . . . . . . . . . 141
Taking care of your vehicle and cleaning the
vehicle . . . . . . . . . . . . . . . . . . . . . . . . . . . . . . . . . . . . . . . . . . . . . . 141
General . . . . . . . . . . . . . . . . . . . . . . . . . . . . . . . . . . . . . . . . . . . 141
Care of the exterior of vehicle . . . . . . . . . . . . . . . . . . . . . . 141
Care of the interior of vehicle . . . . . . . . . . . . . . . . . . . . . . . 145
Fuel . . . . . . . . . . . . . . . . . . . . . . . . . . . . . . . . . . . . . . . . . . . . . . . . . 147
Petrol . . . . . . . . . . . . . . . . . . . . . . . . . . . . . . . . . . . . . . . . . . . . . 147
Diesel . . . . . . . . . . . . . . . . . . . . . . . . . . . . . . . . . . . . . . . . . . . . . 148
Refuelling . . . . . . . . . . . . . . . . . . . . . . . . . . . . . . . . . . . . . . . . . 148
Inspecting and Replenishing . . . . . . . . . . . . . . . . . . . . . . 150
Engine compartment . . . . . . . . . . . . . . . . . . . . . . . . . . . . . . 150
Engine oil . . . . . . . . . . . . . . . . . . . . . . . . . . . . . . . . . . . . . . . . . 152
Cooling system . . . . . . . . . . . . . . . . . . . . . . . . . . . . . . . . . . . . 153
Brake fluid . . . . . . . . . . . . . . . . . . . . . . . . . . . . . . . . . . . . . . . . 156
Battery . . . . . . . . . . . . . . . . . . . . . . . . . . . . . . . . . . . . . . . . . . . 156
Windshield washer system . . . . . . . . . . . . . . . . . . . . . . . . . 160
Wheels and Tyres . . . . . . . . . . . . . . . . . . . . . . . . . . . . . . . . . . 161
Wheels . . . . . . . . . . . . . . . . . . . . . . . . . . . . . . . . . . . . . . . . . . . 161
Accessories, changes and replacement of parts . 166
General . . . . . . . . . . . . . . . . . . . . . . . . . . . . . . . . . . . . . . . . . . . 166 Breakdown assistance
. . . . . . . . . . . . . . . . . . . 167
Breakdown assistance . . . . . . . . . . . . . . . . . . . . . . . . . . . . 167
First-aid kit and warning triangle . . . . . . . . . . . . . . . . . . . 167
Fire extinguisher . . . . . . . . . . . . . . . . . . . . . . . . . . . . . . . . . . 167
Vehicle tool kit . . . . . . . . . . . . . . . . . . . . . . . . . . . . . . . . . . . . 167
Spare wheel . . . . . . . . . . . . . . . . . . . . . . . . . . . . . . . . . . . . . . . 168
Changing a wheel . . . . . . . . . . . . . . . . . . . . . . . . . . . . . . . . . 168
Tyre repair kit . . . . . . . . . . . . . . . . . . . . . . . . . . . . . . . . . . . . . 172
Jump-starting . . . . . . . . . . . . . . . . . . . . . . . . . . . . . . . . . . . . . 175
Towing the vehicle . . . . . . . . . . . . . . . . . . . . . . . . . . . . . . . . 176
Fuses and light bulbs . . . . . . . . . . . . . . . . . . . . . . . . . . . . . . 179
Electric fuses . . . . . . . . . . . . . . . . . . . . . . . . . . . . . . . . . . . . . . 179
Bulbs . . . . . . . . . . . . . . . . . . . . . . . . . . . . . . . . . . . . . . . . . . . . . 183
Praktik . . . . . . . . . . . . . . . . . . . . . . . . . . . . . . . . . . . . . . . . . . 189
Praktik . . . . . . . . . . . . . . . . . . . . . . . . . . . . . . . . . . . . . . . . . . . . . . 189
Rear interior lighting . . . . . . . . . . . . . . . . . . . . . . . . . . . . . . . 189
Lashing eyes . . . . . . . . . . . . . . . . . . . . . . . . . . . . . . . . . . . . . . 189
Adjustable safety partition behind the front seats . . . 189
Fixing of the loading floor . . . . . . . . . . . . . . . . . . . . . . . . . . 189
Adjustment of the safety partition . . . . . . . . . . . . . . . . . . 190
Emergency unlocking of the loading area door . . . . . . 190
Technical data . . . . . . . . . . . . . . . . . . . . . . . . . . . . . . . 191
Technical data . . . . . . . . . . . . . . . . . . . . . . . . . . . . . . . . . . . . . 191
General information . . . . . . . . . . . . . . . . . . . . . . . . . . . . . . . 191
Used abbreviations . . . . . . . . . . . . . . . . . . . . . . . . . . . . . . . . 191
Performances . . . . . . . . . . . . . . . . . . . . . . . . . . . . . . . . . . . . . 191
Weight . . . . . . . . . . . . . . . . . . . . . . . . . . . . . . . . . . . . . . . . . . . . 191
Identification details . . . . . . . . . . . . . . . . . . . . . . . . . . . . . . . 192
Fuel consumption according to the ECE standards and
EU guidelines
. . . . . . . . . . . . . . . . . . . . . . . . . . . . . . . . . . . . . 192
Dimensions . . . . . . . . . . . . . . . . . . . . . . . . . . . . . . . . . . . . . . . 193
Engine oil specifications . . . . . . . . . . . . . . . . . . . . . . . . . . . 194
Engine 1.2 l/51 kW - EU5/EU2 DDK . . . . . . . . . . . . . . . . . . 195
Engine 1.2 l/63 kW TSI - EU5 . . . . . . . . . . . . . . . . . . . . . . . . 196
Engine 1.2 l/77 kW TSI - EU5 . . . . . . . . . . . . . . . . . . . . . . . . 197
Engine 1.4 l/63 kW - EU5 . . . . . . . . . . . . . . . . . . . . . . . . . . . 198 Engine 1.6 l/77 kW - EU4/EU2 DDK . . . . . . . . . . . . . . . . . . 199
Engine 1.2 l/55 kW TDI CR - EU5 . . . . . . . . . . . . . . . . . . . . . 200
Engine 1.6 l/66 kW TDI CR DPF - EU5 . . . . . . . . . . . . . . . . 201
Engine 1.6 l/77 kW TDI CR DPF - EU5 . . . . . . . . . . . . . . . . 202
Index . . . . . . . . . . . . . . . . . . . . . . . . . . . . . . . . . . . . . . . . . . . . . 2034
Table of Contents
Page 16 of 212
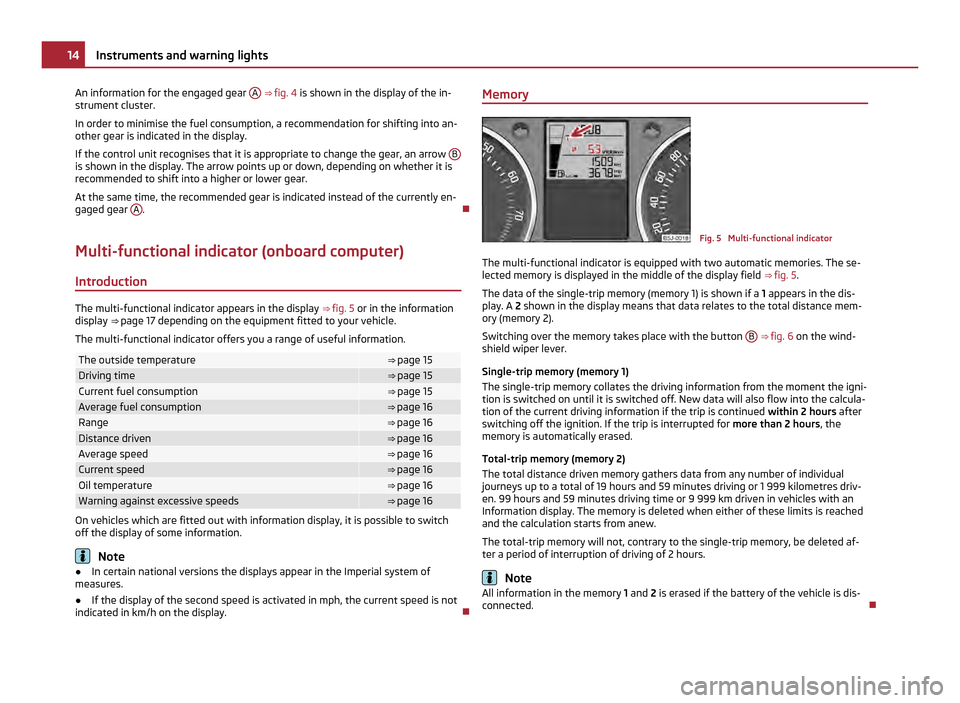
An information for the engaged gear
A
⇒ fig. 4 is shown in the display of the in-
strument cluster.
In order to minimise the fuel consumption, a recommendation for shifting into an-
other gear is indicated in the display.
If the control unit recognises that it is appropriate to change the gear, an arrow Bis shown in the display. The arrow points up or down, depending on whether it is
recommended to shift into a higher or lower gear.
At the same time, the recommended gear is indicated instead of the currently en-
gaged gear A .
Multi-functional indicator (onboard computer) Introduction The multi-functional indicator appears in the display
⇒ fig. 5 or in the information
display ⇒ page 17 depending on the equipment fitted to your vehicle.
The multi-functional indicator offers you a range of useful information. The outside temperature ⇒
page 15 Driving time ⇒
page 15 Current fuel consumption ⇒
page 15 Average fuel consumption ⇒ page 16
Range ⇒ page 16
Distance driven ⇒ page 16
Average speed ⇒ page 16
Current speed ⇒ page 16
Oil temperature ⇒ page 16
Warning against excessive speeds ⇒ page 16
On vehicles which are fitted out with information display, it is possible to switch
off the display of some information.
Note
● In certain national versions the displays appear in the Imperial system of
measures.
● If the display of the second speed is activated in mph, the current speed is not
indicated in km/h on the display. Memory
Fig. 5 Multi-functional indicator
The multi-functional indicator is equipped with two automatic memories. The se-
lected memory is displayed in the middle of the display field ⇒ fig. 5 .
The data of the single-trip memory (memory 1) is shown if a 1 appears in the dis-
play. A 2 shown in the display means that data relates to the total distance mem-
ory (memory
2).
Switching over the memory takes place with the button B
⇒ fig. 6 on the wind-
shield wiper lever.
Single-trip memory (memory 1)
The single-trip memory collates the driving information from the moment the igni-
tion is switched on until it is switched off. New data will also flow into the calcula-
tion of the current driving information if the trip is continued within 2 hours after
switching off the ignition. If the trip is interrupted for more than 2 hours, the
memory is automatically erased.
Total-trip memory (memory 2)
The total distance driven memory gathers data from any number of individual
journeys up to a total of 19 hours and 59
minutes driving or 1 999 kilometres driv-
en. 99 hours and 59 minutes driving time or 9 999 km driven in vehicles with an
Information display. The memory is deleted when either of these limits is reached
and the calculation starts from anew.
The total-trip memory will not, contrary to the single-trip memory, be deleted af-
ter a period of interruption of driving of 2 hours. Note
All information in the memory 1 and 2 is erased if the battery of the vehicle is dis-
connected. 14
Instruments and warning lights
Page 18 of 212
Average fuel consumption
The average fuel consumption since the memory was last erased is shown in the
display in litres/100 km
⇒
page 14. This information can help you to adapt your
style of driving to the fuel consumption you wish to achieve.
If you wish to determine the average fuel consumption over a certain period of
time, you must erase the memory at the start of the new measurement using the
button B on the windshield wiper lever
⇒
fig. 6. A zero appears in the display for
the first approx. 300 m you drive after erasing the memory.
The indicated value will be updated every 5 seconds while you are driving. Note
The amount of fuel consumed will not be indicated.
Range The estimated range in kilometres is shown on the display. It indicates the dis-
tance you can still drive with your vehicle based on the present level of fuel in the
tank for the same style of driving.
The readout is shown in steps of 10 km. After lighting up of the indicator light for
the fuel reserve the display is shown in steps of 5 km.
The fuel consumption for the last 50 km is taken as a basis for calculating the
range. If you drive in a more economical manner from this moment on, the range
will be increased accordingly.
If the memory is set to zero (after disconnecting the battery), the fuel consump-
tion of 10 ltr./100 km is calculated for the range; afterwards the value is adapted
accordingly to the style of driving.
Distance driven The distance driven since the memory was last erased appears in the display
⇒
page 14. If you wish to calculate the distance driven as of a particular time, you
must erase the memory at this moment in time by pressing the button B on the
windshield wiper lever ⇒
fig. 6 .
The maximum distance indicated in both memories is 1 999 km or on vehicles with
information display, it is 9 999 km. The indicator is set back to null if this period is
exceeded. Average speed The average speed since the memory was last erased is shown in the display in
km/hour
⇒
page 14. If you wish to determine the average speed over a certain pe-
riod of time, you must erase the memory at the start of the new measurement by
pressing the button B on the windshield wiper lever
⇒ fig. 6.
A zero appears in the display for the first 100 m you drive after erasing the memo-
ry.
The indicated value will be updated every 5 seconds while you are driving.
Current speed The current speed which is identical to the display of the speedometer, is indica-
ted on the display
3
⇒
fig. 2.
Oil temperature If the oil temperature is lower than 50 °C or if a fault in the system for checking
the oil temperature is present, three lines are displayed instead of the oil temper-
ature.
Warning against excessive speeds This function enables you to set a speed limit and will notify you when this speed
limit is exceeded.
Adjust the speed limit while the vehicle is stationary
– With button A
⇒ fig. 6 , choose the menu point Warning against excessive
speeds .
– Press the button B to active the ability to set the speed limit (value flashes).
– Use the button A to adjust the required speed limit, e.g. to 50 km/h.
– Confirm the speed limit that was set with button B , or wait approx. 5 seconds
until the setting is saved automatically (the value stops flashing).
This allows you to set the speed in 5 km/h intervals.
Adjust the speed limit while the vehicle is moving
– With switch A , choose the menu point
Warning against excessive speeds. £16
Instruments and warning lights
Page 20 of 212
■
Phone ⇒ page 94
■ Vehicle status ⇒ page 94
■ Settings ⇒ page 19
The menu point Audio is only then displayed when the factory-fitted car radio is
switched on.
The menu point Navigation is only then displayed when the factory-fitted radio
navigation system is switched on. Note
● If warning messages are shown in the information display ⇒ page 18, these
messages can be confirmed with the button B on the windshield wiper lever in
order to call up the main menu.
● If you do not activate the information display at that moment, the menu shifts
to one level higher every 10 seconds.
● The operation of the factory-fitted car stereo or radio navigation system is de-
scribed in separate operating instructions to be found in the on-board literature.
Door, luggage compartment door and bonnet ajar warning The door, luggage compartment and bonnet ajar warning lights up if at least one
door, the luggage compartment or bonnet are not closed. The symbol indicates
which door is still open or whether the luggage compartment door or bonnet is
not closed
.
The symbol goes out as soon as the doors, luggage compartment door and bonnet
are completely closed.
A warning signal sounds if the car is driven at a speed of more than 6km/hour and
if the engine or the luggage compartment door is open.
Auto Check Control
Car state The Auto Check Control carries out a check of certain functions and vehicle com-
ponents. The check is performed constantly when the ignition is switched on,
both when the vehicle is stationary, as well as when driving. Some operational faults, urgent repairs, service work or other information appear
in the display of the instrument cluster. The displays are shown with a red or yel-
low light symbol depending on the priority of the message.
The red symbols indicate danger (priority 1) while the yellow symbols indicate a
warning (priority 2). Information for the driver may also appear in addition to the
symbols ⇒
page 20.
There is at least one error message when the term Vehicle status is displayed in
the menu. After selecting this menu the first of the error messages is displayed.
Several error messages are shown on the display under the message e.g. 1/3. This
indicates that the first of a total of three error messages is displayed. The respec-
tive messages are displayed one after the other in an interval of 5 seconds. Check
as soon as possible the displayed error messages.
As long as the operational faults are not rectified, the symbols are always indica-
ted again. After the first display, the symbols are indicated without information for
the driver.
If a fault occurs, a warning signal will also sound in addition to the symbol and
text in the display:
● Priority 1 - three warning signals
● Priority 2 - one warning signal
Red symbols A red symbol signals danger.
– Bring the vehicle to a stop.
– Switch the engine off.
– Investigate the function indicated.
– Obtain professional assistance.
Meaning of the red symbols: Engine oil pressure too low ⇒ page 23
Overheated clutches of the automatic
gearbox DSG
⇒ page 87
Three successive warning signals will sound if a red symbol appears.
18
Instruments and warning lights
Page 21 of 212
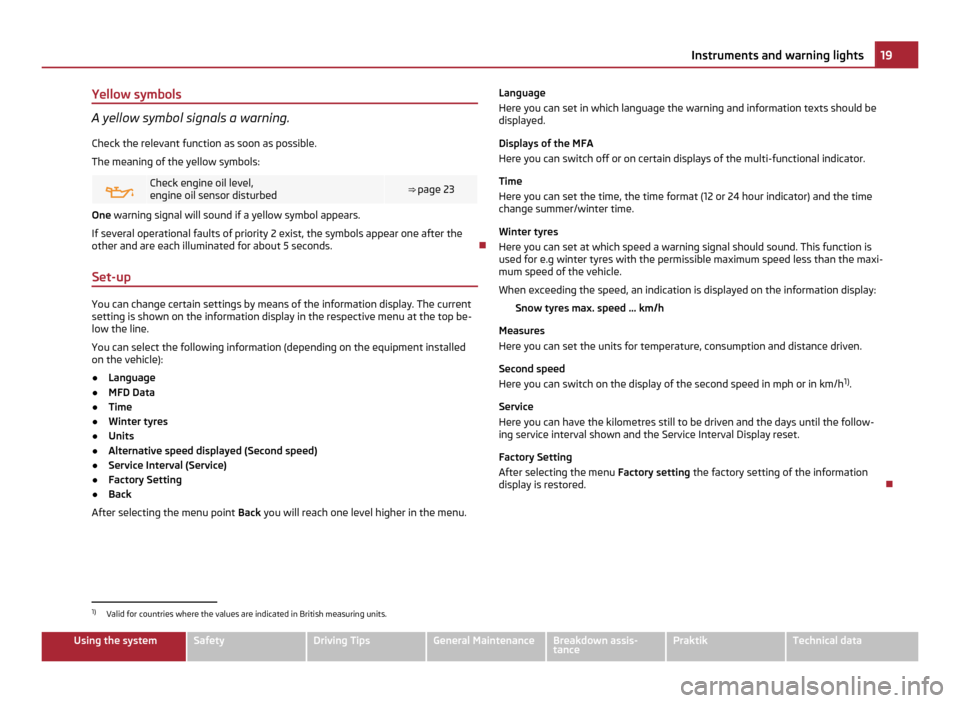
Yellow symbols
A yellow symbol signals a warning.
Check the relevant function as soon as possible.
The meaning of the yellow symbols: Check engine oil level,
engine oil sensor disturbed
⇒
page 23 One warning signal will sound if a yellow symbol appears.
If several operational faults of priority 2 exist, the symbols appear one after the
other and are each illuminated for about 5 seconds.
Set-up You can change certain settings by means of the information display. The current
setting is shown on the information display in the respective menu at the top be-
low the line.
You can select the following information (depending on the equipment installed
on the vehicle):
●
Language
● MFD Data
● Time
● Winter tyres
● Units
● Alternative speed displayed (Second speed)
● Service Interval (Service)
● Factory Setting
● Back
After selecting the menu point Back you will reach one level higher in the menu. Language
Here you can set in which language the warning and information texts should be
displayed.
Displays of the MFA
Here you can switch off or on certain displays of the multi-functional indicator.
Time
Here you can set the time, the time format (12 or 24 hour indicator) and the time
change summer/winter time.
Winter tyres
Here you can set at which speed a warning signal should sound. This function is
used for e.g winter tyres with the permissible maximum speed less than the maxi-
mum speed of the vehicle.
When exceeding the speed, an indication is displayed on the information display:
Snow tyres max. speed ... km/h
Measures
Here you can set the units for temperature, consumption and distance driven.
Second speed
Here you can switch on the display of the second speed in mph or in km/h 1)
.
Service
Here you can have the kilometres still to be driven and the days until the follow-
ing service interval shown and the Service Interval Display reset.
Factory Setting
After selecting the menu Factory setting the factory setting of the information
display is restored. 1)
Valid for countries where the values are indicated in British measuring units. 19
Instruments and warning lights Using the system Safety Driving Tips General Maintenance Breakdown assis-
tance Praktik Technical data
Page 23 of 212
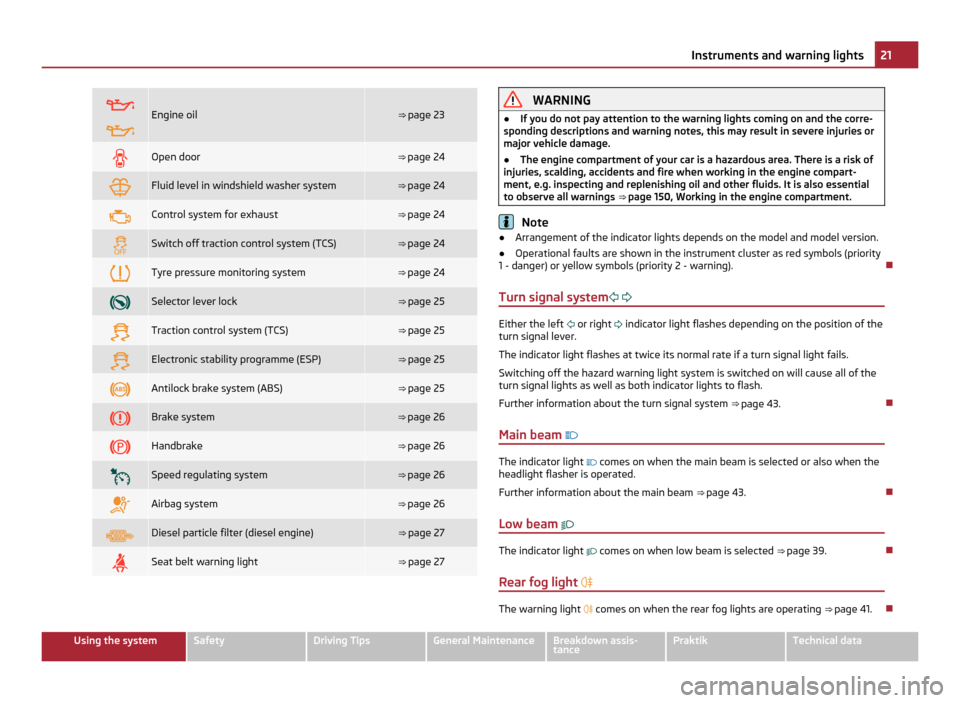
Engine oil ⇒
page 23 Open door ⇒ page 24
Fluid level in windshield washer system ⇒ page 24
Control system for exhaust ⇒ page 24
Switch off traction control system (TCS) ⇒ page 24
Tyre pressure monitoring system ⇒ page 24
Selector lever lock ⇒
page 25 Traction control system (TCS) ⇒
page 25 Electronic stability programme (ESP) ⇒
page 25 Antilock brake system (ABS) ⇒
page 25 Brake system ⇒
page 26 Handbrake ⇒
page 26 Speed regulating system ⇒
page 26 Airbag system ⇒
page 26 Diesel particle filter (diesel engine) ⇒ page 27
Seat belt warning light ⇒ page 27 WARNING
● If you do not pay attention to the warning lights coming on and the corre-
sponding descriptions and warning notes, this may result in severe injuries or
major vehicle damage.
● The engine compartment of your car is a hazardous area. There is a risk of
injuries, scalding, accidents and fire when working in the engine compart-
ment, e.g. inspecting and replenishing oil and other fluids. It is also essential
to observe all warnings ⇒
page 150, Working in the engine compartment. Note
● Arrangement of the indicator lights depends on the model and model version.
● Operational faults are shown in the instrument cluster as red symbols (priority
1 - danger) or yellow symbols (priority 2 - warning).
Turn signal system Either the left
or right
indicator light flashes depending on the position of the
turn signal lever.
The indicator light flashes at twice its normal rate if a turn signal light fails.
Switching off the hazard warning light system is switched on will cause all of the
turn signal lights as well as both indicator lights to flash.
Further information about the turn signal system ⇒
page 43.
Main beam The indicator light
comes on when the main beam is selected or also when the
headlight flasher is operated.
Further information about the main beam ⇒
page 43.
Low beam The indicator light
comes on when low beam is selected
⇒ page 39
.
Rear fog light The warning light
comes on when the rear fog lights are operating
⇒
page 41. 21
Instruments and warning lights Using the system Safety Driving Tips General Maintenance Breakdown assis-
tance Praktik Technical data
Page 25 of 212
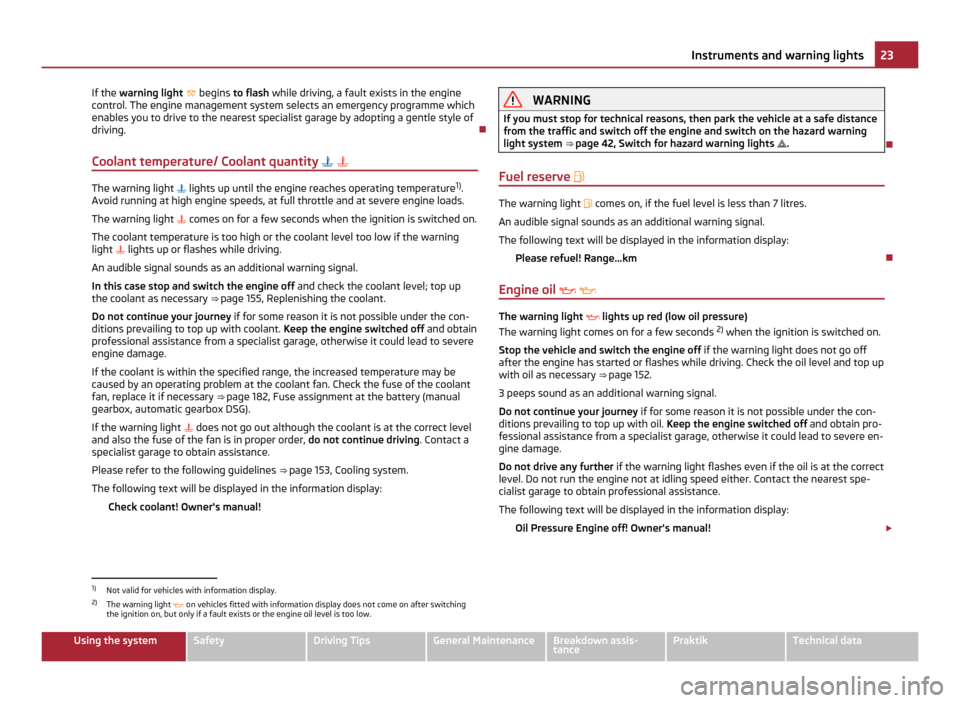
If the
warning light begins to flash while driving, a fault exists in the engine
control. The engine management system selects an emergency programme which
enables you to drive to the nearest specialist garage by adopting a gentle style of
driving.
Coolant temperature/ Coolant quantity The warning light
lights up until the engine reaches operating temperature 1)
.
Avoid running at high engine speeds, at full throttle and at severe engine loads.
The warning light comes on for a few seconds when the ignition is switched on.
The coolant temperature is too high or the coolant level too low if the warning
light lights up or flashes while driving.
An audible signal sounds as an additional warning signal.
In this case stop and switch the engine off and check the coolant level; top up
the coolant as necessary ⇒ page 155, Replenishing the coolant
.
Do not continue your journey if for some reason it is not possible under the con-
ditions prevailing to top up with coolant. Keep the engine switched off and obtain
professional assistance from a specialist garage, otherwise it could lead to severe
engine damage.
If the coolant is within the specified range, the increased temperature may be
caused by an operating problem at the coolant fan. Check the fuse of the coolant
fan, replace it if necessary ⇒ page 182, Fuse assignment at the battery (manual
gearbox, automatic gearbox DSG).
If the warning light does not go out although the coolant is at the correct level
and also the fuse of the fan is in proper order, do not continue driving. Contact a
specialist garage to obtain assistance.
Please refer to the following guidelines ⇒ page 153, Cooling system.
The following text will be displayed in the information display: Check coolant! Owner's manual! WARNING
If you must stop for technical reasons, then park the vehicle at a safe distance
from the traffic and switch off the engine and switch on the hazard warning
light system ⇒ page 42
, Switch for hazard warning lights .
Fuel reserve The warning light
comes on, if the fuel level is less than 7 litres.
An audible signal sounds as an additional warning signal.
The following text will be displayed in the information display: Please refuel! Range...km
Engine oil The warning light
lights up red (low oil pressure)
The warning light comes on for a few seconds 2)
when the ignition is switched on.
Stop the vehicle and switch the engine off if the warning light does not go off
after the engine has started or flashes while driving. Check the oil level and top up
with oil as necessary ⇒
page 152.
3 peeps sound as an additional warning signal.
Do not continue your journey if for some reason it is not possible under the con-
ditions prevailing to top up with oil. Keep the engine switched off and obtain pro-
fessional assistance from a specialist garage, otherwise it could lead to severe en-
gine damage.
Do not drive any further if the warning light flashes even if the oil is at the correct
level. Do not run the engine not at idling speed either. Contact the nearest spe-
cialist garage to obtain professional assistance.
The following text will be displayed in the information display:
Oil Pressure Engine off! Owner's manual! £1)
Not valid for vehicles with information display.
2) The warning light on vehicles fitted with information display does not come on after switching
the ignition on, but only if a fault exists or the engine oil level is too low. 23
Instruments and warning lights Using the system Safety Driving Tips General Maintenance Breakdown assis-
tance Praktik Technical data
Page 26 of 212
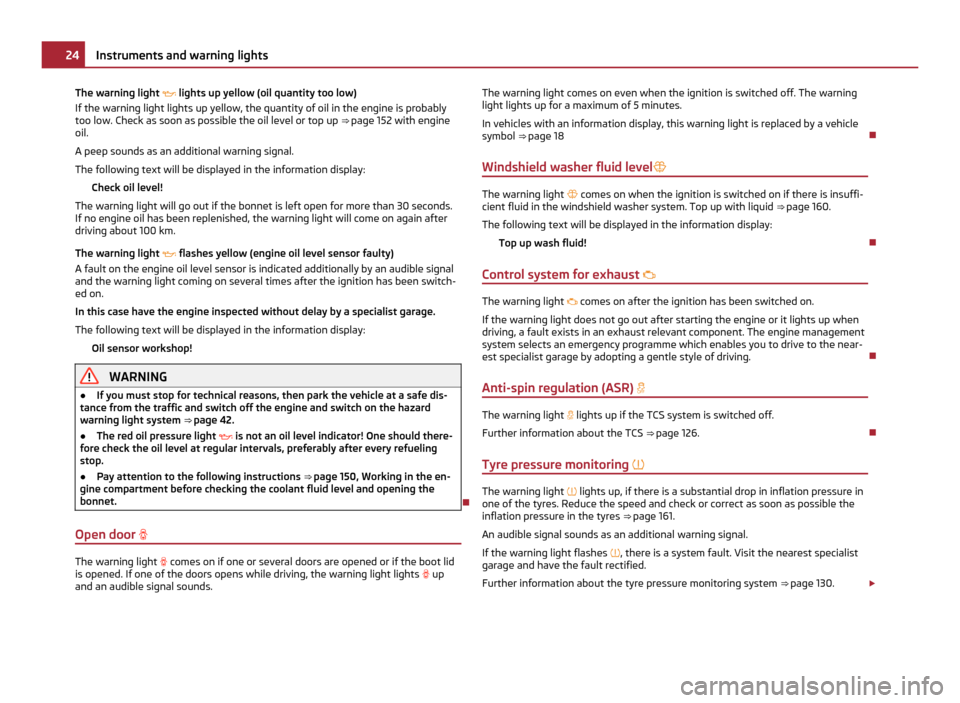
The warning light
lights up yellow (oil quantity too low)
If the warning light lights up yellow, the quantity of oil in the engine is probably
too low. Check as soon as possible the oil level or top up ⇒
page 152 with engine
oil.
A peep sounds as an additional warning signal.
The following text will be displayed in the information display: Check oil level!
The warning light will go out if the bonnet is left open for more than 30 seconds.
If no engine oil has been replenished, the warning light will come on again after
driving about 100 km.
The warning light flashes yellow (engine oil level sensor faulty)
A fault on the engine oil level sensor is indicated additionally by an audible signal
and the warning light coming on several times after the ignition has been switch-
ed on.
In this case have the engine inspected without delay by a specialist garage.
The following text will be displayed in the information display:
Oil sensor workshop! WARNING
● If you must stop for technical reasons, then park the vehicle at a safe dis-
tance from the traffic and switch off the engine and switch on the hazard
warning light system ⇒ page 42
.
● The red oil pressure light is not an oil level indicator! One should there-
fore check the oil level at regular intervals, preferably after every refueling
stop.
● Pay attention to the following instructions ⇒ page 150
, Working in the en-
gine compartment before checking the coolant fluid level and opening the
bonnet.
Open door The warning light
comes on if one or several doors are opened or if the boot lid
is opened. If one of the doors opens while driving, the warning light lights up
and an audible signal sounds. The warning light comes on even when the ignition is switched off. The warning
light lights up for a maximum of 5 minutes.
In vehicles with an information display, this warning light is replaced by a vehicle
symbol ⇒ page 18
Windshield washer fluid level The warning light
comes on when the ignition is switched on if there is insuffi-
cient fluid in the windshield washer system. Top up with liquid ⇒ page 160.
The following text will be displayed in the information display: Top up wash fluid!
Control system for exhaust The warning light
comes on after the ignition has been switched on.
If the warning light does not go out after starting the engine or it lights up when
driving, a fault exists in an exhaust relevant component. The engine management
system selects an emergency programme which enables you to drive to the near-
est specialist garage by adopting a gentle style of driving.
Anti-spin regulation (ASR) The warning light
lights up if the TCS system is switched off.
Further information about the TCS ⇒ page 126
.
Tyre pressure monitoring The warning light
lights up, if there is a substantial drop in inflation pressure in
one of the tyres. Reduce the speed and check or correct as soon as possible the
inflation pressure in the tyres ⇒
page 161.
An audible signal sounds as an additional warning signal.
If the warning light flashes , there is a system fault. Visit the nearest specialist
garage and have the fault rectified.
Further information about the tyre pressure monitoring system ⇒ page 130. £24
Instruments and warning lights
Page 81 of 212
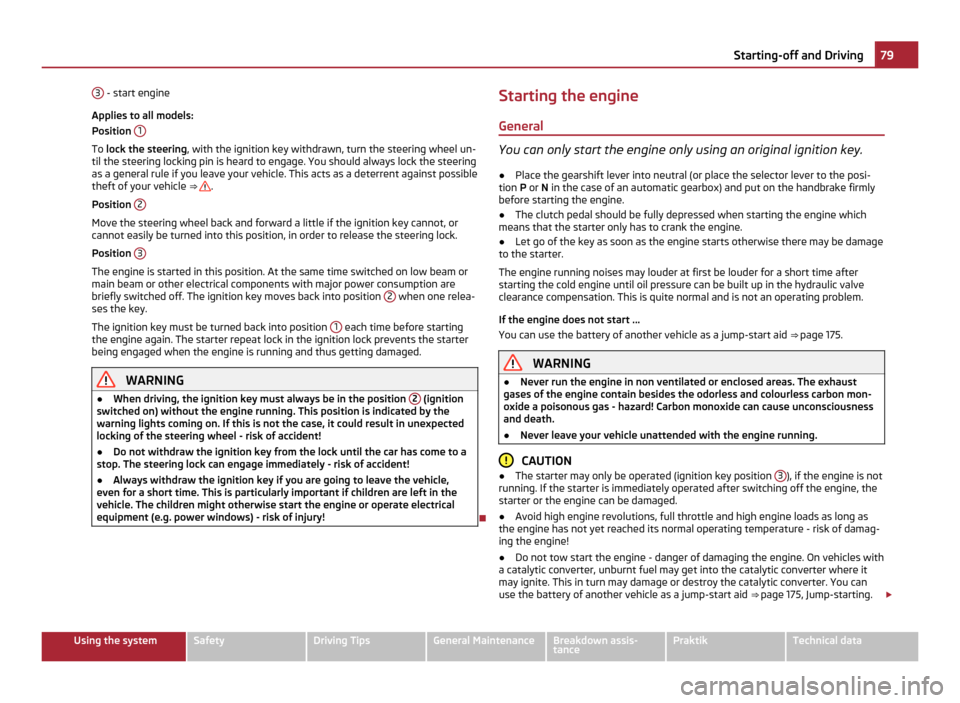
3
- start engine
Applies to all models:
Position 1 To
lock the steering , with the ignition key withdrawn, turn the steering wheel un-
til the steering locking pin is heard to engage. You should always lock the steering
as a general rule if you leave your vehicle. This acts as a deterrent against possible
theft of your vehicle ⇒ .
Position 2 Move the steering wheel back and forward a little if the ignition key cannot, or
cannot easily be turned into this position, in order to release the steering lock.
Position
3 The engine is started in this position. At the same time switched on low beam or
main beam or other electrical components with major power consumption are
briefly switched off. The ignition key moves back into position
2 when one relea-
ses the key.
The ignition key must be turned back into position 1 each time before starting
the engine again. The starter repeat lock in the ignition lock prevents the starter
being engaged when the engine is running and thus getting damaged. WARNING
● When driving, the ignition key must always be in the position 2 (ignition
switched on) without the engine running. This position is indicated by the
warning lights coming on. If this is not the case, it could result in unexpected
locking of the steering wheel - risk of accident!
● Do not withdraw the ignition key from the lock until the car has come to a
stop. The steering lock can engage immediately - risk of accident!
● Always withdraw the ignition key if you are going to leave the vehicle,
even for a short time. This is particularly important if children are left in the
vehicle. The children might otherwise start the engine or operate electrical
equipment (e.g. power windows) - risk of injury! Starting the engine
General You can only start the engine only using an original ignition key.
● Place the gearshift lever into neutral (or place the selector lever to the posi-
tion P or N in the case of an automatic gearbox) and put on the handbrake firmly
before starting the engine.
● The clutch pedal should be fully depressed when starting the engine which
means that the starter only has to crank the engine.
● Let go of the key as soon as the engine starts otherwise there may be damage
to the starter.
The engine running noises may louder at first be louder for a short time after
starting the cold engine until oil pressure can be built up in the hydraulic valve
clearance compensation. This is quite normal and is not an operating problem.
If the engine does not start ...
You can use the battery of another vehicle as a jump-start aid ⇒
page 175. WARNING
● Never run the engine in non ventilated or enclosed areas. The exhaust
gases of the engine contain besides the odorless and colourless carbon mon-
oxide a poisonous gas - hazard! Carbon monoxide can cause unconsciousness
and death.
● Never leave your vehicle unattended with the engine running. CAUTION
● The starter may only be operated (ignition key position 3 ), if the engine is not
running. If the starter is immediately operated after switching off the engine, the
starter or the engine can be damaged.
● Avoid high engine revolutions, full throttle and high engine loads as long as
the engine has not yet reached its normal operating temperature - risk of damag-
ing the engine!
● Do not tow start the engine - danger of damaging the engine. On vehicles with
a catalytic converter, unburnt fuel may get into the catalytic converter where it
may ignite. This in turn may damage or destroy the catalytic converter. You can
use the battery of another vehicle as a jump-start aid ⇒ page 175, Jump-starting
.£ 79
Starting-off and Driving Using the system Safety Driving Tips General Maintenance Breakdown assis-
tance Praktik Technical data
Page 108 of 212
The speed of the vehicle is, nevertheless, the most important factor. Doubling the
speed of the vehicle from 25 km/h up to 50 km/hour increases the kinetic energy
four times.
The common opinion that it is possible to support your body in a minor accident
with your hands, is incorrect. Even in a collision at only a low speed, the forces
acting on the body are such that it is no longer possible to support your body.
Even if you only drive at a speed within the range from 30 km/hour to 50 km/hour,
the forces which are produced on your body in the event of an accident can easily
exceed 10
000 N (Newton). This equals a weight of one tonne (1 000 kg).
In the event of a frontal collision, occupants of the vehicle not wearing a seat belt
are thrown forward and strike in an uncontrolled way parts of the interior of the
vehicle, such as steering wheel, dash panel, windshield ⇒ fig. 93 - left. The occu-
pants of a vehicle who have not fastened their seat belts may even be thrown out
of the vehicle. This can result in fatal injuries.
It is also important that rear seat occupants fasten their seat belts as they will
otherwise be thrown through the vehicle in an uncontrolled manner in the event
of an accident A rear seat passenger who has not fastened the seat belt is a dan-
ger not only to himself but also for those seated at the front ⇒ fig. 93 on the right.
Important safety information regarding the use of
seat belts The correct use of the seat belts considerably reduces the risk of
injury! WARNING
● The belt webbing must not be jammed in-between at any point or twisted,
or chafe against any sharp edges.
● It is important that the belt webbing is properly routed if the seat belts are
to offer their maximum protection ⇒ page 107, How are seat belts correctly
fastened?
.
● No two persons (also not children) should ever use a single seat belt to-
gether.
● The maximum protection which seat belts can offer is only achieved if you
are correctly seated ⇒
page 102, Correct seated position. WARNING (Continued)
● The belt webbing must not run across solid or fragile objects (e.g. specta-
cles, ball-point pens, keys etc.) as this may be a cause of injuries.
● Many layers of clothing and loose clothing (e. g. a winter coat over a jacket)
do not allow you to be correctly seated and impairs proper operation of the
seat belts.
● It is prohibited to use clamps or other objects to adjust seat belts (e. g. for
shortening the belts for smaller persons).
● The lock tongue should only be inserted into the lock which is the correct
one for your seat. Wrong use of the safety belt will reduce its capacity to pro-
tect and the risk of injury increases.
● The seat backrests must not be tilted too far to the rear otherwise the
seatbelts can lose their effectiveness.
● The belt webbing must always be kept clean. Soiled belt webbing may im-
pair proper operation of the inertia reel ⇒
page 146, Seat belts.
● The slot of the belt tongue must not be blocked by paper or similar objects
otherwise the belt tongue will not lock in place properly.
● Inspect the seat belts regularly to ensure they are in good condition. If you
find seat belts which have damage to the belt, the seat belt connections, to
the inertia reel or to the lock, the relevant seat belt must be replaced by a
specialist garage.
● The seat belts must not be removed or changed in any way. Do not make
an attempt to repair the seat belts yourself.
● Damaged seat belts which have been subjected to stress in an accident
and were therefore stretched, must be replaced - this is best done by a spe-
cialist garage. The anchorage points of the belts must also be inspected. The
anchorage points for the belts should also be checked.
● In certain countries it is possible to use seat belts which differ in terms of
their operation from the seat belts which are described on the pages which
follow. 106
Seat belts